Table of Contents
Chicken Caesar Pasta Salad Recipe: 20-Minute Meal in a Bowl
In my bustling New York City kitchen, where time is a precious commodity, I’m always on the lookout for dishes that deliver big on flavor without demanding hours of prep. This Chicken Caesar Pasta Salad recipe is one such gem. It transforms the classic, beloved Caesar salad into a hearty, satisfying pasta dish that’s perfect for a quick weeknight dinner or a vibrant lunch. You get all the creamy, tangy, cheesy goodness of a traditional Caesar, but with the added comfort and substance of pasta. It’s a dish that feels both rustic and sophisticated, a balance I often strive for, inspired by my North African roots and refined French training.
Imagine tender pasta, crisp romaine lettuce, and succulent chicken, all coated in a luxurious, homemade Caesar dressing that bursts with garlic, lemon, and just the right hint of anchovy. The texture play is incredible: the slight chew of the pasta, the satisfying crunch of romaine, the yielding protein, and the optional crispy croutons. This isn’t just a salad; it’s a symphony of deliciousness that is equally at home at a casual picnic as it is at a dinner party. The secret, I’ve found, lies in balancing the richness of the dressing with the freshness of the greens and a bright citrus note.
What sets this chicken caesar pasta salad recipe apart is the simplicity of its execution and the depth of flavor achieved in just twenty minutes. I’ve honed this recipe to be incredibly forgiving, using common ingredients you can find at any New York grocery store, and a shortcut like rotisserie chicken makes it even faster. I’ll share a little trick I learned in Paris for emulsifying the dressing perfectly, and I’ll also guide you on a common mistake people make that can result in a soggy salad, ensuring yours is always restaurant-quality. Get ready for an easy chicken pasta salad that will become a new staple!
Why This Chicken Caesar Pasta Salad Recipe Is the Best
My culinary journey, from my mother’s aromatic kitchen in Morocco to the precise techniques studied in Paris, has taught me the importance of layering flavors and understanding ingredient synergy. This chicken caesar pasta salad recipe is a testament to that philosophy. The dressing, a creamy emulsification of mayonnaise base, Dijon mustard, lemon, Worcestershire, garlic, and anchovy paste, creates a complex savory foundation. I love using the anchovy paste for its umami-rich depth that, surprisingly, doesn’t make the dressing taste fishy but rather enhances all the other notes. It’s this kind of thoughtful flavor building that elevates a simple salad into something truly special, reflecting my multicultural palate.
The texture is paramount in any great pasta salad, and this recipe ensures perfection. Cooking the pasta precisely al dente – with a slight bite – is crucial. Overcooked pasta becomes mushy and breaks apart, turning your salad into a less appealing dish. I learned in culinary school that the residual heat from freshly drained pasta continues to cook it slightly, so taking it off the heat just before it’s fully done is key. Combining the pasta while still slightly warm also helps it absorb the dressing beautifully, ensuring every forkful is infused with that signature Caesar flavor. It’s these chefs’ insights that make this Caesar pasta salad so consistently delicious.
For home cooks in bustling cities like my adopted New York, efficiency is everything. This chicken caesar pasta salad is the epitome of a “fast casual” masterpiece. It requires minimal cooking (just the pasta), and using pre-cooked chicken, like a good quality rotisserie chicken, shaves off even more time. The steps are straightforward and logical, making it an approachable recipe even for novice cooks. You achieve a complex, gourmet flavor and appealing texture without any fuss, proving that delicious, impressive meals can be made in under 30 minutes. It’s proof that an easy chicken pasta salad can be a showstopper!
Easy Chicken Caesar Pasta Salad Recipe Ingredients
When I’m sourcing ingredients for recipes like this, my first stop is often a fantastic farmers market here in NYC, maybe Union Square Greenmarket, for the freshest produce. But for everyday staples, I rely on my local grocery store for convenience. This chicken caesar pasta salad recipe uses classic ingredients, but I always encourage you to seek out quality versions – it truly makes a difference. From the sharp bite of Dijon to the creamy embrace of good mayonnaise and the fresh pop of lemon, each component plays a vital role in creating that irresistible Caesar magic, a flavor profile I’ve loved since childhood.
Ingredients List
- 2 teaspoons Dijon mustard
- 2 Tablespoons fresh lemon juice
- 2 teaspoons Worcestershire sauce
- 3/4 cup mayonnaise
- 2 teaspoons minced garlic
- 1 teaspoon anchovy paste
- 1/3 cup finely grated Parmesan cheese, plus more for serving
- 8 oz. uncooked pasta, such as rotini or penne
- 2 hearts of Romaine lettuce, chopped
- 2 cups shredded rotisserie chicken or chopped cooked chicken breasts
- 1/2 cup croutons (optional)
Ingredient Spotlight
Mayonnaise: This forms the creamy base of our dressing. I prefer a good quality, full-fat mayonnaise for the best richness and emulsification. In the US, brands like Hellmann’s or Duke’s are fantastic. If you’re looking for a lighter option, you can use a light mayo, but the dressing might be slightly less rich. For a homemade touch, you could even whip up your own mayonnaise, a technique I adore learning from my French pastry training.
Parmesan Cheese: Freshly grated Parmesan Reggiano is non-negotiable for that sharp, nutty, salty bite. Pre-shredded cheeses often contain anti-caking agents that can make them gritty in dressings. I recommend buying a wedge and grating it yourself – it truly elevates the flavor. My mother used to keep a block of aged cheese in her pantry in Morocco, a staple that brought instant savory depth to many dishes.
Romaine Lettuce: For that essential crispness and mild, refreshing flavor. I like to use the hearts of Romaine as they are typically more tender and less fibrous than the outer leaves. When chopping, aim for bite-sized pieces that are easy to manage on a fork. If you can’t find Romaine, crisp iceberg or even a sturdy butter lettuce can work in a pinch, though they will alter the classic Caesar crunch.
| Original Ingredient | Best Substitution | Flavor / Texture Impact |
|---|---|---|
| Mayonnaise | Full-fat Greek yogurt or sour cream (for a tangier, lighter dressing) | Less rich, more tangy; may be less emulsified. |
| Parmesan Cheese | Pecorino Romano or a sharp white cheddar cheese | Pecorino will add a sharper, saltier bite. Cheddar will be milder and nuttier. |
| Fresh lemon juice | White wine vinegar or apple cider vinegar | Slightly different acidity profiles; lemon provides a brighter, fresher note. |
How to Make Chicken Caesar Pasta Salad — Step-by-Step
Creating this delicious chicken caesar pasta salad is a breeze, even for the busiest home chefs. Just follow these simple steps, and you’ll have a satisfying meal ready in no time!
Step 1: Make the Creamy Caesar Dressing
In a medium bowl, whisk together the Dijon mustard, fresh lemon juice, Worcestershire sauce, mayonnaise, minced garlic, and anchovy paste until everything is smoothly combined. Stir in the finely grated Parmesan cheese and a good pinch of black pepper. Taste and adjust seasoning if needed. Set this gloriously creamy dressing aside while you prepare the rest of the salad.
💡 mia’s Pro Tip: For an extra smooth and well-emulsified dressing, just like we practice in Paris, use an immersion blender or a small food processor to combine the ingredients. It creates a wonderfully stable and silky dressing.
Step 2: Cook the Pasta
Bring a large pot of generously salted water to a rolling boil over high heat. Add your chosen pasta (rotini or penne work wonderfully here) and cook, stirring occasionally, until it’s perfectly al dente – that’s just tender with a slight bite. This usually takes about 10 minutes, but always check your pasta package directions. Drain the pasta well and immediately transfer it to a large serving bowl.
⚠️ Common Mistake to Avoid: Don’t overcook the pasta! Mushy pasta is the enemy of a great pasta salad. Cook it just until al dente. The residual heat will continue to cook it slightly in the bowl.
Step 3: Assemble the Salad
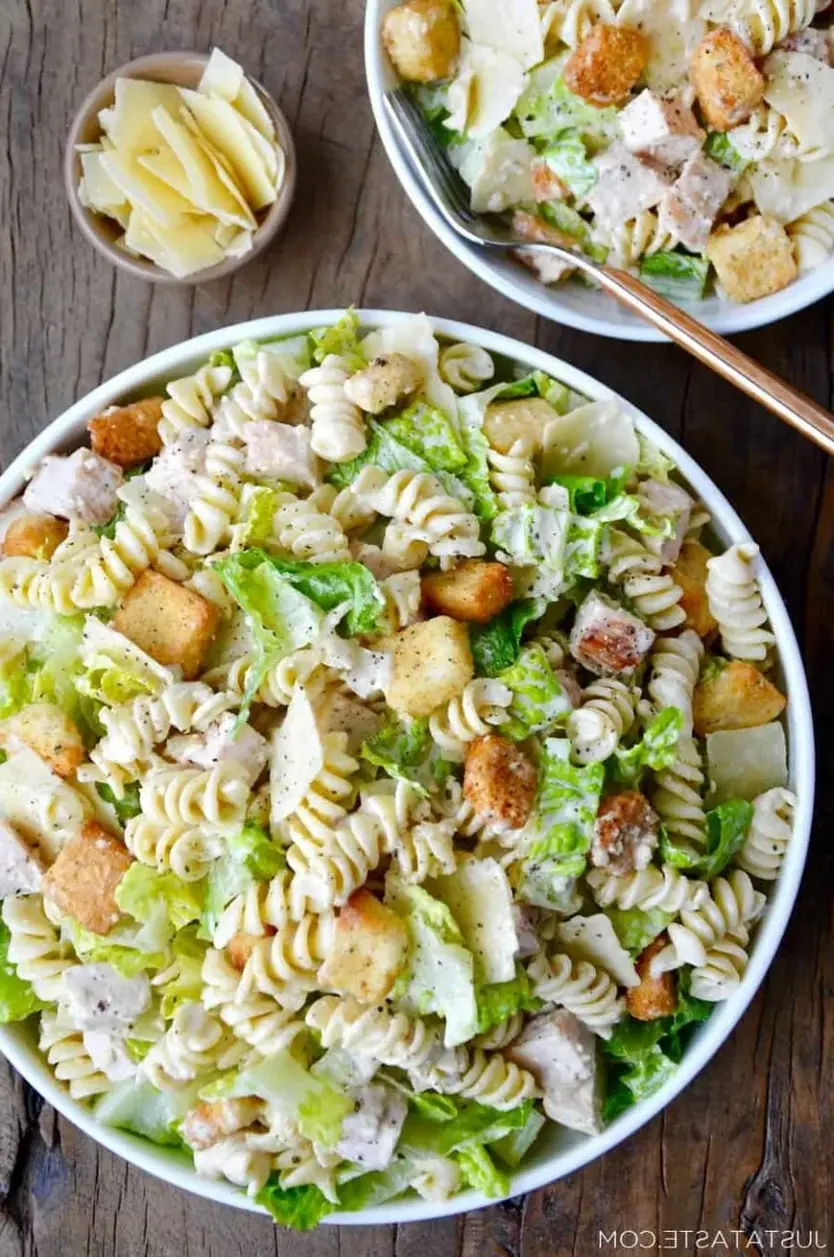
While the pasta is still warm, cut the Romaine hearts into bite-sized, 1-inch pieces and add them to the large serving bowl along with your shredded rotisserie chicken or chopped chicken breasts. Pour the prepared Caesar dressing over the pasta, chicken, and lettuce. Add the optional croutons now if you’re using them. Toss everything together gently but thoroughly, ensuring all the ingredients are evenly coated in the creamy dressing. Garnish with a little extra grated Parmesan cheese before serving.
💡 mia’s Pro Tip: For vibrant green lettuce that stays crisp, wash and chop your Romaine just before you’re ready to assemble the salad. Storing it dry in the fridge will keep it fresh.
| Step | Action | Duration | Key Visual Cue |
|---|---|---|---|
| 1 | Make the dressing | 5 mins | Smooth, creamy, well-combined mixture. |
| 2 | Cook pasta | 10 mins | Pasta is tender with a slight bite (al dente). |
| 3 | Assemble salad | 5 mins | All ingredients coated in dressing, well-mixed. |
Serving & Presentation
This chicken caesar pasta salad is a complete meal on its own, but it also pairs beautifully with a variety of sides. I love serving it slightly chilled or at room temperature, which allows the flavors to meld. For a simple yet elegant presentation, transfer the salad to a beautiful serving bowl. A final flourish of freshly cracked black pepper and a generous sprinkle of shaved Parmesan cheese adds both visual appeal and an extra layer of savory deliciousness. It’s perfect for a summer barbecue, a potluck, or even a quick lunch after a busy morning in the city.
On a warm day in New York, I often find myself craving light yet satisfying dishes. This pasta salad hits all the right notes. You can serve it as is, or alongside grilled vegetables, crusty bread, or even a light soup. In Morocco, we often served substantial salads that could stand alone as a main course, and this dish certainly fits that bill. Its versatility makes it a go-to recipe for any occasion, a true crowd-pleaser that always gets rave reviews for its balance of flavors and textures.
| Pairing Type | Suggestions | Why It Works |
|---|---|---|
| Side Dish | Garlic bread, Roasted Asparagus, Simple Green Salad | Complements the richness of the pasta salad with complementary textures and flavors. |
| Sauce / Dip | Extra Caesar dressing (on the side) | For those who love extra creamy goodness! |
| Beverage | Crisp White Wine (Sauvignon Blanc), Iced Tea | A light, crisp drink cuts through the richness of the dressing. |
| Garnish | Fresh Parsley, Toasted Pine Nuts, Red Pepper Flakes | Adds visual appeal, a hint of freshness, and a subtle crunch. |
Make-Ahead, Storage & Reheating
As a working mom in NYC, meal prep is my secret weapon! This chicken caesar pasta salad is fantastic for making ahead. I often prepare the components separately – cook the pasta, shred the chicken, and make the dressing – and store them in airtight containers in the refrigerator. Then, I can toss it all together just before serving or even the morning of, so it’s perfectly chilled and ready to go. This strategy ensures a fresh and delicious meal is always on hand without last-minute stress.
| Method | Container | Duration | Reheating Tip |
|---|---|---|---|
| Refrigerator | Airtight container | 3-4 days | Best served cold or at room temperature. Toss well before serving. |
| Freezer | Freezer-safe container (store dressing separately) | 1-2 months | Thaw in refrigerator overnight. Reheat pasta/chicken gently, add fresh lettuce and toss with dressing. |
| Make-Ahead | Separate containers for dressing, pasta/chicken, lettuce | Up to 2 days in advance | Combine all ingredients and toss with dressing just before serving for optimal freshness. |
If you’ve made the entire salad ahead and stored it in the fridge, the lettuce may soften slightly. Don’t worry! A good toss with the dressing will help revive it. For the best texture, I highly recommend keeping the dressing separate if you plan to store it for more than a day. Add it just before you’re ready to serve, and toss well. This way, you ensure that lovely crispness and prevent the pasta from becoming saturated too early.
Variations & Easy Swaps
| Variation | Key Change | Best For | Difficulty Impact |
|---|---|---|---|
| Chicken Caesar Wraps | Use smaller pasta or skip pasta entirely; wrap mixture in large tortillas. | Quick lunches, portable meals. | Same – very easy. |
| Shrimp Caesar Pasta Salad | Swap chicken for grilled or sautéed shrimp. | Seafood lovers, lighter protein option. | Same – very easy. |
| Spicy Caesar Pasta Salad | Add a pinch of cayenne pepper or a swirl of sriracha into the dressing. | Those who enjoy a kick of heat. | Same – very easy. |
Chicken Caesar Wrap Suggestion
For a fantastic on-the-go meal or a fun twist, consider turning this chicken caesar pasta salad into wraps. You can reduce the pasta amount slightly or even omit it and use just the chicken, lettuce, and dressing. Simply spoon the mixture into large flour tortillas, add a sprinkle of extra Parmesan, and wrap them up tightly. They make perfect packed lunches for a day spent exploring the city or for a quick dinner on busy evenings.
Gluten-Free and Dairy-Free Options
Making this an easy chicken pasta salad for everyone is simple! For a gluten-free version, simply swap out the regular pasta for your favorite gluten-free pasta. There are many excellent options available now that hold their texture beautifully. For a dairy-free twist, you can omit the Parmesan cheese in the dressing and for serving. Nutritional yeast can offer a ‘cheesy’ flavor substitute in the dressing if desired, though the classic Caesar is quite flavorful without it.
Seasonal and Flavor Twist Ideas
To keep things interesting, I love adding seasonal vegetables. In the spring, I might add some blanched asparagus or peas. In summer, cherry tomatoes halved make a lovely addition. For a Moroccan-inspired touch, a pinch of harissa in the dressing or some sumac sprinkled on top can add a unique spicy-citrus note, reminiscent of my heritage. These small additions can transform the classic flavor profile into something entirely new and exciting.
How do you keep the pasta from getting soggy in a chicken Caesar pasta salad?
The key to preventing a soggy pasta salad is to cook the pasta perfectly al dente – meaning it still has a slight bite. Overcooked pasta will become mushy. Also, it’s crucial to drain the pasta well and let it cool down slightly before adding the dressing, or even better, mix the dressing with the pasta while it’s still a bit warm so it absorbs without becoming waterlogged. If you’re making it ahead, store the dressing separately from the pasta and lettuce, and toss everything together just before serving for maximum crispness.
What can I use instead of anchovies in a chicken Caesar pasta salad?
Anchovy paste provides that essential umami depth to a classic Caesar dressing. If you’re unable to use it, you have a few good options. A small amount of Worcestershire sauce (which itself contains anchovies, so check labels if strictly avoiding) can boost savory notes. Alternatively, you can use a tiny pinch of MSG, or even some finely minced capers or a dab of miso paste. These will help replicate that complex savory flavor without the fishiness, though the taste will be slightly different.
Can I make chicken Caesar pasta salad ahead of time for a party?
Absolutely! Making chicken Caesar pasta salad ahead of time is a smart move for parties. My best tip is to prepare all the components separately: cook and drain the pasta, shred the chicken, chop the lettuce, and make the dressing. Store them in airtight containers in the refrigerator. About 30 minutes to an hour before your guests arrive, or even just before serving, toss everything together with the dressing. This ensures the lettuce stays crisp and the pasta doesn’t get overly saturated or mushy.
Should I serve chicken Caesar pasta salad warm or cold?
Chicken Caesar pasta salad is traditionally served cold or at room temperature. This allows the flavors of the dressing to meld beautifully with the pasta and other ingredients without the heat making the lettuce wilt. Serving it chilled also provides a refreshing contrast, especially if it’s served as part of a larger meal or on a warm day. While you could technically serve it slightly warm right after assembly, the classic preference is definitely for a chilled dish.
What kind of pasta is best for Caesar pasta salad?
The best pasta for Caesar pasta salad is generally short, bite-sized shapes that hold sauce well. Rotini, penne, farfalle (bow-tie pasta), or even fusilli are excellent choices. These shapes have nooks and crannies that capture the creamy Caesar dressing beautifully, ensuring you get a burst of flavor with every bite. Avoid long pasta shapes like spaghetti or linguine, as they can be awkward to eat in a pasta salad and don’t hold the dressing as effectively.
Share Your Version!
I truly hope you love this easy chicken pasta salad as much as I do! It’s become a go-to in my busy New York kitchen, and I’m always thrilled to hear from my readers. If you make this recipe, please consider leaving a star rating and a comment below – it’s incredibly helpful for other home cooks. I also adore seeing your creations! Snap a photo and tag me on Instagram or Pinterest @exorecipes – I love to see how you’ve brought my recipes to life!
From my NYC kitchen to yours — I hope this recipe brings as much warmth to your table as it does to mine. — mia 🧡
Love This Recipe? Save It to Pinterest!
If you enjoyed this Chicken Caesar Pasta Salad recipe, don’t let it get lost in your browser tabs! 😄 Pin it now so you can find it again anytime — and explore hundreds more tried-and-tested recipes waiting for you on my Pinterest boards.
👉 Follow mia on Pinterest @exorecipe
📌 Pin this recipe · 🔁 Re-pin your favorites · 💬 Tag me when you make it — I love seeing your creations!
Chicken Caesar Pasta Salad
Description
Whip up a 20-minute meal in-a-bowl with a refreshing recipe for Chicken Caesar Pasta Salad starring DIY dressing.
Ingredients
- 2 teaspoons Dijon mustard
- 2 Tablespoons fresh lemon juice
- 2 teaspoons Worcestershire sauce
- 3/4 cup mayonnaise
- 2 teaspoons minced garlic
- 1 teaspoon anchovy paste
- 1/3 cup finely grated Parmesan cheese
- 8 oz. uncooked pasta, such as rotini or penne
- 2 hearts of Romaine
- Shredded rotisserie chicken or chopped chicken breasts
- Croutons (optional)
- Parmesan cheese, for serving
Instructions
- In a medium bowl, whisk together the Dijon mustard, lemon juice, Worcestershire, mayonnaise, minced garlic and anchovy paste until well combined. Stir in the grated Parmesan cheese and 1/4 teaspoon pepper then set the dressing aside while you make the salad.
- Bring a large pot of salted water to a boil. Add the pasta and cook until al dente, about 10 minutes. Drain the pasta and transfer it to a large serving bowl.
- Cut the Romaine hearts into 1-inch pieces then add them and your protein of choice to the bowl with the pasta.
- Add the prepared dressing and toss to combine. Add the croutons (optional) and garnish with Parmesan cheese. Serve immediately or refrigerate, covered, until ready to serve.
Nutrition
- Calories: 277 kcal
- Sugar: 1 g
- Fat: 15 g
- Carbohydrates: 18 g
- Protein: 15 g

k">
Tried This Recipe? Leave a Comment!
Did you make this recipe? I’d love to hear how it turned out! Please leave a comment and a rating below. Your feedback helps other home cooks and supports cheerychop.com!
For more delicious inspiration, follow me on Pinterest!