Table of Contents
Chicken Caesar Wraps: Shortcut Lunch Hero
New York City is a whirlwind, and some days, my appetite calls for something quick, flavorful, and satisfying, but I don’t have hours to spend in the kitchen. It reminds me of those rushed lunches back in Paris, where a simple crêpe could be transformed into a gourmet meal with just a few key ingredients. This Chicken Caesar Wraps recipe is my answer to those busy urban days. It takes all the beloved flavors of a classic Caesar salad and transforms them into a portable, satisfying lunch. The beauty of this recipe lies in its simplicity and the brilliant shortcut: using pre-cooked shredded chicken.
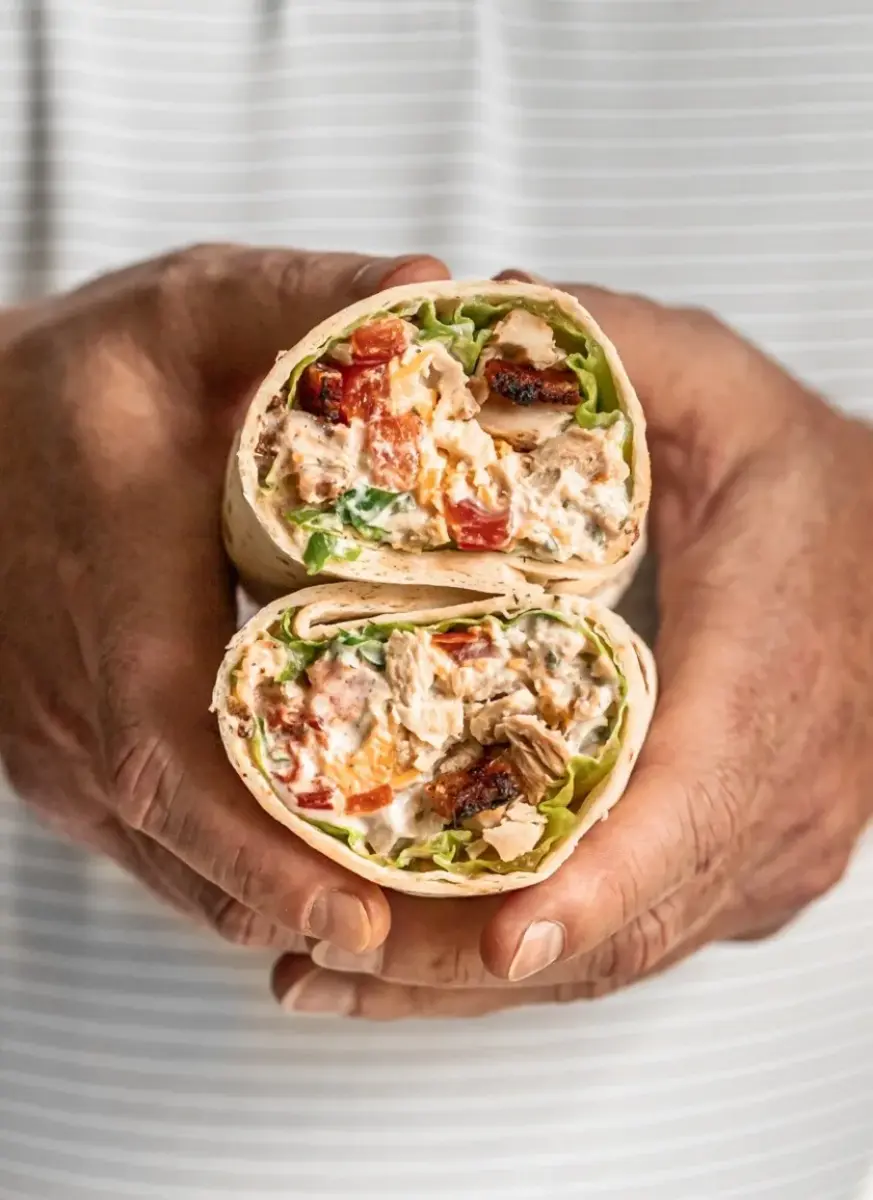
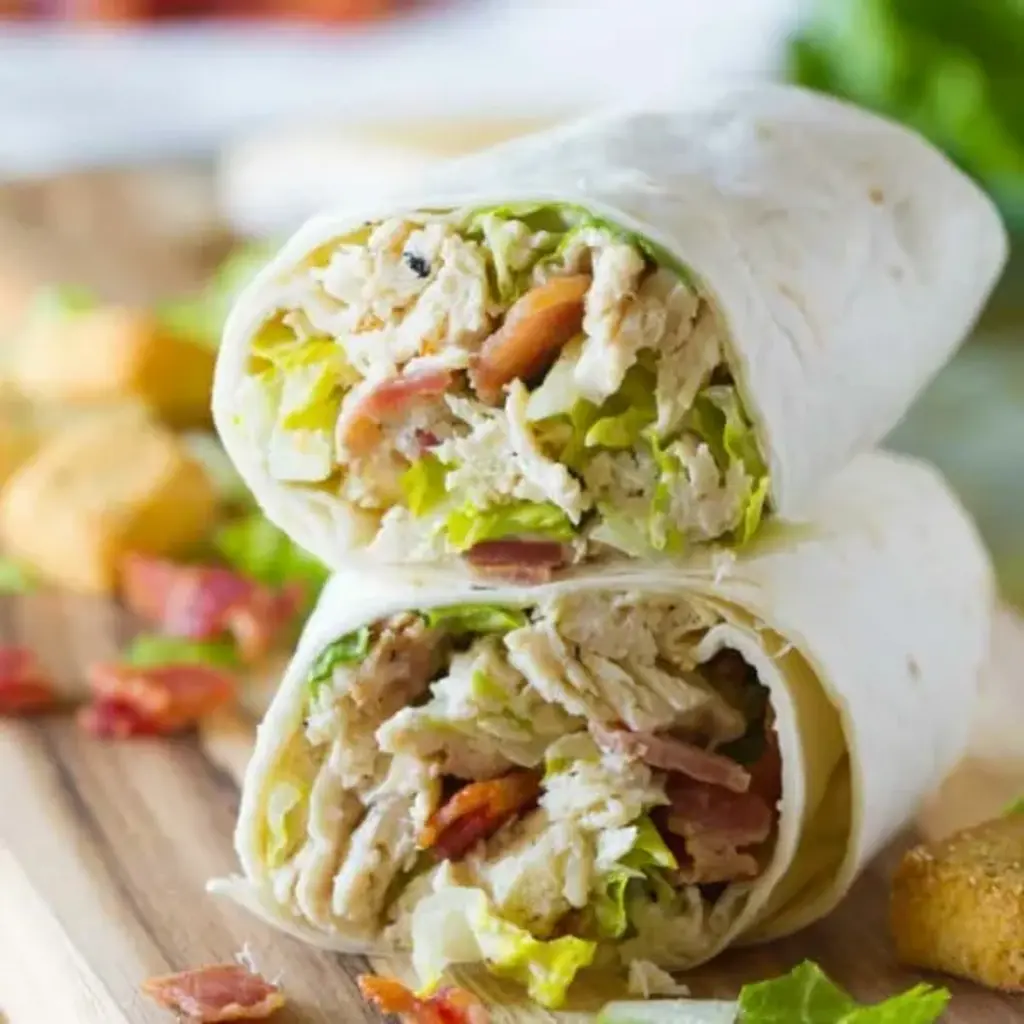
Imagine this: the crisp crunch of romaine, the savory depth of crumbled bacon, tender, shredded chicken, all tossed in a creamy, tangy Caesar dressing, perfectly balanced with salty Parmesan and a satisfying bite of croutons. It’s a symphony of textures and tastes that hits all the right notes. The aroma of the Caesar dressing mingling with the Parmesan is enough to make anyone’s mouth water. This isn’t just a quick meal; it’s a flavor explosion waiting to happen, all tucked neatly inside a soft flour tortilla, making it the ultimate grab-and-go meal.
I’ve tweaked this classic to be as straightforward as possible without sacrificing an ounce of flavor. We’re talking about a wrap that comes together in under 10 minutes, perfect for those days when lunch is an afterthought. I’ll share a little secret to ensure your wrap is perfectly textured, and I’ll highlight a common mistake many home cooks make that can lead to a soggy wrap. Get ready to discover your new go-to lunch solution!
Why This Chicken Caesar Wraps Recipe Is the Best
The true magic of these Chicken Caesar Wraps lies in their ingenious simplicity, and that’s where my culinary background truly shines. By utilizing pre-cooked shredded chicken, we bypass the cooking time entirely. This isn’t just a shortcut; it’s a strategic move inspired by the efficiency of professional kitchens. It allows the vibrant, fresh flavors of the romaine and the rich Caesar dressing to take center stage, creating a balanced and deeply satisfying meal in mere minutes. This recipe is a testament to how classic flavor combinations can be elevated through intelligent preparation, making it a standout in any collection of chicken wrap lunch ideas.
Achieving the perfect texture in a wrap is all about balance – you want creamy, crunchy, and tender all at once, without any element overpowering the other. My technique involves gently warming the tortilla. This simple step, often overlooked, makes the tortilla pliable and easier to roll, preventing tears and ensuring a neat, compact wrap. Additionally, I’ve found that roughly chopping the croutons just before adding them to the filling creates delightful pockets of crispiness throughout the wrap, preventing sogginess and adding a satisfying textural contrast to the creamy dressing and tender chicken.
This easy Chicken Caesar Wraps recipe is designed for everyone, from novice cooks to seasoned chefs looking for a quick yet delicious option. The ingredient list is short and accessible at any US grocery store, and the steps are so straightforward, you can practically make it with your eyes closed. No complicated techniques or obscure ingredients here – just pure, unadulterated flavor. It’s proof that you don’t need a culinary degree to create a fantastic homemade Caesar wrap lunch that tastes as good as anything from your favorite deli.
Easy Chicken Caesar Wraps Ingredients
Living in New York, I’m spoiled for choice when it comes to fresh produce. For my Caesar wraps, I always seek out the brightest, crispest romaine from the Union Square Greenmarket. This recipe relies on pantry staples and a few fresh components, making it a lifesaver for quick lunches. It’s similar to how my mother would whip up a quick meal in her Marrakech kitchen – simple, fresh ingredients transformed with speed and love.
Ingredients List
- 1 cup chopped romaine lettuce
- 1 slice thick cut bacon (cooked and crumbled)
- 1/2 cup cooked shredded chicken
- 2 tablespoons Caesar dressing*
- 1 tablespoon grated Parmesan cheese
- 1/4 cup croutons
- 1 large flour tortilla
Ingredient Spotlight
Romaine Lettuce: The backbone of any good Caesar. Look for crisp, vibrant green leaves. In the US, you can easily find romaine hearts, which are perfect for this as they are typically fresh and easy to chop. If your romaine is looking a bit wilted, a quick ice bath for 10 minutes can revive it, though for wraps, freshness is key. A good substitute would be a mix of iceberg and baby spinach for a similar crispness with a touch of tenderness.
Cooked Shredded Chicken: This is the ultimate shortcut! You can buy pre-cooked rotisserie chicken from your local supermarket, or if you have leftover cooked chicken, shredding it is a breeze. I sometimes cook a big batch of chicken breasts seasoned with salt, pepper, and a hint of paprika on Sundays to use throughout the week for meals like this. For a vegetarian option, firm tofu crumbles or chickpeas would work well.
Croutons: These add that essential crunch. Store-bought is perfectly fine, but if you have day-old bread, making your own is simple. Cube some sturdy bread, toss with olive oil, garlic powder, salt, and pepper, then toast until golden. For a gluten-free version, opt for gluten-free croutons or even some toasted nuts like slivered almonds for crunch.
Caesar Dressing: While store-bought is the quickest route, you can also find fantastic artisanal Caesar dressings at specialty stores or even make your own if you have a little more time. The quality of your dressing significantly impacts the final flavor of your homemade Caesar wrap. If you don’t have Caesar dressing, a creamy ranch or even a lemon-herb vinaigrette could offer a different but still delicious flavor profile.
| Original Ingredient | Best Substitution | Flavor / Texture Impact |
|---|---|---|
| 1/2 cup cooked shredded chicken | 1/2 cup cooked shredded turkey or firm tofu | Similar protein texture; turkey is leaner, tofu adds plant-based protein. |
| 1/4 cup croutons | 1/4 cup toasted slivered almonds or pumpkin seeds | Adds a nutty crunch; seeds offer a different, healthier fat profile. |
| 2 tbsp Caesar dressing | 2 tbsp Ranch dressing or Lemon-Herb Vinaigrette | Ranch offers creaminess; vinaigrette is lighter and tangier. |
| 1 tbsp grated Parmesan | 1 tbsp nutritional yeast or finely grated Pecorino Romano | Nutritional yeast adds a cheesy, umami flavor without dairy; Pecorino is sharper. |
How to Make Chicken Caesar Wraps — Step-by-Step
This recipe is incredibly fast, so have all your ingredients prepped and ready to go before you start. It truly takes minutes!
Step 1: Combine Filling
In a medium-sized bowl, combine the chopped romaine lettuce, crumbled bacon, cooked shredded chicken, Caesar dressing, and grated Parmesan cheese. Stir gently until everything is well coated and evenly distributed.
💡 mia’s Pro Tip: For the best flavor distribution, use a good quality, creamy Caesar dressing. If yours is very thick, you can thin it with a tiny splash of water or lemon juice.
Step 2: Add Croutons
Roughly chop the croutons – don’t crush them into dust! You want some texture. Stir them into the filling mixture. This step adds a delightful crunch that contrasts beautifully with the creamy dressing.
⚠️ Common Mistake to Avoid: Don’t add the croutons too early. Stirring them in right before assembling the wrap ensures they stay crispy and don’t become soggy from the dressing.
Step 3: Warm Tortilla and Assemble
Place the large flour tortilla on a clean surface. Microwave it for 10-15 seconds. This makes it flexible and much easier to roll without tearing. Spread the lettuce and chicken mixture evenly down the center of the warmed tortilla, leaving a little space on the sides.
Step 4: Roll Wrap
Fold in the two sides of the tortilla over the filling, then tightly roll it up from the bottom, tucking the filling in as you go, similar to how you would roll a burrito. Ensure it’s rolled snugly to keep everything contained.
💡 mia’s Pro Tip: To help keep the wrap sealed, you can place it seam-side down for a minute or two, or even wrap it tightly in parchment paper or foil if you’re taking it on the go.
Step 5: Serve
Cut the wrap in half diagonally for a professional presentation. Serve immediately and enjoy your delicious, homemade Caesar wrap!
| Step | Action | Duration | Key Visual Cue |
|---|---|---|---|
| 1 | Combine Filling | 2 mins | Evenly coated ingredients in bowl |
| 2 | Add Croutons | 30 secs | Visible croutons mixed in |
| 3 | Warm Tortilla & Assemble | 1 min | Pliable tortilla, filling spread in center |
| 4 | Roll Wrap | 1 min | Tightly rolled wrap with tucked sides |
| 5 | Serve | 30 secs | Wrap cut in half diagonally |
Serving & Presentation
For a quick and appealing presentation, I love cutting these chicken Caesar wraps diagonally. It not only showcases the colorful filling but also makes them easier to handle. You can serve them on a simple white plate, perhaps with a few extra crumbles of Parmesan cheese sprinkled on top, or a light dusting of smoked paprika for a pop of color, nodding to my Moroccan roots. These wraps are a complete meal on their own, but if you want to make it a heartier affair, a light side salad or a cup of tomato soup works wonderfully.
In my NYC life, we often grab these wraps for a picnic in Central Park or a quick lunch at our desk. They travel exceptionally well, especially if wrapped tightly in parchment paper. The vibrant green of the romaine, the flecks of bacon, and the creaminess of the dressing make for an attractive dish, even in its simplest form. It’s the kind of food that looks as good as it tastes, offering a satisfying crunch and a burst of familiar flavors that always hit the spot.
| Pairing Type | Suggestions | Why It Works |
|---|---|---|
| Side Dish | Small garden salad with a light vinaigrette, Crispy sweet potato fries | Cuts through the richness of the wrap with freshness; offers a different texture and slight sweetness. |
| Sauce / Dip | Extra Caesar dressing, Avocado crema | Enhances the Caesar flavor; adds a cool, creamy, and healthy fat element. |
| Beverage | Sparkling water with lemon, Light white wine (like Pinot Grigio), Iced green tea | Refreshing and palate-cleansing; complements the savory flavors without overpowering. |
| Garnish | Diced red onion, Fresh parsley, A sprinkle of chili flakes | Adds a bit of zing and freshness; provides a fresh herbaceous note; offers a subtle kick of heat. |
Make-Ahead, Storage & Reheating
My life in NYC is all about efficiency, so I love prepping components for meals ahead of time. For these easy chicken Caesar wraps, I often shred extra chicken when I make a roast chicken or cook a batch of chicken breasts specifically for lunches. The dressing can also be made or purchased in advance, and the bacon can be cooked and crumbled, too. This way, assembling the wraps on a busy morning takes literally minutes.
| Method | Container | Duration | Reheating Tip |
|---|---|---|---|
| Refrigerator | Airtight container for filling; wrapped wrap | Filling: 2-3 days; Assembled wrap: 1 day | Assemble just before eating for best texture. If assembling ahead, store filling and tortilla separately. |
| Freezer | Store components separately in freezer bags. | N/A for assembled wrap (tortilla texture suffers). Cooked chicken: up to 3 months. | Best to assemble fresh. Frozen components can be thawed overnight in the fridge. |
| Make-Ahead | Separate containers for filling and tortillas. | Components can be prepped 2 days in advance. | Warm tortilla for 10-15 seconds and assemble just before serving to prevent sogginess. |
When it comes to reheating, my best advice for chicken Caesar wraps is to assemble them right before you eat them. The dressing can make the lettuce limp and the croutons soggy if left too long. However, if you must reheat an already assembled wrap, do it for a very short time in a panini press or a dry skillet on medium heat until just warmed through, being careful not to overheat the tortilla.
For make-ahead lunches, I pack the filling in one small container and the tortilla in another. Then, during my lunch break, I can quickly warm the tortilla, assemble my wrap, and enjoy it fresh. This little trick, born out of necessity in my bustling NYC schedule, ensures you always have a delicious, well-textured homemade Caesar wrap ready to go.
Variations & Easy Swaps
| Variation | Key Change | Best For | Difficulty Impact |
|---|---|---|---|
| Spicy Caesar Twist | Add a pinch of cayenne pepper or a drizzle of hot sauce to the dressing. | Those who love a kick! | None |
| Gluten-Free | Use certified gluten-free tortillas or lettuce cups. Use GF croutons or toasted nuts. | Gluten-sensitive diners. | Minimal, just ingredient swap. |
| Mediterranean Twist | Add Kalamata olives, sun-dried tomatoes, and a squeeze of lemon. | Adventurous eaters seeking new flavors. | None |
Spicy Caesar Twist
For those who like a little heat, this variation is perfect. Mix a teaspoon of finely chopped pickled jalapeños or a dash of your favorite hot sauce directly into the Caesar dressing before tossing with the chicken and lettuce. This adds a wonderful warmth without overpowering the classic Caesar flavors. It’s like a secret ingredient from my days learning at Le Cordon Bleu in Paris when we experimented with adding chili to traditional sauces.
Gluten-Free Caesar Wrap
Making these wraps gluten-free is incredibly simple, and mia has tested it! Swap the large flour tortilla for a good quality gluten-free wrap. Alternatively, use large, sturdy romaine leaves as your “wrap” – they make fantastic, low-carb cups! Ensure your croutons are also certified gluten-free, or substitute them with toasted slivered almonds for a satisfying crunch. The texture might be slightly different, but the flavor journey remains the same.
Mediterranean-Inspired Wrap
Inspired by market finds in NYC, try adding a handful of Kalamata olives (pitted and halved) and a tablespoon of chopped sun-dried tomatoes to the filling. The salty brine of the olives and the sweet intensity of the sun-dried tomatoes offer a delightful Mediterranean flair. A final squeeze of fresh lemon juice over the filling before wrapping also brightens everything up beautifully.
How do you keep chicken Caesar wraps from getting soggy?
The key to preventing soggy chicken Caesar wraps is timing and moisture control. Always add your croutons right before wrapping, as they absorb moisture quickly. Ensure your romaine lettuce is thoroughly dry after washing; use a salad spinner! If assembling ahead, store the filling and the tortilla separately and assemble just before eating. Warming the tortilla slightly also helps create a better seal and prevents condensation. If your dressing is very thin, consider using a slightly thicker one or reducing the amount used.
What can I use instead of Caesar dressing in a chicken Caesar wrap?
If you don’t have Caesar dressing on hand, don’t worry! You can achieve a delicious wrap with other creamy dressings. Ranch dressing offers a similar creamy texture and can be a fantastic alternative. A well-seasoned lemon-herb vinaigrette or a creamy garlic dressing would also work beautifully. For a lighter option, a simple mix of Greek yogurt with lemon juice, garlic powder, and a pinch of salt can create a fresh, tangy dressing base that complements the chicken and romaine.
Can you make chicken Caesar wraps ahead of time?
While you can prepare the components ahead of time, assembling the chicken Caesar wraps right before eating is best for optimal texture. If you need to make them in advance, pack the filling and the tortilla separately. When it’s time to eat, warm the tortilla for about 10-15 seconds, then add the filling and roll it up. This prevents the lettuce from wilting and the croutons from becoming soggy, ensuring your wrap is as fresh and crisp as possible.
What kind of chicken is best for chicken Caesar wraps?
The best chicken for these wraps is pre-cooked and shredded or diced. Rotisserie chicken from the grocery store is an excellent shortcut, offering tender, flavorful meat. Leftover cooked chicken breasts or thighs also work wonderfully. If you’re cooking chicken specifically for this recipe, poaching or baking chicken breasts seasoned simply with salt and pepper is ideal, as it allows the Caesar dressing and other fillings to shine. Avoid heavily seasoned or barbecued chicken, as its strong flavor profile might clash with the classic Caesar taste.
Is it okay to put warm chicken in a Caesar wrap?
Yes, it is perfectly fine to use warm chicken in your Caesar wrap! If you’ve just cooked chicken and are using it immediately, it can be added warm to the filling. The slight warmth against the cool romaine and dressing can even enhance the overall flavor experience. Just be mindful that using warm ingredients might slightly increase the risk of the tortilla becoming less crisp over time, so for the best texture, especially if making ahead, using cooled chicken is preferable.
Can I add other vegetables to my chicken Caesar wrap?
Absolutely! While the classic Caesar wrap is delicious as is, feel free to customize it with your favorite vegetables. Finely chopped red onion or green onions add a nice bite. Sliced cherry tomatoes bring a burst of freshness and acidity. Avocado slices add creaminess and healthy fats. For a bit of crunch, try adding finely diced celery or bell peppers. These additions can elevate your chicken wrap lunch ideas and make it a more complete and nutritious meal.
Share Your Version!
I would absolutely love to see your creations! If you make these Chicken Caesar Wraps, please leave a star rating and a comment below. Your feedback helps other cooks recreate this easy chicken Caesar wraps recipe with confidence. And if you share a photo on Instagram or Pinterest, be sure to tag me @exorecipes – I can’t wait to see how you personalize this delicious chicken wrap lunch idea! I’m always curious, what’s your favorite way to add a unique twist to classic wraps?
From my NYC kitchen to yours — I hope this recipe brings as much warmth to your table as it does to mine. — mia 🧡
Love This Recipe? Save It to Pinterest!
If you enjoyed this Chicken Caesar Wraps recipe, don’t let it get lost in your browser tabs! 😄 Pin it now so you can find it again anytime — and explore hundreds more tried-and-tested recipes waiting for you on my Pinterest boards.
👉 Follow mia on Pinterest @chefrecipes2
📌 Pin this recipe · 🔁 Re-pin your favorites · 💬 Tag me when you make it — I love seeing your creations!

Chicken Caesar Wraps
Description
Lunch doesnt get much easier than this Chicken Caesar Wrap. Full of flavor, this wrap comes together easily with pre-cooked shredded chicken.
Ingredients
- 1 cup chopped romaine lettuce
- 1 slice thick cut bacon (cooked and crumbled)
- 1/2 cup cooked shredded chicken
- 2 tablespoons Caesar dressing*
- 1 tablespoon Parmesan cheese
- 1/4 cup croutons
- 1 large flour tortilla
Instructions
- In a bowl, combine the romaine, bacon, chicken, dressing and Parmesan. Stir to combine.
- Roughly chop the croutons, then stir them into the filling mixture.
- Microwave the tortilla for 10-15 seconds so that it will be easy to roll. Spread the lettuce mixture down the middle of the tortilla. Fold in the two sides of the tortilla, then roll up like a burrito.
- Cut wrap in half to serve.
Nutrition
- Calories: 429 kcal
- Sugar: 3 g
- Fat: 17 g
- Carbohydrates: 36 g
- Protein: 29 g

Tried This Recipe? Leave a Comment!
Did you make this recipe? I’d love to hear how it turned out! Please leave a comment and a rating below. Your feedback helps other home cooks and supports cheerychop.com!
For more delicious inspiration, follow me on Pinterest!