“`html
Table of Contents
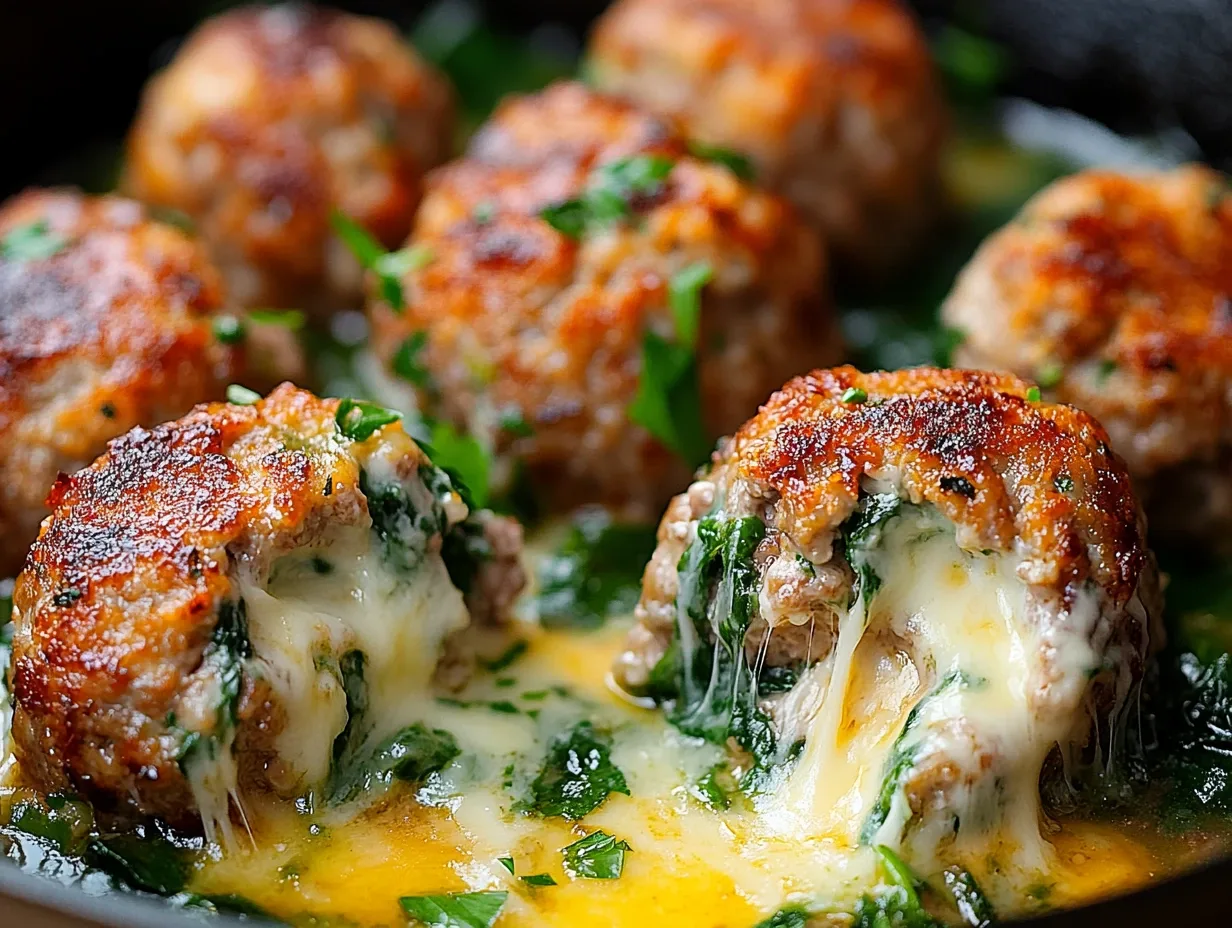
Mozzarella Stuffed Turkey Meatballs A Deliciously Easy Recipe
Craving a Meatball That’s More Than Just Meat?
Are you tired of the same old meatballs? Do you find yourself wishing for a little something extra, something that elevates a simple dish into a crowd-pleaser? If you’re nodding along, then you’re in the right place! We’re diving deep into a recipe that promises to deliver an explosion of flavor and a delightful surprise with every bite: Mozzarella Stuffed Turkey Meatballs. Forget your average turkey meatballs; these are tender, juicy orbs infused with aromatic garlic, fresh spinach, and a medley of Italian herbs, all centered around a molten core of gooey mozzarella cheese. Imagine that first bite – the savory embrace of the seasoned turkey, the subtle richness of spinach, and then, BAM! – a stream of warm, stretchy mozzarella. It’s the kind of culinary magic that makes weeknight dinners exciting and appetizer platters unforgettable. Whether you’re pairing them with a vibrant marinara sauce and your favorite pasta, or serving them up as a sophisticated snack with a side of dipping sauce, these mozzarella-stuffed wonders are destined to become a staple in your recipe repertoire. Ready to transform your meatball game? Let’s get cooking!
The Star Players: Ingredients for Mozzarella Stuffed Turkey Meatballs
The beauty of these meatballs lies in their balanced flavor profile and simple, wholesome ingredients. We aim for tender, moist meatballs that are packed with taste, and that melty mozzarella center is the ultimate reward for your efforts. Here’s what you’ll need:
- 1 lb Ground Turkey: Opt for a blend with a little fat (like 85/15 or 90/10) for the most tender and juicy results. Leaner turkey can sometimes result in drier meatballs.
- 1/2 cup Fresh Spinach, finely chopped: Adds a beautiful color, a boost of nutrients, and a subtle earthy flavor that complements the turkey. You can also use frozen spinach, thawed and squeezed very dry.
- 1/4 cup Grated Parmesan Cheese: For that umami-rich, salty kick that enhances the overall flavor.
- 1 large Egg, lightly beaten: Acts as a binder, helping all the ingredients come together and keeping the meatballs moist.
- 1/4 cup Breadcrumbs: Panko breadcrumbs will yield a lighter texture, while Italian-style breadcrumbs will add extra seasoning.
- 2 cloves Garlic, minced: Essential for that classic savory flavor. The aroma alone is enough to make your mouth water!
- 1 tsp Dried Italian Seasoning: A blend of oregano, basil, thyme, and rosemary that brings authentic Italian flair.
- 1/2 tsp Salt: To enhance all the flavors. Adjust to your preference.
- 1/4 tsp Black Pepper: Freshly ground is always best for a bolder taste.
- 4 oz Mozzarella Cheese, cut into 1/2-inch cubes: This is your gooey surprise! Low-moisture part-skim mozzarella works best as it melts beautifully without becoming too oily. Fresh mozzarella can be too watery.
Substitutions: If you don’t have ground turkey, ground chicken or even a mix of ground beef and pork would work, though the flavor profile will change slightly. For the spinach, finely chopped kale could be used. If you’re out of Italian seasoning, a mix of dried oregano, basil, and thyme will do. For binding, a flax egg (1 tbsp flaxseed meal + 3 tbsp water, let sit for 5 minutes) can be used for a dairy-free/egg-free option, though the texture might be slightly different.
Timing is Everything: Prep, Cook, and Enjoy!
These meatballs are surprisingly quick to whip up, making them perfect for a busy weeknight or a last-minute appetizer. Let’s break down the timing:
Compared to average meatball recipes which often take 45-60 minutes total, these mozzarella-stuffed turkey meatballs are a speedy delight, saving you precious time in the kitchen without sacrificing flavor or fun!
Step-by-Step Instructions
Step 1: Prep the Meatball Base
In a large mixing bowl, combine the ground turkey, finely chopped fresh spinach, grated Parmesan cheese, lightly beaten egg, breadcrumbs, minced garlic, Italian seasoning, salt, and black pepper. Using your hands (the best tool for the job!), gently mix everything together until just combined. Be careful not to overmix, as this can lead to tough meatballs. The mixture should be cohesive enough to hold its shape.
Step 2: Get Those Mozzarella Centers Ready
Take your cubed mozzarella cheese and set it aside. It’s important to have these ready to go so you can quickly stuff each meatball.
Step 3: Stuff and Shape
Now for the fun part! Take about 2 tablespoons of the turkey mixture and flatten it in the palm of your hand. Place one cube of mozzarella cheese in the center. Gently bring the edges of the turkey mixture up and around the cheese, sealing it completely. Roll it between your palms to form a smooth, uniform ball, ensuring there are no cracks where the cheese could escape during cooking. Repeat this process with the remaining turkey mixture and mozzarella cubes. You should get about 10-12 meatballs.
Step 4: Cook to Perfection
You have a few options for cooking your meatballs:
- Baking: Preheat your oven to 400°F (200°C). Arrange the meatballs in a single layer on a baking sheet lined with parchment paper or a silicone mat. Bake for 20-25 minutes, or until the meatballs are cooked through and browned. The internal temperature should reach 165°F (74°C).
- Pan-Frying: Heat a tablespoon or two of olive oil in a large skillet over medium-high heat. Carefully add the meatballs to the hot skillet (you may need to do this in batches to avoid overcrowding). Brown them on all sides, turning gently, for about 5-7 minutes. Then, reduce the heat to medium-low, cover the skillet, and let them simmer for another 10-15 minutes, or until cooked through.
- Simmering in Sauce: If you’re serving these with marinara, you can gently simmer them directly in the sauce. After browning them slightly in a pan (as in the pan-frying method), transfer them to a pot of simmering marinara sauce and let them cook for about 15-20 minutes, or until cooked through.
Ensure the cheese is melted and gooey! If baking, you might see some cheese ooze out, which is perfectly fine.
Nutritional Snapshot
While specific nutritional values can vary based on exact ingredients and portion sizes, here’s an estimated breakdown for these delicious Mozzarella Stuffed Turkey Meatballs (per meatball, assuming 10-12 meatballs per batch):
- Calories: Approximately 120-150 kcal
- Protein: ~10-12g
- Fat: ~7-10g (varies with turkey leanness and cheese)
- Carbohydrates: ~3-5g
- Sodium: Varies based on added salt and Parmesan cheese.
These meatballs offer a good balance of lean protein with the satisfying element of cheese. The spinach adds a nice fiber and vitamin boost.
Healthier Swaps Without Sacrificing Flavor
Looking to make these meatballs even lighter or adapt them for dietary needs? Here are some smart substitutions:
- Leaner Turkey: Use 93% or 99% lean ground turkey, but consider adding a tablespoon more of olive oil or a bit of turkey broth to the mixture to maintain moisture.
- Gluten-Free: Swap the breadcrumbs for gluten-free breadcrumbs, or use cooked quinoa or almond flour as binders.
- Dairy-Free/Vegan Cheese: Use your favorite dairy-free mozzarella shreds or cubes. The melting properties can vary, so choose a brand known for good meltability.
- Lower Sodium: Use reduced-sodium Parmesan cheese and control the added salt, relying more on herbs and garlic for flavor.
- Omit Cheese: If you’re avoiding cheese altogether, you can stuff them with a mixture of finely diced sun-dried tomatoes or mushrooms for a flavor boost, though you’ll lose the signature gooey center.
Serving Suggestions: Beyond the Basics
These versatile meatballs are a blank canvas for culinary creativity. Here are some ideas:
- With Pasta: The classic pairing! Serve them hot over spaghetti, linguine, or penne with your favorite marinara or a light tomato sauce.
- Appetizer Platter: Arrange them on a platter with toothpicks and a side of warm marinara or your favorite dipping sauce. They’re a guaranteed hit at parties!
- Sandwiches & Subs: Stuff them into hoagie rolls with extra sauce and melted mozzarella for a delicious meatball sub.
- Salads: Add a few cooled meatballs to a hearty green salad for a protein boost.
- Low-Carb Bowls: Serve over zucchini noodles or cauliflower rice with a flavorful sauce.
Common Mistakes to Avoid
To ensure your mozzarella stuffed turkey meatballs turn out perfectly every time, steer clear of these common pitfalls:
- Overmixing the Meat: This is the number one culprit for tough meatballs. Mix only until ingredients are incorporated.
- Using Too Lean Turkey: While healthier, very lean turkey can make meatballs dry. Fat equals flavor and moisture.
- Not Sealing the Cheese: Make sure the mozzarella is completely encased in turkey to prevent it from leaking out during cooking.
- Overcrowding the Pan/Sheet: Cook meatballs in batches if necessary. Crowding steams them rather than browning them, affecting texture and flavor.
- Undercooking: Always ensure the meatballs are cooked through to a safe internal temperature of 165°F (74°C).
Storing Smart: Keep Your Meatballs Fresh
Leftover meatballs can be stored in the refrigerator for up to 3-4 days. Ensure they are cooled completely before transferring them to an airtight container. For longer storage, freeze the cooked meatballs in a single layer on a baking sheet until solid, then transfer them to a freezer-safe bag or container for up to 2-3 months. Reheat gently on the stovetop, in the oven, or in the microwave.
The Secret Ingredient? Pure Deliciousness!
There you have it – a recipe for Mozzarella Stuffed Turkey Meatballs that’s as fun to make as it is to eat. These aren’t just meatballs; they’re little pockets of cheesy, savory joy. They prove that healthy choices don’t mean sacrificing indulgence. Whether you’re planning a family dinner, hosting friends, or just looking for a tasty way to sneak in some extra protein and veggies, these meatballs will not disappoint. They’re simple, satisfying, and guaranteed to be a hit. So, go ahead, give them a try, and prepare for the delighted “oohs” and “aahs” when your guests discover that molten mozzarella surprise!
Frequently Asked Questions
***Can I make these ahead of time?***
Yes! You can prepare the meatballs (stuffed and shaped) and refrigerate them for up to 24 hours before cooking. You can also freeze them raw or cooked for longer storage.
***What if the cheese melts out?***
A little cheese leakage is normal and part of the charm! If you’re consistently having a lot melt out, ensure you’re pressing the turkey mixture firmly to seal the cheese completely, and avoid overcrowding the pan when cooking.
***Can I use frozen spinach?***
Absolutely! Just make sure to thaw it completely and squeeze out as much excess water as possible before chopping and adding it to the mix. This prevents the meatballs from becoming too wet.
***Are these meatballs keto-friendly?***
They are relatively low in carbs, but the breadcrumbs and small amount of cheese add carbs. For a keto version, omit the breadcrumbs or use almond flour/pork rinds as a binder, and ensure your mozzarella is low in carbs.
***How can I make them spicier?***
Add a pinch of red pepper flakes to the meatball mixture, or serve them with a spicy marinara sauce for an extra kick.
Print
Mozzarella-Stuffed Turkey Meatballs with Spinach and Garlic
Description
These tender turkey meatballs, packed with the flavors of spinach, garlic, and Italian spices, hide a delightful surprise—gooey melted mozzarella in the center! Perfect as a main dish with pasta or as a snack dipped in marinara, they’re sure to be a hit.
Ingredients
- 1pound ground turkey1 cupfresh spinach, chopped2cloves garlic, minced1/2 cupbreadcrumbs (whole wheat or regular)1/4 cupgrated Parmesan cheese1large egg1 teaspoonItalian seasoning1/2 teaspoonsalt1/4 teaspoonblack pepper12small mozzarella balls (or1 cupmozzarella, cut into 1-inch cubes)1 tablespoonolive oil (for cooking)
- 1 cupfresh spinach, chopped2cloves garlic, minced1/2 cupbreadcrumbs (whole wheat or regular)1/4 cupgrated Parmesan cheese1large egg1 teaspoonItalian seasoning1/2 teaspoonsalt1/4 teaspoonblack pepper12small mozzarella balls (or1 cupmozzarella, cut into 1-inch cubes)1 tablespoonolive oil (for cooking)
- 2cloves garlic, minced1/2 cupbreadcrumbs (whole wheat or regular)1/4 cupgrated Parmesan cheese1large egg1 teaspoonItalian seasoning1/2 teaspoonsalt1/4 teaspoonblack pepper12small mozzarella balls (or1 cupmozzarella, cut into 1-inch cubes)1 tablespoonolive oil (for cooking)
- 1/2 cupbreadcrumbs (whole wheat or regular)1/4 cupgrated Parmesan cheese1large egg1 teaspoonItalian seasoning1/2 teaspoonsalt1/4 teaspoonblack pepper12small mozzarella balls (or1 cupmozzarella, cut into 1-inch cubes)1 tablespoonolive oil (for cooking)
- 1/4 cupgrated Parmesan cheese1large egg1 teaspoonItalian seasoning1/2 teaspoonsalt1/4 teaspoonblack pepper12small mozzarella balls (or1 cupmozzarella, cut into 1-inch cubes)1 tablespoonolive oil (for cooking)
- 1large egg1 teaspoonItalian seasoning1/2 teaspoonsalt1/4 teaspoonblack pepper12small mozzarella balls (or1 cupmozzarella, cut into 1-inch cubes)1 tablespoonolive oil (for cooking)
- 1 teaspoonItalian seasoning1/2 teaspoonsalt1/4 teaspoonblack pepper12small mozzarella balls (or1 cupmozzarella, cut into 1-inch cubes)1 tablespoonolive oil (for cooking)
- 1/2 teaspoonsalt1/4 teaspoonblack pepper12small mozzarella balls (or1 cupmozzarella, cut into 1-inch cubes)1 tablespoonolive oil (for cooking)
- 1/4 teaspoonblack pepper12small mozzarella balls (or1 cupmozzarella, cut into 1-inch cubes)1 tablespoonolive oil (for cooking)
- 12small mozzarella balls (or1 cupmozzarella, cut into 1-inch cubes)1 tablespoonolive oil (for cooking)
- 1 tablespoonolive oil (for cooking)
Instructions
- 1️⃣Prepare the Meatball Mixture:In a large bowl, combine the ground turkey, chopped spinach, minced garlic, breadcrumbs, Parmesan cheese, egg, Italian seasoning, salt, and pepper. Mix until all ingredients are well incorporated.
- 2️⃣Form the Meatballs:Take about 2 tablespoons of the turkey mixture and flatten it in your hand. Place a mozzarella ball or cube in the center and carefully wrap the turkey mixture around it, rolling it into a ball to completely enclose the cheese. Repeat with the remaining mixture and mozzarella.3️⃣Cook the Meatballs:Heat olive oil in a large skillet over medium heat. Add the meatballs in batches, ensuring not to overcrowd the pan. Sear the meatballs for 2-3 minutes on each side, until browned all over.4️⃣Bake to Perfection:Preheat the oven to 375°F (190°C). Transfer the browned meatballs to a baking sheet lined with parchment paper. Bake for 15-20 minutes, or until the internal temperature of the meatballs reaches 165°F (74°C).5️⃣Serve and Enjoy:Serve the meatballs hot, paired with your favorite pasta, smothered in marinara sauce, or as a stand-alone snack. Watch your guests enjoy the cheesy surprise inside!
- 3️⃣Cook the Meatballs:Heat olive oil in a large skillet over medium heat. Add the meatballs in batches, ensuring not to overcrowd the pan. Sear the meatballs for 2-3 minutes on each side, until browned all over.4️⃣Bake to Perfection:Preheat the oven to 375°F (190°C). Transfer the browned meatballs to a baking sheet lined with parchment paper. Bake for 15-20 minutes, or until the internal temperature of the meatballs reaches 165°F (74°C).5️⃣Serve and Enjoy:Serve the meatballs hot, paired with your favorite pasta, smothered in marinara sauce, or as a stand-alone snack. Watch your guests enjoy the cheesy surprise inside!
- 4️⃣Bake to Perfection:Preheat the oven to 375°F (190°C). Transfer the browned meatballs to a baking sheet lined with parchment paper. Bake for 15-20 minutes, or until the internal temperature of the meatballs reaches 165°F (74°C).
- 5️⃣Serve and Enjoy:Serve the meatballs hot, paired with your favorite pasta, smothered in marinara sauce, or as a stand-alone snack. Watch your guests enjoy the cheesy surprise inside!
Notes
Make-Ahead Tip:Form the meatballs and freeze them raw for up to 3 months. Thaw before cooking, or cook directly from frozen by adding a few extra minutes to the bake time.Gluten-Free Option:Use gluten-free breadcrumbs for a gluten-free version.Serving Suggestion:Pair with zoodles for a low-carb meal or a side salad for a lighter option.
Gluten-Free Option:Use gluten-free breadcrumbs for a gluten-free version.Serving Suggestion:Pair with zoodles for a low-carb meal or a side salad for a lighter option.
Serving Suggestion:Pair with zoodles for a low-carb meal or a side salad for a lighter option.
“`