Table of Contents
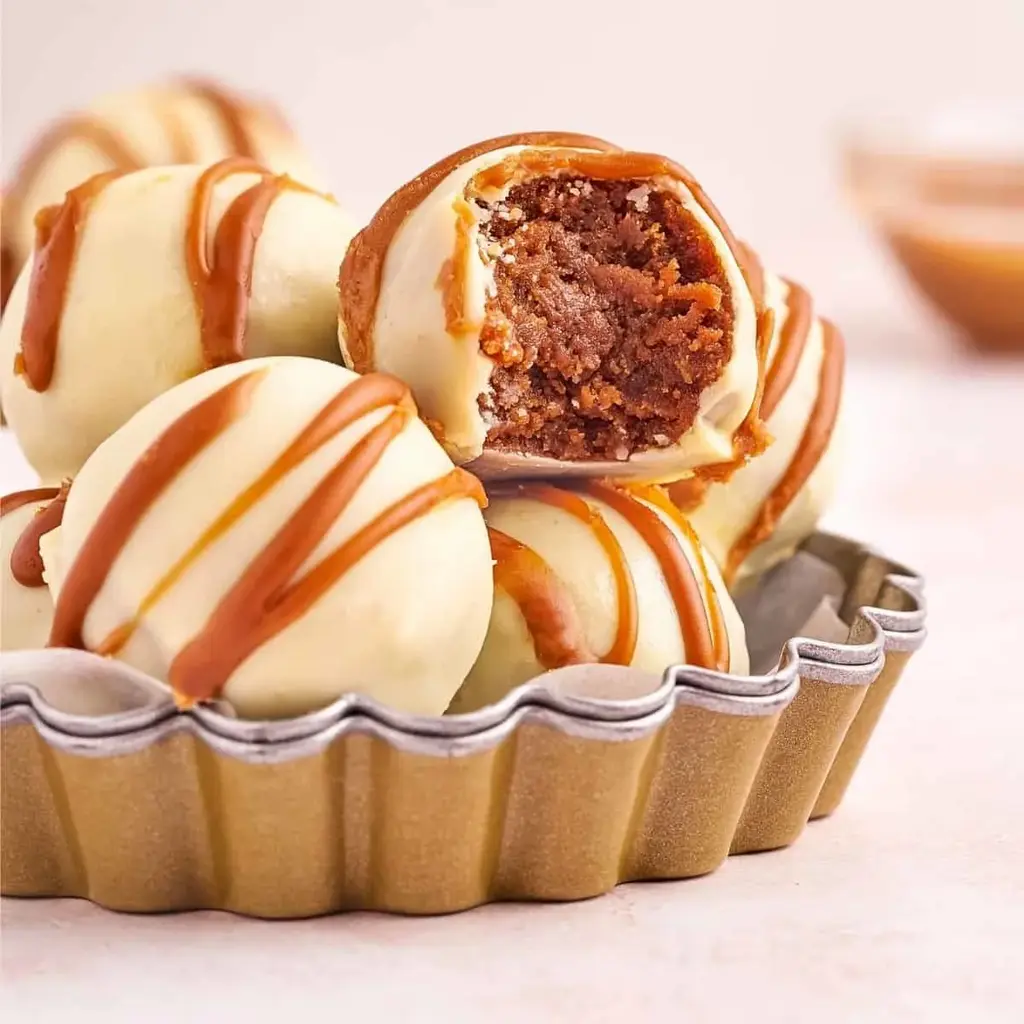
5-Minute Peanut Butter Mousse: The 5-Minute Dessert Magician
Oh, the sweet allure of peanut butter! Back in my childhood kitchen in Morocco, my mother would whip up simple, delicious treats that always centered around comforting flavors. Peanut butter, though not as traditional there as, say, almonds or honey, always felt like a special American import, a taste of a faraway land. Now, living in vibrant New York City, I find myself constantly seeking those moments of pure, unadulterated joy in food. This 5-Minute Peanut Butter Mousse is one such creation – it’s the embodiment of that feeling, a secret weapon for instant dessert gratification that I’m thrilled to share with you. It’s a quick peanut butter mousse recipe that proves you don’t need hours to create something truly decadent.
Imagine a dessert that’s as light and airy as a cloud, yet deeply satisfying with the rich, nutty essence of your favorite peanut butter. This mousse boasts a velvety smooth texture that melts in your mouth, a delightful contrast to its deceptively simple preparation. The aroma is pure comfort – a warm embrace of roasted peanuts mingled with a subtle sweetness. It’s a dessert that looks elegant, especially when piped into individual jars, yet tastes soul-warmingly familiar. I often think of how my French pastry instructors in Paris emphasized the magic of achieving perfect textures, and this recipe, in its own way, captures that essence with minimal fuss, allowing the pure flavors to shine without any complex techniques.
What sets this 5-Minute Peanut Butter Mousse apart is its incredible speed and simplicity, using just four core ingredients. I’ve taken cues from my pastry training in Paris to ensure a consistently smooth and stable mousse, even with this swift method. Many recipes rely on more complex steps like tempering chocolate or preparing custards, but this one is designed for maximum flavor with minimum effort. However, there’s a common mistake people make with no-bake desserts like this, often leading to a too-dense or grainy texture. I’ll be sure to share my foolproof solution for achieving that perfect, airy consistency every single time, ensuring your easy peanut butter dessert is a guaranteed hit.
Why This 5-Minute Peanut Butter Mousse Recipe Is the Best
My culinary journey, from the bustling souks of Morocco to the sophisticated patisseries of Paris and now the dynamic food scene of New York City, has taught me that the most memorable dishes often hide a secret simplicity. This 5-Minute Peanut Butter Mousse is a testament to that philosophy. It’s a recipe born from a desire to capture pure joy in a bowl, using quality ingredients that speak for themselves. I’ve refined it to be not just quick, but genuinely delightful, offering a perfect balance of sweetness, nuttiness, and an irresistibly airy texture that will have everyone asking for seconds. It’s the quintessential quick peanut butter mousse that’s become a go-to in my collection.
The secret to the sublime texture of this 5-Minute Peanut Butter Mousse lies in the careful combination and blending of just a few key ingredients. Drawing inspiration from classic French mousse techniques, I’ve adapted the process to be incredibly fast without sacrificing quality. It’s about creating an emulsion that is both stable and incredibly light. The balance between the creamy peanut butter, the richness of cream cheese, the sweetness of powdered sugar, and the sheer volume of whipped cream is crucial. Mastering this specific ratio ensures that you get that melt-in-your-mouth sensation, a hallmark of a great mousse, even with this simplified, no-bake method.
This recipe is the ultimate fuss-free dessert. It requires no baking, no special equipment beyond a mixer, and comes together in literally minutes, making it a lifesaver for busy weeknights or spontaneous cravings. For anyone new to making desserts or a busy parent looking for an easy peanut butter dessert, this is your answer. It’s incredibly forgiving, and I’ve tested it countless times in my own kitchen to ensure it works every single time. The minimal ingredient list is also a bonus, meaning fewer trips to the grocery store for you!
5-Minute Peanut Butter Mousse Ingredients
When I’m sourcing ingredients for my recipes here in New York, I love visiting local farmers’ markets or specialty shops for the freshest produce and unique pantry items. For this 5-Minute Peanut Butter Mousse, though, the beauty is that you can find everything you need at your local supermarket. I recall my mother using simple, readily available ingredients back home in Morocco to create magic, and this recipe follows that same spirit. It’s all about letting those core flavors shine. These are the building blocks for a truly spectacular, yet incredibly simple, quick peanut butter mousse.
Ingredients List
- 1 cup creamy peanut butter (smooth, natural style is best*)
- 1 cup cream cheese, softened
- 1 cup powdered sugar (confectioners’ sugar)
- 1 cup heavy cream, cold
Ingredient Spotlight
Peanut Butter: The star of our show! For this mousse, I strongly recommend using a smooth, creamy peanut butter. Natural peanut butters (just peanuts and salt) tend to have the best flavor and texture, as they haven’t been altered with stabilizers or excessive sugar that can affect the final consistency. When shopping in the US, look for brands where the oil may separate, as this indicates a purer product. If you use a “whipped” or highly processed peanut butter, your mousse might become too dense and less airy. I find the best results come from a good quality, classic creamy peanut butter.
Cream Cheese: This is crucial for adding that subtle tang and ensuring a stable, rich base for our mousse. Make sure your cream cheese is fully softened! This means taking it out of the refrigerator at least an hour before you plan to make the mousse, or gently warming it in the microwave for very short intervals (10-15 seconds) until it’s pliable but not melted or greasy. Using cold cream cheese can lead to lumps in your mixture, no matter how vigorously you beat it, thus impacting the smoothness of your final easy peanut butter dessert.
Heavy Cream: This is what gives our mousse its signature airy, ethereal texture. It’s vital that your heavy cream is very cold. I often even chill my mixing bowl and whisk attachment in the freezer for about 10-15 minutes before whipping. This helps the cream to emulsify and hold its volume better. When whipping, you’re looking for stiff peaks – meaning when you lift the whisk, the cream holds its shape without drooping. This structural integrity is what makes the mousse light and cloud-like. Don’t over-whip it into butter, though!
| Original Ingredient | Best Substitution | Flavor / Texture Impact |
|---|---|---|
| Smooth Peanut Butter | Crunchy peanut butter | Adds texture from peanut pieces; flavor remains similar. |
| Cream Cheese | Mascarpone cheese | Richer, creamier texture, less tang. Mousse will be slightly denser. |
| Heavy Cream | Whipping cream (30-35% fat) | May result in slightly softer peaks; ensure thorough whipping. |
How to Make 5-Minute Peanut Butter Mousse — Step-by-Step
Get ready to create magic in mere minutes! Just follow these simple steps, and you’ll have a delicious, airy mousse ready to impress.
Step 1: Beat the Base
In a large mixing bowl, combine the softened cream cheese and peanut butter. Beat them together with an electric mixer on medium speed until smooth and well combined. Gradually add the powdered sugar and continue beating until no sugar streaks remain and the mixture is light and fluffy. Scrape down the sides of the bowl as needed. This forms the flavor-packed foundation of your quick peanut butter mousse.
💡 mia’s Pro Tip: Make sure your cream cheese and peanut butter are at room temperature! This is key to avoiding lumps and ensuring a super smooth, homogenous base for your mousse.
Step 2: Whip the Cream
In a separate, clean mixing bowl (preferably chilled), whip the cold heavy cream using your electric mixer on medium-high speed. Continue beating until stiff peaks form. This means that when you lift the beaters, the cream stands up straight and holds its shape. Be careful not to over-whip, or you’ll end up with butter!
| Step | Action | Duration | Key Visual Cue |
|---|---|---|---|
| 1 | Beat peanut butter, cream cheese, powdered sugar | 2-3 minutes | Smooth, creamy, no sugar lumps |
| 2 | Whip heavy cream | 2-4 minutes | Stiff peaks |
| 3 | Fold whipped cream into peanut butter mixture | 2-3 minutes | Light, airy, uniform color |
| 4 | Pipe/Spoon into serving dishes and chill | 1 minute to serve; 30+ minutes to chill | Set mousse consistency |
Step 3: Combine Gently
Now it’s time to bring it all together! Add about a quarter of the whipped cream to the peanut butter mixture. Gently beat it in to lighten the peanut butter base. Next, add the remaining whipped cream and use a spatula to gently fold it into the peanut butter mixture. Be careful not to overmix; you want to maintain that lovely airy texture. Fold just until no white streaks remain and the mousse is uniformly light and creamy. This folding technique is a nod to classic pastry techniques that ensure a delicate result.
⚠️ Common Mistake to Avoid: Overmixing! When folding in the whipped cream, aggressive stirring will deflate all the air you’ve worked so hard to incorporate. Use a gentle, folding motion with a spatula, as if you are turning layers of batter over each other, until just combined.
Step 4: Serve or Chill
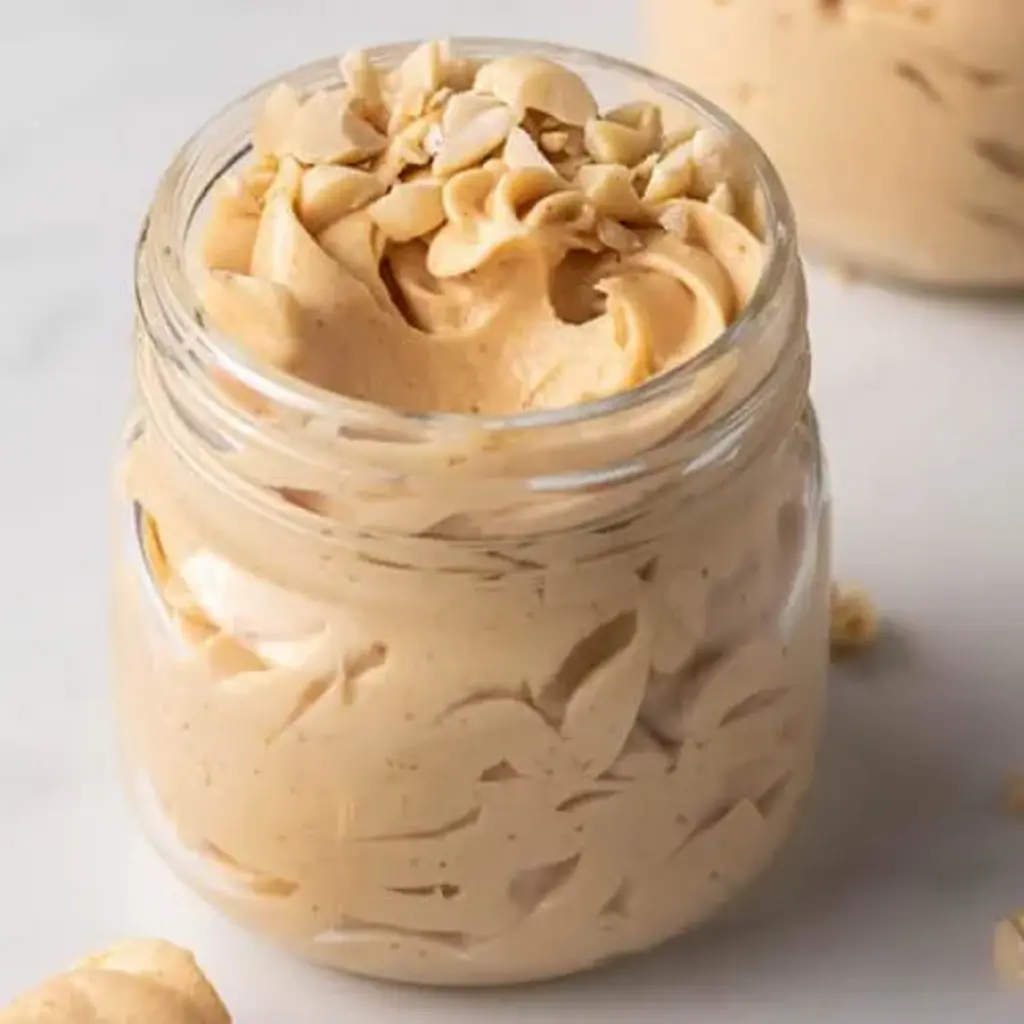
Transfer the mousse into a piping bag fitted with a decorative tip (like a star tip) for an elegant presentation, or simply spoon it into individual serving dishes, small mason jars, or glasses. You can enjoy this delightful 5-Minute Peanut Butter Mousse immediately, but for the best texture, I highly recommend chilling it in the refrigerator for at least 30 minutes. This allows the flavors to meld and the mousse to set up perfectly, ensuring a smooth, no-bake peanut butter mousse experience.
Serving & Presentation
When it comes to serving this easy peanut butter dessert, I love using small, clear glasses or mason jars. They showcase the beautiful, creamy texture, and it’s so easy to top them with a little something extra. In New York, we have such a variety of fantastic bakeries and dessert shops, and presentation is always key. You can create a really appealing dessert with minimal effort, making it perfect for casual gatherings or even a special occasion when you’re short on time.
For a touch of elegance, I like to pipe the mousse using a star tip, creating lovely swirls. A drizzle of extra melted peanut butter, some chopped roasted peanuts for crunch, or a sprinkle of flaky sea salt can elevate it further. A small dollop of whipped cream or a few fresh berries add a pop of color and freshness. Think about how a touch of spice, like a whisper of cinnamon or cardamom, could transform the flavor profile – much like the subtle spices in Moroccan desserts.
| Pairing Type | Suggestions | Why It Works |
|---|---|---|
| Garnish | Chopped roasted peanuts, chocolate shavings, mini chocolate chips, a drizzle of melted peanut butter, flaky sea salt, whipped cream, fresh berries (raspberries, strawberries). | Adds texture, visual appeal, and complementary flavors that enhance the peanut butter. |
| Crust/Base | Crushed graham crackers, finely crushed shortbread cookies, or a simple chocolate cookie crust. | Provides a delightful crunchy contrast to the smooth, airy mousse. |
| Beverage | Cold milk, a light coffee (espresso or latte), or a sweet dessert wine like a Tawny Port. | Complements the sweetness and richness of the peanut butter. |
| Accompaniment | Fresh fruit salad, shortbread cookies, or a dark chocolate truffle. | Adds freshness, a different texture, or an intensified chocolate flavor if desired. |
Make-Ahead, Storage & Reheating
Life in New York is always on the go, and I know how important it is to have reliable make-ahead options. This 5-Minute Peanut Butter Mousse is perfect for that! You can whip it up the day before a party or for easy grab-and-go desserts throughout the week. The simple ingredients hold up beautifully, and any extra prep work you do now will save you precious time later.
| Method | Container | Duration | Reheating Tip |
|---|---|---|---|
| Refrigerator | Airtight containers or individual ramekins/jars with lids. | 3-4 days | Serve chilled directly from the fridge. No reheating needed. |
| Freezer | Freezer-safe airtight containers. For individual servings, freeze in ramekins. | Up to 1 month | Thaw overnight in the refrigerator. The texture might be slightly less airy after freezing and thawing, but still delicious. |
| Make-Ahead | Prepare the mousse mixture completely and store base mixture in an airtight container in the fridge for up to 2 days before whipping the cream and folding. | Up to 1 day in advance | Whip cream and fold in just before chilling or serving for optimum lightness. |
For optimal results, I strongly advise against reheating this mousse in a microwave or oven, as it will melt and lose its characteristic airy texture. The best way to serve it is chilled. If taking it directly from the freezer, remember to allow ample thawing time in the refrigerator. The slight change in texture after freezing is usually unnoticeable once you add your favorite toppings!
Variations & Easy Swaps
| Variation | Key Change | Best For | Difficulty Impact |
|---|---|---|---|
| Peanut Butter Chocolate Chip Mousse | Add ½ cup mini chocolate chips and 1 tbsp cocoa powder to the peanut butter mixture. | Chocolate lovers! | No change. |
| No-Bake Peanut Butter Mousse (Gluten & Dairy-Free) | Use dairy-free cream cheese alternative and coconut cream (chilled solid part). | Dietary restrictions. | Requires specific product sourcing. |
| Spiced Peanut Butter Mousse | Add ½ tsp cinnamon and ¼ tsp cardamom to the peanut butter mixture. | Warm spice lovers. | No change. |
Peanut Butter Chocolate Chip Mousse
For a double dose of deliciousness, fold in ½ cup of mini chocolate chips along with the whipped cream. You can also add 1 to 2 tablespoons of unsweetened cocoa powder to the peanut butter mixture in Step 1 to create a rich chocolate-peanut butter mousse. This combination is always a crowd-pleaser and feels like a decadent treat, even though it’s still incredibly quick to put together. It’s inspired by some of the amazing chocolate creations I learned about during my time in Paris.
No-Bake Peanut Butter Mousse (Gluten & Dairy-Free)
Perfect for those with dietary needs! To make this 5-Minute Peanut Butter Mousse gluten-free and dairy-free, substitute the cream cheese with a good quality dairy-free cream cheese alternative. For the heavy cream, use the solid, chilled part from a can of full-fat coconut milk (make sure it’s been refrigerated overnight). Whip the solid coconut cream until stiff peaks form. The texture will be slightly different, perhaps a bit richer and with a subtle coconut note, but it’s a delicious adaptation that mia has tested and approved for a wonderful no-bake dessert.
Spiced Peanut Butter Mousse with a Hint of Cardamom
Embrace the warmth of spices! My roots in Moroccan cooking deeply influence how I approach flavor, and a touch of spice can elevate even the simplest dessert. For this variation, stir in ½ teaspoon of ground cinnamon and ¼ teaspoon of ground cardamom into the peanut butter and cream cheese mixture in Step 1. This adds a lovely, aromatic depth that pairs beautifully with peanut butter. It’s a subtle nod to the fragrant spice blends used in my mother’s kitchen, creating a unique quick peanut butter mousse.
What is the best way to thicken peanut butter mousse without heavy cream?
If you’re looking to thicken peanut butter mousse without heavy cream, you’ll need to rely on other ingredients and methods to achieve a stable consistency. One effective approach is to increase the proportion of cream cheese or to use a stabilizer. You could also incorporate a bit of melted (but not hot) white chocolate or even a small amount of gelatin, bloomed and dissolved according to package directions, though this adds complexity. For a simpler, no-bake method without cream, think about a base of whipped silken tofu or a very thick, reduced dairy-free milk (like coconut milk). These will create a denser, custard-like texture rather than a light, airy mousse, but they can still be delicious and satisfying as an easy peanut butter dessert option.
Can I use powdered peanut butter instead of regular peanut butter for this mousse?
Yes, you absolutely can use powdered peanut butter (like PB2 or similar brands) for this 5-Minute Peanut Butter Mousse, but it requires a slight adjustment. You’ll need to reconstitute the powdered peanut butter according to the package instructions first, usually by mixing it with water until it forms a paste similar in consistency to regular peanut butter. The key is to ensure you blend it thoroughly with the cream cheese and powdered sugar in Step 1 to avoid any chalky texture. The flavor might be slightly less intense than natural peanut butter, so you might want to adjust the amount or add a touch more sweetener or a few drops of vanilla extract to compensate. It’s a great option if you’re looking for a lighter dessert or are out of regular peanut butter.
How long does 5-minute peanut butter mousse need to chill before serving?
While this 5-minute peanut butter mousse is ready to eat straight after mixing, I highly recommend chilling it for at least 30 minutes to allow the flavors to meld and the texture to set properly. For the best no-bake peanut butter mousse experience, aim for 1 to 2 hours in the refrigerator. This chilling time helps the mousse firm up, becoming smoother and more stable, which makes it easier to serve and enjoy. If you’re in a real pinch, you can speed up the chilling process by putting it in the freezer for about 15-20 minutes, but be careful not to freeze it solid.
Is 5-minute peanut butter mousse keto-friendly or low-carb?
Unfortunately, this specific 5-Minute Peanut Butter Mousse recipe is not keto-friendly or strictly low-carb. The inclusion of powdered sugar, while essential for achieving the correct texture and sweetness, makes it relatively high in carbohydrates. Peanut butter itself contains some carbs, and even cream cheese has a small amount. To make a keto or low-carb version, you would need to substitute the powdered sugar with a keto-approved sweetener like erythritol or stevia blend, and ensure you’re using a natural peanut butter with minimal added sugar. The heavy cream is generally keto-friendly, so that part is fine. It would require careful ingredient swaps to fit a low-carb lifestyle.
Can I make this peanut butter mousse vegan?
You certainly can adapt this 5-Minute Peanut Butter Mousse to be vegan, but it will require some substitutions. Instead of cream cheese, you can use a vegan cream cheese alternative, ensuring it’s softened. For the heavy cream, the most effective substitute is the solid part from a chilled can of full-fat coconut milk. You’ll need to refrigerate the can overnight, then scoop out only the thick cream that separates at the top and whip that. Use a vegan powdered sugar. The flavor and texture might vary slightly depending on the brands used, but it’s a fantastic way to enjoy a delicious vegan, no-bake peanut butter dessert.
What kind of peanut butter is best for this mousse?
For the best smooth and airy texture in this 5-Minute Peanut Butter Mousse, I recommend using a creamy, smooth peanut butter. Natural peanut butters (those containing only peanuts and salt) are ideal because they haven’t been processed with extra stabilizers or oils which can sometimes lead to a grainy or overly dense result. Brands where the oil may naturally separate are usually a good indicator of a pure product. Avoid any “whipped” peanut butters, as they tend to incorporate too much air and can result in a mousse that deflates too easily. The goal is a rich, pure peanut flavor that blends seamlessly.
Can I add other flavors to this mousse?
Absolutely! This 5-Minute Peanut Butter Mousse is a fantastic base for all sorts of flavor additions. My favorite easy swap is adding a tablespoon or two of unsweetened cocoa powder along with the peanut butter and cream cheese to make a chocolate peanut butter version. You could also fold in mini chocolate chips, a touch of espresso powder for a mocha twist, or even some finely chopped nuts for added texture. Thinking about my Moroccan heritage, a pinch of cinnamon or cardamom, as I suggested in the variations, creates a warm, spiced profile that is truly delightful. Get creative – the possibilities are endless!
Why is my peanut butter mousse not firm enough?
If your 5-Minute Peanut Butter Mousse isn’t firming up, there are a few common culprits. First, ensure your heavy cream was thoroughly whipped to stiff peaks. Under-whipped cream won’t provide enough structure. Second, make sure you used softened, not melted, cream cheese. Overly soft or melted cream cheese can make the base too liquid. Lastly, it’s crucial to chill the mousse adequately. While it’s a “5-minute” recipe to make, it needs at least 30 minutes, preferably longer, in the refrigerator to set properly. If it’s still too soft after chilling, it might be due to a higher liquid content in your specific brand of peanut butter or cream cheese.
Share Your Version!
I truly hope you adore this super-quick and incredibly satisfying 5-Minute Peanut Butter Mousse as much as I do. It’s become such a staple in my busy NYC life, and I can’t wait for it to become one in yours too! Please, if you make this easy peanut butter dessert, leave a star rating and a comment below. Your feedback means the world to me and helps other home cooks feel confident trying out new recipes. I also love seeing your creations! Share a photo of your mousse on Instagram or Pinterest and tag me @exorecipes. Did you try any of the variations, or perhaps a unique addition I haven’t thought of yet?
From my NYC kitchen to yours — I hope this recipe brings as much warmth to your table as it does to mine. — mia 🧡
Love This Recipe? Save It to Pinterest!
If you enjoyed this 5-Minute Peanut Butter Mousse recipe, don’t let it get lost in your browser tabs! 😄 Pin it now so you can find it again anytime — and explore hundreds more tried-and-tested recipes waiting for you on my Pinterest boards.
👉 Follow mia on Pinterest @chefrecipes2
📌 Pin this recipe · 🔁 Re-pin your favorites · 💬 Tag me when you make it — I love seeing your creations!
5-Minute Peanut Butter Mousse
Description
This peanut butter mousse is smooth, airy, and so darn easy to make. All you need are 4 ingredients, and its ready in minutes! Watch the video below to see how I make it in my kitchen!
Ingredients
- 1 cup peanut butter (smooth * See notes)
- 1 cup cream cheese (softened)
- 1 cup powdered sugar
- 1 cup heavy cream
Instructions
- In a large mixing bowl, beat together the peanut butter, cream cheese, powdered sugar, and vanilla extract and set aside. In a separate mixing bowl, beat together the heavy cream until stiff peaks form.
- Gently beat through ¼ of the whipped heavy cream into the peanut butter mixture. Fold through another ½ of the cream and mix well. Add the remaining cream until combined.
- Transfer the mousse into a piping bag with a swirly tip. Pipe into mason jars or glass jars enjoy immediately or refrigerate for at least 30 minutes.
Nutrition
- Calories: 288 kcal
- Fat: 26 g
- Carbohydrates: 7 g
- Protein: 10 g

Tried This Recipe? Leave a Comment!
Did you make this recipe? I’d love to hear how it turned out! Please leave a comment and a rating below. Your feedback helps other home cooks and supports cheerychop.com!