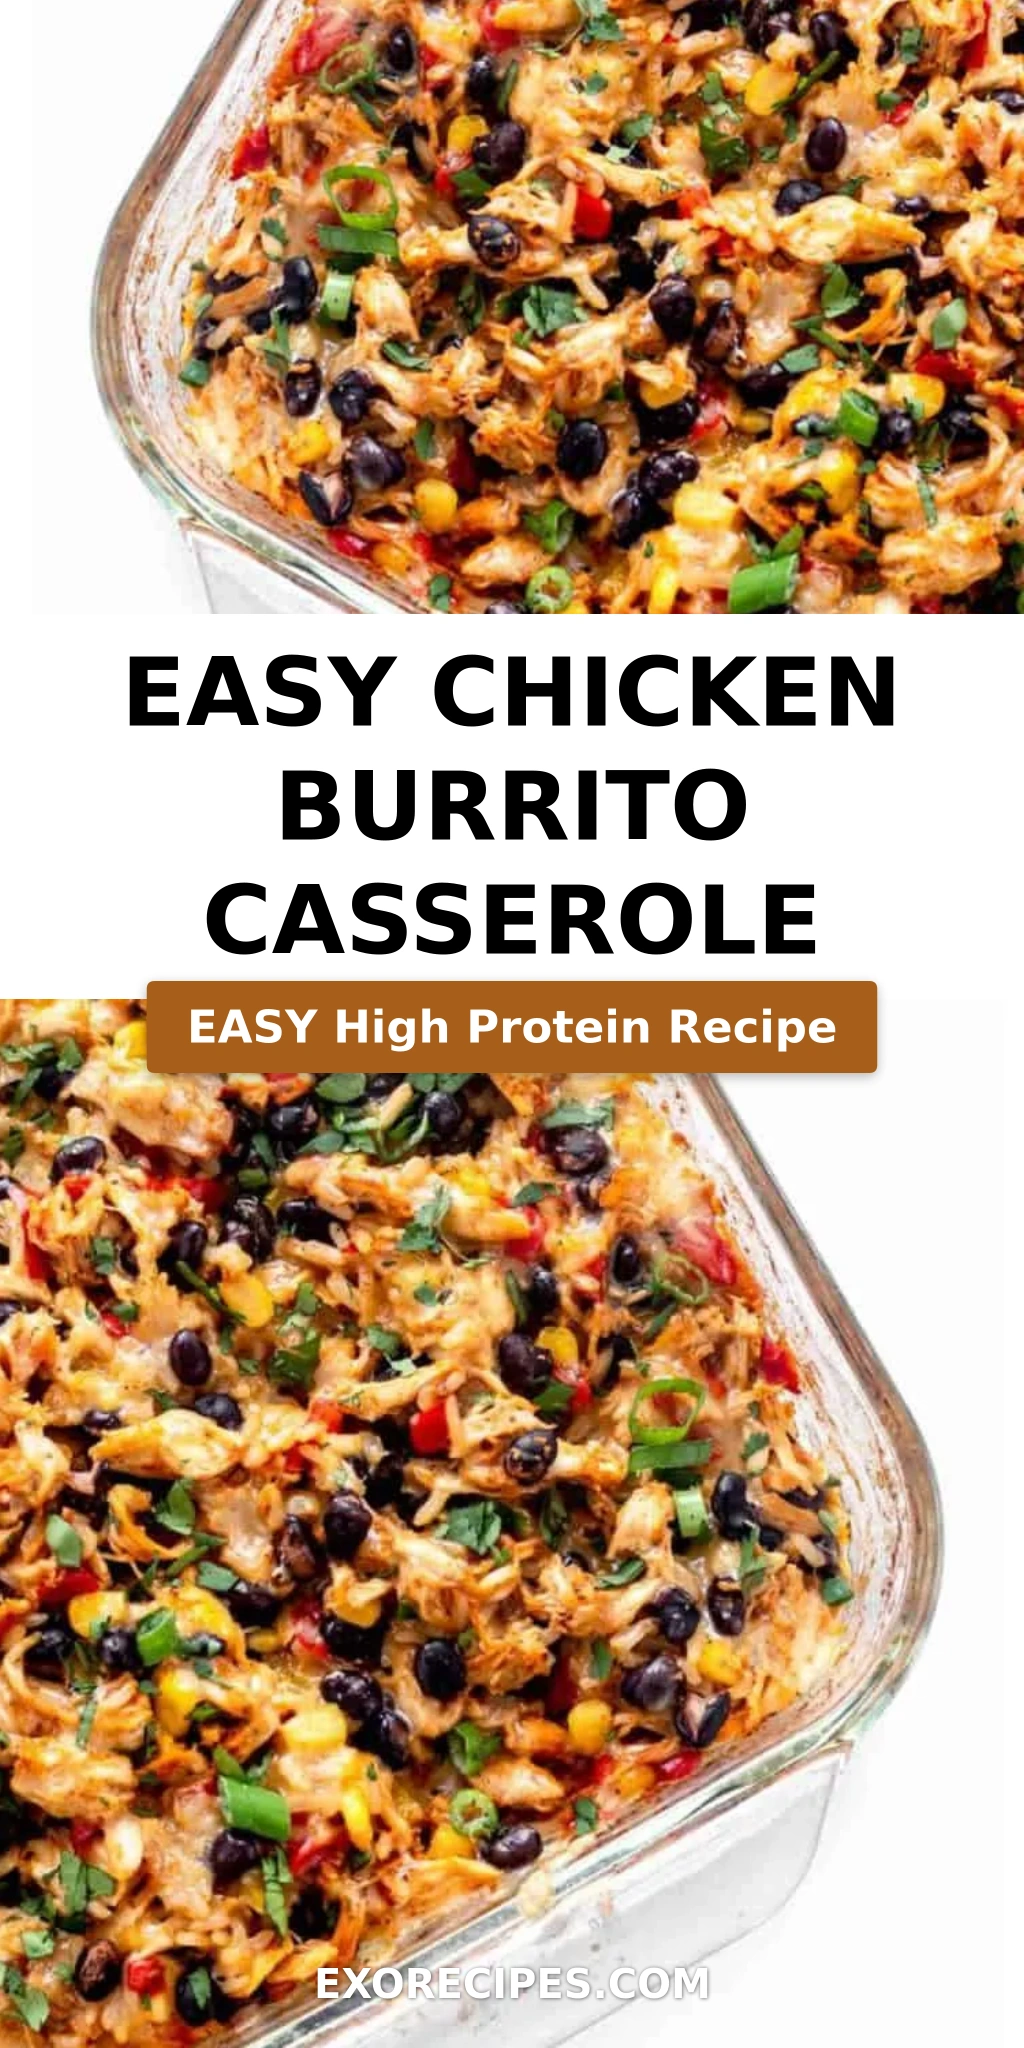
Easy Chicken Burrito Casserole – Cheesy One-Dish Dinner

Easy Chicken Burrito Casserole – A Foolproof One-Dish Dinner

⚖️
Difficulty
Easy
⏲️
Prep Time
15 mins
🕒
Cook Time
70 mins
⏱️
Total Time
85 mins
🍽️
Servings
6

Growing up in Morocco, my mother’s kitchen was a symphony of cumin, coriander, and slow-simmered tagines. When I later trained in Paris, that same earthy warmth met the precision of French technique. Now, in my New York City apartment, I channel those worlds into dinners that are both soulful and weeknight-friendly. This Easy Chicken Burrito Casserole is exactly that — a one-dish wonder that delivers all the satisfaction of a loaded burrito without the rolling. The secret? Using uncooked rice right in the casserole dish so it absorbs all the spiced broth, creating a perfectly tender, flavorful base with zero extra pots. It’s my go-to when the city’s energy calls for something hearty, fast, and deeply comforting.

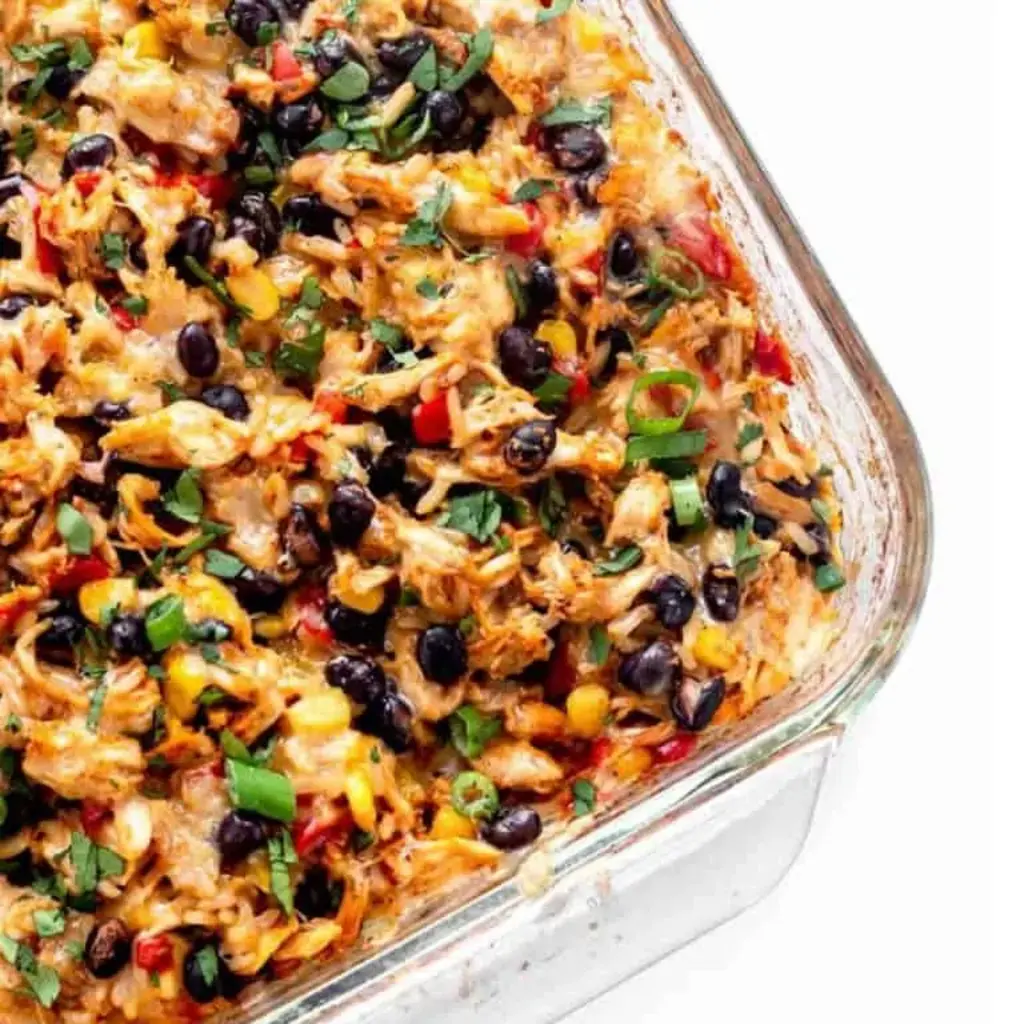
Imagine digging your fork into a creamy, cheesy top layer, then hitting a bed of fluffy rice studded with shredded chicken, sweet corn, and earthy black beans — all kissed by a gentle heat from cayenne and green chiles. The aroma that fills your apartment is pure Mexican warmth: smoky fajita spices, a whisper of garlic, and the irresistible pull of bubbling Monterey Jack. Every bite delivers that perfect balance: a little crunch from the bell pepper, a pop of corn, and the velvety melt of cheese. This isn’t just a casserole; it’s a fiesta in a 9×13 dish.

What sets my version apart is the technique. Instead of baking at the usual 350°F, I start at a higher 400°F to jump-start the rice cooking, then finish with foil removal to let the cheese brown beautifully. And because I’m a stickler for texture, I use parboiled brown rice — it stays separate and chewy, not mushy. I’ve tested this dozens of times in my own tiny NYC kitchen to make sure it’s foolproof for every home cook. Trust me, this chicken burrito casserole recipe will earn a permanent spot in your weekly rotation. 💡 mia’s Pro Tip: For extra depth, toast the rice in a dry skillet for 2 minutes before adding to the dish — it brings out a nutty flavor that’s incredible.

Why This Easy Chicken Burrito Casserole Recipe Is the Best

The Flavor Secret — In my Parisian training, I learned that layering flavors is everything. Here, the fajita seasoning brings a complex blend of cumin, chili, garlic, and oregano, while the tomato paste adds a concentrated sweetness that balances the heat. The green chiles provide a mild, earthy kick that’s reminiscent of a proper salsa verde. It’s a method I borrowed from making enchilada sauce in Morocco — slow-building flavor without extra steps.

Perfected Texture — The biggest challenge with one-dish rice casseroles is ending up with mushy grains. My trick: use parboiled (converted) brown rice and don’t skip the foil cover. The steam trapped inside cooks the rice evenly, and because parboiled rice has been pre-gelatinized, it stays firm and separate. The final 10 minutes without foil let the cheese develop a golden crust that contrasts beautifully with the tender filling.

Foolproof & Fast — With just 15 minutes of active prep, this easy chicken casserole is practically hands-off. No rolling, no stuffing, no sautéeing. You simply mix everything in the baking dish, pop it in the oven, and let the heat do the work. It’s the kind of dinner that saves you on a busy Tuesday and still feels special enough for Sunday supper with the family.

Easy Chicken Burrito Casserole Ingredients

I source most of these ingredients from my favorite stalls at the Union Square Greenmarket or from my local bodega’s well-stocked Latin aisle. The quality of the seasoning really matters here — I often make a double batch of my own fajita blend using spices from Kalustyan’s on Lexington. But even store-bought works beautifully. Let’s walk through the lineup.

Ingredients List

  • 1/2 cup finely diced onion
  • 1 red bell pepper (diced)
  • 1 cup uncooked parboiled long-grain brown rice (can also use long grain white rice)
  • 3 tablespoons fajita seasoning (homemade or store-bought)
  • 1/8 teaspoon cayenne pepper (optional)
  • 1 cup corn kernels (frozen)
  • 1 14 ounce can low sodium black beans (drained and rinsed)
  • 5 cups shredded chicken
  • 3 cups reduced sodium chicken broth
  • 1 4 ounce can mild green chilies
  • 1 tablespoon olive oil
  • 2 tablespoons tomato paste
  • 1 1/4 cups shredded Monterey Jack cheese

Ingredient Spotlight

Rice: Parboiled brown rice is my go-to because it holds its shape and doesn’t get gummy. If you only have white rice, use long-grain (like basmati) and reduce the bake time by 10 minutes. Avoid short-grain or sushi rice — they’ll turn into pudding.

Shredded Chicken: I use leftover rotisserie chicken from my favorite NYC Peruvian chicken spot. You need 5 cups, which is roughly 1½ pounds of cooked meat. For a shortcut, poach 2 large chicken breasts in broth for 15 minutes, then shred.

Fajita Seasoning: The blend is key. Homemade gives you control over salt and heat. I mix 2 tsp chili powder, 1 tsp smoked paprika, 1 tsp cumin, ½ tsp garlic powder, ½ tsp onion powder, ½ tsp oregano, and ¼ tsp black pepper. That’s 3 tablespoons.

Monterey Jack: It melts like a dream and has a mild, buttery flavor. If you want more bite, replace half with sharp cheddar or pepper jack for an extra kick.

Original IngredientBest SubstitutionFlavor / Texture Impact
Parboiled brown riceLong-grain white riceSofter, less chewy; reduce bake time by 10 min
Shredded chickenCanned chicken (drained) or shredded rotisserieCanned is saltier; rotisserie adds smoky notes
Monterey Jack cheesePepper Jack, mild cheddar, or dairy-free shredsPepper Jack adds heat; cheddar is sharper; dairy-free melts differently
Fajita seasoningHomemade blend or taco seasoning (reduce salt)Taco seasoning is milder; add extra cumin

How to Make Easy Chicken Burrito Casserole — Step-by-Step

I promise, this is one of the simplest casseroles you’ll ever make — no precooking, no fuss. Just layer, bake, and enjoy. Follow these steps and you’ll have a golden, bubbling dish that tastes like you spent hours.

Step 1: Prepare the Baking Dish

Preheat your oven to 400°F. In a 9×13-inch baking dish, combine the diced onion, diced red bell pepper, uncooked rice, fajita seasoning, and cayenne (if using). Stir everything together with a fork until the spices coat the vegetables and rice evenly.

💡 mia’s Pro Tip: Use a fork rather than a spoon — it helps break up any clumps of seasoning and keeps the rice grains separate.

Step 2: Make the Broth Mixture

In a separate bowl or a large measuring cup, whisk together the chicken broth, mild green chiles (with their liquid), tomato paste, and olive oil. Whisk until the tomato paste is fully dissolved — no streaks of red remaining.

⚠️ Common Mistake to Avoid: Don’t skip the whisking! If the tomato paste isn’t fully incorporated, it will create hot spots of concentrated flavor that can burn.

Step 3: Combine Everything

Pour the broth mixture over the rice and vegetables in the baking dish. Stir well. Then add the shredded chicken, drained black beans, and frozen corn (no need to thaw). Give it a thorough stir so everything is evenly distributed.

💡 mia’s Pro Tip: If you’re using leftover rotisserie chicken, remove the skin and any large fatty bits before shredding. The skin can turn soggy.

Step 4: Bake Covered

Cover the baking dish tightly with aluminum foil. Transfer to the preheated oven and bake for 65-70 minutes. Check at the 60-minute mark — all the liquid should be absorbed and the rice tender but not mushy.

⚠️ Common Mistake to Avoid: Lifting the foil mid-bake to “check” can release steam and dry out the dish. Resist the urge! Trust the timer.

Step 5: Add Cheese and Finish

Remove the dish from the oven, carefully take off the foil (watch for steam), and sprinkle the shredded Monterey Jack cheese evenly over the top. Return the dish to the oven, uncovered, and bake for another 5-10 minutes, until the cheese is melted and starting to turn golden in spots. Let it rest for 5 minutes before serving — it allows the casserole to set up for cleaner slices.

💡 mia’s Pro Tip: For an extra-bronzed crust, switch your oven to broil for the final 1-2 minutes. Watch it like a hawk — cheese can burn fast!

StepActionDurationKey Visual Cue
1Combine veggies, rice, seasoning5 minSpices coat rice evenly
2Whisk broth mixture2 minTomato paste fully dissolved
3Add chicken, beans, corn; stir3 minAll ingredients evenly mixed
4Bake covered65-70 minLiquid fully absorbed, rice tender
5Add cheese, bake uncovered5-10 minCheese melted, golden spots

Serving & Presentation

I like to serve this casserole family-style right from the dish, but you can also plate individual portions. Spoon a generous scoop onto a warm plate, then top with a shower of fresh cilantro, sliced green onions, a dollop of salsa verde or pico de gallo, and creamy avocado slices. A squeeze of lime juice over everything brightens the flavors instantly.

For sides, think simple: a crisp romaine salad with lime-cumin dressing, or warm flour tortillas (or corn for gluten-free) to scoop up any extra bits. If you’re hosting a fiesta, set out bowls of sour cream, hot sauce, and extra cheese. In my NYC apartment, I often pair this with a cold Mexican lager or a tart michelada — the bubbles cut through the richness.

This casserole also freezes beautifully (see storage section), so it’s perfect for meal prep or bringing to a friend who needs a home-cooked hug.

Pairing TypeSuggestionsWhy It Works
Side DishRomaine salad, Mexican street corn, cilantro-lime riceFresh, crunchy contrast to the creamy casserole
Sauce / DipSalsa verde, sour cream, hot sauceAdds tangy, spicy, or cooling elements
BeverageMexican lager, michelada, iced hibiscus teaRefreshing and palate-cleansing
GarnishCilantro, green onions, avocado, lime wedgesBrightens flavors and adds color

Make-Ahead, Storage & Reheating

As a busy New York food blogger, I love that this casserole can be prepped on Sunday and enjoyed all week. You can assemble the entire dish (without the cheese topping) up to 2 days ahead, cover, and refrigerate. When ready to bake, add about 15 extra minutes to the covered bake time since you’re starting from cold. Leftovers are even better the next day as flavors meld.

MethodContainerDurationReheating Tip
RefrigeratorAirtight container or covered baking dishUp to 4 daysMicrowave with a damp paper towel, or oven at 350°F covered for 20 min
FreezerFreezer-safe dish or zip-top bag (portioned)Up to 3 monthsThaw overnight in fridge, then reheat in oven at 350°F until warmed through
Make-AheadAssemble in dish, cover, refrigerateUp to 2 days before bakingAdd 15 min to covered bake time; add cheese at end

For single servings, I use my toaster oven: 350°F for 12-15 minutes, covered with foil. The rice stays tender, and the cheese re-melts beautifully. Avoid reheating at high power in the microwave for too long — it can toughen the chicken. A little patience goes a long way.

Variations & Easy Swaps

VariationKey ChangeBest ForDifficulty Impact
VegetarianReplace chicken with 2 cans black beans + 1 cup diced zucchiniMeatless MondayEasy
Dairy-Free/VeganUse vegan cheese shreds or nutritional yeast, plus olive oil instead of cheeseDairy-free/vegan dietsEasy
Spicy ChipotleAdd 1-2 chopped chipotle peppers in adobo to the broth mixtureHeat loversEasy

Vegetarian Black Bean Swap

In my mother’s kitchen in Morocco, we often made tagines with chickpeas instead of meat — the same principle applies here. Omit the shredded chicken and add an extra can of black beans (drained and rinsed) plus a small diced zucchini for texture. The zucchini will release moisture as it cooks, keeping the casserole from drying out. Add a pinch of smoked paprika to maintain that earthy depth. This version is still loaded with protein and fiber, and it’s a hit at my (mostly vegetarian) dinner parties.

Dairy-Free / Vegan Option

For my lactose-intolerant friends, swap the Monterey Jack for a high-quality vegan shred (I like Follow Your Heart or Daiya). Nutritional yeast stirred into the broth adds a cheesy umami note. Use vegetable broth instead of chicken broth, and you’ve got a fully vegan burrito casserole that still feels indulgent. The texture will be slightly less gooey, but the flavor is spot-on. I’ve tested this in my tiny NYC kitchen — it works!

Spicy Chipotle Twist

If you crave heat, this is your version. Stir 1-2 minced chipotle peppers (from a can in adobo sauce) into the broth mixture before pouring over the rice. The chipotle adds a smoky, deep heat that complements the fajita seasoning beautifully. Serve with extra sour cream and pickled jalapeños to balance the fire. I love this on a cold January night when I need a little warmth from the inside out.

Can you use rotisserie chicken for an easy chicken burrito casserole?

Absolutely! Rotisserie chicken is my number one shortcut for this recipe. It’s already cooked, seasoned, and shreds like a dream. You’ll need about 5 cups of shredded meat, which is roughly one large or two small rotisserie chickens. Just remove the skin and any large fat pockets before shredding. I often pick up a pre-cooked chicken from my local market in Midtown and have this casserole assembled in under 20 minutes. The rotisserie seasoning adds a subtle smoky layer that works beautifully with the fajita spices.

Do you need to cook the rice before adding it to a chicken burrito casserole?

No, and that’s the beauty of this recipe! You add uncooked parboiled (converted) brown rice directly to the casserole dish. The rice cooks in the seasoned broth during baking, absorbing all the flavors and becoming perfectly tender. This one-pot method saves time and dishes. If you use standard long-grain white rice, it also works without precooking, but you’ll need to reduce the bake time by about 10 minutes. I never recommend using quick-cooking or minute rice here, as it turns mushy.

What can I substitute for cream of chicken soup in a burrito casserole?

This recipe doesn’t call for cream of chicken soup — instead, it uses a lighter broth-based sauce made with chicken broth, tomato paste, and green chiles. This gives you a much fresher, less processed flavor while still creating a deliciously savory binder. If you’re looking for a creamy substitution, you could whisk 1/2 cup of sour cream or full-fat coconut milk into the broth mixture. But honestly, the combination of the cheesy topping and the natural starch from the rice gives plenty of creaminess without any canned soup.

How long do you bake a chicken burrito casserole at 350°F?

While this recipe is designed for a higher 400°F oven to speed up the rice cooking and develop a nice cheese crust, you can certainly bake it at 350°F if you prefer. At the lower temperature, you’ll need to increase the covered bake time to about 80-85 minutes. Keep an eye on the liquid absorption — the rice should be tender and the casserole no longer soupy. The final uncovered cheese melt will still take about 5-10 minutes. I find the higher temperature yields a slightly better texture, but 350°F works in a pinch.

Can I make this chicken burrito casserole ahead of time?

Yes! This is one of my favorite meal-prep dishes. You can assemble the entire casserole (up to the point of baking) and refrigerate it, covered, for up to 2 days in advance. Just don’t add the cheese topping until you’re ready to bake. When you take it out of the fridge, you may need to add 15 extra minutes to the covered bake time since the dish starts cold. The flavors actually deepen as it sits, so leftovers taste even better the next day.

Is this chicken burrito casserole gluten-free?

Yes, as written, this recipe is naturally gluten-free! It uses corn tortillas? No tortillas at all — just rice, beans, chicken, and vegetables. The fajita seasoning is typically gluten-free (always check the label if store-bought, as some blends may contain anti-caking agents with gluten). I make my own blend to be safe. Serve with corn tortillas on the side if you like, or stick with gluten-free toppings like fresh salsa, avocado, and cilantro.

Can I freeze chicken burrito casserole leftovers?

Definitely! Portion cooled leftovers into airtight freezer-safe containers or zip-top bags. They’ll keep for up to 3 months. To reheat, thaw overnight in the refrigerator, then warm in a 350°F oven covered with foil for 20-25 minutes, or microwave individual servings on half power. The rice may soften slightly after freezing, but the flavor remains fantastic. I often double the recipe and freeze one whole casserole (without the cheese) for a no-effort dinner later.

What can I use instead of Monterey Jack cheese?

Monterey Jack is ideal because it melts smoothly and has a mild, buttery flavor that doesn’t overpower the other ingredients. However, you can substitute an equal amount of shredded mild cheddar, pepper jack (for heat), or even a Mexican blend. For a dairy-free option, use your favorite vegan shredded cheese — just be aware it may not brown as deeply. If you want to skip cheese entirely, try a sprinkle of nutritional yeast mixed with breadcrumbs for a crunchy, umami topping.

Can I use canned chicken instead of fresh or rotisserie?

You can, but I recommend draining and rinsing it well to remove excess sodium and metallic notes. Canned chicken tends to be finer and drier than shredded rotisserie, so the texture will be softer and less chunky. If that doesn’t bother you, go ahead — just reduce the added salt elsewhere, and consider adding a tablespoon of olive oil to the mix to boost moisture. For the best result, I always prefer rotisserie or poached chicken breasts.

How can I make this burrito casserole lower in carbs?

To cut carbs, replace the rice with cauliflower rice (frozen, thawed, and squeezed dry). Note that cauliflower rice cooks much faster, so you’ll need to reduce the covered bake time to about 25-30 minutes, then proceed with the cheese topping. Alternatively, use half the amount of rice and bulk up with extra vegetables like diced zucchini or bell peppers. The dish will be less hearty but still delicious. For a keto-friendly version, add a cup of shredded cabbage and use full-fat coconut milk in the broth.

Share Your Version!

I truly hope this Easy Chicken Burrito Casserole becomes as beloved in your home as it is in mine. There’s something magical about a dish that brings people together around the table — especially one that’s so simple to pull off. If you try it, I’d love to know how it turned out! Please leave a star rating and a comment below — your feedback helps other readers know what to expect and inspires me to keep creating.

Did you make a fun variation? Snap a photo and tag me on Instagram or Pinterest @exorecipes. I love seeing your kitchen creations! And if you have any questions about the recipe — maybe about a substitution or a timing tweak — drop them in the comments. I read every single one and answer as fast as I can. Now go preheat that oven and make some delicious memories. From my NYC kitchen to yours — I hope this recipe brings as much warmth to your table as it does to mine. — mia 🧡

📌

Love This Recipe? Save It to Pinterest!

If you enjoyed this Easy Chicken Burrito Casserole recipe, don’t let it get lost in your browser tabs! 😄 Pin it now so you can find it again anytime — and explore hundreds more tried-and-tested recipes waiting for you on my Pinterest boards.

👉 Follow mia on Pinterest @exorecipe

📌 Pin this recipe · 🔁 Re-pin your favorites · 💬 Tag me when you make it — I love seeing your creations!
Print

clock clock iconcutlery cutlery iconflag flag iconfolder folder iconinstagram instagram iconpinterest pinterest iconfacebook facebook iconprint print iconsquares squares iconheart heart iconheart solid heart solid icon

Easy Chicken Burrito Casserole

  • Author: Chef Mia

Description

If your family loves Mexican food, whip together this chicken burrito casserole recipe for an easy, low-prep dinner! It tastes like your favourite burritos yet can be made in one big casserole dish with simple ingredients. Plus, it’s loaded with protein for a satisfying and healthy meal! {Gluten-Free}


Ingredients

Scale
  • 1/2 cup finely diced onion
  • 1 red bell pepper (diced)
  • 1 cup uncooked parboiled long-grain brown rice ((can also use long grain white rice))
  • 3 tablespoons fajita seasoning ((homemade or store-bought))
  • 1/8 teaspoon cayenne pepper ((optional))
  • 1 cup corn kernels (frozen)
  • 1 14 ounce can low sodium black beans (drained and rinsed)
  • 5 cups shredded chicken
  • 3 cups reduced sodium chicken broth
  • 1 4 ounce can mild green chilies
  • 1 tablespoon olive oil
  • 2 tablespoons tomato paste
  • 1 1/4 cups shredded Monterey Jack cheese

Instructions

  1. Preheat oven to 400°F. Add onion, bell pepper, uncooked rice, fajita seasoning and cayenne (if using) to a 9×13 inch baking dish and stir to combine.
  2. In a separate bowl or measuring cup, whisk together the chicken broth, green chiles, tomato paste and olive oil until well combined.
  3. Add the broth mixture to the baking dish and stir to combine with the rice mixture.
  4. Add shredded chicken, black beans and corn to the baking dish. Give it an additional stir until well combined.
  5. Cover the baking dish with aluminium foil and then transfer to the oven to bake for 65-70 minutes or until all of the liquid is absorbed.
  6. Once complete, remove the baking dish from the oven, remove the aluminium foil, and sprinkle evenly with grated cheese.
  7. Return the baking dish to the oven for a final 5-10 minutes until the cheese has melted and is slightly golden.
  8. Remove from the oven, allow to cool for 5-10 minutes, and serve with a sprinkle of fresh cilantro, green onion, salsa and avocado, if desired.


Nutrition

  • Calories: 343 kcal
  • Sugar: 3 g
  • Fat: 14 g
  • Carbohydrates: 24 g
  • Protein: 29 g


Easy Chicken Burrito Casserole

k">

Tried This Recipe? Leave a Comment!

Did you make this recipe? I’d love to hear how it turned out! Please leave a comment and a rating below. Your feedback helps other home cooks and supports cheerychop.com!

For more delicious inspiration, follow me on Pinterest!
Crispy Baked Chicken Parmesan Ready in 30 Minutes

Baked Chicken Parmesan – Crispy, Oven‑Baked & Healthy

⚖️
Difficulty
Easy
⏲️
Prep Time
10 mins
🕒
Cook Time
20 mins
⏱️
Total Time
30 mins
🍽️
Servings
4

Growing up in Morocco, my mother’s kitchen was filled with the scent of cumin, coriander, and slow‑simmered tomato sauces. When I later trained in Paris, I fell in love with the precision of French breading techniques—but I always missed the ease of a one‑pan meal. This Baked Chicken Parmesan recipe is the best of both worlds: it brings together the crispy, golden crust you’d get from frying, but it’s baked entirely in the oven for a healthier, mess‑free dinner. In under 30 minutes you can have a restaurant‑quality dish that’s perfect for busy weeknights—and it’s already become a staple in my tiny NYC kitchen.

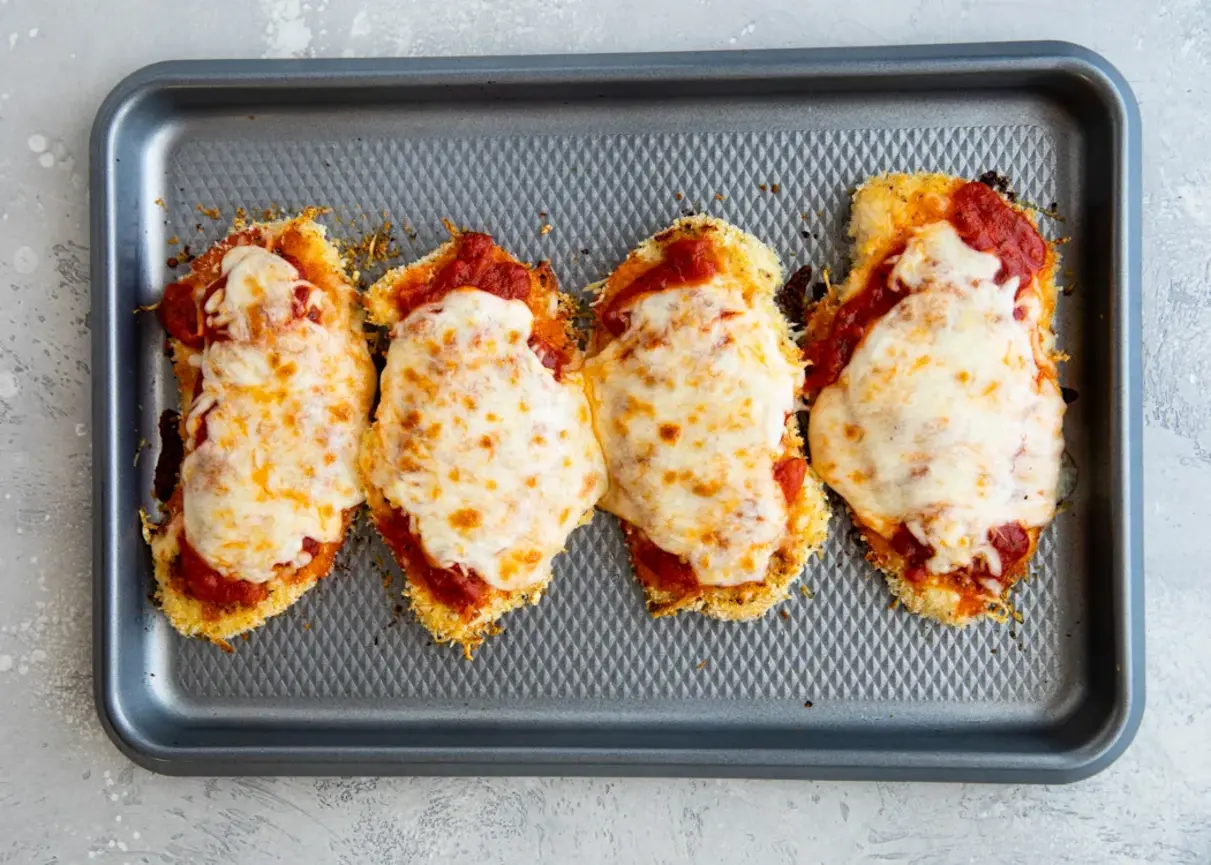
When you pull this chicken from the oven, you’ll hear the sizzle of bubbling mozzarella and smell the sweet, herbal aroma of oregano and garlic. The panko‑parmesan crust shatters with each bite, giving way to tender, juicy chicken underneath. The marinara sauce melts into the cheese, creating little pockets of rich, tangy flavor. It’s the kind of comfort food that makes you close your eyes and smile—and it’s all done without a single drop of oil for frying. I love serving it with a side of spaghetti or a crisp green salad, just like we do at the trattorias in Little Italy.

What sets my version apart is the technique I picked up in Paris: using panko breadcrumbs mixed with freshly grated Parmesan and a touch of olive oil on the pan to create an ultra‑crisp crust without deep‑frying. I also flip the chicken halfway through, ensuring both sides get that perfect golden finish. One common mistake people make is overcrowding the pan—that traps steam and makes the coating soggy. I’ll show you how to avoid that, plus my pro tip for getting the cheese to brown perfectly under the broiler. This is truly the easy Chicken Parmesan bake you’ll turn to again and again.

Why This Baked Chicken Parmesan Recipe Is the Best

The Flavor Secret: I combine North African warmth (a pinch of cumin in the breading, believe it or not) with classic Italian herbs. That subtle earthiness makes the Parmesan and mozzarella pop. The panko‑Parmesan mixture gets extra crisp because I grate the cheese myself—pre‑shredded cheese has anti‑caking agents that prevent browning.

Perfected Texture: My Paris training taught me the importance of a proper crumb coating. By dipping the chicken in egg first, then pressing firmly into the breadcrumb mix, you get a thick, even layer that stays put. Baking at 425°F (the sweet spot) gives you a crunchy exterior while the inside stays moist. Flipping the chicken partway through ensures even browning—a trick I learned from the rotisserie masters near my old apartment in the 11th arrondissement.

Foolproof & Fast: This recipe is designed for the home cook who wants big flavor without the fuss. No deep‑frying, no standing over a hot stove—just one sheet pan and 30 minutes. I’ve taught this to friends who never cook, and they nail it every time. The key is to pat the chicken dry, use a hot oven, and give the cheese a quick broil at the end. That’s it. You’ll never miss the fryer.

Baked Chicken Parmesan Ingredients

I pick up my ingredients from the Union Square Greenmarket in summer and from my local Italian deli on Arthur Avenue the rest of the year. The simplicity of this list reminds me of my mother’s one‑pot tagines—just a few quality items, each doing its job perfectly. Let’s look at what you’ll need.

Ingredients List

  • 2 chicken breasts (approx. 1 lb.)
  • 2 tablespoons olive oil (for the pan)
  • 1 cup panko bread crumbs
  • 1/2 cup grated Parmesan cheese (freshly grated)
  • 1 teaspoon garlic powder
  • 1 teaspoon dried oregano
  • 1 teaspoon salt
  • 1 large egg
  • 1 cup marinara sauce (homemade or good‑quality jarred)
  • 1 cup shredded mozzarella cheese (or 4 slices fresh mozzarella)

Ingredient Spotlight

Chicken breasts: I use boneless, skinless breasts and slice them in half lengthwise to create four thin fillets. This speeds up cooking and ensures every piece stays juicy. If you can find “air‑chilled” chicken, it has less moisture and browns better. Avoid chicken that’s been injected with broth—it will release water and ruin the crispness.

Panko breadcrumbs: Panko gives you that ultra‑crunchy, light texture that regular breadcrumbs can’t match. I buy them from the Asian section of my grocery store. For a gluten‑free version, use gluten‑free panko; the result is just as crispy.

Parmesan cheese: Always buy a block of Parmigiano‑Reggiano and grate it yourself. Pre‑grated cheese contains cellulose and won’t melt into the crust as beautifully. The nutty, salty flavor is irreplaceable.

Marinara sauce: I use a simple, low‑sugar sauce. If you have time, make my 20‑minute marinara with San Marzano tomatoes, garlic, and basil. For a shortcut, Rao’s or Mutti are excellent choices.

Original IngredientBest SubstitutionFlavor / Texture Impact
Chicken breastChicken thighs (boneless, skinless)Slightly richer, more forgiving; slightly longer bake time
Panko breadcrumbsGluten‑free panko or crushed pork rinds (keto)GF panko identical; pork rinds add extra crunch and protein
Parmesan cheesePecorino Romano (sharper, saltier)More tangy, use a little less salt
Marinara sauceArrabbiata (spicy) or basil pesto (white pizza style)Arrabbiata adds heat; pesto gives a bright, herbaceous twist

How to Make Baked Chicken Parmesan — Step‑by‑Step

Trust me, this is easier than you think. Follow these steps, and you’ll have a golden, cheesy masterpiece that rivals any Italian restaurant.

Step 1: Preheat and Prep

Preheat your oven to 425°F. Grease a rimmed sheet pan with 2 tablespoons of olive oil, spreading it evenly with a brush or paper towel. Set the pan aside.

💡 mia’s Pro Tip: Use a light‑colored baking sheet—dark pans absorb more heat and can burn the bottom of the crust before the chicken is cooked through.

Step 2: Slice and Pound

Slice each chicken breast in half lengthwise to make 4 fillets total. Place them between two sheets of plastic wrap and gently pound to an even ¼‑inch thickness with a rolling pin or meat mallet. This ensures uniform cooking.

⚠️ Common Mistake to Avoid: Don’t skip the pounding—uneven chicken will dry out on the thinner side and still be raw in the thicker part.

Step 3: Mix the Breading

In a shallow bowl, combine 1 cup panko breadcrumbs, ½ cup grated Parmesan, 1 teaspoon garlic powder, 1 teaspoon dried oregano, and 1 teaspoon salt. In a separate small bowl, whisk the egg until frothy.

💡 mia’s Pro Tip: Add a pinch of black pepper and a tiny pinch of cayenne for a subtle kick—my Moroccan twist on the classic.

Step 4: Coat the Chicken

Dip each chicken fillet into the egg mixture, letting the excess drip off, then press firmly into the breadcrumb mixture, coating both sides well. Transfer to the prepared baking sheet in a single layer, not touching.

⚠️ Common Mistake to Avoid: Don’t crowd the pan. If the fillets touch, they’ll steam instead of crisp. Use two pans if necessary.

Step 5: First Bake

Bake for 15 minutes. The coating should be golden brown and the chicken almost cooked through.

💡 mia’s Pro Tip: Use tongs to flip each piece carefully. If the coating sticks, let it bake 2 more minutes—it releases when properly browned.

Step 6: Top and Finish

Flip each piece onto the other side. Top each with 3–4 tablespoons of marinara sauce and a generous handful of shredded mozzarella (or 1 slice of fresh mozzarella). Return to the oven and bake 5–7 more minutes, until the cheese is melted and bubbly.

💡 mia’s Pro Tip: For that gorgeous browned cheese, switch the oven to broil for the last 2–3 minutes. Watch closely so it doesn’t burn—it goes from perfect to charred fast!

StepActionDurationKey Visual Cue
1Preheat, oil pan, prep chickenOil shimmering on pan
2Slice & pound chicken2–3 minsEven ¼‑inch thickness
3Mix breading, whisk egg2 minsUniform crumb mixture
4Coat chicken and arrange on pan5 minsFillets not touching
5Bake first side15 minsGolden brown crust
6Flip, top with sauce & cheese, bake5–7 minsCheese melted, bubbling

Serving & Presentation

I love serving this crispy oven‑baked chicken Parmesan right on the sheet pan—it keeps the crust crunchy and makes for a rustic, family‑style presentation. But if you’re plating individual portions, slide each chicken cutlet onto a warm plate and spoon a little extra marinara around the edges. Sprinkle with fresh basil or parsley, and finish with a dusting of extra Parmesan. The bright green against the red sauce and golden cheese is pure art on a plate.

In my NYC apartment, I pair it with a simple arugula salad dressed with lemon and olive oil—the peppery greens cut through the richness. Or you can go the classic route: spaghetti tossed in garlic and oil, or a side of roasted broccoli. For a taste of my Moroccan roots, I sometimes serve it with a side of harissa‑spiced roasted carrots—the heat and sweetness complement the chicken beautifully.

💡 mia’s Pro Tip: Let the chicken rest for 2–3 minutes after baking before serving. This lets the cheese set slightly so it doesn’t slide off when you cut into it.

Pairing TypeSuggestionsWhy It Works
Side DishSpaghetti aglio e olio, roasted broccoli, arugula saladLight pasta or greens balance the rich, cheesy chicken
Sauce / DipExtra marinara, garlic aioli, balsamic glazeAdds moisture and contrasting acidity
BeverageChianti, Pinot Noir, sparkling water with lemonWine’s tannins cut through fat; sparkling cleans the palate
GarnishFresh basil, parsley, red pepper flakes, extra ParmesanAdds color, freshness, and a final burst of flavor

Make‑Ahead, Storage & Reheating

On busy New York weeks, I often prep the breaded chicken the night before and store it in the fridge. Then all I have to do is bake and top with sauce and cheese when I walk in the door. Here’s how to store and reheat for the best results.

MethodContainerDurationReheating Tip
RefrigeratorAir‑tight container (separate layers with parchment)Up to 3 daysReheat in a 375°F oven on a wire rack for 8–10 mins to restore crispness
FreezerFreeze on a sheet pan, then transfer to freezer‑safe bagUp to 3 monthsBake from frozen at 400°F for 18–20 mins, add cheese halfway
Make‑AheadRefrigerator on parchment‑lined plate, coveredUp to 24 hours before bakingBread but don’t add sauce/cheese until ready to bake; add 2–3 mins to total time

The most important rule for reheating: never microwave leftover chicken Parmesan! The microwave turns the crispy coating into a soggy mess. Instead, use the oven or an air fryer (350°F for 5–6 minutes) to revive that crunch. If you have leftover sauce, store it separately and spoon fresh over the reheated chicken.

💡 mia’s Pro Tip: For meal‑prep, I bread and freeze the raw chicken cutlets individually on a sheet pan. Once frozen, I stack them in a bag with parchment between. When I’m ready, I bake straight from frozen, adding 5 extra minutes to the first bake.

Variations & Easy Swaps

VariationKey ChangeBest ForDifficulty Impact
Spicy Harissa Chicken ParmAdd 1 tsp harissa paste to egg wash; swap oregano for cuminHeat lovers, North African flairEasy
Gluten‑Free / KetoUse almond flour + crushed pork rinds instead of panko; bread with egg + oilLow‑carb, gluten‑free dietsEasy
Eggplant Parmesan (Vegetarian)Substitute sliced eggplant for chicken; salt and press to remove moistureMeatless Monday, vegetariansMedium (eggplant needs extra prep)

Spicy Harissa Chicken Parm

This is my personal favorite—a nod to my Moroccan roots. Stir a teaspoon of harissa paste into the beaten egg before dipping the chicken. Replace the dried oregano with a teaspoon of ground cumin. The harissa adds a smoky, fiery depth that pairs beautifully with the sweet marinara and creamy mozzarella. Serve with a dollop of labneh or yogurt to cool the heat. It’s become a cult favorite among my NYC dinner guests.

Gluten‑Free / Keto Version

For a completely gluten‑free and low‑carb version, skip the panko and use a mixture of ½ cup almond flour, ½ cup crushed pork rinds, and the same Parmesan. The pork rinds provide an incredible crunch that rivals traditional breadcrumbs. I’ve tested this at a friend’s keto dinner party, and everyone—even the non‑keto folks—asked for seconds. Just note that the bake time may reduce by 2 minutes, so check for doneness early.

Eggplant Parmesan

When I’m craving a meatless version, I use large, firm eggplants sliced into ½‑inch rounds. The key is to salt them for 30 minutes, then pat dry to remove bitterness and excess moisture. Proceed with the same breading and bake—eggplant takes about 18 minutes on the first side. It’s a classic Italian favorite that I remember eating at a tiny trattoria near the Louvre during my Paris years.

How do you keep baked chicken Parmesan from getting soggy?

The number one cause of soggy baked chicken Parmesan is too much moisture. Start by patting the chicken completely dry with paper towels. Next, don’t skip the step of greasing the pan with olive oil before adding the breaded chicken—the oil helps the bottom crisp. Bake at a high temperature (425°F) and avoid overcrowding the pan; if the fillets touch, they steam. Finally, flip the chicken halfway through baking so both sides get direct heat. For extra insurance, place the chicken on a wire rack set inside the baking sheet—air circulates underneath and keeps the crust crunchy.

Can I use pre-shredded mozzarella for chicken Parmesan?

Technically yes, but I strongly advise against it for the best results. Pre‑shredded mozzarella is coated with anti‑caking agents (like potato starch or cellulose) that prevent it from melting into a smooth, creamy layer. Instead, it tends to stay grainy and may not brown as nicely under the broiler. I recommend buying a block of whole‑milk mozzarella and shredding it yourself, or using fresh mozzarella slices. The fresh mozzarella will give you those gorgeous, bubbly cheese pools that make chicken Parmesan so irresistible.

What temperature should baked chicken Parmesan be cooked to?

Chicken is safe to eat when it reaches an internal temperature of 165°F as measured by an instant‑read thermometer inserted into the thickest part of the fillet. Since we’re using thin cutlets (pounded to ¼ inch), they’ll reach that temperature quickly—usually by the end of the 15‑minute first bake. After adding the sauce and cheese, the second bake of 5–7 minutes will take it well past 165°F. For the juiciest result, I pull the chicken out at about 160°F and let it rest for 2–3 minutes; carryover cooking will bring it to 165°F without drying it out.

What can I serve as a side dish with baked chicken Parmesan?

There are so many wonderful options! Classic pairings include spaghetti with marinara or aglio e olio, a simple green salad with vinaigrette, roasted broccoli or asparagus, garlic bread, or even creamy polenta. I also love serving it with a side of sautéed spinach and white beans for a hearty, nutrient‑packed meal. For a lighter touch, try a shaved fennel and orange salad—the bright, citrusy flavors cut through the richness of the cheese. And if you’re feeling adventurous, roasted sweet potato wedges with smoked paprika echo the Moroccan spice notes I often use.

Can I make baked chicken Parmesan ahead of time?

Absolutely! The best make‑ahead method is to bread the chicken cutlets, place them on a parchment‑lined baking sheet, and refrigerate (uncovered for 1 hour to dry the coating, then cover) for up to 24 hours. When you’re ready to serve, simply bake as directed. You can also fully bake the chicken (without sauce and cheese), cool it, and refrigerate for up to 3 days. When reheating, add the sauce and cheese, then bake at 375°F until hot and bubbly. I don’t recommend freezing the fully assembled dish because the sauce can make the crust soft upon thawing.

Why is my breading falling off the chicken?

This usually happens for a couple of reasons. First, make sure the chicken is dry before dipping—any wet spots will create steam that loosens the coating. Second, press the breadcrumb mixture firmly onto the chicken; don’t just lightly dust it. I like to use one hand for the wet ingredients and the other for the dry, so I don’t end up with clumpy fingers. Third, let the breaded chicken rest on the pan for about 5 minutes before baking. This gives the egg time to “glue” the crumbs to the meat. Finally, use a good amount of breadcrumbs—each fillet should be completely covered with no chicken showing.

Can I use chicken thighs instead of breasts?

Yes, boneless, skinless chicken thighs work beautifully in this recipe. They’re more forgiving because they stay juicy even if cooked a little longer. Because thighs are a bit thicker than pounded breast cutlets, I recommend baking them for an extra 3–4 minutes on the first side (about 18 minutes total). Pound them to an even thickness if possible. The flavor is richer, and many people prefer the texture. Just note that thighs may release a little more fat, so place them on a wire rack if you want extra‑crisp bottoms.

How do I get the cheese perfectly browned without burning?

The best trick is to finish under the broiler for the last 2–3 minutes. Make sure your oven rack is about 6 inches from the heating element. Keep a close eye on it—cheese can go from golden to black in seconds. For even browning, use freshly shredded mozzarella (not the wet, fresh slices, which can turn rubbery under high heat). I also like to sprinkle a little extra grated Parmesan on top before broiling; Parmesan browns quickly and adds a nutty, salty crust.

Is baked chicken Parmesan healthier than fried?

Definitely! Traditional chicken Parmesan is breaded and deep‑fried, which can add hundreds of calories and a lot of saturated fat. In this baked version, we use just 2 tablespoons of olive oil to grease the pan and rely on the high oven heat to crisp the panko coating. The result is chicken that’s still wonderfully crunchy but with fewer calories and less fat—about 401 calories and 21g fat per serving compared to likely 500+ for the fried version. You also avoid the mess and smell of deep‑frying. It’s a win‑win for health and convenience.

What’s the best marinara sauce to use?

For the best flavor, I recommend a sauce that’s low in added sugar and made with high‑quality tomatoes. My top store‑bought picks are Rao’s Homemade Marinara (rich, slightly sweet, and thick), Mutti Pelati (great base you can doctor up), and Victoria Fine Foods (simple and clean). If you have 20 minutes, make your own: sauté 2 minced garlic cloves in 2 tablespoons olive oil, add one 28‑ounce can of San Marzano tomatoes (crushed by hand), a pinch of salt, and a few basil leaves. Simmer for 15 minutes. It’s night‑and‑day better than most jarred sauces and takes almost no effort.

Share Your Version!

I love hearing how you put your own spin on this homemade Chicken Parmesan. Did you try the spicy harissa twist? Or maybe you discovered a new side dish that paired perfectly? Drop a star rating and a comment below—I read every single one and it makes my day! And if you share a photo on Instagram or Pinterest, tag me @exorecipes so I can share your creation with our community.

Here’s a question for you: what’s one ingredient you always add to chicken Parmesan that’s a little unconventional? For me, it’s a pinch of cinnamon in the breadcrumbs—a subtle warmth I learned from my mother’s lamb tagine. I’d love to know your secret twist!

From my NYC kitchen to yours — I hope this recipe brings as much warmth to your table as it does to mine. — mia 🧡

📌

Love This Recipe? Save It to Pinterest!

If you enjoyed this Baked Chicken Parmesan recipe, don’t let it get lost in your browser tabs! 😄 Pin it now so you can find it again anytime — and explore hundreds more tried-and-tested recipes waiting for you on my Pinterest boards.

👉 Follow mia on Pinterest @exorecipe

📌 Pin this recipe · 🔁 Re-pin your favorites · 💬 Tag me when you make it — I love seeing your creations!

Print

clock clock iconcutlery cutlery iconflag flag iconfolder folder iconinstagram instagram iconpinterest pinterest iconfacebook facebook iconprint print iconsquares squares iconheart heart iconheart solid heart solid icon

Baked Chicken Parmesan

  • Author: Chef Mia

Description

Healthy oven baked chicken parmesan is crispy on the outside and tender on the inside with no frying required. This easy method makes the most FLAVORFUL chicken parmesan in under 30 minutes!


Ingredients

Scale
  • 2 chicken breasts ((approx. 1lb.))
  • 2 tablespoons olive oil
  • 1 cup panko bread crumbs
  • 1/2 cup parmesan cheese
  • 1 teaspoon garlic powder
  • 1 teaspoon dried oregano
  • 1 teaspoon salt
  • 1 egg
  • 1 cup marinara sauce
  • 1 cup shredded mozzarella ((or 4 slices fresh mozzarella))

Instructions

  1. Preheat the oven to 425F. Grease a sheet pan with 2 tablespoon olive oil and set aside.
  2. Slice chicken breasts in half lengthwise to make 4 fillets total. Pound to even thickness if desired.
  3. In a shallow bowl, combine the panko breadcrumbs, parmesan, garlic powder, oregano, salt & pepper. In a small bowl, whisk the egg.
  4. Dip each chicken fillet into the egg mixture then into the bread crumb mixture, coating both sides well. Transfer to the prepared baking sheet.
  5. Bake for 15 minutes then flip onto the other side and top each chicken with 3-4 tablespoons of marinara sauce and a generous handful of mozzarella cheese (or 1 fresh slice).
  6. Return to the oven and bake an additional 5-7 minutes or until the cheese is melted and the chicken is cooked through. Brown under broiler for 2-3 minutes if desired.


Nutrition

  • Calories: 401 kcal
  • Sugar: 4 g
  • Fat: 21 g
  • Carbohydrates: 16 g
  • Protein: 36 g


Baked Chicken Parmesan

ph">For more delicious inspiration, follow me on Pinterest!

Creamy Oven Baked Chicken Thighs – Juicy & Rich

Creamy Oven Baked Chicken Thighs – One-Pan Creamy Garlic Parmesan Perfection

⚖️
Difficulty
Easy
⏲️
Prep Time
10 mins
🕒
Cook Time
35 mins
⏱️
Total Time
45 mins
🍽️
Servings
5 thighs
🔥
Calories
583 kcal

There are some recipes that just feel like a warm hug, and these Creamy Oven Baked Chicken Thighs are exactly that for me. Standing in my tiny NYC kitchen on a chilly evening, the sizzle of chicken hitting a hot cast-iron skillet instantly takes me back—halfway across the world to my mother’s kitchen in Morocco, where a simple tagine could fill the whole house with an intoxicating warmth. This easy oven baked chicken recipe is my love letter to those memories, filtered through years of French culinary training in Paris and honed in my busy American kitchen. It’s the ultimate weeknight luxury: juicy, tender chicken thighs enveloped in a velvety garlic parmesan sauce that’s pure comfort.

Imagine cutting into a perfectly baked chicken thigh—the meat is so tender it practically falls apart, bathed in a rich, creamy sauce that clings to every bite. The aroma of garlic and Parmesan bubbling together in the oven is simply irresistible. The sauce itself is a beautiful, pale gold, speckled with fragrant dill and shimmering with the richness of heavy cream. It has that glossy, luscious texture that you usually only get at a restaurant, achieved right in your own oven. It’s the kind of meal that feels fancy enough for a special dinner, but is easy enough to pull off on a busy Tuesday night after a long day.

I’ve tested this baked chicken thighs recipe more times than I can count, and I’m so excited to share my foolproof version with you. The secret is in the method: a quick sear to lock in flavor, followed by a gentle bake in the oven that ensures the chicken stays incredibly moist and the sauce remains perfectly smooth without curdling. Over the years, I’ve learned exactly what works—and what doesn’t. I’ll walk you through every detail, from selecting the right pan to mastering the sauce. Let’s make your new go-to creamy chicken dish.

Why This Creamy Oven Baked Chicken Thighs Recipe Is the Best

The Flavor Secret. Growing up in Morocco, I learned the power of a well-balanced spice blend. My “21 Salute” seasoning (or your favorite poultry seasoning) creates an incredible savory crust on the chicken. Pair that with the richness of a French-style pan sauce—garlic, white wine, cream, and Parmesan—and you get a dish that’s both deeply comforting and sophisticated. It’s the best of my worlds, right in one pan.

Perfected Texture. The number one issue I see with creamy baked chicken is dry meat or a broken, greasy sauce. I tackle both problems head-on. First, we sear the chicken thighs just until golden—this locks in moisture. Then, instead of baking for hours, we use a moderate 375°F oven which gently cooks the chicken through, while the flour in the sauce acts as a stabilizer, preventing curdling. The result is chicken that is fall-apart tender, and a sauce that stays smooth and luscious.

Foolproof & Fast. This entire dish comes together in one oven-proof skillet (less cleanup!), and from start to finish, it takes just 45 minutes. It’s designed for real life. Whether you’re a seasoned cook or making your first creamy chicken thighs recipe, the steps are clear and easy to follow. I’ve included all my best pro tips and common mistakes to avoid, so you can be confident that this easy oven baked chicken will come out perfectly every single time.

Creamy Oven Baked Chicken Thighs Ingredients

I love picking up my ingredients at the Union Square Greenmarket or my local Trader Joe’s—they always have the best quality chicken and fresh herbs. This short list of simple, honest ingredients comes together to create something truly magical. Let’s look at what you’ll need.

Ingredients List

  • 5 chicken thighs (skinless & boneless, dried with paper towel)
  • 1 teaspoon 21 Salute Seasoning (from Trader Joe’s or use any poultry seasoning of your choice)
  • salt & pepper (to taste)
  • 2 tablespoons butter (unsalted)
  • 2 tablespoons garlic (finely chopped)
  • 2 tablespoons flour
  • 1 cup chicken broth
  • 1/2 cup heavy whipping cream
  • 1/2 cup Parmesan cheese (finely grated)
  • salt & pepper (to taste)
  • 2 teaspoon dill (finely chopped for garnish, optional)

Ingredient Spotlight

Chicken Thighs: Boneless, skinless thighs are ideal for this recipe. They have a higher fat content than breasts, which means they stay incredibly moist and flavorful during baking. Look for thighs that are roughly the same size so they cook evenly. At your grocery store, check the sell-by date and go for organic if your budget allows—the flavor difference is noticeable.

21 Salute Seasoning: This is my not-so-secret weapon! Trader Joe’s 21 Salute is a fantastic, salt-free blend of onion, garlic, black pepper, celery seed, and herbs. It adds a beautiful, savory complexity to the chicken. If you don’t have it, any poultry seasoning or a simple mix of thyme, rosemary, and garlic powder will work beautifully.

Heavy Whipping Cream: This is non-negotiable for the most velvety, luscious sauce. It provides the rich, decadent texture that makes this dish so special. For the best results, use full-fat heavy cream. It’s much more stable and will not curdle over low heat, especially when combined with the flour in the recipe.

Original IngredientBest SubstitutionFlavor / Texture Impact
21 Salute SeasoningPoultry seasoning + garlic powderSlightly different herb profile, but still aromatic and savory. Add a pinch of celery salt if you have it.
Heavy Whipping CreamHalf & Half + 1 tbsp melted butterLighter sauce, less decadent but still creamy. The butter helps mimic heavy cream’s richness.
Parmesan CheesePecorino Romano or Grana PadanoPecorino is saltier and sharper; Grana Padano is milder and nuttier. Both melt beautifully.
Chicken BrothDry white wine (like Sauvignon Blanc)Adds a wonderful acidity and depth of flavor. Use half broth, half wine for the best results.

How to Make Creamy Oven Baked Chicken Thighs — Step-by-Step

Don’t worry, this creamy chicken thighs recipe is incredibly straightforward. I’ll guide you through each simple step, and my pro tips will ensure you get perfect results every single time.

Step 1: Sear the Chicken

First, preheat your oven to 375°F (190°C). Season the chicken thighs generously on both sides with the 21 Salute seasoning, salt, and pepper. Melt 2 tablespoons of butter in a large oven-proof skillet over medium-high heat. Once the butter is foaming, carefully place the chicken thighs in the skillet, smooth side down. Sear for 2-3 minutes per side, until deeply golden brown. Transfer the seared chicken to a plate and set aside.

💡 mia’s Pro Tip: For the best crust, it is non-negotiable to pat the chicken thighs completely dry with paper towels before seasoning. Moisture is the enemy of browning!

Step 2: Sauté the Garlic

Reduce the heat to medium. Add the remaining 2 tablespoons of butter to the same skillet. Once it has melted, add the finely chopped garlic. Sauté for about 1 minute, stirring constantly, until it is fragrant but not browned. Burnt garlic will taste bitter, so watch it carefully.

⚠️ Common Mistake to Avoid: Overcooking the garlic. It can go from perfectly aromatic to burnt and acrid in seconds. Stir it constantly and remove the pan from the heat briefly if it’s cooking too fast.

Step 3: Build the Roux

Sprinkle the 2 tablespoons of flour over the garlic-butter mixture. Stir continuously with a wooden spoon for about 1 minute. This cooks the raw flour taste out and creates a roux, which is the essential thickening agent for our creamy sauce and the key to preventing curdling.

Step 4: Create the Creamy Sauce

Slowly pour in the chicken broth while whisking vigorously to prevent lumps from forming. Cook for 1-2 minutes, stirring continuously, until the sauce thickens slightly. Lower the heat to low and pour in the heavy whipping cream, stirring to combine. Finally, add the grated Parmesan cheese and stir until it is fully melted and the sauce is smooth. Taste the sauce and adjust the salt and pepper as needed. It should be rich, savory, and garlicky.

💡 mia’s Pro Tip: Add the cream on low heat and never let it boil. High heat is the primary reason a cream sauce will break or curdle. Gentle heat ensures it stays velvety smooth.

Step 5: Bake to Perfection

Return the seared chicken thighs to the skillet, nestling them into the sauce. Spoon some of the sauce over the top of each thigh so they aren’t dry. Place the skillet in the preheated oven, uncovered, and bake for 30-35 minutes. The chicken is done when it is cooked through (internal temperature of 165°F / 74°C) and incredibly tender. The sauce will have thickened beautifully.

⚠️ Common Mistake to Avoid: Overcrowding the pan. Your skillet should be large enough to hold the chicken thighs in a single layer with space around them. If they are crowded, they will steam instead of sear.

Step 6: Garnish and Serve

Remove the skillet from the oven and let it rest for 5 minutes before serving. This allows the juices to redistribute. Garnish with freshly chopped dill and an extra sprinkle of Parmesan cheese for a beautiful, finished look. Then, get ready to enjoy the most incredible creamy baked chicken of your life!

StepActionDurationKey Visual Cue
1Sear Chicken4-6 minsDeep golden brown crust on both sides
2Sauté Garlic1 minFragrant, garlic is soft but not colored
3Build Roux1 minSmooth, bubbly paste
4Finish Sauce2-3 minsSmooth, creamy, coats the back of a spoon
5Bake30-35 minsChicken cooked through, sauce is bubbly and thick

Serving & Presentation

These creamy oven baked chicken thighs are incredibly versatile. I love serving them over a bed of fluffy egg noodles or creamy mashed potatoes to soak up every last drop of that luscious sauce. If I’m feeling nostalgic for Paris, I’ll pair them with a side of steamed green beans or a simple, buttery French salad. Back in my mom’s kitchen in Morocco, we would always have a basket of warm, crusty bread for scooping up the sauce—that’s my number one recommendation.

For the prettiest presentation, I serve the chicken straight from the skillet—it’s rustic and so inviting. Spoon extra sauce over the top, sprinkle with fresh dill and a generous final flourish of finely grated Parmesan cheese. The vibrant green of the dill against the creamy, golden sauce is stunning. It’s a dish that feels elegant and soul-satisfying at the same time.

Pairing TypeSuggestionsWhy It Works
Side DishEgg noodles, mashed potatoes, rice, crusty breadAll these starchy sides are like a sponge for the creamy sauce.
VegetableSteamed broccoli, green beans, roasted asparagusThe bright, clean flavor of these veggies cuts through the richness.
BeverageChilled Sauvignon Blanc, light Chardonnay, sparkling water with lemonAcidic white wines balance the creamy, buttery sauce perfectly.
GarnishFresh dill, fresh parsley, chives, extra ParmesanFresh herbs add a pop of color and a fresh, bright finish.

Make-Ahead, Storage & Reheating

In my busy NYC life, meal prep is a lifesaver. This recipe is fantastic for making ahead. The flavors actually meld and deepen overnight, making the leftovers taste even better. Here’s my simple guide to storing and reheating this creamy chicken dish properly so the sauce stays perfect.

MethodContainerDurationReheating Tip
RefrigeratorAirtight containerUp to 4 daysReheat gently on the stovetop over low heat, stirring occasionally. Add a splash of milk or broth if the sauce has thickened too much.
FreezerFreezer-safe containerUp to 2 monthsThaw overnight in the refrigerator. Reheat in a covered skillet in a 300°F oven for 15-20 minutes, or until heated through.
Make-AheadIn the skillet1 day in advanceSear the chicken and make the sauce. Cover and refrigerate. When ready to bake, add 5-10 minutes to the oven time.

💡 mia’s Pro Tip: The most important rule for reheating creamy sauces is to use gentle, low heat. High heat will cause the cream to break and become oily. If you are using the microwave, use 50% power and stir every 30 seconds.

Variations & Easy Swaps

One of the things I love most about this recipe is how endlessly adaptable it is. You can easily play with the flavors to keep it exciting. Here are a few of my favorite variations.

VariationKey ChangeBest ForDifficulty Impact
Lemon & HerbAdd 1 tsp lemon zest and 1 tbsp lemon juice to the sauce.A brighter, fresher version perfect for spring.Easy
Mushroom & ThymeSauté 8 oz sliced cremini mushrooms with the garlic.Earthy, rich depth. A classic French bistro twist.Easy
Spicy HarissaStir 1-2 tbsp of harissa paste into the sauce.A nod to my Moroccan roots! Adds incredible warmth and a mild kick.Easy

Lemon & Herb

This is my go-to when I want a cream sauce that feels a little lighter and brighter. The lemon zest and juice cut through the richness beautifully, much like a classic French beurre blanc. Add the zest along with the garlic, and stir in the juice at the very end before serving. Use a mix of fresh dill and parsley for a beautiful, fresh finish.

Mushroom & Thyme

For a hearty, earthy version, this is absolutely divine. After removing the seared chicken, add a little extra butter and sauté sliced cremini mushrooms until they are golden brown. Then, proceed with the garlic and the rest of the recipe as written. The mushrooms release a savory umami flavor that makes the sauce even more complex and delicious. It’s like a trip to a Parisian bistro!

Dairy-Free & Gluten-Free Version

Don’t let dietary restrictions keep you from enjoying this creamy chicken thigh recipe! This easy oven baked chicken can be made dairy-free by substituting the butter with a high-quality vegan butter or olive oil, and the heavy cream with a can of full-fat coconut cream (the thick part from a refrigerated can of coconut milk). For the Parmesan, use a dairy-free grated alternative. To make it gluten-free, swap the all-purpose flour for a 1:1 gluten-free flour blend or cornstarch.

Frequently Asked Questions (FAQ)

Can I use boneless skinless chicken thighs instead of bone-in for creamy oven baked chicken thighs?

Absolutely! This recipe is written specifically for boneless, skinless chicken thighs, which are perfect for this dish because they are quick-cooking, incredibly tender, and easy to portion. Bone-in, skin-on thighs will also work, but you will need to increase the baking time by about 10-15 minutes, and you may want to crisp the skin separately if you prefer it crunchy. If using bone-in, check the internal temperature reaches 165°F / 74°C near the bone.

What temperature should you bake creamy chicken thighs at to keep them tender?

For this recipe, you should bake the creamy chicken thighs at 375°F (190°C). This is the perfect temperature for a few reasons. It is high enough to gently cook the chicken through in a reasonable time (30-35 minutes), but not so high that the heavy cream sauce will boil and separate. This moderate, even heat in the oven is the secret to keeping your chicken thighs exceptionally juicy and your cream sauce silky smooth without curdling.

How do you prevent the creamy sauce from curdling when baking chicken thighs?

This is the most important part of a creamy baked chicken recipe, and I have a few foolproof tips. First, and most crucially, we use a flour roux at the beginning, which stabilizes the cream and prevents it from breaking. Second, always add the heavy cream on low heat and do not let the sauce boil—a gentle simmer is perfectly fine. Finally, bake the dish uncovered at a moderate 375°F. These three steps together guarantee a perfectly smooth, velvety sauce every single time.

What can I substitute for heavy cream in creamy oven baked chicken thighs?

If you don’t have heavy cream, there are a few good substitutes, though they will alter the final texture slightly. The best substitute is to use half & half combined with a tablespoon of melted butter to add back some fat. Another option is full-fat coconut milk (the canned variety), which will give you a dairy-free, slightly coconut-tinged creaminess. You can also use 2/3 cup of whole milk mixed with 1/3 cup of melted butter, whisked together. Avoid skim milk or half & half alone, as they may curdle more easily.

Can I use chicken breasts instead of thighs in this easy oven baked chicken recipe?

Yes, you can absolutely substitute boneless, skinless chicken breasts for the thighs. However, chicken breasts are leaner and cook faster, so you need to adjust the timing to prevent them from drying out. I recommend using a meat mallet to pound the breasts to an even thickness of about 1 inch. Sear them for 2 minutes per side as directed, but reduce the oven baking time to 20-25 minutes, checking for doneness at 165°F / 74°C with an instant-read thermometer.

What is 21 Salute Seasoning and what can I use instead?

21 Salute Seasoning is a popular blend from Trader Joe’s. It is a salt-free seasoning mix that contains a fantastic combination of onion, garlic, black pepper, celery seed, cayenne, and a variety of dried herbs like thyme, rosemary, and oregano. It adds a wonderful, savory depth to the chicken without adding extra salt. If you don’t have it, you can easily substitute it with any poultry seasoning mix, or make your own by combining 1/2 teaspoon each of garlic powder, onion powder, and dried thyme.

Can I add vegetables to this creamy oven baked chicken thighs recipe?

Definitely! Adding vegetables makes it a complete one-pan meal. I recommend adding vegetables that will hold up well to a 30-minute bake. Mushrooms are a classic choice—just sauté them along with the garlic. You can also stir in a handful of fresh spinach or chopped kale right before adding the chicken back to the skillet before baking. For a heartier option, blanch some broccoli florets or green beans and nestle them into the sauce around the chicken before it goes into the oven.

What should I do if my sauce is too thin or too thick?

Both issues are easy to fix! If your sauce is too thin after baking, remove the chicken from the skillet and place the skillet on the stovetop over medium heat. Let the sauce simmer for 3-5 minutes, stirring often, until it reduces and thickens to your liking. If your sauce is too thick, simply whisk in a splash of warm chicken broth, milk, or even water until it reaches your desired consistency. The best way to get it right is to use the visual cue from the recipe: it should easily coat the back of a spoon.

How do I store and reheat leftover creamy baked chicken thighs?

Storing leftovers is easy and this dish tastes amazing the next day! Allow the chicken and sauce to cool completely, then transfer them to an airtight container. It will keep well in the refrigerator for up to 4 days. The best way to reheat is gently on the stovetop over low heat, stirring the sauce occasionally to prevent it from sticking or breaking. You can also reheat it in a covered dish in a 300°F oven for 15-20 minutes. If the sauce seems too thick, stir in a splash of milk or broth.

Can I freeze creamy oven baked chicken thighs?

Yes, this recipe freezes quite well! Because the sauce is stabilized with flour, it holds up much better to freezing than a simple cream sauce. Place the cooled chicken and sauce in a freezer-safe, airtight container or a heavy-duty zip-top bag. Lay the bag flat to save space. It can be frozen for up to 2 months. To serve, thaw it overnight in the refrigerator. For the best texture, reheat it gently in a covered skillet in a 300°F oven, stirring occasionally, until it is hot and bubbly.

Share Your Version!

I truly hope you love making these Creamy Oven Baked Chicken Thighs as much as I do. There is something so satisfying about pulling a golden, bubbling skillet out of the oven and knowing a delicious, comforting meal is ready to be enjoyed. It reminds me that no matter how busy life gets in this crazy city, taking the time to cook a simple, beautiful meal is always worth it.

I’d love to hear how yours turn out! Did you try one of the variations like the spicy harissa or the lemon herb? Leave a star rating and a comment below—I read every single one and it makes my day to hear from you. Don’t forget to tag me in your photos on Instagram or Pinterest @exorecipe. Your kitchen creations are my biggest inspiration!

From my NYC kitchen to yours — I hope this recipe brings as much warmth to your table as it does to mine. — mia 🧡

This post may contain affiliate links, which means I earn a small commission at no extra cost to you. As an Amazon Associate, I earn from qualifying purchases.

📌

Love This Recipe? Save It to Pinterest!

If you enjoyed this Creamy Oven Baked Chicken Thighs recipe, don’t let it get lost in your browser tabs! 😄 Pin it now so you can find it again anytime — and explore hundreds more tried-and-tested recipes waiting for you on my Pinterest boards.

👉 Follow mia on Pinterest @exorecipe

📌 Pin this recipe · 🔁 Re-pin your favorites · 💬 Tag me when you make it — I love seeing your creations!

Print

clock clock iconcutlery cutlery iconflag flag iconfolder folder iconinstagram instagram iconpinterest pinterest iconfacebook facebook iconprint print iconsquares squares iconheart heart iconheart solid heart solid icon

Creamy Oven Baked Chicken Thighs

  • Author: Chef Mia

Description

Creamy Oven Baked Chicken Thighs – seared chicken thighs cooked in a creamy garlic sauce.


Ingredients

Scale
  • 5 chicken thighs (skinless & boneless, dried with paper towel)
  • 1 teaspoon 21 Salute Seasoning (from Trader Joe's or use any poultry seasoning of your choice)
  • salt & pepper (to taste)
  • 2 tablespoons butter (unsalted)
  • 2 tablespoons butter
  • 2 tablespoons garlic (finely chopped)
  • 2 tablespoons flour
  • 1 cup chicken broth
  • 1/2 cup heavy whipping cream
  • 1/2 cup Parmesan cheese (or prieve cheese, finely grated)
  • salt & pepper (to taste)
  • 2 teaspoon dill (finely chopped for garnish, optional)

Instructions

  1. First, preheat the oven to 375F. Next, season chicken with seasoning, salt & pepper, on both sides.
  2. Now, melt butter in oven-proof skillet over medium heat, add chicken thighs and sear for 2-3 minutes or until golden color on both sides. After, transfer to a plate and set aside.
  3. To make the creamy chicken sauce, melt butter in the same skillet. Once it melts add garlic and saute for 1 minute, stirring few times.
  4. Now, add flour and stir continuously for 1 minute. Next, slowly pour in chicken broth and cook for 1 minute stirring continuously, or until sauce thickens. Pour in heavy whipping cream and give it a nice stir. Add cheese, stir and taste it, add more salt or pepper, if needed.
  5. Finally, add chicken thighs back into the skillet, coating each thigh in the creamy sauce. Place in the oven and bake for 30-35 minutes, uncovered or until chicken is cooked thru.
  6. Garnish with dill and more cheese, if desired. Enjoy!


Nutrition

  • Calories: 583 kcal
  • Sugar: 1 g
  • Fat: 49 g
  • Carbohydrates: 6 g
  • Protein: 29 g


Creamy Oven Baked Chicken Thighs

k">

Tried This Recipe? Leave a Comment!

Did you make this recipe? I’d love to hear how it turned out! Please leave a comment and a rating below. Your feedback helps other home cooks and supports cheerychop.com!

For more delicious inspiration, follow me on Pinterest!

3 Ingredient Sugar Free Peanut Butter Cookies

3 Ingredient Sugar Free Peanut Butter Cookies: The Ultimate Easy Keto Treat

⚖️
Difficulty
Easy
⏲️
Prep Time
5

mins

🕒
Cook Time
10

mins

⏱️
Total Time
15

mins

🍽️
Servings
12

Welcome back to my kitchen! If you’re anything like me, you crave that comforting, sweet treat that also fits into a mindful eating lifestyle. Living in New York City, with its endless culinary temptations, I’ve learned to perfect a few go-to recipes that satisfy without derailing my progress. Today, I’m thrilled to share my absolute favorite: these 3 ingredient sugar free peanut butter cookies. They are exactly what they sound like – incredibly simple, utterly delicious, and perfect for anyone following a low carb or keto diet. You won’t believe how a recipe this straightforward can yield such incredibly satisfying results, making them an instant staple in my baking repertoire.

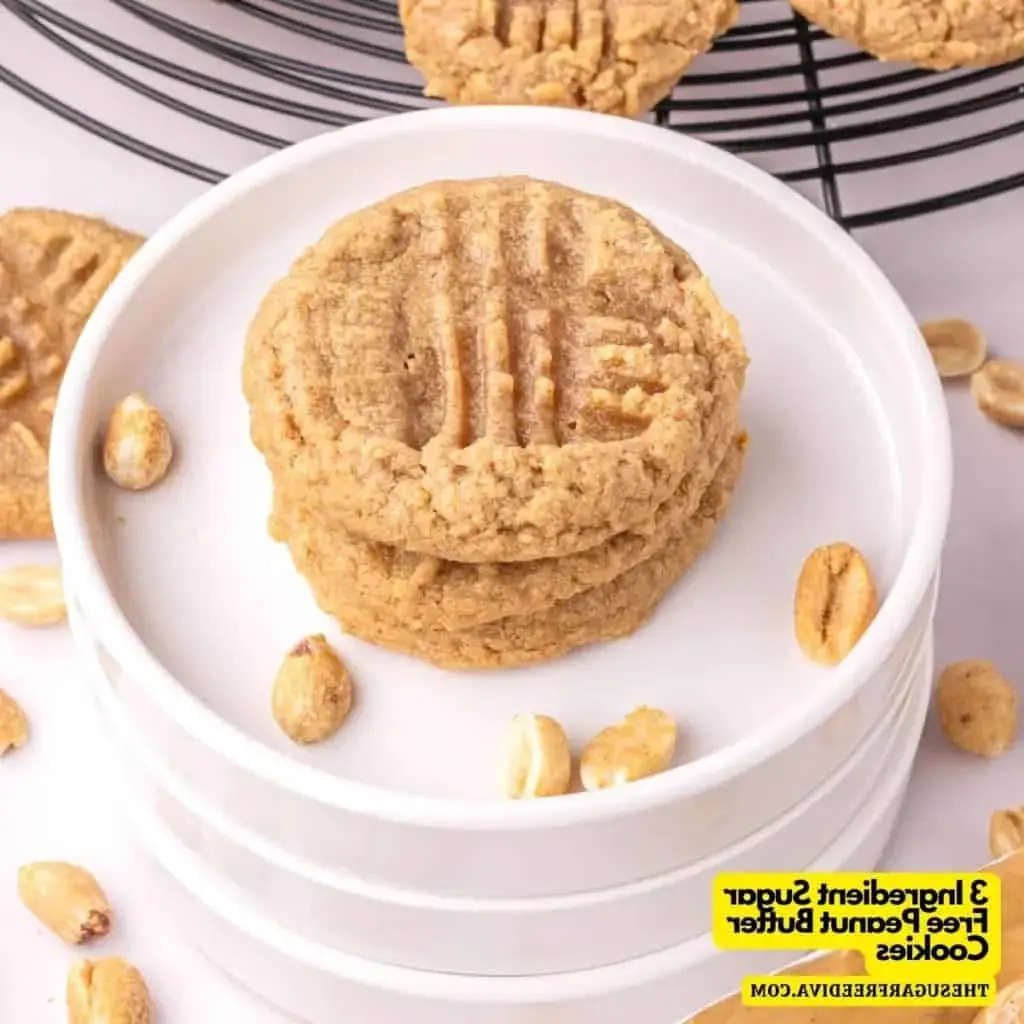
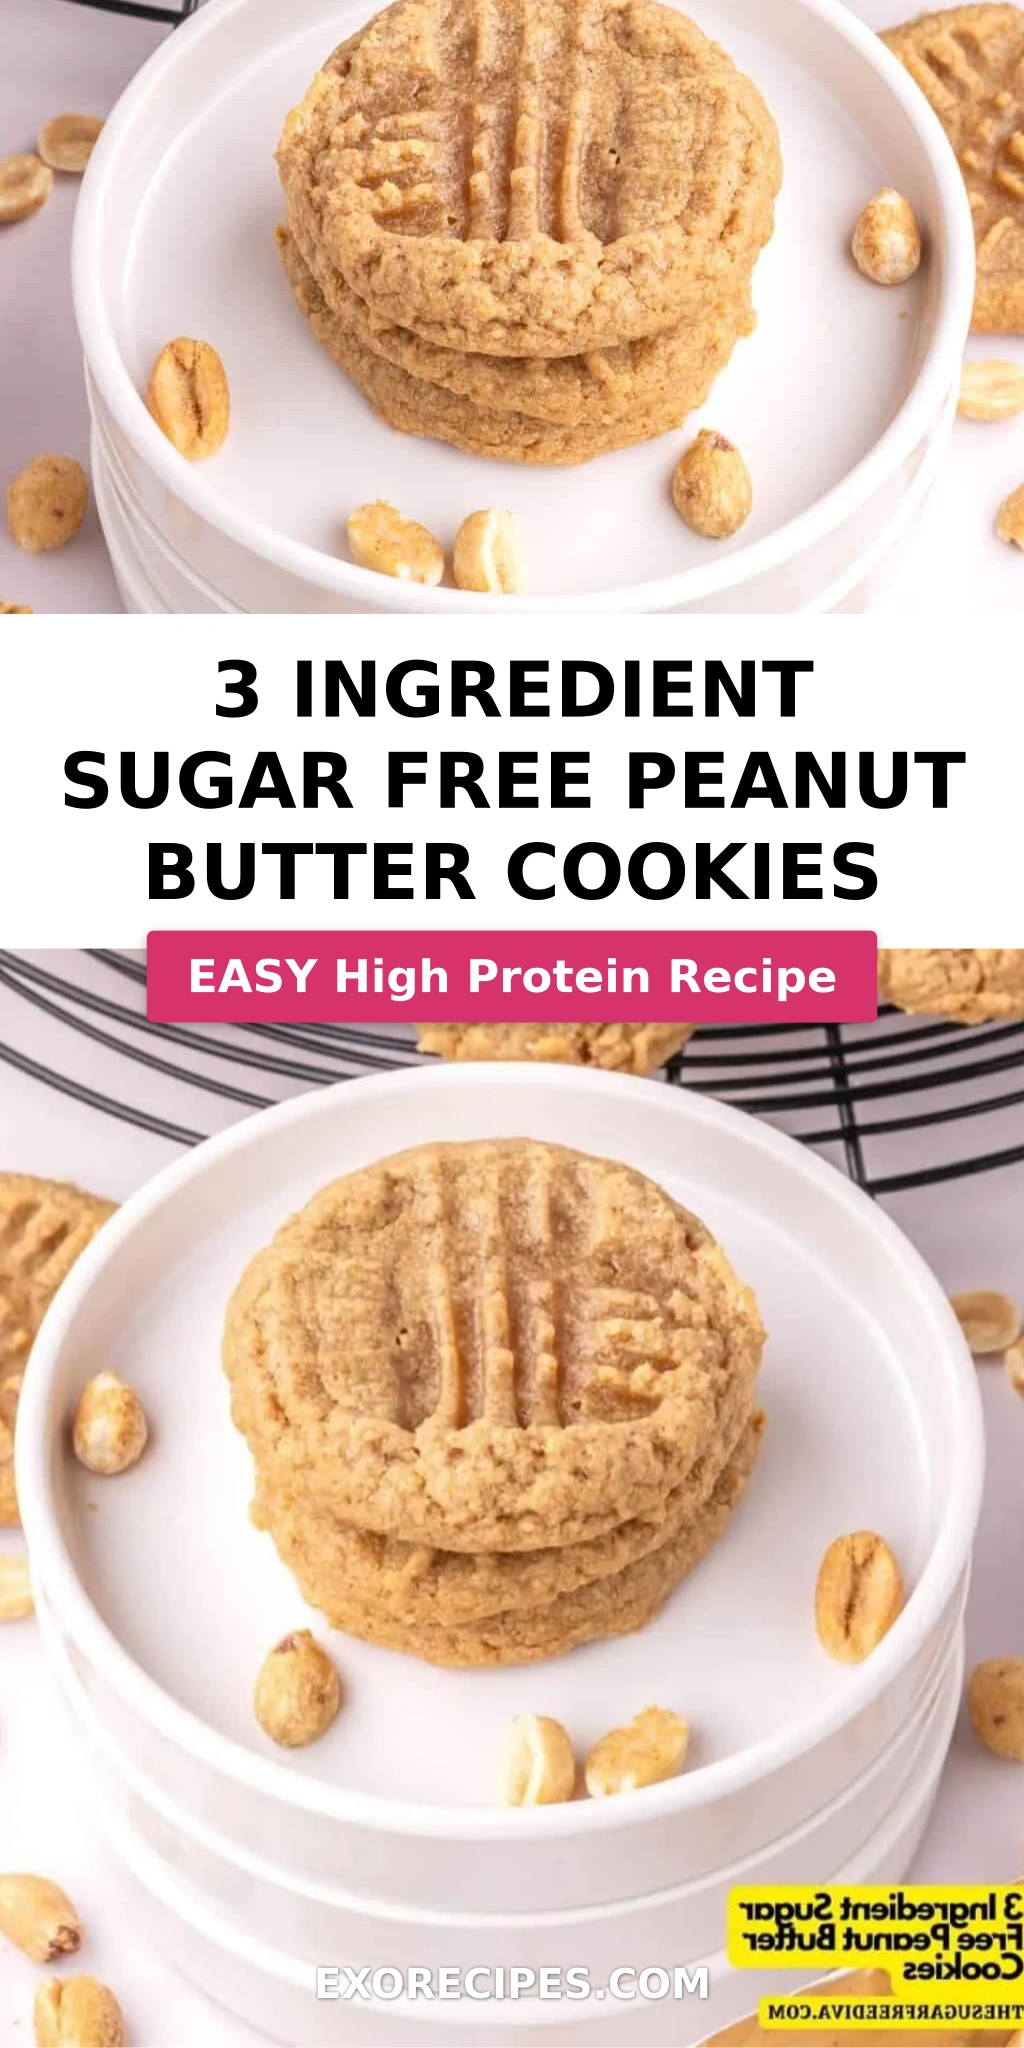
Imagine a cookie that’s golden brown around the edges, slightly chewy in the center, and bursting with rich, nutty peanut butter flavor. That’s exactly what you get with these gems. The magic lies in the pure simplicity of the ingredients, which come together to create a cookie that’s both wholesome and decadent. There’s no complicated pastry technique involved, no long chilling times, just pure, unadulterated cookie goodness. This recipe captures the essence of a classic peanut butter cookie, stripped down to its delicious core, proving that sometimes, less is truly more when it comes to baking.

What sets this recipe apart is its brilliant simplicity and its adaptability to a sugar-free lifestyle. While many recipes call for sugar, brown sugar, or maple syrup, my method relies on a sugar alternative to keep things low carb and keto-friendly. I’ll guide you through selecting the best sweetener and share a little something I picked up in Paris about achieving that perfect creamy texture. Plus, I’ll warn you about a common pitfall that can lead to crumbly cookies, ensuring your first batch is a resounding success. Get ready for a truly easy peanut butter cookie experience!

Why This 3 Ingredient Sugar Free Peanut Butter Cookies Recipe Is the Best

My culinary journey, from my mother’s kitchen in bustling Rabat to the refined classrooms of Paris and now to my vibrant NYC apartment, has taught me that the best food often comes from simplicity executed perfectly. This 3 ingredient sugar free peanut butter cookie recipe embodies that philosophy. It’s a testament to how a few quality ingredients, handled with a touch of professional insight, can create something truly magical. I’ve refined this recipe over time to ensure it’s not just simple, but consistently delivers that perfect, craveable peanut butter cookie experience without any added sugars. It’s the kind of recipe that makes you feel like a baking whiz in minutes!

The secret to these cookies lies in the quality of the peanut butter and the smart choice of a sugar alternative. My French pastry training taught me the importance of ingredient ratios and how subtle changes impact texture. For these cookies, I’ve found that using a natural, unsweetened peanut butter is key, as it concentrates the peanut flavor and provides the perfect base. Combined with the right sugar substitute, we achieve a delightful chewiness and that classic sweet-and-salty balance without any sugar spike. It’s a little trick that makes all the difference!

This recipe is also incredibly forgiving and quick, a lifesaver for busy weeknights here in NYC. You genuinely need only three ingredients and about 15 minutes from start to finish. This makes it perfect for beginners, or for anyone who needs a quick, healthy-ish treat. I’ll walk you through each step to guarantee your cookies turn out perfectly shaped and wonderfully textured. And don’t worry, I’ll also give you a heads-up on the single most common mistake that can make these cookies crumble, ensuring your success right from the very first bite.

3 Ingredient Sugar Free Peanut Butter Cookies Ingredients

Sourcing great ingredients is a constant joy here in New York. I love visiting my local Union Square Greenmarket for the freshest produce, but for pantry staples like peanut butter, I rely on trusted brands from my neighborhood grocery stores, ensuring they’re always fresh and high-quality. For this recipe, you truly only need a few components, inspired by the simplicity I learned to appreciate back in my mother’s Moroccan kitchen, where flavors were robust and ingredients were cherished.

Ingredients List

  • 1 cup Natural Peanut Butter (unsweetened, creamy or crunchy)
  • 1 cup Granulated Sugar Alternative (erythritol, xylitol, or blend – see notes)
  • 1 large Egg

Ingredient Spotlight

The peanut butter is the star here, providing not only flavor but also essential fat and binding properties. For the best results in these 3 ingredient sugar free peanut butter cookies, I recommend using a natural peanut butter where the only ingredients are peanuts and maybe a touch of salt. Avoid peanut butters with added sugars or oils, as they can alter the cookie’s texture. When shopping in the US, look for brands that require stirring due to natural oil separation – that’s your sign of purity!

Our sugar alternative is crucial for that sugar-free and low-carb profile. I primarily use erythritol or a blend of erythritol and monk fruit for its clean taste and good texture. Xylitol is another option, but it’s toxic to dogs, so use with caution if you have pets. When buying, opt for a granulated version that measures cup-for-cup like sugar. If you use a powdered version, you might need to adjust the quantity slightly. The key is a consistent, fine grain to incorporate seamlessly into the dough.

The egg acts as our binder, bringing all the ingredients together and providing structure. It’s essential for ensuring the cookies hold their shape while baking and achieve a tender crumb. A standard large egg from any US grocery store will work perfectly. Make sure it’s at room temperature, as this helps it emulsify better with the peanut butter and sweetener, leading to a smoother dough and more uniformly baked cookies. This simple ingredient is the unsung hero of these easy peanut butter cookies.

Original IngredientBest SubstitutionFlavor / Texture Impact
Natural Peanut ButterAlmond Butter or Sunflower Seed ButterSlightly different nutty flavor, almond butter is nuttier, sunflower seed butter is milder. Texture remains similar, but might be slightly more delicate.
Granulated Sugar AlternativeA different granulated keto sweetener (e.g., Allulose) or a small amount of liquid stevia/monk fruitMight slightly alter sweetness level or texture. Allulose can lead to a softer cookie. Liquid sweeteners need careful measurement to avoid overpowering.
1 large Egg1 Flax Egg (1 tbsp flaxseed meal + 3 tbsp water, let sit 5 mins)Cookies may be slightly denser and have a more pronounced nutty flavor from the flaxseed. Ensure the flax egg is well-formed.

How to Make 3 Ingredient Sugar Free Peanut Butter Cookies — Step-by-Step

Get ready to be amazed at how quickly these delicious cookies come together. It’s a straightforward process that I often do during a quick break here in my NYC apartment.

Step 1: Preheat and Prep Your Baking Sheet

Start by preheating your oven to 350°F (175°C). Line a baking sheet with parchment paper or a silicone baking mat. This simple step prevents sticking and ensures your cookies bake evenly and lift off cleanly.

💡 mia’s Pro Tip: Using parchment paper not only prevents sticking but also makes cleanup a breeze, which is a lifesaver on busy days in the city!

Step 2: Cream Peanut Butter and Sweetener

In a large mixing bowl, combine the 1 cup of natural peanut butter and 1 cup of granulated sugar alternative. Use an electric mixer or a sturdy whisk to cream these ingredients together until the mixture is light and fluffy. This process aerates the mixture, which is key for a good cookie texture.

Step 3: Add Egg and Combine

Once the peanut butter and sweetener are well-combined and fluffy, gently mix in the 1 large egg until fully incorporated. Be careful not to overmix at this stage. The dough will come together and should have a thick, scoopable consistency.

⚠️ Common Mistake to Avoid: Overmixing after adding the egg can develop the gluten too much, leading to tough cookies. Mix just until combined.

Step 4: Scoop Dough into Balls

Use a medium cookie scoop (about 1.5 tablespoons) to portion the dough. Roll each portion into a ball and place them on your prepared baking sheet, leaving about two inches between each cookie to allow for spreading.

Step 5: Flatten and Decorate

Gently press down on each dough ball with the palm of your hand or the bottom of a glass to flatten them to about half their original thickness. This creates the ideal shape for baking. Then, take a fork and press into the top of each cookie to create the classic crisscross pattern. This not only looks pretty but also helps the cookies bake more evenly.

💡 mia’s Pro Tip: For an even more professional look, chill the dough for about 15-20 minutes before scooping and shaping. This makes the dough firmer and easier to handle.

Step 6: Bake Until Golden

Bake in the preheated oven for 7 to 10 minutes. You’re looking for the edges to be lightly golden brown. The centers might still look a little soft, but they will continue to set as they cool.

Step 7: Cool Cookies

Allow the cookies to cool on the baking sheet for about 5 minutes before carefully transferring them to a wire rack to cool completely. This resting period is crucial for them to firm up properly.

⚠️ Common Mistake to Avoid: Trying to move the cookies immediately after taking them out of the oven. They are very delicate when hot and need this resting time on the sheet to set.

StepActionDurationKey Visual Cue
1Preheat oven & Prep sheet~5 minsOven at 350°F, baking sheet lined
2Cream PB & Sweetener~2 minsLight, fluffy mixture
3Add Egg & Combine~1 minDough is thick and combined
4Scoop Dough Balls~2 minsUniform balls, spaced on sheet
5Flatten & Decorate~2 minsFlattened cookies with crisscross
6Bake7-10 minsEdges golden brown
7Cool~5 mins on sheet, then cool completelyCookies set and firm

Serving & Presentation

These simple sugar free peanut butter cookies are wonderful served on their own, perhaps with a cup of coffee or herbal tea, much like we’d enjoy a small treat with mint tea back home in Morocco. Their richness means they don’t need much fuss, but if you’re looking to elevate them slightly, consider a dusting of powdered erythritol for an extra touch of sweetness and visual appeal. For a truly New York moment, serve them alongside a creamy latte or a glass of rich almond milk.

For a more decadent presentation, you can drizzle them with a little sugar-free melted chocolate – dark chocolate works beautifully with peanut butter. Or, try sandwiching two cookies together with a dollop of sugar-free cream cheese frosting or even more peanut butter for an extra special treat. They look fantastic arranged artfully on a rustic wooden platter or a simple white plate, letting their golden hue and classic crisscross pattern be the star.

Pairing TypeSuggestionsWhy It Works
BeverageCoffee, Unsweetened Almond Milk, Herbal Tea (Mint or Chamomile)Complements the richness of peanut butter without adding sugar; the warmth of coffee or tea is classic.
Dip / FrostingSugar-Free Chocolate Glaze, Cream Cheese Frosting, Melted Sugar-Free Dark ChocolateAdds indulgence and a contrasting flavor/texture that pairs exceptionally well with peanut butter.
GarnishA light dusting of powdered erythritol, a sprinkle of chopped peanuts, a few sugar-free chocolate chipsEnhances visual appeal and adds a subtle textural or flavor variation that complements the cookie.

Make-Ahead, Storage & Reheating

One of the best things about these 3 ingredient sugar free peanut butter cookies is how simple they are to store. Since I’m always on the go in NYC, I love having a batch ready to grab for a quick snack or to share with friends. They genuinely hold up so well, maintaining their texture and flavor for days, which is perfect for meal prepping.

MethodContainerDurationReheating Tip
RefrigeratorAirtight container or resealable bagUp to 7 daysServe at room temperature; no reheating usually needed.
FreezerFreezer-safe airtight container or bag, well-wrappedUp to 3 monthsThaw at room temperature for a few hours or gently warm in a toaster oven for a few minutes.
Make-AheadStore baked cookies in an airtight container at room temperature or fridge.Cookies are best within 3-4 days, but can last longer in the fridge.If stored in the fridge, let cookies sit at room temperature for 15-20 minutes before serving for optimal texture.

If your cookies feel a bit too hard after refrigeration, a quick 30 seconds to 1 minute in a toaster oven on a low setting can bring back that delightful chewiness without over-baking them. Freezing is also a fantastic option; just make sure they are completely cooled and sealed well to prevent freezer burn. They make a wonderful surprise treat when you’re craving something sweet and low-carb on demand.

Variations & Easy Swaps

VariationKey ChangeBest ForDifficulty Impact
Chocolate Chip KissedAdd 1/4 cup sugar-free chocolate chips or chunks to doughChocolate lovers, those craving extra richnessEasy – just mix in
Spiced DelightAdd 1/2 tsp cinnamon and a pinch of nutmeg or cardamomThose who love warm spices, a hint of Moroccan flavorEasy – just mix in
Nutty CrunchUse crunchy peanut butter, or add 1/4 cup chopped nuts (pecans, walnuts)For texture enthusiasts, a satisfying biteEasy – swap PB or mix in nuts

To add a bit of Moroccan flair, I love to mix in a half teaspoon of cinnamon and a pinch of cardamom. This doesn’t change the texture significantly, but it adds a wonderful warmth and complexity that reminds me of my grandmother’s spiced cookies. It’s a simple way to bring a touch of my heritage into these otherwise American classics. Another twist I adore from my Paris culinary school days is incorporating a very subtle hint of sea salt on top just before baking – it truly enhances the peanut butter flavor.

Keto Peanut Butter Cookies

These three ingredient sugar free peanut butter cookies are already perfectly keto-friendly! The key is the choice of sugar alternative. Ensure you’re using a granulated, zero-carb sweetener like erythritol, xylitol (with caution), or a monk fruit blend. If you use allulose, the cookies might be a bit softer, which is perfectly fine. I’ve tested these extensively, and they work wonderfully for anyone following a ketogenic diet, providing that satisfying cookie fix with minimal net carbs.

Low Carb Peanut Butter Cookies

For those focusing on low-carb eating, these cookies are an absolute dream. The 1 gram of carbohydrates per serving comes primarily from the peanut butter itself, and the sugar alternative has negligible net carbs. They are a fantastic healthier alternative to traditional cookies when you need something sweet. My favorite way to enjoy them while keeping carbs low is simply as they are, or perhaps with a few sugar-free chocolate chips mixed in for an extra special treat.

Can I use natural peanut butter for 3 ingredient sugar free peanut butter cookies?

Absolutely! In fact, I highly recommend using natural peanut butter for these 3 ingredient sugar free peanut butter cookies. Natural peanut butter, where the only ingredients are peanuts and perhaps a little salt, provides a deeper peanut flavor and the right consistency. Brands that require stirring because the oil separates are ideal. Avoid peanut butters with added sugars or hydrogenated oils, as they can negatively affect the cookie’s texture and sugar content, defeating the purpose of a sugar-free recipe.

How long do you bake 3 ingredient sugar free peanut butter cookies?

For these 3 ingredient sugar free peanut butter cookies, you’ll typically bake them for 7 to 10 minutes. The key is to watch the edges closely. You want them to be lightly golden brown. The centers might still appear a bit soft when you take them out of the oven, but don’t worry! They will continue to set and firm up as they cool on the baking sheet. Overbaking can lead to dry, crumbly cookies, so it’s better to err on the side of slightly underdone in the center.

What can I use instead of eggs in sugar free peanut butter cookies?

If you need to make these sugar free peanut butter cookies egg-free, the best substitute is a flax egg or chia egg. For one egg, you can combine 1 tablespoon of ground flaxseed or chia seeds with 3 tablespoons of water and let it sit for about 5-10 minutes until it forms a gel-like consistency. This acts as a binder. Be aware that this might slightly alter the texture, making the cookies a bit denser or chewier, and it does add a very subtle nutty flavor from the seeds.

How do you keep 3 ingredient sugar free peanut butter cookies from falling apart?

To keep your 3 ingredient sugar free peanut butter cookies from falling apart, the most crucial steps involve the right ingredient balance and proper cooling. Ensure you’re using natural peanut butter and not an overly oily or smooth variety. The egg is essential for binding; make sure it’s fully incorporated. Crucially, allow the cookies to cool on the baking sheet for at least 5-10 minutes after baking before attempting to move them. They are very fragile when hot and need this time to set and firm up. Gentle handling is key!

Are these cookies keto-friendly?

Yes, these 3 ingredient sugar free peanut butter cookies are wonderfully keto-friendly! The key lies in using a sugar alternative like erythritol, xylitol, or a monk fruit blend, which have very low to zero net carbs. The carbohydrates primarily come from the peanut butter, which is generally acceptable in moderation on a keto diet. I’ve specifically formulated this recipe to omit traditional sugars, making it a perfect treat for those adhering to a ketogenic lifestyle who want a delicious, satisfying cookie without the carb load.

What kind of sugar alternative works best?

For these 3 ingredient sugar free peanut butter cookies, a granulated sugar alternative is ideal. Erythritol or a blend of erythritol and monk fruit/stevia work exceptionally well, mimicking the texture of sugar without the carbs. Xylitol is another option, but it’s toxic to pets, so I advise caution if you have furry friends. Ensure the alternative you choose measures cup-for-cup like regular sugar for the best results. Avoid liquid sweeteners in this simple recipe, as they can alter the dough consistency too much.

Can I make these cookies crunchy?

To achieve a crunchier cookie, there are a couple of things you can try with these 3 ingredient sugar free peanut butter cookies. First, slightly extend the baking time by 1-2 minutes, watching carefully to avoid burning. Second, consider using crunchy peanut butter instead of creamy. The bits of peanut add texture. Also, flattening the cookies a bit more before baking can help them spread and crisp up better. However, remember that keto-friendly cookies tend to be softer than traditional ones, so a very crisp texture might be harder to achieve.

My cookies spread too much, what went wrong?

If your 3 ingredient sugar free peanut butter cookies spread too much, it could be due to a few reasons. Ensure your peanut butter isn’t too oily or at room temperature; slightly chilled peanut butter can help. Also, make sure your oven temperature is accurate; an oven that’s too hot can cause premature spreading. My biggest tip is to chill the dough for about 15-20 minutes before scooping and flattening. This firms up the fat in the peanut butter and makes the cookies less likely to spread excessively, maintaining a better shape.

Share Your Version!

I truly hope you adore these 3 ingredient sugar free peanut butter cookies as much as I do. They are a little piece of simplicity and joy from my kitchen to yours. If you whip up a batch, please consider leaving a star rating and a comment below – your feedback means the world to me! And if you share a photo on Instagram or Pinterest, don’t forget to tag me @chefrecipes2; I absolutely love seeing your kitchen creations come to life!

I’m always curious to hear how you adapt recipes! Have you tried making them with a different type of nut butter, or perhaps added a special spice? I’d love to hear your adventures in the comments below! What’s your favorite way to enjoy a simple, wholesome cookie?

From my NYC kitchen to yours — I hope this recipe brings as much warmth to your table as it does to mine. — mia 🧡

📌

Love This Recipe? Save It to Pinterest!

If you enjoyed this 3 Ingredient Sugar Free Peanut Butter Cookies recipe, don’t let it get lost in your browser tabs! 😄 Pin it now so you can find it again anytime — and explore hundreds more tried-and-tested recipes waiting for you on my Pinterest boards.

👉 Follow mia on Pinterest @chefrecipes2

📌 Pin this recipe · 🔁 Re-pin your favorites · 💬 Tag me when you make it — I love seeing your creations!

Print

clock clock iconcutlery cutlery iconflag flag iconfolder folder iconinstagram instagram iconpinterest pinterest iconfacebook facebook iconprint print iconsquares squares iconheart heart iconheart solid heart solid icon

3 Ingredient Sugar Free Peanut Butter Cookies

  • Author: Chef Mia

Description

This 3 ingredient recipe for a delicious peanut butter cookie is easy to make and can be made without adding sugar to it.


Ingredients

Scale
  • 1 cup Peanut Butter
  • 1 cup Sugar Alternative (-See post for details)
  • 1 Egg

Instructions

  1. Preheat your oven to 350 degrees and prep your cookie sheet for nonstick.
  2. In a large mixing bowl, cream together the peanut butter and sugar until light and fluffy. Once the ingredients are creamed together you can mix in the egg until combined.
  3. Use a cookie scoop scoop out the dough into balls and place each of the balls on to your prepared baking sheet about two inches apart.
  4. Next, using the palm of your hand or an object of choice, gently press each of the balls to half of their thickness. Then take a fork and make the crisscross design on top, pressing in the cookies in further.
  5. Bake the cookies for seven to ten minutes or until the edges are golden brown.
  6. Allow the cookies to sit on the cookie sheet for a few minutes before transferring them to a cookie rack to further set.


Nutrition

  • Calories: 37 kcal
  • Sugar: 0.01 g
  • Fat: 0.2 g
  • Carbohydrates: 1 g
  • Protein: 4 g


3 Ingredient Sugar Free Peanut Butter Cookies

k">

Tried This Recipe? Leave a Comment!

Did you make this recipe? I’d love to hear how it turned out! Please leave a comment and a rating below. Your feedback helps other home cooks and supports cheerychop.com!

For more delicious inspiration, follow me on Pinterest!
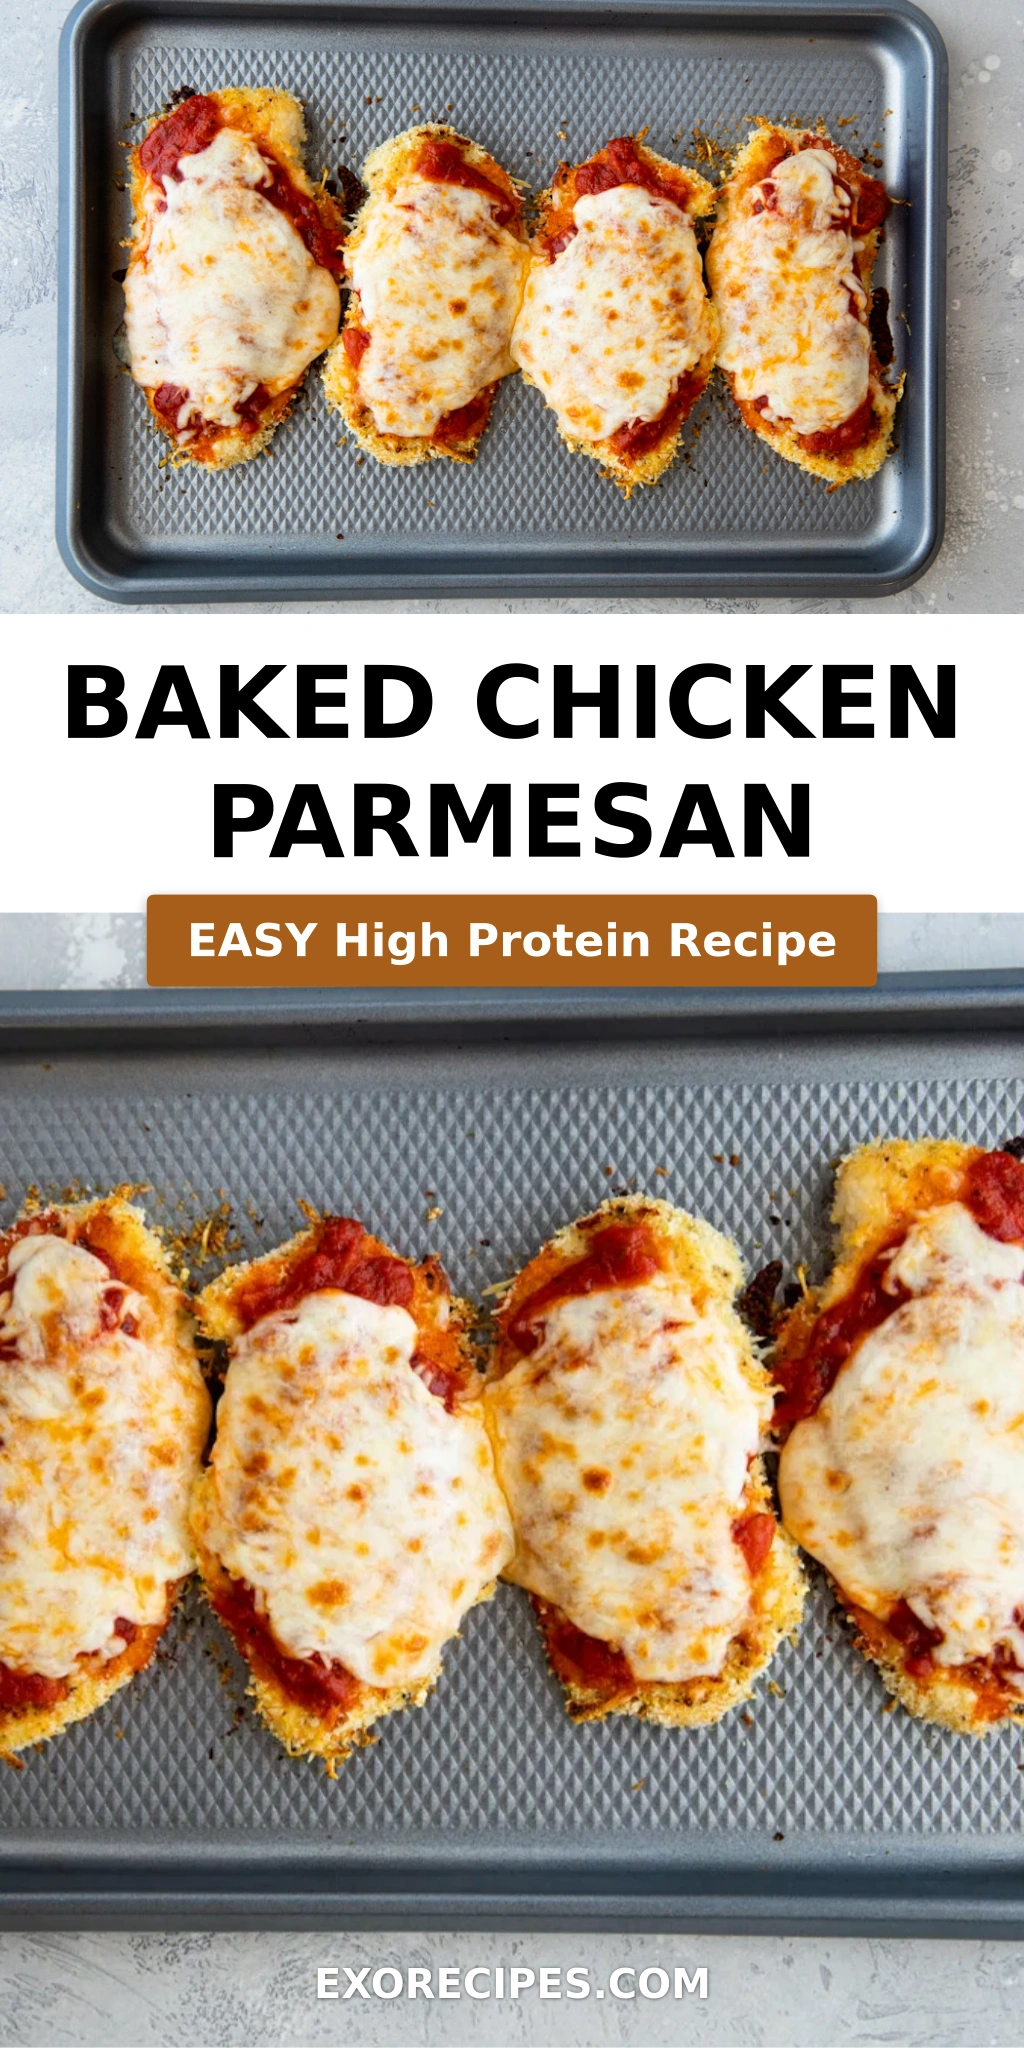
Crispy Chicken Fried Chicken with Creamy Gravy

Chicken Fried Chicken: Crispy and Flavorful! The Ultimate Comfort Food

⚖️
Difficulty
Easy
⏲️
Prep Time
15
🕒
Cook Time
20
⏱️
Total Time
35
🍽️
Servings
6-8

Growing up in my mother’s kitchen in Marrakech, I learned the magic of transforming simple ingredients into a feast. The aromas of cumin, paprika, and slow-cooked tagines filled our home. While my heart will always hold those Moroccan spices dear, my culinary journey took me through the precise techniques of Paris, where I mastered the art of sauces and the perfect crisp crust. Now, living in the vibrant culinary tapestry of New York City, I find endless inspiration. This Chicken Fried Chicken recipe is a testament to that journey—a comforting classic that I’ve refined to ensure you get that incredibly crispy, golden exterior and juicy interior every single time. It’s proof that even the most beloved homestyle dishes can benefit from a touch of professional polish.

Imagine biting into a piece of perfectly fried chicken, the coating shattering with an audible crunch, giving way to moist, succulent meat. That’s what this dish is all about. The aroma is intoxicating—a savory blend of seasoned flour and hot oil, hinting at the richness to come. The final touch of creamy, dreamy gravy, made right in the same pan, ties everything together. We achieve that amazing texture not just through proper frying temperatures, but through a thoughtfully seasoned flour mixture and a buttermilk marinade that tenderizes the chicken beautifully. It’s a symphony of textures and a comforting hug on a plate, perfect for a family dinner or a weekend treat.

What sets this specific chicken fried chicken recipe apart? It’s the blend of classic techniques with my own chef’s insights. I’ve found that using a combination of baking powder and baking soda in the flour dredge is key for that extra lightness and crispness, something I learned was crucial for achieving ethereal textures in French pastry, but applied here to savory fried chicken. I’ll also share a tip on how to make sure your breading stays put, no matter what. And watch out for the common mistake of overcrowding the pan, which is the enemy of crispy fried chicken!

Why This Chicken Fried Chicken Recipe Is the Best

My approach to this chicken fried chicken recipe is rooted in bringing together my diverse culinary experiences. The initial inspiration came from the soul-warming dishes of the American South, but I’ve infused it with my Moroccan heritage and French training. From Marrakech, I’ve inherited an appreciation for layering flavors, using aromatic spices that sing. From Paris, I’ve learned the importance of technique—precise temperatures, proper dredging, and balanced seasoning. This recipe marries those influences, creating a deeply flavorful and perfectly textured fried chicken that’s both comforting and sophisticated. It’s a taste of my journey, right in your kitchen.

Achieving that coveted crispy coating is an art, but one I’ve demystified for you. The secret lies in the double dredge, ensuring a thick, craggy crust, and crucially, in the buttermilk marinade. Buttermilk’s acidity not only tenderizes the chicken but also helps the flour mixture adhere like magic. Then, frying at the correct temperature, a technique I honed while perfecting French confit, ensures the outside is golden brown and crispy without drying out the tender interior. It’s about building layers of flavor and texture that are both delightful and reliable.

Even if you’re new to making homemade fried chicken, this recipe is designed to be incredibly approachable. I’ve streamlined the process and provided clear, actionable steps. The ingredient list is straightforward, using items you likely already have in your pantry. I’ve also included tips to prevent common pitfalls, like soggy breading or uneven cooking. This means you can confidently serve up a plate of truly spectacular, crispy fried chicken that will have everyone asking for seconds, all without feeling overwhelmed.

Chicken Fried Chicken Ingredients

When I’m in New York, I love picking up my chicken from a local butcher shop in the West Village, they always have the freshest cuts. For my pantry staples like flour and spices, I rely on the fantastic selection at Kalustyan’s on 3rd Avenue, a true treasure trove. This recipe uses simple ingredients that come together to create something truly special, reminding me of the resourceful cooking I grew up with.

Ingredients List

  • 6-8 thin sliced boneless, skinless chicken breasts (or pounded thin)
  • 2 cups all-purpose flour (for dredging)
  • 2 tsp baking powder
  • 1 tsp baking soda
  • 1 tsp salt
  • 1 tsp black pepper
  • 1 tsp garlic powder
  • 1 ½ cups buttermilk
  • 1 large egg
  • 1 Tbs hot sauce (like Frank’s RedHot or Texas Pete)
  • Vegetable oil or other high-smoke point oil for frying (about 3-4 cups depending on pot size)
  • ¼ cup reserved oil from frying (for gravy)
  • ⅓ cup all-purpose flour (for gravy)
  • 2 cups milk (whole or 2% recommended)
  • Salt and freshly ground black pepper (for gravy, to taste)

Ingredient Spotlight

Chicken Breasts: For this recipe, I prefer using thin-sliced chicken breasts, or pounding regular breasts to about ½-inch thickness. This ensures they cook quickly and evenly, staying moist inside while the exterior crisps up. You can find thin-sliced chicken breasts at most major US grocery stores, or easily create them by placing chicken breasts between two sheets of plastic wrap and gently pounding with a meat mallet or rolling pin. This even thickness is crucial for perfectly cooked chicken.

Buttermilk: Buttermilk is the secret weapon for tenderizing chicken and helping the breading adhere. Its acidity breaks down the chicken’s proteins, making it incredibly tender, while its thickness creates a rich coating. If you don’t have buttermilk, you can easily make a substitute: pour 1 ½ tablespoons of white vinegar or lemon juice into a liquid measuring cup, then add enough milk to reach the 1 ½ cup line. Let it sit for 5-10 minutes until it thickens and curdles slightly. This homemade version works beautifully!

All-Purpose Flour: This forms the base of our crispy coating and is also used to thicken the gravy. For the best results, use a good quality all-purpose flour. Make sure to season your flour mixture generously with salt, pepper, and garlic powder, as this is where a lot of the flavor comes from. If you need a gluten-free version, a good gluten-free all-purpose flour blend specifically designed for baking and frying will work, though the texture might be slightly different.

Original IngredientBest SubstitutionFlavor / Texture Impact
ButtermilkHomemade buttermilk (milk + vinegar/lemon juice)Virtually identical in tenderizing and adhesion.
Thin-sliced Chicken BreastsChicken thighs, pounded thinThighs are more forgiving and moister, but may take slightly longer to cook.
All-purpose FlourGluten-free all-purpose flour blendMay result in a slightly less crisp or slightly grittier texture depending on the blend.

How to Make Chicken Fried Chicken — Step-by-Step

Ready? Let’s get frying! Each step is designed to build that perfect crispy fried chicken.

Step 1: Prepare the Marinade and Dredge

First, in a large bowl, whisk together the 2 cups of flour, baking powder, baking soda, salt, pepper, and garlic powder. This is your dry dredge mixture. In a separate medium bowl, whisk together the buttermilk, egg, and hot sauce until well combined. This forms your wet marinade.

💡 mia’s Pro Tip: Make sure your buttermilk mixture is well-whisked. The egg helps bind everything together and gives the flour something extra to cling to, creating a more robust crust.

Step 2: Dredge the Chicken

Take each thin chicken breast and dredge it thoroughly in the seasoned flour mixture, pressing gently to ensure it’s well-coated. Then, dip it into the buttermilk mixture, letting any excess drip off, and immediately return it to the flour mixture. Press the flour onto the chicken again, ensuring a good, even coating. This double-dredging process is key for that extra crispy texture.

⚠️ Common Mistake to Avoid: Don’t skip the second dredge! A single coating can become thin and may not adhere well. The double dredge creates a thicker, more textured crust that stays on during frying.

Step 3: Heat the Oil

In a deep fryer or a large, heavy-bottomed pot on the stove, pour in enough oil to reach a depth of about 3-4 inches. Heat the oil to 325°F (160°C). It’s important to maintain this temperature for the best results; a thermometer is highly recommended.

Step 4: Fry the Chicken

Carefully place the flour-coated chicken pieces into the hot oil, being careful not to overcrowd the pot (fry in batches if necessary). Fry for 6-8 minutes per side, or until the chicken is golden brown, crispy, and cooked through. The internal temperature should reach 165°F (74°C).

💡 mia’s Pro Tip: Resist the urge to constantly move the chicken. Let it develop a crust and brown on one side before flipping. This helps prevent the coating from breaking apart.

Step 5: Drain and Rest

Using a slotted spoon or spider strainer, remove the fried chicken from the oil and place it on a wire rack set over a baking sheet or on a plate lined with paper towels. Let it drain and rest for a few minutes. This allows excess oil to drip off and the crust to set further.

Step 6: Make the Gravy

Once all the chicken is fried, carefully pour out most of the frying oil, leaving about ¼ cup in the pan. Return the pan to medium-high heat. Whisk in the ⅓ cup of flour until it forms a smooth paste, cooking for about 1 minute to toast the flour slightly.

Step 7: Finish the Gravy

Slowly whisk in the 2 cups of milk, a little at a time, ensuring no lumps form. Continue to cook, whisking constantly, until the gravy thickens to your desired consistency. Season generously with salt and pepper to taste.

💡 mia’s Pro Tip: For an ultra-smooth gravy, you can strain it through a fine-mesh sieve after whisking in the milk, before seasoning. This removes any small lumps and gives it a professional finish.

StepActionDurationKey Visual Cue
1Prepare Marinade & Dredge5 minsDry mix and wet mix ready.
2Dredge Chicken5-7 minsChicken fully coated, double-layered.
3Heat Oil10-15 minsOil reaches 325°F (160°C).
4Fry Chicken12-16 mins (per batch)Golden brown, crispy, cooked through.
5Drain & Rest5 minsChicken on rack, excess oil drips.
6Start Gravy2 minsFlour paste forms.
7Finish Gravy5-7 minsSmooth, thickened gravy.

Serving & Presentation

This golden, crispy fried chicken is a sight to behold! I love to serve it family-style, piled high on a platter, with a generous ladleful of the warm, creamy gravy poured right over the top. It’s a dish that truly brings people together, reminiscent of lively Sunday dinners in my family, or the buzzing energy of a casual eatery in NYC’s West Village. Garnish with a sprinkle of fresh parsley for a pop of color and freshness that cuts through the richness.

For a truly comforting meal, pair this chicken fried chicken with classic Southern sides. Creamy mashed potatoes are essential for soaking up that delicious gravy. A crisp, simple coleslaw or a fresh green salad provides a lovely contrast in texture and flavor. Another favorite of mine, especially during the warmer months here in NYC, is a vibrant succotash or some grilled corn on the cob. Don’t forget a slice of warm cornbread or even a light, flaky biscuit to round out the meal.

Pairing TypeSuggestionsWhy It Works
Side DishCreamy Mashed Potatoes, Macaroni and Cheese, Candied YamsClassic Southern comfort food that perfectly complements the chicken and gravy.
VegetableCollard Greens, Biscuits and Honey, CornbreadAdds a balance of savory, sweet, and hearty elements to the meal.
BeverageIced Tea, Lemonade, Pale AleRefreshing drinks cut through the richness of the fried chicken.
GarnishFresh Parsley, ChivesA simple garnish adds a touch of freshness and visual appeal.

Make-Ahead, Storage & Reheating

Like many New Yorkers, my schedule can be hectic, so I often rely on smart meal prep. While chicken fried chicken is best enjoyed fresh for maximum crispness, I’ve tested various methods to ensure you can enjoy leftovers too. The key is storing it properly to minimize sogginess and reheating it carefully.

MethodContainerDurationReheating Tip
RefrigeratorAirtight container or wrap tightly3-4 daysReheat in a 375°F oven or air fryer for best results.
FreezerHeavy-duty freezer bag or container1-2 monthsThaw in the refrigerator overnight, then reheat in oven or air fryer.
GravyAirtight container3-4 daysGently reheat on the stovetop over low heat, adding a splash of milk if needed.

For reheating, my preferred method is to skip the microwave altogether, as it can make fried chicken soggy. Instead, I’ll reheat leftover chicken fried chicken in a preheated oven at 375°F (190°C) for about 10-15 minutes, or until heated through and the crust has regained some of its crispness. An air fryer is also fantastic for this, usually taking just 5-8 minutes. For the gravy, gently warm it on the stovetop over low heat, whisking occasionally. If it’s too thick, a little splash of milk or water will help thin it out perfectly.

Variations & Easy Swaps

VariationKey ChangeBest ForDifficulty Impact
Spicy Southern Fried ChickenAdd cayenne pepper and smoked paprika to flour dredge.Those who love a kick of heat.Easy
Gluten-Free VersionUse a gluten-free flour blend for dredging and gravy.Celiac or gluten-sensitive diners.Slightly more complex; texture may vary.
Herb-Infused Fried ChickenAdd chopped fresh herbs like rosemary and thyme to the buttermilk marinade.A more fragrant and nuanced flavor profile.Easy

Spicy Southern Fried Chicken

For a little heat that reminds me of the vibrant spices found in North Africa, simply add ½ teaspoon of cayenne pepper and ½ teaspoon of smoked paprika to your flour dredge. This gives the chicken a warm, subtle spice that complements the savory flavors beautifully. This is perfect for those who enjoy a bit of a kick, turning your homemade fried chicken into a fiery delight.

Gluten-Free Chicken Fried Chicken

To make this recipe gluten-free, swap the all-purpose flour for a good quality gluten-free all-purpose flour blend that’s suitable for baking and frying. Ensure your blend contains a binder like xanthan gum for best results. The flavor will be similar, but the texture might be slightly different; some GF blends can result in a less uniformly crisp coating. I’ve found that using a blend designed for frying works best for minimizing textural changes.

Herb-Infused Fried Chicken

Inspired by the fragrant herb gardens of Provence, I love infusing this chicken with fresh herbs. Finely chop about 1 tablespoon each of fresh rosemary and thyme, and whisk them into the buttermilk marinade. The herbs will infuse the chicken as it marinates, adding a lovely aromatic depth to the final dish. This variation is particularly wonderful when serving alongside roasted vegetables.

What is the difference between chicken fried chicken and country fried chicken?

The primary difference lies in the gravy and the dredging process. Chicken Fried Chicken is typically breaded with flour, then fried, and served with a white gravy (often made from the pan drippings and milk). Country Fried Chicken is often dredged in seasoned flour, sometimes without an egg wash, fried, and always served with a brown gravy. My recipe focuses on the classic chicken fried chicken style with a creamy white gravy.

What kind of oil is best for frying chicken fried chicken?

For the best results when frying chicken, you want an oil with a high smoke point to prevent it from burning at the temperatures needed for crispy frying. Excellent choices include vegetable oil, canola oil, peanut oil, or even a blend of vegetable oils. These oils are relatively neutral in flavor, allowing the chicken and seasoning to shine through, and they maintain their integrity at frying temperatures of around 325-350°F.

How do you keep the breading from falling off when frying chicken fried chicken?

There are a few key techniques to ensure your breading stays put. First, make sure the chicken is properly dredged and pressed firmly into the flour. The buttermilk marinade is crucial for adhesion. Second, don’t overcrowd the pan; this lowers the oil temperature and can cause the coating to become gummy and detach. Finally, I find that a double dredge (flour, egg/buttermilk, flour again) creates a more robust crust that adheres exceptionally well.

Can you make chicken fried chicken in an air fryer instead of deep frying?

Yes, you can achieve a delicious, crispy result using an air fryer, though it won’t be exactly the same as deep frying. Spray the breaded chicken generously with oil and air fry at around 375°F (190°C) for 15-20 minutes, flipping halfway through, until golden brown and cooked through. It’s a healthier alternative that still delivers a satisfying crunch, though deep frying is traditional for the ultimate crispy coating.

Should the chicken be marinated in buttermilk before frying?

Absolutely! Marinating the chicken in buttermilk is a crucial step for both tenderizing the meat and helping the flour coating adhere better. The acidity in buttermilk tenderizes the chicken from the inside out, ensuring it stays moist and succulent during the frying process. It also creates a richer, slightly tangy base for the seasoned flour to cling to, resulting in a more flavorful and crisper crust.

What temperature should the oil be for frying?

For authentic, perfectly crispy fried chicken, maintaining the correct oil temperature is vital. I recommend frying at 325°F (160°C) when you first put the chicken in. This allows the chicken to cook through without the exterior burning. As you add more chicken, the temperature might drop, so you may need to adjust the heat to bring it back up slightly, ideally keeping it between 300-325°F (150-160°C) during frying.

Can I use chicken thighs instead of breasts?

Yes, you absolutely can use chicken thighs! In fact, many people prefer thighs for their extra moisture and flavor. If using bone-in thighs, they will take longer to cook than thin-sliced breasts, so adjust your frying time accordingly, ensuring they reach an internal temperature of 165°F (74°C). Boneless, skinless thighs are also a great option and will cook similarly to breasts.

How do I make sure the chicken is cooked through?

The most reliable way to ensure your chicken fried chicken is cooked through is by using an instant-read thermometer. Insert it into the thickest part of the chicken, avoiding bone if applicable. The chicken is done when it reaches an internal temperature of 165°F (74°C). Visually, it should be opaque white throughout, with juices running clear.

Share Your Version!

I always love to see what you create in your own kitchens! If you try this chicken fried chicken recipe, please leave a comment and a star rating below. It helps other home cooks know what to expect! If you share a photo of your masterpiece on Instagram or Pinterest, please tag me at @exorecipe – I can’t wait to see your beautiful creations! Have you ever experimented with different flavor profiles for your fried chicken using spices from your own heritage? I’d love to hear about it!

From my NYC kitchen to yours — I hope this recipe brings as much warmth to your table as it does to mine. — mia 🧡

📌

Love This Recipe? Save It to Pinterest!

If you enjoyed this Chicken Fried Chicken recipe, don’t let it get lost in your browser tabs! 😄 Pin it now so you can find it again anytime — and explore hundreds more tried-and-tested recipes waiting for you on my Pinterest boards.

👉 Follow mia on Pinterest @chefrecipes2

📌 Pin this recipe · 🔁 Re-pin your favorites · 💬 Tag me when you make it — I love seeing your creations!

Print

clock clock iconcutlery cutlery iconflag flag iconfolder folder iconinstagram instagram iconpinterest pinterest iconfacebook facebook iconprint print iconsquares squares iconheart heart iconheart solid heart solid icon

Chicken Fried Chicken

  • Author: Chef Mia

Description

Easy and delicious this Chicken Fried Chicken is a quick and flavorful dinnertime recipe that brings the whole family to the table, with minimal ingredients it’s a simple and comforting meal.


Ingredients

Scale
  • 68 thin sliced chicken breasts
  • 2 cups flour
  • 2 tsp baking powder
  • 1 tsp baking soda
  • 1 tsp salt
  • 1 tsp pepper
  • 1 tsp garlic powder
  • 1 1/2 cup buttermilk
  • 1 egg
  • 1 Tbs hot sauce
  • Oil for frying
  • 1/4 cup reserved oil from frying
  • 1/3 cup flour
  • 2 cup milk
  • Salt & pepper

Instructions

  1. Heat oil in deep fryer or large pan on stove (a few inches deep) to 325.
  2. In large bowl whisk together your flour, baking powder, baking soda, salt, pepper and garlic powder.
  3. In another bowl whisk together buttermilk, egg and hot sauce.
  4. Dredge your chicken in the flour mixture then dip into the egg mixture than back into the flour mixture making sure to press down flour to get stuck on the steak real good.
  5. Place chicken in pan/deep fryer and fry on each side 3-5 minutes until golden brown, remove and drain on paper towel lined plate, repeat with all chicken.
  6. To make your gravy, in large pan add 1/4" of oil from cooking and heat on medium-high, stir in your flour until absorbed and cook for about 1 minute.
  7. Slowly add in your milk whisking to blend and heat until thickened then stir in salt and pepper to desired taste.
  8. Pour gravy over individual chicken before serving.


Nutrition

  • Calories: 490 kcal
  • Sugar: 7 g
  • Fat: 18 g
  • Carbohydrates: 45 g
  • Protein: 35 g


Chicken Fried Chicken

ph">For more delicious inspiration, follow me on Pinterest!