Table of Contents
Garlic Parmesan Chicken Skewers – Juicy, Buttery & Perfectly Charred in the Air Fryer
Let me take you back to my first bite of a truly unforgettable garlic parmesan chicken skewer. I was a young cook in Paris, training under a chef who believed butter and garlic could cure anything. He’d brush a golden, fragrant butter sauce over chicken as it sizzled, and the smell would draw everyone in the kitchen. Later, I brought that technique home to my mother’s kitchen in Morocco, where we added a whisper of harissa-like heat and fresh parsley. Now, in my tiny New York City apartment, I’ve perfected these Garlic Parmesan Chicken Skewers in the air fryer — tender, juicy, and absolutely bursting with flavor. The secret? A double-basting method that locks in moisture and builds layers of savory, cheesy goodness.
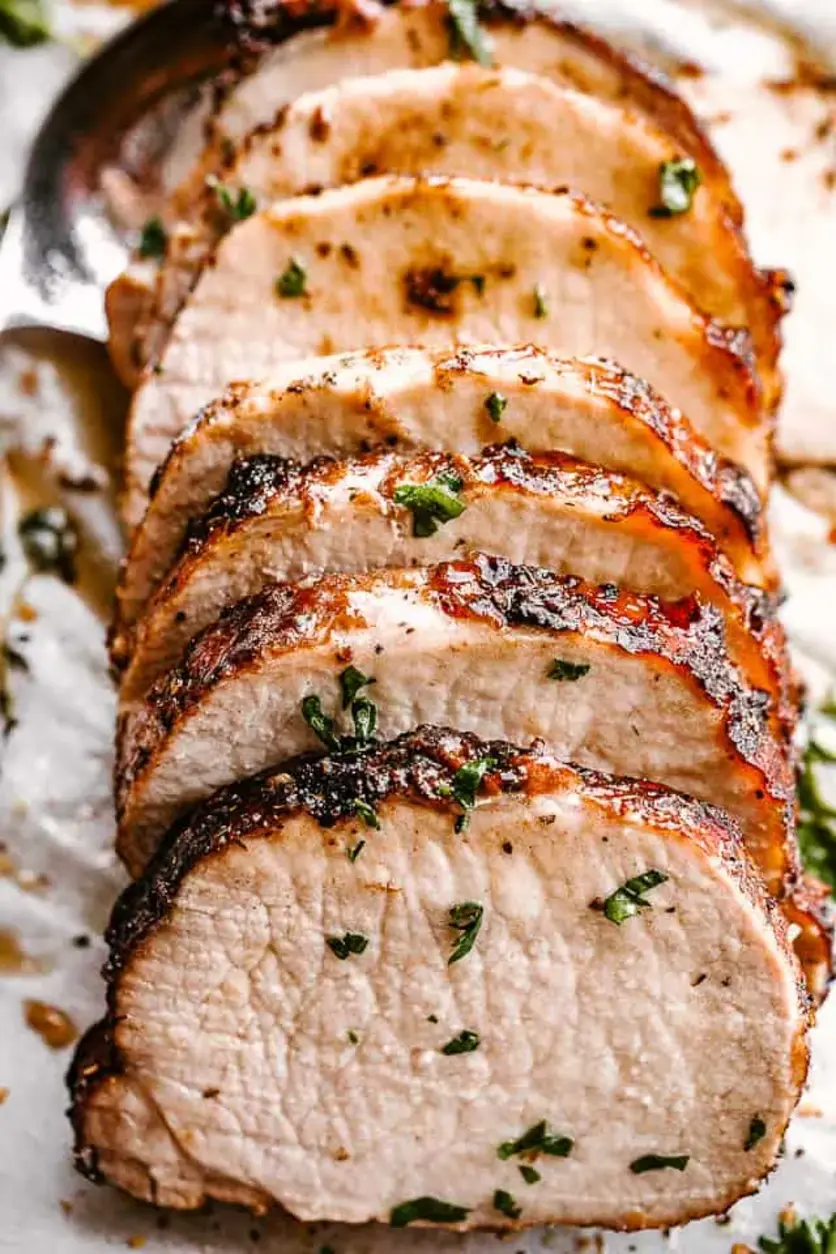
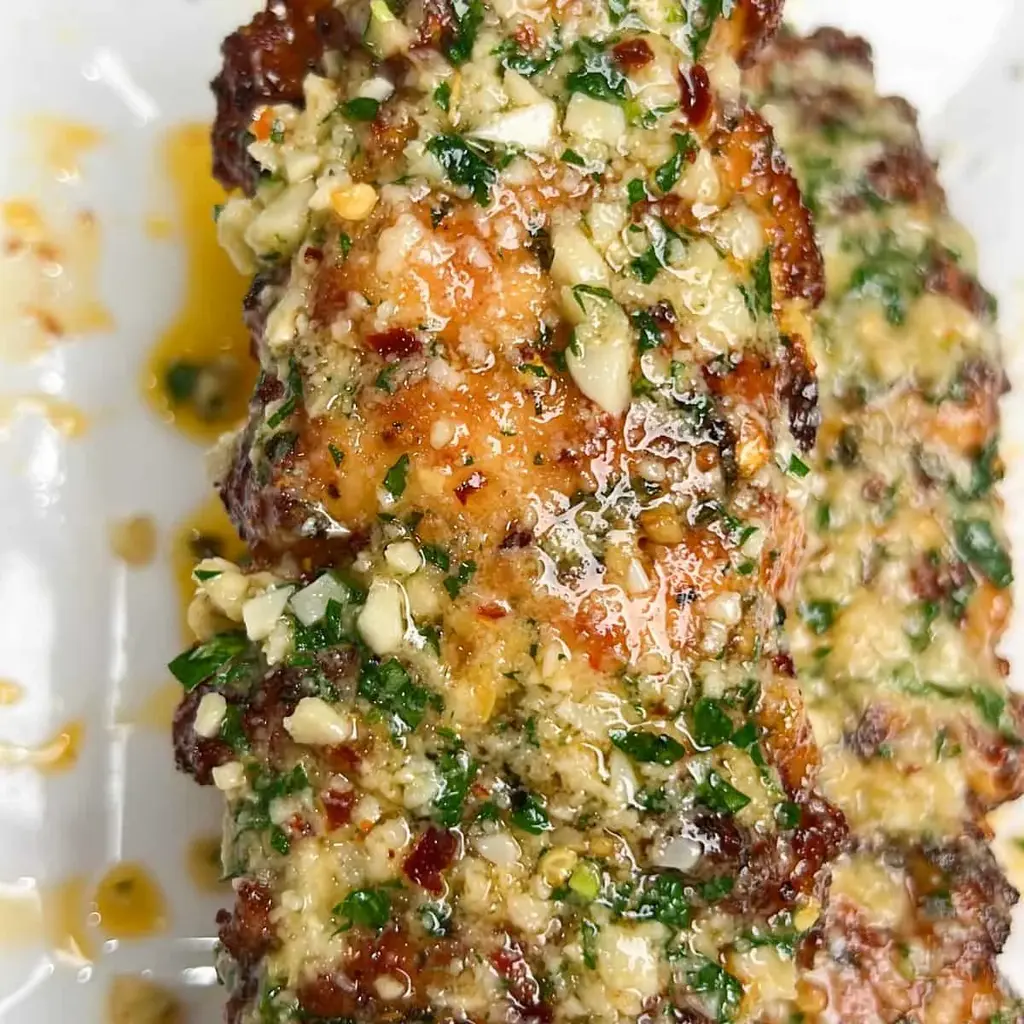
Imagine piercing a piece of chicken with your fork: the exterior is lightly charred and speckled with melted Parmesan and parsley, while the inside is so juicy it almost falls apart. Each bite carries the punch of fresh garlic, the richness of butter, and a subtle kick from hot sauce and red pepper flakes. The aroma alone — garlic toasting, cheese browning, paprika warming — is enough to make your stomach growl. These skewers are the kind of dish that disappears before you can say “second serving.”
I’ve tested this recipe over a dozen times to make sure it works perfectly in the air fryer, which gives you that beautiful golden crust without the fuss of a grill. My version stands out because of the sauce: a garlic Parmesan butter that we baste in stages, first to build flavor, then to finish with a clean, fresh layer. One common mistake is overcrowding the skewers — we’ll avoid that by cooking in small batches. And my Pro Tip? Soak those wooden skewers for at least 30 minutes, or they’ll burn before the chicken is done. Trust me, I learned that one the hard way.
Why This Garlic Parmesan Chicken Skewers Recipe Is the Best
The Flavor Secret: The magic lies in the garlic Parmesan butter — a silky emulsion of butter, minced garlic, hot sauce, red pepper flakes, fresh parsley, and finely grated Parmesan. This isn’t just a marinade; it’s a baste that we apply at different stages of cooking. The first coat caramelizes into a crust, while the final coat stays bright and fresh. I learned this layering technique during my pastry training in Paris, where we would glaze cakes in stages. It works wonders for savory dishes too.
Perfected Texture: Here’s a chef’s trick: pack the chicken pieces tightly onto the skewer with no gaps. This prevents the meat from drying out because the pieces protect each other, trapping steam and juices inside. When you cook in the air fryer at 400°F, the high heat sears the outside quickly while the inside stays tender. The basting every few minutes adds another layer of moisture, so you get that fall-apart texture every single time.
Foolproof & Fast: This recipe is designed for busy weeknights and spontaneous get-togethers. From prep to plate in under 30 minutes, with no grill needed. The air fryer does the heavy lifting, and the only real work is mixing the spice rub and whisking the butter sauce. Even if you’ve never made chicken skewers before, the step-by-step instructions and visual cues will guide you to success. Plus, it scales beautifully for parties.
Garlic Parmesan Chicken Skewers Ingredients
I like to source my ingredients from the local farmers market in Union Square — the garlic is always plump and fragrant, and the fresh parsley smells like my mother’s herb garden. The Parmesan I grate myself from a block; pre-shredded won’t melt as smoothly into the butter sauce. And the chicken? Look for organic, air-chilled if you can find it — it’s more tender and has better flavor.
Ingredients List
- 2 lbs chicken tenders, thighs, or breast (cut into 3-inch pieces)
- 2 tbsp olive oil
- 1 stick (8 tbsp) unsalted butter
- 8–10 cloves garlic, minced
- ½ cup grated Parmesan cheese (plus extra for finishing)
- 1 tbsp hot sauce (Frank’s RedHot or your favorite)
- 2 tsp red pepper flakes (adjust to heat preference)
- ⅓ cup fresh parsley, minced
- 2 tsp paprika
- 1 tsp garlic powder
- 1 tsp onion powder
- ½ tsp salt
- ½ tsp black pepper
- Wooden skewers (soaked in water at least 30 minutes)
Ingredient Spotlight
Chicken: I prefer boneless skinless chicken thighs for maximum juiciness, but breasts work too if you’re watching calories. Cut uniform pieces so they cook evenly. If using breasts, slightly flatten thicker parts with a meat mallet.
Parmesan: Always use a good-quality wedge of Parmigiano-Reggiano and grate it yourself. The pre-grated stuff contains anti-caking agents that prevent smooth melting. Parmesan adds umami and helps the sauce cling to the chicken.
Butter: Unsalted gives you control over the salt level. If you only have salted, reduce the added salt to ¼ teaspoon. The butter creates the rich base for the basting sauce and helps develop that golden crust.
Garlic: Fresh garlic is non-negotiable here. Pre-minced jars have a metallic taste. I mince mine by hand or use a garlic press. The garlic mellows as it cooks in the butter, releasing sweetness.
Hot Sauce: A tablespoon adds just a whisper of heat and acidity that cuts through the richness. You can omit it for a milder version, or double it for extra kick.
| Original Ingredient | Best Substitution | Flavor / Texture Impact |
|---|---|---|
| Chicken tenders/thighs | Boneless skinless chicken breast | Slightly leaner; cook 2 minutes less to avoid dryness |
| Unsalted butter | Ghee or vegan butter (for dairy-free) | Ghee adds nuttiness; vegan butter may be less creamy |
| Parmigiano-Reggiano | Pecorino Romano | More salty and tangy; reduce added salt |
| Frank’s RedHot | Sriracha or your favorite hot sauce | Sriracha adds sweetness and garlic; adjust to taste |
| Fresh parsley | Fresh cilantro or basil | Cilantro gives a brighter, herbaceous note; basil becomes sweeter |
How to Make Garlic Parmesan Chicken Skewers — Step-by-Step
These skewers come together quickly, so read through the steps once before you start. The key is to keep your basting sauce divided into a “cooking batch” and a “finishing batch” for food safety and best flavor.
Step 1: Prep Your Skewers and Chicken
Soak the wooden skewers in water for at least 30 minutes before using. This prevents them from burning in the hot air fryer. While they soak, cut your chicken into 3-inch pieces. Pat them dry with paper towels — this helps the seasoning stick better and promotes browning.
💡 mia’s Pro Tip: If you forget to soak, use metal skewers instead. They conduct heat and help cook the interior faster.
Step 2: Season the Chicken
In a small bowl, combine paprika, garlic powder, onion powder, salt, and pepper. This is your spice blend. Place the chicken pieces in a large bowl or zip-top bag, drizzle with olive oil, and toss with the spice mixture until each piece is well coated. Let it sit while you prepare the sauce.
⚠️ Common Mistake to Avoid: Don’t skip the olive oil! The oil helps the spices adhere and also aids in browning. Without it, the seasoning will fall off.
Step 3: Skewer the Chicken
Thread the seasoned chicken pieces onto the soaked skewers, packing them tightly together with no gaps. Leave about ½ inch of space at each end for handling. If the skewers are too long for your air fryer basket, snip off the sharp points with kitchen shears after threading.
💡 mia’s Pro Tip: Tight packing is the secret to juicy skewers. The pieces steam each other from the inside, staying tender while the exterior gets crisp.
Step 4: Make the Garlic Parmesan Butter
In a microwave-safe bowl, combine the butter and minced garlic. Heat in 20-second bursts until the butter is mostly melted but not boiling — you want some butter solids still slightly firm. Stir in the hot sauce, red pepper flakes, minced parsley, and grated Parmesan. Whisk until smooth and combined. If the sauce separates (butter and water separate), add 1–2 tablespoons of softened butter and whisk again to re-emulsify.
⚠️ Common Mistake: Don’t overheat the butter or it will break completely. Gentle melting is the key to a creamy sauce.
Step 5: Baste and Cook – First Round
Divide the sauce: scoop out about ⅓ of it into a small bowl for basting during cooking (this will be discarded after contact with raw chicken). Reserve the remaining ⅔ for the final basting. Place 2–3 skewers in the air fryer basket in a single layer. Cook at 400°F for 5 minutes. Remove the basket, flip the skewers, and brush with the “cooking” sauce. Return to the air fryer and cook another 2 minutes.
💡 mia’s Pro Tip: Use a clean, heat-safe silicone brush for basting. Wash it thoroughly between the cooking and finishing batches to avoid cross-contamination.
Step 6: Flip, Baste, Cook – Second Round
After the 2 minutes, flip the skewers again (so the original side is up). Baste with more cooking sauce. Return to the air fryer and cook another 5–6 minutes, or until the internal temperature reaches 165°F when tested with an instant-read thermometer. Total air fryer time is about 12–14 minutes, depending on your model.
⚠️ Common Mistake: Don’t rely on time alone — chicken must reach 165°F to be safe. Air fryers vary widely in heat distribution.
Step 7: Final Baste and Finish
Once the chicken is fully cooked, transfer the skewers to a serving platter. Using the reserved fresh sauce (the ⅔ that never touched raw chicken), brush each skewer generously. This final coat gives you that vibrant, raw-garlic-and-parsley flavor that makes the recipe shine. Sprinkle with extra grated Parmesan and a pinch of fresh parsley.
💡 mia’s Pro Tip: For an extra pop of color and acidity, squeeze a little fresh lemon juice over the skewers right before serving — it balances the richness beautifully.
Step 8: Rest and Serve
Allow the skewers to rest for 2–3 minutes before serving. This lets the juices redistribute so every bite is moist. Serve immediately with your favorite sides and extra sauce on the side.
| Step | Action | Duration | Key Visual Cue |
|---|---|---|---|
| 1 | Soak skewers, cut & dry chicken | 30 min (soak) + 5 min | Chicken pieces uniform, 3” |
| 2 | Season with spice blend & oil | 5 min | All pieces evenly coated red/orange |
| 3 | Skewer chicken tightly | 5 min | No gaps between pieces |
| 4 | Make garlic parmesan butter | 5 min | Smooth, creamy, pale yellow |
| 5 | Air fry 400°F first side | 5 min | Top surface golden with brown spots |
| 6 | Flip, baste (cooking batch), cook | 2 min | Bubbling sauce, edges crisp |
| 7 | Flip, baste again, final cook | 5–6 min | Internal temp 165°F, deep golden |
| 8 | Baste with fresh sauce, rest, serve | 3 min rest | Glossy, bright green parsley specks |
Serving & Presentation
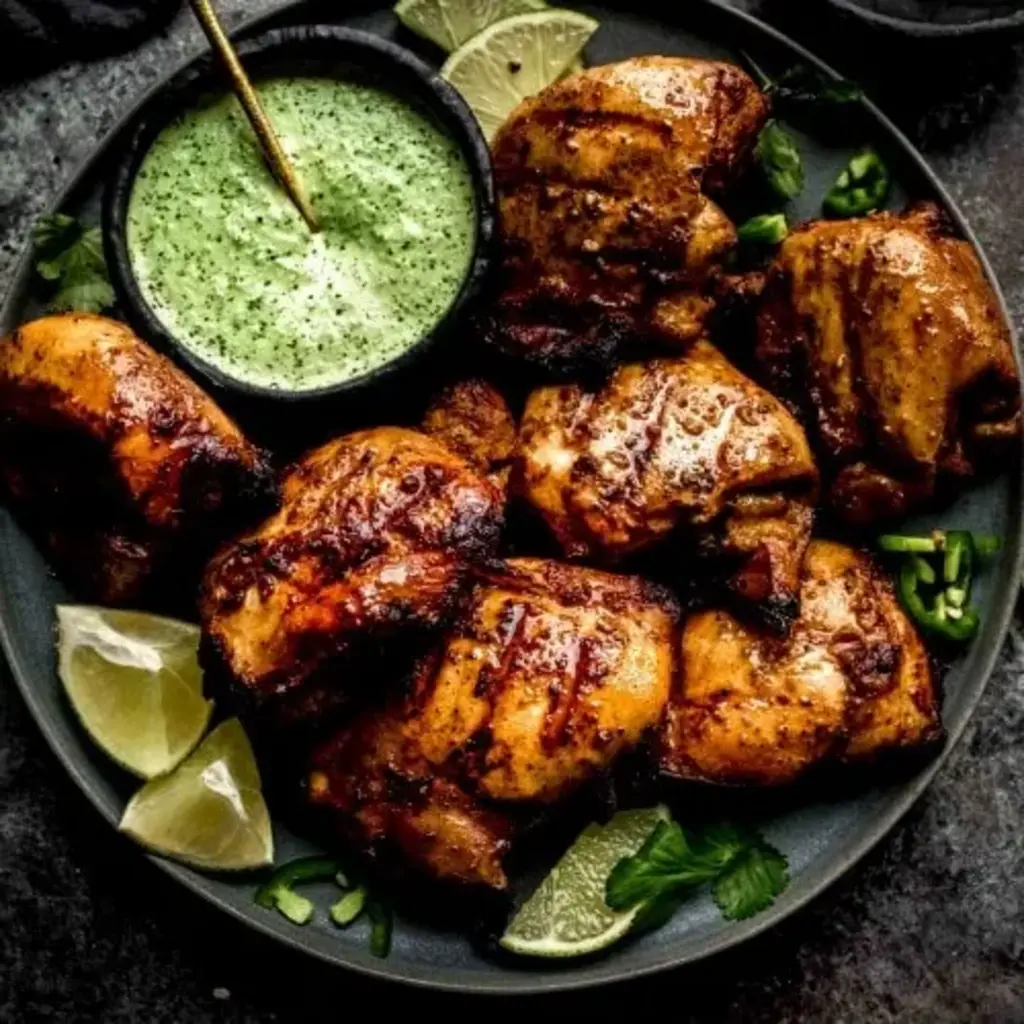
I love serving these skewers over a bed of fluffy basmati rice or creamy garlic mashed potatoes — the buttery sauce pools underneath and soaks into the starch. For a lighter meal, pile them on a big salad with cucumber, cherry tomatoes, and a yogurt dressing inspired by my mother’s Moroccan table. Don’t forget a side of the reserved garlic Parmesan butter for dipping (just whisk in a little lemon juice to thin it). It’s the kind of dish that feels both elegant and comforting, perfect for a dinner party or a casual weeknight dinner.
When I make these for a crowd — like our Sunday gatherings at our little apartment in Brooklyn — I arrange the skewers on a large wooden board, sprinkle with extra Parmesan and parsley, and garnish with lemon wedges and a small bowl of extra sauce. The presentation couldn’t be easier, and everyone goes straight for the ones with the most caramelized bits.
For beverage pairings, I recommend a crisp Sauvignon Blanc or a light lager to balance the richness. If you’re feeling adventurous, a Moroccan mint tea (sweet and cool) is a delightful contrast.
| Pairing Type | Suggestions | Why It Works |
|---|---|---|
| Side Dish | Basmati rice, garlic mashed potatoes, roasted veggies | Soaks up the buttery sauce; neutral base |
| Sauce / Dip | Extra garlic parmesan butter, tzatziki, ranch | Adds creaminess or tangy contrast |
| Beverage | Sauvignon Blanc, light lager, iced mint tea | Acidity or carbonation cuts fat; tea refreshes |
| Garnish | Lemon wedges, extra parsley, red pepper flakes | Brightness and color |
Make-Ahead, Storage & Reheating
My NYC schedule is hectic, so I often prep these skewers the night before or batch-cook them for the week. The chicken can be seasoned and skewered up to 24 hours ahead; just keep them covered in the fridge. The garlic Parmesan butter can be made 3 days in advance and stored in an airtight container. When you’re ready to cook, simply bring the butter to room temperature (or gently reheat in the microwave in short bursts).
| Method | Container | Duration | Reheating Tip |
|---|---|---|---|
| Refrigerator | Airtight container or zip-top bag | 3–4 days | Air fry at 350°F for 3–4 minutes; brush with extra sauce |
| Freezer | Wrap tightly in foil then place in freezer bag | Up to 2 months | Thaw in fridge overnight, then reheat as above |
| Make-Ahead | Seasoned skewers on a tray, covered | Up to 24 hours in advance | Take out 15 minutes before cooking to take chill off |
To reheat, avoid the microwave — it can make the chicken rubbery. Instead, use the air fryer at 350°F for 3–4 minutes, then brush with a little fresh butter sauce or olive oil to revive the moisture. For larger batches, you can reheat in a preheated 375°F oven for about 8–10 minutes.
Variations & Easy Swaps
| Variation | Key Change | Best For | Difficulty Impact |
|---|---|---|---|
| Spicy Moroccan Twist | Add 1 tsp harissa paste to butter + ½ tsp cumin to spice rub | Extra heat and North African flair | Easy |
| Dairy-Free Option | Replace butter with vegan butter, omit Parmesan or use nutritional yeast | Dairy-free / lactose intolerant | Easy – moderate flavor change |
| Herb & Lemon Version | Replace parsley with basil & mint, add zest of 1 lemon | Summer vibes, fresh and bright | Easy |
Spicy Moroccan Twist
Growing up in Morocco, we always had a jar of preserved lemons and harissa in the fridge. For this twist, stir 1 teaspoon of harissa paste into the garlic Parmesan butter along with ½ teaspoon of ground cumin in the spice rub. The harissa brings a smoky, floral heat that pairs beautifully with the Parmesan. This version is fantastic served with couscous and roasted carrots.
Dairy-Free Option
If you’re avoiding dairy, swap the butter for a high-quality vegan butter (I like Miyoko’s) and replace the Parmesan with 2 tablespoons of nutritional yeast blended with ¼ cup of breadcrumbs for a crispy coating. The texture will be slightly less creamy, but the umami from nutritional yeast is surprisingly close. Brush with a little more vegan butter at the end to keep them moist.
Herb and Lemon Version
For a bright, summery version, replace the parsley with a mix of fresh basil and mint (about ½ cup total), and add the zest of one lemon to the butter sauce. Squeeze the lemon juice over the finished skewers. This variation is perfect for outdoor parties — I love serving it with grilled pita and tzatziki. The lemon cuts through the richness and elevates the garlic.
How do you keep garlic Parmesan chicken skewers from drying out on the grill?
The key to preventing dry skewers is to use a combination of fat and moisture. Start by marinating the chicken in olive oil and your spice blend for at least 30 minutes to lock in moisture. When grilling, baste frequently with the garlic Parmesan butter — the butter creates a protective barrier that slows down moisture loss. Also, don’t overcook: use a meat thermometer and pull the skewers at 160°F (they’ll carryover cook to 165°F). Another crucial tip I learned in Paris: pack the chicken tightly on the skewer with no gaps. The pieces steam each other from the inside, keeping them incredibly juicy. If you’re using a charcoal grill, move the skewers to a cooler zone after searing to finish cooking gently.
Can I use chicken thighs instead of chicken breast for garlic Parmesan skewers?
Absolutely! In fact, I prefer boneless, skinless chicken thighs for this recipe because they have a higher fat content that stays tender and forgiving during cooking. Thighs are less likely to dry out than breasts, especially if you’re a beginner. Just cut them into uniform 3-inch pieces so they cook evenly. The cook time will be roughly the same, about 12–14 minutes in the air fryer at 400°F. If you substitute breasts, I recommend brining them first (soak in salt water for 15 minutes) to boost moisture, and check for doneness a minute or two earlier. The flavor will be slightly leaner but still delicious with that garlic Parmesan butter basting.
What is the best way to get the Parmesan coating to stick to the chicken skewers?
The Parmesan coating sticks best when you apply it as part of a butter-based sauce rather than trying to coat the raw chicken with cheese alone. In my recipe, the grated Parmesan is whisked into the melted butter along with garlic, hot sauce, and parsley. This creates an emulsion that clings to the chicken surface during basting. For an extra-crispy crust, you can also roll the raw seasoned chicken in a mixture of ¼ cup grated Parmesan and 2 tablespoons of breadcrumbs before skewering, but be careful — the breadcrumbs can burn in the air fryer. I recommend sticking with the butter-basting method for the best flavor and texture. When you baste during the last few minutes of cooking, the Parmesan melts and adheres beautifully, creating that irresistible golden coating.
How long should you marinate garlic Parmesan chicken skewers for the best flavor?
For this recipe, you don’t need a long marinade because the flavor comes from the repeated basting with the garlic Parmesan butter during cooking. However, if you want to maximize the spice rub’s impact, let the seasoned chicken rest in the fridge for 30 minutes to 2 hours before threading onto skewers. Any longer than that, and the salt in the rub can start to draw moisture out of the chicken, making it slightly dry. If you’re meal-prepping, you can leave the chicken in the spice rub overnight, but I’d recommend holding back a tiny bit of salt and adding it just before cooking. For the most intense garlic flavor, you can also add a few cloves of minced garlic to the marinade bag, but since we’re adding garlic in the basting sauce, it’s not necessary.
Can I make these skewers in the oven or on the grill?
Yes, definitely! For the oven, preheat to 425°F and place skewers on a wire rack over a baking sheet. Bake for 12–15 minutes, flipping and basting halfway through, until the internal temperature reaches 165°F. For the grill, cook over medium-high heat (about 400°F) for 4–5 minutes per side, basting with the cooking sauce after each flip. The total grill time is similar — about 12–14 minutes. The key difference is that you’ll want to keep a close eye on the grill to prevent flare-ups from the butter drippings. Both methods will work wonderfully. The air fryer version is my favorite for speed and convenience, but the grill adds a lovely smoky char that many people love. Whichever method you choose, always follow the same basting sequence: start with cooking sauce, finish with the reserved fresh sauce.
What can I use instead of wooden skewers?
You can use metal skewers — they are reusable and don’t require soaking. I love using flat-blade metal skewers because the chicken doesn’t spin when you flip it. Another option is to skip the skewers entirely and cook the chicken pieces directly in the air fryer basket as loose pieces. Just spread them in a single layer and shake the basket halfway through. The flavor and cooking time will be the same, though you’ll lose the fun presentation of skewers. If you’re serving a crowd, you can also use short bamboo toothpicks for appetizer-sized bites — just adjust the cook time to about 8–10 minutes.
How do I prevent the garlic from burning in the air fryer?
Garlic can burn quickly at high temperatures, which is why I add it to the butter sauce rather than rubbing it directly on the chicken. In the sauce, the butter surrounds the garlic and slows down caramelization. Additionally, by basting only after the first flip, you’re adding the garlic mixture when the chicken is already partially cooked, so it has less time to burn. If you’re concerned, you can also use roasted garlic puree instead of raw minced garlic — it’s sweeter and less prone to burning. But honestly, with the short cook time and the basting schedule I’ve outlined, the garlic will toast gently and stay fragrant, not bitter. Just avoid applying the sauce at the very beginning of cooking; start basting after the first 5 minutes.
What should I serve with garlic Parmesan chicken skewers for a party?
These skewers are incredibly versatile for parties. For a casual gathering, I set out a platter of skewers alongside a big bowl of herbed rice, a simple arugula salad with lemon vinaigrette, and a basket of warm crusty bread for sopping up the extra butter sauce. You can also serve them as appetizers — just cut the skewers in half or use short toothpicks. Dipping sauces are always a hit: try a cool yogurt-mint sauce, extra garlic butter, or a spicy mayo. For drinks, a crisp Sauvignon Blanc or a light Belgian beer pairs beautifully. And don’t forget to put out extra lemon wedges and fresh parsley for garnish — they make the platter look gorgeous with minimal effort.
Can I freeze uncooked garlic Parmesan chicken skewers?
Yes, you can freeze the skewers before cooking. Thread the seasoned chicken onto the skewers, then lay them in a single layer on a parchment-lined baking sheet and freeze until solid (about 2 hours). Once frozen, transfer the skewers to a freezer-safe bag or container, removing as much air as possible. They will keep for up to 2 months. To cook, thaw them overnight in the refrigerator, then cook in the air fryer at 400°F as directed, adding an extra 2–3 minutes since they start colder. I don’t recommend freezing the butter sauce — it’s best made fresh. But you can prep the dry spice rub ahead and store it in a jar for weeks.
How do I adjust the recipe for a lower spice level?
To make a mild version of these garlic Parmesan chicken skewers, simply reduce or omit the hot sauce and red pepper flakes. Start by using only 1 teaspoon of red pepper flakes (or none at all), and skip the hot sauce entirely. The rest of the recipe remains the same — you’ll still get plenty of flavor from the garlic, Parmesan, parsley, and paprika. If you want a little warmth without the heat, add ¼ teaspoon of smoked paprika instead of the pepper flakes. Children and spice-sensitive guests will love this milder version, and you can always pass a bottle of hot sauce at the table for those who want extra kick.
Share Your Version!
I’d love to hear how these Garlic Parmesan Chicken Skewers turned out in your kitchen! Did you stick with the air fryer, or try the oven or grill? Did you add your own twist — maybe extra lemon, a different herb, or a drizzle of honey? Drop a star rating below and leave a comment with your experience. Your feedback helps other readers discover their perfect version.
If you snapped a photo, please share it on Pinterest or Instagram and tag @exorecipes. I love scrolling through your beautiful plates and seeing how you make this recipe your own. Don’t forget to pin this post to your favorite chicken recipe board so you never lose it!
From my NYC kitchen to yours — I hope this recipe brings as much warmth to your table as it does to mine. — mia 🧡
Love This Recipe? Save It to Pinterest!
If you enjoyed this Garlic Parmesan Chicken Skewers recipe, don’t let it get lost in your browser tabs! 😄 Pin it now so you can find it again anytime — and explore hundreds more tried-and-tested recipes waiting for you on my Pinterest boards.
👉 Follow mia on Pinterest @chefrecipes2
📌 Pin this recipe · 🔁 Re-pin your favorites · 💬 Tag me when you make it — I love seeing your creations!
⭐ Tried this recipe? Let me know!
Tap the stars to rate it ⭐⭐⭐⭐⭐ and leave a comment below. Your feedback helps other cooks and makes my day! And don’t forget to tag @exorecipes on Instagram so I can share your beautiful creation.
Click to rate: ★ ★ ★ ★ ★

Garlic Parmesan Chicken Skewers
Description
Fall-apart chicken skewers. These are basted with a homemade garlic parmesan sauce throughout the cooking process and easily prepared in an air fryer.Enjoy as an appetizer or serve over a bed of rice and veggies spread with leftover garlic parmesan butter**SEE NOTES for oven or grill instructions**
Ingredients
- 2 lbs chicken tenders, thighs or breast
- 2 tbsp olive oil
- 1 stick butter
- 8–10 cloves garlic, minced
- 1/2 cup parmesan, grated
- 1 tbsp hot sauce (more if desired)
- 2 teaspoons red pepper flakes
- 1/3 cup fresh parsley, minced
- 2 teaspoons paprika
- 1 teaspoon garlic powder
- 1 teaspoon onion powder
- 1/2 teaspoon salt
- 1/2 teaspoon pepper
Instructions
- Before you start, make sure to soak your wooden skewers in water for at least 30 minutes.
- Start by combining your chicken seasoning mixture in a small bowl and set aside. Prep your chicken by cutting in 3" pieces. Place them in a large bowl or ziptop bag and toss in olive oil and the spices, coating well on all sides.
- Pack the chicken onto each skewer, making sure they are tightly packed with no space in between to ensure maximum juiciness. If needed, snip the top few inches of the skewers to fit in the air fryer after the chicken is skewered.
- Add the butter and garlic in a microwave-safe bowl and heat until partially melted. Add in red pepper flakes, hot sauce, parsley, and parmesan. Whisk together until combined. (If sauce separates, add 1-2 tablespoons of softened butter and stir to re-emulsify.)
- Scoop out 1/3 of the sauce and use that for basting the par-cooked chicken. Reserve the remaining sauce for basting the cooked chicken so you don't cross contaminate. Be sure to wash your basting brush in between.
- Cook 2-3 skewers at a time. Place in an air fryer and cook at 400 degrees for 5 minutes. Remove and flip the skewers, baste with sauce, return to cook an additional 2 minutes at 400 degrees.
- Flip them back, baste with more sauce and cook another 5-6 minutes or until the internal temp reaches 165 degrees. Total cook time of 12-14 minutes. This time will vary based on your air fryer.
- Once they are finished cooking, hit them with a final pass of the garlic sauce (the clean reserved sauce) and sprinkle with some extra parmesan and serve.

Tried This Recipe? Leave a Comment!
Did you make this recipe? I’d love to hear how it turned out! Please leave a comment and a rating below. Your feedback helps other home cooks and supports cheerychop.com!
For more delicious inspiration, follow me on Pinterest!