Table of Contents
Peruvian Chicken Recipe with Creamy Green Sauce – Juicy, Flavor-Packed, and Grill-Ready!
I still remember the first time I tasted truly great Peruvian Chicken — it was at a tiny hole-in-the-wall spot in Queens, not long after I moved to New York City. The moment that chicken hit my lips, I was transported. The smoky char, the deeply savory marinade with soy sauce and cumin, and that impossibly creamy green sauce on the side — it was love at first bite. This Authentic Peruvian Grilled Chicken, or Pollo a la Brasa as it’s known in Peru, has everything I crave in a recipe: bold flavor, simple technique, and the kind of weeknight magic that makes you feel like a chef. My version — this Peruvian Chicken Recipe with Creamy Green Sauce — stays true to the classic while adding a few touches from my own culinary journey. The soy sauce in the marinade? That’s a nod to the Peruvian-Chinese fusion you find all over Lima, a city I fell in love with during my culinary travels. The green sauce? It’s pure, unabashedly creamy perfection — bright from lime and cilantro, with a gentle heat from jalapeño that builds slowly and never overwhelms.
Let me paint you a picture of what you’re about to create in your own kitchen. Imagine tender, juicy chicken thighs — not dry, not bland, but succulent and deeply infused with a marinade that hits every single note: salty from the soy sauce, bright from fresh lime juice, warm and earthy from cumin and paprika, with a whisper of oregano that lingers on the finish. As that chicken hits the grill grates, the sizzle alone will make your mouth water. The marinade caramelizes into a beautiful mahogany crust, while the inside stays impossibly moist. And then there’s the sauce — oh, that sauce. It’s a vibrant, emerald-green dream: cool and creamy from Greek yogurt and mayonnaise, herbaceous from a full cup of cilantro, with just enough jalapeño to keep things interesting. Dip a piece of that smoky, charred chicken into the sauce and you’ll understand why this recipe has become one of the most requested on my blog. The contrast of temperatures, textures, and flavors is simply unforgettable.
What makes this Peruvian Chicken Recipe truly special — and what I’m most excited to share with you today — is how approachable it is for home cooks. You don’t need a fancy grill or hard-to-find ingredients. You don’t need to have grown up in Peru to get that authentic taste. What you need is a good marinade, a little patience (the marinating time does the heavy lifting), and my creamy green sauce that will become your new obsession. I’ve tested this recipe more times than I can count — for backyard barbecues in Brooklyn, for weeknight dinners in my own tiny Manhattan kitchen, and for friends who begged me to bottle that sauce. As a trained chef who spent years learning French technique in Paris, I know how to build layers of flavor with precision. But as a home cook who learned from her mother in Morocco, I also know that the best food comes from the heart. This recipe is the best of both worlds. I’ll walk you through every step, share my pro tips, and help you avoid the common mistakes so your Peruvian Chicken turns out perfect the very first time.
Why This Peruvian Chicken Recipe Is the Best
The Flavor Secret. The magic of this Authentic Peruvian Grilled Chicken starts with a marinade that uses soy sauce as its backbone — a trick I picked up from the Chinese-Peruvian (Chifa) tradition that’s so integral to Lima’s food scene. Soy sauce adds an umami depth that salt alone can’t touch, and it helps the chicken develop that deep, mahogany-colored crust when it hits the heat. Combined with cumin, paprika, oregano, and fresh lime juice, this Peruvian Chicken Marinade is a masterclass in balance. It’s savory, tangy, warm, and slightly sweet — all at once. My French training taught me that a great marinade is about harmony, not just intensity, and this one nails it every time.
Perfected Texture. Chicken thighs are the unsung heroes of grilling season, and I use them here because they stay juicy and tender even when cooked over high heat. But the real trick — learned from years of professional cooking — is the marinating time. Eight hours is the minimum, but if you can go twenty-four, you’ll be rewarded with chicken that’s infused all the way to the bone. The acidity from the lime juice tenderizes the meat without making it mushy, while the oil helps carry the fat-soluble flavors deep into the tissue. When I worked in Paris, my chef always said that patience is the cheapest ingredient you can buy — and he was right. This recipe proves it.
Foolproof & Fast. I know not everyone has a grill, and I’ve got you covered. This recipe works beautifully on a grill (my favorite method) or in the oven — I include both sets of instructions so you can cook it no matter the weather or your equipment. The creamy green sauce comes together in your blender in under two minutes, and it can be made days ahead. Whether you’re a seasoned backyard pitmaster or a total beginner, this recipe is forgiving, flexible, and absolutely delicious. Plus, the entire active cooking time is under an hour — the only thing you need to plan ahead is the marinating, which is completely hands-off.
Peruvian Chicken Recipe Ingredients
When I shop for this recipe, I head straight to my go-to spots in NYC. The cilantro and jalapeños come from the Union Square Greenmarket in summer — there’s nothing like the smell of fresh herbs from a local farm. The spices I buy from a little bodega in my neighborhood that stocks the best cumin and paprika. And the chicken? I always look for organic, pastured thighs — they have more flavor and better texture. Whether you’re shopping at a farmers market or your local grocery store, these ingredients are all easy to find and incredibly rewarding to cook with.
Ingredients List
For the Chicken and Marinade
- 2 pounds chicken thighs (boneless, skinless)
- 5 cloves garlic (peeled)
- 1/3 cup soy sauce
- 2 Tablespoons lime juice
- 1 Tablespoon extra virgin olive oil
- 2 teaspoons cumin
- 1 teaspoon paprika
- 1/2 teaspoon dried oregano
- Black pepper (to taste)
For the Creamy Green Sauce
- 3 jalapeños (seeded, ribs removed and roughly chopped)
- 1 cup fresh cilantro leaves
- 2 green onions (chopped, green parts only)
- 2 cloves garlic (peeled)
- 1/2 cup mayonnaise
- 1/4 cup Greek yogurt
- 1 Tablespoon lime juice
- 1/2 teaspoon salt
- 1/4 teaspoon black pepper
- 2 Tablespoons extra virgin olive oil
Ingredient Spotlight
Soy Sauce. This is my secret weapon in the Peruvian Chicken Marinade. It adds deep, savory umami that salt alone can’t provide, and it helps the chicken develop a beautifully caramelized crust during cooking. Use a good-quality soy sauce like Kikkoman or San-J tamari for the best flavor. If you need a gluten-free option, tamari works perfectly and tastes almost identical. Avoid low-sodium soy sauce here — the full salt content helps the marinade penetrate the meat and build that signature flavor.
Cumin. Cumin is the heart and soul of this Authentic Peruvian Grilled Chicken. It gives the marinade its warm, earthy, slightly nutty character that’s unmistakably Peruvian. I recommend using ground cumin that’s been stored in a cool, dark place — spices lose their potency over time, and fresh cumin makes a huge difference. Toasting whole cumin seeds and grinding them yourself takes the flavor to another level, but pre-ground works wonderfully too. If you run out, you can substitute with an equal amount of ground coriander for a different but still delicious flavor profile.
Jalapeños. For the creamy green sauce, jalapeños provide the perfect balance of bright heat without overwhelming the other flavors. Seeding and removing the ribs tames the spiciness while keeping the fresh, grassy flavor. If you want more heat, leave a few seeds in. If you’re heat-sensitive, use only one jalapeño or swap in half a poblano pepper for a milder, slightly smoky flavor. My French-trained palate loves the precision of controlling heat this way — it’s all about balance.
Greek Yogurt. The yogurt in the green sauce adds tanginess and creaminess while keeping the sauce lighter than if it were made with just mayonnaise. I use full-fat Greek yogurt because it emulsifies better and doesn’t separate in the fridge. If you’re dairy-free, you can use a thick plant-based yogurt or simply use all mayonnaise — the sauce will be richer but still absolutely delicious. The combination of yogurt and mayo is a classic French technique that creates a sauce with the perfect consistency: thick enough to cling to the chicken, but not so heavy that it masks the other flavors.
| Original Ingredient | Best Substitution | Flavor / Texture Impact |
|---|---|---|
| Soy Sauce | Tamari or coconut aminos | Tamari is nearly identical; coconut aminos are sweeter and less salty |
| Greek Yogurt | Full-fat sour cream or dairy-free yogurt | Sour cream is tangier; dairy-free yogurt may be thinner |
| Jalapeños | Serrano peppers or poblano peppers | Serrano is spicier; poblano is milder and slightly smoky |
| Cumin | Ground coriander or a pinch of smoked paprika | Coriander is citrusy and bright; smoked paprika adds smokiness |
| Chicken Thighs | Chicken breast or bone-in thighs | Breasts cook faster and can dry out; bone-in thighs need longer cooking time |
How to Make Peruvian Chicken Recipe — Step-by-Step
Making this Authentic Peruvian Grilled Chicken at home is easier than you think. I’ve broken it down into clear, manageable steps with my best pro tips and the most common mistakes to watch out for. Whether you’re grilling or baking, the key is to trust the process — and don’t skip the marinating time!
Step 1: Make the Marinade
Add the peeled garlic, soy sauce, lime juice, extra virgin olive oil, cumin, paprika, dried oregano, and a generous pinch of black pepper to a blender. Puree on high until the mixture is completely smooth, about 30 seconds. The marinade should look emulsified and smell incredibly fragrant — that’s the garlic and cumin doing their work. Give it a taste (just a tiny bit!) and adjust the black pepper if needed.
💡 mia’s Pro Tip: Let the marinade sit for 5 minutes after blending. This allows the dried oregano and cumin to rehydrate and bloom, which deepens their flavor. I learned this technique during my time in Paris — patience with dried herbs makes a world of difference.
Step 2: Marinate the Chicken
Place the chicken thighs in a large ziploc bag or a glass dish with a tight-fitting lid. Pour the marinade over the chicken, seal the bag (removing as much air as possible), and massage the marinade into every piece. Make sure each thigh is evenly coated. Place the bag in the refrigerator and allow the chicken to marinate for at least 8 hours and up to 24 hours. The longer you marinate, the deeper the flavor will penetrate.
⚠️ Common Mistake to Avoid: Don’t marinate for less than 8 hours. I know it’s tempting to rush, but the acidity from the lime juice needs time to tenderize the meat, and the spices need hours to fully infuse. If you’re short on time, aim for a minimum of 4 hours — but 8 is where the magic really happens. Also, never marinate at room temperature — always keep it in the fridge to prevent foodborne illness.
Step 3: Make the Creamy Green Sauce
While the chicken marinates, prepare the green sauce. In a blender, combine the seeded and chopped jalapeños, fresh cilantro leaves, green onion tops, peeled garlic, mayonnaise, Greek yogurt, lime juice, salt, and black pepper. Pulse a few times to break everything down, then process until smooth. With the motor running, slowly drizzle in the extra virgin olive oil through the opening in the lid. The sauce will emulsify and become beautifully creamy and vibrant green. Transfer to a bowl, cover, and refrigerate until you’re ready to serve. The flavors actually get better after a few hours in the fridge.
💡 mia’s Pro Tip: For the brightest green color, blanch the cilantro and jalapeños in boiling water for 10 seconds, then plunge them into an ice bath before blending. This sets the chlorophyll and prevents the sauce from turning brown over time. It’s a French technique that I use for all my herb sauces — it keeps them looking gorgeous for days.
Step 4: Grill the Chicken (Grill Method)
Preheat your grill to medium-high heat, around 350°F. Remove the chicken from the marinade and let any excess drip off — you want a thin, even coating, not pools of liquid. Place the thighs on the grill grates and close the lid. Cook for 5-6 minutes without opening the lid — this helps the chicken develop that beautiful char and keeps the heat consistent. Using tongs (never a fork, which pierces the meat and lets juices escape), flip the chicken thighs. Cook for an additional 5-6 minutes with the lid closed. Check the internal temperature with a digital thermometer — it should reach 165°F in the thickest part of the thigh. If it needs more time, flip and cook in 2-minute increments until done.
⚠️ Common Mistake to Avoid: Don’t move the chicken around on the grill during the first 5 minutes. Let it sit and develop a nice sear. If you try to flip it too early, the chicken will stick to the grates and the beautiful crust will tear. Trust the process — when it’s ready, the chicken will release easily from the grill grates.
Step 5: Oven-Baked Alternative (No Grill? No Problem!)
Preheat your oven to 500°F — yes, that’s hot, but it’s the key to getting a nice caramelized exterior without a grill. Place the marinated chicken thighs in a single layer in a 13×9 inch roasting pan. Add 1 cup of water to the pan (this creates steam that keeps the chicken moist). Bake uncovered for 30 minutes. Then tent the pan loosely with aluminum foil and cook for an additional 15 minutes. The internal temperature should reach 165°F when tested with a digital thermometer. The foil traps steam at the end, ensuring the chicken stays juicy while the skin (if using skin-on thighs) gets perfectly tender.
💡 mia’s Pro Tip: For an extra-crispy finish in the oven, switch the oven to broil for the last 2-3 minutes of cooking. Watch it closely — broilers can go from perfect to burnt very quickly! This gives you that grill-like char without ever lighting a flame. I use this trick all winter long in my NYC apartment when the weather doesn’t cooperate for grilling.
| Step | Action | Duration | Key Visual Cue |
|---|---|---|---|
| 1 | Make the marinade | 5 minutes | Smooth, emulsified, fragrant |
| 2 | Marinate chicken | 8–24 hours | Chicken looks evenly coated |
| 3 | Make green sauce | 10 minutes | Vibrant green, creamy |
| 4a | Grill chicken | 10–14 minutes | Char marks, internal temp 165°F |
| 4b | Bake chicken (alt.) | 45 minutes | Golden-brown, internal temp 165°F |
Serving & Presentation
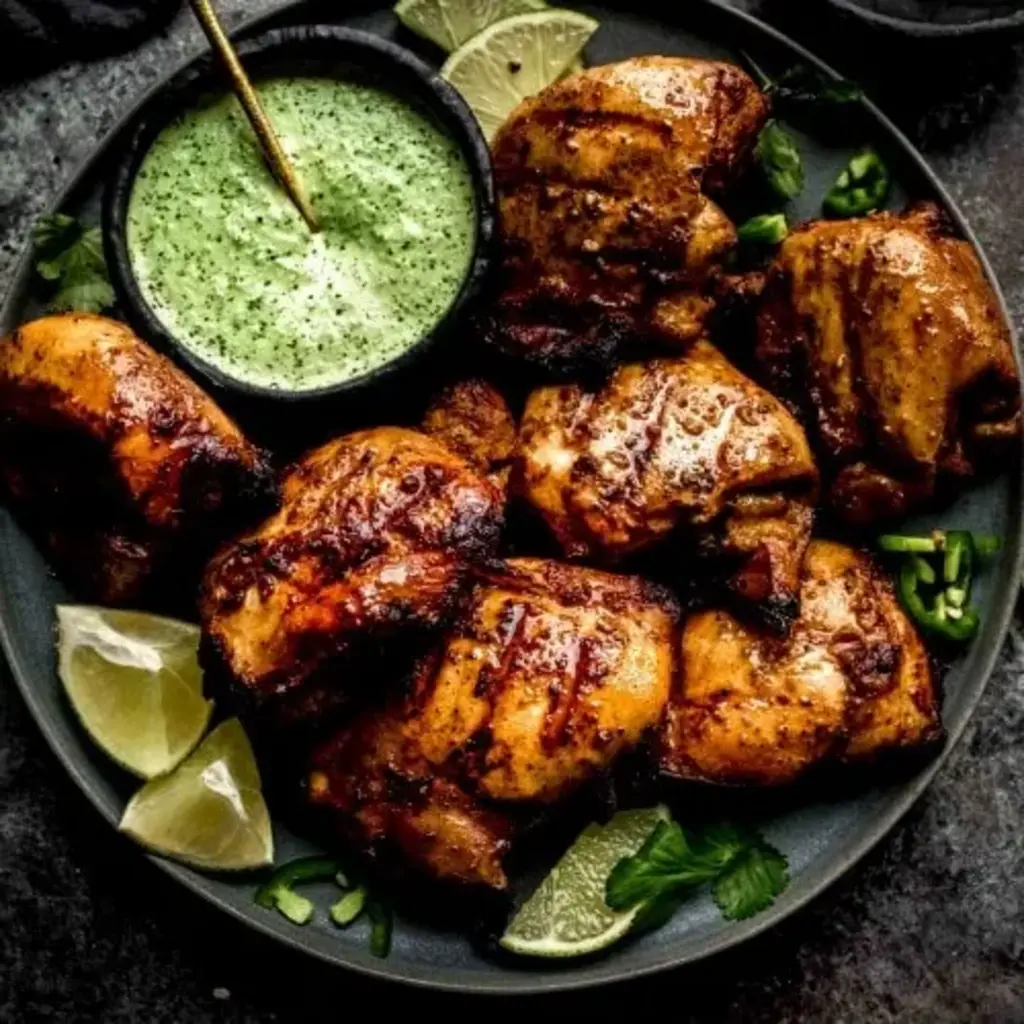
When I serve this Peruvian Chicken Recipe, I like to let the vibrant colors do the talking. Arrange the grilled chicken thighs on a large platter — I love using my white ceramic serving dish from Morocco, which makes the rich mahogany of the chicken and the bright green of the sauce pop beautifully. Drizzle some of the creamy green sauce over the chicken (but not too much — you want people to see that beautiful char), and serve the rest in a small bowl on the side for dipping. Garnish with a few extra cilantro sprigs and thin lime wedges for a fresh, restaurant-quality presentation.
In my NYC kitchen, I love pairing this chicken with simple, crowd-pleasing sides that let the main event shine. A crisp Peruvian-style slaw made with shredded red cabbage, lime juice, and a pinch of cumin is a favorite — it adds crunch and acidity that cuts through the richness of the chicken. For starch, I go with either fluffy white rice (to soak up every drop of that green sauce) or crispy roasted sweet potatoes seasoned with smoked paprika. The sweetness of the potatoes is a beautiful contrast to the savory, spicy chicken. And if I’m feeling really nostalgic, I’ll make a simple quinoa salad with cucumbers and mint — a nod to the North African flavors I grew up with in Morocco.
| Pairing Type | Suggestions | Why It Works |
|---|---|---|
| Side Dish | Peruvian slaw, white rice, roasted sweet potatoes, quinoa salad | Adds crunch, absorbs sauces, contrasts sweetness with savory chicken |
| Sauce / Dip | Creamy green sauce, extra lime wedges, hot sauce (for heat lovers) | The green sauce is the star — cool, creamy, and herbaceous |
| Beverage | Chilled Peruvian beer (Cusqueña), cilantro-lime sparkling water, Sauvignon Blanc | Crisp, cold beverages cut through the richness of the chicken and sauce |
| Garnish | Fresh cilantro sprigs, lime wedges, thinly sliced red onion | Adds freshness, color contrast, and a pop of brightness |
Make-Ahead, Storage & Reheating
As a busy New York City food blogger, I live by make-ahead meals. This Peruvian Chicken Recipe is one of my favorites to prep in advance. The chicken marinates overnight (that’s the make-ahead part), and the green sauce can be made up to 3 days ahead. On busy weeknights, I just pull the chicken from the fridge, fire up the grill or oven, and dinner is on the table in under 45 minutes. The sauce keeps beautifully in the fridge and actually gets more flavorful as the ingredients meld together. I often double the sauce recipe because it’s also amazing on tacos, roasted vegetables, or as a sandwich spread.
| Method | Container | Duration | Reheating Tip |
|---|---|---|---|
| Refrigerator | Airtight container (chicken and sauce separate) | Up to 4 days | Reheat chicken in a 350°F oven for 10 minutes to restore crispness |
| Freezer | Freezer-safe bag or container (chicken only; sauce doesn’t freeze well) | Up to 3 months | Thaw in fridge overnight, then reheat in a 350°F oven or air fryer at 375°F for 6 minutes |
| Make-Ahead | Marinate in ziploc bag; store sauce in jar | Marinate up to 24 hours ahead; sauce up to 3 days ahead | Remove chicken from fridge 20 minutes before cooking to take the chill off |
For reheating, I’ve found that the oven or air fryer works much better than the microwave, which can make the chicken rubbery and dry out the sauce. If you’re reheating just the chicken, place it on a baking sheet in a 350°F oven for about 10 minutes, or until warmed through. The green sauce should be served cold or at room temperature — never warm it up, as the mayonnaise and yogurt can separate and become grainy. If the sauce has thickened too much in the fridge, stir in a teaspoon of water or lime juice to loosen it back up. This is one of those recipes that tastes almost as good the next day — if there are any leftovers, that is!
Variations & Easy Swaps
| Variation | Key Change | Best For | Difficulty Impact |
|---|---|---|---|
| Spicy Aji Amarillo Version | Add 2 Tbsp aji amarillo paste to marinade | Heat lovers, authentic Peruvian flavor seekers | Easy (paste is widely available online) |
| Dairy-Free Green Sauce | Replace Greek yogurt with extra mayo or dairy-free yogurt | Dairy-free diets | Easy (one swap) |
| Lemon-Herb Twist | Add lemon zest and fresh mint to the green sauce | Brighter, more herbaceous flavor profile | Easy (adds 2 minutes) |
Spicy Aji Amarillo Version
If you want to take this Authentic Peruvian Grilled Chicken to the next level of authenticity, add 2 tablespoons of aji amarillo paste to the marinade. Aji amarillo is a bright yellow Peruvian chili with a fruity, moderately spicy flavor that’s absolutely unique. It’s available in jars at Latin grocery stores or online, and it keeps in the fridge for months. The paste adds a gorgeous golden hue to the marinade and a warm, lingering heat that works beautifully with the cumin and soy sauce. This is how my favorite pollería in Queens makes their chicken — and now you can too. If you can’t find aji amarillo, substitute with 1 tablespoon of sriracha mixed with 1 teaspoon of turmeric for color — it’s not the same, but it’s a solid backup.
Dairy-Free Green Sauce
This variation is incredibly simple and works perfectly for anyone avoiding dairy. Simply replace the Greek yogurt with an equal amount of additional mayonnaise (use a good-quality one like Hellmann’s or a vegan mayo) or a thick, unsweetened plant-based yogurt. The sauce will be slightly richer and a bit tangier if you use all mayo, or slightly thinner if you use dairy-free yogurt. I’ve tested this with both oat milk yogurt and coconut yogurt, and both work beautifully — just make sure the yogurt isn’t flavored or sweetened. The rest of the ingredients stay exactly the same. The sauce will still be creamy, vibrant, and absolutely delicious poured over your Peruvian Chicken.
Lemon-Herb Twist
This is a variation I developed during a particularly gray NYC winter when I was craving something bright and fresh. Add the zest of one lemon to the green sauce along with 1/4 cup of fresh mint leaves (in addition to the cilantro). The lemon zest adds a fragrant, sunny brightness that cuts through the richness of the chicken, and the mint brings a cool, slightly sweet note that pairs beautifully with the jalapeño. This version is fantastic with the oven-baked method — the brightness of the sauce complements the more caramelized, concentrated flavor of oven-roasted chicken. I also love serving this version with a side of grilled pineapple for a sweet-savory combination that’s absolutely addictive.
What is the secret ingredient in Peruvian chicken marinade?
The secret ingredient that takes Peruvian Chicken Marinade to the next level is soy sauce. While traditional Peruvian recipes often use salt and aji amarillo as the primary seasonings, the Chinese-Peruvian (Chifa) influence introduced soy sauce to the marinade, and it’s become a game-changer. Soy sauce provides deep umami flavor that salt alone cannot achieve, and it helps the chicken develop a beautifully caramelized, mahogany-colored crust during grilling or baking. In my version, I use 1/3 cup of soy sauce along with cumin, paprika, oregano, garlic, and lime juice. The combination creates a complex, savory-sweet-tangy profile that’s unmistakably Peruvian. If you want to get even more authentic, adding aji amarillo paste alongside the soy sauce gives you that classic Peruvian flavor with an extra layer of fruity heat.
How long should you marinate Peruvian chicken for the best flavor?
For the best flavor in this Peruvian Chicken Recipe, I recommend marinating the chicken for at least 8 hours and up to 24 hours. The minimum of 8 hours allows the acidity from the lime juice to begin tenderizing the meat, and gives the spices — especially cumin and paprika — enough time to penetrate deep into the chicken thighs. If you can go the full 24 hours, the flavor becomes noticeably deeper and more complex. The soy sauce, garlic, and spices will have fully infused every bite, from the surface all the way to the center. That said, don’t exceed 24 hours, as the acidity can start to break down the protein structure too much, making the chicken slightly mushy in texture. If you’re short on time, even 4 hours will yield good results — just know that the flavor won’t be as bold as it could be. I always tell my readers: the best things in cooking come to those who wait, and this marinade is no exception.
Can I make Peruvian chicken without aji amarillo paste?
Absolutely — you can make this Authentic Peruvian Grilled Chicken without aji amarillo paste and it will still be absolutely delicious. My recipe is designed specifically to use common, easy-to-find ingredients like soy sauce, cumin, paprika, and oregano, so you don’t need to hunt down specialty products. Aji amarillo paste adds a fruity, mildly spicy flavor and a beautiful golden color, but it’s not essential for a fantastic result. If you do want to approximate that flavor without buying a jar, you can substitute with 1 tablespoon of sriracha mixed with 1 teaspoon of turmeric powder. It won’t be exactly the same, but it will add color and a gentle heat that works beautifully. For the green sauce, the jalapeños provide all the heat and freshness you need — no aji amarillo required. That’s what I love about this recipe: it’s authentic enough to satisfy purists but flexible enough for any home cook.
What is the best way to cook Peruvian chicken if I don’t have a grill?
If you don’t have a grill, the best alternative is to bake the chicken in a very hot oven — and I include full instructions for this method in the recipe above. Preheat your oven to 500°F, place the marinated chicken thighs in a 13×9 inch roasting pan with 1 cup of water, and bake uncovered for 30 minutes. Then tent the pan with foil and bake for another 15 minutes. The high temperature helps create a nice caramelized exterior similar to what you’d get on a grill, and the water in the pan creates steam that keeps the chicken incredibly moist. For an even better result, you can finish the chicken under the broiler for 2-3 minutes to get some char. Another excellent option is using an air fryer — cook the thighs at 375°F for about 12-15 minutes, flipping halfway through. Both methods produce juicy, flavorful chicken that rivals anything from a grill.
What is pollo a la brasa?
Pollo a la Brasa is Peru’s most iconic chicken dish — a whole chicken that’s marinated in a blend of spices, soy sauce, and often aji amarillo, then slow-roasted on a spit over charcoal or wood fire until the skin is crispy and the meat is incredibly juicy and flavorful. It’s Peru’s answer to rotisserie chicken, but with a far more complex and aromatic flavor profile thanks to the marinade. The dish originated in Lima in the 1950s and has since become a national treasure, with dedicated pollerías found on nearly every corner. My Peruvian Chicken Recipe is inspired by this classic but adapted for the home cook using chicken thighs, which cook faster and stay juicier than a whole bird. I serve it with the same creamy green sauce (aji verde) that you’d find at any authentic pollería in Peru — it’s the perfect accompaniment to the smoky, savory chicken.
Can I use chicken breast instead of thighs?
Yes, you can use chicken breast instead of thighs in this Peruvian Chicken Recipe, but there are a few important adjustments to make. Chicken breasts are leaner and cook faster, so they can dry out more easily if you’re not careful. I recommend using boneless, skinless chicken breasts that are evenly thick — about 6-8 ounces each. Reduce the grilling time to about 4-5 minutes per side, and the oven baking time to about 20-25 minutes total (start checking for doneness at 20 minutes). The internal temperature should reach 165°F. For the best results, pound the breasts to an even thickness before marinating so they cook uniformly. The marinade and green sauce work just as beautifully with breasts, and the result is a lighter but still deeply flavorful dish. If you’re using breasts, I especially recommend the oven method with the foil tent to help keep the meat moist.
What goes well with Peruvian chicken?
Peruvian Chicken pairs beautifully with a wide range of sides that balance the bold, savory flavors of the marinade and the cool, creamy green sauce. In Peru, the classic accompaniments are simple: fluffy white rice, crispy french fries (yes, fries are a common side for pollo a la brasa!), and a simple salad of lettuce, tomatoes, and onions with lime dressing. Here in my NYC kitchen, I love serving it with a crunchy Peruvian-style slaw made from shredded red cabbage, lime juice, and a pinch of cumin. Roasted sweet potatoes seasoned with smoked paprika are another favorite — their natural sweetness is a perfect foil for the spicy, savory chicken. For a lighter option, try a quinoa salad with cucumber, mint, and lemon. And of course, extra green sauce on the side is non-negotiable — it’s amazing on everything from rice to fries to the chicken itself.
How do I store leftover Peruvian chicken?
Storing leftover Peruvian Chicken is easy, and the leftovers are almost as delicious as the fresh-cooked version. First, let the chicken cool completely at room temperature — but don’t leave it out for more than 2 hours. Store the chicken and the green sauce separately in airtight containers. The chicken will keep in the refrigerator for up to 4 days. The green sauce lasts a bit longer — about 5 to 7 days in the fridge if stored in a sealed jar. I do not recommend freezing the green sauce, as the mayonnaise and yogurt can separate and become grainy when thawed. The chicken, however, freezes beautifully for up to 3 months. Wrap it tightly in plastic wrap and then place it in a freezer-safe bag. To reheat, thaw the chicken in the refrigerator overnight, then warm it in a 350°F oven for about 10 minutes to restore the texture. Avoid the microwave, which can make the chicken rubbery.
Can I freeze the creamy green sauce?
I don’t recommend freezing the creamy green sauce from this Peruvian Chicken Recipe. The sauce contains both mayonnaise and Greek yogurt, which are emulsions that can break down when frozen and thawed. The result is often a watery, grainy, or separated sauce that’s lost its smooth, creamy texture and vibrant color. Instead, I suggest making the sauce fresh and storing it in the refrigerator for up to 5-7 days. It’s so quick to make — just 10 minutes in the blender — that you can easily whip up a new batch whenever you need it. If you want to meal-prep, you can make the sauce up to 3 days ahead of time and keep it in a tightly sealed jar in the fridge. The flavors actually meld and deepen as it sits, so making it ahead is a great strategy. If you absolutely must freeze it, you can try, but expect the texture to change — you may need to whisk in a tablespoon of fresh mayonnaise after thawing to bring it back together.
Is this Peruvian chicken recipe gluten-free?
This Peruvian Chicken Recipe can easily be made gluten-free with one simple swap. The only ingredient that contains gluten is the soy sauce, as traditional soy sauce is made from fermented wheat and soybeans. To make this recipe gluten-free, simply substitute the soy sauce with tamari, which is a gluten-free soy sauce that tastes nearly identical. Coconut aminos are another good option, though they are slightly sweeter and less salty than soy sauce. All the other ingredients in both the marinade and the creamy green sauce are naturally gluten-free — including the spices, fresh herbs, chicken, yogurt, and mayonnaise. Just be sure to check the labels on your mayonnaise and spices to confirm they haven’t been processed in facilities that handle gluten. With this simple soy sauce swap, you’ll have a fully gluten-free Authentic Peruvian Grilled Chicken that doesn’t compromise on flavor one bit.
Love This Recipe? Save It to Pinterest!
If you enjoyed this Peruvian Chicken Recipe, don’t let it get lost in your browser tabs! 😄 Pin it now so you can find it again anytime — and explore hundreds more tried-and-tested recipes waiting for you on my Pinterest boards.
👉 Follow mia on Pinterest @exorecipe
📌 Pin this recipe · 🔁 Re-pin your favorites · 💬 Tag me when you make it — I love seeing your creations!
Share Your Version!
I hope you love this Peruvian Chicken Recipe as much as I do! If you make it, please leave a star rating and a comment below to let me know how it turned out. Tag me in your photos on Instagram or Pinterest @exorecipe — I absolutely love seeing your creations and sharing them with our community. Did you try the aji amarillo variation? Did your family fight over the last piece? I want to hear everything! From my NYC kitchen to yours — I hope this recipe brings as much warmth to your table as it does to mine. — mia 🧡

Peruvian Chicken Recipe
Description
Peruvian Chicken with Creamy Green Sauce is packed with flavor and the perfect way to add some international flair to your next barbecue.
Ingredients
- 2 pounds chicken thighs (boneless, skinless)
- 5 cloves garlic (peeled)
- 1/3 cup soy sauce
- 2 Tablespoons lime juice
- 1 Tablespoon extra virgin olive oil
- 2 teaspoons cumin
- 1 teaspoon paprika
- 1/2 teaspoon dried oregano
- Black pepper
- 3 jalapeños (seeded, ribs removed and roughly chopped)
- 1 cup fresh cilantro leaves
- 2 green onions (chopped (green parts only) )
- 2 cloves garlic (peeled)
- 1/2 cup mayonnaise
- 1/4 cup Greek yogurt
- 1 Tablespoon lime juice
- 1/2 teaspoon salt
- 1/4 teaspoon black pepper
- 2 Tablespoons extra virgin olive oil
Instructions
- Puree garlic, soy sauce, lime juice, oil, cumin, paprika, oregano and a pinch of black pepper in a blender.
- Put chicken in a large ziploc bag and add marinade. Place in refrigerator and allow to marinate for 8 to 24 hours.
- Combine all ingredients except the olive oil in a blender process until smooth. With the motor running, slowly drizzle in olive oil. Transfer to a bowl and refrigerate until ready to serve.
- Preheat grill to medium-high heat (around 350-degrees). Remove chicken from marinade and shake off any extra marinade. Place on the grill grates. Let chicken cook for 5-6 minutes with the grill cover closed to maintain the heat. Use tongs to flip the chicken thighs. Cook for an additional 5-6 minutes. Use a digital thermometer to make sure internal temperature reaches 165°F.
- Preheat the oven to 500 degrees and place the chicken pieces in a 13×9 inch roasting pan. Add 1 cup water to the pan. Bake uncovered for 30 minutes, then tent the pan with foil and cook for an additional 15 minutes, until the chicken is fully cooked. (The internal temperature should reach 165°F.)
Nutrition
- Calories: 731 kcal
- Sugar: 2 g
- Fat: 60 g
- Carbohydrates: 5 g
- Protein: 39 g

Tried This Recipe? Leave a Comment!
Did you make this recipe? I’d love to hear how it turned out! Please leave a comment and a rating below. Your feedback helps other home cooks and supports cheerychop.com!
For more delicious inspiration, follow me on Pinterest!