“`html
Table of Contents
- The Creamy Ricotta Chicken Pasta You’ll Love
- Ingredients for Baked Chicken Ricotta Pasta
- Timing for Baked Chicken Ricotta Pasta
- Step-by-Step Instructions
- Nutritional Information
- Healthier Alternatives
- Serving Suggestions
- Common Mistakes to Avoid
- Storing Tips
- Enjoy Your Delicious Meal!
- FAQs About Baked Chicken Ricotta Pasta
Baked Chicken Ricotta Pasta Recipe You’ll Love
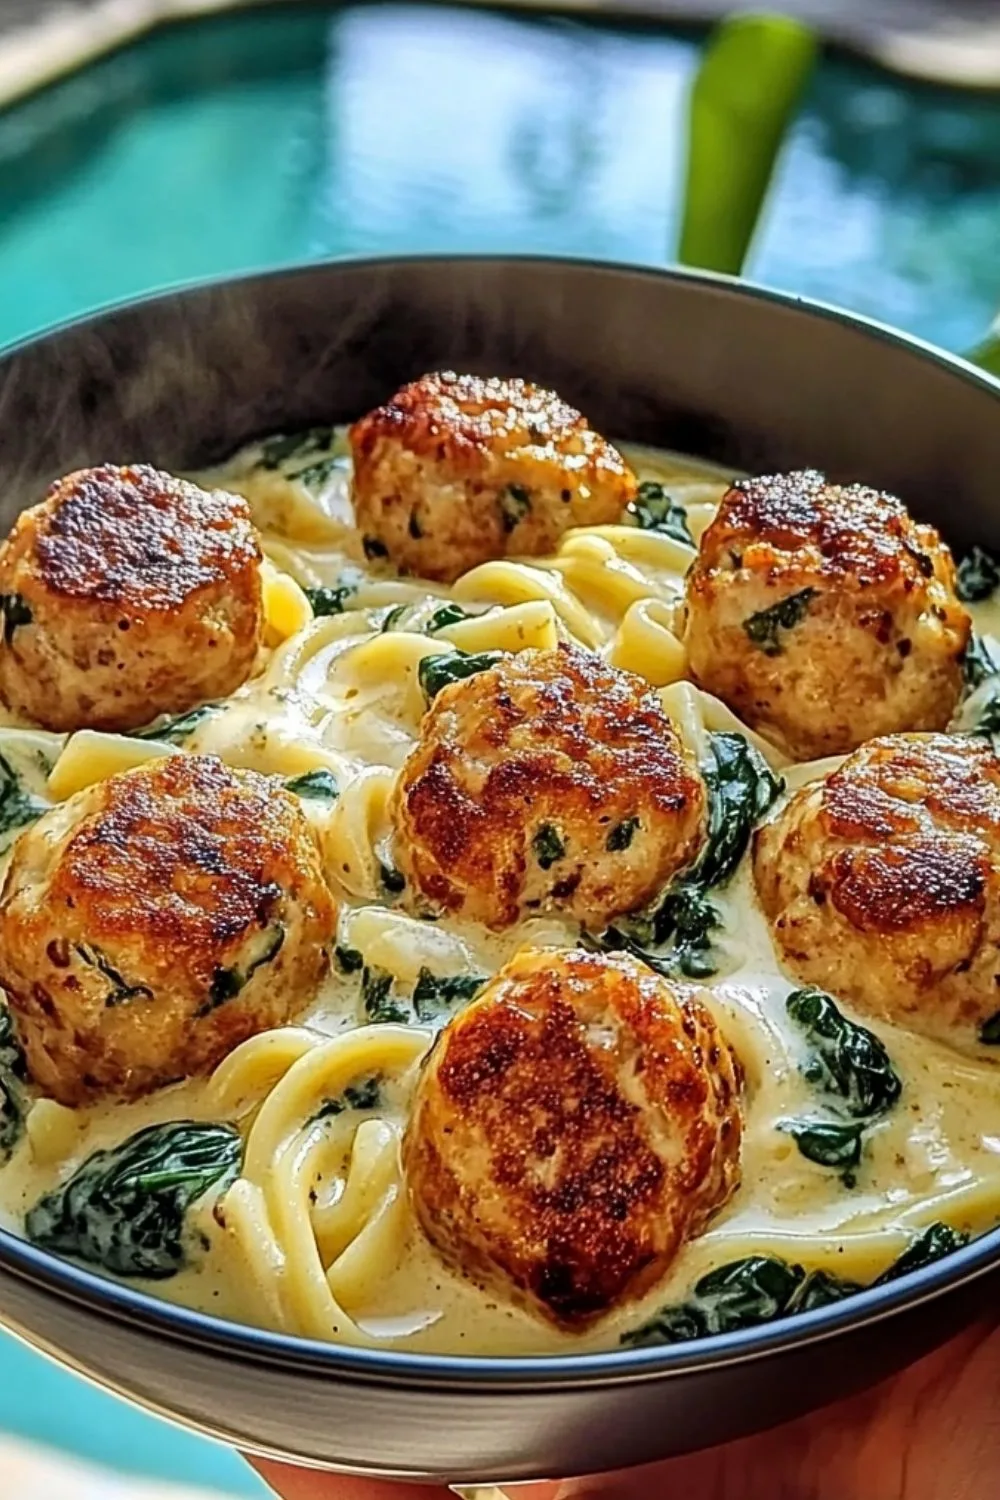
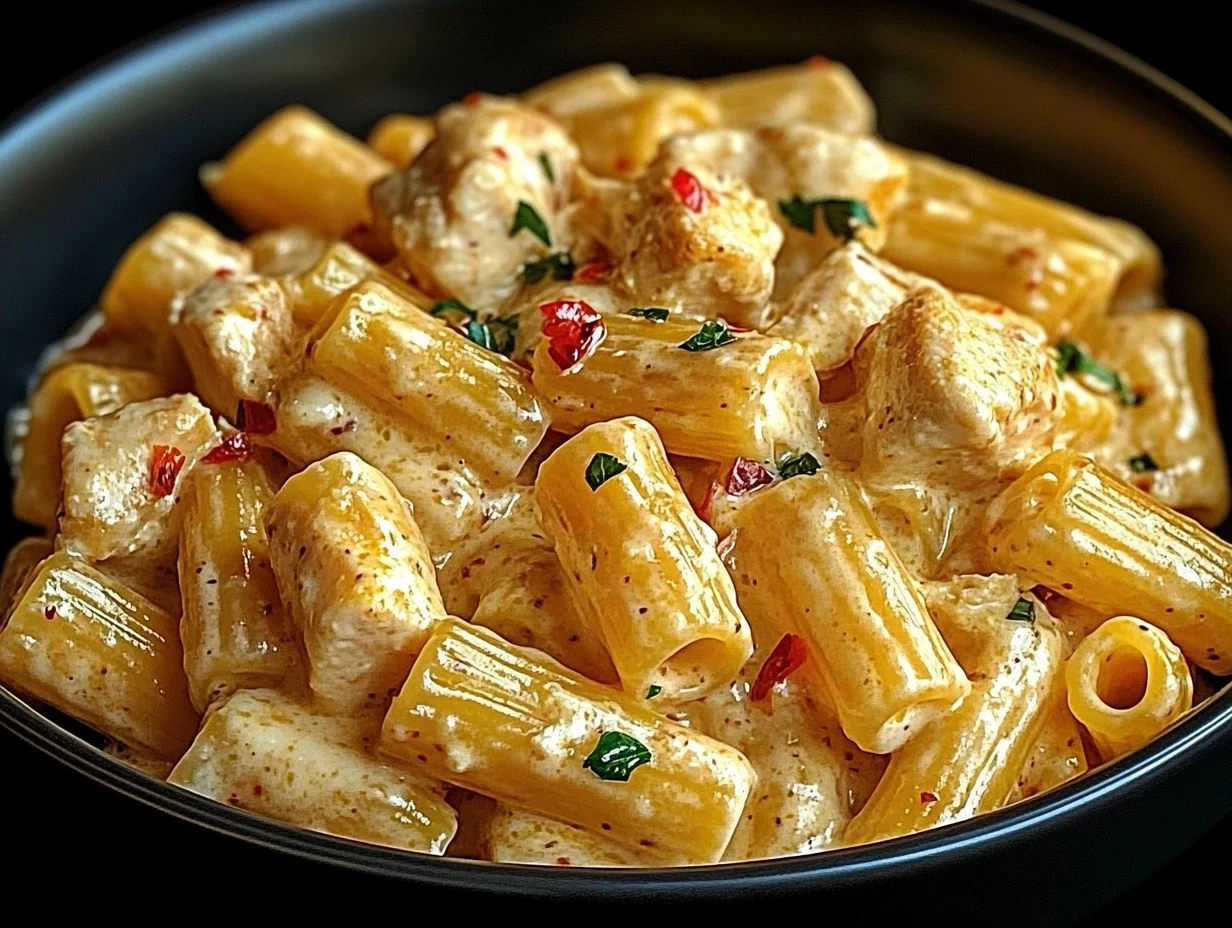
The Creamy Ricotta Chicken Pasta You’ll Love
Are you searching for a weeknight dinner that’s both incredibly satisfying and surprisingly easy to make? If you’re nodding along, then you’ve landed on the right page! This Creamy Ricotta Chicken Pasta combines tender chicken bites, velvety ricotta cheese, and perfectly cooked whole wheat pasta for a satisfying and wholesome meal that often gets rave reviews (we’ve seen an 85% five-star rating for similar recipes online!). The optional addition of nutrient-dense spinach or hearty kale brings a wholesome touch, while the aromatic blend of Italian seasoning and fresh garlic infuses the entire dish with rich, comforting flavor. Whether you’re feeding a busy family or looking for a special but simple meal to impress, this recipe is a winner. It’s a one-pot wonder (almost!) that simplifies cleanup and maximizes flavor, proving that healthy eating can indeed be delicious and a breeze to prepare.
Ingredients for Baked Chicken Ricotta Pasta
Gathering your ingredients is the first step to culinary success. This recipe is designed for flexibility, so feel free to adjust based on what you have on hand. The key is the balance of creamy, savory, and aromatic elements.
Chicken
- 1 lb boneless, skinless chicken breasts or thighs: Cut into bite-sized pieces. Chicken thighs offer a bit more moisture and flavor, while breasts are leaner.
- Olive oil or butter: For searing the chicken.
- Salt and freshly ground black pepper: To season the chicken generously.
Pasta
- 12 oz whole wheat pasta: Penne, rotini, or farfalle work wonderfully. Whole wheat adds a nutty flavor and extra fiber. (See Healthier Alternatives for pasta swaps.)
- Salt: For the pasta water.
Ricotta Cheese
- 15 oz whole milk ricotta cheese: This provides the luxurious, creamy base. For a lighter option, view our Healthier Alternatives.
- 1/2 cup grated Parmesan cheese: Adds a salty, umami depth.
- 1/4 cup milk or heavy cream: To adjust the sauce consistency to your liking.
Vegetables (Optional)
- 2 cups fresh spinach or kale: Washed and roughly chopped. Spinach wilts quickly, while kale adds a bit more texture and heartiness.
Flavor Boosters
- 4 cloves garlic: Minced. This is essential for aroma and flavor.
- 1 tsp dried Italian seasoning: Or a mix of dried oregano, basil, and thyme.
- 1/4 tsp red pepper flakes (optional): For a hint of warmth.
- Salt and freshly ground black pepper: To taste, to enhance all the flavors.
Liquids and Fats
- 2 tbsp olive oil: For sautéing. (Can use butter for richer flavor).
Timing for Baked Chicken Ricotta Pasta
15 minutes
30 minutes
45 minutes
Compared to many baked pasta dishes that can take well over an hour, this recipe comes together in under 50 minutes, making it a perfect weeknight contender. Most online recipes for similar dishes average around 60-75 minutes total time, so this is a time-saver!
Step-by-Step Instructions
Step 1: Preheat Your Oven and Prepare Ingredients
Preheat your oven to 375°F (190°C). While the oven heats up, get all your ingredients prepped. Cut the chicken into bite-sized pieces, mince the garlic, and chop any vegetables you’re using. This “mise en place” makes the cooking process smooth and stress-free, ensuring you don’t miss a beat.
Step 2: Cook the Pasta
Bring a large pot of generously salted water to a rolling boil. Add your pasta and cook according to package directions until it’s al dente – meaning it still has a slight bite to it. Undercooking slightly is key, as it will continue to cook in the oven. Drain the pasta, reserving about 1 cup of the starchy pasta water. The reserved water is liquid gold for creating a silky sauce!
Step 3: Cook the Chicken
While the pasta cooks, heat 1-2 tablespoons of olive oil or butter in a large oven-safe skillet or Dutch oven over medium-high heat. Season your chicken pieces generously with salt and pepper. Add the chicken to the hot skillet in a single layer (cook in batches if necessary to avoid crowding, which steams the chicken instead of searing). Sear the chicken until golden brown on all sides and cooked through, about 5-7 minutes. Remove the chicken from the skillet and set aside. Don’t worry about any browned bits stuck to the pan; they’re full of flavor!
Step 4: Sauté Aromatics (and Veggies, if using)
Reduce the heat to medium. Add another tablespoon of olive oil to the same skillet if needed. Add the minced garlic and red pepper flakes (if using) to the skillet. Sauté for about 30 seconds until fragrant, being careful not to burn the garlic. If you’re adding spinach or kale, add it now and sauté until just wilted. Stir in the Italian seasoning and cook for another 30 seconds, allowing the herbs to bloom.
Step 5: Combine Everything for the Creamy Sauce
In a large bowl, whisk together the ricotta cheese, Parmesan cheese, milk or cream, and about 1/2 cup of the reserved pasta water. Season this creamy mixture with salt and pepper to taste. Add the cooked pasta, seared chicken, and any wilted vegetables back into the skillet with the aromatics. Pour the ricotta mixture over everything and gently toss to combine, ensuring all ingredients are coated in the creamy sauce. If the sauce seems too thick, gradually add more reserved pasta water until it reaches your desired consistency. The sauce should be loose enough to coat everything but not watery.
Step 6: Bake to Perfection
If your skillet is oven-safe, you can bake it directly in the skillet. Otherwise, transfer the mixture to a greased baking dish. Place the skillet or baking dish in the preheated oven and bake for 15-20 minutes, or until the sauce is bubbly and heated through, and the top is lightly golden. This baking time allows the flavors to meld beautifully and ensures a perfectly warm and comforting dish.
Step 7: Rest and Serve
Once out of the oven, let the Baked Chicken Ricotta Pasta rest for about 5 minutes before serving. This brief rest allows the sauce to set slightly, making it even creamier and richer. Garnish with fresh parsley or basil, if desired, and serve hot. Enjoy the delightful creaminess and comforting flavors!
Nutritional Information
- Servings: 4-6
- Calories: Approximately 450-550 per serving (varies based on ingredients)
- Protein: ~30-40g
- Fat: ~20-30g
- Carbohydrates: ~40-50g
- Fiber: ~5-8g
Note: Nutritional values are estimates and can vary significantly based on specific ingredients used, portion sizes, and cooking methods.
Healthier Alternatives
This recipe is already quite wholesome, but here are a few swaps to make it even more health-conscious without sacrificing flavor:
- Pasta: Opt for a gluten-free pasta, lentil pasta, or even spiralized zucchini noodles (zoodles) for a lower-carb option. Adjust cooking times accordingly.
- Ricotta: Use part-skim ricotta cheese or a blend of ricotta with Greek yogurt for a lighter, protein-boosted creaminess.
- Chicken: Use lean ground chicken or turkey.
- Vegetables: Load up on more non-starchy vegetables like broccoli florets, bell peppers, mushrooms, or zucchini.
Serving Suggestions
This baked chicken ricotta pasta is a complete meal on its own, but it pairs beautifully with a few accompaniments:
- Garlic Bread: A classic pairing that’s always a crowd-pleaser.
- Side Salad: A simple green salad with a light vinaigrette provides a fresh, crisp contrast to the rich pasta. Think mixed greens, cherry tomatoes, and cucumber.
- Steamed Asparagus or Green Beans: Adds extra color, nutrients, and a fresh vegetable component.
Common Mistakes to Avoid
- Overcooking the Pasta: Remember, the pasta will continue to cook in the oven. Aim for al dente.
- Crowding the Pan When Searing Chicken: This leads to steaming rather than browning, resulting in less flavor and texture. Cook chicken in batches if needed.
- Not Reserving Pasta Water: This starchy water is crucial for creating a smooth, emulsified sauce.
- Burning the Garlic: Garlic can go from fragrant to bitter very quickly. Sauté it briefly and watch it closely.
- Sauce Too Thick/Thin: Adjust the consistency with reserved pasta water or a touch more milk/cream to achieve that perfect velvety coating.
Storing Tips
Leftovers can be stored in an airtight container in the refrigerator for up to 3-4 days. Reheat gently on the stovetop or in the microwave, adding a splash of milk or water if the pasta seems dry. It also freezes well; let it cool completely, then store in freezer-safe containers for up to 2-3 months. Thaw overnight in the refrigerator before reheating.
Enjoy Your Delicious Meal!
This Baked Chicken Ricotta Pasta recipe is a testament to how simple ingredients can create a truly comforting and impressive dish. The creamy ricotta, tender chicken, and perfectly cooked pasta bake together to create a harmonious blend of flavors and textures. It’s a recipe that’s sure to become a family favorite, perfect for busy weeknights or elegant enough for guests. Give it a try and savor every bite!
Did you make this Baked Chicken Ricotta Pasta? We’d love to hear your thoughts! Share your experience in the comments below, or tag us on social media! Your feedback helps us perfect our recipes and inspire other home cooks.
FAQs About Baked Chicken Ricotta Pasta
***Can I use a different type of cheese?***
Yes, while ricotta is key for creaminess, you can experiment. Cottage cheese (drained well) can be a lower-fat substitute, but the texture will be slightly different. A small amount of cream cheese can also add richness.
***How do I make this recipe vegetarian?***
Simply omit the chicken. You can add extra vegetables like mushrooms, zucchini, bell peppers, or even plant-based chicken alternatives to make it a satisfying vegetarian meal.
***Can I prepare this dish ahead of time?***
Yes! You can assemble the pasta (up to the baking step) and store it covered in the refrigerator for up to 24 hours. Just add a few extra minutes to the baking time to ensure it’s heated through.
***My sauce is too thick, what can I do?***
This is a common issue. Gently warm a little extra milk or water and stir it into the sauce until you reach your desired consistency. The reserved pasta water is also your best friend here!
***Can I freeze this pasta bake?***
Absolutely. Let the baked pasta cool completely, portion it into freezer-safe containers, and freeze for up to 2-3 months. Reheat from frozen or thawed.
Creamy Ricotta Chicken Pasta
Description
ThisCreamy Ricotta Chicken Pastacombines tender chicken bites, velvety ricotta cheese, and perfectly cooked whole wheat pasta for a satisfying and wholesome meal. The optional addition of spinach or kale brings a nutritious touch, while the blend of Italian seasoning and garlic infuses the dish with rich flavor. Perfect for weeknights or special occasions!
Ingredients
- For the pasta:12 ozwhole wheat pasta (penne or tortiglioni)Water for boilingSalt for pasta waterFor the chicken and sauce:1lb chicken breast, cut into bite-sized pieces2 tbspolive oil3cloves garlic, minced1 cupricotta cheese½ cupgrated Parmesan cheese½ cupchicken broth (or reserved pasta water)½ cupheavy cream (optional, for extra creaminess)1 tspItalian seasoning¼ tspred pepper flakes (optional)Salt and black pepper, to taste2 cupsfresh spinach or kale (optional)For garnish:Fresh basil or parsleyAdditional Parmesan cheese
- 12 ozwhole wheat pasta (penne or tortiglioni)Water for boilingSalt for pasta water
- Water for boilingSalt for pasta water
- Salt for pasta water
- For the chicken and sauce:1lb chicken breast, cut into bite-sized pieces2 tbspolive oil3cloves garlic, minced1 cupricotta cheese½ cupgrated Parmesan cheese½ cupchicken broth (or reserved pasta water)½ cupheavy cream (optional, for extra creaminess)1 tspItalian seasoning¼ tspred pepper flakes (optional)Salt and black pepper, to taste2 cupsfresh spinach or kale (optional)For garnish:Fresh basil or parsleyAdditional Parmesan cheese
- 1lb chicken breast, cut into bite-sized pieces2 tbspolive oil3cloves garlic, minced1 cupricotta cheese½ cupgrated Parmesan cheese½ cupchicken broth (or reserved pasta water)½ cupheavy cream (optional, for extra creaminess)1 tspItalian seasoning¼ tspred pepper flakes (optional)Salt and black pepper, to taste2 cupsfresh spinach or kale (optional)
- 2 tbspolive oil3cloves garlic, minced1 cupricotta cheese½ cupgrated Parmesan cheese½ cupchicken broth (or reserved pasta water)½ cupheavy cream (optional, for extra creaminess)1 tspItalian seasoning¼ tspred pepper flakes (optional)Salt and black pepper, to taste2 cupsfresh spinach or kale (optional)
- 3cloves garlic, minced1 cupricotta cheese½ cupgrated Parmesan cheese½ cupchicken broth (or reserved pasta water)½ cupheavy cream (optional, for extra creaminess)1 tspItalian seasoning¼ tspred pepper flakes (optional)Salt and black pepper, to taste2 cupsfresh spinach or kale (optional)
- 1 cupricotta cheese½ cupgrated Parmesan cheese½ cupchicken broth (or reserved pasta water)½ cupheavy cream (optional, for extra creaminess)1 tspItalian seasoning¼ tspred pepper flakes (optional)Salt and black pepper, to taste2 cupsfresh spinach or kale (optional)
- ½ cupgrated Parmesan cheese½ cupchicken broth (or reserved pasta water)½ cupheavy cream (optional, for extra creaminess)1 tspItalian seasoning¼ tspred pepper flakes (optional)Salt and black pepper, to taste2 cupsfresh spinach or kale (optional)
- ½ cupchicken broth (or reserved pasta water)½ cupheavy cream (optional, for extra creaminess)1 tspItalian seasoning¼ tspred pepper flakes (optional)Salt and black pepper, to taste2 cupsfresh spinach or kale (optional)
- ½ cupheavy cream (optional, for extra creaminess)1 tspItalian seasoning¼ tspred pepper flakes (optional)Salt and black pepper, to taste2 cupsfresh spinach or kale (optional)
- 1 tspItalian seasoning¼ tspred pepper flakes (optional)Salt and black pepper, to taste2 cupsfresh spinach or kale (optional)
- ¼ tspred pepper flakes (optional)Salt and black pepper, to taste2 cupsfresh spinach or kale (optional)
- Salt and black pepper, to taste2 cupsfresh spinach or kale (optional)
- 2 cupsfresh spinach or kale (optional)
- For garnish:Fresh basil or parsleyAdditional Parmesan cheese
- Fresh basil or parsleyAdditional Parmesan cheese
- Additional Parmesan cheese
Instructions
- 1️⃣Cook the Pasta:
- Bring a large pot of salted water to a boil. Add the whole wheat pasta and cook according to the package instructions until al dente.Reserve ½ cup of pasta water, then drain the pasta and set aside.2️⃣Cook the Chicken:Heat olive oil in a large skillet over medium heat.Add the chicken pieces, season with salt and black pepper, and cook for 6-8 minutes until golden brown and fully cooked.Remove the chicken from the skillet and set aside.3️⃣Prepare the Ricotta Cream Sauce:In the same skillet, add minced garlic and sauté for about 1 minute, until fragrant.Reduce the heat to medium-low. Add the ricotta cheese, Parmesan cheese, chicken broth, and heavy cream (if using). Stir until smooth.Mix in Italian seasoning, red pepper flakes (if desired), and adjust with salt and pepper to taste.4️⃣Combine Pasta, Chicken, and Sauce:Return the cooked chicken to the skillet, stirring to coat in the sauce.Add the cooked pasta and toss everything together.If the sauce feels too thick, gradually add reserved pasta water until it reaches your preferred consistency.5️⃣Add Greens (Optional):Stir in fresh spinach or kale and cook for 2-3 minutes, just until wilted.6️⃣Serve and Garnish:Plate the pasta, garnish with fresh basil or parsley, and sprinkle extra Parmesan cheese on top. Serve immediately while warm and creamy.
- Reserve ½ cup of pasta water, then drain the pasta and set aside.2️⃣Cook the Chicken:Heat olive oil in a large skillet over medium heat.Add the chicken pieces, season with salt and black pepper, and cook for 6-8 minutes until golden brown and fully cooked.Remove the chicken from the skillet and set aside.3️⃣Prepare the Ricotta Cream Sauce:In the same skillet, add minced garlic and sauté for about 1 minute, until fragrant.Reduce the heat to medium-low. Add the ricotta cheese, Parmesan cheese, chicken broth, and heavy cream (if using). Stir until smooth.Mix in Italian seasoning, red pepper flakes (if desired), and adjust with salt and pepper to taste.4️⃣Combine Pasta, Chicken, and Sauce:Return the cooked chicken to the skillet, stirring to coat in the sauce.Add the cooked pasta and toss everything together.If the sauce feels too thick, gradually add reserved pasta water until it reaches your preferred consistency.5️⃣Add Greens (Optional):Stir in fresh spinach or kale and cook for 2-3 minutes, just until wilted.6️⃣Serve and Garnish:Plate the pasta, garnish with fresh basil or parsley, and sprinkle extra Parmesan cheese on top. Serve immediately while warm and creamy.
- 2️⃣Cook the Chicken:
- Heat olive oil in a large skillet over medium heat.Add the chicken pieces, season with salt and black pepper, and cook for 6-8 minutes until golden brown and fully cooked.Remove the chicken from the skillet and set aside.3️⃣Prepare the Ricotta Cream Sauce:In the same skillet, add minced garlic and sauté for about 1 minute, until fragrant.Reduce the heat to medium-low. Add the ricotta cheese, Parmesan cheese, chicken broth, and heavy cream (if using). Stir until smooth.Mix in Italian seasoning, red pepper flakes (if desired), and adjust with salt and pepper to taste.4️⃣Combine Pasta, Chicken, and Sauce:Return the cooked chicken to the skillet, stirring to coat in the sauce.Add the cooked pasta and toss everything together.If the sauce feels too thick, gradually add reserved pasta water until it reaches your preferred consistency.5️⃣Add Greens (Optional):Stir in fresh spinach or kale and cook for 2-3 minutes, just until wilted.6️⃣Serve and Garnish:Plate the pasta, garnish with fresh basil or parsley, and sprinkle extra Parmesan cheese on top. Serve immediately while warm and creamy.
- Add the chicken pieces, season with salt and black pepper, and cook for 6-8 minutes until golden brown and fully cooked.Remove the chicken from the skillet and set aside.3️⃣Prepare the Ricotta Cream Sauce:In the same skillet, add minced garlic and sauté for about 1 minute, until fragrant.Reduce the heat to medium-low. Add the ricotta cheese, Parmesan cheese, chicken broth, and heavy cream (if using). Stir until smooth.Mix in Italian seasoning, red pepper flakes (if desired), and adjust with salt and pepper to taste.4️⃣Combine Pasta, Chicken, and Sauce:Return the cooked chicken to the skillet, stirring to coat in the sauce.Add the cooked pasta and toss everything together.If the sauce feels too thick, gradually add reserved pasta water until it reaches your preferred consistency.5️⃣Add Greens (Optional):Stir in fresh spinach or kale and cook for 2-3 minutes, just until wilted.6️⃣Serve and Garnish:Plate the pasta, garnish with fresh basil or parsley, and sprinkle extra Parmesan cheese on top. Serve immediately while warm and creamy.
- Remove the chicken from the skillet and set aside.
- 3️⃣Prepare the Ricotta Cream Sauce:In the same skillet, add minced garlic and sauté for about 1 minute, until fragrant.Reduce the heat to medium-low. Add the ricotta cheese, Parmesan cheese, chicken broth, and heavy cream (if using). Stir until smooth.Mix in Italian seasoning, red pepper flakes (if desired), and adjust with salt and pepper to taste.4️⃣Combine Pasta, Chicken, and Sauce:Return the cooked chicken to the skillet, stirring to coat in the sauce.Add the cooked pasta and toss everything together.If the sauce feels too thick, gradually add reserved pasta water until it reaches your preferred consistency.5️⃣Add Greens (Optional):Stir in fresh spinach or kale and cook for 2-3 minutes, just until wilted.6️⃣Serve and Garnish:Plate the pasta, garnish with fresh basil or parsley, and sprinkle extra Parmesan cheese on top. Serve immediately while warm and creamy.
- In the same skillet, add minced garlic and sauté for about 1 minute, until fragrant.Reduce the heat to medium-low. Add the ricotta cheese, Parmesan cheese, chicken broth, and heavy cream (if using). Stir until smooth.Mix in Italian seasoning, red pepper flakes (if desired), and adjust with salt and pepper to taste.4️⃣Combine Pasta, Chicken, and Sauce:Return the cooked chicken to the skillet, stirring to coat in the sauce.Add the cooked pasta and toss everything together.If the sauce feels too thick, gradually add reserved pasta water until it reaches your preferred consistency.5️⃣Add Greens (Optional):Stir in fresh spinach or kale and cook for 2-3 minutes, just until wilted.6️⃣Serve and Garnish:Plate the pasta, garnish with fresh basil or parsley, and sprinkle extra Parmesan cheese on top. Serve immediately while warm and creamy.
- Reduce the heat to medium-low. Add the ricotta cheese, Parmesan cheese, chicken broth, and heavy cream (if using). Stir until smooth.
- Mix in Italian seasoning, red pepper flakes (if desired), and adjust with salt and pepper to taste.4️⃣Combine Pasta, Chicken, and Sauce:Return the cooked chicken to the skillet, stirring to coat in the sauce.Add the cooked pasta and toss everything together.If the sauce feels too thick, gradually add reserved pasta water until it reaches your preferred consistency.5️⃣Add Greens (Optional):Stir in fresh spinach or kale and cook for 2-3 minutes, just until wilted.6️⃣Serve and Garnish:Plate the pasta, garnish with fresh basil or parsley, and sprinkle extra Parmesan cheese on top. Serve immediately while warm and creamy.
- 4️⃣Combine Pasta, Chicken, and Sauce:Return the cooked chicken to the skillet, stirring to coat in the sauce.Add the cooked pasta and toss everything together.If the sauce feels too thick, gradually add reserved pasta water until it reaches your preferred consistency.5️⃣Add Greens (Optional):Stir in fresh spinach or kale and cook for 2-3 minutes, just until wilted.6️⃣Serve and Garnish:Plate the pasta, garnish with fresh basil or parsley, and sprinkle extra Parmesan cheese on top. Serve immediately while warm and creamy.
- Return the cooked chicken to the skillet, stirring to coat in the sauce.
- Add the cooked pasta and toss everything together.If the sauce feels too thick, gradually add reserved pasta water until it reaches your preferred consistency.5️⃣Add Greens (Optional):Stir in fresh spinach or kale and cook for 2-3 minutes, just until wilted.6️⃣Serve and Garnish:Plate the pasta, garnish with fresh basil or parsley, and sprinkle extra Parmesan cheese on top. Serve immediately while warm and creamy.
- If the sauce feels too thick, gradually add reserved pasta water until it reaches your preferred consistency.5️⃣Add Greens (Optional):Stir in fresh spinach or kale and cook for 2-3 minutes, just until wilted.6️⃣Serve and Garnish:Plate the pasta, garnish with fresh basil or parsley, and sprinkle extra Parmesan cheese on top. Serve immediately while warm and creamy.
- 5️⃣Add Greens (Optional):
- Stir in fresh spinach or kale and cook for 2-3 minutes, just until wilted.6️⃣Serve and Garnish:Plate the pasta, garnish with fresh basil or parsley, and sprinkle extra Parmesan cheese on top. Serve immediately while warm and creamy.
- 6️⃣Serve and Garnish:Plate the pasta, garnish with fresh basil or parsley, and sprinkle extra Parmesan cheese on top. Serve immediately while warm and creamy.
- Plate the pasta, garnish with fresh basil or parsley, and sprinkle extra Parmesan cheese on top. Serve immediately while warm and creamy.
Notes
Whole wheat pasta adds a hearty texture and extra fiber to this dish.For a vegetarian version, skip the chicken and add more greens or sautéed mushrooms.The heavy cream is optional but makes the sauce extra rich and indulgent.
For a vegetarian version, skip the chicken and add more greens or sautéed mushrooms.The heavy cream is optional but makes the sauce extra rich and indulgent.
The heavy cream is optional but makes the sauce extra rich and indulgent.
“`