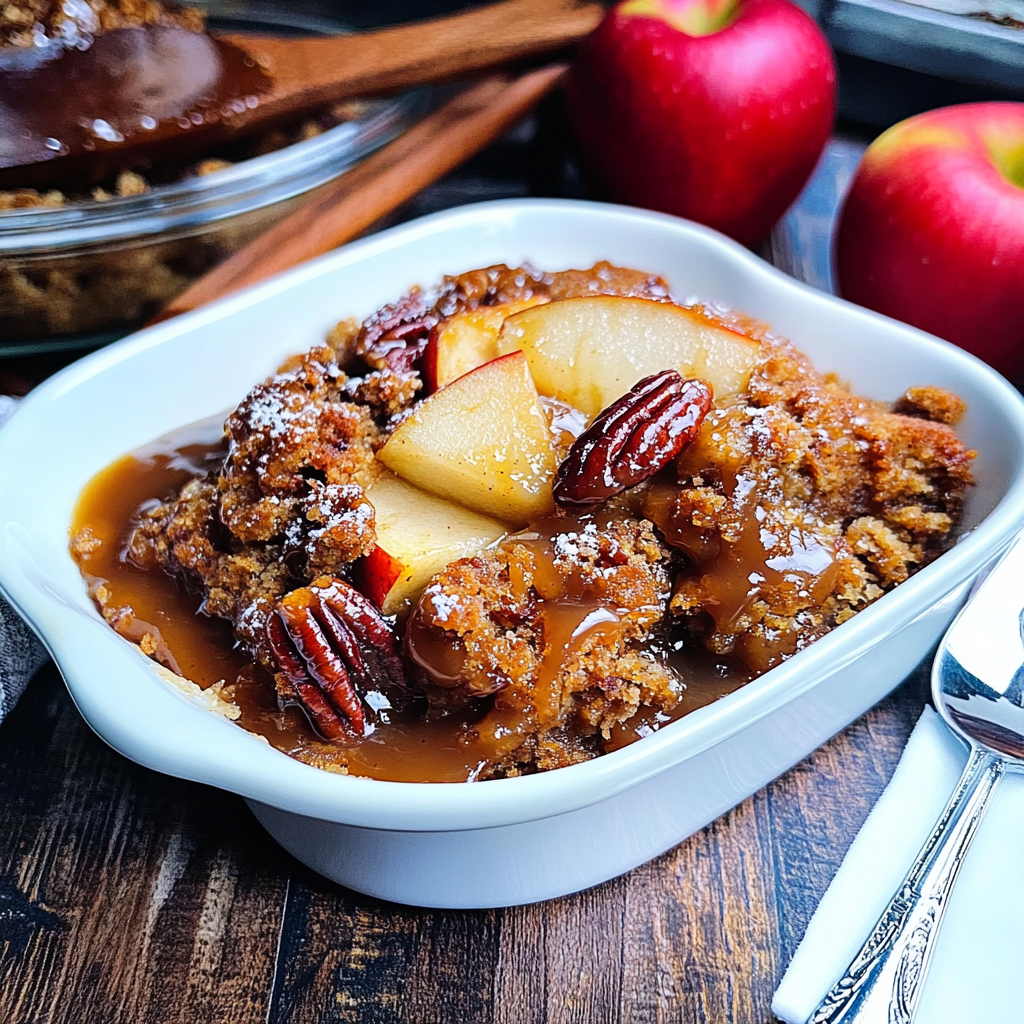
Easy Honey Garlic Boneless Pork Chops Recipe: Sweet and Savory Perfection

sweet garlic pork chops, honey glazed pork chops, boneless pork chop recipe, honey garlic pork loin, pork chops with honey garlic glaze

Honey Garlic Boneless Chops: A Flavorful and Easy Recipe

Honey garlic boneless pork chops are the perfect balance of sweet, savory, and juicy. This dish is ideal for busy weeknight dinners or when you want to impress guests with a delicious, easy-to-make meal. With the right combination of honey, garlic, and a few simple ingredients, you’ll have a tender, flavorful pork chop that everyone will love.

For similar pork-based dishes, you might enjoy our popular Sour Cream and French Fried Onion Pork Chops or One Pan Pork Chops and New Potatoes, which both offer unique twists on pork recipes.


Why Choose Boneless Pork Chops?

Boneless pork chops are an excellent choice for this recipe because they cook faster than bone-in pork chops and are just as tender when prepared correctly. Here are a few reasons why boneless pork chops are ideal for this recipe:

  • Quick to cook: Boneless chops cook faster, making them perfect for busy weeknights.
  • Tender and flavorful: When cooked with a honey garlic glaze, these pork chops remain juicy and flavorful.
  • Easy to handle: Without the bone, these chops are easier to slice and serve, making them more appealing for family meals.

In our Honey Garlic Boneless Chops recipe, the honey adds the perfect amount of sweetness while the garlic provides a rich depth of flavor. This makes the dish a wonderful main course for any occasion.


Ingredients for Honey Garlic Boneless Chops

To make this dish, you will need the following ingredients:

  • 4 boneless pork chops (1 inch thick)
  • 1/4 cup honey
  • 3 garlic cloves, minced
  • 2 tablespoons soy sauce
  • 1 tablespoon Dijon mustard
  • 1 tablespoon olive oil
  • Salt and pepper to taste
  • Optional: Red pepper flakes for a spicy kick

If you enjoy experimenting with flavor, try swapping out honey for maple syrup or adding lemon zest for a refreshing citrus twist.

For more pork inspiration, check out our recipe for Crockpot Ham, Green Beans, and Potatoes, which uses similar savory and sweet flavor profiles.


How to Cook Honey Garlic Boneless Pork Chops

Here is the step-by-step process to cook the perfect honey garlic boneless pork chops:

1. Season the Pork Chops

  • Begin by seasoning the pork chops on both sides with salt and pepper. This simple seasoning brings out the natural flavor of the pork and prepares it for the glaze.

2. Sear the Pork Chops

  • Heat olive oil in a large skillet over medium-high heat. Add the pork chops and sear them for 3-4 minutes on each side, or until they develop a golden-brown crust. This step locks in the juices and adds a layer of flavor to the pork.

Pro Tip: Avoid overcrowding the skillet; if necessary, cook the pork chops in batches to ensure an even sear.

3. Prepare the Honey Garlic Glaze

  • In a small bowl, whisk together honey, minced garlic, soy sauce, and Dijon mustard. This glaze will coat the pork chops, adding sweet, savory, and tangy flavors that make this dish irresistible.

4. Cook the Pork Chops in the Glaze

  • After the pork chops are seared, reduce the heat to medium-low. Pour the glaze over the pork chops and allow them to cook in the glaze for an additional 5-6 minutes, flipping the chops halfway through. Make sure to spoon the glaze over the pork chops to coat them evenly.

5. Rest and Serve

  • Once the pork chops have cooked through (reaching an internal temperature of 145°F), remove them from the skillet and let them rest for 5 minutes. This ensures the juices are redistributed and the pork stays tender.

For additional tips on preparing pork, take a look at our Slow Cooker Pork Loin recipe.


Glaze Variations for Honey Garlic Boneless Chops

While the traditional honey garlic glaze is delicious on its own, there are many variations to try if you’re looking for something different:

  • Spicy Honey Garlic Glaze: Add crushed red pepper flakes or sriracha for a kick of heat.
  • Citrus Honey Glaze: Add the juice and zest of an orange or lemon to the glaze for a refreshing, citrus flavor.
  • Maple Mustard Glaze: Replace honey with maple syrup and add extra mustard for a deeper, tangy sweetness.

For more glaze ideas, take a look at our Ultimate Pork Marinade Guide in the Perfect Pork Loin Glaze article.


Cooking Techniques: Grill, Bake, or Pan-Fry?

This recipe primarily calls for pan-frying, but you can also adapt the technique to grilling or baking based on your preferences:

  • Grilling: Brush the pork chops with the glaze and grill them over medium heat for about 4-5 minutes on each side. This adds a delicious smoky flavor.
  • Oven-Baking: Preheat the oven to 375°F, sear the pork chops, then bake for 20-25 minutes, brushing them with the glaze halfway through.

For more grilling techniques, see our guide on Grilling Pork Loin to Perfection.


What to Serve with Honey Garlic Boneless Pork Chops

A dish this flavorful deserves equally tasty sides. Here are some recommendations for serving alongside your honey garlic boneless chops:

  • Mashed Potatoes: Creamy mashed potatoes balance the sweetness of the pork chops.
  • Roasted Vegetables: Try roasted Brussels sprouts, carrots, or broccoli for a healthy side.
  • Rice Pilaf: A lighter side that complements the savory notes of the dish.
  • Garlic Bread: Perfect for soaking up the extra glaze.

If you’re looking for more side dish ideas, consider pairing this meal with our Ultimate Potato Salad.


Storing and Reheating Leftovers

Here’s how to store and reheat any leftover pork chops:

  • Storage: Place any leftovers in an airtight container and refrigerate for up to 3 days.
  • Reheating: Reheat the pork chops in a skillet over low heat or in the oven at 300°F. This ensures the meat stays moist without overcooking.

FAQs

Can I Use Bone-In Pork Chops Instead?

Yes, you can use bone-in pork chops for this recipe, but be sure to adjust the cooking time. Bone-in chops take longer to cook and may need an additional 5-10 minutes of cooking time.

What Can I Substitute for Honey in the Glaze?

If you don’t have honey or prefer a different sweetener, try using maple syrup or agave nectar. These alternatives will provide a similar sweetness but with slightly different flavor profiles.

How Do I Know When the Pork Chops Are Done?

The best way to check for doneness is by using a meat thermometer. The internal temperature should reach 145°F (63°C) before removing the pork chops from the heat.

Can I Make the Glaze in Advance?

Yes, you can make the honey garlic glaze up to 2 days ahead of time. Store it in the refrigerator until you’re ready to use it.


Conclusion

Honey garlic boneless pork chops are a quick and easy dish that delivers bold flavors with minimal effort. Whether you’re pan-frying, grilling, or baking, this recipe will leave you with juicy, flavorful pork chops every time. Pair it with roasted vegetables or mashed potatoes for a complete meal, and don’t forget to try one of our glaze variations for a unique twist!

For more recipes, be sure to check out our One Pan Pork Chops and New Potatoes and other pork-based dishes.


Internal Links:

  1. Sour Cream and French Fried Onion Pork Chops
  2. One Pan Pork Chops and New Potatoes
  3. Crockpot Ham, Green Beans, and Potatoes

External Links:

  1. Perfect Pork Chops Guide
  2. Best Pork Marinades
  3. Healthy Pork Chop Recipes

Pork Essentials: How to Make the Perfect Sweetly Glazed Pork Loin

glazed pork loin, pork loin with sweet glaze, pork loin recipe, honey-glazed pork loin, roasted pork loin, sweet pork loin

Pork Essentials: Sweetly Glazed Pork Loin

Introduction (150 words)

The sweetly glazed pork loin is a versatile and delicious dish that combines savory pork with a sweet glaze, perfect for any occasion. Whether you’re hosting a family dinner or preparing a holiday feast, this dish is sure to impress your guests. The tender, juicy pork loin, when paired with the right blend of ingredients, creates a mouth-watering experience that leaves everyone wanting more.

For additional tips on mastering pork-based recipes, check out our guide on rediscovering comfort with sour cream and French-fried onion pork chops.

Ingredients for the Sweet Glaze (200 words)

Before we dive into the recipe, let’s talk about the ingredients needed to create the perfect glaze. A balance of sweetness and tanginess is essential for this dish. The ingredients include:

  • 1 cup of brown sugar
  • 1/4 cup of honey
  • 2 tablespoons of Dijon mustard
  • 2 cloves of garlic, minced
  • 1 teaspoon of soy sauce
  • Salt and pepper to taste

The glaze is what gives the pork loin its rich and flavorful finish. You can find similar pork recipes and techniques for perfecting your seasoning in our guide to one-pan pork chops and new potatoes.

Preparing the Pork Loin (300 words)

Start by selecting a high-quality pork loin. You will want to choose a cut that is well-marbled but not overly fatty. Here’s how you can prepare the pork loin for the glaze:

  1. Trim the fat – While some fat is essential for flavor, too much can lead to a greasy dish. Use a sharp knife to trim excess fat.
  2. Season generously – Season the pork loin with salt, pepper, and a bit of olive oil to enhance the meat’s natural flavors.
  3. Sear the meat – Searing the pork loin in a hot pan for a few minutes on each side helps to lock in the juices.

For further tips on cooking pork to perfection, don’t miss our guide on the ultimate comfort food: crockpot ham, green beans, and potatoes.

Creating the Sweet Glaze (250 words)

Once your pork loin is seared, it’s time to make the sweet glaze. This glaze is a combination of sweet and tangy ingredients that complement the savory pork. Here’s how to make it:

  1. In a small saucepan, combine the brown sugar, honey, and Dijon mustard over medium heat.
  2. Add the minced garlic and soy sauce, stirring constantly to avoid burning the sugar.
  3. Simmer the glaze until it thickens, which should take about 5-7 minutes.

Make sure to taste as you go to balance the flavors. For those who enjoy a more tangy flavor, add a splash of vinegar or more mustard.

Cooking the Pork Loin (400 words)

Once the pork loin is seared and the glaze is ready, it’s time to combine the two:

  1. Preheat your oven to 375°F (190°C).
  2. Place the seared pork loin in a baking dish and generously brush the glaze over the top.
  3. Roast the pork loin in the oven for about 45 minutes, or until the internal temperature reaches 145°F (63°C). Remember to baste the pork every 15 minutes to ensure a flavorful, moist finish.
  4. Rest the pork loin – Once done, allow the pork to rest for 10 minutes before slicing. This will help retain the juices and keep the meat tender.

If you’re looking for additional side dishes, you can check out our recipes for pairing options like bacon ranch chicken quesadillas.

Pairing Suggestions (250 words)

A sweetly glazed pork loin pairs wonderfully with a variety of side dishes. For a well-rounded meal, consider these options:

  • Roasted vegetables: Carrots, potatoes, and Brussels sprouts complement the pork perfectly.
  • Creamy mashed potatoes: The smooth texture of mashed potatoes balances the sweet and savory notes of the pork.
  • Crispy roasted potatoes: For a crunchy alternative to mashed potatoes, try crispy roasted potatoes with a garlic and herb twist.
  • A fresh green salad: Lighten up your meal with a salad made from mixed greens, cucumbers, and a tangy vinaigrette.

To complete your dinner, you can find more pairing options in our ultimate guide to comfort food.

Tips for Success (300 words)

To make sure your pork loin turns out perfect every time, follow these tips:

  • Choose the right cut: A pork loin with good marbling ensures that your meat stays juicy and flavorful.
  • Use a meat thermometer: Avoid overcooking by using a thermometer to check the internal temperature. Aim for 145°F (63°C).
  • Let it rest: Always allow the pork loin to rest after cooking. This helps the juices redistribute throughout the meat, resulting in a more tender dish.
  • Baste regularly: Keep the pork moist by basting it every 15 minutes with the glaze.

Frequently Asked Questions (200 words)

What is the best glaze for pork loin?
The best glaze for pork loin typically combines sweet and tangy ingredients such as honey, brown sugar, Dijon mustard, and soy sauce. This balance enhances the savory flavor of the pork while providing a rich, caramelized finish.

How long should I cook pork loin?
A pork loin should be cooked for 45-50 minutes at 375°F (190°C) or until the internal temperature reaches 145°F (63°C). It’s important to let the meat rest for 10 minutes after cooking to retain the juices.

What sides go well with sweetly glazed pork loin?
Popular sides include roasted vegetables, mashed potatoes, and fresh salads. Roasted carrots and Brussels sprouts are especially good complements to the sweetness of the glaze.

Conclusion (150 words)

The sweetly glazed pork loin is an exquisite dish that’s perfect for both weeknight dinners and special occasions. By following these steps and incorporating some of the suggested side dishes, you can create a meal that’s not only delicious but also easy to prepare. For more pork recipes and inspiration, explore our one-pan pork chops and other family-friendly dishes.


Suggested Internal Links:

  • Rediscovering Comfort: Sour Cream and French Fried Onion Pork Chops
  • One Pan Pork Chops and New Potatoes: A Flavorful Symphony in Every Bite
  • The Ultimate Comfort Food: Bacon Ranch Chicken Quesadillas

External Links:

The Ultimate Black Magic Cake Recipe: Rich, Moist, and Irresistible

rich chocolate cake, moist chocolate cake recipe, chocolate magic cake, coffee chocolate cake, best chocolate cake

The Ultimate Black Magic Cake Recipe

If you’re searching for a dessert that wows with every bite, look no further than the Black Magic Cake. This incredibly moist, decadent chocolate cake has a rich, velvety texture that comes from the magic combination of coffee, buttermilk, and cocoa powder. It’s the kind of cake that looks just as good as it tastes and has become a favorite in many homes.

The Black Magic Cake is not just about its dramatic name; it’s a dessert masterpiece that promises to leave an impression. Whether you’re planning a cozy family gathering or need an impressive dessert for a special occasion, this cake is perfect for all chocolate lovers.

What Makes the Black Magic Cake Special?

The secret to the Black Magic Cake lies in its ingredients. Unlike traditional chocolate cakes, the inclusion of coffee amplifies the depth of the cocoa, while buttermilk ensures the cake remains tender and moist. Here’s what makes this cake stand out:

  • Moist texture: The combination of coffee and buttermilk creates a soft, tender crumb.
  • Rich flavor: Coffee enhances the cocoa without making the cake taste like coffee.
  • Velvety finish: The cake’s smooth texture makes every bite melt in your mouth.

For those who love to combine desserts, you could pair this cake with a classic such as the Kentucky Butter Cake for a perfect dinner party dessert spread. These two cakes, while distinct, offer rich flavors that complement each other beautifully.

Ingredients Needed for Black Magic Cake

To make this magical cake, gather the following ingredients:

  • 1¾ cups all-purpose flour
  • 2 cups granulated sugar
  • ¾ cup unsweetened cocoa powder
  • 2 tsp baking soda
  • 1 tsp baking powder
  • 1 tsp salt
  • 1 cup buttermilk
  • 1 cup freshly brewed coffee (cooled)
  • ½ cup vegetable oil
  • 2 large eggs
  • 2 tsp vanilla extract

Step-by-Step Instructions

1. Preheat the Oven

Preheat your oven to 350°F (175°C). Grease and flour two 9-inch round cake pans or line them with parchment paper.

2. Prepare the Dry Ingredients

In a large mixing bowl, sift together the flour, sugar, cocoa powder, baking soda, baking powder, and salt. Sifting helps remove any lumps and ensures the cake’s texture remains light and airy.

3. Add the Wet Ingredients

In a separate bowl, whisk together the buttermilk, coffee, oil, eggs, and vanilla extract. Slowly add the wet ingredients to the dry mixture, stirring until just combined. Be careful not to overmix the batter.

Pro Tip: Use freshly brewed coffee to enhance the cocoa flavor. The coffee won’t make the cake taste like coffee; it simply intensifies the chocolate.

4. Bake the Cake

Divide the batter evenly between the two prepared cake pans. Bake for 30-35 minutes or until a toothpick inserted into the center comes out clean. Let the cakes cool in the pans for about 10 minutes, then transfer them to a wire rack to cool completely.

For an alternative breakfast option, consider pairing this cake with Pancake Muffins, offering variety for your guests.

Frosting Ideas for Black Magic Cake

A Black Magic Cake is not complete without a delicious frosting to complement its rich chocolate flavor. Here are a few frosting ideas:

  • Classic Chocolate Ganache: A silky, smooth ganache adds richness and elevates the chocolate experience.
  • Cream Cheese Frosting: Adds a tangy contrast to the sweetness, making each bite more balanced.
  • Whipped Cream Frosting: Light and airy, perfect for those who want a less dense finish to their cake.

For a creamier finish, this cake pairs beautifully with a frosting like the one used in our Slow Cooker Chicken and Gravy Over Noodles recipe, where cream-based sauces add depth and smoothness.

Why Coffee? The Secret Ingredient

Many bakers wonder why coffee is included in a Black Magic Cake. Coffee’s role in this recipe is crucial because it boosts the chocolate flavor by adding complexity and richness. The bitterness of the coffee enhances the cocoa, making the cake taste even more chocolatey without an overt coffee taste.

If you’re still unsure about adding coffee, rest assured that its flavor becomes subtle once the cake is baked. For a more hands-on approach to enhancing your cakes and desserts, you can experiment with different types of coffee to see how it influences the final result.

Serving Suggestions

This cake is versatile and can be served in various ways depending on the occasion:

  • With whipped cream and fresh berries: A lighter way to serve a rich cake, balancing sweetness with freshness.
  • Topped with ice cream: Vanilla or coffee-flavored ice cream pairs exceptionally well with this cake.
  • Drizzled with caramel sauce: The combination of caramel and chocolate is heavenly.

If you’re feeling adventurous, try serving a slice alongside our Orange Creamsicle Moonshine recipe, available here, for a unique dessert and beverage pairing.

Common Questions About Black Magic Cake

Can I make this cake gluten-free?

Yes, you can substitute the all-purpose flour with a gluten-free baking flour. Ensure the flour mix you use has a binding agent like xanthan gum to achieve the right consistency.

What is the best way to store Black Magic Cake?

This cake can be stored at room temperature for 2-3 days in an airtight container. Alternatively, refrigerate the cake for up to a week or freeze it for up to 3 months.

Can I use regular milk instead of buttermilk?

While you can substitute regular milk, the buttermilk adds an important acidic component that helps break down gluten and gives the cake its signature moist texture. If you don’t have buttermilk, you can create a substitute by adding 1 tablespoon of vinegar or lemon juice to 1 cup of milk.

Pairing Desserts with Black Magic Cake

For a complete dessert table, consider pairing this cake with other rich, crowd-pleasing recipes like No Peek Beef Tips or even Homemade Pineapple Soft Serve. Both options are great additions to any dessert buffet, complementing the Black Magic Cake with different textures and flavors.

Closing Thoughts

There’s no denying that Black Magic Cake is a showstopper. Its combination of rich chocolate flavor and moist, tender crumb makes it a must-try for any dessert enthusiast. Whether you’re baking it for a special event or simply because you crave something indulgent, this cake is sure to impress.

For more culinary inspiration, including savory dishes that complement this dessert, check out our Crockpot Baked Ziti recipe—a perfect main course to precede a slice of Black Magic Cake.

Amish Onion Fritters: Crispy and Delicious Homemade Snack

onion fritters recipe, crispy onion fritters, homemade onion fritters, Amish fritters, fried onion patties, Amish onion patties

Amish Onion Fritters Recipe

Amish Onion Fritters are a simple yet delicious dish that can be enjoyed as a snack, side dish, or even a breakfast item. These fritters are crispy on the outside and soft and flavorful on the inside, making them perfect for any occasion.


Introduction to Amish Onion Fritters

Amish cuisine is known for its simple, wholesome ingredients, and these fritters are no exception. The combination of fresh onions, cornmeal, and a crispy fried coating creates a mouth-watering experience that is loved by many. The fritters are often served during breakfast or as a savory snack in Amish communities.

Internal Linking Opportunity: For more delicious breakfast recipes, check out the Sheet Pan Pancakes recipe on Exorecipes.


Ingredients You Will Need

  • 2 1/2 cups chopped onions
  • 3/4 cup all-purpose flour
  • 1 tablespoon cornmeal
  • 1 tablespoon sugar
  • 2 teaspoons baking powder
  • 3/4 cup milk (or half and half)
  • 1/2 teaspoon salt
  • 1/4 teaspoon black pepper
  • Vegetable oil for frying

How to Make Amish Onion Fritters

  1. Prepare the Batter
    In a mixing bowl, combine flour, cornmeal, sugar, baking powder, salt, and pepper. Stir in the milk until you have a smooth batter.
  2. Add the Onions
    Gently fold the chopped onions into the batter until they are evenly coated.
  3. Heat the Oil
    Heat vegetable oil in a frying pan over medium-high heat.
  4. Fry the Fritters
    Drop spoonfuls of the batter into the hot oil. Flatten slightly and fry for 3-4 minutes on each side until golden brown and crispy.
  5. Drain and Serve
    Remove the fritters from the oil and drain on paper towels. Serve immediately with your favorite dipping sauce.

Serving Suggestions

  • Serve Amish Onion Fritters with homemade garlic aioli or ranch dressing as a dip.
  • Enjoy them with eggs and bacon for a savory breakfast.
  • Pair them with soups like Crockpot Potato Soup with Hashbrowns for a comforting meal.

Variations

  • Cheesy Onion Fritters: Add shredded cheddar cheese to the batter for extra flavor.
  • Spicy Onion Fritters: Mix in chopped jalapenos or red pepper flakes for a spicy twist.
  • Vegetable Fritters: Include grated carrots or zucchini for a vegetable-packed option.

Storing and Reheating

  • Storing: Store leftover fritters in an airtight container in the refrigerator for up to 3 days.
  • Reheating: Reheat the fritters in a 350°F oven for 10 minutes to retain their crispiness.
  • Freezing: You can freeze the fritters by placing them on a baking sheet, freezing until solid, then transferring them to a freezer-safe bag.

FAQs

  1. Can I bake these instead of frying?
    Yes, you can bake the fritters at 375°F for 15-20 minutes, flipping halfway through.
  2. What onions should I use?
    Yellow onions work best for this recipe, but sweet or red onions can also be used.
  3. How do I keep the fritters crispy?
    Place the fritters on a wire rack after frying to prevent them from becoming soggy.
  4. Can I make the batter ahead of time?
    Yes, you can prepare the batter up to a day in advance and store it in the refrigerator.

Health Benefits and Tips

  • Onion fritters are rich in vitamins C and B6 from the onions.
  • To make them healthier, consider using whole wheat flour or air-frying instead of deep frying.
  • Reduce the salt content to make the recipe more heart-friendly.

Internal Linking Opportunity: For more vegetable-based dishes, try the Cowboy Cornbread Casserole for a hearty, nutritious meal.


Conclusion

Amish Onion Fritters are a simple, flavorful dish perfect for any occasion. With their crispy exterior and soft, savory interior, they are sure to become a favorite in your household. Try adding your own spin by including different vegetables or spices, and enjoy the comforting flavors of Amish cooking.


Suggested Internal Links:

  1. The Ultimate Comfort Food: Crockpot Potato Soup with Hashbrowns
    Anchor text: Crockpot Potato Soup with Hashbrowns
  2. Sheet Pan Pancakes: A Simple Breakfast Delight
    Anchor text: Sheet Pan Pancakes
  3. Cowboy Cornbread Casserole: A Hearty Meal for Any Occasion
    Anchor text: Cowboy Cornbread Casserole

Suggested External Links:

  1. “Crispy Homemade Amish Onion Fritters”
    Link: 12 Tomatoes
    Anchor Text: Crispy Homemade Amish Onion Fritters
  2. “Best Amish Onion Fritters Recipe”
    Link: Just A Pinch
    Anchor Text: Best Amish Onion Fritters Recipe
  3. “Amish Onion Patties: A Delicious Snack”
    Link: Food.com
    Anchor Text: Amish Onion Patties: A Delicious Snack

Mama’s Cornbread Dressing: A Classic Southern Holiday Favorite

southern cornbread dressing, cornbread stuffing, holiday dressing recipe, best cornbread dressing, traditional cornbread dressing

Mama’s Cornbread Dressing Recipe

Mama’s Cornbread Dressing is a beloved Southern dish, often served during the holidays, especially Thanksgiving and Christmas. This savory dressing, made with a base of crumbled cornbread and enhanced with various herbs and vegetables, offers a comforting flavor that takes you right back to your childhood kitchen. Below is a guide that will help you recreate this family favorite, complete with tips, variations, and suggested pairings.


Why Mama’s Cornbread Dressing Stands Out

Cornbread dressing is a traditional Southern side dish that is often confused with stuffing. However, in the South, “dressing” is baked outside the bird and is typically made with cornbread rather than bread cubes. Mama’s cornbread dressing is particularly moist and flavorful, with a perfect balance of texture and seasoning.

Internal Linking Opportunity: For more comforting holiday recipes, check out The Ultimate Comfort Food: Crockpot Potato Soup with Hashbrowns for a perfect pairing.


Ingredients You’ll Need

  • Cornbread (4 cups crumbled, preferably homemade)
  • Stale white bread (2 cups)
  • Onions (1 cup chopped)
  • Celery (1 cup chopped)
  • Chicken or turkey broth (4 cups)
  • Eggs (2 large, beaten)
  • Sage (2 tablespoons)
  • Butter (1/2 cup)
  • Salt and pepper to taste

Step-by-Step Instructions

  1. Prepare the Cornbread:
    Begin by making your cornbread a day in advance, allowing it to dry out slightly. Crumble it into large chunks.
  2. Sauté the Vegetables:
    Sauté onions and celery in butter until softened. This gives the dressing a rich, buttery flavor.

    External Link Opportunity: Learn more about achieving the perfect cornbread texture with this Classic Southern Cornbread Dressing Recipe.

  3. Combine Ingredients:
    In a large mixing bowl, combine the crumbled cornbread, stale bread, sautéed vegetables, beaten eggs, and sage. Slowly pour in the chicken or turkey broth until the mixture is moistened but not soupy.
  4. Bake the Dressing:
    Preheat your oven to 350°F. Transfer the mixture into a greased baking dish and bake for 35-45 minutes or until the top is golden brown.

Tips for the Perfect Dressing

  • Moisture Control: Gradually add broth to avoid making the dressing too wet. You can always add more, but you can’t take it out once it’s in.
  • Crispy Top: To achieve a slightly crisp top, bake uncovered for the last 10-15 minutes.
  • Homemade Cornbread is Best: While you can use store-bought cornbread in a pinch, homemade cornbread enhances the flavor significantly.

Internal Linking Opportunity: Pair this dish with another comforting recipe, like Slow Cooker Magic: Crock Pot Baked Ziti for a hearty, satisfying meal.


Variations of Mama’s Cornbread Dressing

  • Sausage Cornbread Dressing: Add cooked sausage to the dressing for a meaty, savory twist.
  • Vegetarian Dressing: Use vegetable broth and omit the eggs for a vegetarian-friendly version.
  • Seafood Dressing: For a coastal Southern flair, consider adding shrimp or oysters.

Storing and Reheating Instructions

  1. Storing:
    Store leftover dressing in an airtight container in the refrigerator for up to three days.
  2. Reheating:
    Reheat the dressing in the oven at 350°F, covered with aluminum foil to prevent it from drying out.

External Link Opportunity: Need more tips on reheating? Check out How to Reheat Cornbread Dressing for additional methods.


FAQs About Cornbread Dressing

  • Can I make it ahead of time?
    Yes, you can make the dressing a day in advance. Prepare it up to the point of baking, refrigerate, and bake it fresh the next day.
  • What’s the difference between stuffing and dressing?
    Stuffing is cooked inside the bird, while dressing is baked in a separate dish. Dressing is more common in the South and often uses cornbread as the base.
  • Can I freeze cornbread dressing?
    Yes, you can freeze the dressing after baking. Wrap it tightly in aluminum foil and freeze for up to three months.

Pairing Suggestions

Mama’s cornbread dressing pairs wonderfully with roasted turkey, chicken, or ham. It’s a perfect side for Thanksgiving, but it can also accompany meals throughout the year.

Internal Linking Opportunity: For a delicious main dish to serve alongside this dressing, try Chicken Bacon Ranch Potatoes: Your New Favorite Comfort Dish.


Conclusion

There’s nothing quite like the comforting, nostalgic flavors of Mama’s Cornbread Dressing. Whether you’re following the traditional recipe or trying a creative variation, this dish is sure to be a hit at your holiday table. Enjoy the rich, savory goodness with your loved ones, and don’t forget to add your personal touch to make it your own.

Internal Linking Opportunity: Explore more comforting recipes like The Ultimate Comfort Food: Bacon Ranch Chicken Quesadillas for other family favorites.


External Links for Additional Tips:

  1. Classic Southern Cornbread Dressing
    Link: The Pioneer Woman
    Anchor Text: Classic Southern Cornbread Dressing
  2. Best Cornbread Dressing Tips
    Link: Bon Appétit
    Anchor Text: Best Cornbread Dressing Tips
  3. Moist Cornbread Dressing Recipe
    Link: Southern Living
    Anchor Text: Moist Cornbread Dressing Recipe