Easy Lentil Shepherd’s Pie: A Hearty and Healthy Comfort Dish

lentil shepherd’s pie, vegan shepherd’s pie, plant-based shepherd’s pie, vegetarian lentil pie, healthy shepherd’s pie, meatless shepherd’s pie

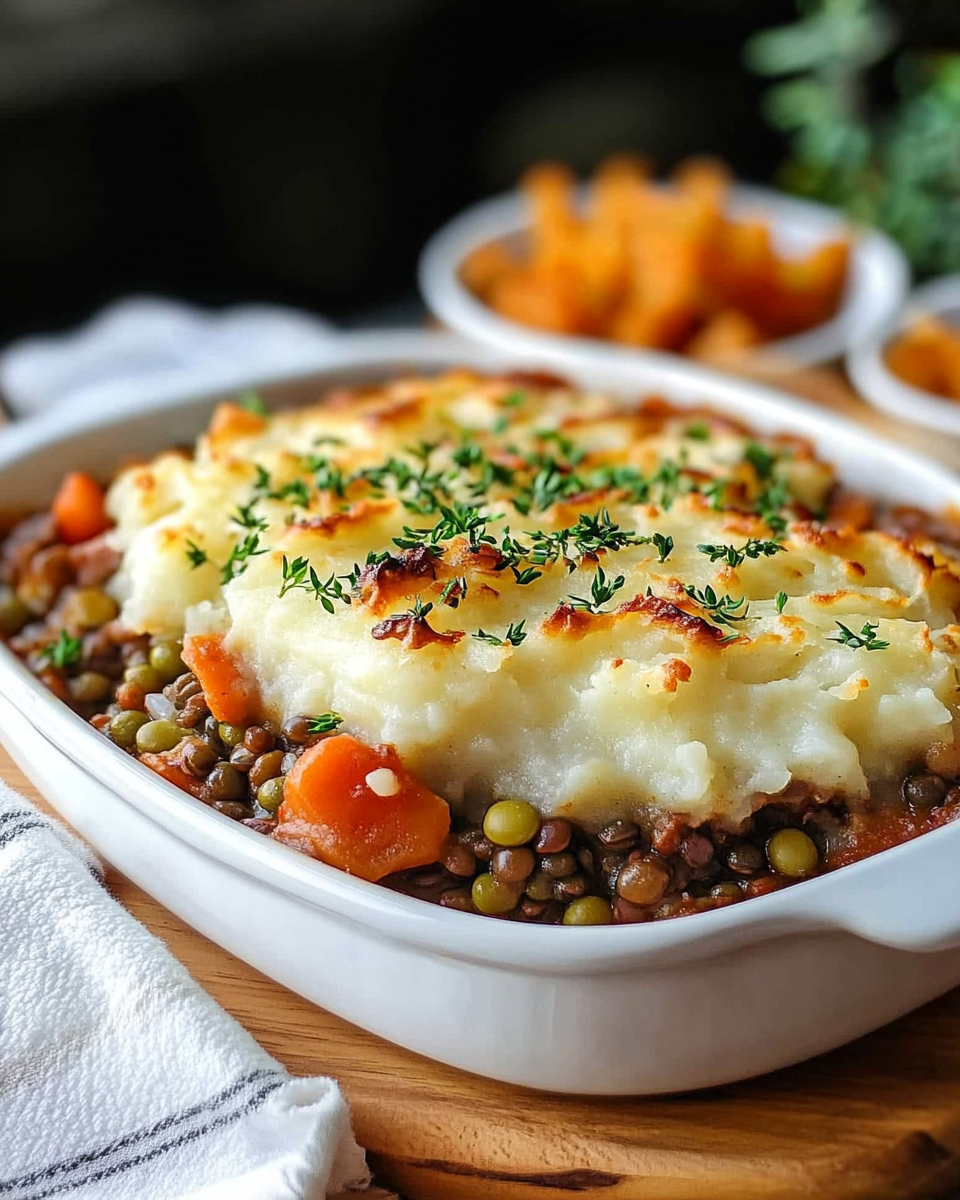
Easy Lentil Shepherd’s Pie: A Hearty and Healthy Comfort Food

Lentil Shepherd’s Pie is a delicious, comforting, and healthy twist on the classic Shepherd’s Pie. This recipe swaps out the traditional meat filling for hearty lentils, which provide a rich, earthy flavor and plenty of plant-based protein. With a layer of creamy mashed potatoes on top and a savory lentil filling, this dish is perfect for vegans, vegetarians, and anyone looking for a healthier alternative to the classic dish.

In this article, we’ll take you through everything you need to know about making Easy Lentil Shepherd’s Pie. We’ll also offer a variety of recipe variations, serving suggestions, and tips for making the perfect pie. Lentils are a fantastic ingredient to work with, as they offer a great source of fiber, protein, and essential nutrients, making them an ideal substitute for meat.

Let’s dive into how to make this dish that’s guaranteed to become a household favorite.

Ingredients for Easy Lentil Shepherd’s Pie

To get started, you’ll need the following ingredients:

  • 1 cup of green or brown lentils, rinsed and drained
  • 3 cups of vegetable broth (or water)
  • 1 medium onion, diced
  • 2 carrots, peeled and diced
  • 2 celery stalks, chopped
  • 3 cloves of garlic, minced
  • 2 tablespoons tomato paste
  • 1 tablespoon soy sauce or Worcestershire sauce (for a deeper flavor)
  • 1 tablespoon flour (for thickening)
  • 1 teaspoon thyme (dried or fresh)
  • Salt and pepper to taste
  • 2 cups of mashed potatoes (for the topping)

For a cheesy variation, you can top your pie with cheddar cheese or a vegan cheese substitute.

Why Lentils are a Great Meat Substitute

Lentils are rich in protein, fiber, and iron, making them an excellent substitute for ground meat in this dish. They have a hearty texture and easily absorb the flavors of the seasonings and vegetables they’re cooked with. This is why they work so well as a base for a vegetarian Shepherd’s Pie.

Not only are lentils nutritious, but they’re also affordable and widely available. Cooking them with vegetable broth enhances their flavor, making them the perfect filling for this savory pie. If you’re new to cooking with lentils, here’s a guide on how to cook lentils that will help you get them just right.


Step-by-Step Guide to Making Lentil Shepherd’s Pie

Step 1: Cook the Lentils (300 words)

Start by cooking the lentils in vegetable broth or water. Bring the lentils and broth to a boil in a saucepan, then reduce the heat to low and simmer for about 20 minutes or until the lentils are tender. Drain any excess liquid and set the lentils aside.

Step 2: Prepare the Vegetable Filling (400 words)

In a large skillet, heat some oil and sauté the diced onion, carrots, celery, and garlic until softened, about 5-7 minutes. Add the tomato paste, thyme, and soy sauce (or Worcestershire sauce). Stir well, then sprinkle the flour over the vegetables to help thicken the filling. Cook for an additional 2-3 minutes to develop the flavors.

Stir in the cooked lentils and season with salt and pepper to taste. Let the mixture simmer for another 5 minutes to allow the flavors to meld together.

Step 3: Prepare the Mashed Potato Topping (250 words)

While the filling is cooking, prepare your mashed potatoes. You can use freshly boiled potatoes or leftover mashed potatoes if you have them on hand. For a creamier texture, mix in some butter and milk (or vegan substitutes like almond milk and olive oil).

If you want a cheesy twist, add some shredded cheddar cheese to the mashed potatoes, or opt for a plant-based cheese for a vegan version. Check out this Vegan Shepherd’s Pie Recipe for more inspiration on creating the perfect topping.

Step 4: Assemble and Bake (300 words)

Preheat your oven to 400°F (200°C). In a large baking dish, spread the lentil and vegetable filling evenly across the bottom. Then, gently spoon the mashed potatoes over the top, using a spatula to spread them evenly. For an extra-crispy topping, use a fork to create some texture on the surface of the mashed potatoes.

Bake the pie for 20-25 minutes or until the top is golden brown and crispy. If you prefer an even crispier topping, you can broil the pie for an additional 2-3 minutes at the end of the baking time.


Recipe Variations

There are plenty of ways to modify this Lentil Shepherd’s Pie to suit your dietary needs or flavor preferences:

  • Vegan Lentil Shepherd’s Pie: Make sure all the ingredients are vegan, including the mashed potato topping. Use a dairy-free butter or olive oil to make the mashed potatoes, and opt for vegan cheese if desired.
  • Gluten-Free Option: Simply omit the flour or use a gluten-free flour blend to thicken the filling.
  • Spicy Lentil Shepherd’s Pie: Add a dash of cayenne pepper or smoked paprika to the filling for an extra kick of heat.
  • Mushroom-Lentil Pie: Add sautéed mushrooms to the vegetable filling for a deeper umami flavor and meatier texture.

For more hearty, comfort food ideas, you can check out this Crockpot Potato Soup recipe, which also highlights the joy of cozy, filling meals.


Tips for Perfecting Your Lentil Shepherd’s Pie

  • Creamy Mashed Potatoes: For the creamiest mashed potatoes, make sure to use starchy potatoes like Russets or Yukon Golds. Adding warm milk and melted butter helps create a smooth texture.
  • Thickening the Filling: If your filling turns out too watery, let it simmer for a few more minutes to evaporate some of the excess liquid, or sprinkle in a bit more flour to thicken it up.
  • Achieving a Crispy Topping: For a golden-brown finish, use a broiler for the last few minutes of baking. You can also sprinkle breadcrumbs or extra cheese over the mashed potatoes for an extra-crispy crust.

Serving Suggestions

Lentil Shepherd’s Pie is a filling dish that doesn’t need much in the way of sides. However, if you’d like to complete the meal, consider serving it with:

  • Fresh Green Salad: A simple salad with a light vinaigrette can help balance the richness of the pie.
  • Roasted Vegetables: Serve with roasted broccoli, carrots, or Brussels sprouts for added color and nutrition.
  • Crusty Bread: A slice of warm, crusty bread makes for a delicious way to soak up the savory filling.

If you’re planning a cozy dinner night, pairing this dish with a side of Slow Cooker Baked Ziti offers a wonderful mix of flavors and textures.


FAQs About Lentil Shepherd’s Pie

1. Can I freeze lentil shepherd’s pie?

Yes! This pie freezes beautifully. After baking, let the pie cool completely before wrapping it in foil and placing it in the freezer. To reheat, thaw it overnight in the fridge and bake at 350°F (175°C) until warmed through.

2. What’s the best type of lentils for this recipe?

Green or brown lentils are the best options, as they hold their shape well after cooking. Red lentils tend to get mushy and are better suited for soups or purees.

3. How long does lentil shepherd’s pie last in the fridge?

Stored in an airtight container, this dish will keep for up to 3-4 days in the refrigerator. Reheat individual portions in the microwave or oven.

4. Can I make this recipe vegan?

Absolutely! Simply swap out the butter and milk in the mashed potatoes for plant-based alternatives, and ensure that any Worcestershire sauce used is vegan.


Conclusion: Why You Should Try Lentil Shepherd’s Pie

Lentil Shepherd’s Pie is the perfect blend of comfort, nutrition, and deliciousness. Whether you’re following a plant-based diet, looking for a healthier twist on a classic dish, or simply in the mood for a hearty meal, this recipe has something to offer.

The versatility of lentils combined with the creamy mashed potatoes creates a dish that’s both filling and satisfying. Plus, with easy modifications for vegan and gluten-free diets, it’s a meal that everyone can enjoy. Give this recipe a try, and it might just become your new go-to comfort food!

For more comfort food recipes, check out Kentucky Butter Cake, which pairs beautifully with this hearty meal for a sweet ending.

Easy Chicken Enchiladas with Creamy Sour Cream Sauce

creamy chicken enchiladas, sour cream enchiladas, chicken enchilada recipe, cheesy chicken enchiladas, enchiladas with sour cream

Chicken Enchiladas with Sour Cream Sauce: A Comforting Mexican Favorite

Chicken Enchiladas with Sour Cream Sauce are a creamy, savory, and rich dish that blends Mexican flavors with a comfort food twist. This recipe is perfect for anyone craving an easy-to-make yet decadent dish to serve on a busy weeknight or for a gathering of friends and family. The addition of sour cream in the sauce adds a tangy richness that pairs perfectly with shredded chicken, cheese, and mild green chiles.

In this article, we’ll dive deep into how to make the perfect chicken enchiladas, common mistakes to avoid, and how to put your own twist on this Mexican-inspired comfort dish. We’ll also answer common questions about the dish to ensure that your chicken enchiladas come out perfectly every time.

Ingredients for Chicken Enchiladas with Sour Cream Sauce

To make the most delicious chicken enchiladas, you’ll need a few key ingredients:

  • 2 cups shredded chicken (rotisserie chicken works well)
  • 8-10 flour tortillas
  • 2 cups Monterey Jack cheese (shredded)
  • 1 cup cheddar cheese
  • 1 cup sour cream
  • 1 cup green chile enchilada sauce (mild or medium)
  • 1 small onion (diced)
  • 2 cloves garlic (minced)
  • 1 tablespoon butter
  • 1 teaspoon cumin
  • 1 teaspoon chili powder
  • Salt and pepper to taste
  • Optional toppings: fresh cilantro, green onions, avocado

How to Make Chicken Enchiladas with Sour Cream Sauce

Step 1: Prepare the Chicken Filling

Start by sautéing the diced onion and minced garlic in a tablespoon of butter until translucent. Add in the shredded chicken, cumin, chili powder, and a pinch of salt and pepper. Stir until everything is well combined and heated through. Set the filling aside.

Step 2: Make the Sour Cream Sauce

In a separate saucepan, melt the butter over medium heat. Stir in the green chile enchilada sauce and sour cream, whisking constantly until smooth. Be careful not to let the sauce boil, as this could cause the sour cream to curdle. Season the sauce with salt and pepper.

Step 3: Assemble the Enchiladas

Preheat your oven to 350°F (175°C). Spoon some of the chicken filling onto the center of each tortilla, then sprinkle with a handful of Monterey Jack cheese. Roll up the tortillas and place them seam-side down in a greased baking dish. Once all the tortillas are filled and arranged, pour the sour cream sauce evenly over the top.

Step 4: Add Cheese and Bake

Sprinkle the remaining shredded cheddar cheese and Monterey Jack cheese over the top of the enchiladas. Bake for 25-30 minutes, or until the cheese is melted and bubbly. If you prefer a golden-brown finish, broil the enchiladas for the last 2-3 minutes of baking.

Step 5: Serve and Enjoy!

Garnish your chicken enchiladas with fresh cilantro, green onions, or sliced avocado. Serve with Spanish rice, refried beans, or a fresh salad for a complete meal. These enchiladas are sure to become a family favorite!


Why Sour Cream Sauce Works for Enchiladas

One of the defining features of this dish is the sour cream sauce. Traditional enchiladas are often topped with a tomato-based or red chile sauce, but adding sour cream creates a creamy, slightly tangy flavor profile that balances the richness of the cheese and chicken.

This sauce also has the benefit of toning down the spiciness, making it a great choice for families or guests who prefer a milder dish. The tangy sour cream complements the smoky flavors of the green chiles and the earthiness of cumin, creating a sauce that’s velvety and indulgent.

For a spicier variation, you could add a few spoonfuls of jalapeno salsa to the sauce or use a spicier green chile enchilada sauce.


Common Variations of Chicken Enchiladas with Sour Cream Sauce

One of the great things about enchiladas is their versatility. While the basic ingredients remain the same, there are endless ways to customize them to your taste preferences:

  • Green Chile Enchiladas: Add chopped green chilies into the sour cream sauce for an extra burst of flavor. This works especially well if you’re using a green chile enchilada sauce as the base.
  • Healthier Alternatives: Swap out the flour tortillas for whole wheat or corn tortillas, and substitute Greek yogurt for sour cream. This adds a bit more protein and makes the dish slightly lighter.
  • Cheesy Chicken Enchiladas: For the ultimate cheesy experience, use a combination of cheddar, Monterey Jack, and mozzarella cheese. You could also top the enchiladas with a queso blanco sauce for an even creamier result.

For those who enjoy cooking with a slow cooker, try out Crockpot Potato Soup with Hashbrowns, which also features hearty, comforting flavors perfect for pairing with enchiladas.


Serving Suggestions and Sides

Chicken enchiladas with sour cream sauce are delicious on their own, but they also pair beautifully with traditional Mexican sides. Consider serving them with:

  • Spanish Rice: A flavorful rice dish seasoned with tomatoes, onions, and bell peppers.
  • Refried Beans: Creamy and savory beans are a classic side that pairs well with the rich sauce.
  • Guacamole or Salsa: A fresh and zesty salsa or a creamy guacamole can help balance the richness of the sour cream sauce.
  • Corn Salad: A fresh salad made with roasted corn, lime juice, and cilantro can add a bright, refreshing contrast.

Common Mistakes to Avoid

Even though chicken enchiladas with sour cream sauce are fairly easy to make, there are a few common mistakes that can affect the outcome of the dish:

  • Overfilling the Tortillas: Be careful not to add too much filling to each tortilla. If they’re overfilled, they may not stay closed, and the filling can leak out during baking.
  • Runny Sauce: If your sauce is too thin, the enchiladas may become soggy. To avoid this, make sure to simmer the sauce long enough for it to thicken slightly.
  • Curdled Sour Cream: Heating sour cream at too high a temperature can cause it to curdle. Always keep the heat low and stir the sauce constantly.

FAQs About Chicken Enchiladas with Sour Cream Sauce

1. Can I make chicken enchiladas ahead of time?

Yes, you can assemble the enchiladas and refrigerate them for up to 24 hours before baking. When ready to bake, add an additional 10 minutes to the baking time.

2. Can I freeze chicken enchiladas?

Absolutely! Assemble the enchiladas without the sour cream sauce, then freeze. When ready to bake, thaw them overnight in the fridge, add the sauce, and bake as directed.

3. What’s the best type of chicken for enchiladas?

Rotisserie chicken is an easy option, but you can also use boiled chicken breasts or thighs. Shredded or diced, both work well for enchiladas.

4. Can I make these enchiladas gluten-free?

Yes, simply substitute the flour tortillas with corn tortillas. Ensure all other ingredients, like the green chile sauce, are labeled gluten-free.

5. How do I reheat leftover enchiladas?

The best way to reheat enchiladas is in the oven. Cover them with foil and bake at 350°F (175°C) for 15-20 minutes, or until heated through.

For more inspiration on what to pair with these enchiladas, check out Kentucky Butter Cake for a delightful, sweet contrast to your savory main course.


Internal Linking Opportunities from ExoRecipes

Here are a few opportunities for internal linking based on content from ExoRecipes:


Conclusion

Chicken enchiladas with sour cream sauce are a deliciously comforting meal that combines classic Mexican flavors with a creamy, tangy twist. Whether you’re serving them at a family dinner or preparing them for a potluck, these enchiladas are guaranteed to impress. With their simple ingredients and straightforward preparation, you can have a hearty, homemade meal ready in no time.

By following this recipe and avoiding common mistakes, you’ll achieve enchiladas that are packed with flavor and perfectly creamy. And with plenty of opportunities to customize the dish to your own tastes, these enchiladas will soon become a staple in your home.

Granny Cake Recipe: The Ultimate Nostalgic Pineapple Dessert

Granny Cake: A Delicious Nostalgic Dessert

Introduction to Granny Cake

Granny Cake is a classic, old-fashioned dessert that evokes memories of family gatherings, grandma’s kitchen, and comforting flavors. This vintage cake is rich in flavor, moist in texture, and simple to make, making it an ideal go-to dessert for any occasion. In this article, we’ll explore everything you need to know about Granny Cake, including how to make it, different variations, and tips to perfect your recipe.

Granny Cake, a dessert that’s been passed down through generations, typically includes crushed pineapple, brown sugar, and a pecan topping. This mix of ingredients creates a delightfully moist cake that satisfies a sweet tooth and brings a sense of nostalgia to the table. Whether you’re looking for a traditional recipe or a new twist on an old favorite, Granny Cake is sure to please.

Before diving into the recipe, it’s important to understand why moist cakes like this one are so popular, especially in Southern baking traditions.

What is Granny Cake?

Granny Cake is a simple cake that combines pineapple with a sugary topping and optional ingredients like coconut, nuts, or raisins. Its origins are rooted in family traditions, where recipes were passed down from one generation to the next. The defining feature of a Granny Cake is its moistness, primarily due to the use of crushed pineapple in the batter. When baked, the pineapple breaks down, releasing juices that infuse the cake with a rich, tangy sweetness.

While the traditional recipe sticks closely to basic ingredients, many bakers have adapted the recipe over time to include modern flavors and health-conscious alternatives.

How to Make the Perfect Granny Cake

Ingredients

  • 1 cup of all-purpose flour
  • 1 cup of crushed pineapple (with juice)
  • 1 cup of sugar
  • 1 tsp baking soda
  • 1 tsp vanilla extract
  • 1 egg
  • 1/2 cup of butter (melted)
  • 1 cup brown sugar (packed)
  • 1/2 cup chopped pecans
  • Optional: Shredded coconut or raisins for additional texture

Instructions

  1. Preheat your oven to 350°F (175°C).
  2. In a large bowl, mix together flour, sugar, and baking soda.
  3. Add the crushed pineapple (with juice), egg, and vanilla. Stir until combined.
  4. Pour the mixture into a greased 9×13 inch baking dish.
  5. In a separate bowl, combine the melted butter, brown sugar, and pecans. Sprinkle this mixture evenly over the top of the cake batter.
  6. Bake for 40-45 minutes or until the cake is golden brown and a toothpick inserted into the center comes out clean.
  7. Allow the cake to cool for 10 minutes before serving.

This recipe provides the traditional flavor profile that so many associate with Granny Cake, though variations abound.


Variations of Granny Cake

While the classic Granny Cake recipe remains a favorite, there are several ways to modify the ingredients to suit different tastes or dietary needs. Here are some common variations:

  • Pineapple Upside-Down Granny Cake: By layering the pineapple at the bottom of the pan and inverting the cake after baking, you can create a pineapple upside-down version of this dessert.
  • Granny Cake with Coconut and Nuts: Adding shredded coconut or extra nuts, such as pecans or walnuts, enhances the cake’s texture and adds a layer of flavor.
  • Healthier Alternatives: For a healthier take, swap the all-purpose flour for almond flour or use coconut sugar in place of regular sugar. You can also reduce the butter or replace it with coconut oil.

The Secret to a Moist Cake: Why Pineapple Works

One of the reasons Granny Cake remains such a popular dessert is due to its incredible moistness. Pineapple, the key ingredient, is loaded with natural juices that not only add flavor but also keep the cake from drying out. This moisture retention allows the cake to remain soft and flavorful for days after baking.

Additionally, using crushed pineapple ensures that the juice is distributed evenly throughout the batter, preventing any dry spots and contributing to a consistent texture. This is why Granny Cake is often praised as a dessert that tastes even better the day after it’s made.


FAQs About Granny Cake

Here are some commonly asked questions about Granny Cake:

1. Can I make Granny Cake without pineapple?

Yes, while pineapple is a key ingredient for moisture, you can substitute it with applesauce or mashed bananas for a similar result. However, the flavor will change slightly.

2. How long does Granny Cake last?

When stored in an airtight container, Granny Cake can last up to five days at room temperature. You can also refrigerate it to extend its shelf life to about a week.

3. Can I freeze Granny Cake?

Yes, Granny Cake freezes well. Wrap individual slices in plastic wrap and place them in a freezer-safe bag. It can last up to three months in the freezer. Just thaw and warm before serving.


Serving Suggestions for Granny Cake

Granny Cake is a versatile dessert that can be served in several ways. For a classic approach, serve it with a dollop of whipped cream or a scoop of vanilla ice cream. The rich, sweet flavors of the cake pair perfectly with these lighter, creamy accompaniments.

For a more decadent experience, drizzle a simple vanilla glaze over the top or add a sprinkle of powdered sugar.


Internal Linking Opportunities from ExoRecipes

While discussing various comfort foods and dessert recipes, several internal linking opportunities arise:

  1. Link to the Ultimate Comfort Food: Crockpot Potato Soup when discussing comfort food desserts.
  2. Reference Kentucky Butter Cake while exploring the similarities between Granny Cake and other Southern comfort cakes.
  3. Connect with the perfect ribeye steak recipe by linking to Master the Art of Steak Cooking.

These internal links help enhance the article’s SEO and guide readers to related recipes.


Why Granny Cake Is a Family Tradition

Granny Cake’s popularity isn’t just due to its taste—it’s about the memories it invokes. This cake, often baked by grandmothers for family gatherings, has become a symbol of comfort food. Whether it’s the act of passing down the recipe or the cake being a staple at family dinners, Granny Cake holds a special place in many homes.

Sharing a slice of this cake is more than just enjoying a dessert; it’s about connecting with loved ones over a common family tradition. The nostalgia associated with Granny Cake makes it more than just a dessert; it’s a piece of history.


Conclusion: A Timeless Dessert

Granny Cake is a nostalgic dessert that continues to win over new generations. Its combination of crushed pineapple, brown sugar, and optional toppings like pecans or coconut makes it an indulgent treat. Whether you’re following a traditional recipe or experimenting with new variations, Granny Cake remains a favorite for family gatherings and celebrations. So why not give this timeless dessert a try in your own kitchen?

Not only will you enjoy a delicious, moist cake, but you’ll also become part of the tradition of sharing Granny Cake with those you love.

Easy Big Fat Yeast Rolls: Soft, Fluffy, and Irresistible

fluffy dinner rolls, soft yeast rolls, homemade bread rolls, simple yeast rolls, easy bread recipe, fluffy yeast rolls

Easy Big Fat Yeast Rolls: Soft, Fluffy, and Delicious

When it comes to baking the perfect dinner rolls, there’s nothing quite like easy big fat yeast rolls. These rolls are the epitome of comfort food, with their soft, fluffy texture and slightly sweet flavor. Whether you’re a seasoned baker or a beginner, this simple recipe will make you look like a pro in the kitchen.

Why You’ll Love These Yeast Rolls

  • Quick and simple: This recipe is straightforward, with easy-to-follow steps.
  • Soft and fluffy: The texture of these yeast rolls is incredibly soft and pillow-like.
  • Versatile: Pair these rolls with any meal, whether it’s breakfast, lunch, or dinner.

For similar comfort food ideas, don’t miss out on The Ultimate Comfort Food: Crockpot Potato Soup with Hashbrowns.

Ingredients You’ll Need

The beauty of these yeast rolls lies in their simplicity. You’ll need just a few basic ingredients to create these soft rolls:

  • Active dry yeast: Helps the rolls rise and become fluffy.
  • Warm water: Activates the yeast.
  • Granulated sugar: Adds a slight sweetness.
  • Salt: Balances the sweetness.
  • All-purpose flour: Forms the base of the dough.
  • Butter: Adds richness to the rolls.
  • Eggs: Help with structure and fluffiness.

You can explore other easy bread recipes such as Slow Cooker Magic: Unveiling the Ease of Crockpot Baked Ziti.

Step-by-Step Guide to Making Easy Big Fat Yeast Rolls

1. Activate the Yeast (15 minutes)

In a large mixing bowl, combine the warm water and sugar, stirring until dissolved. Add the active dry yeast, allowing it to activate. In about 5–10 minutes, the mixture should become frothy, a sign that the yeast is ready.

2. Mix the Dough (20 minutes)

Add eggs, melted butter, and salt to the activated yeast mixture. Gradually add in the flour, one cup at a time, mixing until a soft dough forms. Continue kneading the dough for about 5–7 minutes until it becomes smooth and elastic.

3. Let the Dough Rise (1 hour)

Cover the dough with a clean towel and place it in a warm spot to rise. Let it sit for about an hour, or until it doubles in size. For optimal results, a consistent warm environment helps the dough rise more efficiently.

4. Shape the Rolls (20 minutes)

Once the dough has risen, punch it down and divide it into 12–16 equal portions. Shape each portion into a round ball and place them on a greased baking sheet, leaving enough room for the rolls to expand.

5. Second Rise (30 minutes)

Allow the shaped rolls to rise for another 30 minutes. This will ensure that they are light and fluffy.

6. Bake (15–20 minutes)

Preheat the oven to 375°F (190°C). Brush the tops of the rolls with melted butter for a golden finish. Bake the rolls for 15–20 minutes, or until they are golden brown.

7. Serve and Enjoy!

Let the rolls cool slightly before serving. Brush them with more melted butter if desired for extra richness.

Yeast rolls like these are a perfect side for any meal, and they can even be used for sandwiches. Make sure to try them with spreads like honey butter or jam for a delightful treat!

Tips for the Best Yeast Rolls

  • Room temperature ingredients: Make sure all ingredients, especially butter and eggs, are at room temperature before mixing.
  • Don’t rush the rise: Allowing the dough to fully rise will ensure the rolls are light and fluffy.
  • Check your yeast: Always make sure your yeast is fresh. Expired yeast can result in dense rolls.

Pairing Suggestions

These easy big fat yeast rolls go well with any hearty dish. Consider pairing them with comfort food favorites like Dorito Chicken Casserole: A Crunchy Twist on Comfort Food.

Frequently Asked Questions

1. Can I freeze yeast rolls?

Yes, you can freeze yeast rolls either before or after baking. If freezing before baking, let them thaw and rise again before baking. If freezing after baking, reheat in the oven at a low temperature.

2. How do I store leftover rolls?

Store leftover rolls in an airtight container at room temperature for up to 3 days. For longer storage, refrigerate or freeze them.

3. Can I make these rolls ahead of time?

Absolutely! You can prepare the dough ahead of time and let it rise in the refrigerator overnight. When you’re ready to bake, simply bring the dough to room temperature, shape it, and let it rise again before baking.

Internal Linking Opportunities

For readers looking for more recipes, there are several internal linking opportunities within the ExoRecipes site. Consider linking to these relevant recipes:

By strategically linking to these articles, readers can explore a variety of comfort food recipes while staying on the site, improving both user engagement and SEO.

Wrapping Up

There’s nothing quite like the satisfaction of homemade easy big fat yeast rolls. With this simple recipe, you can enjoy warm, soft, and fluffy rolls straight from your oven. These rolls are not only easy to make but also versatile, pairing well with a range of dishes. Whether you’re serving them at a family gathering or just making a weekday dinner extra special, these yeast rolls will not disappoint.

Parmesan Baked Pork Chops: Crispy, Juicy, and Easy to Make

baked pork chops with Parmesan, crispy Parmesan pork chops, easy baked pork chops, pork chops with cheese crust, Parmesan crusted pork chops

Parmesan Baked Pork Chops: A Crispy and Juicy Dinner Delight

If you’re craving a dinner recipe that’s both easy and incredibly delicious, look no further than Parmesan Baked Pork Chops. With a crispy, cheesy crust and tender, juicy meat, this dish is bound to become a favorite in your household.

Why Parmesan Baked Pork Chops Are a Must-Try

Pork chops often get a bad reputation for being dry or bland, but when prepared correctly, they can be juicy and packed with flavor. By adding a layer of Parmesan cheese and breadcrumbs, you create a golden, crispy crust that seals in the pork’s natural juices.

Here are some reasons to love this dish:

  • Easy preparation with minimal ingredients
  • A crispy, flavorful crust
  • Juicy and tender pork every time
  • Perfect for weeknight dinners or special occasions

For more comfort food recipes, check out this hearty Crockpot Potato Soup that’s perfect for chilly nights.

Ingredients for Parmesan Baked Pork Chops

The ingredients for this recipe are simple, yet they create a delicious and satisfying meal. You likely already have most of these in your kitchen:

  • Pork chops: Choose thick-cut for juicier results.
  • Parmesan cheese: Freshly grated for the best flavor.
  • Breadcrumbs: Panko is ideal for extra crunch.
  • Garlic powder: Adds a rich, savory taste.
  • Paprika: Enhances the pork’s natural flavor.
  • Salt and pepper: To taste.

Step-by-Step Recipe for Parmesan Baked Pork Chops

This easy-to-follow recipe will help you achieve perfect pork chops with minimal effort.

  1. Preheat the oven to 400°F (200°C).
  2. Prepare the coating: In a bowl, combine the Parmesan cheese, breadcrumbs, garlic powder, paprika, salt, and pepper.
  3. Coat the pork chops: Pat the pork chops dry with a paper towel, then dip them in the Parmesan mixture, ensuring an even coat.
  4. Bake: Place the pork chops on a greased baking sheet and bake for 20-25 minutes, or until they reach an internal temperature of 145°F (63°C).
  5. Serve and enjoy: Let the pork chops rest for a few minutes before serving.

For a similar crispy dish, you might enjoy this No Peek Beef Tips recipe, which offers a hands-off approach with big flavor.


Tips for the Best Parmesan Baked Pork Chops

To ensure your pork chops turn out perfectly every time, keep these tips in mind:

  • Use thick-cut pork chops: Thicker chops retain more moisture and are less likely to dry out.
  • Pat the pork dry: This ensures the Parmesan coating sticks well.
  • Use freshly grated Parmesan: Pre-grated cheese doesn’t melt as well and can affect the texture.

Perfect Pairings: What to Serve with Parmesan Baked Pork Chops

Looking for the perfect sides to complement your Parmesan Baked Pork Chops? Try these delicious options:

  • Mashed potatoes: Creamy and smooth, they balance out the crispy texture of the pork.
  • Steamed vegetables: Light and healthy, vegetables like broccoli or green beans provide a fresh contrast.
  • Garlic bread: For an extra indulgent touch, serve garlic bread to soak up any juices from the pork.

Check out this Slow Cooker Baked Ziti for another easy, cheesy dinner idea that’s just as satisfying.


FAQs About Parmesan Baked Pork Chops

How do I keep pork chops from drying out?

Thick-cut chops and baking at the right temperature are key. Also, allowing the chops to rest for a few minutes before serving helps retain their juices.

Can I use boneless pork chops?

Yes, boneless chops work well in this recipe, but they may cook faster, so check them for doneness after 15-20 minutes.

What can I substitute for Parmesan cheese?

You can try Pecorino Romano for a similar salty flavor, or even sharp cheddar for a different take on the recipe.


Variations and Additional Flavor Enhancements

Want to mix things up? Here are some creative twists to add more flavor to your Parmesan Baked Pork Chops:

  • Add herbs: Fresh thyme or rosemary mixed into the Parmesan coating adds an herby aroma.
  • Spicy kick: Mix some cayenne pepper or chili flakes into the breadcrumb mixture for a little heat.
  • Lemon zest: For a citrusy touch, add lemon zest to the Parmesan and breadcrumbs.

For more hearty meals like this, try this chicken and bacon comfort dish, perfect for cozy nights at home.


In conclusion, Parmesan Baked Pork Chops are a foolproof way to create a delicious, satisfying meal with minimal effort. Whether you’re preparing dinner for the family or hosting a gathering, this dish will leave everyone asking for seconds.


SEO Optimization Tips:

  • Ensure frequent use of keywords like Parmesan Baked Pork Chops throughout the article.
  • Utilize internal and external links strategically within the first few paragraphs.
  • Provide valuable FAQs and recipe variations to enhance readability and engagement.