Drunk Witch Cocktail Recipe: The Perfect Halloween Party Drink

Halloween cocktail, spooky cocktail, witch-themed cocktail, Halloween party drinks, fruity Halloween drinks

Drunk Witch: A Spooky Halloween Cocktail Perfect for Your Next Party

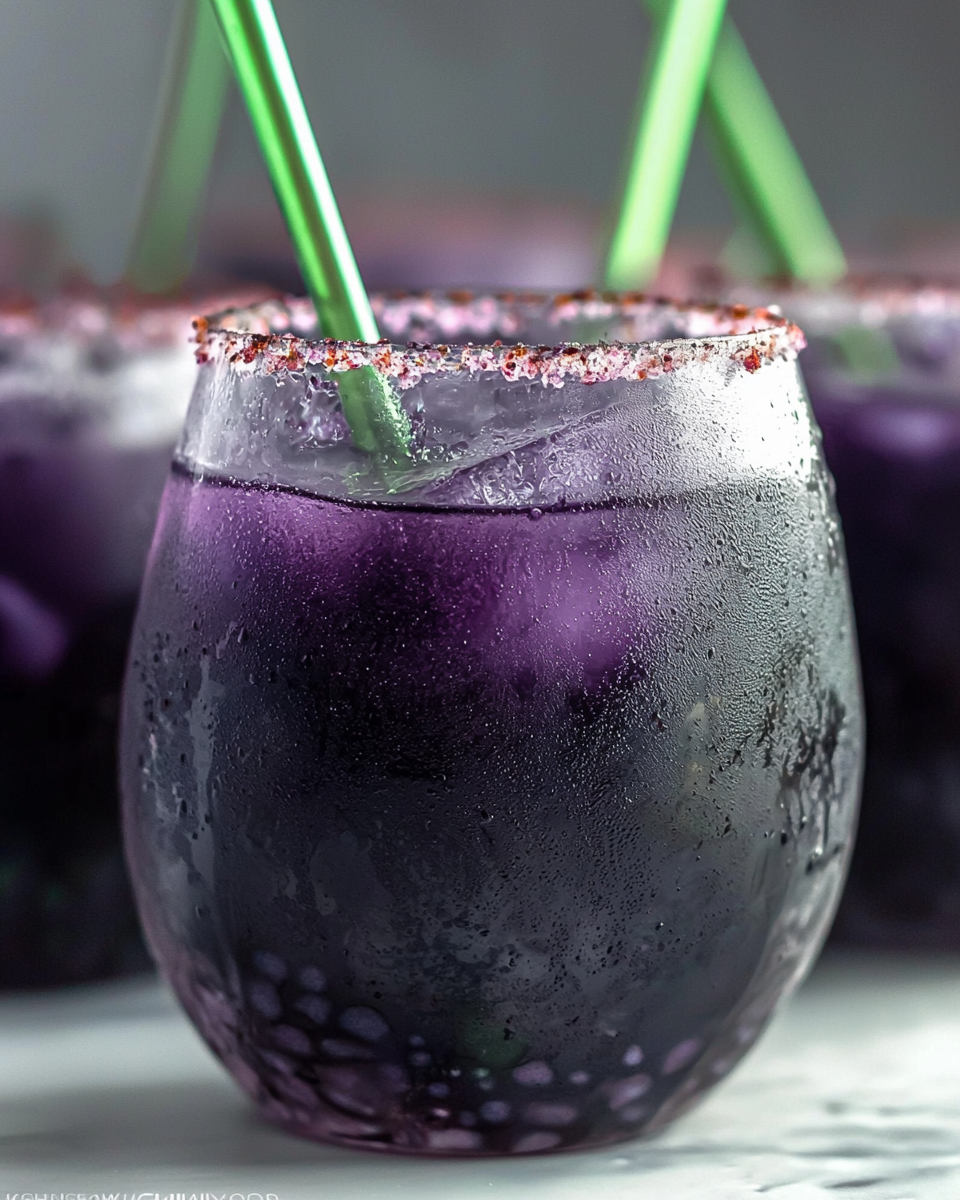
As Halloween approaches, themed cocktails become a fun and festive way to set the mood for spooky celebrations. The Drunk Witch cocktail is one such creation that not only looks the part with its deep purple hue but also delivers a sweet, tangy, and fizzy flavor perfect for partygoers. Whether you’re hosting a large Halloween bash or simply enjoying a cozy night in with friends, the Drunk Witch is an easy-to-make drink that will add a magical touch to your gathering.

This cocktail combines vodka, Blue Curacao, grenadine, and Sprite for a simple yet festive drink that’s sure to be a hit. It’s a versatile recipe that can be adapted to your taste preferences or modified for a non-alcoholic version, making it the ideal addition to your Halloween menu.

For more comforting recipes to complement your party, check out The Ultimate Comfort Food: Crockpot Potato Soup with Hashbrowns.

Why the Drunk Witch Cocktail is a Halloween Favorite

The Drunk Witch cocktail isn’t just about the taste—it’s about creating a spooky and visually appealing drink. The deep purple color, achieved by mixing Blue Curacao and grenadine, creates an eerie look that’s perfect for Halloween festivities. Add some fun garnishes like a lime wheel, cherry, or even Halloween-themed decorations to take the presentation to the next level.

The sweet and tangy flavor makes the Drunk Witch accessible to a wide audience, appealing to those who prefer fruity drinks. It’s also incredibly easy to make, with just a few ingredients needed to craft the perfect Halloween cocktail. For those looking for a non-alcoholic option, you can easily substitute vodka with soda water or a flavored sparkling drink.

Looking to balance out your cocktail offerings? Pair the Drunk Witch with easy-to-make meals like Slow Cooker Magic: Crock-Pot Baked Ziti to keep your guests satisfied.

Ingredients for the Drunk Witch Cocktail

To create your Drunk Witch, you will need the following ingredients:

  • 2 oz Vodka: The base alcohol for the cocktail, offering a neutral flavor.
  • 2 oz Blue Curacao: Provides both the vibrant color and a sweet citrusy taste.
  • 2 oz Grenadine: Adds a reddish hue and a bit of sweetness to balance the cocktail.
  • Sprite (to top): The fizz of Sprite lightens the drink and adds a refreshing finish.

Optional garnishes include:

  • Lime wheel or wedge
  • Cherry
  • Halloween-themed decorations (e.g., plastic spiders, candy eyeballs)

How to Make the Drunk Witch Cocktail

Making this cocktail is as easy as 1-2-3. Here’s the step-by-step process to prepare your Drunk Witch cocktail:

  1. Prepare the Glass: Start by filling a glass with ice cubes.
  2. Mix the Alcohol: In a cocktail shaker, combine 2 oz of vodka, 2 oz of Blue Curacao, and 2 oz of grenadine. Shake until well mixed and chilled.
  3. Pour Over Ice: Strain the mixture into your prepared glass filled with ice.
  4. Top with Sprite: Pour Sprite over the mixture until the glass is filled, creating a fizzy, refreshing finish.
  5. Garnish: Add your lime wheel, cherry, or any Halloween-themed decoration for an extra spooky touch.

With its fun and festive appearance, this cocktail is bound to be the centerpiece of your Halloween party drink menu.

Recipe Variations

The Drunk Witch cocktail is easily adaptable. Here are some variations you can try to suit your taste or the vibe of your party:

  • Drunk Witch Punch: For larger gatherings, multiply the ingredients and serve the cocktail in a punch bowl. You can float lime wheels or gummy worms on top for added effect.
  • Non-Alcoholic Drunk Witch: Substitute the vodka with soda water or a flavored sparkling drink. You can also replace Blue Curacao with blue fruit punch and adjust the sweetness with more or less grenadine.
  • Frozen Drunk Witch: Blend the ingredients with ice to create a slushy version of the cocktail, perfect for warm-weather Halloween parties.
  • Spicy Drunk Witch: Add a splash of jalapeño-infused vodka for those who like a bit of heat in their drinks.

For more creative drinks, check out some other fun recipes like Elevate Your Summer with Orange Creamsicle Moonshine.

Nutritional Information

A single serving of the Drunk Witch cocktail (without garnishes) contains approximately:

  • Calories: 250-300
  • Carbohydrates: 25-30g (from the Sprite and grenadine)
  • Sugar: 20-25g
  • Alcohol content: 12-14% ABV (depending on the vodka used)

If you’re looking for a lighter version, try using diet Sprite to cut down on the sugar content.

FAQs: Frequently Asked Questions About the Drunk Witch Cocktail

Can I make a large batch of Drunk Witch cocktails for a party?

Yes! Simply multiply the ingredients and mix them in a large punch bowl. Serve over ice in individual glasses, and garnish as desired.

What alcohol works best for a Drunk Witch cocktail?

While vodka is the standard base, you can experiment with other spirits like rum or tequila. Each will add a different flavor profile to the drink.

How do I make the Drunk Witch cocktail less sweet?

To reduce the sweetness, swap the Sprite for soda water or club soda. You can also cut back on the amount of grenadine.

What are the best garnishes for a Drunk Witch cocktail?

A lime wheel, cherry, or fun Halloween decorations like candy eyeballs or gummy worms work well. If you’re going for a dramatic effect, dry ice can also create a spooky fog.

Tips for Serving the Drunk Witch Cocktail

To make the most of your Halloween party, here are some serving tips for your Drunk Witch cocktails:

  • Presentation Matters: Use Halloween-themed glasses or even small cauldrons to serve the drinks.
  • Spooky Garnishes: In addition to lime wheels and cherries, get creative with garnishes like black licorice, candy worms, or even small plastic spiders.
  • Theatrics: Consider adding a small piece of dry ice to each glass for a foggy, eerie effect. Just be sure to wait until the dry ice fully evaporates before drinking.

If you’re hosting a Halloween dinner, pair the Drunk Witch with savory dishes like Chicken Bacon Ranch Potatoes, which complement the sweetness of the cocktail.

Why the Drunk Witch Cocktail is the Perfect Halloween Drink

The Drunk Witch is not only fun and festive but also incredibly versatile. Its bright colors and fruity flavors appeal to a wide variety of partygoers, and its simple preparation makes it an easy choice for hosts. Whether you’re serving it in single glasses or mixing up a large punch bowl for a crowd, the Drunk Witch is sure to cast a spell over your guests.

The drink’s adaptability is another reason it’s perfect for Halloween. From adding different spirits to creating a non-alcoholic version, the Drunk Witch can suit any party’s needs, making it a must-have for your next spooky event.

Conclusion

The Drunk Witch cocktail is a Halloween favorite, offering both style and substance in a glass. With its bold colors, sweet flavors, and simple ingredients, this cocktail is sure to impress your guests and keep the party going. Whether you’re making a large batch or serving individual drinks, the Drunk Witch will become a staple of your Halloween festivities.

For more creative cocktail ideas and fun recipes, explore Exo Recipes and discover how to make your next holiday party truly magical.

Holiday Spinach Casserole Recipe: A Creamy, Cheesy Side Dish for Festive Meals

spinach casserole recipe, holiday side dish, cheesy spinach casserole, creamed spinach bake, Christmas spinach casserole

Holiday Spinach Casserole: The Perfect Festive Side Dish

When it comes to holiday dinners, nothing beats the combination of simplicity and flavor that holiday spinach casserole brings to the table. Creamy, cheesy, and packed with nutritious spinach, this dish is a crowd-pleaser, whether it’s served as a comforting side for your Thanksgiving turkey or a festive addition to your Christmas roast. Spinach casserole has all the right elements to become a holiday tradition, as it can be easily tailored to suit various dietary preferences, and is a hit with both adults and kids.

This dish is also perfect for busy holiday planning because it can be prepared ahead of time, saving you from the last-minute stress of holiday cooking. The following recipe will walk you through everything you need to know to make this holiday favorite, and I’ll also explore some variations that you can try to elevate this already delicious dish.

For more comforting recipes to complement your holiday meal, be sure to check out The Ultimate Comfort Food: Crockpot Potato Soup with Hashbrowns.

Why You Should Make Holiday Spinach Casserole This Year

Holiday spinach casserole stands out for its rich flavor and nutritional benefits. Spinach is known for being a powerhouse of vitamins and minerals, including iron, calcium, and vitamin A. When combined with creamy cheeses and savory seasonings, it transforms into a decadent dish that balances indulgence with health-conscious choices.

Moreover, spinach casserole can be customized with ingredients like artichokes, mushrooms, and bacon to give it a new twist. For those who are watching their caloric intake, it can also be modified to use lighter ingredients without sacrificing flavor.

If you want to simplify your holiday meal prep further, consider pairing this casserole with make-ahead options like Slow Cooker Magic: Crock-Pot Baked Ziti, which frees up oven space for your other holiday dishes.

Ingredients You’ll Need for Holiday Spinach Casserole

Here’s what you’ll need to make this delightful dish:

  • Fresh or frozen spinach: You can use either fresh or frozen spinach. Frozen spinach is often easier to work with, but fresh spinach brings a slightly brighter flavor.
  • Cream cheese: Provides the casserole with its signature creamy texture.
  • Heavy cream or milk: Adds richness and ensures a smooth consistency.
  • Shredded cheese: Cheddar, mozzarella, and Parmesan are popular choices for this dish. Choose your favorite or mix them for added flavor complexity.
  • Garlic and onions: These aromatic ingredients help to elevate the savory profile of the casserole.
  • Salt, pepper, and nutmeg: The seasoning essentials to enhance the flavors without overpowering the dish.

Optional additions include mushrooms, artichokes, or even crispy bacon bits for extra flavor and texture.

Step-by-Step Guide to Making the Best Holiday Spinach Casserole

  1. Preheat the Oven: Set your oven to 375°F (190°C) and grease a baking dish (9×13 works best) to ensure the casserole doesn’t stick.
  2. Prepare the Spinach: If you’re using frozen spinach, thaw it and drain it thoroughly by pressing out as much moisture as possible. For fresh spinach, blanch it quickly in boiling water and drain it well. Excess moisture can make the casserole watery.
  3. Sauté the Aromatics: In a skillet, heat some olive oil or butter, and sauté chopped onions and garlic until translucent and fragrant. This step is crucial to building the dish’s flavor base.
  4. Mix the Creamy Base: In a large mixing bowl, combine the sautéed onions and garlic with cream cheese, heavy cream, and half of your shredded cheese. Mix until smooth. Season with salt, pepper, and a pinch of nutmeg.
  5. Combine with Spinach: Fold the prepared spinach into the creamy mixture until it’s fully coated.
  6. Assemble the Casserole: Pour the spinach mixture into your greased baking dish. Top with the remaining shredded cheese and an optional breadcrumb topping for extra crunch.
  7. Bake: Place the casserole in the oven and bake for about 25-30 minutes, or until the top is golden and bubbling.
  8. Serve and Enjoy: Let the casserole cool slightly before serving. This will help the ingredients set and make it easier to slice.

Recipe Variations for Holiday Spinach Casserole

  • Cheesy Spinach Casserole: Add an extra layer of shredded mozzarella or Gruyère on top to make the casserole even cheesier.
  • Spinach and Artichoke Casserole: Turn this dish into a spinach and artichoke dip-inspired casserole by mixing in chopped artichoke hearts.
  • Vegan Spinach Casserole: Use plant-based cream cheese and non-dairy milk for a vegan version of this classic.
  • Spinach Casserole with Bacon: Add cooked, crispy bacon bits to the spinach mixture or sprinkle them on top before baking for a savory, smoky flavor.

For more ideas on how to adjust your holiday meal prep, explore No-Peek Beef Tips: The Ultimate Comfort Food You’ve Been Missing.

Nutritional Information

A typical serving of holiday spinach casserole (about 1 cup) contains:

  • Calories: 300-350
  • Fat: 20g
  • Carbohydrates: 5-10g (depending on add-ins)
  • Protein: 8-12g

To make this dish lighter, you can swap out heavy cream for milk or even use Greek yogurt in place of cream cheese. Reducing the amount of cheese used can also cut down on fat and calories without sacrificing too much flavor.

FAQs: Frequently Asked Questions About Holiday Spinach Casserole

Can I make spinach casserole ahead of time?

Yes! You can prepare the casserole up to 24 hours in advance and store it in the refrigerator. When ready to serve, simply bake it as directed, adding a few extra minutes to the cooking time.

Can I use fresh spinach instead of frozen?

Absolutely. Fresh spinach can be used, but you’ll need to blanch it and drain it thoroughly to avoid excess water in the casserole.

How do I keep spinach casserole from getting watery?

Make sure to drain the spinach very well. If using frozen spinach, press out as much water as possible. If using fresh spinach, ensure it’s properly dried after blanching.

Can I freeze leftover spinach casserole?

Yes, spinach casserole freezes well. Just be sure to cool it completely before storing it in an airtight container. To reheat, thaw overnight in the fridge and then bake in a preheated oven until warmed through.

Serving Suggestions and Pairing Ideas

Holiday spinach casserole pairs beautifully with a wide range of holiday main dishes. Here are some ideas to serve alongside it:

  • Roast turkey or ham: Spinach casserole’s creamy texture contrasts well with the savory, juicy flavors of roast meats.
  • Mashed potatoes or stuffing: These holiday classics are enhanced when paired with the rich, cheesy spinach casserole.
  • Cranberry sauce: For a burst of tartness that cuts through the richness of the casserole.

For more holiday recipe inspiration, take a look at Crockpot Ham & Green Beans.

Why Holiday Spinach Casserole is a Festive Favorite

The popularity of spinach casserole during the holidays stems from its simplicity, adaptability, and ability to feed a crowd. It’s a perfect dish to round out any holiday meal, providing a healthy dose of vegetables with a creamy, indulgent twist. Best of all, it’s a dish that can be modified to suit just about any dietary restriction or taste preference, making it a true holiday staple.

Conclusion

Whether you’re making it for a large family gathering or just a cozy holiday dinner at home, holiday spinach casserole is sure to impress. The balance of creamy, cheesy goodness with the fresh flavor of spinach makes this dish a hit with everyone at the table. Try out different variations to see which one becomes a new family favorite!

For more hearty, comforting dishes to complement your holiday spread, visit Exo Recipes. Happy cooking, and happy holidays!

Cheesy Chicken Crescent Rolls Recipe: Easy, Delicious, and Family-Friendly

cheesy crescent rolls, chicken crescent roll ups, creamy chicken crescent rolls, chicken and cheese crescent rolls, easy crescent rolls

Cheesy Chicken Crescent Rolls: A Deliciously Easy Comfort Food Recipe

If you’re a fan of warm, cheesy meals wrapped in flaky, golden dough, then these cheesy chicken crescent rolls are exactly what you need. They combine the creamy goodness of cheese with tender chicken, all wrapped up in a buttery crescent roll. This dish is not only delicious but also incredibly simple to make, making it the perfect meal for busy weeknights or for impressing guests at a gathering.

The recipe is highly versatile, allowing you to add your favorite ingredients or modify it to suit dietary preferences. Whether you’re a seasoned cook or a beginner in the kitchen, cheesy chicken crescent rolls are a foolproof, satisfying dish that everyone will love.

For an additional layer of flavor, learn more about how crescent rolls have evolved as a staple in easy comfort foods in this History of Crescent Rolls.

Why Are Cheesy Chicken Crescent Rolls So Popular?

There are several reasons why cheesy chicken crescent rolls have become a beloved comfort food:

  • Ease of Preparation: With only a few ingredients, you can assemble this meal in no time. It’s a great go-to recipe when you want something homemade but without the hassle of complex cooking.
  • Versatility: Whether you want to stick to a traditional recipe or experiment with new fillings, cheesy chicken crescent rolls offer plenty of options for customization. You can swap the chicken for bacon, add vegetables, or even spice things up with jalapeños.
  • Perfect for Any Occasion: These crescent rolls work just as well as a hearty dinner for the family as they do as appetizers for a party. They are bite-sized, convenient, and easily transportable.

For those who want to make the preparation even quicker, using a pre-made filling like the one found in this Easy Cream Cheese Chicken Recipe can simplify the process without sacrificing flavor.

Ingredients for Cheesy Chicken Crescent Rolls

Here’s what you’ll need to make this delightful recipe:

  • Crescent roll dough: You can either use store-bought crescent roll dough or, if you’re feeling adventurous, make your own. Pre-made dough cuts down on preparation time and still delivers that buttery, flaky texture.
  • Cooked, shredded chicken: You can use leftovers from a rotisserie chicken, or quickly cook up some chicken breasts or thighs.
  • Cream cheese: This adds a smooth, creamy texture to the filling.
  • Shredded cheese: Cheddar is a classic choice, but feel free to use your favorite blend of cheeses like mozzarella, pepper jack, or a Mexican blend.
  • Spices: A bit of salt, pepper, garlic powder, and onion powder will elevate the flavors of your chicken filling.

Optional ingredients to consider include green onions, bacon bits, or even a dash of hot sauce for those who enjoy a bit of spice.

Step-by-Step Guide to Making Cheesy Chicken Crescent Rolls

Making these cheesy chicken crescent rolls is a straightforward process that won’t take more than 30 minutes from start to finish. Follow these steps for a perfectly golden, cheesy treat:

  1. Preheat the Oven: Set your oven to 375°F (190°C) to ensure it’s ready by the time your crescent rolls are assembled.
  2. Prepare the Filling: In a large bowl, mix together the shredded chicken, cream cheese, shredded cheese, and spices. Make sure everything is well combined and evenly coated.
  3. Assemble the Crescent Rolls: Roll out the crescent dough triangles onto a lined baking sheet. Place a spoonful of the chicken and cheese mixture at the larger end of each triangle. Then, roll the dough from the wide end to the point, wrapping the filling inside.
  4. Bake the Rolls: Place the assembled crescent rolls in the oven and bake for 12-15 minutes or until they are golden brown on top.
  5. Serve Warm: These rolls are best served fresh from the oven, where the cheese is still melted and gooey.

Recipe Variations

If you’re in the mood to change things up, there are endless possibilities for customizing your cheesy chicken crescent rolls:

  • Buffalo Chicken Crescent Rolls: Add buffalo sauce to the chicken and cream cheese mixture for a spicy, tangy twist. You can also drizzle blue cheese dressing over the rolls before serving.
  • BBQ Chicken Crescent Rolls: Mix in your favorite barbecue sauce with the chicken and cheese for a smoky flavor that’s perfect for summer picnics or game day.
  • Vegetarian Crescent Rolls: Swap the chicken for sautéed mushrooms and spinach for a tasty vegetarian option.
  • Breakfast Crescent Rolls: Replace the chicken with scrambled eggs and bacon to create a savory breakfast pastry.

For even more inspiration, try adding other creative fillings like those in Tips for Freezing Crescent Rolls, which offer ways to make your meal prep easier.

Nutritional Information

A single cheesy chicken crescent roll typically contains:

  • Calories: 230
  • Fat: 12g
  • Protein: 10g
  • Carbohydrates: 20g

While delicious, these rolls can be high in fat and carbs due to the dough and cheese. To make a lighter version, consider using low-fat cream cheese, whole wheat crescent rolls, or reducing the amount of cheese in the filling.

FAQs: Frequently Asked Questions

Here are some common questions about cheesy chicken crescent rolls and their answers:

  • Can I use canned chicken for cheesy chicken crescent rolls?
    • Yes, canned chicken works well as a quick alternative to freshly cooked chicken. Just make sure to drain it thoroughly before mixing it with the other ingredients.
  • Can you make cheesy chicken crescent rolls ahead of time?
    • Yes! You can assemble the rolls and store them in the refrigerator for up to 24 hours before baking. Alternatively, you can freeze unbaked rolls and bake them straight from the freezer, adding a few extra minutes to the baking time.
  • How do I prevent crescent rolls from getting soggy?
    • Make sure your filling is not too wet. Drain any excess liquid from ingredients like canned chicken or cooked vegetables to avoid soggy rolls.

Tips for Making the Best Cheesy Chicken Crescent Rolls

  • Use a good seal: When rolling up the crescent dough, make sure to pinch the seams together to prevent any filling from leaking out during baking.
  • Don’t overfill: It’s tempting to pack as much filling as possible into each roll, but overfilling can cause the dough to tear or the rolls to bake unevenly.
  • Brushing with Butter: For an extra golden and flavorful crust, brush the top of each roll with melted butter before baking. You can also sprinkle some extra cheese or garlic powder on top.

Serving Suggestions

These cheesy chicken crescent rolls are delicious on their own, but they pair well with a variety of sides and dipping sauces:

  • Serve with a fresh garden salad for a light, balanced meal.
  • Pair with marinara sauce, ranch dressing, or BBQ sauce for dipping.
  • Offer as part of a larger appetizer spread, alongside items like stuffed mushrooms or veggie platters.

For even more dinner ideas, you can explore recipes like slow cooker meals such as Crockpot Potato Soup with Hashbrowns, which are perfect for busy weeknights and can complement these cheesy rolls perfectly.

Why Cheesy Chicken Crescent Rolls Are a Weeknight Favorite

Crescent rolls have become a beloved go-to for busy families because of their ease of preparation and versatility. Whether you’re looking for a quick snack, a meal to please picky eaters, or a dish that can be made ahead of time, these rolls check all the boxes.

Crescent rolls themselves are incredibly versatile, as seen in recipes like the ones found in Crescent Roll Pizza, which shows how adaptable this dough can be for both savory and sweet applications.

Conclusion

Cheesy chicken crescent rolls are the ultimate comfort food—a perfect combination of savory chicken, creamy cheese, and buttery, flaky crescent dough. With easy preparation and a variety of ways to customize the filling, this recipe is sure to become a staple in your home.

Whether you’re making them for a quick family dinner or an impressive appetizer for guests, these crescent rolls are guaranteed to satisfy. So go ahead, roll up some cheesy goodness, and enjoy!

The Original Easiest Pineapple Cake Recipe: Simple and Delicious

bacon-wrapped onion recipe, French Vidalia onion recipe, grilled bacon onion, Vidalia onion appetizer, smoked bacon onions

The Original Easiest Pineapple Cake Recipe: A Tropical Delight Made Simple

There’s something undeniably special about pineapple cake. Moist, flavorful, and light, this dessert is a wonderful tropical treat that has captured the hearts of many. But what makes the original easiest pineapple cake recipe stand out? It’s all about simplicity without sacrificing flavor. This guide will walk you through how to make this cake step-by-step, while also exploring why it’s such a favorite for both novice bakers and seasoned chefs alike.

What Makes this Pineapple Cake the Easiest?

When it comes to cakes, some recipes require meticulous techniques, a long list of ingredients, and lots of time. Not this one. The easiest pineapple cake is all about minimizing effort while maximizing results. With just a few staple ingredients—flour, sugar, eggs, baking soda, and, of course, canned pineapple—you can whip up a delightful cake in no time.

One of the best things about this recipe is that it uses crushed pineapple, which means you don’t have to spend time cutting, chopping, or pureeing fresh fruit. The natural juices from the canned pineapple add both sweetness and moisture, making this cake incredibly soft and delicious. The recipe’s straightforward process ensures that even a beginner baker can pull off this cake with no-fail results.

The History of Pineapple Cakes showcases how the cake’s origins date back to a fusion of tropical ingredients becoming widely available. Pineapple cakes became iconic in areas that embraced the fruit for its unique sweetness and moisture, making it a great ingredient for simple desserts.

The Ingredients: What You Need for Pineapple Cake

Let’s break down the basic ingredients you’ll need to make this original easiest pineapple cake:

  • 2 cups all-purpose flour: Provides the base for the cake, giving it structure.
  • 2 cups sugar: Balances the tartness of the pineapple.
  • 2 eggs: Adds richness and helps bind the ingredients.
  • 1 teaspoon baking soda: Helps the cake rise, keeping it light and airy.
  • 1 teaspoon vanilla extract: Adds depth to the flavor.
  • A pinch of salt: Enhances all the other flavors.
  • 1 can (20 oz) crushed pineapple: The star of the show! No need to drain it; the juice keeps the cake moist.

The cake also lends itself well to variations. For example, if you want to add a tropical twist, mix in some shredded coconut or even top it with cream cheese frosting for an extra layer of flavor.

The Benefits of Eating Pineapple explain that pineapples are not only delicious but packed with nutrients, including vitamin C, antioxidants, and anti-inflammatory properties. So, this cake isn’t just a treat; it’s a way to indulge while getting some nutritional benefits too!

Step-by-Step Guide to Making Pineapple Cake

Here’s how you can prepare the easiest pineapple cake in your kitchen:

  1. Preheat Your Oven: Start by preheating your oven to 350°F (175°C). Grease a 9×13-inch baking dish or line it with parchment paper for easy removal.
  2. Mix the Dry Ingredients: In a large bowl, combine the flour, sugar, baking soda, and salt. Stir to evenly distribute the baking soda and salt throughout the dry mix.
  3. Combine Wet Ingredients: In another bowl, whisk together the eggs, vanilla extract, and the entire can of crushed pineapple—juice included.
  4. Combine Both Mixtures: Slowly add the wet ingredients into the dry ingredients, stirring until everything is well combined. The batter will be thick, and that’s exactly how you want it.
  5. Pour and Bake: Pour the batter into your prepared baking dish, spreading it out evenly. Bake in the preheated oven for about 30-35 minutes, or until a toothpick inserted into the center comes out clean.
  6. Let it Cool: Allow the cake to cool completely in the pan before cutting into squares.

This recipe is perfect for those who are looking for a quick, fuss-free dessert that doesn’t compromise on flavor. If you’re feeling extra indulgent, you can add a cream cheese frosting to enhance the sweetness and richness.

Nutritional Information and Health Benefits

Pineapple cake, particularly when made with simple ingredients, offers a balance between indulgence and lightness. Here’s a basic breakdown of its nutritional value per serving:

  • Calories: 250
  • Carbohydrates: 50g
  • Sugars: 35g
  • Fat: 7g
  • Protein: 3g

While this is a sweet dessert, you can make a few tweaks to create a healthier version. For example, you could replace some of the sugar with honey or maple syrup, or use a sugar substitute like Stevia. Additionally, swapping out some of the all-purpose flour for whole wheat flour can increase fiber content.

Internal link opportunities can be connected to other similar dessert recipes available on Exo Recipes, such as pineapple soft serve, which complements this cake beautifully.

Recipe Variations and Toppings

If you’re feeling adventurous, there are several ways you can put your own spin on this cake:

  • Add Coconut: Stir in half a cup of shredded coconut into the batter for a tropical flair.
  • Cream Cheese Frosting: Make a quick frosting by combining cream cheese, powdered sugar, and a splash of vanilla. Spread it over the cooled cake for a decadent treat.
  • Nuts: If you like a bit of crunch, sprinkle chopped pecans or walnuts over the top before baking.

For more creative dessert ideas, check out recipes like Mini Pineapple Upside-Down Cakes from the internal link on Exo Recipes. It provides another great use of pineapple in a nostalgic dessert form.

Frequently Asked Questions (FAQs)

  • Can I use fresh pineapple instead of canned pineapple? Yes, but you’ll need to ensure it’s finely chopped and includes some juice to maintain the cake’s moisture. Fresh pineapple tends to be less sweet, so you may want to add extra sugar.
  • How can I make pineapple cake more moist? The juice from the crushed pineapple already adds moisture, but if you want an even moister cake, you can try adding sour cream or a little extra oil to the batter.
  • What’s the best topping for pineapple cake? A simple whipped cream or a cream cheese frosting pairs perfectly. You can also drizzle a caramel sauce or top it with toasted coconut flakes for a more tropical flavor.

Storage and Shelf Life

Properly stored, this pineapple cake will last for a couple of days at room temperature, covered tightly with plastic wrap or foil. For longer storage, keep it in the refrigerator for up to 5 days. You can also freeze the cake (without frosting) for up to 3 months. Just make sure to wrap it in plastic wrap and aluminum foil to avoid freezer burn.

Why This Pineapple Cake is a Crowd Favorite

Whether you’re making it for a family gathering, a potluck, or just to enjoy a slice with your afternoon tea, this pineapple cake always hits the mark. It’s versatile, and you can dress it up or keep it simple based on the occasion. Its unique blend of sweetness and tropical flavor makes it a universal crowd-pleaser.

Another great advantage is that it’s a relatively light cake. You don’t have to feel guilty about indulging, especially if you swap out some ingredients for healthier alternatives. It’s an easy, low-maintenance dessert that looks and tastes far more impressive than the effort involved.

Conclusion

The original easiest pineapple cake is a wonderful example of how a simple, classic recipe can bring immense satisfaction. Whether you’re a seasoned baker or someone who rarely ventures into the kitchen, this recipe promises delicious results every time. Don’t hesitate to try it out—your friends and family will thank you!

For more ideas on pineapple-based desserts, visit Exo Recipes and explore a variety of tropical-themed treats like pineapple upside-down cake or pineapple soft serve ice cream. These additional dishes help complete the tropical dessert experience.

Smoked Bacon Wrapped French Vidalia Onion with Gruyere Cheese

smoked onion recipe, bacon wrapped Vidalia onion, grilled onion with bacon, French Vidalia onion, stuffed Vidalia onion

Smoked Bacon Wrapped French Vidalia Onion Recipe

If you’re looking for an unforgettable side dish to impress your guests at your next barbecue or family gathering, this smoked bacon wrapped French Vidalia onion recipe is just what you need. The combination of sweet Vidalia onions, crispy bacon, and a smoky finish creates an irresistible dish that pairs perfectly with grilled meats or as a stand-alone appetizer.


Ingredients for the Recipe

To get started, you’ll need the following ingredients:

  • 4 small to medium Vidalia onions
  • 4 slices of thick-cut bacon
  • 4 oz Gruyere cheese (sliced or shredded)
  • 2 tbsp olive oil
  • 1 tbsp Montreal seasoning
  • 1 cup beef broth
  • ¼ cup dry vermouth
  • Fresh parsley for garnish

For more smoked onion variations, you can explore dishes like Grilled Mushroom Bacon Bites or Ultimate Bacon Potato Casserole.


Preparation Steps for Bacon-Wrapped Onions

1. Prepping the Vidalia Onions

  • Step 1: Peel the onions and cut off the top and bottom to create flat surfaces.
  • Step 2: Scoop out the core of the onions, making sure to leave enough of the outer layers intact.
  • Step 3: Brush the onions with olive oil and season them generously with Montreal seasoning.

2. Wrapping the Onions in Bacon

  • Step 1: Wrap each onion with a slice of bacon, securing the ends with toothpicks.
  • Step 2: Make sure the bacon is tight around the onion to avoid unraveling during smoking.

3. Smoking the Onions

  • Step 1: Preheat your smoker to 250°F and prepare the wood chips (apple or hickory for a sweet, smoky flavor).
  • Step 2: Place the onions in the smoker and cook for approximately 2 hours, basting with beef broth and vermouth every 30 minutes.

Explore other comforting smoker dishes like The Ultimate Comfort Food: Crockpot Potato Soup.


Cheese Topping and Final Touches

1. Adding Gruyere Cheese

  • Step 1: During the last 10 minutes of smoking, fill the hollowed-out center of each onion with sliced Gruyere cheese.
  • Step 2: Continue smoking until the cheese melts and becomes golden and bubbly.

2. Garnishing and Serving

  • Step 1: Remove the onions from the smoker and sprinkle with freshly chopped parsley.
  • Step 2: Serve immediately while the bacon is crispy and the cheese is still warm.

For a sweeter pairing, consider serving this dish alongside Slow Cooker Magic Baked Ziti.


Tips for Perfect Smoked Bacon Wrapped Onions

  • Choosing the Best Onions: Always opt for Vidalia onions due to their natural sweetness, but any sweet onion can be substituted.
  • Bacon Wrapping Technique: Wrapping the bacon tightly ensures it stays in place during cooking.
  • Basting for Flavor: Basting the onions regularly with beef broth and vermouth adds moisture and enhances flavor.

You might also enjoy other smoked variations such as the Crispy Bacon Grilled Cheese.


Nutritional Information and Health Tips

  • Calories: 350 per serving
  • Fat: 25g
  • Carbs: 20g
  • Protein: 12g

Healthier Substitutions:

  • Swap regular bacon for turkey bacon to reduce fat content.
  • Opt for a low-sodium broth if you’re watching your sodium intake.

Storage and Reheating Instructions

1. Storing Leftovers

  • Store leftover onions in an airtight container in the refrigerator for up to 3 days.

2. Reheating Instructions

  • Reheat in a 350°F oven for 15 minutes or until warmed through.

If you’re planning for future meals, you can also make dishes like Sheetpan Pancakes for breakfast ahead of time.


FAQs About Smoked Bacon Wrapped French Vidalia Onion

Q: Can I use a grill instead of a smoker?
A: Yes! Set your grill up for indirect heat and add wood chips for that smoky flavor.

Q: Can I make this recipe in advance?
A: You can prepare the onions ahead of time, wrap them in bacon, and refrigerate them. Just smoke them before serving.

Q: What other cheeses can I use besides Gruyere?
A: Cheddar, mozzarella, or even Gouda would work well for this recipe.

Q: How can I make the onions softer?
A: If you prefer softer onions, cook them at a lower temperature for a longer time or wrap them in foil halfway through the smoking process.


Conclusion

This smoked bacon wrapped French Vidalia onion recipe combines the sweetness of Vidalia onions with the savory, smoky flavor of bacon. The addition of Gruyere cheese takes this dish to the next level, making it a perfect side dish or appetizer for any barbecue or family gathering. For more delicious recipes, don’t forget to check out Slow Cooker Chicken Pot Pie Casserole and Sour Cream & French Fried Onion Pork Chops.