The Best Fluffy Pumpkin Pancakes: A Perfect Fall Breakfast
There’s something undeniably comforting about starting a crisp fall morning with a stack of fluffy pumpkin pancakes. Infused with warm spices and the rich flavor of pumpkin, these pancakes are light, fluffy, and absolutely irresistible. Whether you’re making a cozy family breakfast or preparing for a fall gathering, these pumpkin pancakes will surely impress.
Pumpkin, with its mild flavor and creamy texture, pairs beautifully with cinnamon, nutmeg, and other warm spices. The result is a pancake that is soft, flavorful, and perfect for the season. If you’re already a fan of classic pancakes, you’ll love the autumn twist these fluffy pumpkin pancakes provide. Pair them with your favorite toppings for an extra special treat.
For more breakfast ideas, try this Sheet Pan Pancakes Recipe for another creative spin on traditional pancakes, ideal for feeding a crowd.
Why You’ll Love These Pumpkin Pancakes
Pumpkin pancakes are not just a fall favorite—they’re a delicious way to start your day any time of year. Here’s why:
- Extra Fluffy Texture: The combination of buttermilk, pumpkin purée, and leavening agents like baking powder ensures a light and airy pancake.
- Bursting with Flavor: The natural sweetness of pumpkin combined with warm spices like cinnamon, nutmeg, and ginger creates a balanced flavor profile that’s ideal for fall.
- Versatile Toppings: Whether you prefer maple syrup, whipped cream, or caramel sauce, pumpkin pancakes pair well with a variety of toppings.
These pancakes are perfect for serving during a leisurely weekend breakfast or even a holiday brunch. If you’re looking for other comforting recipes, check out this Ultimate Comfort Food Crockpot Potato Soup, which makes a great pairing with these pumpkin pancakes.
Ingredients for Fluffy Pumpkin Pancakes
Here’s everything you’ll need to make the best pumpkin pancakes:
Dry Ingredients:
- All-Purpose Flour: Creates the base for the pancake batter.
- Baking Powder: Helps the pancakes rise and become fluffy.
- Baking Soda: Works with the buttermilk to create air pockets, enhancing fluffiness.
- Pumpkin Pie Spice: A blend of cinnamon, nutmeg, ginger, and cloves.
- Salt: Balances out the sweetness and enhances flavor.
Wet Ingredients:
- Pumpkin Purée: Provides moisture, flavor, and a rich texture.
- Buttermilk: Adds tanginess and helps create a tender pancake.
- Eggs: Provide structure and stability.
- Vanilla Extract: Enhances the flavor of the spices and pumpkin.
- Maple Syrup or Brown Sugar: Sweetens the batter naturally.
Step-by-Step Instructions for Perfect Pumpkin Pancakes
1. Mixing the Dry Ingredients
Start by whisking together the flour, baking powder, baking soda, pumpkin pie spice, and salt. This step ensures that the leavening agents and spices are evenly distributed throughout the batter, leading to a uniform texture.
2. Mixing the Wet Ingredients
In a separate bowl, combine the pumpkin purée, buttermilk, eggs, vanilla extract, and maple syrup. Whisk these ingredients together until fully blended. Make sure to use pumpkin purée rather than pumpkin pie filling, as the latter contains added sugars and spices that can throw off the recipe.
3. Combining Wet and Dry Ingredients
Gently fold the wet ingredients into the dry ingredients. Be careful not to overmix—this can cause the pancakes to become tough. Stir until just combined. A few lumps are okay, as they’ll disappear while cooking.
4. Cooking the Pancakes
Heat a griddle or non-stick skillet over medium heat and lightly grease it with butter or oil. Use a ¼-cup measuring cup to pour the batter onto the griddle, making sure to leave enough space between each pancake. Cook until bubbles form on the surface and the edges look set, then flip and cook the other side until golden brown.
Tips for Fluffy Pumpkin Pancakes
Here are a few tips to ensure your pumpkin pancakes turn out light, fluffy, and delicious:
- Use Fresh Baking Powder: Baking powder loses its potency over time, so make sure yours is fresh for maximum fluffiness.
- Don’t Overmix: Stir the batter until just combined. Overmixing can lead to dense, rubbery pancakes.
- Let the Batter Rest: Allow the batter to sit for about 5 minutes before cooking. This gives the gluten a chance to relax, resulting in a fluffier texture.
- Low Heat is Key: Cook your pancakes over medium to low heat to ensure they cook through without burning.
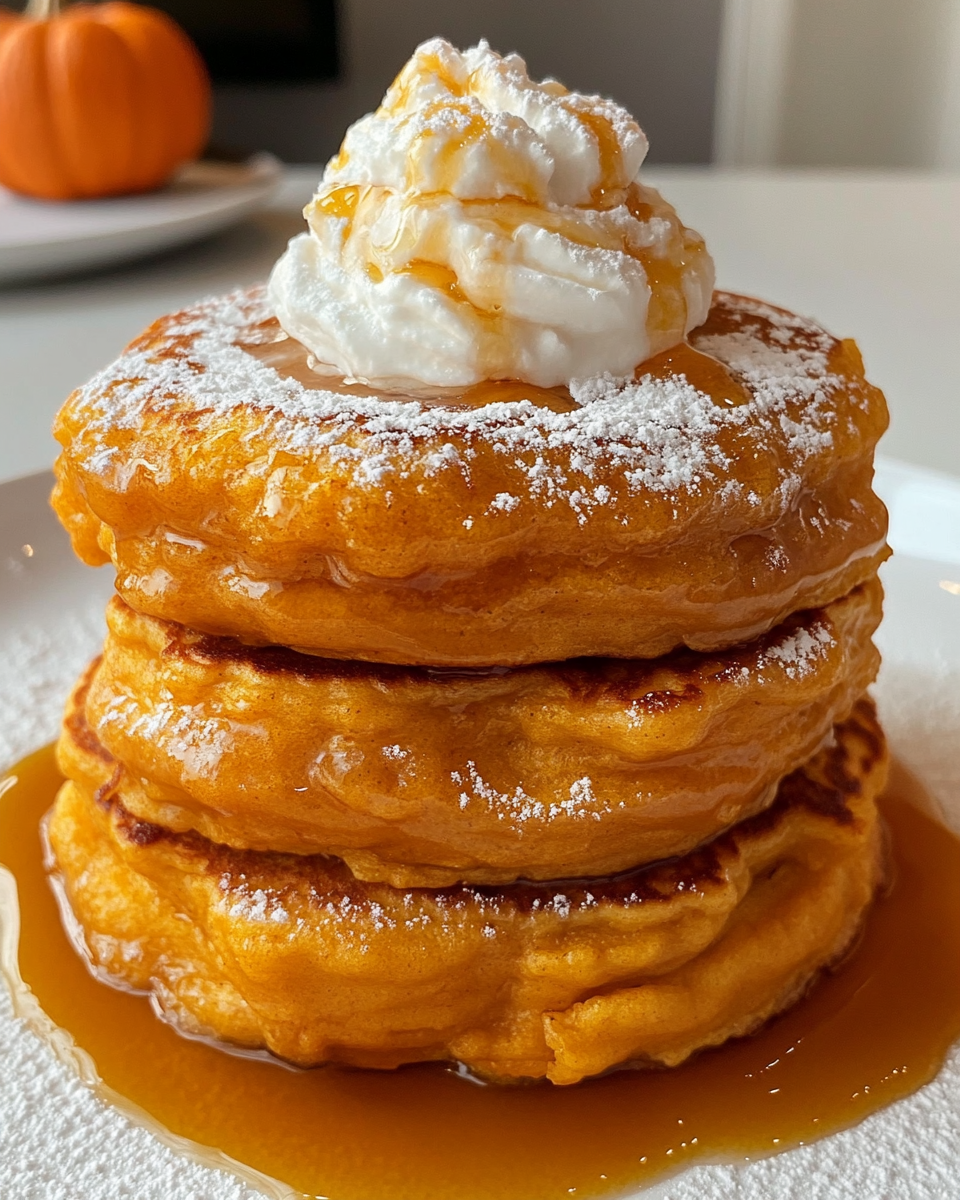
Topping Ideas for Pumpkin Pancakes
The sky’s the limit when it comes to toppings for fluffy pumpkin pancakes. Here are some delicious options:
- Maple Syrup: A classic pancake topping that pairs beautifully with pumpkin.
- Whipped Cream: Adds a light and creamy contrast to the warm spices in the pancakes.
- Caramelized Apples: Sautéed apple slices with cinnamon make for a perfect fall-inspired topping.
- Toasted Pecans or Walnuts: Add a bit of crunch with toasted nuts.
- Cinnamon Sugar: For a simple but flavorful touch, sprinkle a bit of cinnamon sugar over the top of your pancakes.
Variations and Customizations
One of the best things about this recipe is how versatile it is. You can easily adapt it to suit different dietary preferences or tastes:
1. Vegan Pumpkin Pancakes
To make these pancakes vegan, replace the eggs with flax eggs (1 tablespoon ground flaxseed + 2.5 tablespoons water per egg). Swap the buttermilk for almond milk mixed with a little lemon juice to mimic the tanginess.
2. Gluten-Free Pumpkin Pancakes
For a gluten-free version, simply replace the all-purpose flour with a gluten-free flour blend. Make sure to check that the baking powder you’re using is gluten-free as well.
3. Pumpkin Chocolate Chip Pancakes
For a sweet and indulgent twist, fold some chocolate chips into the batter. The rich chocolate complements the pumpkin and spices beautifully.
Health Benefits of Pumpkin
Pumpkin isn’t just delicious—it’s also packed with nutrients:
- Rich in Vitamin A: Pumpkin is high in beta-carotene, which your body converts into vitamin A, supporting eye health and boosting immunity.
- High in Fiber: This helps with digestion and keeps you feeling full longer.
- Low in Calories: Despite its rich flavor and creamy texture, pumpkin is low in calories, making these pancakes a healthier indulgence.
For more information on the benefits of pumpkin, check out this Healthline article on pumpkin nutrition.
FAQs About Pumpkin Pancakes
1. Can I Make Pumpkin Pancakes Ahead of Time?
Yes! You can prepare the batter ahead of time and refrigerate it for up to 24 hours. When you’re ready to cook, give the batter a quick stir and proceed as usual.
2. Can I Freeze Pumpkin Pancakes?
Absolutely. Once cooked, let the pancakes cool completely. Stack them with parchment paper in between and store them in a freezer-safe bag. They can be reheated in the toaster or microwave for a quick breakfast.
3. What Type of Pumpkin Should I Use?
Make sure to use pumpkin purée and not pumpkin pie filling. Purée is 100% pumpkin, while pie filling contains added sugars and spices.
Serving Suggestions
Pumpkin pancakes are a versatile dish that can be served in a variety of ways. Here are a few ideas for pairing your pancakes with other breakfast or brunch dishes:
- Crispy Bacon: The salty crunch of bacon complements the sweetness of the pancakes perfectly.
- Fresh Fruit: Serve with a side of fresh berries or sliced apples for a burst of freshness.
- Hot Coffee or Spiced Apple Cider: The warm spices in both drinks pair wonderfully with pumpkin pancakes.
For more pairing ideas, try making these Pancake Muffins alongside your pumpkin pancakes for a fun and unique breakfast spread.
Conclusion
Fluffy pumpkin pancakes are the perfect way to celebrate fall mornings or add a little seasonal flair to any breakfast. With their warm spices, tender texture, and endless topping options, these pancakes are sure to become a family favorite. Whether you’re keeping it classic with maple syrup or adding your own twist with toppings and variations, this recipe is one you’ll come back to time and time again.
For more seasonal breakfast ideas, check out these Fall-Inspired Breakfast Recipes that pair beautifully with pumpkin pancakes.