Pumpkin Slab Pie: The Perfect Fall Dessert for Feeding a Crowd

pumpkin pie for a crowd, easy pumpkin slab pie, fall dessert slab pie, pumpkin sheet pan pie, slab pie with pumpkin

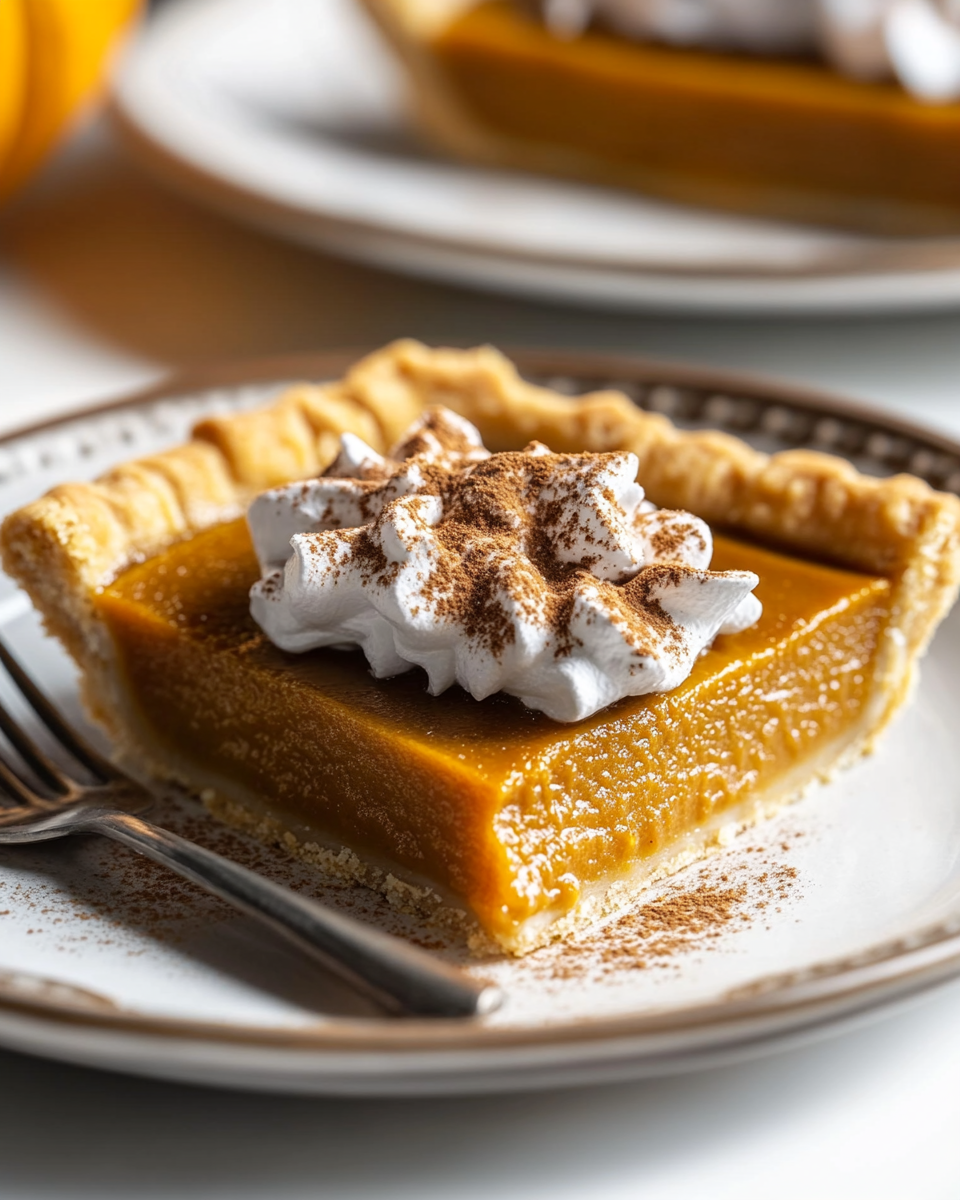
Pumpkin Slab Pie: A Delicious and Easy Fall Dessert

Pumpkin Slab Pie is a perfect dessert for large gatherings or holiday celebrations. This recipe features all the flavors of a classic pumpkin pie, but baked in a rectangular sheet pan, allowing for easy serving and larger portions. It’s an excellent choice for anyone looking to serve a crowd without the hassle of making multiple pies.

For another delicious fall dessert, you can check out this Salted Caramel Apple Cheesecake with Apple Roses which adds a stunning presentation to your dessert table.


Ingredients for Pumpkin Slab Pie

To make this pumpkin slab pie, you will need:

  • Pie Crust: Either homemade or store-bought.
  • Pumpkin Puree: Canned or homemade pumpkin puree works well.
  • Sweetened Condensed Milk or Heavy Cream: Adds a rich and creamy texture.
  • Eggs: Essential for setting the pie filling.
  • Pumpkin Pie Spice: A blend of cinnamon, ginger, cloves, and nutmeg.
  • Vanilla Extract: Enhances the flavor of the pumpkin filling.

For a complete fall meal, consider pairing this pie with our Ultimate Comfort Food: Crockpot Potato Soup with Hashbrowns for a cozy and satisfying dinner.


Step-by-Step Guide: How to Make Pumpkin Slab Pie

  1. Prepare the Crust
    Roll out the pie crust and press it into the bottom of a sheet pan. Pre-bake the crust for 10 minutes to prevent it from getting soggy later.
  2. Make the Pumpkin Filling
    In a large mixing bowl, whisk together the pumpkin puree, eggs, sweetened condensed milk, and pumpkin pie spices. Pour the filling over the pre-baked crust.
  3. Bake the Pie
    Bake the pie at 375°F (190°C) for 35-40 minutes, or until the filling is set and the crust is golden brown.
  4. Cool and Serve
    Let the pie cool completely before slicing it into squares. Serve with whipped cream or a caramel drizzle for extra indulgence.

Variations of Pumpkin Slab Pie

  • Pumpkin Streusel Slab Pie: Top the pie with a crunchy streusel made from oats, butter, and brown sugar.
  • Pumpkin Cream Cheese Slab Pie: Add a layer of cream cheese between the crust and pumpkin filling for a cheesecake-like twist.
  • Vegan Pumpkin Slab Pie: Use a vegan pie crust and replace the eggs with a flaxseed mixture and the cream with coconut milk.

For more savory dishes that pair well with pumpkin pie, try our Slow Cooker Magic: Unveiling the Ease of Crock-Pot Baked Ziti, which makes a fantastic main course for any fall meal.


Nutritional Information and Healthier Substitutions

Nutritional Breakdown (per serving):

  • Calories: Approx. 300
  • Fat: 15g
  • Carbs: 35g
  • Protein: 5g

Healthier Alternatives:

  • Use low-fat dairy or plant-based milk alternatives to cut down on calories and fat.
  • Replace sugar with a natural sweetener like maple syrup or coconut sugar.
  • For a gluten-free option, use a gluten-free pie crust.

FAQs About Pumpkin Slab Pie

  1. Can I make Pumpkin Slab Pie ahead of time?
    Yes, you can make the pie 1-2 days in advance. Just store it in the refrigerator and bring it to room temperature before serving.
  2. Can I freeze Pumpkin Slab Pie?
    Absolutely! Allow the pie to cool completely, then wrap it tightly and freeze for up to 3 months. Thaw in the fridge overnight before serving.
  3. How do I keep the crust from getting soggy?
    Pre-bake the crust for 10 minutes before adding the filling, and allow the pie to cool completely before slicing.

Conclusion

Pumpkin Slab Pie is a must-try dessert for the fall season, combining the comforting flavors of pumpkin spice with the convenience of a large-format dessert. Whether you’re serving it at a Thanksgiving feast or a casual family dinner, this pie will undoubtedly impress your guests.

Looking for more ways to use seasonal ingredients? Try this Slow Cooker Chicken and Gravy Over Noodles for a cozy, comforting dinner option.

Turkey Cranberry Sliders: Easy Holiday Leftover Recipe

turkey sliders with cranberry, leftover turkey sliders, Thanksgiving sliders, turkey and cranberry sandwiches

Turkey Cranberry Sliders: The Perfect Holiday Treat

Turkey Cranberry Sliders are a delicious and easy way to use up your Thanksgiving leftovers or to enjoy a tasty combination of flavors throughout the year. These sliders feature savory turkey, tangy cranberry sauce, and a buttery Hawaiian roll base, all topped with melty cheese and a savory butter drizzle. Whether you’re serving them at a holiday gathering or a casual potluck, these sliders are sure to please.

For another simple comfort food recipe, check out our Ultimate Comfort Food: Crockpot Potato Soup with Hashbrowns, which is perfect for chilly days.


Ingredients for Turkey Cranberry Sliders

To create these mouthwatering sliders, you’ll need the following ingredients:

  • Leftover Turkey: Shredded or sliced turkey, preferably roasted.
  • Cranberry Sauce: Use homemade or store-bought cranberry sauce.
  • Hawaiian Rolls or Brioche Buns: Soft rolls that pair well with savory and sweet fillings.
  • Cheese: Options like Swiss, Havarti, or Cheddar.
  • Butter: Melted butter, often mixed with garlic or herbs for added flavor.
  • Poppy Seeds or Herbs: For a savory topping.

Tip: To elevate your sliders, consider using homemade cranberry sauce or adding caramelized onions for extra depth of flavor.


Step-by-Step Recipe: How to Make Turkey Cranberry Sliders

  1. Prepare the Rolls:
    Slice the Hawaiian rolls or brioche buns in half and arrange the bottoms in a greased baking dish.
  2. Layer the Ingredients:
    • Spread shredded turkey on the bottom half of each roll.
    • Add a spoonful of cranberry sauce over the turkey.
    • Place a slice of cheese over the cranberry sauce.
  3. Top with the Rolls:
    Place the top half of the rolls over the filling, creating a slider sandwich.
  4. Drizzle with Butter:
    Brush melted butter over the tops of the rolls. For added flavor, mix in garlic or herbs like thyme or rosemary.
  5. Bake:
    Bake in the oven at 350°F (175°C) for 15-20 minutes, or until the cheese is melted and the tops are golden brown.
  6. Serve Warm:
    Enjoy your sliders while they’re warm and melty.

Looking for more slider ideas? Check out our Slow Cooker Magic: Unveiling the Ease of Crock-Pot Baked Ziti for a hearty, easy-to-make dinner option.


Variations on Turkey Cranberry Sliders

  • Cheesy Turkey Cranberry Sliders: Add extra cheese for a rich, creamy bite.
  • Stuffing Sliders: Add a layer of stuffing to make the sliders a true Thanksgiving-in-a-bite.
  • Spicy Sliders: Include jalapeños or sriracha for a spicy kick.
  • Vegetarian Sliders: Swap turkey for a plant-based meat substitute and use vegan cheese for a vegetarian version.

Tips for Perfect Sliders

  1. Prevent Soggy Rolls: Brush the insides of the rolls with butter before adding the filling to prevent sogginess.
  2. Use Thick Cheese: A thicker slice of cheese helps keep the sliders together while adding a creamy texture.
  3. Make Ahead: Assemble the sliders in advance, then refrigerate and bake them when you’re ready to serve.

Nutritional Information

Here’s an approximate nutritional breakdown per serving (1 slider):

  • Calories: 250-300
  • Fat: 12-15g
  • Carbs: 25-30g
  • Protein: 15g

For a lighter option, consider using whole wheat rolls and low-fat cheese, or skip the butter drizzle to reduce the fat content.


FAQs About Turkey Cranberry Sliders

  1. Can I make these sliders ahead of time?
    Yes! You can assemble the sliders and refrigerate them for up to a day before baking.
  2. Can I freeze Turkey Cranberry Sliders?
    Yes, freeze the sliders before baking. Thaw in the refrigerator before baking to avoid soggy rolls.
  3. Can I use a different type of bread?
    Absolutely! Brioche, dinner rolls, or even sourdough rolls work well.
  4. How do I keep the rolls from becoming soggy?
    Brush the rolls with butter or oil, or use a thicker layer of cheese to create a barrier between the wet cranberry sauce and the bread.

For more slider variations, try our No-Peek Beef Tips Recipe for a delicious dinner option.


Conclusion: The Versatility of Turkey Cranberry Sliders

Turkey Cranberry Sliders are the perfect dish for using up holiday leftovers or for serving as a quick, tasty meal. With minimal preparation and ingredients, these sliders are easy to customize and are sure to be a hit at any gathering. Serve them with a side of sweet potato fries or a green salad for a complete meal.

For another creative recipe, check out our Dorito Chicken Casserole, a crunchy, flavorful twist on a classic casserole.

Apple Pie Lasagna: No-Bake Layered Dessert for Fall

no-bake apple pie lasagna, apple pie cheesecake lasagna, caramel apple lasagna, layered apple dessert

Apple Pie Lasagna: The Ultimate No-Bake Fall Dessert

Apple Pie Lasagna is a delicious, no-bake dessert perfect for fall gatherings, holiday potlucks, or even just a cozy night in. This layered dessert features a combination of apple pie filling, graham cracker crust, whipped cream, and a creamy cheesecake layer. The result is a sweet, creamy, and crunchy treat that everyone will love.

For more amazing dessert ideas, check out this No-Bake Banana Pudding Cheesecake for another indulgent no-bake option.


Ingredients for Apple Pie Lasagna

To make this delightful dessert, you will need the following ingredients:

  • Graham Cracker Crust: Crushed graham crackers mixed with melted butter to form the base layer.
  • Apple Pie Filling: Either homemade or store-bought apple pie filling works well for the sweet and fruity layer.
  • Cream Cheese Layer: A mixture of softened cream cheese, powdered sugar, and whipped cream creates a cheesecake-like layer.
  • Caramel Sauce: For extra sweetness and flavor.
  • Whipped Cream: To add a light and airy topping.

For another quick dessert, try our S’mores Jars that brings the campfire favorite into your kitchen.


Step-by-Step Guide: How to Make Apple Pie Lasagna

  1. Prepare the Crust: Crush graham crackers and mix them with melted butter. Press this mixture into the bottom of your baking dish to create a firm base.
  2. Create the Cream Cheese Layer: In a bowl, beat softened cream cheese with powdered sugar and fold in whipped cream. Spread this mixture over the graham cracker crust.
  3. Add Apple Pie Filling: Spread the apple pie filling evenly over the cream cheese layer. For a homemade twist, make your own apple pie filling by cooking apples with cinnamon and sugar.
  4. Top with Whipped Cream: Generously spread whipped cream over the apple pie filling layer.
  5. Drizzle with Caramel Sauce: Drizzle caramel sauce over the top for a sweet finishing touch.
  6. Chill: Refrigerate for at least 4 hours or overnight to let the layers set.

This no-bake recipe is perfect for making ahead of time and storing until you’re ready to serve.


Variations of Apple Pie Lasagna

  • Caramel Apple Pie Lasagna: Add a rich caramel layer between the apples and whipped cream.
  • Apple Cinnamon Roll Lasagna: Use cinnamon rolls as the base instead of graham crackers for a fun twist.
  • Apple Cheesecake Lasagna: Incorporate a cheesecake layer by increasing the cream cheese mixture.
  • Vegan Apple Pie Lasagna: Use dairy-free cream cheese and coconut whipped cream for a plant-based version.

For more autumn-inspired desserts, try our Salted Caramel Apple Cheesecake for a decadent and elegant treat.


Tips for the Perfect Apple Pie Lasagna

  1. Use a Thick Filling: A thick apple pie filling will hold its shape better and prevent the dessert from becoming soggy.
  2. Chill Properly: Ensure the lasagna chills for at least 4 hours to set properly.
  3. Balance the Sweetness: Use unsweetened whipped cream or reduce sugar in the cream cheese layer to balance out the caramel and pie filling’s sweetness.

Nutritional Information and Healthier Alternatives

Nutritional Breakdown (per serving):

  • Calories: Approx. 350-400
  • Fat: 20g
  • Carbs: 40g
  • Protein: 4g

Healthier Substitutions:

  • Low-Fat Cream Cheese: Use low-fat or fat-free cream cheese for a lighter option.
  • Whole Wheat Crust: Swap the graham crackers for whole wheat cookies or oats.
  • Sugar-Free Caramel Sauce: Reduce sugar by using a sugar-free caramel sauce or reducing the amount of sugar in the recipe.

For another lightened-up recipe, check out our Greek Style Lemon Roasted Potatoes for a healthy and flavorful side dish.


FAQs About Apple Pie Lasagna

  1. Can I make Apple Pie Lasagna ahead of time?
    Yes! This dessert is perfect for making ahead. It needs time to chill, so preparing it the night before is ideal.
  2. Can I freeze Apple Pie Lasagna?
    You can freeze the layers before adding whipped cream. Once frozen, thaw in the fridge and add fresh whipped cream before serving.
  3. What apples are best for the filling?
    Tart apples like Granny Smith work best for apple pie filling, as they balance the sweetness of the cream and caramel.
  4. Can I use a different crust?
    Absolutely! You can try shortbread cookies, vanilla wafers, or even an oatmeal crust for a different texture.

Conclusion: Why You Should Try Apple Pie Lasagna

Apple Pie Lasagna is a simple yet indulgent dessert that combines the comforting flavors of fall with the ease of a no-bake recipe. Whether you’re serving it at a holiday party or enjoying it at home, this dessert is sure to be a hit. The layers of apple pie filling, creamy cheesecake, and crunchy graham crackers make it a dessert that’s as beautiful as it is delicious.

For more no-bake desserts, check out our No-Bake Banana Pudding Cheesecake or try our Ultimate Comfort Food: Crockpot Potato Soup for a savory dish to pair with this sweet treat.

Honey Garlic Chicken Wings Recipe: Sweet, Savory, and Easy to Make

garlic honey chicken wings, sticky honey garlic wings, sweet garlic chicken wings, honey glazed chicken wings

Honey Garlic Chicken Wings Recipe: Sweet and Savory Perfection

If you’re looking for a delicious and simple appetizer that will please any crowd, Honey Garlic Chicken Wings are the perfect choice. These wings are coated in a flavorful sauce made with honey, garlic, and soy sauce, creating a perfect balance of sweet and savory. Whether you choose to bake, fry, or air fry these wings, they’ll come out crispy on the outside and juicy on the inside. Perfect for game days, family dinners, or casual get-togethers, honey garlic wings are a guaranteed hit.

To create these wings, you need minimal ingredients, and the cooking process is straightforward. These wings can be served alongside sides like rice or vegetables, or enjoyed solo. Plus, with the right tips and tricks, you can achieve that golden, crispy texture, whether you bake, fry, or use an air fryer.


Ingredients for Honey Garlic Chicken Wings

To make the best honey garlic chicken wings, you’ll need the following essential ingredients:

  • Chicken Wings: Drumettes and flats separated for even cooking.
  • Honey: Adds natural sweetness and helps to thicken the glaze.
  • Garlic: Fresh garlic provides a sharp contrast to the sweetness.
  • Soy Sauce: Adds umami and balances the flavor of the honey.
  • Other Flavor Enhancers: Optional ingredients like ginger, sesame oil, or chili flakes for an extra kick.

These ingredients make up the base for your honey garlic wings, but you can always adjust the recipe with your favorite spices or toppings for added flair.


Step-by-Step Guide: How to Make Honey Garlic Chicken Wings

Follow these simple steps to make the best honey garlic chicken wings:

  1. Prepare the Wings: Pat the wings dry with paper towels. This step is essential to getting that crispy skin. For baked wings, toss the wings in a little baking powder or cornstarch before cooking.
  2. Bake or Fry the Wings:
    • Baked Wings: Preheat the oven to 400°F and bake for 30-40 minutes, flipping halfway through. Use a wire rack for even cooking.
    • Fried Wings: Heat oil in a deep fryer or large pot to 350°F. Fry the wings in small batches until golden brown and crispy.
    • Air-Fried Wings: Preheat the air fryer to 375°F and cook the wings for 20-25 minutes, shaking the basket halfway through.
  3. Prepare the Honey Garlic Sauce:
    In a saucepan, combine honey, minced garlic, soy sauce, and any additional seasonings (ginger or chili flakes). Simmer on medium heat until the sauce thickens slightly.
  4. Coat the Wings: Once the wings are cooked, toss them in the honey garlic sauce until evenly coated.
  5. Serve Immediately: Garnish with sesame seeds or chopped green onions if desired, and serve with your favorite dipping sauces.

For another flavorful chicken dish that requires minimal effort, try our Slow Cooker Chicken and Gravy Over Noodles, which offers a hearty meal with ease.


Cooking Methods: Baked, Fried, or Air-Fried Wings

  • Baked Wings: Baking is the healthier option, and the key to crispy baked wings is patting the chicken dry and cooking them at a high temperature.
  • Fried Wings: For ultimate crispiness, frying the wings is unbeatable. It’s essential to maintain the right oil temperature to avoid greasy wings.
  • Air-Fried Wings: For a healthy yet crispy option, air frying is a great alternative. The air fryer mimics the results of fried wings with less oil, making it ideal for those watching their calorie intake.

For another fun take on crispy appetizers, check out our Dorito Chicken Casserole, which combines layers of crunchy goodness in every bite.


Variations of Honey Garlic Chicken Wings

There are many ways to customize honey garlic chicken wings to suit your tastes. Here are some delicious variations:

  1. Spicy Honey Garlic Wings: Add chili flakes or sriracha for a spicy kick.
  2. Ginger Honey Garlic Wings: Grated ginger adds a zesty punch to the sauce.
  3. Sesame Honey Garlic Wings: Top the wings with sesame seeds for added crunch.
  4. Sticky Honey Soy Garlic Wings: Increase the soy sauce in the recipe for a more umami-rich glaze.

For those who enjoy trying different styles of wings, you might also enjoy our Buffalo Chicken Mac and Cheese, a delicious fusion of two comfort foods in one.


Nutritional Information and Healthier Substitutions

Honey garlic wings can be indulgent, but there are ways to lighten up the dish without sacrificing flavor.

  • Air Frying: Use an air fryer instead of deep frying to reduce the amount of oil used.
  • Low-Sodium Soy Sauce: Swap out regular soy sauce for a low-sodium version to cut back on salt.
  • Honey Alternatives: Use sugar-free honey substitutes like monk fruit syrup for a lower-sugar option.

Here’s an approximate nutritional breakdown per serving:

  • Calories: 400-450 per serving (depending on cooking method).
  • Fat: 20-25g (primarily from frying).
  • Protein: 25g from the chicken wings.
  • Carbs: 30-35g from the honey and sauce.

FAQs About Honey Garlic Chicken Wings

  1. Can I make honey garlic chicken wings ahead of time? Yes, you can bake or fry the wings ahead of time and toss them in the sauce right before serving. This keeps the wings crispy.
  2. Can I use boneless chicken instead of wings? Absolutely! Boneless chicken thighs or breast chunks work well, especially if you prefer boneless wings.
  3. How do I keep the wings crispy after coating them in sauce? To keep the wings crispy, toss them in the sauce right before serving. You can also bake them for a few minutes after saucing to lock in the crispiness.
  4. Can I make the sauce without soy sauce? Yes, you can substitute soy sauce with tamari for a gluten-free option or coconut aminos for a soy-free version.

For more tips on crispy dishes, try our Crispy Fried Cheesecake Bites, which is perfect for those who love a crunchy exterior with a sweet interior.


Conclusion: Why You Should Try Honey Garlic Chicken Wings

Honey garlic chicken wings are the perfect combination of sweet, savory, and sticky goodness. Whether you bake, fry, or air fry them, they’re sure to be a crowd-pleaser at any gathering. With simple ingredients and straightforward instructions, these wings are a must-try for wing lovers everywhere.

For more crowd-pleasing recipes, check out our guide to making Slow Cooker Chicken Tacos, a flavorful and easy meal that everyone will love.

Chicken Stuffing Casserole: The Perfect Comfort Food for Any Occasion

chicken and stuffing casserole, easy chicken stuffing bake, creamy chicken stuffing casserole, chicken casserole with stuffing

Chicken Stuffing Casserole: A Comforting Classic for Any Occasion

When you’re in need of a hearty, easy-to-make dinner, Chicken Stuffing Casserole is the perfect solution. It’s a classic comfort food that brings together tender chicken, flavorful stuffing, and creamy soup, all baked into a warm, satisfying dish. Whether you’re feeding a large family or preparing a simple weeknight dinner, this casserole never fails to impress.

If you’re a fan of comforting casseroles, you’ll love our Dorito Chicken Casserole, which adds a crunchy, cheesy twist to classic chicken dishes.


Why You’ll Love Chicken Stuffing Casserole

Chicken Stuffing Casserole is versatile and can be made with a variety of ingredients. Whether you’re using leftover chicken or turkey, fresh vegetables, or frozen ingredients, this dish adapts easily. Plus, it’s perfect for using up leftover holiday stuffing or bread.

For another easy meal idea, check out our Slow Cooker Chicken and Gravy Over Noodles, which offers the same comfort and ease of preparation as this casserole.


Ingredients for Chicken Stuffing Casserole

Essential Ingredients:

  • Cooked Chicken: Shredded or cubed chicken breast works best, but you can also use rotisserie chicken or turkey.
  • Stuffing Mix: Opt for store-bought stuffing mix or make your own with bread cubes, celery, onions, and herbs.
  • Cream Soup: Cream of chicken or cream of mushroom soup adds creaminess and binds the ingredients together.
  • Broth: Chicken broth keeps the stuffing moist and flavorful.
  • Vegetables: Frozen or fresh vegetables like green beans, carrots, or peas add texture and nutrients.
  • Butter: Adds richness and helps the stuffing brown nicely on top.

If you’re in the mood for more easy weeknight meals, you might also enjoy our Crockpot Potato Soup—another comforting, crowd-pleasing dish.


How to Make Chicken Stuffing Casserole

Step-by-Step Instructions:

  1. Prepare the Stuffing: Follow the package directions for your stuffing mix, or prepare homemade stuffing by sautéing onions, celery, and herbs in butter before mixing with bread cubes and broth.
  2. Mix the Chicken and Soup: In a large bowl, combine shredded chicken, cream of chicken soup, and your choice of vegetables.
  3. Layer the Casserole: Spread the chicken mixture into a greased casserole dish. Top with the prepared stuffing.
  4. Bake: Bake the casserole in a preheated oven at 350°F for 30-40 minutes, until the stuffing is golden brown and the casserole is heated through.

For more step-by-step recipes, try our Slow Cooker Baked Ziti, an easy and delicious way to enjoy a classic Italian dish with minimal effort.


Popular Variations of Chicken Stuffing Casserole

  1. Cheesy Chicken Stuffing Casserole: Add shredded cheese, such as cheddar or mozzarella, to the chicken mixture or sprinkle on top for a cheesy twist.
  2. Vegetarian Stuffing Casserole: Swap the chicken for extra vegetables like mushrooms, zucchini, or spinach to create a hearty vegetarian version.
  3. Turkey Stuffing Casserole: Perfect for using up leftover turkey after Thanksgiving, this version is just as delicious and comforting.
  4. Healthy Chicken Stuffing Casserole: Use low-fat cream soup, whole grain stuffing, and add extra vegetables for a lighter, healthier casserole.
  5. Slow Cooker Chicken Stuffing Casserole: Assemble the ingredients in a slow cooker and let it cook on low for 4-6 hours for an easy, hands-off meal.

What to Serve with Chicken Stuffing Casserole

Best Side Dishes:

  • Green Salad: A fresh green salad with a light vinaigrette pairs perfectly with the richness of the casserole.
  • Roasted Vegetables: Roasted broccoli, carrots, or Brussels sprouts add a nice crunch and balance out the creamy casserole.
  • Cranberry Sauce: For a Thanksgiving-style meal, serve with cranberry sauce for a sweet-tart contrast.

For a complete meal idea, you can also try pairing your casserole with our Crockpot Baked Ziti for a fun mix of flavors and textures.


Nutritional Information and Healthier Substitutions

Nutritional Breakdown (Per Serving):

  • Calories: Approx. 350-400 depending on ingredients and portion size.
  • Fat: 20g per serving, mainly from the butter and cream soup.
  • Protein: 25-30g, due to the chicken and any added cheese.
  • Carbohydrates: 30-40g, primarily from the stuffing and any added vegetables.

Healthier Alternatives:

  1. Low-Fat Cream Soup: Use a low-fat or reduced-sodium cream of chicken soup to reduce calories and sodium content.
  2. Whole Grain Stuffing: Swap traditional stuffing for a whole grain or gluten-free alternative.
  3. More Vegetables: Increase the vegetable content by adding extra carrots, green beans, or zucchini for a fiber-rich, nutrient-dense casserole.
  4. Greek Yogurt: Replace some or all of the cream soup with Greek yogurt to reduce fat and increase protein.

Frequently Asked Questions (FAQs)

1. Can I make Chicken Stuffing Casserole ahead of time?

Yes, you can assemble the casserole ahead of time and refrigerate it for up to 24 hours before baking. This makes it an ideal dish for busy weeknights or meal prepping.

2. How do I keep the stuffing from getting soggy?

To avoid soggy stuffing, make sure to use less broth and bake the casserole uncovered. You can also bake the stuffing separately and add it on top during the last 10 minutes of baking.

3. Can I use leftover turkey instead of chicken?

Absolutely! Leftover turkey is a great substitute for chicken, especially after the holidays.

4. What’s the best way to reheat Chicken Stuffing Casserole?

Reheat the casserole in a 350°F oven until warmed through. If the stuffing seems dry, you can add a little extra broth or butter before reheating.

For more cooking tips, visit our Ultimate Comfort Food Guide.


Conclusion: Why You Should Try Chicken Stuffing Casserole

Chicken Stuffing Casserole is the ultimate comfort food that’s easy to make, customizable, and perfect for any occasion. Whether you’re preparing a weeknight dinner or using up leftovers after the holidays, this casserole is sure to become a family favorite. With so many variations and side dish options, it’s a versatile meal that everyone will love.

For more delicious recipes, check out our Dorito Chicken Casserole for a fun twist on the classic chicken casserole, or explore more comforting dishes like our Slow Cooker Chicken and Gravy.