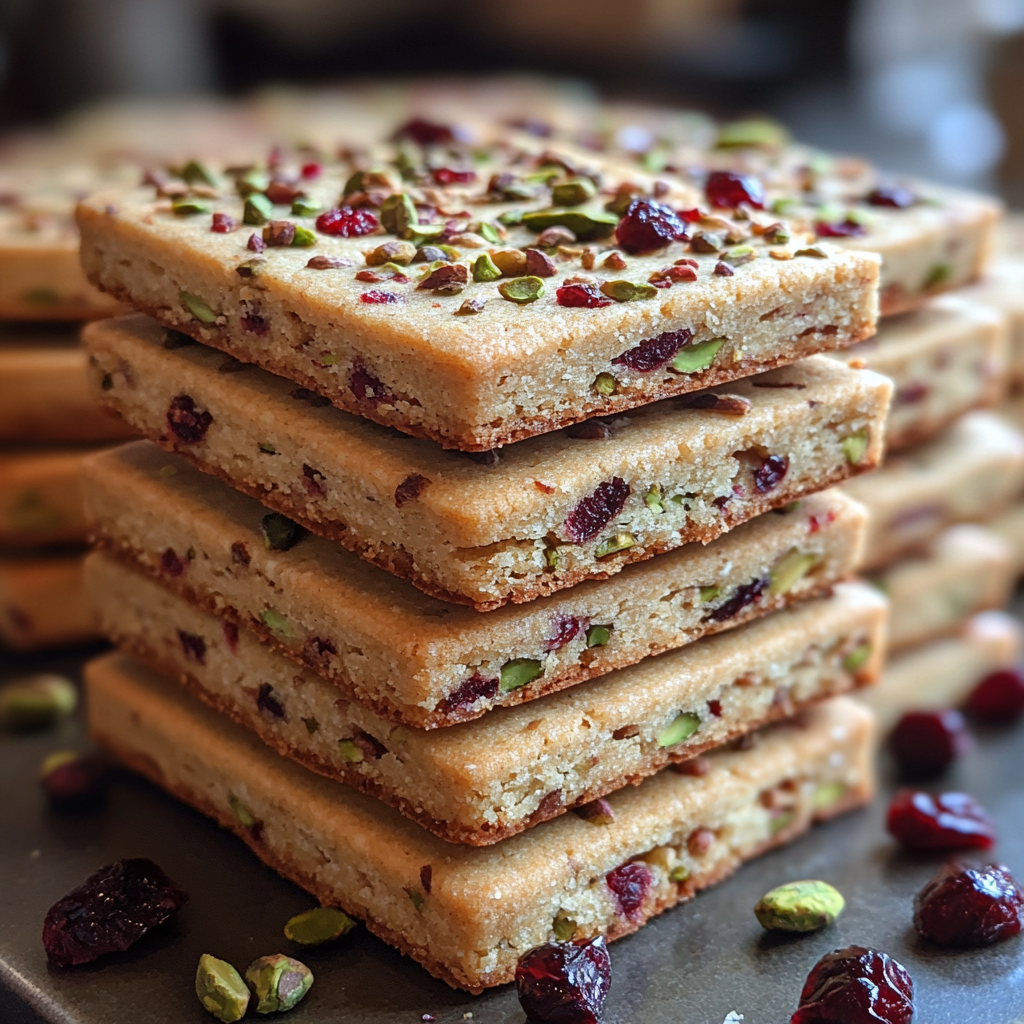
Festive Grinch Oreo Balls Recipe – Perfect No-Bake Holiday Treats

holiday Oreo balls, Christmas Oreo balls, Grinch dessert, no-bake Oreo treats, festive Oreo balls, easy Grinch recipe, Grinch-themed dessert, holiday sweets

Grinch Oreo Balls: A Festive Treat for the Holidays

The holidays are a time for special treats, and few things capture the spirit of the season like Grinch Oreo Balls. Inspired by Dr. Seuss’ iconic Grinch character, these no-bake bites are the perfect blend of holiday cheer and deliciousness. Made with crushed Oreos, cream cheese, green candy melts, and a signature red heart sprinkle, Grinch Oreo Balls bring fun and flavor to any holiday table.

Why Make Grinch Oreo Balls?

Creating Grinch Oreo Balls is not only easy but also a delightful way to bring the family together in the kitchen. Since they require no baking, these treats are perfect for children and adults alike. Explore other family-friendly treats here. Pairing them with holiday beverages or as part of a festive dessert table will surely delight your guests.

Learn more about creating no-bake desserts.

Ingredients for Grinch Oreo Balls

To create these tasty treats, gather the following ingredients:

  • 1 package of Oreos (any variety)
  • 8 oz cream cheese, softened
  • Green candy melts
  • Red heart sprinkles
  • Optional: peppermint extract for a holiday twist

Step-by-Step Instructions

  1. Prepare the Oreo Mixture
    • Crush Oreos into a fine crumb and mix with cream cheese until smooth.
    • Optional: Add a few drops of peppermint extract for a festive minty twist.
  2. Form and Freeze
    • Roll the mixture into balls and place on a parchment-lined baking sheet.
    • Freeze for 15-20 minutes to set, making them easier to dip.
  3. Melt the Candy Coating
    • Melt the green candy melts in a microwave-safe bowl, stirring every 30 seconds until smooth.
    • Dip each Oreo ball in the melted candy, coating it evenly.
  4. Add the Heart
    • While the coating is still wet, place a red heart sprinkle on each ball.
  5. Set and Serve
    • Let the coated balls sit until the candy hardens. They’re now ready to serve or store!

Tips and Tricks for Perfect Grinch Oreo Balls

  • Ensure Firmness: Keep your Oreo mixture firm by chilling it before coating.
  • Alternative Coatings: Swap candy melts for white chocolate with a touch of food coloring for a more customizable color.
  • Storing Grinch Oreo Balls: Store them in an airtight container to keep them fresh for up to a week.

For a complementary recipe that requires minimal prep time, check out this easy dessert option.

Fun Variations on Grinch Oreo Balls

Why not add some creativity to the classic recipe?

1. Mint Chocolate Grinch Balls

Using mint-flavored Oreos or adding peppermint extract to the filling gives these Grinch Oreo Balls an extra holiday flair. Green or red peppermint chips on top could be an additional festive touch!

2. Dairy-Free and Gluten-Free Options

  • Use dairy-free cream cheese and gluten-free cookies to create Grinch Oreo Balls suitable for those with dietary restrictions.

Looking for more holiday-inspired treats? Visit our recipe collection for gluten-free options.

FAQs About Grinch Oreo Balls

  • What Oreos work best?
    Regular or mint-flavored Oreos give the best flavor balance.
  • Can I make Grinch Oreo Balls in advance?
    Yes, prepare them a few days ahead and store in the refrigerator.
  • What if I don’t have green candy melts?
    White chocolate with a drop of green food coloring works well as a substitute.

Nutrition and Healthier Variations

Each ball contains approximately 120 calories. To lighten the recipe, consider using reduced-fat cream cheese or opting for dark chocolate as a coating alternative.

How to Make a Stunning Pink Dragon Fruit Layer Cake: Recipe & Tips

dragon fruit cake, pitaya cake recipe, pink layer cake, exotic fruit dessert, tropical cake recipe, dragon fruit frosting, dragon fruit dessert

Pink Dragon Fruit Layer Cake Recipe

Creating a Pink Dragon Fruit Layer Cake is a fantastic way to bring vibrant colors and unique tropical flavors to any dessert table. This cake not only impresses visually but also offers a delightful balance of light, fruity flavor with creamy frosting. Whether you’re celebrating a special occasion or simply want to experiment with exotic fruits, this recipe will guide you through each step, ensuring you achieve an Instagram-worthy, delectable result.


Why Dragon Fruit?

Dragon fruit, or pitaya, is known for its rich, vibrant colors, ranging from deep pink to red hues. Beyond its stunning appearance, dragon fruit is a low-calorie, nutrient-dense food packed with antioxidants, vitamins, and minerals that boost wellness. Adding dragon fruit to your dessert enhances its nutritional value, making it as healthful as it is delicious.

Did you know? Dragon fruit powder can give the cake a consistent color without compromising flavor. Find out more about how to puree dragon fruit to perfect this process.


Ingredients You’ll Need

Here’s what you’ll need to create this stunning, layered cake:

  • Pink Dragon Fruit Puree (or powder, for consistent coloring)
  • Flour (use cake flour for a light texture)
  • Sugar (standard granulated or a natural alternative)
  • Eggs (for binding and structure)
  • Butter or Coconut Oil (for moistness)
  • Baking Powder and Baking Soda (for rise)
  • Salt (to enhance flavor)
  • Coconut Milk or Almond Milk (for a hint of creaminess)
  • Vanilla Extract (for added depth in flavor)
  • Cream Cheese Frosting or Whipped Coconut Cream (to layer and frost)

Step-by-Step Recipe Instructions

  1. Prepare Your Dragon Fruit
    If using fresh dragon fruit, peel and blend until smooth. For an easy option, consider dragon fruit powder, which delivers vibrant color without extra water content.
  2. Make the Cake Batter
    • In a large bowl, mix dry ingredients: flour, baking powder, baking soda, and salt.
    • In a separate bowl, cream together sugar and butter. Add eggs one at a time, beating well after each addition.
    • Gradually add the dry mixture and coconut milk, alternating until smooth.
    • Fold in the dragon fruit puree or powder.
  3. Bake the Cake Layers
    Divide the batter evenly between two or three cake pans. Bake at 350°F (175°C) for 25–30 minutes or until a toothpick inserted into the center comes out clean. Allow the layers to cool completely.
  4. Prepare the Frosting
    Using cream cheese or whipped coconut cream creates a luscious, tropical pairing with the dragon fruit layers. Whip the frosting until fluffy and refrigerate it until you’re ready to use.
  5. Assemble the Cake
    • Place the first cake layer on your serving plate.
    • Spread a generous amount of frosting on top before adding the next layer.
    • Repeat until all layers are stacked, then frost the top and sides.
  6. Decorate
    For a show-stopping finish, garnish with fresh dragon fruit slices or edible flowers.

Variations and Tips for Success

  • Vegan and Gluten-Free Options
    Substitute eggs with a flax egg and use almond or coconut flour instead of regular flour.
  • Boost Flavor with Lime
    Lime zest or juice can add a hint of acidity to balance the cake’s sweetness.
  • Use a Powdered Dragon Fruit for Consistency
    Powder gives a more consistent color, especially if you’re aiming for a bright pink.

For more fruity inspiration, check out this simple pancake recipe for breakfast ideas that complement tropical ingredients.


Serving Suggestions

  • Serve this cake as a centerpiece dessert for tropical-themed events or family gatherings.
  • Pair it with fresh berries, mango slices, or even a sprinkle of coconut for an added tropical vibe.

Storage Tips

This cake can be stored in an airtight container in the refrigerator for up to 3 days. For longer storage, consider freezing the layers separately and assembling just before serving.


FAQs

  • How do I keep the vibrant pink color?
    Use pink dragon fruit powder, as fresh dragon fruit can lose color upon baking.
  • Can I substitute white dragon fruit?
    White dragon fruit has a milder flavor and lighter color; it won’t yield the same visual effect.
  • What’s the best frosting for this cake?
    Cream cheese frosting complements the tropical flavors, but coconut whipped cream is also an excellent choice for a lighter, dairy-free option.

For more cake inspiration, explore our moist Kentucky butter cake recipe.


Nutritional Profile of Dragon Fruit

  • Low Calories: Helps to keep the dessert light and health-conscious.
  • Rich in Fiber: Aids in digestion and helps maintain fullness.
  • Loaded with Antioxidants: Offers health benefits by combating oxidative stress.

Final Touches for the Perfect Cake

The Pink Dragon Fruit Layer Cake combines beauty with flavor in every bite. By following these tips and exploring creative variations, you can make this dessert uniquely yours. With fresh or powdered dragon fruit, your cake is sure to become a family favorite!

For more creative dessert recipes, see our collection of sweet treats. Enjoy baking!

Amish Neighbor’s Comfort Bowl: A Hearty and Simple Recipe for Cozy Dinners

Amish comfort food, hearty Amish recipes, Amish-style stew, cozy bowl recipe, classic comfort bowl, Amish family dinner

Amish Neighbor’s Comfort Bowl: A Recipe for Hearty Comfort

When it comes to soul-warming dishes that bring family together, the Amish Neighbor’s Comfort Bowl is a classic. This dish captures the essence of Amish cooking with its emphasis on simple, wholesome ingredients and flavors that satisfy. Known for a rich blend of tender meats, fresh vegetables, and a savory creamy broth, this comfort bowl is perfect for cool weather or a family gathering.

Amish cuisine often highlights fresh, locally sourced ingredients, creating meals that are filling yet uncomplicated. For those who love slow-cooked, creamy flavors, this dish makes a fantastic addition to any dinner table. If you enjoy exploring creamy potato-based comfort foods, you may also love The Ultimate Comfort Food Crockpot Potato Soup with Hashbrowns, which shares the same heartwarming appeal.

The charm of this comfort bowl lies in its ability to adapt to your preferences. With this recipe, you can add your choice of seasonal vegetables or adjust the level of creaminess to match your taste. Curious about more effortless slow-cooked meals? Try exploring recipes like Slow Cooker Magic: Unveiling the Ease of Crock-Pot Baked Ziti, which pairs beautifully with hearty, home-cooked flavors.


Ingredients for Amish Neighbor’s Comfort Bowl

This recipe serves 4–6 people, making it ideal for a cozy family dinner.

Main Ingredients:

  • 1 lb boneless chicken breast or beef chuck, cubed
  • 1 cup sliced carrots
  • 1 cup diced potatoes
  • 1/2 cup celery, chopped
  • 1 cup green beans
  • 1 onion, diced
  • 3 cups chicken or beef broth
  • 1 cup heavy cream
  • 1 tablespoon butter
  • Salt and pepper to taste

Optional Additions for Flavor:

  • Garlic cloves (minced) for a savory depth
  • Bay leaf for a subtle earthy flavor
  • Fresh herbs like parsley or thyme for garnish

For equipment, you’ll need a large pot or Dutch oven to cook the comfort bowl to perfection. Feel free to add more vegetables or proteins to suit your family’s preferences.


Step-by-Step Instructions

Step 1: Prep Your Ingredients

  1. Peel and dice the potatoes, slice the carrots, and chop the celery and onions.
  2. Cube the chicken breast or beef chuck into bite-sized pieces.
  3. Prepare any optional ingredients, such as garlic or fresh herbs.

Step 2: Sauté the Meat and Vegetables

  1. In a large pot or Dutch oven, melt the butter over medium heat.
  2. Add the meat and cook until browned on all sides.
  3. Stir in the onions, garlic (if using), and celery, cooking until softened, approximately 5 minutes.

Step 3: Add Broth and Simmer

  1. Pour in the chicken or beef broth, followed by the carrots and potatoes.
  2. Add a bay leaf and season with salt and pepper to taste.
  3. Bring the mixture to a gentle boil, then reduce the heat to low. Cover and simmer for 30–40 minutes until the vegetables are tender.

Step 4: Add Cream and Finalize

  1. Stir in the heavy cream to create a creamy base.
  2. Simmer for an additional 5–10 minutes until the broth thickens slightly.
  3. Adjust seasonings as needed. Remove the bay leaf before serving.

This savory, creamy comfort bowl is perfect when served with freshly baked bread for dipping. For more hearty, slow-cooked flavors, consider No Peek Beef Tips for another satisfying main course.


Tips for Making the Perfect Amish Comfort Bowl

  • Use Fresh Ingredients: Fresh vegetables and quality cuts of meat enhance the dish’s flavors.
  • Season Generously: Add extra salt, pepper, or smoked paprika if you prefer a bolder taste.
  • Simmer Slowly: Letting the ingredients cook slowly allows them to meld and the meat to become tender.
  • Experiment with Herbs: Fresh herbs like parsley and thyme can add brightness and depth to the creamy base.

For another delicious, creamy one-pot meal, you may also love this creamy baked ziti recipe for family dinners or cozy evenings.


Serving Suggestions

Amish Neighbor’s Comfort Bowl is a versatile dish that can be enjoyed as a standalone meal or paired with classic Amish sides.

  • Crusty Bread or Rolls: Perfect for dipping into the creamy broth.
  • Green Salad: A fresh salad with a light vinaigrette balances the richness of the comfort bowl.
  • Egg Noodles: For a heartier version, serve the bowl over egg noodles for a more filling meal.

Garnish Ideas

  • Fresh parsley or thyme for a hint of color
  • A sprinkle of black pepper or smoked paprika for added flavor

Storage and Reheating Tips

This dish stores well, making it ideal for leftovers or meal prep.

  • Refrigerate: Place leftovers in an airtight container and refrigerate for up to 4 days.
  • Freeze: For longer storage, freeze in individual portions for up to 3 months.
  • Reheating: Warm on the stove over low heat, adding a bit of broth if it thickens.

Following these steps will help maintain the comfort bowl’s delicious texture and flavor, even as a next-day meal.


Frequently Asked Questions (FAQs)

1. Can I make this recipe in a slow cooker?
Absolutely! Simply brown the meat and sauté the onions before transferring everything to a slow cooker. Cook on low for 6–8 hours or until the vegetables are tender.

2. What other vegetables can I add?
Common additions include corn, peas, and bell peppers, which add more flavor and color.

3. Can I make this dish vegetarian?
Yes! Replace the meat with extra vegetables like mushrooms or chickpeas, and use vegetable broth.

4. How can I thicken the broth if it’s too thin?
You can add a small amount of cornstarch mixed with water to the broth or let it simmer uncovered until it reduces to your desired consistency.


Final Thoughts

The Amish Neighbor’s Comfort Bowl combines the best of homestyle flavors and hearty ingredients in a satisfying, nourishing meal. With its creamy base, fresh vegetables, and tender meat, this dish truly represents the art of Amish cooking. Whether you’re making it for a family dinner or a cozy weekend meal, it’s bound to become a favorite.

Southern Candied Sweet Potatoes Recipe: Perfect Holiday Side Dish

Southern yams, candied sweet potato dish, holiday sweet potatoes, caramelized sweet potatoes, classic candied yams

Southern Candied Sweet Potatoes: A Classic Holiday Recipe

If you’re looking for a sweet, savory side dish that brings comfort food vibes to your table, Southern Candied Sweet Potatoes are exactly what you need. A staple in Southern kitchens and a popular side during the holiday season, candied sweet potatoes blend the earthy flavor of yams with a rich, caramelized glaze. This dish is sure to complement any holiday meal or add warmth to a casual family dinner.

Creating the perfect candied sweet potatoes is all about the balance of flavors. With just a few essential ingredients like butter, brown sugar, and a touch of cinnamon, you can transform sweet potatoes into a decadent treat. For insights into the ideal sweet potato variety, check out Sweet Potatoes in Southern Cuisine and discover what makes this root vegetable a Southern favorite.

While this recipe will help you master the art of candied sweet potatoes, for tips on glazing them perfectly, refer to Making the Perfect Sweet Potato Glaze. Now, let’s dive into the steps to make this rich, sticky, and flavor-packed side dish.


Ingredients for Southern Candied Sweet Potatoes

This recipe is designed to serve a family gathering, making about six portions. For larger groups, you can easily double or triple the ingredients. Here’s what you’ll need:

  • 4 large sweet potatoes (peeled and sliced into thick rounds)
  • 1/2 cup unsalted butter
  • 3/4 cup brown sugar
  • 1/4 cup maple syrup (optional for extra richness)
  • 1 teaspoon ground cinnamon
  • 1/2 teaspoon nutmeg
  • Salt to taste

Optional Ingredients

  • Marshmallows: for an extra-sweet, gooey topping
  • Pecans: for a crunchy contrast
  • Vanilla extract: a touch of warmth to round out flavors

For equipment, you’ll need a large saucepan or cast iron skillet and a baking dish. This recipe is versatile and can be made either on the stovetop or baked in the oven for a caramelized finish.


Step-by-Step Instructions

Step 1: Preparing the Sweet Potatoes

  1. Preheat your oven to 350°F (175°C) if you prefer baking.
  2. Peel the sweet potatoes and cut them into 1/2-inch thick rounds. This thickness allows the sweet potatoes to cook through evenly while absorbing the glaze.

Step 2: Making the Glaze

  1. In a large skillet or saucepan over medium heat, melt the butter.
  2. Add the brown sugar, cinnamon, nutmeg, and a pinch of salt. Stir well until the mixture becomes smooth and starts to bubble.
  3. If desired, add maple syrup for a deeper caramelized flavor. Stir the glaze until well-combined.

Step 3: Candied Coating

  1. Add the sliced sweet potatoes to the skillet, making sure they’re fully coated with the glaze.
  2. Cook for 5–7 minutes, stirring occasionally to ensure even coating and absorption.
  3. Stovetop Method: Lower the heat, cover the skillet, and let the sweet potatoes cook for about 30–40 minutes until tender.
  4. Oven Method: Transfer the sweet potatoes to a baking dish, pour the glaze over, and bake uncovered for 45 minutes, basting occasionally.

By the end of this step, the sweet potatoes should be tender with a beautiful, caramelized coating.


Tips for Perfecting Southern Candied Sweet Potatoes

  • Use Fresh Sweet Potatoes: They have a firmer texture than canned ones, making them ideal for candied recipes.
  • Adjust the Sweetness: If you prefer a less sugary taste, reduce the brown sugar slightly. Alternatively, you can add a hint of honey or agave.
  • Baste Regularly: If you’re baking, baste the sweet potatoes every 15 minutes to keep them moist and evenly glazed.

For another satisfying, creamy side dish, consider this Crockpot Potato Soup with Hashbrowns to pair with your sweet potatoes and create a hearty Southern-inspired meal.


Flavor Variations and Serving Suggestions

While the classic Southern candied sweet potatoes are delicious as is, a few additions can enhance the dish further:

  • Marshmallows: Add mini marshmallows on top and broil for a few minutes for a sweet, toasted layer.
  • Pecans: Sprinkle chopped pecans for added crunch and a nutty flavor.
  • Vanilla Extract: Add a teaspoon of vanilla extract to the glaze for added depth.

Serving Suggestions

  • Perfect with Holiday Meals: These sweet potatoes pair well with turkey, ham, or roasted chicken.
  • Pair with Hearty Dishes: Try serving alongside Slow Cooker Baked Ziti for a complete meal that combines savory and sweet flavors.
  • Garnish Options: A sprinkle of cinnamon or nutmeg on top enhances the aroma and look of the dish.

Storage and Reheating Tips

Candied sweet potatoes store well, allowing you to enjoy leftovers without losing flavor or texture.

  • Refrigerate: Place in an airtight container and refrigerate for up to 4 days.
  • Freeze: For longer storage, freeze the sweet potatoes for up to 2 months. Reheat them in the oven at 300°F until warmed through.

To maintain their caramelized finish, avoid microwaving; instead, reheat in the oven to keep the glaze intact.


Frequently Asked Questions (FAQs)

1. What are the best types of sweet potatoes for this recipe?
Choose firm, fresh sweet potatoes, ideally orange-fleshed varieties like Garnet or Jewel, for a naturally sweet flavor and a vibrant color that holds up well to cooking.

2. Can I make candied sweet potatoes ahead of time?
Yes! Prepare them as directed, refrigerate, and reheat before serving. This makes them perfect for holiday prep.

3. Do candied sweet potatoes need to be refrigerated?
Yes, refrigerating helps maintain their flavor and texture for up to 4 days.

4. How do I prevent my sweet potatoes from becoming mushy?
Avoid overcooking, and make sure to slice them into even rounds for consistent cooking.

5. Can I make this recipe vegan?
Yes, by using a plant-based butter substitute and opting for maple syrup instead of honey, this recipe easily adapts for a vegan-friendly version.


Final Thoughts

Whether you’re preparing for a holiday meal or simply craving a taste of the South, Southern Candied Sweet Potatoes are a satisfying side that fits any occasion. With their sweet, buttery glaze and the option to add pecans or marshmallows, these sweet potatoes bring a classic touch of nostalgia to the table. So, gather your ingredients, follow these simple steps, and enjoy a dish that’s steeped in tradition yet flexible enough to adapt to your tastes.

Grandma’s Old-Fashioned Bread Pudding with Vanilla Sauce Recipe

traditional bread pudding recipe, homemade bread pudding, vanilla sauce for desserts, old-fashioned dessert, classic bread pudding

Grandma’s Old-Fashioned Bread Pudding with Vanilla Sauce

There’s something undeniably special about Grandma’s old-fashioned bread pudding with vanilla sauce. The aroma, the warmth, and the decadent taste of each spoonful make it a classic comfort dessert that’s hard to beat. Passed down through generations, this timeless dessert utilizes simple, budget-friendly ingredients, often transforming leftover bread into a culinary delight. If you’re craving a sweet treat that brings back childhood memories, bread pudding with a creamy vanilla sauce is perfect for you.

In this recipe, we’ll explore the steps to create a soft, custard-like bread pudding topped with a silky vanilla sauce that complements every bite. For those looking to elevate their baking skills, learning the Origins of Bread Pudding can provide insight into the dessert’s fascinating history. Not only is it a comforting addition to your dessert collection, but it also serves as a fantastic way to repurpose leftover bread, preventing food waste in a delicious way.

With a combination of rustic ingredients, bread pudding is a nostalgic treat that brings us back to family gatherings and holidays around the dining table. To ensure you achieve the perfect pudding texture, we’ve included step-by-step instructions and tips on enhancing its flavor. If you’re interested in making a sauce that complements bread pudding, consider these tips for vanilla sauce perfection, which ensure a smooth and delicious result.

Ingredients for Grandma’s Old-Fashioned Bread Pudding

To prepare this rich and indulgent dessert, gather the following ingredients. These proportions are suitable for serving approximately six people, and the recipe can be easily adjusted based on your preferred servings.

For the Bread Pudding:

  • 4 cups of day-old bread, cubed (sourdough, French, or brioche recommended)
  • 2 cups of whole milk or any milk alternative
  • 1/2 cup of granulated sugar
  • 3 large eggs, beaten
  • 1 teaspoon of vanilla extract
  • 1/2 teaspoon of ground cinnamon (optional, for added warmth)
  • 1/4 teaspoon of nutmeg

For the Vanilla Sauce:

  • 1 cup of heavy cream or whole milk
  • 1/2 cup of sugar
  • 1/4 cup of butter
  • 1 teaspoon of vanilla extract
  • Pinch of salt

Tools Needed

To make this recipe, you’ll need:

  • Mixing bowls
  • Measuring cups and spoons
  • Whisk or fork for mixing
  • 8×8-inch baking dish (or similar size)
  • Medium saucepan for vanilla sauce preparation

Step-by-Step Instructions for the Best Bread Pudding

Step 1: Prepare the Bread

  1. Preheat your oven to 350°F (175°C).
  2. Grease the baking dish with a small amount of butter.
  3. Spread the cubed bread evenly in the baking dish.

Step 2: Make the Custard

  1. In a mixing bowl, whisk together the milk, sugar, beaten eggs, vanilla extract, and spices until well combined.
  2. Pour the custard mixture evenly over the bread cubes, ensuring that each piece is coated.
  3. Allow the bread to sit for 10–15 minutes, soaking up the custard for a moist and custardy texture.

Step 3: Bake

  1. Place the baking dish in the preheated oven.
  2. Bake for 45–50 minutes, or until the pudding is set, and the top is golden brown.
  3. Once done, remove it from the oven and let it cool slightly.

Crafting the Vanilla Sauce

While the bread pudding bakes, you can prepare the vanilla sauce. This sweet, creamy topping is the perfect partner for bread pudding, adding a layer of flavor and a touch of elegance.

  1. In a saucepan over medium heat, combine the cream, sugar, and butter, stirring frequently until the butter melts and the sugar dissolves.
  2. Once the mixture begins to bubble slightly, reduce the heat and stir in the vanilla extract and salt.
  3. Cook for 2–3 minutes until the sauce has thickened slightly.
  4. Remove from heat and pour over the warm bread pudding before serving.

Serving and Enhancements

Bread pudding is best served warm. Top with a generous drizzle of vanilla sauce, and for added indulgence, try serving it with a scoop of vanilla ice cream or whipped cream. Garnishes like toasted nuts, powdered sugar, or a dash of cinnamon add an extra visual and flavor appeal.

If you enjoyed this recipe, you may want to try related desserts on our site, such as the Kentucky Butter Cake or French Toast Casserole Muffins, which share similar comforting flavors.

Storage and Reheating Tips

For leftovers:

  • Store in an airtight container in the refrigerator for up to 3 days.
  • Reheat individual servings in the microwave or warm the entire dish in the oven at 300°F (150°C) until heated through.

Freezing

If you wish to freeze bread pudding, wrap portions in plastic wrap and place them in freezer-safe bags. Thaw overnight in the refrigerator before reheating.

Frequently Asked Questions (FAQs)

1. What bread is best for bread pudding?
Old-fashioned bread pudding benefits from dense, slightly stale bread. French bread, brioche, and sourdough absorb custard well, creating a rich texture.

2. Can I make bread pudding ahead of time?
Yes, you can prepare the pudding, store it in the fridge, and bake when needed.

3. How long does bread pudding last?
It lasts for about 3–4 days in the refrigerator.

4. What other toppings work with vanilla sauce?
Caramel, chocolate, or fruit sauces also pair beautifully with bread pudding.