Quick and Easy Weeknight Chicken Stir-Fry Recipe

easy chicken stir-fry, quick chicken stir-fry, healthy chicken dinner, chicken and vegetable stir-fry, weeknight stir-fry recipe, simple chicken stir-fry

Weeknight Chicken Stir-Fry: A Quick, Flavorful, and Healthy Dinner Solution

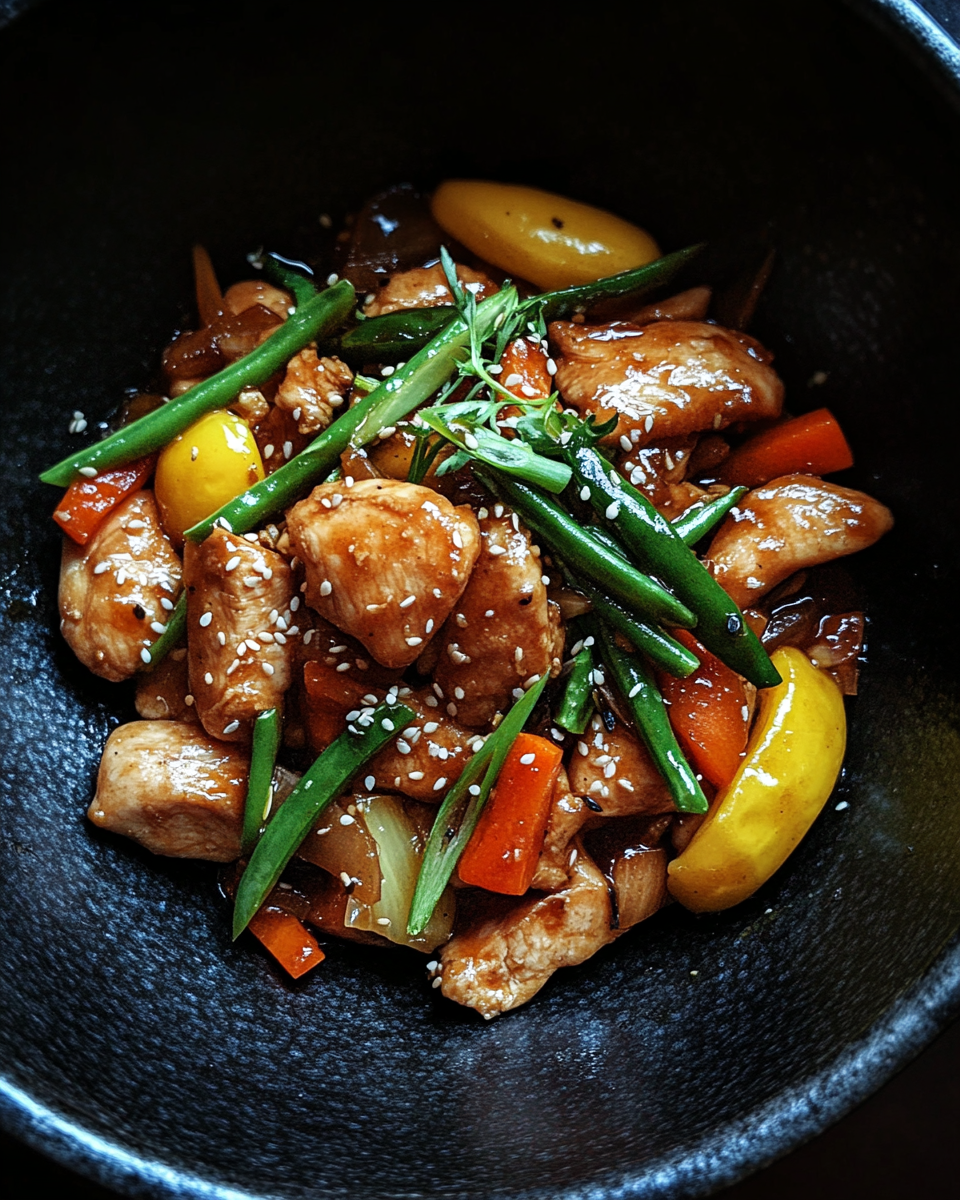
When you’re short on time but still want a delicious and nutritious dinner, Weeknight Chicken Stir-Fry is the perfect solution. This one-pan meal is packed with protein, fresh vegetables, and a savory sauce that’s sure to please everyone at the table. Plus, it’s endlessly customizable, making it easy to adapt with whatever ingredients you have on hand. For those looking for more quick, comforting dinners, our one-pot creamy broccoli and Parmesan noodles offer another simple yet satisfying option.


Why Weeknight Chicken Stir-Fry is a Go-To Meal

Chicken stir-fry has earned its place as a weeknight favorite because it’s quick to prepare, uses just one pan, and allows for plenty of variation. You can easily switch up the vegetables, adjust the sauce to taste, and even make it gluten-free. With minimal cleanup and tons of flavor, it’s an ideal choice for busy days. For another comfort food option with easy prep, try our slow cooker chicken and gravy over noodles.


Ingredients You’ll Need for Weeknight Chicken Stir-Fry

Creating Weeknight Chicken Stir-Fry requires a few key ingredients, many of which you likely already have in your kitchen:

  • Chicken: Boneless, skinless chicken breast or thigh is ideal for quick cooking and lean protein.
  • Vegetables: Popular choices include bell peppers, broccoli, snap peas, and carrots, which add color, crunch, and nutrition.
  • Aromatics: Fresh garlic and ginger bring a vibrant flavor that complements the sauce.
  • Stir-Fry Sauce: Soy sauce, sesame oil, a sweetener (such as honey or brown sugar), and cornstarch for thickening.
  • Optional Add-Ins: Red pepper flakes for heat, sesame seeds for texture, or cashews for added crunch.

Step-by-Step Guide to Making Weeknight Chicken Stir-Fry

1. Preparing the Chicken and Vegetables

  • Step 1: Slice the chicken into thin strips, which allows it to cook quickly and evenly.
  • Step 2: Cut the vegetables into similar-sized pieces for uniform cooking. This ensures each bite has a balance of flavors and textures.
  • Step 3: Mince the garlic and ginger for added freshness and depth.

2. Mixing the Stir-Fry Sauce

  • Ingredients: Soy sauce, sesame oil, honey, cornstarch, and water.
  • Instructions:
    1. In a small bowl, whisk together the sauce ingredients until smooth.
    2. Adjust the sweetness or saltiness to suit your taste; a little more honey for sweetness or soy sauce for saltiness.

3. Cooking the Chicken and Vegetables

  • Step 1: Heat a tablespoon of oil in a large skillet or wok over medium-high heat.
  • Step 2: Add the chicken strips and cook until browned, then set aside.
  • Step 3: Add the vegetables to the skillet and stir-fry until they’re crisp-tender, about 4–5 minutes.
  • Step 4: Return the chicken to the skillet, pour in the sauce, and stir until everything is well-coated and heated through.

Tips for the Best Weeknight Chicken Stir-Fry

To ensure your stir-fry turns out perfect every time, consider these helpful tips:

  • Use High Heat: High heat prevents the chicken and vegetables from steaming, allowing them to brown for added flavor.
  • Cook the Chicken First: This helps avoid overcooked vegetables and ensures each ingredient is perfectly done.
  • Don’t Overcrowd the Pan: Overcrowding leads to steaming instead of stir-frying. Cook in batches if needed.
  • Prep Everything Before Cooking: Stir-frying happens quickly, so have all ingredients prepped and ready to go before you start.

Delicious Variations of Weeknight Chicken Stir-Fry

While the basic recipe is delicious, here are some fun and tasty variations:

  • Teriyaki Chicken Stir-Fry: Substitute stir-fry sauce with teriyaki sauce for a sweeter profile.
  • Spicy Chicken Stir-Fry: Add Sriracha or red pepper flakes to bring a spicy kick to the dish.
  • Chicken and Noodle Stir-Fry: Toss in cooked noodles for a heartier meal.
  • Vegetarian Stir-Fry: Swap the chicken for tofu or tempeh for a plant-based alternative.

Serving Suggestions for Chicken Stir-Fry

Serve Weeknight Chicken Stir-Fry in a variety of ways:

  • With Steamed Rice: Classic and delicious, rice pairs perfectly with the flavors and textures.
  • Over Noodles: Udon or rice noodles make for a filling and comforting dish.
  • On a Bed of Greens: For a lighter option, serve the stir-fry over fresh greens or with a side of our easy vegetable soup recipe for a balanced meal.

Storing and Reheating Leftover Stir-Fry

Leftovers are easy to store and reheat, making this meal ideal for meal prep:

  • Refrigerate: Store in an airtight container in the fridge for up to three days.
  • Freeze: Freeze individual portions for up to two months; this makes for a quick, ready-to-go meal.
  • Reheat: Warm leftovers in a skillet to keep vegetables crisp and the chicken tender.

Frequently Asked Questions (FAQs)

Can I use frozen vegetables?
Yes, frozen vegetables work well, but be sure to thaw and pat them dry to remove excess moisture.

Is there a way to make this gluten-free?
Yes, substitute soy sauce with tamari or coconut aminos for a gluten-free option.

How do I keep the chicken tender?
Avoid overcooking and cook on high heat for a short time to keep it juicy.

Can I make the sauce ahead of time?
Absolutely, prepare the sauce in advance and store in the fridge for up to a week.

What other proteins work well in stir-fry?
Shrimp, beef, or tofu are great alternatives to chicken in this recipe.


Nutritional Information and Health Benefits

This stir-fry offers a well-rounded meal with protein, fiber, and essential nutrients from the vegetables:

  • Calories: Roughly 300–350 per serving.
  • Protein-Rich: Chicken provides a high-protein meal for muscle repair and energy.
  • Nutrient-Dense: Bell peppers, broccoli, and other vegetables add vitamins A and C and dietary fiber.

Conclusion: Make Weeknight Chicken Stir-Fry Part of Your Meal Rotation

With its quick preparation, customizable ingredients, and delightful flavors, Weeknight Chicken Stir-Fry is a must-have for any busy household. This meal is perfect for weeknights when time is tight but you still want something nutritious and delicious. Try it with one of our favorite one-pan recipes, like one-pot creamy broccoli and Parmesan noodles, to add even more variety to your weeknight dinner lineup.

Christmas Cherry Bars: Festive, Easy Holiday Dessert Recipe

cherry pie bars, holiday cherry bars, cherry dessert bars, Christmas cherry squares, festive cherry dessert, easy cherry holiday bars, glazed cherry bars

Christmas Cherry Bars: Festive, Easy, and Perfect for Holiday Gatherings

The holiday season calls for bright, festive, and shareable treats that are as joyful to look at as they are to eat. Christmas Cherry Bars are one of those holiday desserts that add a pop of color and flavor to any table. With a buttery crust, a sweet-tart cherry filling, and a crumbly topping drizzled with vanilla glaze, these bars are perfect for family gatherings, office parties, or gift exchanges. If you’re looking to add even more easy, holiday-inspired desserts to your collection, try our no-bake pumpkin cheesecake, a deliciously simple addition to your festive table.


What Makes Christmas Cherry Bars a Holiday Favorite?

Cherry bars have become a staple in many holiday kitchens due to their bright red filling and nostalgic flavor. The combination of a crumbly crust, rich cherry filling, and vanilla glaze creates a dessert that looks as festive as it tastes. Plus, they’re simple to make and easy to serve in squares, making them ideal for holiday gatherings or potluck events. For another easy, fruit-filled dessert, try our easy apple hand pies—a hit with kids and adults alike!


Essential Ingredients for Christmas Cherry Bars

Creating Christmas Cherry Bars requires just a few basic ingredients to deliver a deliciously festive flavor:

  • Cherry Filling: Canned cherry pie filling is the most convenient option and gives these bars a bright, holiday-ready look.
  • Butter: Provides richness to the crust and topping.
  • Almond Extract: This adds a subtle, nutty aroma that enhances the cherry flavor.
  • Flour and Sugar: Form the base of the crust and crumbly topping.
  • Vanilla Glaze: A simple drizzle made from powdered sugar, milk, and vanilla extract for added sweetness and decoration.

For another festive and unique flavor, you might also enjoy our pistachio shortbread cookies, which bring a nutty, crunchy contrast to your holiday dessert platter.


Step-by-Step Recipe Guide

1. Preparing the Crust

  • Ingredients: Flour, sugar, butter.
  • Instructions:
    1. Combine flour, sugar, and melted butter in a mixing bowl.
    2. Press the mixture evenly into a greased baking dish to form a firm crust.
    3. Bake at 350°F (175°C) for about 10 minutes or until lightly golden.

2. Adding the Cherry Filling

  • Ingredients: Canned cherry pie filling.
  • Instructions:
    1. Spread an even layer of cherry pie filling over the partially baked crust.
    2. Use a spatula to distribute the cherries evenly across the crust.

3. Preparing the Crumble Topping

  • Ingredients: Remaining flour, sugar, butter, almond extract.
  • Instructions:
    1. Combine flour, sugar, and softened butter with a splash of almond extract.
    2. Sprinkle the crumbly mixture over the cherry filling, covering the surface evenly.
    3. Return the pan to the oven and bake for another 20–25 minutes, or until the topping is golden brown.

4. Drizzling with Vanilla Glaze

  • Ingredients: Powdered sugar, milk, vanilla extract.
  • Instructions:
    1. Whisk together powdered sugar, milk, and vanilla until smooth.
    2. Drizzle the glaze over the cooled cherry bars for a beautiful finish.

Tips for Perfect Christmas Cherry Bars

To make the best Christmas Cherry Bars, consider these tips:

  • Chill the Crust: Pre-chilling the crust can help achieve a firmer texture.
  • Drain Excess Liquid: If your cherry filling is too liquidy, let it drain briefly before adding it to the crust.
  • Don’t Overbake: Bake just until the topping is golden; overbaking can dry out the bars.

Variations of Christmas Cherry Bars

While traditional cherry bars are always delicious, here are a few creative twists:

  • Cherry-Almond Bars: Add sliced almonds to the topping for a crunchy texture.
  • Cherry Cheesecake Bars: Spread a thin layer of cream cheese mixture over the crust before adding the cherry filling for a creamy surprise.
  • Gluten-Free Cherry Bars: Substitute gluten-free flour to make this dessert accessible for those with gluten sensitivities.
  • White Chocolate Cherry Bars: Drizzle melted white chocolate over the glaze for added sweetness and a festive touch.

For another twist on holiday treats, explore our easy apple hand pies—another fruit-filled delight.


Serving Suggestions for Christmas Cherry Bars

Serve Christmas Cherry Bars in a variety of ways for any occasion:

  • As a Standalone Dessert: Perfect for holiday gatherings and potlucks.
  • Paired with Ice Cream: Serve with a scoop of vanilla or almond ice cream for a classic dessert combo.
  • On a Dessert Platter: Mix and match with other holiday cookies and bars for a beautiful festive display.

Storage and Freezing Tips

Cherry bars are ideal for making ahead and storing:

  • Refrigeration: Store in an airtight container for up to five days.
  • Freezing: Place in single layers separated by parchment paper and freeze for up to three months.
  • Reheating: Serve cold or reheat briefly in the oven to restore crispness.

Frequently Asked Questions (FAQs)

Can I use fresh cherries instead of canned?
Yes, but cook them down with sugar and cornstarch first to achieve a similar texture.

Can I make this dairy-free?
You can use a plant-based butter alternative, but note that texture may vary slightly.

Is there a way to make a low-sugar version?
Use a low-sugar pie filling and reduce sugar in the crust and topping.

Can I add a different fruit filling?
Absolutely! Blueberry, raspberry, or apple fillings also work well.


Nutritional Information and Health Tips

Enjoy Christmas Cherry Bars in moderation with these nutritional insights:

  • Calories: Approximately 250 per bar.
  • Reduce Sugar: Use reduced-sugar fillings or glaze.
  • Gluten-Free Adaptations: Easily substitute gluten-free flour for those with dietary needs.

Conclusion: Celebrate the Holidays with Christmas Cherry Bars

Christmas Cherry Bars are a delightful addition to any holiday dessert lineup. Easy to make and visually festive, these bars are perfect for gatherings, gift trays, or simply enjoying with family. For more holiday baking inspiration, check out our full collection of holiday treats at Exorecipes.

Pineapple Dream Dessert: Creamy, No-Bake Tropical Delight

creamy pineapple dessert, tropical dream dessert, no-bake pineapple treat, pineapple cream dessert, pineapple dessert recipe, no-bake tropical dessert

Pineapple Dream Dessert: A Tropical No-Bake Delight

When it comes to light, creamy, and refreshingly fruity desserts, Pineapple Dream Dessert stands out as a crowd-pleaser. This no-bake dessert is easy to make and perfect for hot summer days, holiday gatherings, or whenever you crave a tropical twist. Its layers of creamy filling, pineapple, and buttery graham cracker crust offer a melt-in-your-mouth experience that’s both satisfying and refreshing. If you love other tropical flavors, you might also enjoy our mini pineapple upside-down cakes, which bring a similar sunny vibe.


Why Pineapple Dream Dessert is So Popular

There’s something irresistible about the combination of pineapple and cream. This dessert takes it to the next level with its no-bake format, making it ideal for busy schedules or warm days when turning on the oven is less than appealing. The Pineapple Dream Dessert is not only delicious but also versatile; it can be served in squares, individual parfait glasses, or even as a layered trifle for a special occasion.

For those who enjoy creamy no-bake desserts, our easy no-bake banana split cheesecake offers another delightful and simple recipe that pairs well with tropical flavors.


Essential Ingredients for Pineapple Dream Dessert

This dessert requires a handful of simple ingredients that come together in perfect harmony:

  • Graham Cracker Crust: Provides a buttery, crunchy base that complements the creaminess of the filling.
  • Cream Cheese Layer: A mixture of cream cheese, powdered sugar, and whipped topping gives the dessert its rich, creamy texture.
  • Pineapple Layer: Crushed pineapple adds a burst of flavor and juiciness.
  • Optional Toppings: Shredded coconut, maraschino cherries, or a sprinkle of graham cracker crumbs.

Step-by-Step Recipe Guide

1. Prepare the Graham Cracker Crust

  • Ingredients: Graham cracker crumbs, melted butter.
  • Instructions: Mix graham cracker crumbs with melted butter until well-combined. Press the mixture into the bottom of a baking dish and chill in the refrigerator to set.

2. Create the Cream Cheese Layer

  • Ingredients: Cream cheese, powdered sugar, whipped topping.
  • Instructions: Beat the softened cream cheese with powdered sugar until smooth. Fold in whipped topping, then spread evenly over the chilled crust.

3. Add the Pineapple Layer

  • Ingredients: Drained crushed pineapple.
  • Instructions: Spread the crushed pineapple over the cream cheese layer. Ensure the pineapple is well-drained to prevent excess moisture.

4. Top with Additional Whipped Topping

  • Spread a final layer of whipped topping over the pineapple. For a decorative touch, sprinkle with graham cracker crumbs, shredded coconut, or a few maraschino cherries.

Popular Variations of Pineapple Dream Dessert

While the classic Pineapple Dream Dessert is hard to beat, there are a few variations to try:

  • Pineapple Coconut Dream: Add shredded coconut to the cream cheese layer for extra tropical flair.
  • Pineapple Dream Bars: Prepare in a square pan for easy slicing into bars.
  • Vegan Pineapple Dream: Substitute dairy-free cream cheese and whipped topping for a vegan-friendly version.

For those interested in fruit-filled, creamy desserts with a twist, consider our apple cranberry walnut salad, which pairs well with a variety of meals or can be enjoyed as a light dessert.


Tips for Perfect Pineapple Dream Dessert

To make the best Pineapple Dream Dessert, keep these tips in mind:

  • Drain Pineapple Well: Excess liquid can make the dessert too runny.
  • Chill Before Serving: Refrigerating for at least two hours helps the layers set.
  • Use Fresh Whipped Cream for Extra Richness: While whipped topping works well, fresh whipped cream adds a homemade touch.

Serving Suggestions for Pineapple Dream Dessert

This dessert is versatile and can be served in a variety of ways. Here are some ideas:

  • Family-Style in a Pan: Slice into squares and serve chilled.
  • Individual Parfaits: Layer the dessert in parfait glasses for a beautiful presentation.
  • As a Frozen Treat: Freeze individual portions for a firmer texture, perfect for warm days.

Frequently Asked Questions (FAQs)

Can I use fresh pineapple instead of canned?
Yes, but be sure to finely chop and drain the fresh pineapple well to avoid adding excess moisture.

Can I make Pineapple Dream Dessert without cream cheese?
You can substitute the cream cheese with mascarpone or a dairy-free alternative, but it will alter the texture slightly.

How long does Pineapple Dream Dessert last in the fridge?
Stored in an airtight container, it should last for 3-4 days.

Is there a way to make a sugar-free version?
Yes, use sugar-free whipped topping and replace the powdered sugar with a low-calorie sweetener.


Storing and Making Ahead

Pineapple Dream Dessert can be stored easily and even made in advance:

  • Refrigerate: Store in an airtight container for up to four days.
  • Freeze: Individual servings can be frozen and enjoyed as a semi-frozen treat.

Nutritional Information and Health Tips

This dessert is a treat, so enjoy it in moderation. Here’s a general nutritional breakdown:

  • Calories: Approximately 300 calories per serving.
  • Sugars: Use a sugar substitute if you’re looking to reduce sugar content.
  • Lighten It Up: Opt for low-fat cream cheese and whipped topping for a lighter version.

Conclusion: Why Pineapple Dream Dessert is a Must-Try Treat

With its creamy layers, tropical flavor, and no-bake ease, Pineapple Dream Dessert is a delightful treat for any occasion. Whether you’re enjoying it as a summer dessert or serving it at a family gathering, it’s sure to impress. For more easy-to-make desserts, explore our collection, including fruity and creamy options like our apple cranberry walnut salad.

Authentic German Stollen: Traditional Christmas Bread Recipe

traditional Stollen recipe, German Christmas bread, homemade Stollen, holiday fruit bread, marzipan Stollen, Dresden Stollen, Christmas Stollen

Authentic German Stollen: The Timeless Christmas Bread

Authentic German Stollen is a treasured holiday bread originating from Germany. Known for its dense, fruit-studded dough and unique marzipan center, Stollen has a rich history and a delightful flavor that makes it perfect for Christmas celebrations. Its characteristic shape and powdered sugar coating evoke a snowy holiday scene, bringing both tradition and delicious flavor to any festive gathering. If you’re interested in more holiday recipes, try our Homemade Pecan Pie Recipe, another classic treat that complements holiday gatherings.


The History of German Stollen

The history of Stollen dates back to 15th-century Dresden, Germany. Originally called “Striezel,” this holiday bread has become a symbol of German Christmas traditions. Each year, the Dresden Stollen Festival celebrates this iconic treat, highlighting its cultural importance. Authentic Stollen is recognized by its unique ingredients, from dried fruits soaked in rum to marzipan fillings and a generous dusting of powdered sugar.

For those interested in other festive European dishes, try our Italian Stromboli, which brings together delicious flavors in a comforting, rolled bread form.


Essential Ingredients for Authentic German Stollen

Creating Authentic German Stollen requires quality ingredients to capture its rich, festive taste:

  • Flour and Yeast: These form the base of the dough, providing structure and texture.
  • Dried Fruits: Commonly raisins and sultanas, often soaked in rum for added flavor.
  • Marzipan: Traditional Stollen includes a marzipan core that adds sweetness and a moist texture.
  • Candied Citrus Peels: Adds a tangy citrus note that complements the sweetness.
  • Spices: Warm spices like cinnamon, nutmeg, and cardamom provide a holiday aroma.
  • Butter and Milk: These enrich the dough, giving it a tender texture.

For another flavorful recipe featuring dried fruits, explore our Apple Cranberry Walnut Salad, perfect as a festive appetizer or side.


Step-by-Step Guide to Making Authentic German Stollen

1. Preparing the Dough

  • Begin by activating the yeast in warm milk, then add flour, sugar, and spices. Knead to form a smooth dough.

2. Soak the Fruits

  • Soak raisins, sultanas, and candied citrus peels in rum. This step enhances the depth of flavor.

3. Shape the Stollen

  • Roll the dough out, add a log of marzipan in the center, and fold the dough over to enclose the marzipan.

4. Bake the Stollen

  • Bake at 350°F (175°C) for about 40-50 minutes until golden brown.

5. Apply the Finishing Touch

  • Brush with melted butter and generously coat with powdered sugar for a snowy finish.

For more German-inspired baking ideas, check out our German Chocolate Sheet Cake, a delicious dessert that celebrates classic flavors in a different way.


Tips for Perfect Stollen

Achieving the perfect Authentic German Stollen involves a few essential techniques:

  • Use Quality Marzipan: The marzipan core is a standout feature, so opt for high-quality marzipan.
  • Soak Fruits for 24 Hours: Letting fruits soak overnight in rum gives a more profound flavor.
  • Allow Time for Aging: Aging the Stollen for at least one week enhances its taste.

If you’re looking for tips on another classic holiday dessert, our guide to Classic Apple Dumplings shares insights for creating a cozy, comforting treat.


Popular Variations of German Stollen

While traditional Stollen is beloved, there are several popular variations:

  • Dresden Stollen: Known as the original, this version uses premium ingredients and is often protected as a regional specialty.
  • Mandelstollen: An almond-based variation for a nuttier flavor.
  • Vegan Stollen: Uses dairy-free alternatives for those following a plant-based diet.
  • Quarkstollen: Replaces marzipan with quark cheese, offering a creamy twist on the original.

For another take on holiday baking, try our Kentucky Butter Cake, a rich, moist cake that’s perfect for holiday gatherings.


Serving Suggestions for German Stollen

Serve Stollen in thin slices, paired with warm drinks like mulled wine or coffee. Here are some ideas to elevate your holiday table:

  • Breakfast: Serve Stollen with coffee or tea for a holiday breakfast.
  • Dessert: Pair with whipped cream or a drizzle of brandy sauce.
  • Gift Idea: Wrap in festive paper for a homemade holiday gift.

If you’re planning a holiday feast, our Perfect Ribeye Steak Recipe can be a luxurious main course to complement a Stollen dessert.


Storage and Aging Tips

Stollen improves with age, as the flavors deepen over time. Follow these tips for storage:

  • Wrap in Aluminum Foil: Seal tightly to preserve freshness.
  • Store in a Cool, Dry Place: Keep it in a cool spot to age properly.
  • Refrigeration: Store in the fridge for up to four weeks, or freeze for extended storage.

If you’re interested in aging other baked goods, try our Homemade Pecan Pie Recipe, which also benefits from resting before serving.


Frequently Asked Questions (FAQs)

What makes Stollen different from fruitcake?
Unlike dense fruitcake, Stollen has a lighter texture and features a marzipan core.

Can I make Stollen without marzipan?
Yes, you can skip the marzipan or replace it with additional fruits or nuts.

How long should I age Stollen?
Allowing Stollen to age for at least one week brings out the best flavor.

What’s the best way to keep Stollen moist?
Wrap it well and store it in a cool, dry place to maintain its moist texture.

Can I use other dried fruits in Stollen?
Absolutely! You can experiment with cranberries, dried cherries, or apricots.

If you’re looking for more holiday dessert inspiration, check out our Salted Caramel Apple Cheesecake for a festive, fruit-based treat.


Nutritional Information and Health Tips

Stollen is a rich holiday bread, but it can be enjoyed in moderation:

  • Calories: Stollen is dense, so small portions are recommended.
  • High in Fiber: Dried fruits add fiber, making it more filling.
  • Adjustable Sugar Content: Reduce sugar in the dough if you prefer a less sweet Stollen.

For those seeking lighter dessert options, try our Greek-Style Lemon Roasted Potatoes as a refreshing side dish.


Conclusion: Authentic German Stollen – A Holiday Tradition to Cherish

Making Authentic German Stollen at home is more than just baking; it’s embracing a piece of holiday tradition. With its rich flavors, marzipan core, and dusting of powdered sugar, this bread brings warmth and festivity to any table. Whether as a centerpiece dessert or a thoughtful gift, Stollen is a timeless holiday favorite. Explore our collection at Exorecipes for more holiday recipes that celebrate the joy of baking and sharing.

Slow Cooker Turkey Breast: Juicy, Effortless, and Perfect for Holidays

crockpot turkey breast, moist turkey in slow cooker, easy turkey breast recipe, slow-cooked turkey, tender holiday turkey, bone-in turkey breast

Slow Cooker Turkey Breast: A Perfectly Moist and Effortless Feast

When holiday dinners and family gatherings call for a hassle-free yet delicious main course, slow cooker turkey breast is an ideal choice. Cooking turkey breast in a slow cooker not only frees up oven space but also keeps the meat tender and juicy. With minimal effort, you can enjoy a meal that feels special without the work typically required for a roasted turkey. For more holiday meal inspiration, consider our Ultimate Comfort Food: Crockpot Potato Soup with Hashbrowns, another slow-cooked delight.


Why Slow Cooker Turkey Breast is the Perfect Choice

Using a slow cooker for turkey breast has several advantages:

  • Keeps Turkey Moist: The controlled low heat prevents the meat from drying out.
  • Saves Oven Space: Ideal for holiday dinners when oven space is at a premium.
  • Effortless Prep: Minimal seasoning and setup make this recipe simple and rewarding.

If you love convenient, one-pot meals, try our Slow Cooker Baked Ziti, which offers the same hands-off approach with pasta.


Key Ingredients for Slow Cooker Turkey Breast

This dish requires a few key ingredients to deliver a juicy and flavorful turkey breast:

  • Turkey Breast: Either bone-in or boneless works, though bone-in offers extra flavor.
  • Broth or Stock: Adds moisture and creates a flavorful base for gravy.
  • Herbs: Fresh rosemary, thyme, and sage provide classic flavors.
  • Seasonings: Garlic powder, onion powder, salt, and pepper for extra taste.
  • Butter: Adds richness and helps brown the turkey breast if searing.

For those looking to add more holiday sides, consider our Ham and Potato Casserole as a hearty companion dish.


Step-by-Step Recipe Guide for Slow Cooker Turkey Breast

1. Season the Turkey Breast

  • Rub the turkey breast with salt, pepper, garlic powder, and herbs for a well-rounded flavor.

2. Optional Step: Sear the Turkey

  • In a skillet, melt a tablespoon of butter over medium heat. Sear the turkey breast on all sides until golden brown. This step, though optional, adds a depth of flavor and a visually appealing crust.

3. Place Ingredients in the Slow Cooker

  • Add broth, additional herbs, and aromatics like chopped onions, garlic cloves, and a few sprigs of rosemary. Place the seasoned turkey breast on top, ensuring the breast side is up.

4. Cook on Low Setting

  • Set the slow cooker to low and cook for 4-6 hours, or until the internal temperature reaches 165°F.

For another savory, slow-cooked dish, try our Slow Cooker Chicken and Gravy for a creamy, comforting option.


Making Gravy from the Drippings

1. Collect the Drippings

  • Once the turkey is cooked, remove it from the slow cooker and set aside. Pour the remaining liquid into a saucepan.

2. Prepare a Roux

  • In a separate saucepan, melt two tablespoons of butter over medium heat. Add two tablespoons of flour, whisking continuously to form a roux.

3. Add Drippings to the Roux

  • Gradually pour in the drippings, whisking until the mixture thickens into a smooth, flavorful gravy. If necessary, add additional broth for desired consistency.

If you’re looking for a versatile side to go with this turkey and gravy, our Creamy Garlic Parmesan Chicken pairs well with hearty meats.


Tips for a Perfect Slow Cooker Turkey Breast

To ensure your turkey breast turns out moist and flavorful, follow these tips:

  • Choose Bone-In for Flavor: While boneless is convenient, bone-in turkey offers a richer taste.
  • Use Fresh Herbs: Fresh herbs like rosemary and thyme add aromatic flavors that permeate the meat.
  • Don’t Overcook: Check the turkey’s internal temperature early to avoid dryness.

For additional savory recipes, try our No-Peek Beef Tips for another flavorful, slow-cooked meat option.


Variations of Slow Cooker Turkey Breast

Here are some variations to customize your turkey breast:

  • Herb-Crusted: Add a crust of rosemary, thyme, and sage for an herb-forward flavor.
  • Lemon-Garlic: Add fresh lemon slices and whole garlic cloves for a citrusy, aromatic finish.
  • Spicy Option: Incorporate smoked paprika or a dash of cayenne for a spicier twist.

If you’re exploring different ways to flavor meats, our Dorito Chicken Casserole offers a bold, cheesy option that’s easy to make.


Serving Suggestions for Slow Cooker Turkey Breast

This dish pairs well with a variety of sides, making it perfect for any occasion. Here are some serving ideas:

  • Mashed Potatoes: The gravy from the turkey complements classic mashed potatoes beautifully.
  • Green Beans or Roasted Vegetables: Balance the meal with green vegetables for a pop of color and nutrition.
  • Stuffing: A traditional side, perfect for holiday meals or comforting dinners.

For a unique and flavorful side, try our Corn Casserole Recipe, which adds a sweet, buttery touch to any feast.


Storing and Reheating Tips

To make the most of your Slow Cooker Turkey Breast leftovers, follow these storage and reheating tips:

  • Refrigerate Leftovers: Store in an airtight container for up to three days.
  • Freezing: Slice the turkey and freeze in portions with some gravy for up to three months.
  • Reheating: For best results, reheat in the oven with a splash of broth to retain moisture.

Frequently Asked Questions (FAQs)

Can I use a boneless turkey breast?
Yes, boneless works well and usually cooks slightly faster than bone-in. It’s ideal if you prefer easier slicing and serving.

Is it safe to cook turkey breast in a slow cooker?
Absolutely, as long as the turkey reaches an internal temperature of 165°F, it’s safe to eat.

Can I prepare this recipe ahead of time?
Yes, you can season and prep the turkey breast the night before, then start the slow cooker in the morning.

How do I keep it from drying out?
Using broth and cooking at a low temperature helps keep the turkey moist. Avoid overcooking by checking the temperature early.

Can I add vegetables to the slow cooker?
Definitely. Carrots, potatoes, and celery can cook alongside the turkey, absorbing flavors from the broth and seasonings.


Nutritional Information and Health Tips

Slow Cooker Turkey Breast is a lean, protein-rich option. Here’s a nutritional overview:

  • Calories: Approximately 190 calories per 4 oz serving.
  • Protein: High in protein, ideal for maintaining muscle and overall health.
  • Low in Fat: Using skinless turkey breast reduces fat content.

For a balanced, lower-calorie side, try our Greek-Style Lemon Roasted Potatoes, which provides a light yet flavorful companion to the turkey.


Conclusion: Why Slow Cooker Turkey Breast is a Must-Try Dish

With its simple preparation, succulent flavors, and hands-off cooking process, Slow Cooker Turkey Breast is a perfect option for holiday meals or any day when you’re craving a comforting main course. This dish frees up oven space, keeps the meat moist, and delivers a satisfying meal with minimal effort. For more comfort food recipes and inspiration, browse our collection at Exorecipes, where delicious simplicity meets classic flavors.