Grinch Christmas Fudge Recipe: Festive and Easy Holiday Treat

holiday fudge, Christmas fudge recipe, green Grinch fudge, Grinch-inspired dessert, festive fudge, easy Christmas treats, holiday fudge recipe

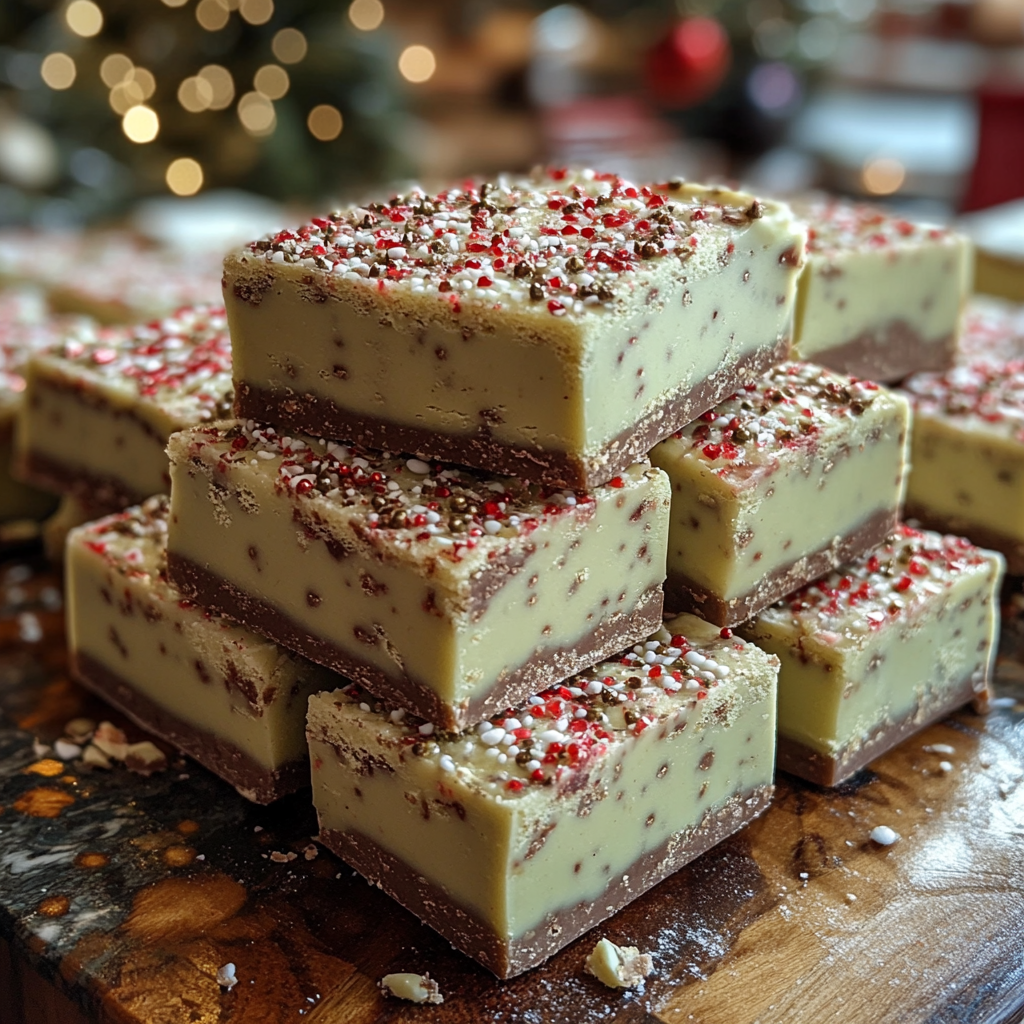
Grinch Christmas Fudge: A Whimsical, Festive Recipe for Holiday Cheer

Add a touch of whimsy to your holiday dessert table with Grinch Christmas Fudge. Inspired by the beloved holiday character, this green, heart-topped fudge is fun, simple to make, and perfect for holiday gatherings. This recipe captures the spirit of Christmas, making it a treat both kids and adults will enjoy.

Pair this fudge with a cozy bowl of Crockpot Potato Soup with Hashbrowns for a comforting winter meal that complements the festive flavors.


Why Make Grinch Fudge for Christmas?

This fudge is more than just a treat—it’s a holiday experience. With its vibrant green color and iconic red heart sprinkle, Grinch fudge brings the classic story to life on your dessert table. It’s a simple recipe perfect for family baking, adding a touch of joy to any holiday gathering.

For a main course that requires minimal prep time, Slow Cooker Baked Ziti pairs well with holiday desserts and frees up your oven for other baking.


Ingredients Needed for Grinch Christmas Fudge

Making this Grinch-inspired fudge requires only a handful of ingredients:

  • White Chocolate Chips: Forms the base and gives a creamy texture.
  • Sweetened Condensed Milk: Adds sweetness and smoothness to the fudge.
  • Vanilla Extract: Enhances the flavor profile.
  • Green Food Coloring: Essential for that signature Grinch-green color.
  • Heart Sprinkles: The finishing touch, representing the Grinch’s transformation.

Optional Add-Ins

For extra flair, try these optional ingredients:

  • Peppermint Extract for a holiday minty twist.
  • Crushed Candy Canes for added crunch and seasonal flavor.
  • Mini Marshmallows for a soft texture contrast.

Step-by-Step Instructions for Grinch Christmas Fudge

1. Prepare Your Pan

Line an 8×8-inch baking pan with parchment paper, ensuring easy removal and smooth slicing once the fudge sets.

2. Melt and Mix

In a medium saucepan, combine white chocolate chips and sweetened condensed milk. Melt over low heat, stirring frequently to avoid burning and ensure a smooth consistency.

3. Add Color and Flavor

Once melted, add a few drops of green food coloring and the vanilla extract. Stir until the color is evenly distributed to achieve a vibrant green.

4. Pour and Decorate

Pour the mixture into the prepared pan, spreading it evenly. Place red heart sprinkles on each square for a festive look.

5. Cool and Slice

Let the fudge cool completely, either at room temperature or in the refrigerator. Once set, cut into squares and serve.


Tips for Perfect Grinch Fudge

Make sure your Grinch fudge is the perfect holiday treat by following these tips:

  1. Achieve a Smooth Texture
    • Use high-quality chocolate chips and stir continuously for a creamy, lump-free consistency.
  2. Get the Ideal Green Color
    • Gel food coloring is ideal for a vibrant color without altering the fudge’s consistency.
  3. Avoid Common Mistakes
    • Avoid overcooking the chocolate, and keep stirring for even melting.

Creative Variations on Grinch Fudge

Add some creative touches to your fudge with these fun ideas:

  • Peppermint Grinch Fudge
    A few drops of peppermint extract give this fudge a refreshing holiday twist.
  • Layered or Swirled Fudge
    Create a two-tone look by swirling white chocolate into the green base for a whimsical design.
  • Extra Festive Toppings
    Top with additional festive sprinkles, edible glitter, or small candy pieces for extra holiday cheer.

Storing and Preserving Grinch Fudge

Grinch fudge is an ideal make-ahead treat and can be stored in various ways.

  1. Room Temperature
    • Store in an airtight container for up to one week.
  2. Refrigeration
    • Keep in the fridge for up to two weeks for a firmer texture.
  3. Freezing
    • Freeze in a freezer-safe container for up to three months. Thaw in the refrigerator before serving.

Frequently Asked Questions (FAQs) About Grinch Christmas Fudge

Can I Use Dark Chocolate Instead of White Chocolate?

Yes, although white chocolate is recommended to maintain the Grinch-green color, dark or milk chocolate can be used for a different flavor.

How Long Does Grinch Fudge Last?

Stored properly in an airtight container, Grinch fudge can last up to two weeks in the fridge.

What Can I Use if I Don’t Have Heart Sprinkles?

Red M&Ms or similar red candies can be used if heart sprinkles aren’t available.

Can I Add Mix-ins Like Nuts or Marshmallows?

Yes, adding nuts or mini marshmallows can give your fudge extra texture and flavor.


Serving and Gift Ideas for Grinch Fudge

This festive fudge is perfect for sharing and makes a delightful gift during the holidays. Here’s how you can present it:

  • Holiday Dessert Platter
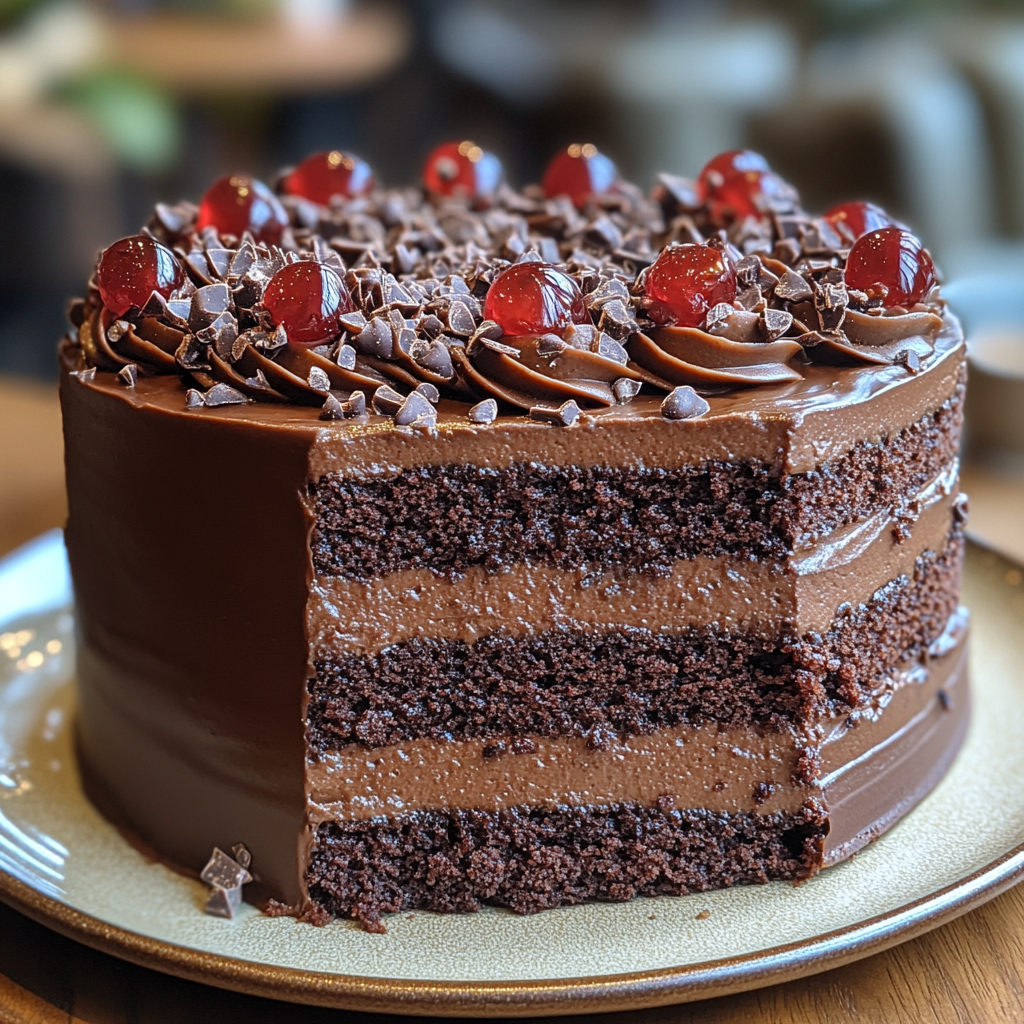
    Serve Grinch fudge alongside other treats like Salted Caramel Apple Cheesecake for a holiday dessert table that will impress guests.
  • Festive Gift Packaging
    Wrap individual fudge pieces in cellophane bags tied with ribbon for easy holiday gifts.
  • Kid-Friendly Movie Night Treat
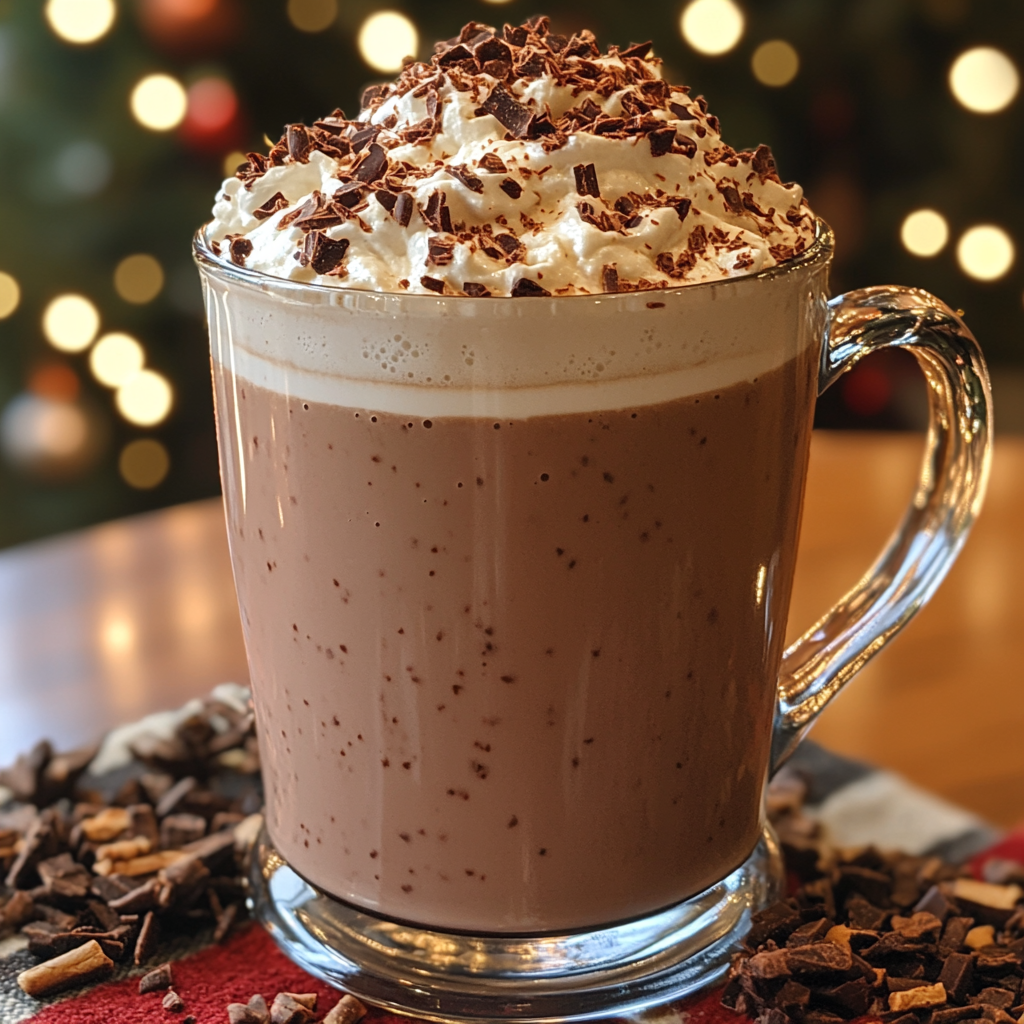
    Pair with a cozy drink like Creamy Crockpot Hot Chocolate for a family movie night during the holiday season.

Making Grinch Fudge a Family Holiday Tradition

This recipe isn’t just a dessert; it’s an opportunity to create holiday memories. Kids can join in by mixing the color, placing the sprinkles, or cutting the fudge. Make it a part of your holiday tradition by enjoying it while reading the Grinch story or watching the movie together.

For another family-friendly recipe, Sheet Pan Pancakes is an easy breakfast option that can bring everyone together during the holiday season.


Internal Links for Additional Holiday Recipes

Explore more holiday recipes on ExoRecipes to round out your festive menu:

Indulgent Christmas Eve Creamy Crockpot Hot Chocolate Recipe

Christmas hot chocolate, slow cooker hot chocolate, holiday crockpot cocoa, creamy holiday hot chocolate, festive hot chocolate recipe

Christmas Eve Creamy Crockpot Hot Chocolate: A Cozy Recipe for the Holidays

The charm of Christmas Eve is all about warm lights, cozy gatherings, and a sense of nostalgia that fills the air. Nothing complements this ambiance better than a steaming mug of creamy crockpot hot chocolate. This holiday recipe is incredibly easy to prepare, letting you enjoy time with loved ones while the crockpot works its magic in the background.

Explore more delicious and comforting crockpot recipes, like this Crockpot Potato Soup with Hashbrowns, which is another holiday favorite and a great accompaniment to hot chocolate on a cold evening.


Why Choose Crockpot Hot Chocolate for Christmas?

On Christmas Eve, you want everything to feel effortless yet memorable. Crockpot hot chocolate allows you to prep the ingredients, start the cooking process, and then focus on the festivities. Whether you’re watching holiday movies, wrapping gifts, or telling stories by the fireplace, this recipe brings a touch of luxury with minimal effort.

For more ideas on how to make your holiday preparations stress-free, try recipes like Slow-Cooker Baked Ziti, which provides hearty comfort food without needing to stay in the kitchen.


Ingredients for the Ultimate Creamy Crockpot Hot Chocolate

To create a rich and velvety texture, selecting the right ingredients is key. Here’s what you’ll need:

  • Milk – Whole milk is ideal for a rich base, but almond or oat milk works for dairy-free versions.
  • Heavy Cream – Adds thickness and a smooth texture that elevates the hot chocolate.
  • Sweetened Condensed Milk – For a sweet, indulgent depth.
  • Chocolate Chips – Use high-quality chocolate; a mix of milk and semi-sweet varieties balances flavor.
  • Vanilla Extract – A splash of vanilla enhances the chocolate flavors, making it well-rounded and aromatic.

Step-by-Step Guide: Making Crockpot Hot Chocolate

1. Preparation and Setting

  • Add Ingredients: Place all ingredients into the crockpot, stirring lightly.
  • Set the Temperature: Cook on low heat for about 2 hours, allowing flavors to meld and chocolate to melt.
  • Stir Occasionally: Stir every 30 minutes to keep the texture smooth.

2. Serving and Presentation Tips


Tips for Achieving the Creamiest Texture

Perfecting the creamy texture is about technique as well as ingredients. Here’s how to achieve a luxurious result:

  • Whisk Occasionally: Whisking every 30 minutes ensures smoothness and prevents separation.
  • Avoid Overcooking: Set the crockpot to a consistent low temperature to prevent burning or over-thickening.
  • Add Marshmallows During Cooking: For extra creaminess, stir in a handful of marshmallows during the last 15 minutes.

Creative Toppings and Garnishes

Adding toppings is a fun way to personalize each serving of crockpot hot chocolate. Try these festive options:

  • Classic Toppings: Marshmallows, whipped cream, or chocolate shavings.
  • Seasonal Twists: Crushed candy canes, cinnamon sticks, or a drizzle of caramel sauce.
  • Adult Enhancements: A splash of Irish cream or peppermint schnapps adds warmth and depth.

These toppings let everyone customize their drink, making it a perfect choice for holiday gatherings.


Storing and Reheating Leftovers

If you find yourself with leftover hot chocolate, it’s easy to store and reheat without compromising the texture or flavor.

  • Refrigeration: Store in an airtight container and refrigerate for up to 3 days.
  • Reheating: Reheat on low in the crockpot or in a microwave-safe mug to preserve the creamy consistency.

Healthier Variations and Dietary Adjustments

For those looking to lighten up this holiday treat, there are easy substitutions available:

  • Lower Calorie Option: Substitute heavy cream with low-fat milk or almond milk for a lighter version.
  • Sugar-Free Alternative: Use sugar-free chocolate chips and reduce or omit the sweetened condensed milk for a less sweet but equally creamy result.

FAQs About Christmas Eve Crockpot Hot Chocolate

Can I make this hot chocolate sugar-free?
Yes, you can use sugar-free chocolate chips and adjust the sweetness by omitting condensed milk.

How long can I keep the hot chocolate warm in the crockpot?
It can stay on the “warm” setting for up to 2 hours after cooking, perfect for serving at holiday gatherings.

What’s the best non-dairy milk for this recipe?
Almond or oat milk work well and blend smoothly with chocolate.


Make It a Tradition: Enjoying Hot Chocolate on Christmas Eve

Creating a cozy atmosphere with crockpot hot chocolate on Christmas Eve can quickly become a cherished tradition. Encourage family members to add their favorite toppings, share stories, or watch a holiday movie together. It’s all about making memories as you enjoy each sip of this creamy holiday drink.


Suggested Internal Links for Further Reading

To enhance the reading experience, here are some internal links to consider, each offering complementary recipes and ideas to make your holiday season even warmer:

  1. Crockpot Potato Soup with Hashbrowns – A hearty side for any holiday meal.
  2. Cinnamon Roll Cake with Cream Cheese Glaze – Perfectly paired with hot chocolate, bringing warm spices to your dessert table.
  3. Ultimate Guide to Perfect French Bread Pizza – A savory, shareable snack to enjoy alongside hot chocolate.

How to Make the Perfect Chocolate Cake: An Ultimate Guide for Dessert Lovers

best chocolate cake, moist chocolate cake, homemade chocolate cake, classic chocolate cake, chocolate cake recipe, ultimate chocolate cake

How to Make the Perfect Chocolate Cake: The Ultimate Guide

Chocolate cake is a dessert that never goes out of style. Its rich flavor and moist texture make it a favorite at celebrations, holidays, or simply as an indulgent treat. This comprehensive guide will cover everything you need to know, from essential ingredients to advanced baking techniques, ensuring your chocolate cake is as decadent as possible.

For those who enjoy unique dessert twists, you might also appreciate exploring recipes like Decadent Caramel Chocolate Cupcakes or Gone to Heaven Chocolate Pie, both offering distinct chocolate flavors.


Table of Contents

  1. Introduction
  2. Essential Ingredients
  3. Step-by-Step Recipe Guide
  4. Advanced Tips for Perfect Chocolate Cake
  5. Frosting and Decorating Options
  6. FAQs on Chocolate Cake

1. Introduction to Chocolate Cake

Chocolate cake has been loved for generations, but what makes a truly great chocolate cake? The key lies in the balance of ingredients, precise technique, and a few secret tricks. Below, we’ll take you through the steps to create a chocolate cake that’s moist, flavorful, and unforgettable.

If you’re interested in similar treats, you might find the Ultimate Peanut Butter Pie a delightful complement to your baking repertoire.


2. Essential Ingredients for a Moist Chocolate Cake

A perfectly moist and delicious chocolate cake requires the following core ingredients:

  • Cocoa Powder: Choose high-quality cocoa for a rich chocolate flavor. Dutch-processed cocoa powder adds smoothness.
  • Flour: All-purpose flour works well, but cake flour can give a softer texture.
  • Sugar: Granulated sugar provides moisture and balances cocoa’s bitterness. For a denser cake, brown sugar is ideal.
  • Eggs: They add structure and richness.
  • Fat: Butter adds flavor, while oil creates a more tender, moist cake.
  • Leavening Agents: Baking soda and baking powder ensure the cake rises.
  • Liquids: Milk or coffee helps to deepen the chocolate flavor.

Tip: For a unique variation, see Chocolate Magic Shell Yogurt Cup, which adds an interesting chocolate experience to yogurt.


3. Step-by-Step Recipe Guide

Here is a simple, classic chocolate cake recipe you can try at home:

Ingredients:

  • 1 ½ cups all-purpose flour
  • 1 ½ cups granulated sugar
  • ¾ cup cocoa powder
  • 1 ½ tsp baking powder
  • ¾ tsp baking soda
  • ¾ tsp salt
  • 2 large eggs
  • 1 cup milk
  • ½ cup vegetable oil
  • 2 tsp vanilla extract
  • 1 cup boiling water or coffee

Instructions:

  1. Prepare the Oven: Preheat to 350°F (175°C). Grease and flour two 9-inch round cake pans.
  2. Mix Dry Ingredients: In a large bowl, combine flour, sugar, cocoa, baking powder, baking soda, and salt.
  3. Combine Wet Ingredients: Add eggs, milk, oil, and vanilla. Beat on medium speed until smooth.
  4. Incorporate Boiling Water/Coffee: Slowly add hot water or coffee. The batter will be thin but will create a moist cake.
  5. Bake: Pour batter into pans and bake for 30–35 minutes.
  6. Cool: Let cakes cool for 10 minutes before transferring them to wire racks.

4. Advanced Tips for a Perfect Chocolate Cake

Take your chocolate cake to the next level with these expert tips:

  • Use Coffee for Depth: Adding coffee intensifies chocolate without adding a coffee taste.
  • Room Temperature Ingredients: Ensures even mixing for a smoother texture.
  • Salt and Vanilla Extract: Salt enhances flavor, and vanilla adds depth.

If you’re exploring more chocolate-based desserts, consider the Black Magic Cake for its distinctive, intense cocoa flavor: Black Magic Cake.


5. Frosting and Decorating Options

Frosting Choices

  • Chocolate Ganache: Made from chocolate and cream for a glossy finish.
  • Buttercream: Smooth, fluffy, and classic.
  • Whipped Cream: Light, with a touch of sweetness.

Decorating Ideas

  • Fresh fruits (strawberries, raspberries).
  • Shaved chocolate or chocolate curls.
  • Edible flowers for an elegant look.

Garnishing Tips

Decorating a cake can be as simple or elaborate as you like. For inspiration on flavor pairings, check out our guide on the Ultimate Peanut Butter Pie, which provides insights on complementing chocolate.


6. FAQs: Common Questions About Chocolate Cake

Q1: Can I use cocoa powder in place of melted chocolate?

  • Yes, but adjust the sugar accordingly. Cocoa powder is more intense.

Q2: How do I keep my cake moist?

  • Use oil instead of butter, add coffee, and avoid overmixing.

Q3: What’s the best way to store chocolate cake?

  • Keep it in an airtight container at room temperature for up to 3 days.

Q4: Can I make a chocolate cake gluten-free?

  • Substitute with almond or coconut flour and ensure leavening agents are gluten-free.

Conclusion

Mastering a chocolate cake recipe is a journey of learning and experimenting. From adjusting ingredients to refining techniques, each cake you bake offers the chance to improve. Whether you’re looking to create a simple chocolate layer cake or something more elaborate with decorations, this guide has covered the essentials for success.

The Ultimate Guide to Making a Perfectly Moist Chocolate Cake

chocolate cake dessert, homemade chocolate cake, best chocolate cake recipe, easy chocolate cake, moist chocolate cake, chocolate cake tips

How to Make the Perfect Chocolate Cake: A Complete Guide

Chocolate cake is an iconic dessert that holds a special place in the hearts of cake lovers worldwide. Whether you’re making it for a birthday, holiday, or just as a weekend treat, creating a cake with the perfect balance of moistness, sweetness, and deep chocolate flavor is a skill worth mastering. In this guide, we’ll walk you through everything you need to know to make a chocolate cake that’s as rich in taste as it is in texture. From essential ingredients to troubleshooting tips, we’ve got you covered!

For fans of other decadent cakes, you might enjoy exploring some comforting classics like Kentucky Butter Cake or indulgent Black Magic Cake, which brings a similarly rich flavor profile with a unique twist.

Why Chocolate Cake?

Why is chocolate cake such a beloved dessert? Chocolate cake has a luxurious texture and intense flavor that can be enhanced with different ingredients, techniques, and toppings. Additionally, chocolate itself has a mood-boosting effect, making it an ideal treat for celebrations or simply as a pick-me-up.

This versatile cake can be adapted to any dietary requirement and taste preference. You can make it vegan, gluten-free, or layer it with flavors like peanut butter, coffee, and spices. And if you’re looking to take your cake decorating skills up a notch, our tips on frosting and garnishing will add the final touch to your culinary masterpiece.


Essential Ingredients for a Moist Chocolate Cake

1. Cocoa Powder

The quality of your cocoa powder will impact your cake’s taste and texture. Choose high-quality cocoa powder, ideally Dutch-processed for a smoother, richer flavor.

2. Flour

All-purpose flour is standard, but you can use cake flour for a lighter, softer crumb. If you’re experimenting with gluten-free options, almond flour or coconut flour can add a unique taste and texture.

3. Sugar

Granulated sugar helps create a moist cake and balances the bitterness of cocoa. For a denser cake, try using brown sugar, which contains molasses and adds moisture.

4. Eggs

Eggs provide structure and richness. Make sure they are at room temperature to ensure even mixing.

5. Fat

For a tender texture, use butter or oil. Oil generally makes a more moist cake, while butter provides a richer flavor.

6. Baking Powder and Baking Soda

These leavening agents help your cake rise. Be sure to measure accurately for the best results.

7. Liquid (Milk, Buttermilk, or Coffee)

Adding coffee instead of water intensifies the chocolate flavor, while buttermilk adds tang and tenderness. Experiment with both to find your perfect balance.

To learn more about the science behind these ingredients, check out this article on Baking Science Principles.


Step-by-Step Recipe for the Ultimate Chocolate Cake

Ingredients:

  • 1 ½ cups of all-purpose flour
  • 1 ½ cups of sugar
  • ¾ cup of cocoa powder
  • 1 ½ teaspoons baking powder
  • ¾ teaspoon baking soda
  • ¾ teaspoon salt
  • 2 large eggs
  • 1 cup milk
  • ½ cup vegetable oil
  • 2 teaspoons vanilla extract
  • 1 cup boiling water or coffee

Instructions:

  1. Preheat the Oven: Set your oven to 350°F (175°C). Grease and flour two 9-inch round baking pans.
  2. Mix Dry Ingredients: In a large bowl, combine flour, sugar, cocoa, baking powder, baking soda, and salt. Whisk until well-blended.
  3. Add Wet Ingredients: Add the eggs, milk, oil, and vanilla to the bowl of dry ingredients. Beat on medium speed until smooth.
  4. Incorporate Boiling Water/Coffee: Slowly add the boiling water or coffee, which will thin out the batter. Mix until smooth.
  5. Bake: Pour the batter into prepared pans. Bake for 30–35 minutes or until a toothpick inserted into the center comes out clean.
  6. Cool: Let cakes cool in their pans for about 10 minutes, then transfer them to wire racks to cool completely before frosting.

Advanced Baking Tips for Enhanced Flavor and Texture

Adding Coffee for Depth

Incorporating coffee into your cake batter not only intensifies the chocolate flavor but also adds a subtle richness. The coffee flavor won’t overpower the cake but will create a more complex taste profile.

Using Room-Temperature Ingredients

Ensure all your ingredients, especially eggs and milk, are at room temperature. This simple step improves the texture and helps ingredients blend seamlessly, leading to a smooth batter.

Salt and Vanilla Extract

Salt helps balance sweetness and enhances chocolate flavor, while vanilla adds a lovely depth. Both ingredients bring out the full potential of the chocolate.

For more baking inspiration, don’t miss our guide on Ultimate Peanut Butter Pie, a great alternative if you’re looking to explore other decadent dessert flavors.


Variations of Chocolate Cake

Vegan Chocolate Cake

For a dairy-free and egg-free version, replace eggs with flaxseed and use almond milk. Coconut oil works well as a fat substitute, making the cake moist without any animal products.

Gluten-Free Chocolate Cake

Use almond or coconut flour in place of all-purpose flour. This will give the cake a denser texture, which is perfect for those seeking a flourless dessert.

Chocolate Lava Cake

This cake is known for its molten center, often made by baking at a high temperature for a shorter time. It’s perfect for those who enjoy a gooey center!


Decorating Ideas and Frosting Options

Choosing the right frosting can elevate your chocolate cake to a whole new level.

Frosting Choices:

  • Chocolate Ganache: Simple yet luxurious, made from chocolate and cream.
  • Buttercream: A classic choice for a soft and fluffy topping.
  • Whipped Cream: Light and airy, it pairs well with berries and chocolate.

Garnishing Ideas:

  • Fresh berries for a burst of color and flavor.
  • Shaved chocolate, cocoa powder dusting, or chocolate curls.
  • Edible flowers or nuts like almonds and pecans.

Troubleshooting Common Chocolate Cake Issues

Here are solutions to some common cake-baking challenges:

  • Dry Cake: This often results from overbaking or using too much flour. Be sure to measure accurately and check the cake a few minutes before it’s supposed to be done.
  • Sinking in the Middle: Overmixing the batter or opening the oven door too early can lead to a sunken cake.
  • Crumbly Texture: Using the right balance of fat and sugar will result in a cohesive crumb structure.

If you’re looking for another chocolate-inspired treat, consider these Crafting the Ultimate Thick Homemade Chocolate Chip Cookies for a fun baking project.


FAQs: Your Chocolate Cake Questions Answered

Q1: Can I substitute cocoa powder for chocolate in a cake recipe?

  • Yes, but adjust the sugar content since cocoa powder is unsweetened and more intense.

Q2: How can I ensure my chocolate cake is extra moist?

  • Use oil instead of butter, add coffee, and avoid overmixing to keep your cake tender.

Q3: What’s the best way to store chocolate cake?

  • Store it in an airtight container at room temperature for 3–4 days or refrigerate for up to a week.

Q4: How can I make my chocolate cake gluten-free?

  • Substitute almond or coconut flour and ensure your leavening agents are gluten-free.

Conclusion: Make Your Chocolate Cake Shine

Mastering chocolate cake is a worthwhile endeavor, and with these tips, you’re set up for success. Enjoy the process, and remember that each cake offers an opportunity to refine your baking skills. With variations, decorations, and troubleshooting insights, you’re ready to create a delicious cake that will surely impress.

Chocolate Ice Cream Recipe: Rich, Creamy, and Easy to Make at Home

homemade chocolate ice cream, creamy chocolate ice cream recipe, best chocolate ice cream, easy chocolate ice cream, no-churn chocolate ice cream, chocolate gelato

Chocolate Ice Cream: A Rich and Creamy Guide to Making the Perfect Scoop

Chocolate ice cream is one of the world’s most popular desserts. Its creamy texture and rich chocolate flavor make it a favorite treat for all ages, enjoyed in cones, sundaes, milkshakes, and as a companion to other desserts. This guide covers everything you need to know to make the perfect homemade chocolate ice cream, from its origins to the best recipe variations and serving ideas. For those who love creating homemade desserts, check out our Homemade Banana Pudding Ice Cream for another delicious ice cream option.

Why Chocolate Ice Cream is Loved Worldwide

Chocolate ice cream has become a staple flavor, alongside vanilla and strawberry, in freezers and ice cream shops globally. But what makes it so beloved? It’s a combination of its versatility, its perfect balance of sweet and bitter flavors, and the satisfaction that a scoop of creamy chocolate brings. If you’re a fan of classic flavors with a twist, consider pairing your chocolate ice cream with our Kentucky Butter Cake for an indulgent treat.

Ingredients for Chocolate Ice Cream

To make chocolate ice cream from scratch, you’ll need just a few key ingredients. The right ingredients can transform an average dessert into an extraordinary one. Here’s what you’ll need:

  • Heavy Cream: Adds richness and creamy texture.
  • Whole Milk: Balances out the cream and keeps the ice cream light.
  • Cocoa Powder: Provides a deep chocolate flavor; choose unsweetened for best results.
  • Chocolate Chips or Chocolate Bars: Adds texture and enhances chocolate intensity.
  • Sugar: Sweetens and balances the bitterness of the cocoa.
  • Egg Yolks: Helps create a smooth, custard-like consistency.
  • Vanilla Extract: Adds depth to the flavor profile.

Optional ingredients like coffee powder can add even more depth to the chocolate, and some people prefer a pinch of sea salt to bring out the chocolate’s flavors.

Step-by-Step Guide to Making Chocolate Ice Cream

1. Prepare the Chocolate Mixture

  • Combine Cocoa Powder and Sugar: In a saucepan, whisk together cocoa powder, sugar, and a bit of the milk. This forms a smooth base that helps the cocoa powder dissolve better.
  • Add Cream and Milk: Pour in the rest of the cream and milk, stirring to combine. Place the pan over medium heat, warming the mixture until it’s hot but not boiling.

2. Temper the Egg Yolks

  • Whisk Egg Yolks Separately: In a bowl, whisk the egg yolks until smooth. Gradually add some of the warm milk mixture, whisking continuously to temper the yolks and prevent curdling.

3. Cook the Custard

  • Combine and Heat: Pour the yolk mixture back into the saucepan with the rest of the milk mixture. Cook over medium heat, stirring constantly, until the custard thickens enough to coat the back of a spoon.

4. Cool and Chill

  • Add Vanilla: Remove from heat, add vanilla, and let the custard cool to room temperature. Then, refrigerate for at least 4 hours or overnight.

5. Churn and Freeze

  • Churn in an Ice Cream Maker: Pour the chilled mixture into your ice cream maker and churn according to the manufacturer’s instructions. Once churned, transfer to an airtight container and freeze for at least 2 hours before serving.

For more detailed ice cream tips, take a look at our Pineapple Soft Serve Recipe, another refreshing treat that’s simple to make.

Variations of Chocolate Ice Cream

If you’re looking to mix up your chocolate ice cream experience, here are some delicious variations:

  • Double Chocolate Ice Cream: Add chocolate chips or chunks for a more intense chocolate flavor.
  • Chocolate Espresso Ice Cream: Mix in a small amount of espresso powder for a mocha twist.
  • Dark Chocolate Ice Cream: Use dark chocolate with a higher cocoa content for a richer, slightly bitter taste.
  • Mint Chocolate Chip: Add a few drops of peppermint extract and fold in chocolate chips for a refreshing variation.

Vegan and Dairy-Free Chocolate Ice Cream

For those with dietary preferences or restrictions, it’s easy to make a dairy-free version. Here’s how:

  • Use Coconut Milk: Substitute heavy cream and milk with full-fat coconut milk for a creamy texture.
  • Sweeteners: Opt for maple syrup or coconut sugar to keep it refined sugar-free if desired.
  • Skip the Eggs: Use a tablespoon of cornstarch to thicken the mixture instead.

Tips for Perfecting Your Chocolate Ice Cream

To achieve the best chocolate ice cream, keep these tips in mind:

  • Chill Your Base: Always chill the custard base thoroughly before churning for a smooth texture.
  • High-Quality Cocoa and Chocolate: Quality chocolate and cocoa powder make a noticeable difference in flavor.
  • Avoid Over-Churning: Follow the ice cream maker instructions carefully to prevent an icy texture.

For more guidance on ice cream making, our article on Banana Pudding Ice Cream covers essential tips that work for chocolate ice cream too.

Fun Serving Ideas for Chocolate Ice Cream

Chocolate ice cream can be enjoyed on its own, but here are some ideas for serving it:

  • With Fresh Berries: Strawberries and raspberries add a tart contrast to the rich chocolate.
  • In a Sundae: Layer with whipped cream, chocolate sauce, and nuts for an indulgent treat.
  • Chocolate Milkshake: Blend with a splash of milk for a classic chocolate milkshake.
  • Ice Cream Sandwich: Place a scoop between two cookies for a delightful dessert.

FAQs About Chocolate Ice Cream

Why does homemade chocolate ice cream sometimes taste bitter?

Homemade chocolate ice cream can taste bitter if you use too much unsweetened cocoa powder or dark chocolate. Adjust the sugar to balance out the bitterness, or try using semi-sweet chocolate for a smoother flavor.

What type of cocoa is best for making chocolate ice cream?

Unsweetened Dutch-processed cocoa is preferred for its intense, smooth flavor. Regular cocoa powder works as well, but it may give a slightly more acidic taste.

Can I make chocolate ice cream without an ice cream maker?

Yes, you can make no-churn chocolate ice cream by mixing the base and placing it in the freezer. Stir it every 30 minutes to prevent large ice crystals from forming.

What’s the difference between chocolate gelato and chocolate ice cream?

Chocolate gelato has less cream and more milk, resulting in a denser texture and richer flavor compared to ice cream. It’s also churned slower, which reduces the amount of air in the final product.

Can chocolate ice cream be healthy?

While it’s a treat, you can make a healthier chocolate ice cream by using lower-fat milk, reducing sugar, or choosing dark chocolate for antioxidant benefits.

Nutritional Information

A typical serving of chocolate ice cream is rich in calories and fats due to the cream and chocolate. However, opting for dark chocolate or reduced sugar versions can make it a slightly healthier choice. For more health-conscious dessert ideas, check out our recipe for Healthy Avocado Egg Salad Roll-Ups, a lighter option that balances well with a treat like ice cream.

Conclusion

Chocolate ice cream is a timeless classic that brings joy with every creamy scoop. Whether you enjoy it in a cone, as part of a sundae, or paired with a warm dessert, homemade chocolate ice cream offers a rich, customizable experience. With the tips and recipes in this guide, you’re ready to create the perfect batch of chocolate ice cream tailored to your tastes. And if you’re exploring other flavors, give our Homemade Fried Donuts a try for another delicious homemade treat.