Shepherd’s Pie Soup: Cozy, Hearty Comfort Food in a Bowl

Shepherd’s Pie-inspired soup, cozy Shepherd’s Pie soup, hearty meat and potato soup, comforting beef and vegetable soup, classic comfort soup

Shepherd’s Pie Soup: A Warm Bowl of Comfort

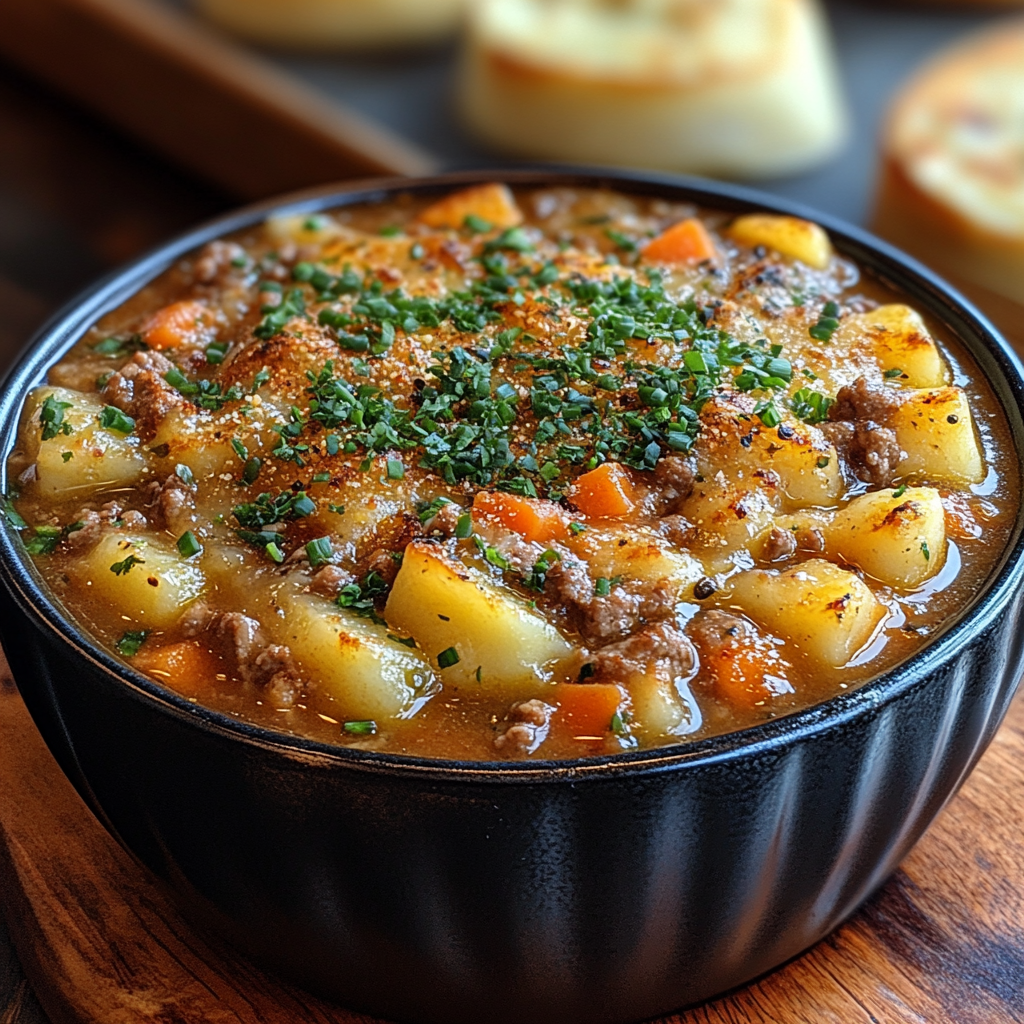
Shepherd’s Pie Soup takes the classic flavors of Shepherd’s Pie and transforms them into a savory, satisfying soup perfect for chilly evenings. Combining ground meat, hearty vegetables, a flavorful broth, and topped with creamy mashed potatoes, this dish delivers comfort in every bite.

For those who love other cozy and comforting soups, consider trying Crockpot Potato Soup with Hashbrowns, another fantastic recipe ideal for cold weather.


Ingredients for Shepherd’s Pie Soup

The following ingredients form the base of this delicious soup:

  • Ground Beef or Lamb: Traditional Shepherd’s Pie uses lamb, but ground beef is a common alternative.
  • Vegetables: Carrots, peas, and corn add texture, color, and nutrients.
  • Beef Broth: Provides a rich, savory foundation.
  • Worcestershire Sauce: Adds depth with its unique umami profile.
  • Mashed Potatoes: A comforting, creamy topping that adds the perfect finishing touch.

If you’re looking to complement this soup with other dishes, try pairing it with rich, hearty meat dishes like No Peek Beef Tips, for a full and satisfying meal.


Step-by-Step Recipe for Shepherd’s Pie Soup

Step 1: Brown the Meat and Sauté the Vegetables

Word Count: 300

  1. Cook the Meat: In a large pot, brown the ground beef or lamb over medium heat, seasoning with salt and pepper.
  2. Sauté the Vegetables: Add onions, carrots, celery, and garlic, cooking until softened.

Step 2: Add Broth and Seasonings

Word Count: 250

  1. Pour in Beef Broth and Worcestershire Sauce: Add the beef broth, Worcestershire sauce, and any additional seasonings to taste.
  2. Simmer: Allow the soup to cook for about 20-30 minutes, letting the flavors meld.

For tips on achieving a deep, savory broth, check out the recipe for Crockpot Potato Soup with Hashbrowns, which offers techniques to build rich flavors.

Step 3: Prepare the Mashed Potato Topping

Word Count: 200

  1. Boil Potatoes: Use Yukon Gold or Russet potatoes for creamy mashed potatoes.
  2. Mash with Butter and Cream: Add butter and cream for a smooth, fluffy texture.

Add a touch of shredded cheese for extra flavor if desired.


Assembly and Serving Suggestions

  1. Ladle the Soup: Serve the soup in individual bowls.
  2. Top with Mashed Potatoes: Add a generous scoop of mashed potatoes to each bowl, creating a comforting and flavorful topping.
  3. Optional Garnishes: Sprinkle with parsley or chives, or add a touch of shredded cheese for extra richness.

For a complete meal, serve this with perfect side dishes for comfort meals like Ultimate Bacon Potato Casserole, which pairs wonderfully with the flavors of this soup.


Recipe Variations and Customizations

  • Vegetarian Option: Substitute ground meat with a plant-based alternative and use vegetable broth.
  • Topping Alternatives: Try mashed sweet potatoes or a cauliflower mash for a twist.
  • Herb Additions: Enhance with rosemary, thyme, or bay leaves for added aroma.

Frequently Asked Questions (FAQs)

  • Can I make Shepherd’s Pie Soup ahead of time?
    Yes, it can be stored in the refrigerator for up to three days.
  • How do I make it gluten-free?
    Use gluten-free Worcestershire sauce and check that all other ingredients are gluten-free.
  • Can I freeze this soup?
    Shepherd’s Pie Soup can be frozen without the mashed potato topping. Simply add fresh mashed potatoes when ready to serve.

For a similar comforting recipe, consider No Peek Beef Tips, which offers another warm, hearty option ideal for cozy family dinners.

Baileys Chocolate Cheesecake Trifle: A Decadent No-Bake Dessert Recipe

Baileys trifle recipe, chocolate cheesecake trifle, Irish cream dessert, no-bake chocolate trifle, Baileys dessert idea

Baileys Chocolate Cheesecake Trifle: A Decadent No-Bake Dessert for Every Occasion

There’s something irresistibly indulgent about a layered Baileys Chocolate Cheesecake Trifle. This no-bake dessert combines creamy cheesecake layers with rich chocolate and a touch of Baileys Irish Cream, creating a treat that’s perfect for holidays or any special occasion. With minimal effort, you’ll create a trifle that delivers on flavor, elegance, and texture.

This recipe fits right alongside ultimate comfort food ideas like these Bacon Ranch Chicken Quesadillas, making it a crowd-pleaser that anyone can whip up. For those who love the classic flavors of chocolate and Baileys, this trifle will be a delightful addition to their dessert repertoire.

Ingredients Overview

Key Ingredients:

  • Baileys Irish Cream: Adds a creamy, mildly boozy flavor.
  • Chocolate Cake or Brownies: Forms the base layers, bringing richness and texture.
  • Cream Cheese and Whipped Cream: For the cheesecake layer, providing that smooth, creamy consistency.
  • Chocolate Pudding and Chocolate Shavings: Amplifies the chocolate flavors in every bite.

For more inspiration on cheesecake desserts, explore creative cheesecake ideas like this Salted Caramel Apple Cheesecake, perfect for those who love a unique twist.


How to Make the Baileys Chocolate Cheesecake Trifle

Step 1: Prepare the Cheesecake Filling

Word Count: 200
Start by creating a smooth and creamy cheesecake layer. Combine softened cream cheese with powdered sugar, a splash of Baileys, and vanilla extract. This mixture should be light and creamy to balance the other layers in the trifle.

Step 2: Bake or Buy the Chocolate Cake/Brownies

Word Count: 150
If you’re short on time, use store-bought chocolate cake or brownies. If you prefer homemade, bake your favorite chocolate cake and allow it to cool before cutting it into bite-sized cubes. This layer provides a fudgy texture that complements the creamy cheesecake filling.


Step 3: Assemble the Trifle Layers

Word Count: 250
In a large trifle dish or individual glasses, layer the ingredients in the following order:

  1. Chocolate cake cubes or brownie pieces.
  2. A generous layer of Baileys cheesecake filling.
  3. Chocolate pudding or a layer of whipped cream infused with a dash of Baileys.
  4. Repeat the layers until the dish is full.

Top the trifle with chocolate shavings, a sprinkle of cocoa powder, or additional whipped cream for a beautiful finish.

Tips for Perfect Assembly

  • Use clear glass to showcase the layers.
  • Keep each layer even for an elegant presentation.
  • Make sure to refrigerate for at least 2 hours to let the flavors meld.

For another delicious no-bake dessert, consider checking out these no-bake dessert options, like the Easy No-Bake Banana Split Cheesecake.


Trifle Variations and Add-Ins

To customize your trifle, consider these creative additions:

  • Caramel Drizzle: For an extra layer of sweetness.
  • Mini Chocolate Chips: Add some texture to each bite.
  • Alternative Spirits: Replace Baileys with Kahlua for a coffee twist or Frangelico for a nutty flavor.
  • Fruit Layer: Raspberries or strawberries can add a refreshing tartness.

These variations allow you to tailor the trifle to different preferences or events, making it versatile for various occasions.


Serving and Presentation Tips

Presentation Suggestions:

  • Serve in individual glasses for a sophisticated touch.
  • Garnish with chocolate curls or fresh mint leaves for a pop of color.
  • Dust with cocoa powder for a polished finish.

These tips can help elevate the trifle, making it as visually appealing as it is delicious.


Frequently Asked Questions (FAQs)

Q: Can I make this trifle ahead of time?
A: Yes, this dessert is best when made ahead, allowing the flavors to meld. Store in the fridge for up to 24 hours.

Q: Can I use a non-alcoholic Irish cream substitute?
A: Absolutely! There are non-alcoholic Irish cream syrups available, or you can use a mix of cream and Irish cream flavoring.

Q: How should I store leftovers?
A: Cover and refrigerate for up to 2 days. Note that the cake layers may become softer over time.

Q: Can I freeze the trifle?
A: Freezing is not recommended as it may alter the texture of the cheesecake and whipped cream layers.

Q: Can I make this less sweet?
A: Adjust the sugar in the cheesecake mixture or use unsweetened whipped cream to reduce sweetness.


Conclusion

This Baileys Chocolate Cheesecake Trifle is an elegant yet straightforward dessert perfect for any special gathering. With its rich layers of chocolate, creamy cheesecake, and the unmistakable taste of Baileys, it’s a dessert that’s as delightful to make as it is to eat. Serve it with confidence at your next event, and watch it become the star of the dessert table!

For other creative dessert ideas, don’t miss unique cheesecake recipes like the Salted Caramel Apple Cheesecake or explore the world of no-bake treats with the Banana Split Cheesecake.

Delicious Brown Sugar Pork Chops: Easy Sweet and Savory Recipe for Dinner

brown sugar glazed pork chops, sweet pork chops recipe, caramelized pork chops, savory pork chops, easy pork chop dinner

Delicious Brown Sugar Chops: A Sweet-Savory Recipe for All Occasions

When it comes to a perfect balance of sweet and savory, brown sugar chops are a go-to recipe that never disappoints. This dish combines the natural flavors of pork with the caramel-like sweetness of brown sugar, creating a delicious glaze that will leave your taste buds wanting more. Brown sugar chops are ideal for a family dinner or even a special occasion, thanks to their simplicity and rich flavor.

For those looking to make their pork chops more flavorful, this recipe offers an incredible taste experience. Learn how to select the best pork chops, master the brown sugar glaze, and cook the chops to perfection. Explore additional techniques for enhancing pork chop dishes by checking out Mom’s Tender and Juicy Pork Chops, which provides valuable insights into keeping chops tender and juicy.

Understanding how sweetness elevates savory dishes is essential for this recipe. If you’re interested in discovering more about balancing flavors, the Benefits of Brown Sugar in Cooking provides an excellent resource. For more ways to perfect baked pork dishes, the Perfectly Baked Pork Chops Guide is another recommended read.


Choosing the Best Pork Chops

The type of pork chop you choose can greatly impact the flavor and texture of your dish. Here’s a quick breakdown:

  • Bone-in vs. Boneless: Bone-in chops are known for their juiciness and intense flavor. Boneless chops, however, cook faster and are easier to handle.
  • Thickness Matters: Opt for chops that are at least an inch thick to prevent them from drying out during cooking.

For a deeper dive into pork chop types, check out the Rediscovering Comfort: Sour Cream and French Fried Onion Pork Chops, which provides another take on comfort-driven pork recipes.


Why Brown Sugar Enhances Pork

Brown sugar doesn’t just add sweetness; it also helps in caramelizing the meat, creating a flavorful crust. The sugar melts and blends with the pork’s juices, transforming into a delicious glaze. This technique is especially popular for creating rich flavors that pair well with savory pork.

A few tips for balancing flavors:

  • Add Soy Sauce: A touch of soy sauce enhances the umami taste, balancing out the sweetness.
  • Include Fresh Herbs: Herbs like rosemary or thyme add depth to the glaze without overpowering the dish.

For additional tips on working with glazes, try the Sweetly Glazed Pork Loin, which features another way to incorporate sweetness into pork.


Step-by-Step Recipe for Delicious Brown Sugar Chops

Ingredients

  • 4 bone-in pork chops
  • 4 tablespoons brown sugar
  • 2 tablespoons unsalted butter
  • 1 tablespoon soy sauce
  • 1 tablespoon Worcestershire sauce
  • Salt and pepper to taste

Instructions

  1. Preheat Your Oven: Set the oven to 350°F (175°C) to ensure an even cooking environment.
  2. Prepare the Glaze:
    • In a saucepan, melt the butter over medium heat.
    • Stir in the brown sugar, soy sauce, and Worcestershire sauce, mixing until smooth.
  3. Season the Pork Chops: Generously season each side of the pork chops with salt and pepper.
  4. Sear the Pork Chops:
    • In a skillet, heat a bit of oil and sear each side of the pork chops for about 2 minutes, until golden brown.
  5. Bake the Pork Chops:
    • Transfer the chops to a baking dish, then pour the brown sugar glaze over them.
    • Bake for 20-25 minutes, or until the internal temperature reaches 145°F (63°C).

Tips for Perfection

  • Baste with Extra Glaze: For a thicker, more flavorful coating, baste the chops midway through baking.
  • Let Rest: Allow the chops to rest for five minutes before serving, which helps keep them juicy.

For a delightful side, pair this dish with the Ultimate Bacon Potato Casserole, a hearty accompaniment that complements the sweet-savory notes of the chops.


Variations to Try

Experimenting with different ingredients can enhance the flavors of your brown sugar chops:

  • Maple Syrup Glaze: Swap out brown sugar for maple syrup for a distinct sweetness.
  • Garlic Butter Mix: Add minced garlic to the glaze for a robust flavor boost.
  • Smoked Paprika: A sprinkle of smoked paprika adds a subtle heat and smoky undertone.

These adjustments allow you to enjoy this recipe with different flavor profiles, making it perfect for any palate.


Ideal Side Dishes for Brown Sugar Chops

Finding the right side dish enhances the overall meal experience. Here are a few recommendations:

  • Creamy Mashed Potatoes: The rich, buttery flavor of mashed potatoes pairs well with the sweet glaze on the pork chops.
  • Roasted Veggies: Oven-roasted carrots, broccoli, or green beans bring a fresh contrast to the sweetness.
  • Garden Salad: A simple salad with a light vinaigrette can add a refreshing balance to the dish.

Consider trying these sides with another one-pan pork chop option, like One Pan Pork Chops and New Potatoes, for easy weeknight cooking.


Expert Tips for Perfect Brown Sugar Chops

Achieving perfection with brown sugar chops is all about technique. Here are some tips from the pros:

  • Use a Meat Thermometer: Pork chops are best when cooked to 145°F (63°C) for optimal juiciness.
  • Rest After Cooking: Let the meat rest before cutting into it, allowing the juices to redistribute evenly.
  • Double the Glaze: If you love a saucy finish, double the glaze ingredients and use half for baking and the other half for basting during cooking.

For additional tips on achieving tenderness, take a look at Mom’s Tender and Juicy Pork Chops, which provides more guidance on cooking moist pork chops.


Frequently Asked Questions (FAQs)

Can I make brown sugar chops with boneless pork chops?

Yes, boneless chops work well, though they may cook faster, so keep an eye on the temperature.

What can I substitute for brown sugar?

Alternatives like honey, maple syrup, or even coconut sugar can work in place of brown sugar.

How should I store leftover brown sugar chops?

Store them in an airtight container in the refrigerator for up to three days. To reheat, bake or microwave until warmed through.

Why are my pork chops dry?

Overcooking is a common issue with pork chops. Use a thermometer to ensure they reach 145°F (63°C) and no higher to keep them juicy.

For more detailed answers on pork chop preparation, check out the Perfectly Baked Pork Chops Guide.


Conclusion

Delicious Brown Sugar Chops are the ultimate comfort food, combining savory and sweet in a dish that’s simple to prepare yet unforgettable. With just a few basic ingredients and a little attention to detail, you can create a meal that’s perfect for any occasion. Serve with hearty sides, experiment with flavors, and enjoy this timeless recipe with family and friends.

For additional recipe ideas, try Parmesan Baked Pork Chops for a savory twist or explore Ultimate Comfort Food: Bacon Ranch Chicken Quesadillas to expand your comfort food repertoire.

Crazy Good Casserole: The Ultimate Comfort Food Recipe

easy casserole recipe, cheesy chicken casserole, creamy baked casserole, family-friendly casserole, comfort food casserole

Crazy Good Casserole: The Ultimate Comfort Food Recipe

Nothing beats a Crazy Good Casserole for a warm, satisfying meal that brings everyone to the table. With a creamy sauce, hearty protein, and delicious cheese, this casserole is a family favorite and perfect for weeknight dinners or potluck gatherings. Its versatility allows you to adapt it to suit any taste or dietary preference, making it truly customizable.

For more comfort food inspiration, check out The Ultimate Comfort Food Crockpot Potato Soup with Hashbrowns or Slow Cooker Magic: Unveiling the Ease of Crock-Pot Baked Ziti, both hearty, satisfying recipes that are easy to prepare.


Why Crazy Good Casserole is a Family Favorite

This dish is perfect for any occasion, offering both flavor and flexibility. You can vary the ingredients to match what you have on hand, adjust the seasonings to suit your family’s preferences, and enjoy a comforting, one-dish meal that satisfies everyone.

If you enjoy the ease of casseroles and rich flavors, you may also like our Dorito Chicken Casserole: A Crunchy Twist on Comfort Food for another delicious dinner idea.


Ingredients for Crazy Good Casserole

  • Protein: Chicken, turkey, or beef for a hearty base.
  • Creamy Base: Cream of chicken or mushroom soup for creaminess.
  • Vegetables: Common choices include broccoli, green beans, or peas.
  • Cheese: Cheddar, mozzarella, or a blend to add gooey, melty layers.
  • Carbohydrates: Rice, noodles, or potatoes for a filling texture.

Step-by-Step Recipe Instructions

1. Prepare the Ingredients

  • Cook and shred the chicken (or use leftover cooked meat).
  • Blanch vegetables like broccoli or green beans to ensure they remain tender-crisp.
  • Grate fresh cheese for better melting and texture.

2. Mix the Creamy Sauce

  • In a large bowl, combine cream of chicken or mushroom soup, a bit of sour cream, and your choice of seasonings (salt, pepper, garlic powder).
  • Adjust the seasonings to taste, adding herbs like thyme or parsley for extra flavor.

3. Assemble the Casserole Layers

  • Layer the cooked chicken or protein at the bottom of a greased baking dish.
  • Spread the creamy sauce over the chicken, followed by the vegetables and shredded cheese.
  • Top with a crunchy layer of breadcrumbs or extra cheese for a crispy finish.

4. Bake the Casserole

  • Preheat the oven to 350°F (175°C).
  • Bake for 30-40 minutes, or until the casserole is bubbly and golden brown on top.
  • Let it rest for a few minutes before serving.

Tips for the Perfect Crazy Good Casserole

  • Customize the Cheese: Use a blend of cheeses like cheddar and mozzarella for the best texture and flavor.
  • Add a Crunchy Topping: Sprinkle breadcrumbs or crushed crackers on top for added texture.
  • Balance the Seasonings: Add salt gradually, as cream soups can be salty on their own.

If you’re a fan of versatile casseroles, try Ultimate Bacon Potato Casserole, which combines the rich flavor of bacon with creamy potatoes for another satisfying meal option.


Recipe Variations

  1. Vegetarian Crazy Good Casserole: Substitute chickpeas or tofu for meat and add more vegetables.
  2. Low-Carb Option: Replace rice or noodles with cauliflower rice.
  3. Spicy Version: Add diced jalapeños or red pepper flakes to the creamy sauce.
  4. Extra Cheesy Casserole: Layer in more cheese between the ingredients for a super cheesy dish.

Suggested Sides to Pair with Crazy Good Casserole

  • Garlic Bread: Perfect for scooping up the creamy casserole sauce.
  • Simple Green Salad: A fresh side to balance the richness of the casserole.
  • Steamed Vegetables: For added nutrition and a light side option.

For more quick and easy side ideas, check out our recipe for Easy French Bread Pizza that complements a range of main dishes.


Frequently Asked Questions

Can I make this casserole ahead of time?

Yes, you can prepare the casserole, cover it, and refrigerate it for up to 24 hours. Bake it when ready, adding an extra 5-10 minutes if starting cold.

What substitutions can I make for the creamy base?

If you prefer a lighter option, try using Greek yogurt or a low-fat cream soup.

Can I freeze Crazy Good Casserole?

Yes, this casserole freezes well. Cover it tightly, label it, and freeze for up to three months. Thaw overnight in the fridge before baking.

How can I prevent the casserole from becoming too watery?

Blanching vegetables and using less liquid in the sauce can help keep the casserole from becoming watery.


Storing and Reheating

  • Storage: Place leftovers in an airtight container in the refrigerator for up to three days.
  • Reheating: Reheat in the oven at 300°F (150°C) for 15-20 minutes or until warmed through.

For more hearty, make-ahead options, consider Rediscovering Comfort: Sour Cream and French Fried Onion Pork Chops, which pairs wonderfully with easy casseroles and is equally comforting.


Final Thoughts

Crazy Good Casserole is a versatile, delicious, and easy meal to bring comfort to any table. With a creamy, cheesy base, it’s a hit with both kids and adults, and it can be adapted to match any dietary preference. This casserole is not just a meal; it’s a go-to recipe for busy nights and family gatherings alike.

For more casserole ideas and family-friendly dinners, check out Ham and Potato Casserole for another creamy, hearty dish that’s perfect for weeknight meals or potlucks.

Melt in Your Mouth Caesar Chicken: Creamy and Delicious Dinner Recipe

Caesar baked chicken, creamy Caesar chicken, easy Caesar chicken recipe, baked Caesar Parmesan chicken, Caesar chicken with garlic

Melt in Your Mouth Caesar Chicken: A Quick, Flavorful Dinner Recipe

Melt in Your Mouth Caesar Chicken is a creamy, tender dish that’s as simple as it is delicious. With just a few ingredients, this baked chicken dish delivers big on flavor, making it ideal for weeknight dinners or gatherings. The Caesar dressing, Parmesan, and garlic powder create a crust that locks in moisture, while the chicken remains juicy and tender beneath. This recipe is perfect for anyone looking for a satisfying, flavorful meal that requires minimal prep.

For those who love easy, comforting dishes, check out The Ultimate Comfort Food Crockpot Potato Soup with Hashbrowns or Slow Cooker Magic: Unveiling the Ease of Crock-Pot Baked Ziti, both excellent options for busy days.


Why Caesar Chicken is So Popular

This recipe has gained popularity for its simplicity and the “melt-in-your-mouth” texture that sets it apart. The creamy Caesar dressing not only adds a tangy, savory flavor but also ensures the chicken remains moist and tender. By using minimal ingredients, you get a rich dish that doesn’t overwhelm the palate but satisfies completely.

If you’re a fan of classic baked dishes with a twist, you might also enjoy our Ultimate Comfort Food: Bacon Ranch Chicken Quesadillas for another simple yet delicious option.


Ingredients for Melt in Your Mouth Caesar Chicken

  • Chicken Breasts: Boneless, skinless chicken breasts work best.
  • Caesar Dressing: This adds creaminess and a hint of tanginess.
  • Sour Cream or Mayonnaise: Enhances the creamy texture.
  • Parmesan Cheese: Adds a savory, slightly salty flavor.
  • Garlic Powder: Adds depth and balances the richness of the dressing.

Step-by-Step Recipe Instructions

1. Prepare the Caesar Coating

  • In a bowl, combine Caesar dressing, sour cream (or mayonnaise), grated Parmesan, and garlic powder.
  • Mix until well-combined, creating a thick, creamy mixture.

2. Season the Chicken

  • Lightly season the chicken breasts with salt and pepper to taste.
  • Coat each piece of chicken thoroughly with the Caesar mixture.

3. Bake the Chicken

  • Preheat your oven to 375°F (190°C).
  • Arrange the coated chicken in a baking dish and bake for 25-30 minutes.
  • Check that the internal temperature of the chicken reaches 165°F (74°C) for safe cooking.

Tips for Perfect Caesar Chicken

  • Choose Quality Caesar Dressing: The flavor of this dish depends on the Caesar dressing, so select a high-quality option for the best results.
  • Use Freshly Grated Parmesan: Pre-grated cheese can be dry; freshly grated Parmesan adds a better texture and flavor.
  • Don’t Overcook the Chicken: Keep an eye on the oven to avoid drying out the chicken. The Caesar dressing helps retain moisture, but over-baking can still result in dry chicken.

For similar tips on baking, you may also like Perfect Ribeye Steak Recipe: Master the Art of Steak Cooking, which provides insights into achieving perfect results with simple ingredients.


Recipe Variations

  1. Low-Fat Caesar Chicken: Use a low-fat Caesar dressing and replace sour cream with Greek yogurt for a lighter version.
  2. Keto-Friendly Caesar Chicken: Choose a Caesar dressing that’s low in carbs and omit sour cream or mayonnaise if needed.
  3. Extra Cheesy Caesar Chicken: Add shredded mozzarella for an extra cheesy layer.
  4. Spicy Caesar Chicken: Add a pinch of red pepper flakes or a dash of hot sauce to the Caesar mixture for some heat.

Suggested Sides for Caesar Chicken

  • Mashed Potatoes: Creamy mashed potatoes are a perfect base for the flavorful Caesar sauce.
  • Roasted Vegetables: A mix of carrots, zucchini, and bell peppers complements the richness of the chicken.
  • Steamed Broccoli: For a light, nutritious pairing, steamed broccoli adds a refreshing contrast.

For more meal ideas, check out our recipe for Rediscovering Comfort: Sour Cream and French Fried Onion Pork Chops, another easy comfort meal with rich flavors.


Frequently Asked Questions

Can I use chicken thighs instead of chicken breasts?

Yes, chicken thighs can be used. They may require slightly longer baking to reach an internal temperature of 165°F.

What type of Caesar dressing is best?

Choose a creamy, high-quality Caesar dressing for the best flavor. Homemade Caesar dressing can also work well if you prefer.

Can I make this dish dairy-free?

To make this recipe dairy-free, use a vegan Caesar dressing and replace Parmesan with a dairy-free cheese alternative.

Can I make this recipe ahead of time?

Yes, you can coat the chicken with the Caesar mixture, cover, and refrigerate for up to 24 hours before baking. This is great for meal prep!

How do I prevent the chicken from drying out?

Make sure to coat the chicken thoroughly with the Caesar mixture and avoid over-baking. The Caesar dressing helps keep the chicken moist, but checking the internal temperature is essential.


Storage and Reheating

  • Storing: Store leftovers in an airtight container in the refrigerator for up to 3 days.
  • Reheating: Reheat in the oven at 300°F until warm, or use a microwave for quicker reheating. Avoid high heat, which can dry out the chicken.

For more ideas on easy-to-store recipes, explore Family Night Favorite: Easy French Bread Pizza for another quick meal that holds up well in the fridge.


Final Thoughts

Caesar Chicken is an incredibly easy, flavorful dish that’s perfect for anyone seeking a fuss-free dinner. With just a few ingredients, you can create a meal that’s satisfying, creamy, and packed with flavor. Whether you’re cooking for a family gathering or a cozy night in, this recipe is sure to impress.

For more recipes with minimal ingredients and maximum flavor, check out Chicken Bacon Ranch Potatoes: Your New Favorite Comfort Dish, which combines hearty ingredients in a simple, comforting way.