4 Ingredients Grinch Punch: The Perfect Festive Holiday Drink

Grinch holiday punch, Christmas green punch, festive lime sherbet drink, holiday Grinch drink recipe, easy Christmas party punch

Article: 4 Ingredients Grinch Punch

Grinch Punch is the ultimate festive drink for your holiday celebrations. This easy-to-make, vibrant green beverage is perfect for kids and adults alike. Whether you’re hosting a Christmas party or just want a special treat for your family, this four-ingredient recipe is simple, delicious, and fun!


What is Grinch Punch?

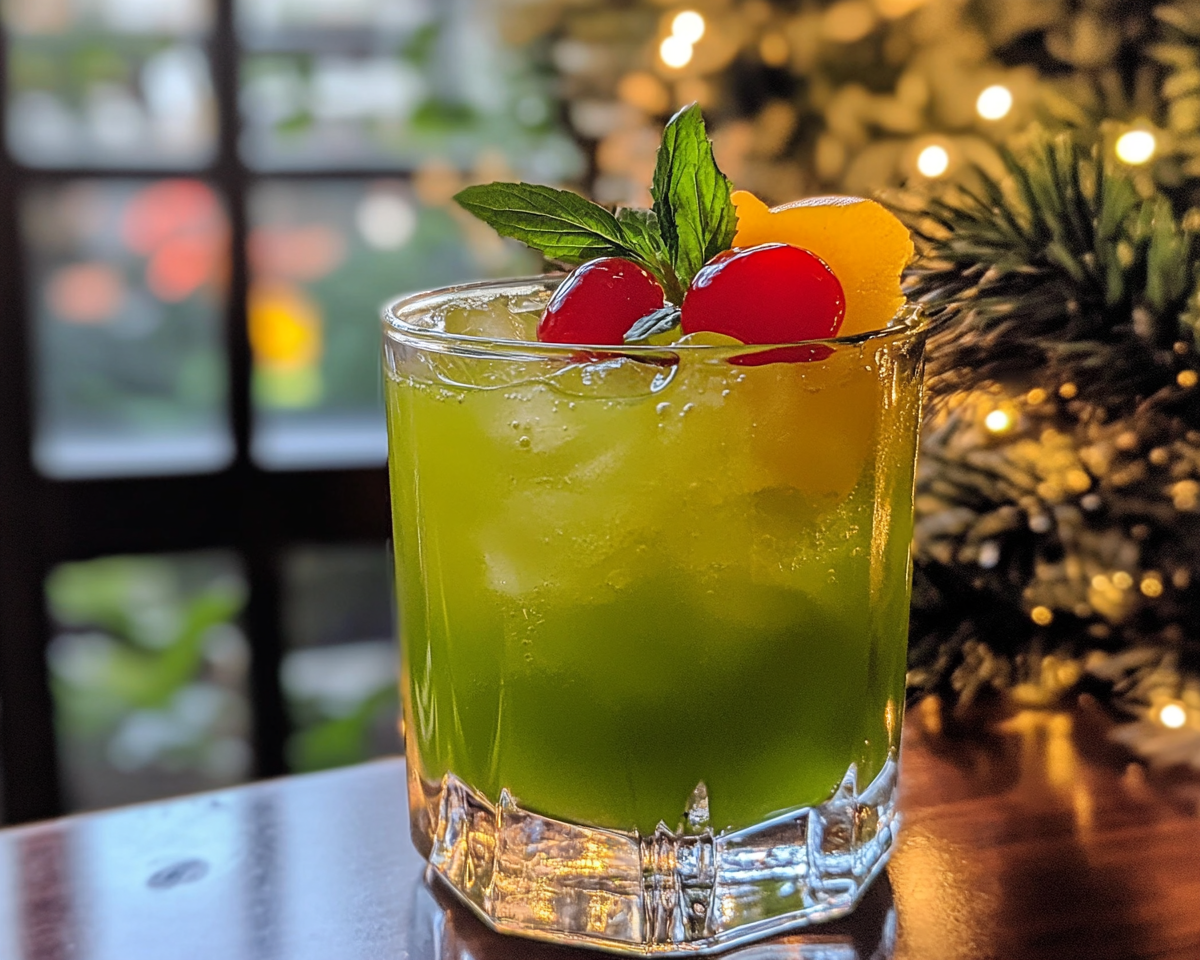
Grinch Punch gets its name from the classic holiday character, The Grinch. Its bright green hue and sweet flavor make it a holiday favorite. The drink combines fizzy, fruity, and creamy textures for a delightful festive treat.


Ingredients You’ll Need

  • Lime Sherbet – The creamy base that gives the drink its signature green color.
  • Lemon-lime soda – Adds a bubbly, refreshing touch.
  • Pineapple juice – Balances sweetness with a tropical twist.
  • Red sugar sprinkles – Optional, for decoration, representing the Grinch’s tiny red heart.

For a kid-friendly party, these ingredients can be adjusted for flavor intensity. Check out our guide on festive party drink ideas.


Step-by-Step Preparation

  1. Scoop Lime Sherbet: Add generous scoops into a punch bowl.
  2. Pour Pineapple Juice: Gently pour pineapple juice over the sherbet.
  3. Add Lemon-lime Soda: Top it off with lemon-lime soda for fizz.
  4. Decorate with Sprinkles: If desired, rim glasses with red sugar sprinkles.

Looking for more festive recipes? Our Crockpot Baked Ziti recipe makes a great holiday main dish!


Why This Punch is Perfect for the Holidays

  • Visually Festive: The green color fits perfectly into any Christmas theme.
  • Quick & Easy: Just a few steps and you’re ready to serve.
  • Versatile: Easily customizable for dietary needs or flavor preferences.

Customization Options

  • Adult Version: Add vodka or rum for a boozy twist.
  • Color Variations: Use different sherbet flavors for unique color combinations.
  • Low-sugar Option: Swap regular soda with a diet or sugar-free version.

For more tips on festive customization, check out our Holiday Drink Hacks.


Serving Ideas

  • Use clear cups to showcase the vibrant green color.
  • Garnish with candy canes or mint leaves for added flair.
  • Pair with holiday-themed snacks like Candy Cane Cookies.

Frequently Asked Questions

Can I make Grinch Punch in advance?

Yes, but add the soda just before serving to retain its fizz.

What if I can’t find lime sherbet?

Substitute with lemon sherbet and a drop of green food coloring.

How do I store leftovers?

Store in an airtight container in the fridge. However, fizz will diminish after a few hours.


Internal Linking Opportunities


Conclusion

This Grinch Punch recipe will be the star of your holiday celebrations. Its simplicity, versatility, and festive appeal make it a must-have addition to your Christmas menu. Try it today and make your festivities even more magical!

Homemade Bacon Dog Treats: Easy, Healthy, and Delicious

homemade dog snacks, dog bacon treats, healthy dog treats, easy dog treat recipe, pet-friendly bacon snacks

Article: Bacon Dog Treats – A Guide to Nutritious and Delicious Pet Snacks

Introduction

Bacon Dog Treats are a delightful and easy-to-make snack that your furry friends will adore. This article will guide you through creating the perfect treats, offering tips for customization and answering common questions. Let’s dive into the world of homemade pet snacks!


Why Make Homemade Bacon Dog Treats?

  1. Health Benefits
    • Control the ingredients: Avoid harmful additives.
    • Balanced nutrition: Tailor to your dog’s dietary needs.
  2. Cost-Effective
    • Homemade treats are cheaper than store-bought options.
  3. Bonding Activity
    • Cooking treats strengthens your bond with your pet.

Learn more about making healthy meals for loved ones.


Ingredients for Bacon Dog Treats

  1. Bacon (cooked and crumbled)
  2. Whole wheat flour or oat flour
  3. Eggs (as a binding agent)
  4. Pumpkin puree (or applesauce)
  5. Peanut butter (ensure it’s xylitol-free)

Step-by-Step Recipe

  1. Preheat your oven to 350°F (175°C).
  2. Combine dry ingredients in a bowl.
  3. Mix wet ingredients, adding crumbled bacon last.
  4. Shape into bite-sized pieces.
  5. Bake for 20–25 minutes until golden brown.

Tips for Success

  • Storage: Keep treats in an airtight container.
  • Customization: Add grated carrots or switch bacon for chicken.

Discover simple slow cooker recipes that can be adapted for pet-friendly meals.


Nutritional Value of Homemade Bacon Dog Treats

  1. High protein content.
  2. Low in artificial preservatives.
  3. Provides essential vitamins and minerals.

Creative Variations

  • Cheesy Bacon Treats
    • Add shredded cheddar cheese for flavor.
  • Sweet Potato & Bacon Bites
    • Incorporate mashed sweet potato for a soft texture.

Common Questions About Bacon Dog Treats

  • Are these treats safe for all dogs?
    Yes, but avoid ingredients like garlic or onions.
  • Can I freeze these treats?
    Absolutely! Freeze for up to 3 months.
  • What can I use instead of bacon?
    Substitute with turkey or tofu for healthier options.

For human food inspirations, check out delightful pancake muffins.


Conclusion

Making Bacon Dog Treats at home is simple, economical, and rewarding. Your furry friends will enjoy a tasty and nutritious snack while you have the peace of mind that comes with knowing exactly what they’re eating. Try out this recipe today and see tails wag in excitement!

Nutritious Homemade Dog Food Recipes: A Complete Guide for Pet Owners

DIY dog food, dog food recipes, homemade pet food, natural dog food, homemade meals for dogs

Homemade Dog Food: A Complete Guide for Your Pet’s Nutrition

Introduction

Providing homemade dog food to your furry friend ensures a nutritious, wholesome diet tailored to their unique needs. In this guide, we’ll explore the benefits, essential recipes, and key considerations for preparing meals that keep your pet happy and healthy.


Benefits of Homemade Dog Food

  • Control Over Ingredients: Tailor meals to your dog’s dietary needs and avoid harmful additives.
  • Freshness and Quality: Ensure the food is free from preservatives.
  • Bonding Through Feeding: Strengthens the connection with your pet.

For more detailed preparation techniques, check out The Ultimate Comfort Food: Crockpot Potato Soup with Hashbrowns, which provides similar wholesome recipes for family and pets.


Ingredients to Use and Avoid

Safe Ingredients:

  • Proteins: Chicken, turkey, beef, fish.
  • Carbohydrates: Brown rice, quinoa, sweet potatoes.
  • Vegetables: Carrots, spinach, green beans.

Ingredients to Avoid:

  • Toxic Foods: Grapes, onions, chocolate.
  • High-Fat or Spicy Foods: Can upset a dog’s stomach.

Discover more safe options by exploring Slow Cooker Magic: Unveiling the Ease of Crock-Pot Baked Ziti, which incorporates pet-safe ingredients in its recipe base.


Recipes for Homemade Dog Food

1. Basic Chicken and Rice Recipe (Prep Time: 30 minutes)

  • Ingredients:
    • 1 cup of cooked chicken (shredded)
    • 1 cup of brown rice
    • 1/2 cup of steamed vegetables (carrots or peas)
  • Instructions:
    1. Cook rice as per package instructions.
    2. Steam vegetables until tender.
    3. Mix all ingredients and let them cool before serving.

Nutritional Needs for Dogs

Key Nutrients:

  • Protein: Supports muscle growth.
  • Fats: Provide energy and promote a shiny coat.
  • Vitamins and Minerals: Strengthen immunity and bone health.

For a comprehensive view on balanced meals, see No Peek Beef Tips: The Ultimate Comfort Food.


Transitioning Your Dog to Homemade Food

  • Gradual Change: Start by mixing small portions of homemade food with their regular kibble.
  • Monitor Reactions: Watch for any signs of allergies or digestive issues.

Common Questions About Homemade Dog Food

1. Is homemade dog food better than store-bought?

Homemade food offers control over ingredients but requires proper planning to meet nutritional needs.

2. How much homemade food should I feed my dog?

Depends on size, age, and activity level. Consult your veterinarian for precise guidelines.

3. Can I freeze homemade dog food?

Yes, portion meals and store them in airtight containers for up to three months.


Internal Linking Opportunities

  1. Homemade Pizza Sticks: Link to Homemade Pizza Sticks as an idea for healthy treat alternatives.
  2. Slow Cooker Chicken and Gravy Over Noodles: Suggest a read on Slow Cooker Chicken and Gravy for shared family and pet recipes.
  3. Ultimate Bacon Potato Casserole: Include Ultimate Bacon Potato Casserole for protein-rich meal inspiration.

Conclusion

Homemade dog food is a labor of love, ensuring your pet receives a fresh, balanced diet. By focusing on the right ingredients and recipes, you can promote their health and happiness for years to come.

Original Fantasy Fudge Recipe: A Classic Holiday Treat

fantasy fudge, classic fudge recipe, holiday fudge, original fudge recipe, creamy chocolate fudge, marshmallow fudge, easy holiday dessert recipe

Original Fantasy Fudge Recipe: A Holiday Treat Everyone Will Love


Introduction
Original Fantasy Fudge is a timeless holiday classic, loved for its creamy texture and rich chocolate flavor. Perfect for sharing or gifting, it has become a tradition in many households.


Why Fantasy Fudge is a Holiday Favorite

A Sweet Nostalgia

This fudge recipe originated as a promotional recipe on Kraft Marshmallow Crème jars, becoming a holiday staple ever since. Its simplicity and indulgence make it perfect for celebrations.

Pair this dessert with Mama Dee’s Never-Fail Creamy Fudge for an ultimate fudge assortment.

The Perfect Gift

Fantasy Fudge is easy to make in large batches and can be beautifully wrapped for gifting. It’s a thoughtful and delicious way to spread holiday cheer.


Ingredients for Fantasy Fudge

Essential Ingredients

  • 3 cups granulated sugar
  • ¾ cup unsalted butter
  • ⅔ cup evaporated milk
  • 2 cups semi-sweet chocolate chips
  • 1 jar (7 oz) marshmallow crème
  • 1 tsp vanilla extract
  • 1 cup chopped walnuts (optional)

Step-by-Step Recipe

  1. Prepare the Mixture: Combine sugar, butter, and evaporated milk in a heavy saucepan. Cook over medium heat, stirring constantly, until the mixture reaches a boil. Continue to boil for 5 minutes.
  2. Add Chocolate: Remove the saucepan from heat. Stir in chocolate chips until melted and smooth.
  3. Incorporate Marshmallow Crème: Mix in marshmallow crème and vanilla extract until fully combined.
  4. Add Walnuts: Stir in walnuts, if using, for added texture.
  5. Pour and Set: Pour the fudge mixture into a greased 9×13-inch pan. Let it cool completely before cutting into squares.

Tips for Perfect Fantasy Fudge

  • Achieving the Right Texture: Use a candy thermometer to ensure the sugar mixture reaches the perfect temperature.
  • Smooth Incorporation: Stir vigorously when adding marshmallow crème for a velvety consistency.
  • Storage: Store in an airtight container to keep the fudge fresh for up to 2 weeks.

Creative Variations

  • Mint Chocolate Fudge: Add peppermint extract and top with crushed candy canes.
  • Salted Caramel Fudge: Drizzle salted caramel on top before setting.
  • Peanut Butter Fudge: Swirl in creamy peanut butter for a nutty flavor twist.

Explore more festive ideas like Salted Caramel Apple Cheesecake for variety in your dessert spread.


FAQs About Fantasy Fudge

How Long Does Fantasy Fudge Last?

Stored properly, it lasts up to two weeks in an airtight container.

Can I Freeze Fantasy Fudge?

Yes, wrap it tightly in plastic wrap and freeze for up to 3 months.

How Do I Prevent Grainy Fudge?

Cook the sugar mixture thoroughly and stir continuously to avoid crystallization.

Can I Substitute Ingredients?

Yes, you can use dark chocolate or add mix-ins like dried fruits or crushed cookies.


Internal Linking Opportunities


Conclusion
The Original Fantasy Fudge is a must-have recipe for any holiday celebration. Its rich, creamy texture and endless flavor possibilities make it a versatile and cherished dessert. Give it a try this season and bring smiles to everyone around you!

Chocolate Swiss Roll: A Decadent and Elegant Dessert Recipe

chocolate roll cake, Swiss roll recipe, chocolate log cake, rolled chocolate sponge, creamy Swiss roll, chocolate ganache roll, holiday dessert recipes

Chocolate Swiss Roll: A Decadent Delight for Every Occasion


Introduction
The Chocolate Swiss Roll is an elegant, nostalgic dessert that blends the rich flavors of chocolate with the creamy goodness of its filling. Its beautiful presentation and delightful taste make it a favorite at celebrations and family gatherings.


Why the Chocolate Swiss Roll Stands Out

Perfect Balance of Flavor and Texture

A successful Chocolate Swiss Roll has a fluffy sponge cake, creamy filling, and rich chocolate ganache coating. The harmonious combination of these elements creates a dessert that pleases the senses.

For tips on achieving the perfect sponge cake, visit The Science of Sponge Cakes.

A Versatile Dessert

From holiday feasts to everyday treats, this dessert is versatile enough to be customized with different fillings and coatings. It’s also a crowd-pleaser for all ages.

Pair your Chocolate Swiss Roll with Kentucky Butter Cake for a dessert spread that delights every palate.


Ingredients for Chocolate Swiss Roll

Essential Ingredients

  • For the Sponge Cake:
    • ½ cup all-purpose flour
    • ⅓ cup cocoa powder
    • 4 large eggs
    • ¾ cup granulated sugar
    • 1 tsp vanilla extract
  • For the Filling:
    • 1 cup heavy whipping cream
    • 2 tbsp powdered sugar
    • 1 tsp vanilla extract
  • For the Ganache Coating:
    • 6 oz dark chocolate
    • ½ cup heavy cream

Step-by-Step Recipe

  1. Prepare the Sponge Cake:
    • Preheat the oven to 350°F (175°C).
    • Line a baking sheet with parchment paper and grease it lightly.
    • Whisk eggs and sugar until pale and fluffy. Fold in sifted flour and cocoa powder gently.
  2. Bake the Cake:
    • Spread the batter evenly on the prepared sheet and bake for 10-12 minutes.
    • Remove from the oven and roll the warm cake in parchment paper. Let it cool completely.
  3. Prepare the Filling:
    • Whip heavy cream, powdered sugar, and vanilla extract until stiff peaks form.
  4. Assemble the Roll:
    • Unroll the cooled cake, spread the filling evenly, and re-roll it carefully.
  5. Coat with Ganache:
    • Heat heavy cream and pour it over chopped chocolate. Mix until smooth and glossy. Spread ganache over the rolled cake.

Explore more ganache tips at Perfect Ganache Techniques.


Tips for Success

  • Roll the cake while warm to prevent cracks.
  • Chill the cake for at least 1 hour before slicing for clean cuts.
  • Use high-quality chocolate for the ganache to ensure a luxurious finish.

Creative Variations

Berry Chocolate Swiss Roll

Add a layer of raspberry or strawberry jam under the whipped cream for a fruity twist.

Mocha Swiss Roll

Incorporate espresso powder into the sponge batter and filling for a coffee-infused delight.

Gluten-Free Option

Replace all-purpose flour with almond flour or a gluten-free baking mix.


FAQs About Chocolate Swiss Roll

Can I Make the Cake Ahead of Time?

Yes, you can prepare the cake and refrigerate it for up to 3 days before serving.

How Do I Avoid Cracks When Rolling?

Roll the cake gently while it’s still warm, and avoid overbaking.

Can I Freeze a Swiss Roll?

Absolutely! Wrap it tightly in plastic wrap and freeze for up to a month.

What’s the Best Substitute for Heavy Cream in the Filling?

Use coconut cream for a dairy-free alternative.

How Do I Store Leftovers?

Keep the Swiss roll in an airtight container in the refrigerator for up to 5 days.


Internal Linking Opportunities


Conclusion
The Chocolate Swiss Roll is a timeless dessert that offers a luxurious experience with every bite. With its rich chocolate flavor, fluffy sponge, and creamy filling, it’s perfect for any celebration. Whether you stick to the classic recipe or try creative variations, this dessert is sure to impress!