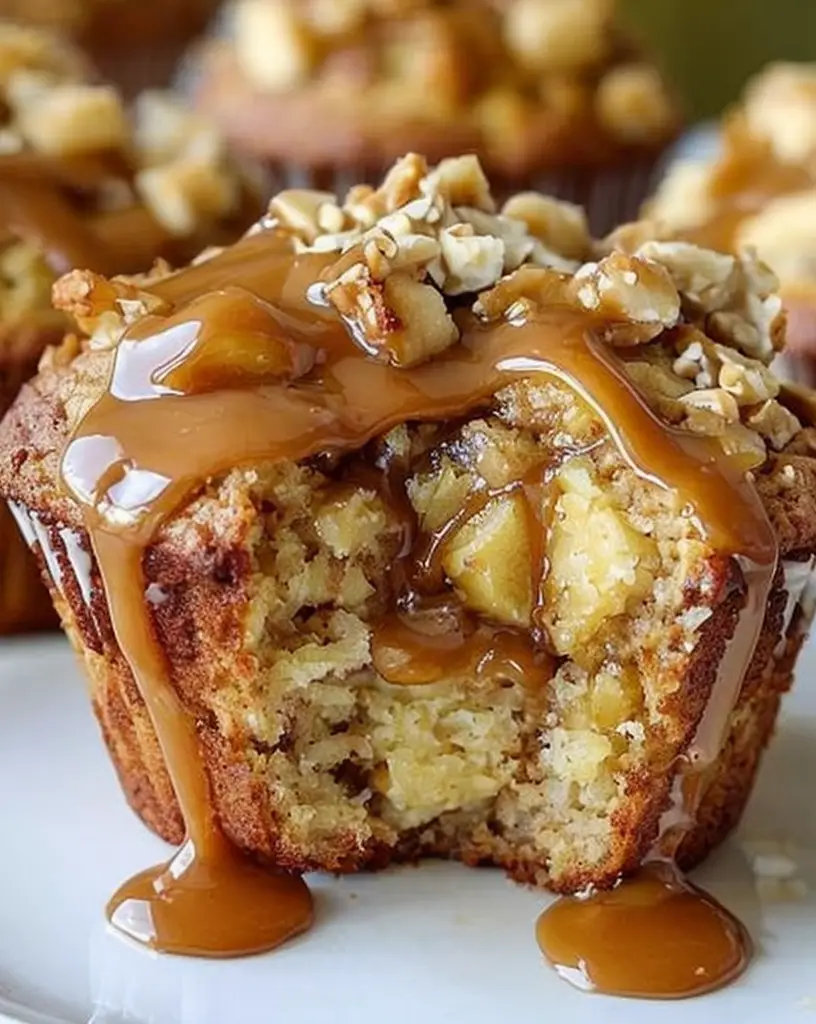
Delicious Caramel Apple Muffins Recipe: A Sweet Treat for Any Occasion
Caramel apple muffins are the perfect autumn treat that combines the flavors of sweet caramel and tart apples in a soft, fluffy muffin. With a delightful crunch from the walnuts and a rich caramel drizzle on top, these muffins aren’t just a pleasure to eat; they’re a feast for the senses. Imagine the aroma of fresh baked goods wafting through your kitchen as you prep this recipe—it’s the kind of smell that draws everyone in and makes them feel right at home.
These muffins are ideal for breakfast, an afternoon snack, or even a comforting dessert. Each bite reveals a moist apple-filled muffin accented with the crunch of walnuts, making it a true crowd-pleaser. Plus, the caramel drizzle adds an irresistible sweetness that brings the whole experience together. You’ll love how easy it is to make them and how delightful they are to share with family and friends.
Quick Recipe Highlights
- Flavor Profile: Sweet caramel paired with tart apple creates a harmonious balance that’s irresistible.
- Texture: Soft and fluffy muffins with a slight crunch from chopped walnuts.
- Aroma: The warm scent of baked apples and caramel fills the air during baking.
- Visual Appeal: Golden-brown tops drizzled with glossy caramel make for a stunning presentation.
- Skill Level Needed: Requires basic baking skills with a few simple steps—perfect for beginners!
- Special Equipment: Standard baking tools including muffin tins and mixing bowls are all you need.
Recipe Overview
- Difficulty Level: Moderate; this recipe involves mixing ingredients and requires proper baking time to achieve the perfect muffin texture.
- Category: These caramel apple muffins fit perfectly into breakfast or dessert categories.
- Cuisine: A delightful combination of American and autumnal flavors comes through, celebrating seasonal ingredients.
- Cost: An economical treat, with common ingredients that won’t break the bank.
- Season: Best enjoyed during fall, when apples are in season and the desire for warm treats is at its peak.
- Occasion: Perfect for brunches, holiday gatherings, or simply an afternoon indulgence.
Why You’ll Love This Recipe
This caramel apple muffin recipe is a wonderful combination of taste and texture that will never go out of style. The sweet, sticky caramel accentuates the apples’ natural sweetness, perfectly balancing flavors that everyone will enjoy. Each muffin is tender yet hearty, thanks to the addition of walnuts that provide a satisfying crunch.
Not only is this recipe simple and convenient to prepare, but it can also be easily customized based on your preferences. Need to use up those extra apples? This is the perfect opportunity. You can also make the batter in advance and bake them when you’re ready to savor the warm, delectable aroma wafting from your oven.
These muffins also offer some nutritional advantages. Apples are full of fiber, while walnuts provide healthy omega-3 fatty acids. Together, they create a more balanced snack option that can keep your energy levels up throughout the day.
Making these muffins is a wonderful, engaging activity to share with family or friends. Whether you’re hosting a casual get-together or snuggled up with a good book, these muffins set the perfect mood. Plus, they make excellent gifts for neighbors or loved ones during the holiday season!
Cost-effectiveness is another great reason to love this recipe. The ingredients are usually inexpensive and readily available, meaning you can whip up a batch without a hefty grocery bill.
Historical Background and Cultural Significance
The tradition of baking with apples and caramel goes back many centuries, with roots in various culinary practices across the globe. Apples have long been a symbol of autumn in many cultures, often celebrated during harvest festivals. The idea of combining sweet caramel with apples likely evolved as chefs sought to enhance the natural flavors of seasonal produce.
In the U.S., apples are not just an everyday fruit but are part of significant cultural events, such as apple picking in orchards. These outings are a cherished activity for families every fall. Caramel as an ingredient adds a level of indulgence to recipes that reflects a more contemporary approach to dessert making.
The evolution of the caramel apple muffin specifically showcases how traditional flavors adapt into modern baking. It’s a wonderful blend between quick, easy treats and favorite nostalgic tastes that generations cherish. Regional variations can be found, with some incorporating spices like cinnamon or nutmeg to invoke even more warmth.
As time goes on, these muffins have become popular not only in homes but also in cafés and bakeries, often taking center stage during seasonal menus. Their popularity highlights the universal love for combining the best of what the fall harvest has to offer.
Ingredient Deep Dive
Apples
Apples have a long-standing cultural significance as a symbol of health and knowledge. Their history dates back thousands of years and is featured in numerous folklore and tales. Nutritionally, they are rich in dietary fiber and vitamin C, making them beneficial for digestion and immune health.
When selecting apples for baking, look for firmer varieties such as Granny Smith or Honeycrisp for their taste and texture during cooking. Store them in a cool, dry place, and always wash thoroughly before use. If you need to substitute, you can use pears or other firm fruits.
Walnuts
Walnuts are a popular ingredient in many cuisines around the world, celebrated for their rich flavor and nutritional benefits. They provide healthy fats, protein, and antioxidants, making them an excellent choice for baking.
When choosing walnuts for this recipe, select fresh, unsalted nuts. Store them in an airtight container to prevent them from going rancid. If allergies are a concern, pecans or almonds can serve as great substitutes while maintaining similar textures.
Common Mistakes to Avoid
- Overmixing the batter: This can lead to tough muffins instead of fluffy ones. Mix the dry and wet ingredients just until combined.
- Using too much flour: Scoop the flour into the measuring cup rather than scooping directly from the container to prevent packing down.
- Not preheating the oven: Ensure your oven is hot enough before baking to help muffins rise properly.
- Ignoring ingredient temperature: Room temperature ingredients blend better and create a smoother batter.
- Not sifting the flour: This adds air, resulting in lighter and fluffier muffins.
- Skipping the caramel drizzle: The drizzle enhances flavor—it shouldn’t be omitted; it’s part of the magic!
- Underbaking or overbaking: Keep a close eye on baking time; muffins should be golden brown but not dry.
- Not letting muffins cool: Allow them to cool for a few minutes in the pan before transferring to a wire rack to help form the perfect texture.
Essential Techniques
Mixing the batter
Proper mixing is crucial for achieving the right texture in your muffins. Gentle folding of ingredients helps maintain the fluffiness. Overmixing can develop the gluten, resulting in denser muffins. Look for a lumpy batter rather than a smooth one for best results.
Testing for doneness
To ensure your muffins are perfectly baked, use a toothpick to test for doneness. Insert it into the center; if it comes out clean or with just a few crumbs, they are done. This technique prevents the disappointment of undercooked muffins.
Pro Tips for Perfect Caramel Apple Muffins
1. Use a combination of apples for more complex flavors—mix tart and sweet varieties for depth.
2. Toast walnuts lightly before adding them to the batter to enhance their nutty flavor.
3. Drizzle caramel sauce while the muffins are still warm for better adhesion.
4. Experiment with spices like cinnamon or nutmeg to add warmth and complexity to the flavor.
5. Freeze any extra muffins for an easy grab-and-go snack throughout the week.
6. For an extra touch, sprinkle sea salt on top of the caramel for a sweet-salty contrast.
7. Use silicone muffin liners for easy removal post-baking.
8. Fill muffin tins only up to the 2/3 mark to prevent overflow.
Variations and Adaptations
These caramel apple muffins can easily accommodate a variety of tastes and dietary needs. Consider adding dried cranberries or raisins for a chewy surprise. To enhance the autumnal flavors, incorporate pumpkin spice into the mix.
For those who wish to keep it seasonal, try substituting fresh berries in the summer for a lighter taste. Gluten-free flour can be used for a gluten-free option without sacrificing texture.
If you’re looking for a healthier twist, substitute half of the sugar with mashed bananas or unsweetened applesauce. For a richer flavor, consider adding dark chocolate chips or a cream cheese filling.
Different nuts may also enhance texture, such as pecans or even toasted sunflower seeds for those with nut allergies. The presentation can be varied by serving them in a tiered cupcake stand for more visual height or using decorative muffin wrappers for added charm.
Serving and Presentation Guide
Serve your muffins warm or at room temperature to best enjoy their flavor. Plating can be accomplished simply on a rustic wooden board or with a colorful cloth underneath for a cozy feel.
A dip of melted caramel sauce on the side can add an interactive element, letting diners decide how much they want. For garnish, sprinkle chopped walnuts or drizzle additional caramel on top for visual contrast.
For a modern twist, consider presenting with a dollop of whipped cream or a scoop of vanilla ice cream for indulgence. Temperature-wise, serving them warm right out of the oven enhances flavor and texture, so keep that in mind during gatherings.
When it comes to portion control, consider creating smaller muffins or offering them alongside other light snacks for a brunched occasion.
Wine and Beverage Pairing
Pairing your warm caramel apple muffins with a glass of light Chardonnay can elevate your dining experience. Its crisp acidity complements the sweetness of the muffins beautifully.
For non-alcoholic options, consider serving with fresh apple cider or a spiced chai latte to accentuate autumn flavors. A rich, dark roast coffee also pairs pleasantly and balances the sweetness of the caramel.
When serving, ensure drinks are served at the appropriate temperatures: chilled beverages in cool glassware and warm drinks in sturdy mugs to evoke that cozy vibe.
Storage and Shelf Life
Store your caramel apple muffins in an airtight container at room temperature for up to three days. They can also be refrigerated for a week if you prefer them chilled.
For longer storage, consider freezing them. Wrap each muffin tightly in plastic wrap, then place them in a freezer-safe bag. They will keep well for up to three months. When ready to enjoy, simply thaw at room temperature or reheat briefly in the microwave.
Signs of spoilage include discoloration or a sour smell, indicating it’s best to discard them. When reheating, a few seconds in the microwave can bring back their moist texture, but do avoid overdoing it, which can lead to rubbery muffins.
Make Ahead Strategies
You can prepare the muffin batter the night before, storing it in the refrigerator to save time. Just be sure to stir it gently before baking, as the ingredients may settle.
Another strategy is to bake the muffins a day in advance and store them in an airtight container, making them ready for your gathering. Just remember to add the caramel drizzle before serving to keep it fresh.
Add fresh elements, such as whipped cream or chocolate shavings, right before serving, ensuring that they’re appealing and delicious.
Scaling Instructions
If you’d like to halve this recipe, simply divide all ingredient quantities by two. This is a great approach if you’re baking for smaller groups.
When doubling or tripling, consider using multiple muffin tins and stay attentive to baking times—larger quantities may require extra time.
Keep in mind the size of your mixing bowl as well; scaling up may demand a more spacious option to blend ingredients properly. Adjust your storage plans as well, ensuring that baked goods are still kept airtight to maximize freshness.
Nutritional Deep Dive
Each muffin serves as a hearty source of energy, with a macro breakdown of carbohydrates from the apples and flour, proteins from the walnuts, and fats from the oil. The apples also contribute essential vitamins.
Micronutrient analysis indicates a fair amount of vitamin A and C, as well as dietary fiber, aiding digestion and contributing to overall health. The muffins can serve as a snack option that aligns well with a balanced diet.
If you’re mindful of your portions, each muffin can easily fit into a weight management plan without straying away from indulgence. Enjoying it alongside a healthy beverage can further enhance its nutritional completeness.
Dietary Adaptations
For a gluten-free option, replace all-purpose flour with a 1:1 gluten-free substitute, ensuring all other ingredients are certified gluten-free.
Dairy-free recipes can use plant-based milk and a dairy-free alternative for caramel to accommodate lactose intolerance.
If needed, vegan substitutions can replace eggs with flax eggs or chia seeds, allowing the muffins to retain their texture and moisture.
For dietary considerations such as low-carb or keto, substitute flour with almond flour and adjust sugar content accordingly using sugar substitutes.
Each of these adaptations allows for flexible consumption without compromising on taste or texture.
Troubleshooting Guide
If you find your muffins are too dense, consider checking your baking time and ensuring ingredients are not overmixed.
A lack of flavor often stems from low-quality carrots or insufficient spices; always choose fresh produce for best results.
Temperature issues may arise if your oven isn’t properly preheated. Using an oven thermometer can help ensure accuracy.
If you encounter ingredient substitutions, make sure to match the moisture content—too dry can lead to crumbly muffins, while too moist can produce soggy results.
Timing concerns can be tricky; set timers to avoid overbaking or underbaking based on muffin size. Practice makes perfect when adjusting for various batches.
Recipe Success Stories
Our readers have shared heartwarming stories about their favorite caramel apple muffins. Many have enjoyed baking them with family during the fall season, creating cherished memories around the kitchen table.
Several have noted how successful the recipe is for school bake sales, praising its flavor and moist texture—always a hit among kids and parents alike.
Kitchen tips shared by readers include using various types of apples, which have resulted in delightful surprises regarding flavor combinations.
Numerous community members have shared their adaptation stories, showcasing how small changes to the recipe can lead to tailored results specific to their families’ tastes.
Photography tips also come from enthusiastic bakers who love the presentation of these muffins, often taking candid shots for social media to share their success.
Frequently Asked Questions
Can I freeze caramel apple muffins?
Yes, you can freeze the muffins! Just wrap them in plastic wrap and store them in an airtight container. They can last for up to three months in the freezer. When you’re ready to enjoy them, simply thaw them at room temperature or reheat them in the microwave.
What type of apples are best for this recipe?
For the best flavor, choose firm varieties like Granny Smith, Honeycrisp, or Fuji apples. They hold up well in baking and provide a nice tartness that balances the sweetness of the caramel.
How do I prevent my muffins from sticking to the tin?
To prevent sticking, make sure to thoroughly grease your muffin tin or use muffin liners. Silicone liners are particularly helpful for easy removal and less cleanup.
Can I use a different nut?
Absolutely! If you have allergies or prefer another flavor, feel free to substitute walnuts with pecans, almonds, or even sunflower seeds for a delightful crunch.
What’s the best way to store leftover muffins?
Store your leftover muffins in an airtight container at room temperature for up to three days. For longer storage, refrigerate or freeze, wrapping them well to maintain freshness.
Can I make these muffins vegan?
Yes, you can easily adapt this recipe to be vegan by substituting eggs with flax eggs (1 tablespoon of flaxseed meal mixed with 2.5 tablespoons of water per egg) and using plant-based milk and dairy-free caramel.
How can I make these muffins healthier?
To make them healthier, consider reducing the sugar, using whole wheat flour, or substituting half the oil with unsweetened applesauce. Adding chia seeds or oatmeal can also enhance their nutritional profile.
Can I double this recipe?
Yes, you can double the recipe! Just ensure that you have adequate mixing space and multiple muffin tins as needed. Keep an eye on baking time, as larger batches may require a slight increase.
Is it necessary to add caramel sauce?
While caramel sauce adds a delightful sweetness and visual appeal, it’s not mandatory. You can enjoy the muffins plain or topped with a dusting of powdered sugar for a less sweet alternative.
How do I prevent overbaking?
To prevent overbaking, check your muffins a few minutes before the recommended bake time by inserting a toothpick. If it comes out clean, they’re done!
Additional Resources
For more delicious recipes similar to caramel apple muffins, check out our other seasonal treats such as pumpkin spice muffins or cinnamon roll cupcakes. We also provide technique guides on baking fundamentals that can elevate your home cooking.
Explore ingredient information to learn the various apples available and how they impact flavor, plus equipment recommendations for the best kitchen tools.
If you’re looking for seasonal variations, keep an eye out for recipes that utilize fresh fruits and spices as the seasons change.
Join the Conversation
We invite you to share your thoughts and any modifications you’ve made to the caramel apple muffins recipe! Connect with us on social media by sharing your photos and tagging us—we love seeing your baking triumphs!
Leave us a review to share your experience so we can continue improving our community recipes.
If you’ve made variations or have favorite pairings that work well, we’d love to hear those ideas, too. Engaging in this community strengthens our love for cooking and exploring new flavors together.
The Recipe
Caramel Apple Muffins
Serves: 12 muffins
Prep Time: 15 mins
Cook Time: 20 mins
Total Time: 35 mins
Kitchen Equipment Needed
- Muffin tin
- Mixing bowls
- Whisk
- Spatula
- Measuring cups and spoons
Ingredients
- 1 1/2 cups all-purpose flour
- 1 cup granulated sugar
- 2 teaspoons baking powder
- 1/2 teaspoon salt
- 1 teaspoon cinnamon
- 1/2 cup unsalted butter, melted
- 1/2 cup milk
- 1 large egg
- 1 cup chopped apples (about 2 medium apples)
- 1/2 cup chopped walnuts
- Caramel sauce for drizzling
Directions
- Preheat the oven to 350°F (175°C) and grease the muffin tin or line with muffin liners.
- In a large bowl, whisk together the flour, sugar, baking powder, salt, and cinnamon.
- In a separate bowl, mix the melted butter, milk, and egg until well combined.
- Pour the wet ingredients into the dry ingredients and stir until just combined.
- Gently fold in the chopped apples and walnuts.
- Scoop the batter into the prepared muffin tin, filling each cup about 2/3 full.
- Bake for 20-25 minutes, or until a toothpick inserted in the center comes out clean.
- Allow to cool in the pan for 5 minutes, then transfer to a wire rack to cool completely.
- Drizzle caramel sauce over the muffins just before serving.
Recipe Notes
- Store leftovers in an airtight container for up to three days at room temperature.
- Substitute walnuts with other nuts or omit them for nut-free muffins.
- For a dairy-free recipe, replace butter with coconut oil and use plant-based milk.
