“`html
Table of Contents
- Welcome to Your New Favorite Weeknight Meal!
- Irresistible Ingredients
- Speedy Preparation: 30 Minutes to Deliciousness
- Step-by-Step Guide
- Nutritional Snapshot
- Healthier Alternatives for Lighter Bowls
- Elevate Your Serving Style
- Common Mistakes to Avoid
- Smart Storing Tips
- A Flavorful Finale
- Frequently Asked Questions
Cilantro-Lime Chicken Bowls with Peach Salsa | 30-Min Meal ⏱
Welcome to Your New Favorite Weeknight Meal!
Are you tired of spending hours in the kitchen on a weeknight, only to end up with a meal that’s less than inspiring? We get it. The juggle of work, family, and life leaves little room for elaborate cooking, but that doesn’t mean you have to sacrifice flavor or nutrition. Welcome to your next favorite weeknight recipe! These Cilantro-Lime Chicken Bowls with Peach Salsa are vibrant, fresh, and packed with protein, healthy ingredients, and bold flavors. Not only is this dish incredibly delicious, but it also takes just 30 minutes to prepare, making it perfect for busy weeknights or meal prep. If you’re a fan of quick and easy chicken recipes, this bowl has it all: tangy cilantro-lime chicken, sweet and spicy peach salsa, and fluffy jasmine rice. Get ready to revolutionize your dinner routine with this incredibly satisfying and speedy dish!
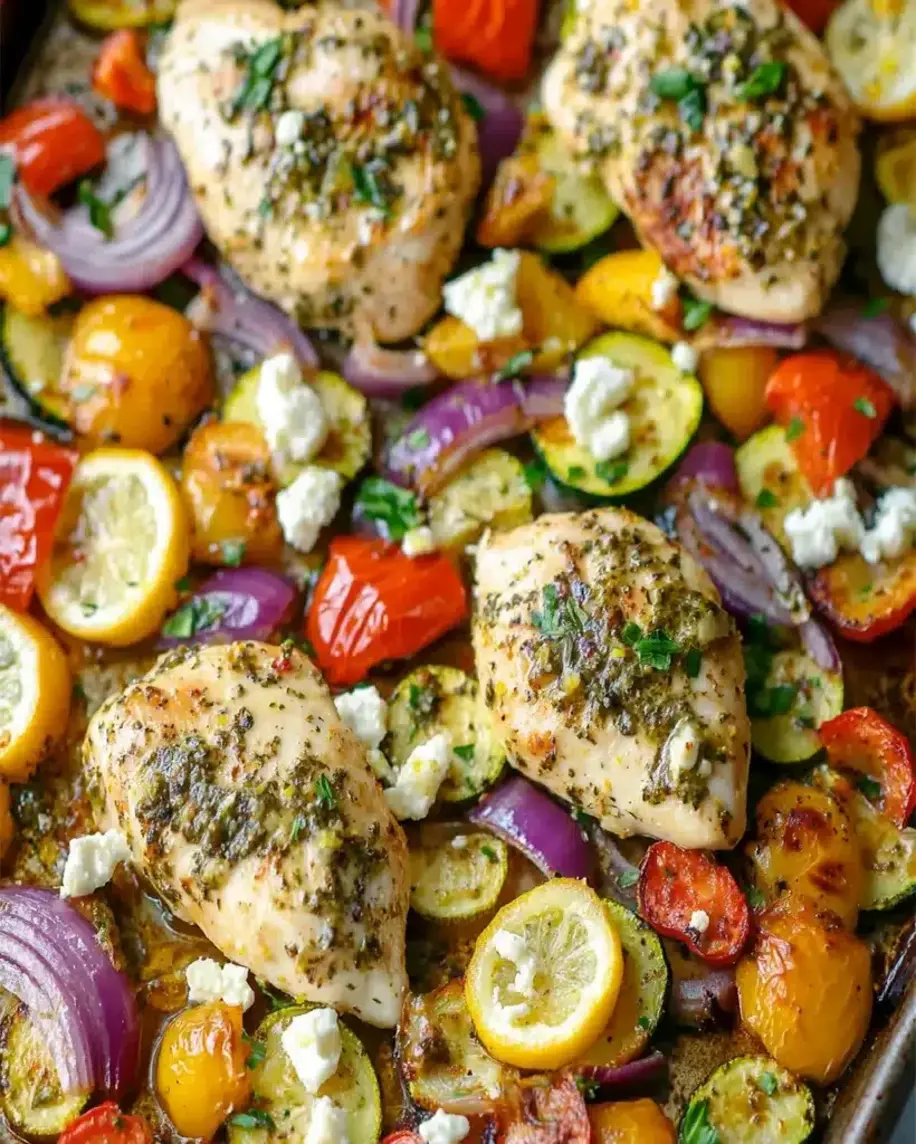
Irresistible Ingredients
The magic of these Cilantro-Lime Chicken Bowls lies in the beautiful balance of fresh, zesty, and sweet flavors. We’ve carefully selected ingredients that complement each other perfectly, creating a symphony of taste and texture. Don’t worry if you don’t have every single item – we’ve included some fantastic substitution ideas!
For the Cilantro-Lime Chicken:
-
1.5 lbs boneless, skinless chicken breasts or thighs: The lean protein base. Chicken thighs offer more moisture and flavor, while breasts are a leaner choice.
- *Substitution: Tofu or tempeh for a vegetarian option, or shrimp for a seafood twist. Adjust cooking time accordingly.
-
1/4 cup fresh cilantro, chopped: The signature herbaceous note. Use the leaves and tender stems.
- *Substitution: Parsley can be used in a pinch, though it lacks the distinct peppery bite of cilantro.
-
2 limes, juiced (about 1/4 cup): Bright, tangy citrus that tenderizes the chicken and adds zest.
- *Substitution: Lemon juice can be used, but limes offer a more authentic flavor profile for this dish.
-
2 cloves garlic, minced: Aromatic foundation for the marinade.
- *Substitution: 1 teaspoon garlic powder if fresh is unavailable.
-
1 tablespoon olive oil: Helps distribute flavors and aids in searing.
- *Substitution: Avocado oil or any neutral cooking oil.
-
1 teaspoon cumin: Warm, earthy spice that pairs beautifully with lime and cilantro.
- *Substitution: A tiny pinch of chili powder can add a subtle heat if cumin isn’t on hand.
- Salt and freshly ground black pepper: To taste, enhancing all the other flavors.
For the Vibrant Peach Salsa:
-
2 ripe peaches, diced: Sweet, juicy, and naturally summery. Look for peaches that yield slightly to gentle pressure.
- *Substitution: Mangoes, nectarines, or even finely diced pineapple can offer a similar sweet and slightly tart profile.
-
1/4 cup red onion, finely diced: Adds a sharp, pungent bite that balances the sweetness.
- *Substitution: Shallots offer a milder, sweeter onion flavor.
-
1/4 cup jalapeño, finely diced (seeds removed for less heat): For that crucial kick of heat and freshness.
- *Substitution: Serrano pepper for more heat, or a pinch of red pepper flakes for convenience.
- 2 tablespoons fresh cilantro, chopped: More herbaceous goodness to tie into the chicken.
- 1 lime, juiced (about 2 tablespoons): Brightens and harmonizes the salsa ingredients.
- Pinch of salt: To enhance the overall flavor.
For Serving:
-
2 cups cooked jasmine rice: The fluffy, fragrant base.
- *Substitution: Brown rice, quinoa, or even cauliflower rice for a lower-carb option.
- Optional toppings: Sliced avocado, black beans, corn, a drizzle of crema or yogurt.
Speedy Preparation: 30 Minutes to Deliciousness
One of the biggest draws of this recipe is its incredible speed. In just 30 minutes from start to finish, you’ll have a complete, satisfying meal on the table. This is significantly faster than the average chicken bowl recipe, which often requires longer marinating times or more complex cooking methods. With a typical prep time of about 15 minutes and cook time of 15 minutes, this is a true weeknight warrior!
Step-by-Step Guide
Let’s get cooking! This recipe is designed for maximum flavor with minimal fuss. Each step is outlined for clarity and ease.
Step 1: Marinate and Prep the Chicken
If you have a little extra time, you can let the chicken marinate for up to 30 minutes. Otherwise, simply combine the chopped chicken, cilantro, lime juice, minced garlic, olive oil, cumin, salt, and pepper in a bowl or resealable bag. Toss to ensure the chicken is well coated. If you’re short on time, you can skip the extensive marinating and proceed to cooking, as the flavors will still penetrate during the cooking process. Cut the chicken into bite-sized pieces (about 1-inch cubes) for faster and more even cooking.
Step 2: Craft the Quick Peach Salsa
While the chicken is enjoying its zesty bath (or just waiting patiently), whisk together the diced peaches, red onion, jalapeño, cilantro, lime juice, and a pinch of salt in a medium bowl. Taste and adjust seasonings as needed – perhaps it needs a little more lime for tang or a touch more salt to awaken the flavors. Set aside to let the flavors meld. This salsa is best made fresh, but can be kept in the fridge for a few hours.
Step 3: Sear the Cilantro-Lime Chicken
Heat a large skillet or grill pan over medium-high heat. Add a drizzle of oil if your pan isn’t non-stick. Add the marinated chicken pieces in a single layer (cook in batches if necessary to avoid overcrowding, which would steam rather than sear). Cook for 3-5 minutes per side, or until the chicken is cooked through and has a beautiful golden-brown crust. The internal temperature should reach 165°F (74°C).
Step 4: Prepare Fluffy Rice
While the chicken is cooking, prepare your jasmine rice according to package directions. Typically, this involves rinsing the rice, adding it to a pot with the correct water ratio (usually 1:1.5 or 1:2 rice to water), bringing to a boil, then simmering covered until the water is absorbed and the rice is tender. If you have a rice cooker, now’s the perfect time to use it!
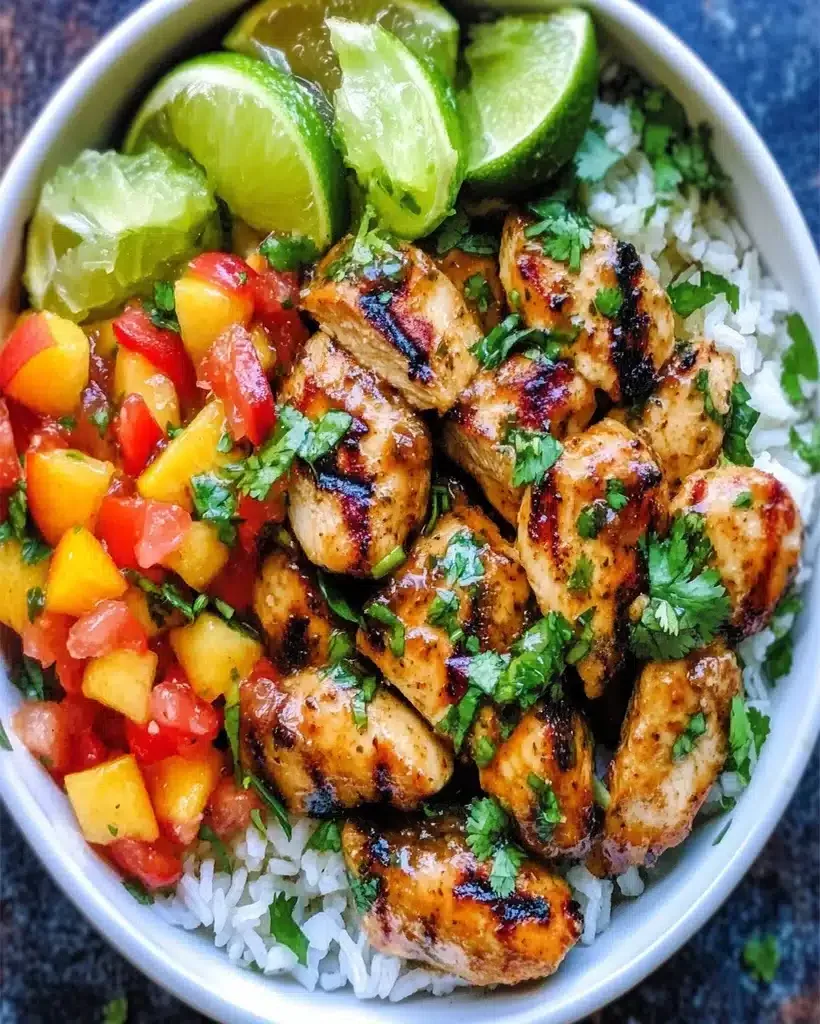
Step 5: Assemble Your Masterpiece Bowls
Time to build your delicious bowls! Divide the cooked jasmine rice among serving bowls. Top generously with the seared cilantro-lime chicken. Spoon a healthy portion of the vibrant peach salsa over the chicken. Garnish with any optional toppings you desire, such as sliced avocado, black beans, corn, or a cooling drizzle of plain Greek yogurt or a light crema. Enjoy immediately!
Nutritional Snapshot
While exact nutritional values can vary based on portion sizes and specific ingredients used, a typical serving of these Cilantro-Lime Chicken Bowls with Peach Salsa (excluding optional toppings) is approximately:
- Calories: 450-550
- Protein: 30-40g
- Fat: 15-20g (mostly healthy fats from olive oil/avocado)
- Carbohydrates: 40-50g (from rice and peaches)
- Fiber: 5-8g
These bowls are a fantastic source of lean protein, fresh vitamins from the fruits and vegetables, and satisfying complex carbohydrates.
Healthier Alternatives for Lighter Bowls
Looking to make these bowls even lighter or cater to specific dietary needs? We’ve got you covered with flavor-preserving swaps!
- Grain Swap: Instead of jasmine rice, opt for quinoa for added protein and fiber, or cauliflower rice for a low-carb, vegetable-forward base.
- Chicken to Plant-Based: Marinated and pan-fried firm tofu or tempeh makes an excellent vegetarian or vegan alternative. Ensure you press the tofu well before cubing and marinating.
- Salsa Spice Adjustment: Control the heat of your salsa by adjusting the amount of jalapeño or removing all seeds and membranes. For a milder salsa, a diced bell pepper can be a good substitute for the jalapeño.
- Fat Reduction: If you’re concerned about fat content, you can slightly reduce the olive oil in the marinade or omit it entirely if using a very good non-stick pan for searing. For topping, opt for a dollop of plain Greek yogurt instead of avocado or a heavier crema.
Elevate Your Serving Style
Presentation matters! While these bowls are designed for ease, a little effort can make them even more appealing:
- Layering is Key: Start with a bed of rice, then artfully arrange the chicken and salsa.
- Garnish Generously: Fresh cilantro sprigs, a lime wedge on the side, and a sprinkle of toasted pepitas (pumpkin seeds) add visual appeal and extra texture.
- Color Pop: Add a handful of vibrant ingredients like black beans, corn, or thinly sliced radishes for a beautiful contrast.
- Individual Bowls: Serve in shallow, wide bowls for a restaurant-style presentation.
Common Mistakes to Avoid
To ensure your Cilantro-Lime Chicken Bowls are a resounding success, steer clear of these common slip-ups:
- Overcrowding the Pan: Adding too much chicken to the skillet at once will cause it to steam instead of sear, resulting in less flavor and a less appealing texture. Cook in batches if needed.
- Under-seasoning: Don’t be shy with salt and pepper! They are crucial for bringing out the best in every ingredient. Taste and adjust as you go.
- Using Unripe Peaches: Hard, unripe peaches won’t provide the sweet, juicy burst needed for the salsa. Choose ripe, slightly soft fruits.
- Not Tasting and Adjusting: Your palate is your best guide. Always taste your marinade and salsa before serving and adjust lime, salt, or spice as needed.
Smart Storing Tips
These bowls are fantastic for meal prep. Here’s how to store them:
- Component Storage: For best results, store the cooked chicken, cooked rice, and peach salsa in separate airtight containers in the refrigerator. This prevents the rice from becoming mushy and the salsa from wilting.
- Assembled Bowls: If assembling ahead of time, it’s best to add the salsa just before serving to keep it fresh and vibrant. Store assembled bowls with the salsa on the side or on top, and reheat the chicken and rice, then add the cool salsa.
- Shelf Life: Meals stored properly will remain fresh in the refrigerator for up to 3-4 days.
A Flavorful Finale
There you have it – a weeknight meal that’s bursting with fresh, vibrant flavors, incredibly satisfying, and astonishingly quick to make. These Cilantro-Lime Chicken Bowls with Peach Salsa are proof that delicious, healthy eating doesn’t have to be complicated or time-consuming. Whip up a batch for a quick lunch, a speedy dinner, or to impress guests with minimal effort. This recipe is sure to become a staple in your weekly meal rotation. What are you waiting for? Gather your ingredients and prepare to fall in love with dinner all over again!
Did you make these Cilantro-Lime Chicken Bowls? We’d love to hear about it! Share your creations in the comments below or tag us on social media!
Frequently Asked Questions
- ***Can I make the peach salsa ahead of time?***
Yes! The peach salsa can be made a few hours in advance and stored in an airtight container in the refrigerator. The flavors will meld beautifully. For the freshest taste and texture, it’s best to add it to the bowl just before serving.
- ***What if I don’t like cilantro?***
If cilantro isn’t your favorite, you can substitute it with fresh parsley. It won’t have the same distinctive flavor, but it will still add a lovely fresh, herbaceous note to both the chicken and the salsa.
- ***Can I grill the chicken instead of pan-searing?***
Absolutely! Grilling the marinated chicken will add an amazing smoky flavor. Grill over medium-high heat for about 4-6 minutes per side, or until cooked through. Remember to slice it into bite-sized pieces before assembling.
- ***Is this recipe good for meal prep?***
Yes, it’s an excellent meal prep recipe! Store components separately (chicken, rice, salsa) and assemble when ready to eat, or add the salsa just before serving to maintain its freshness.
Cilantro-Lime Chicken Bowls with Peach Salsa | 30-Min Meal
Description
Welcome to your next favorite weeknight recipe! TheseCilantro-Lime Chicken Bowls with Peach Salsaare vibrant, fresh, and packed with protein, healthy ingredients, and bold flavors. Not only is this dish incredibly delicious, but it also takes just30 minutesto prepare, making it perfect for busy weeknights or meal prep. If you’re a fan ofquick and easy chicken recipes, this bowl has it all: tangy cilantro-lime chicken, sweet and spicy peach salsa, and fluffy jasmine rice.
Ingredients
- 3medium-sized yellow peaches, pitted and diced (leave the skin on for extra texture)
- 1sweet red bell pepper, diced
- ¼ cupred onion, diced
- 3green onions, finely chopped
- ½bunch cilantro, chopped
- 2 tablespoonsfreshly squeezed lime juice (or more to taste)
- ¼ teaspoonchili powder (adjust for spice level)
- ¼ teaspoonsalt (or more to taste)
- 1lb skinless, boneless chicken breasts, sliced into strips
- ½ teaspoonsmoked paprika
- 1 teaspoonchili powder
- ¼ teaspoonsalt
- Freshly ground black pepper, to taste
- 2 tablespoonsolive oil
- 2 tablespoonsfreshly squeezed lime juice (juice from½lime)
- 2 tablespoonshoney
- 1 tablespoonbutter
- 2 cupscooked jasmine rice (or any rice of your choice)
- Fresh cilantro, chopped
- Lime slices for serving
Instructions
- Start by dicing theyellow peaches, keeping the skins on for added texture.
- In a large mixing bowl, combine the diced peaches, red bell pepper, red onion, green onions, and cilantro.
- Addlime juice,chili powder, andsaltto the bowl. Toss all the ingredients together until well mixed.
- Taste the salsa and adjust the seasoning by adding more lime juice or chili powder if needed. Set aside in the fridge to let the flavors meld.
- Season the slicedchicken breastsgenerously withsalt,pepper,smoked paprika, andchili powder.
- Heatolive oilin a large skillet over medium-high heat. Once the oil is hot, add the seasoned chicken strips and cook undisturbed for about 4 minutes to allow them to sear properly.
- Flip the chicken and cook for an additional 2 minutes.
- Lower the heat, addlime juiceandhoney, and cook for another 2 minutes while stirring frequently until the chicken is cooked through.
- Remove from heat and stir inbutterto coat the chicken. Finish with freshly chopped cilantro for extra flavor.
- Add a portion of the cookedjasmine riceto each bowl.
- Top the rice with thepeach salsaandcilantro-lime chicken.
- Garnish with additional cilantro and lime slices, and serve immediately.
Notes
Use ripe peaches:Ripe peaches add the perfect sweetness to the salsa. If you don’t have peaches, you can substitute with nectarines or mango.
Marinate the chicken:For extra flavor, marinate the chicken in lime juice, honey, and chili powder for at least 30 minutes before cooking.
Meal prep:These bowls are great for meal prep! Just store the components separately and assemble them when you’re ready to eat.
“`