Table of Contents
- Hello Food Lovers!
- Irresistible Ingredients for Cheesy Garlic Chicken Wraps
- Crafting Your Wraps: Prep, Cook & Chill
- Step-by-Step: Crafting Your Cheesy Garlic Chicken Wraps
- Nutritional Spotlight
- Healthier Swaps for Lighter Wraps
- Perfect Pairings for Your Wraps
- Avoiding Common Wrap Pitfalls
- Keep the Flavor Fresh: Storing Your Wraps
- Wrap Up Your Taste Buds
- Frequently Asked Questions
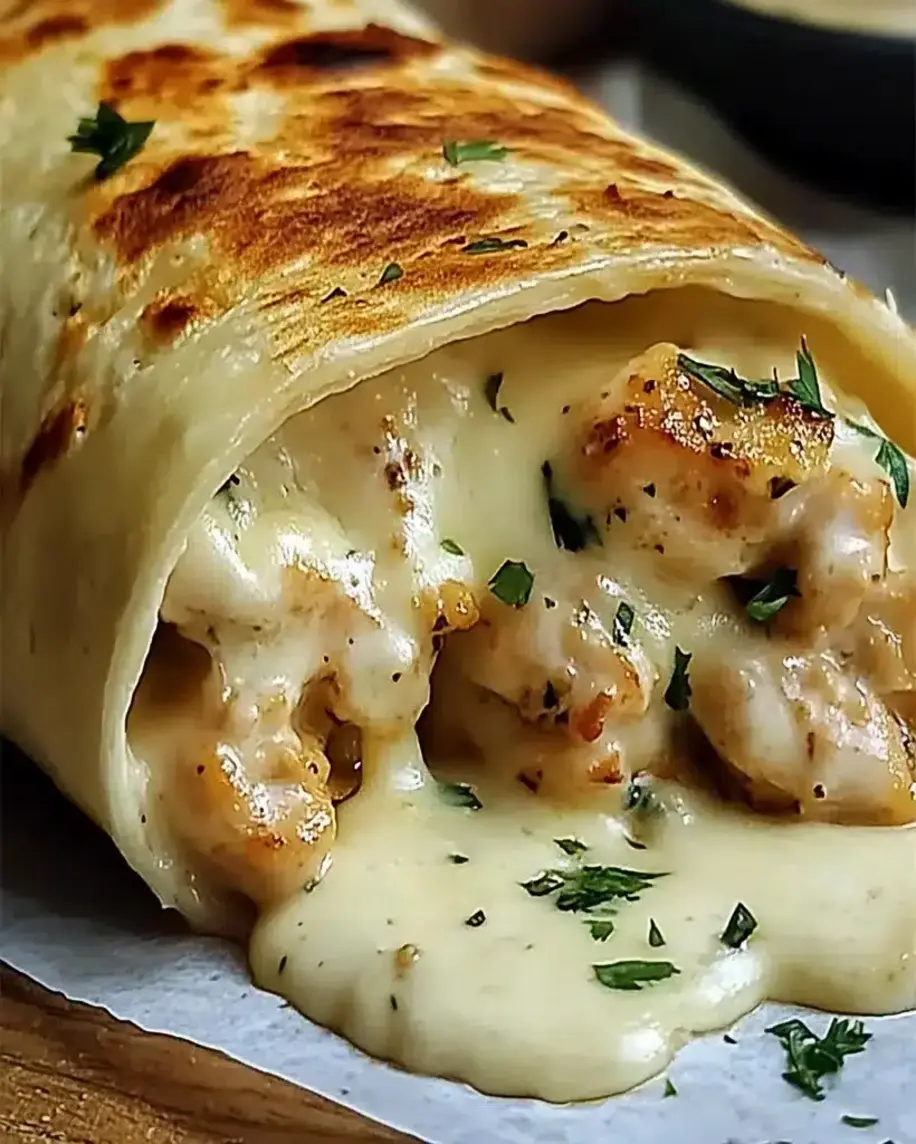
Cheesy Garlic Chicken Wraps – Quick & Easy Dinner Idea!
Hello Food Lovers!
Are you on the hunt for a dinner that’s both incredibly satisfying and surprisingly simple to make? In today’s fast-paced world, finding a meal that doesn’t require hours in the kitchen but still delivers on big flavors can feel like a challenge. That’s where these Cheesy Garlic Chicken Wraps come in! If your taste buds sing at the mere mention of savory, tender chicken coated in a rich, garlicky sauce and perfectly melted cheese, all hugged by a soft tortilla, then you’ve found your culinary soulmate. These wraps are more than just a meal; they’re a speedy solution for busy weeknights, a fantastic option for meal prepping, and an absolute crowd-pleaser. Get ready to transform your dinner routine with this easy yet incredibly flavorful recipe that’s destined to become a regular star in your kitchen!
Irresistible Ingredients for Cheesy Garlic Chicken Wraps
The magic of these wraps lies in the quality and harmonious blend of simple, fresh ingredients. Here’s what you’ll need:
The Star: Tender Chicken
- 1 lb Boneless, Skinless Chicken Breasts or Thighs: Choose chicken thighs for extra succulence and flavor, or breasts for a leaner option. Cut into bite-sized pieces for even cooking and easy wrapping.
Aromatic Garlic & Herbs
- 4-6 Cloves Garlic: Freshly minced garlic is key to that robust, authentic flavor. Don’t be shy!
- 1 Teaspoon Dried Oregano: Adds a classic Mediterranean aroma and taste.
- 1 Teaspoon Dried Parsley: Brightens up the overall flavor profile. Fresh parsley can be used as a garnish for extra freshness.
- 1/4 Teaspoon Red Pepper Flakes (Optional): For a subtle kick of heat.
The Cheesy Goodness
- 1.5 Cups Shredded Cheese: A blend of cheddar and Monterey Jack offers a perfect melt and creamy texture. Mozzarella works beautifully too for that irresistible stretch.
The Perfect Vehicle
- 8-10 Large Flour Tortillas: Choose your favorite kind – whole wheat for added fiber, or classic white for ultimate softness. Warm them slightly before assembling for better pliability.
Creamy Garlic Sauce Components
- 1 Tablespoon Olive Oil or Butter: For sautéing the garlic and chicken.
- 1/4 Cup Chicken Broth: The liquid base for our sauce. Vegetable broth is a good alternative.
- 1/4 Cup Heavy Cream or Half-and-Half: This adds richness and creaminess to the sauce. For a lighter version, consider milk or a dairy-free alternative.
- 1 Tablespoon Lemon Juice (Optional): To add a touch of brightness and balance the richness.
- Salt and Black Pepper: To taste, bringing all the flavors together.
Crafting Your Wraps: Prep, Cook & Chill
15 minutes
20 minutes
35 minutes
Compared to the average dinner recipe, which often requires 45-60 minutes of total time, these Cheesy Garlic Chicken Wraps are a speedy winner. You’ll be enjoying a delicious, homemade meal in under an hour, making them perfect for weeknights or when those spontaneous cravings strike!
Step-by-Step: Crafting Your Cheesy Garlic Chicken Wraps
Step 1: Prepare the Chicken
Begin by patting your chicken dry with paper towels. This helps ensure a good sear. Cut the chicken into uniform, bite-sized pieces – about 1-inch cubes work wonderfully. Season generously with salt and freshly ground black pepper. This initial seasoning is crucial for building flavor from the start.
Step 2: Cook the Chicken Perfection
Heat the olive oil or butter in a large skillet or frying pan over medium-high heat. Once shimmering, add the seasoned chicken pieces in a single layer. Avoid overcrowding the pan, as this will steam the chicken instead of searing it; cook in batches if necessary. Cook for about 5-7 minutes, turning occasionally, until the chicken is golden brown and cooked through. Remove the chicken from the skillet and set aside on a plate.
Step 3: Whisk Up the Creamy Garlic Sauce
In the same skillet (no need to wipe it clean – those browned bits are flavor!), reduce the heat to medium. Add the minced garlic and sauté for about 1 minute until fragrant, being careful not to burn it. Pour in the chicken broth and scrape up any browned bits from the bottom of the pan. Let it simmer for 1-2 minutes. Stir in the heavy cream (or your chosen alternative), dried oregano, dried parsley, and red pepper flakes (if using). Bring to a gentle simmer, then let it thicken slightly, which should take about 3-5 minutes. Season with salt and pepper to taste. If you’re using lemon juice, stir it in now for a bright finish.
Step 4: Bring It All Together
Return the cooked chicken pieces to the skillet with the creamy garlic sauce. Stir gently to coat all the chicken pieces. Let it simmer for another 1-2 minutes, allowing the chicken to warm through and absorb the delicious sauce. Remove from heat. Now, sprinkle in about half of the shredded cheese over the chicken mixture and stir until it begins to melt into a gooey, irresistible coating. This creates the ultimate cheesy chicken filling.
Step 5: Assemble Your Masterpieces
Warm your tortillas slightly if you haven’t already – this makes them more pliable and less likely to tear. Lay a tortilla flat. Spoon a generous amount of the cheesy garlic chicken mixture down the center. Top with a little extra shredded cheese if you desire more gooeyness. Fold in the sides of the tortilla, then tightly roll it up from the bottom. Repeat with the remaining tortillas and filling.
Nutritional Spotlight
Enjoying these Cheesy Garlic Chicken Wraps is a delight, and understanding their nutritional profile can help you fit them into your dietary goals. A typical wrap, made with chicken breast and a blend of cheddar/Monterey Jack cheese, will offer:
- Calories: Approximately 450-550 kcal per wrap (this can vary based on cheese, cream, and tortilla size)
- Protein: Around 30-35g, thanks to the chicken.
- Fat: 20-30g, contributed by cheese, cream, and cooking oil.
- Carbohydrates: 35-45g, primarily from the tortilla.
(Note: These are approximate values and can differ based on specific ingredients and portion sizes.)
Healthier Swaps for Lighter Wraps
Looking to lighten up this indulgent dish without sacrificing flavor? Try these simple substitutions:
- Leaner Protein: Opt for chicken breast or even lean ground turkey. For a vegetarian twist, consider seasoned chickpeas or firm tofu.
- Lighter Cream Sauce: Substitute heavy cream with low-fat milk, unsweetened almond milk, or a Greek yogurt-based sauce for tanginess and protein.
- Whole Wheat Tortillas: Increase fiber and nutrients by using whole wheat or corn tortillas.
- Reduced-Fat Cheese: Use a reduced-fat cheddar or Monterey Jack cheese blend.
- Add More Veggies: Bulk up your wraps with spinach, bell peppers, onions, or mushrooms sautéed with the chicken.
Perfect Pairings for Your Wraps
These wraps are incredibly versatile. Serve them as a hearty main course alongside:
- A crisp green salad with a light vinaigrette.
- A side of sweet potato fries or classic potato wedges.
- Steamed seasonal vegetables like broccoli or green beans.
- A cup of hearty soup, especially on a chilly day.
Avoiding Common Wrap Pitfalls
To ensure your Cheesy Garlic Chicken Wraps turn out perfectly every time, steer clear of these common mistakes:
- Overcrowding the Pan: This leads to steamed, not seared, chicken, resulting in a less flavorful and less tender outcome. Cook chicken in batches.
- Burning the Garlic: Garlic cooks very quickly. Sauté it only until fragrant, not brown or black, as burnt garlic turns bitter.
- Not Warming Tortillas: Cold, stiff tortillas are prone to cracking when you try to roll them. A quick warm-up in a dry skillet or microwave makes them pliable.
- Watery Sauce: Make sure your sauce has thickened sufficiently before adding the chicken, and don’t let it boil vigorously for too long after adding cream, which can cause it to separate.
Keep the Flavor Fresh: Storing Your Wraps
These wraps are best enjoyed fresh, but they can be stored for meal prep. For the best texture:
- Assemble Just Before Eating: Store the cheesy chicken filling and the tortillas separately in airtight containers in the refrigerator. Reheat the filling gently and assemble the wraps right before serving to prevent sogginess. The filling will keep for 3-4 days.
- Pre-Assembled Wraps: If you must assemble them ahead of time, wrap them tightly in foil or plastic wrap. They are best eaten within 1-2 days. The tortilla may become slightly softer over time.
Wrap Up Your Taste Buds
There you have it – the ultimate Cheesy Garlic Chicken Wrap recipe that proves deliciousness doesn’t need to be complicated. With minimal effort and maximum flavor, you’ve got a meal that’s perfect for any occasion. It’s quick, it’s comforting, and it’s guaranteed to be a hit with everyone. So, gather your ingredients, get cooking, and get ready to be amazed by how simple and satisfying dinner can be!
Did you try these Cheesy Garlic Chicken Wraps? We’d love to hear about your experience! Share your thoughts in the comments below. Don’t forget to tag us on social media with your delicious creations!
Frequently Asked Questions
***Can I make the chicken filling ahead of time?***
Yes! The chicken filling can be made up to 3-4 days in advance and stored in an airtight container in the refrigerator. Reheat it gently on the stovetop or in the microwave before assembling your wraps.
***What kind of cheese is best for these wraps?***
A good melting cheese blend works best. Cheddar and Monterey Jack are classic choices. Mozzarella offers great stretch, while a touch of Parmesan can add extra savory depth. Feel free to experiment with your favorites!
***Can I use pre-cooked chicken?***
Absolutely! If you have leftover rotisserie chicken or pre-cooked chicken strips, you can skip the cooking step for the chicken. Simply add it to the skillet during the last few minutes of sauce simmering to warm through and coat it in the delicious garlic sauce before adding the cheese.
***Are these wraps spicy?***
The recipe includes optional red pepper flakes for a touch of heat. If you prefer a mild wrap, simply omit them entirely. You can also adjust the amount to your personal spice preference.
***How can I make this dairy-free?***
To make these dairy-free, use plant-based milk or dairy-free cream alternative for the sauce, and opt for a good melting dairy-free shredded cheese. Ensure your tortillas are also dairy-free.

Cheesy Garlic Chicken Wraps Recipe – Quick & Easy Meal
Description
Hello food lovers!Get ready to indulge in an irresistible flavor combination with these deliciousCheesy Garlic Chicken Wraps. If you’re a fan of cheesy, garlicky goodness paired with tender chicken, then this recipe is for you. Whether you are meal prepping or making a quick dinner, these wraps are your new go-to favorite. Let’s dive into this simple yet incredibly flavorful recipe that’s bound to become a staple in your kitchen!
Ingredients
- For the Chicken:
- For the Filling:
- For Cooking the Wraps:
- Optional Substitutions:
Instructions
- Begin by seasoning both sides of the chicken breasts with garlic powder, onion powder, paprika, salt, and pepper. Heat olive oil in a skillet over medium heat. Once hot, add the chicken breasts and cook for about 5-6 minutes per side, until fully cooked. The internal temperature should reach 165°F (74°C).
- Pro Tip:Let the chicken rest for 5 minutes before shredding to retain its juices.
- While the chicken rests, prepare the filling. In a medium bowl, mix the shredded mozzarella, cheddar cheese, minced garlic, cream cheese, and sour cream. Stir until smooth and creamy. After the chicken has rested, shred it into small pieces and add it to the cheese mixture. Stir until everything is well combined.
- Lay each tortilla flat and place a layer of fresh spinach leaves on top. Spoon the cheesy chicken mixture into the center of each tortilla, then tightly roll them into wraps. Make sure the filling is evenly distributed for that perfect bite every time!
- In a skillet, heat butter and olive oil over medium heat. Place the wraps seam-side down and cook for 2-3 minutes per side, or until golden brown and crispy. The cheese should be melted and gooey.