Table of Contents
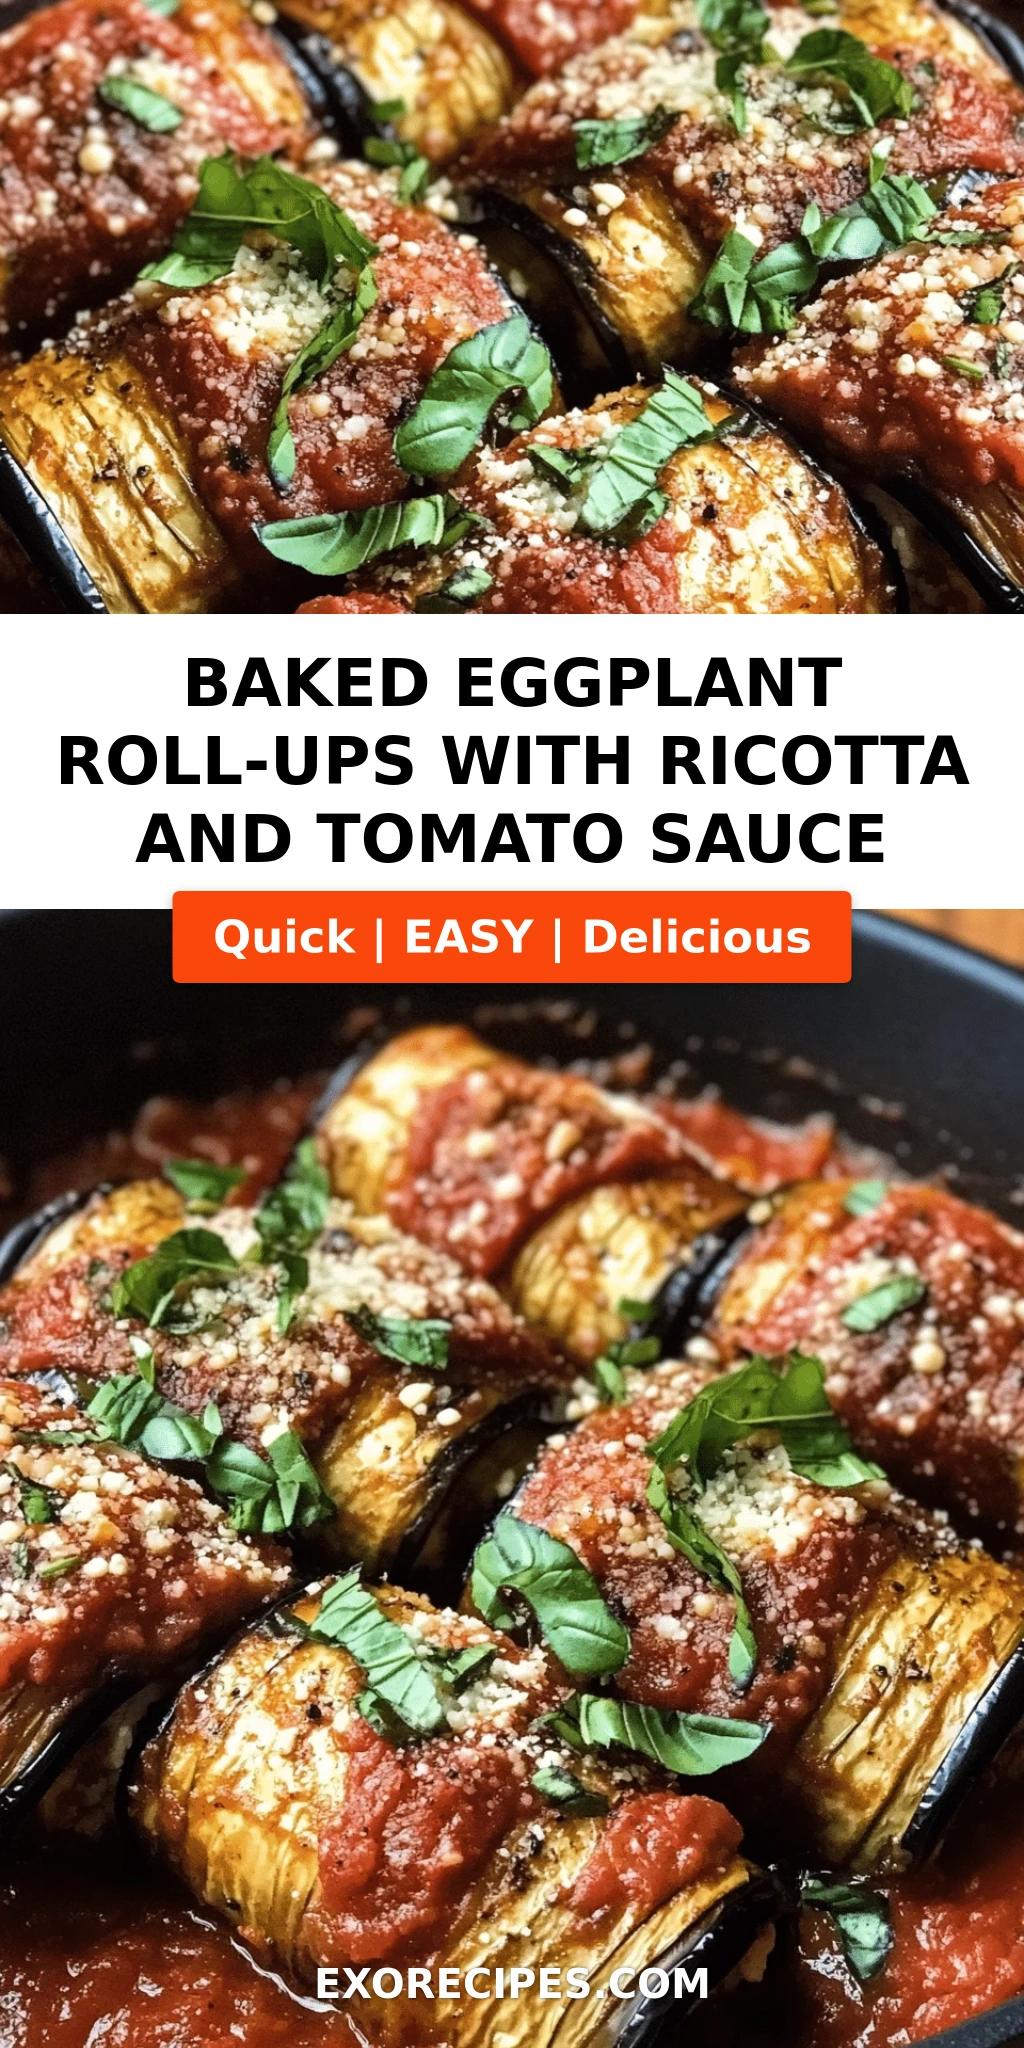
Baked Eggplant Roll-Ups with Ricotta and Tomato Sauce – A Healthier, No-Fry Italian Comfort Dish
Growing up in Morocco, my mother’s kitchen was a symphony of slow-cooked tagines and fresh herbs. But it was during my years training at Le Cordon Bleu in Paris that I fell in love with Italian vegetable dishes — especially eggplant. These baked eggplant roll-ups are my healthier, no-fry take on classic eggplant Parm. By quickly pre-baking the slices before rolling, you get tender, never-soggy rolls that hold a creamy ricotta and spinach filling. This is the healthy eggplant bake you’ll turn to again and again.
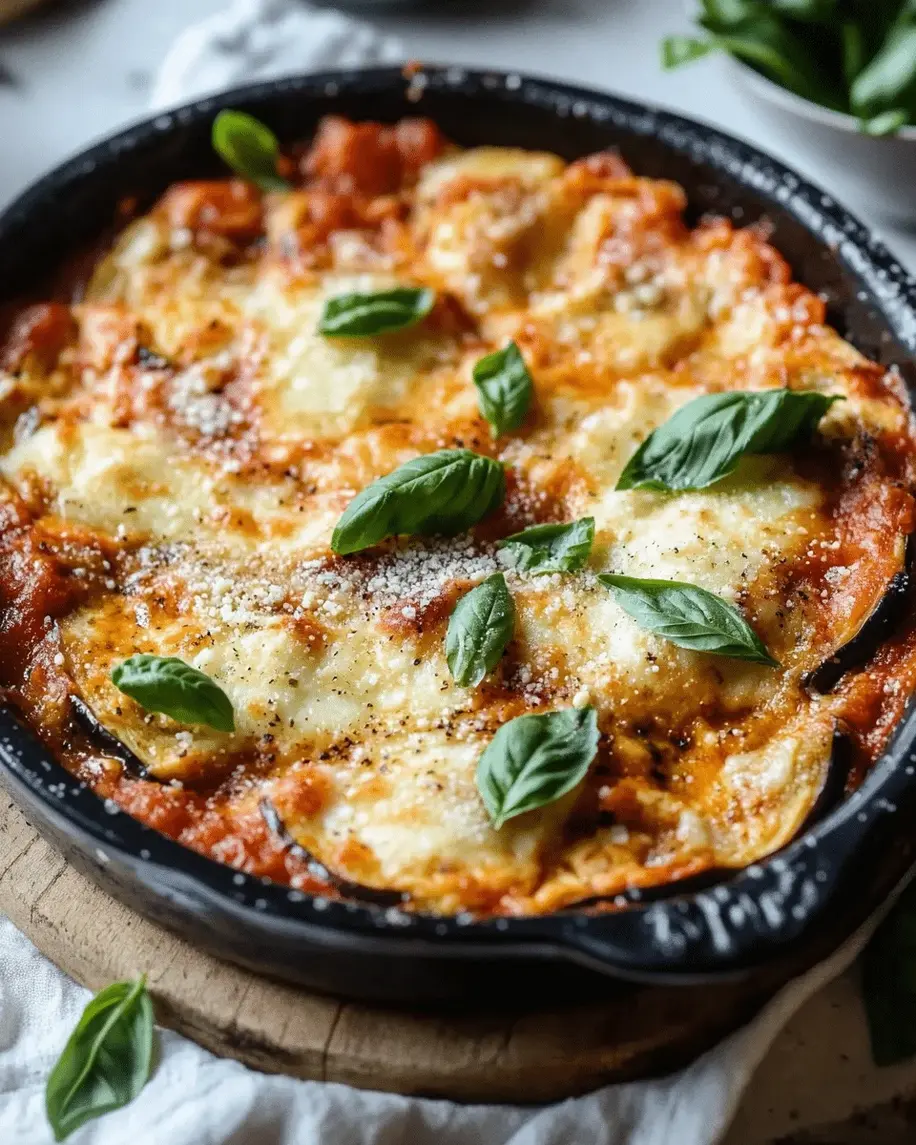
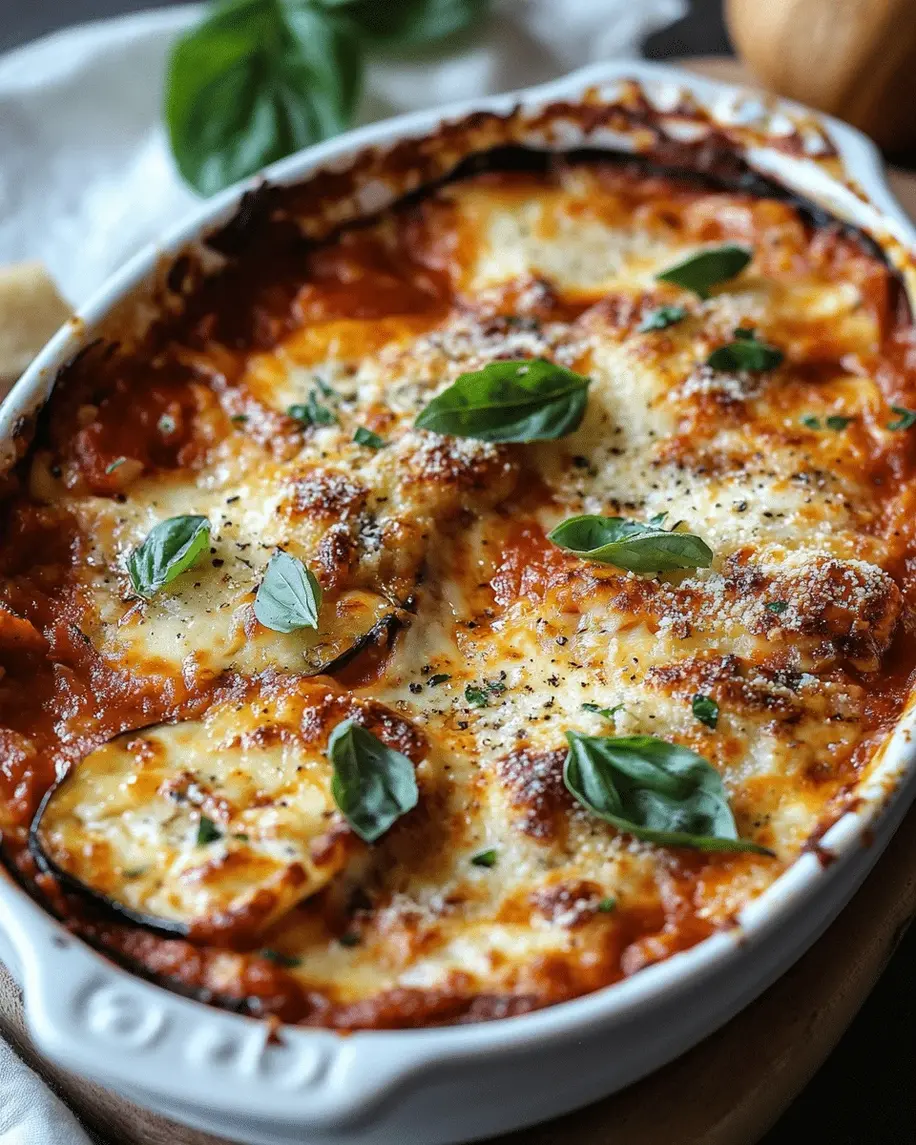
Picture this: a forkful of soft, silky eggplant wrapped around a rich, garlicky ricotta-spinach mixture, all nestled in a pool of tangy marinara sauce and topped with a golden blanket of melted mozzarella. The first bite delivers a gentle burst of tomato, followed by the creamy, slightly nutty filling, and finally the satisfying, melt-in-your-mouth texture of the eggplant. It’s comfort food that feels light and nourishing — exactly what I crave after a busy day navigating New York City’s farmers markets.
What sets my version apart? I use a clever pre-bake step that eliminates the need for frying, cutting calories without sacrificing flavor. Plus, I swap traditional breadcrumbs for a Parmesan-rich ricotta filling that keeps it low-carb — perfect for anyone searching for keto eggplant roll-ups. One common mistake home cooks make is skipping the salt-and-sweat step for the eggplant; I’ll show you my trick to avoid a watery dish. Ready to roll? Let’s get cooking!
Why This Baked Eggplant Roll-Ups Recipe Is the Best
The Flavor Secret: Every element here pulls double duty. I lightly brush the eggplant with olive oil before baking — a technique I learned in Paris that caramelizes the natural sugars and adds a subtle richness. The ricotta filling gets a hit of red pepper flakes for a gentle warmth, and the marinara sauce (use your favorite jarred brand or my quick homemade version) keeps the dish bright and acidic. It’s a balance of savory, creamy, and tangy that feels both indulgent and clean.
Perfected Texture: Eggplant can turn mushy if you mishandle it. My method: salt the slices, let them sweat, then pre-bake just until pliable. This draws out excess moisture and firms up the flesh so the rolls hold their shape beautifully. The ricotta mixture acts as a binder, and the final bake under mozzarella creates a bubbly, golden crust that contrasts the tender interior. No sogginess, no falling apart.
Foolproof & Fast: From start to finish, you’re about an hour away from a satisfying dinner. The hands-on prep is just 20 minutes, and most of the time is oven time. I’ve tested this recipe a dozen times to make sure even a beginner can nail it. Whether you’re making eggplant ricotta roll-ups for a weeknight meal or a weekend gathering, this recipe delivers consistent, crowd-pleasing results.
Baked Eggplant Roll-Ups Ingredients
Every Saturday morning, I stop by the Union Square Greenmarket to pick up the fattest, shiniest eggplants I can find. For this recipe, you want globe eggplants — they’re meaty and wide, perfect for rolling. The rest of the ingredients are pantry staples, but let me walk you through each one so you know exactly what to look for.
Ingredients List
- 2 large eggplants, sliced lengthwise into 1/4-inch thick slices
- 1 tablespoon olive oil
- 1 cup ricotta cheese (whole milk or part-skim)
- 1 cup shredded mozzarella cheese, divided
- 1/4 cup grated Parmesan cheese
- 1 large egg, beaten
- 1 cup chopped fresh spinach (or thawed frozen spinach, squeezed dry)
- 2 cloves garlic, minced
- 1/2 teaspoon salt
- 1/4 teaspoon black pepper
- 1/4 teaspoon red pepper flakes (optional)
- 2 cups marinara sauce
Ingredient Spotlight
Eggplant: The star of the show. Look for eggplants that feel heavy for their size and have smooth, unblemished skin. The pre-bake softens them without turning them into mush. If globe eggplants are out of season, you can use Italian or Japanese eggplants — just adjust the slice length accordingly.
Ricotta Cheese: Whole-milk ricotta gives the creamiest filling, but part-skim works fine if you’re watching calories. For a dairy-free twist, try a high-quality cashew-based ricotta — just note the texture will be slightly less thick.
Spinach: Fresh spinach adds a lovely green pop and earthy flavor. If using frozen, make sure to wring it out in a clean kitchen towel to remove all excess water — otherwise your filling will be too wet.
Marinara Sauce: A good-quality jarred sauce saves time. I recommend one with minimal added sugar and a bright tomato flavor. You can also use homemade if you have it on hand.
Mozzarella: Low-moisture, part-skim mozzarella melts beautifully and browns without becoming greasy. Fresh mozzarella can be used but will release more liquid; if you go that route, pat it dry before shredding.
| Original Ingredient | Best Substitution | Flavor / Texture Impact |
|---|---|---|
| Ricotta cheese | Cottage cheese (blended smooth) | Less creamy, lower fat; slight tanginess |
| Mozzarella (shredded) | Provolone or fontina | More pungent, melts equally well |
| Fresh spinach | Chopped kale (massaged with oil) | Heartier texture, slightly bitter |
| Marinara sauce | Arrabbiata or tomato basil | Similar base, spice level may vary |
| Parmesan cheese | Pecorino Romano | Saltier, sharper finish |
How to Make Baked Eggplant Roll-Ups — Step-by-Step
Don’t let the roll-ups intimidate you — this recipe flows smoothly if you follow the order. I’ll walk you through each stage with my chef’s tips so you feel confident from start to finish.
Step 1: Prep the Eggplant
Slice your eggplants lengthwise into 1/4-inch thick planks. Lay them on a sheet pan lined with paper towels and sprinkle both sides generously with salt. Let them sit for 30 minutes — this draws out bitter juices and excess moisture. Then pat them dry with more paper towels. Transfer to a parchment-lined baking sheet, brush lightly with olive oil on both sides, and bake at 375°F for 10 minutes, flipping halfway, until pliable but not fully cooked.
💡 mia’s Pro Tip: Don’t overcrowd the pan. Give the slices breathing room so they steam instead of bake. If necessary, use two sheet pans.
Step 2: Make the Filling
While the eggplant bakes, combine the ricotta, half the mozzarella, Parmesan, beaten egg, chopped spinach, minced garlic, salt, pepper, and optional red pepper flakes in a medium bowl. Mix until thoroughly combined. Taste and adjust seasoning — the filling should be well-seasoned since the eggplant itself is mild.
⚠️ Common Mistake to Avoid: Don’t skip the egg — it binds the filling and keeps it from oozing out during baking.
Step 3: Assemble the Rolls
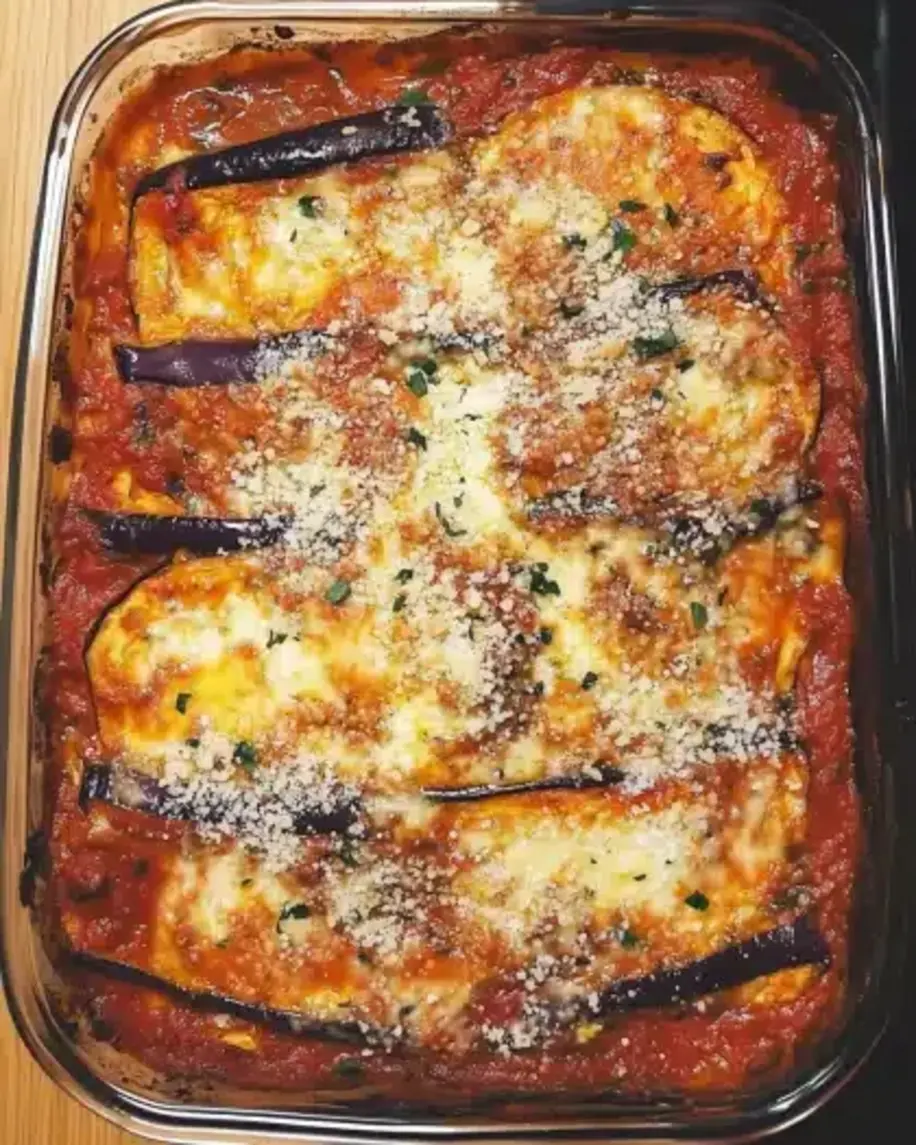
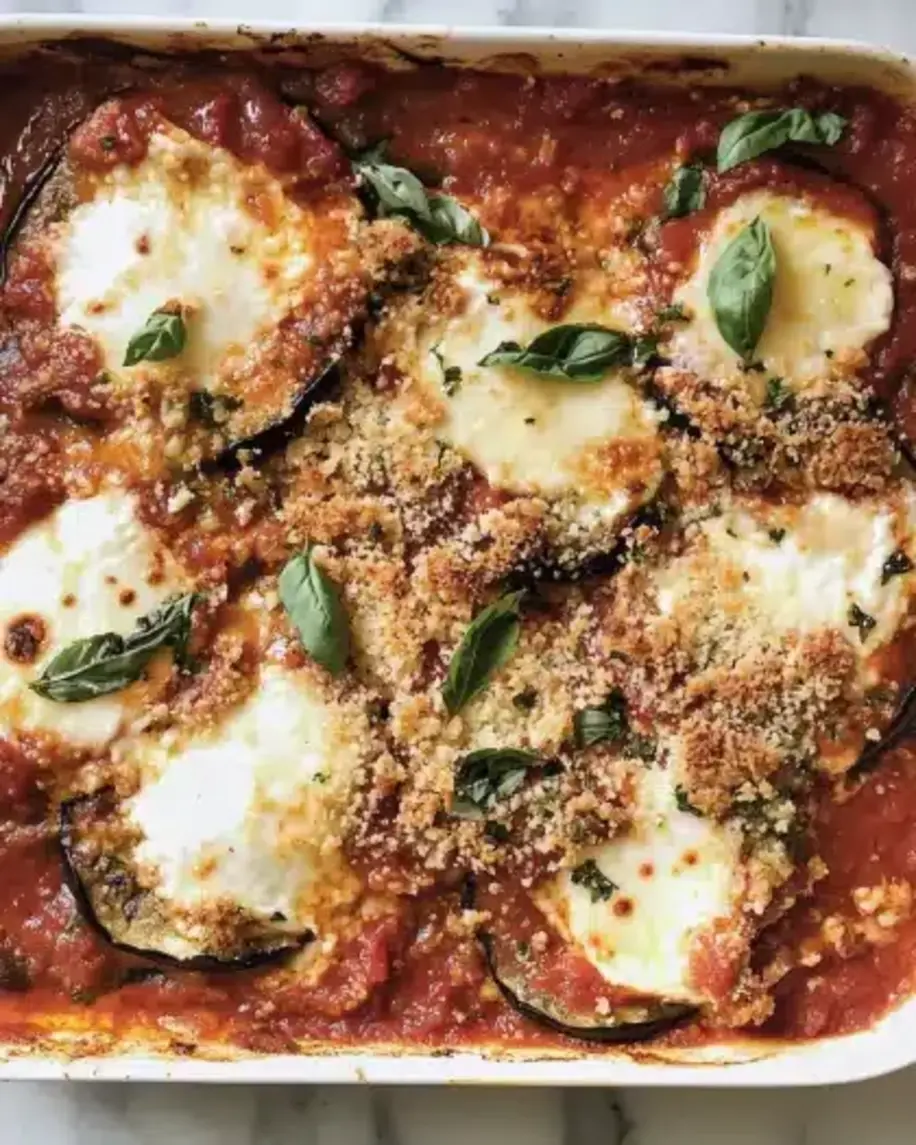
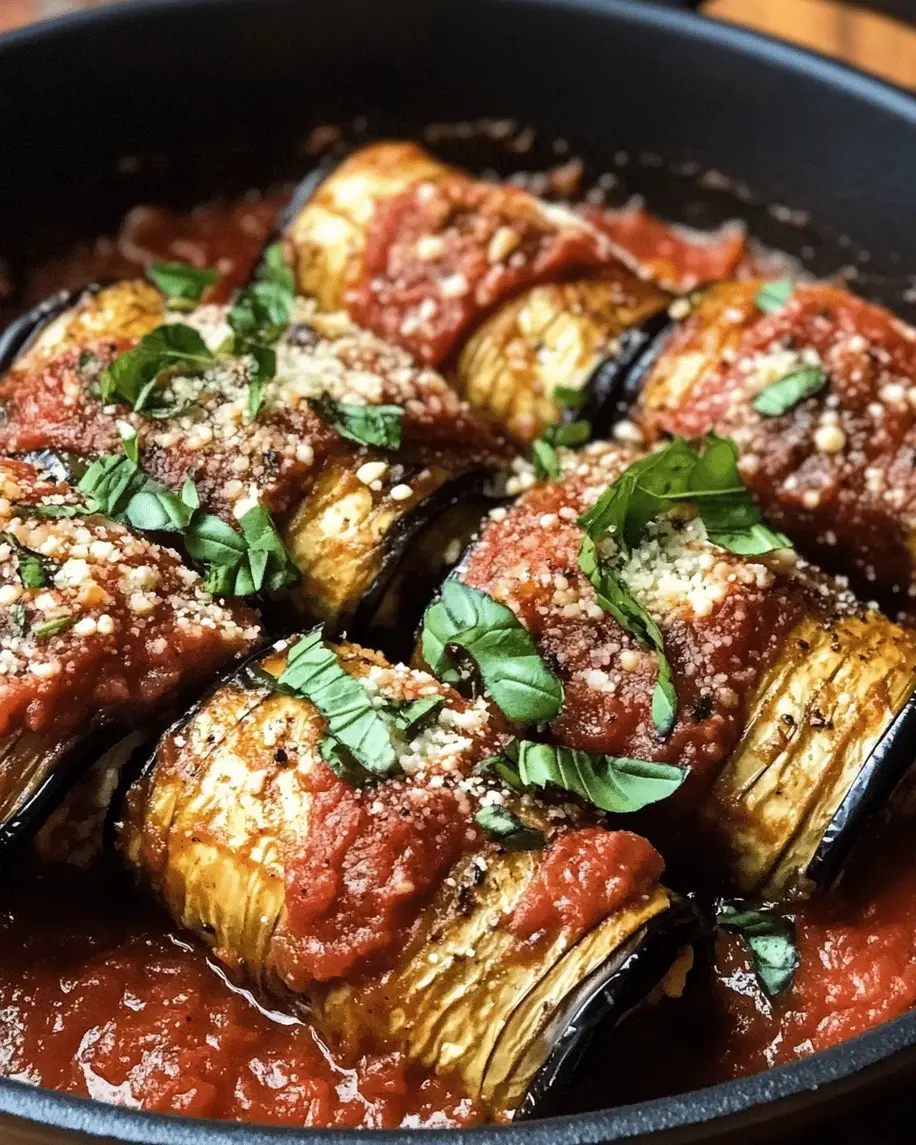
Spread 1/2 cup of marinara sauce on the bottom of a 9×13-inch baking dish. Take one cooled eggplant slice, place about 2 tablespoons of the ricotta mixture at the wider end, and roll it up tightly. Place seam-side down in the dish. Repeat with remaining slices, nestling them close together.
💡 mia’s Pro Tip: If the eggplant slices are uneven, trim the thin tail ends so the rolls are uniform in size — they’ll cook more evenly.
Step 4: Top and Bake
Pour the remaining marinara sauce over the roll-ups, then sprinkle with the reserved mozzarella. Bake uncovered at 375°F for 25–30 minutes, until the sauce is bubbly and the cheese is golden and melted. For extra browning, switch to broil for the last 2 minutes, but watch closely to avoid burning.
⚠️ Common Mistake to Avoid: Don’t overbake — the eggplant will continue to soften as it sits. Remove it when the cheese is just melted and lightly browned.
Step 5: Rest and Serve
Let the dish rest for 5 minutes before serving. This allows the filling to set and prevents it from spilling out when you lift a roll. Garnish with fresh basil or a sprinkle of extra Parmesan if you like.
| Step | Action | Duration | Key Visual Cue |
|---|---|---|---|
| 1 | Salt eggplant slices, then bake | 30 min sweating + 10 min baking | Slices are pliable and lightly golden |
| 2 | Mix ricotta filling | 5 minutes | Smooth, evenly blended |
| 3 | Roll and arrange in dish | 10 minutes | Seam-side down, snugly packed |
| 4 | Add sauce, top with cheese, bake | 25–30 minutes | Cheese is melted, bubbly, and golden |
| 5 | Rest before serving | 5 minutes | Rolls hold shape when lifted |
Serving & Presentation
I love serving these baked eggplant roll-ups straight from the baking dish, family-style, with a big salad on the side. The contrast of the warm, cheesy rolls and a crisp green salad (maybe arugula with lemon vinaigrette) is a match made in heaven. For a heartier meal, serve alongside crusty garlic bread or a side of roasted broccoli.
When I plate individual servings, I spoon a little extra sauce from the dish over each roll, then add a small basil leaf on top. A final sprinkle of red pepper flakes adds a pop of color and heat. This dish feels elegant enough for a dinner party but is simple enough for a Tuesday night — just like the cozy, unfussy cooking I grew up with in my mother’s Moroccan kitchen.
| Pairing Type | Suggestions | Why It Works |
|---|---|---|
| Side Dish | Arugula salad, roasted asparagus, sautéed zucchini | Adds freshness and bitterness to cut richness |
| Sauce / Dip | Extra marinara, pesto drizzle, garlic yogurt | Enhances moisture and flavor contrast |
| Beverage | Chianti, Pinot Noir, sparkling water with lemon | Acidity and bubbles cleanse the palate |
| Garnish | Fresh basil, chopped parsley, red pepper flakes | Brightens color and adds a fresh finish |
Make-Ahead, Storage & Reheating
Life in NYC moves fast, so I often prep these roll-ups a day ahead. You can assemble the entire dish (without the final bake), cover tightly, and refrigerate for up to 24 hours. When ready to eat, add a few extra minutes to the bake time. Leftovers are a gift — they taste even better the next day.
| Method | Container | Duration | Reheating Tip |
|---|---|---|---|
| Refrigerator | Airtight container | 3–4 days | Cover with foil, bake at 350°F for 15 mins |
| Freezer | Freezer-safe baking dish or foil pan | Up to 3 months | Thaw overnight, then bake covered at 375°F for 25 mins |
| Make-Ahead | Assembled in baking dish, uncooked | 1 day in fridge | Add 10 minutes to bake time; check center is hot |
For the best reheated texture, I always cover the dish with foil to prevent the edges from drying out. If you have an air fryer, reheat individual portions at 350°F for 5–7 minutes — the cheese gets wonderfully crisp.
Variations & Easy Swaps
| Variation | Key Change | Best For | Difficulty Impact |
|---|---|---|---|
| Keto / Low-Carb | Use full-fat ricotta, omit egg, add almond flour to thicken | Low-carb dieters | Easy |
| Gluten-Free | Naturally GF — no breadcrumbs used | Gluten-sensitive | No change |
| Moroccan Spiced | Add 1 tsp ras el hanout to ricotta, top with harissa sauce | Adventurous palates | Easy |
Keto Eggplant Roll-Ups
For a truly low-carb version, swap the Parmesan for an equal amount of almond flour to thicken the ricotta mixture — this keeps the filling sturdy without the egg’s carbs. Use full-fat dairy and watch your portion size; one serving contains about 8g net carbs. I often make these for my friends who follow a keto lifestyle, and they never miss the breadcrumbs.
Dairy-Free Eggplant Roll-Ups
If you’re avoiding dairy, use a high-quality cashew ricotta (store-bought or homemade), dairy-free mozzarella shreds, and nutritional yeast in place of Parmesan. The texture will be slightly less creamy, but the flavor is still rich from the marinara and garlic. I’ve tested this with Kite Hill brand ricotta with great results.
Seasonal Twist: Roasted Red Pepper & Spinach
During summer, I love adding a layer of roasted red pepper strips inside each roll alongside the ricotta. It adds a sweet, smoky note that pairs beautifully with the tomato sauce. Just blot the peppers dry so they don’t make the rolls soggy. This twist reminds me of the vibrant vegetable dishes I discovered at the Marché Bastille in Paris.
Frequently Asked Questions
How do you prevent eggplant slices from getting soggy when making baked roll-ups?
The key is to salt the eggplant slices before cooking. Lay the slices on paper towels, sprinkle both sides generously with salt, and let them sit for 30 minutes. This draws out excess moisture and bitterness. After sweating, pat them dry, then pre-bake at 375°F for 10 minutes until pliable but not fully cooked. This double step — salting and pre-baking — ensures the eggplant stays firm enough to roll and never turns mushy in the final bake.
Can I use cottage cheese instead of ricotta in this baked eggplant recipe?
Absolutely! Cottage cheese makes a great lower-fat substitute. For the smoothest texture, blend it in a food processor until creamy before mixing with the other ingredients. Keep in mind that cottage cheese is saltier and less rich than ricotta, so you may want to reduce the added salt slightly. The filling will be a bit looser, but it still holds up well during rolling and baking.
What is the best way to slice eggplant for roll-ups so they stay intact?
For sturdy, even slices, use a sharp chef’s knife or a mandoline set to 1/4-inch thickness. Slice the eggplant lengthwise (from the stem end to the bottom) to create long planks that are wide enough to hold the filling. Avoid slicing too thin — less than 1/4 inch may tear when rolling. If the slices are uneven, you can gently pound the thicker parts with a rolling pin after pre-baking to make them more uniform.
How long should baked eggplant roll-ups be cooked in the oven for the perfect texture?
After assembling the rolls with sauce and cheese, bake them uncovered at 375°F for 25–30 minutes. You’ll know they’re done when the sauce is bubbly around the edges and the mozzarella is melted and lightly golden. For extra browning, switch to broil for the last 2 minutes, but watch closely to prevent burning. Let the dish rest 5 minutes before serving so the filling sets.
Can I make baked eggplant roll-ups ahead of time?
Yes, this dish is perfect for meal prep. Assemble the rolls in the baking dish without the final bake, cover tightly with foil, and refrigerate for up to 24 hours. When ready to cook, add about 10 extra minutes to the baking time (check that the center is hot). You can also freeze the unbaked dish for up to 3 months; thaw overnight in the fridge before baking.
Can I freeze baked eggplant roll-ups after cooking?
Definitely. Let the baked dish cool completely, then portion into freezer-safe containers or wrap the whole dish tightly in plastic wrap and foil. Freeze for up to 3 months. To reheat, thaw overnight in the refrigerator, then bake covered at 350°F for 20–25 minutes, or until heated through. The texture may soften slightly, but the flavor remains excellent.
What can I use instead of marinara sauce?
You can swap marinara with any tomato-based pasta sauce — try arrabbiata for extra spice, tomato basil for a sweeter note, or even a creamy roasted red pepper sauce for a different flavor profile. If you’re short on sauce, crushed tomatoes seasoned with garlic, oregano, and a pinch of sugar work beautifully as a quick substitute.
Can I use zucchini instead of eggplant for roll-ups?
Yes, zucchini is a great lighter alternative. Slice zucchini lengthwise into 1/4-inch strips, then salt and pre-bake just like eggplant — but reduce the baking time to about 6 minutes since zucchini softens faster. Zucchini contains more water, so be extra diligent with the salting step and patting dry. The rolls will be a little more delicate, but they work wonderfully.
Is this recipe suitable for a keto diet?
Yes, these baked eggplant roll-ups are naturally low in carbs when you use full-fat dairy and skip any breadcrumbs. Each serving contains about 22g of carbohydrates, with 10g of sugar from the tomatoes. To bring the carbs down for strict keto, reduce the marinara sauce to 1 cup (sugar content varies by brand) and serve with a side salad instead of bread. The ricotta and mozzarella provide plenty of fat to keep you satisfied.
How do I keep the rolls from unrolling during baking?
Place the rolls seam-side down in the baking dish, and pack them snugly together so they support each other. The sauce on the bottom helps anchor them. Also, don’t overfill — 2 tablespoons of filling per slice is just right. If any rolls still try to open, you can secure them with a toothpick (remove before serving). The mozzarella on top also helps glue everything together as it melts.
Share Your Version!
I’d love to see how these baked eggplant roll-ups turn out in your kitchen. Did you try the keto version? Add a Moroccan twist? Or keep it classic with extra mozzarella on top? Drop a star rating below and leave a comment — your feedback helps fellow home cooks decide what to make for dinner tonight.
Snap a photo of your creation and tag me on Instagram or Pinterest with @exorecipes. I personally read every comment and love hearing about your triumphs (and even the messy rolls — we’ve all been there!). If you have a question I didn’t cover, ask away in the comments and I’ll get back to you within a day. From my NYC kitchen to yours — I hope this recipe brings as much warmth to your table as it does to mine. — mia 🧡
Love This Recipe? Save It to Pinterest!
If you enjoyed this Baked Eggplant Roll-Ups with Ricotta and Tomato Sauce recipe, don’t let it get lost in your browser tabs! 😄 Pin it now so you can find it again anytime — and explore hundreds more tried-and-tested recipes waiting for you on my Pinterest boards.
👉 Follow mia on Pinterest @exorecipe
📌 Pin this recipe · 🔁 Re-pin your favorites · 💬 Tag me when you make it — I love seeing your creations!

Baked Eggplant Roll-Ups with Ricotta and Tomato Sauce
- Prep Time: 20 minutes
- Cook Time: 40 minutes
- Total Time: 1 hour
- Yield: 6 servings 1x
- Method: Main Course
- Cuisine: Italian
Description
These baked eggplant roll-ups are filled with a creamy ricotta and spinach mixture, topped with marinara sauce and melted mozzarella, then baked to perfection. A delicious and healthy Italian-inspired main dish.
Ingredients
- 2 large eggplants, sliced lengthwise into 1/4-inch thick slices
- 1 tablespoon olive oil
- 1 cup ricotta cheese
- 1 cup shredded mozzarella cheese, divided
- 1/4 cup grated Parmesan cheese
- 1 large egg, beaten
- 1 cup chopped fresh spinach (or thawed frozen spinach, squeezed dry)
- 2 cloves garlic, minced
- 1/2 teaspoon salt
- 1/4 teaspoon black pepper
- 1/4 teaspoon red pepper flakes (optional)
- 2 cups marinara sauce
Instructions
- Preheat oven to 375°F (190°C). Line a baking sheet with parchment paper.
- Place eggplant slices in a single layer on prepared baking sheet. Brush lightly with olive oil on both sides.
- Bake eggplant slices for 10 minutes, flipping halfway, until softened and pliable. Remove from oven and let cool slightly.
- In a medium bowl, combine ricotta, half of the mozzarella, Parmesan, beaten egg, spinach, garlic, salt, pepper, and red pepper flakes (if using). Mix well.
- Spread about 1/2 cup of marinara sauce on the bottom of a 9×13-inch baking dish.
- Take one eggplant slice, place 2 tablespoons of the ricotta mixture at one end, and roll up tightly. Place seam-side down in the baking dish. Repeat with remaining slices.
- Pour remaining marinara sauce over the roll-ups and sprinkle with remaining mozzarella cheese.
- Bake uncovered for 25-30 minutes, until bubbly and cheese is melted and golden.
- Let rest for 5 minutes before serving. Garnish with fresh basil if desired.
Notes
To avoid excess moisture, salt the eggplant slices and let them sit for 30 minutes before baking, then pat dry. You can also add cooked ground meat to the sauce for a heartier dish.
Nutrition
- Calories: 320
- Sugar: 10g
- Fat: 18g
- Carbohydrates: 22g
- Protein: 16g
Tried This Recipe? Leave a Comment!
Did you make this recipe? I’d love to hear how it turned out! Please leave a comment and a rating below. Your feedback helps other home cooks and supports cheerychop.com!