Table of Contents
Baked Turkey Meatballs in Creamy Spinach Artichoke Sauce – A Healthy & Comforting Dinner
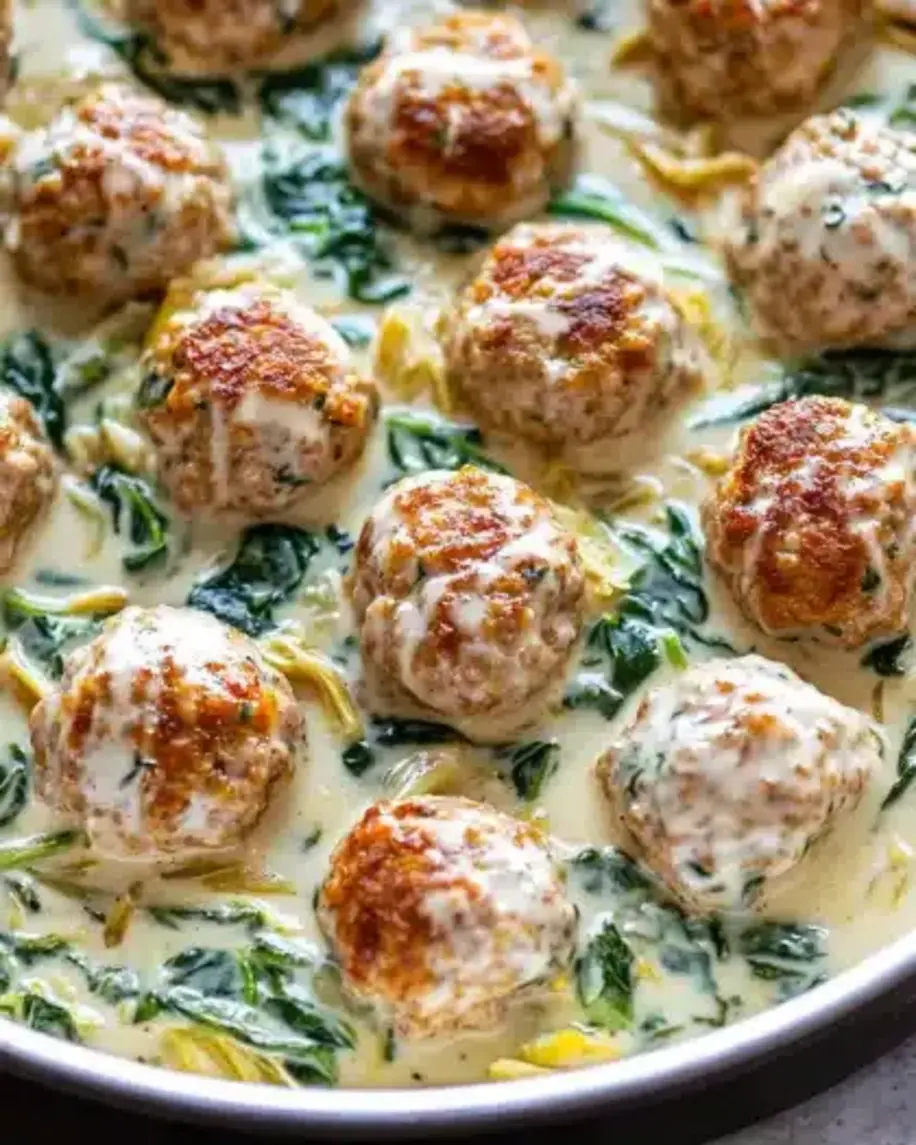
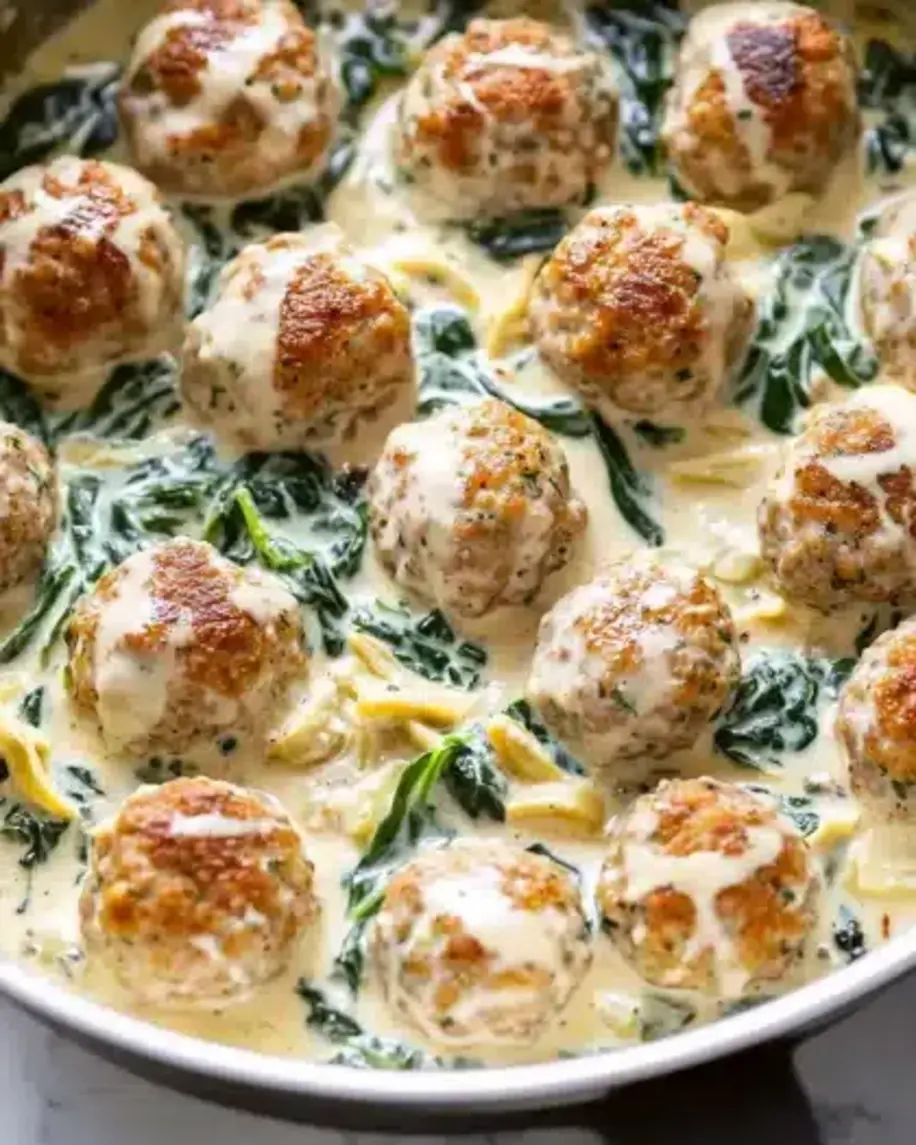
As a chilly New York evening settles over my little kitchen in Brooklyn, I find myself craving something that wraps you up like a warm hug. That’s when I turn to my Baked Turkey Meatballs in Creamy Spinach Artichoke Sauce. I learned the art of a silk-smooth sauce during my years at Le Cordon Bleu in Paris, but the heart of this dish comes straight from my mother’s kitchen in Morocco – where bold flavors and nourishing ingredients always came first. These meatballs are tender, baked to juicy perfection, then simmered in a rich, velvety sauce that’s packed with spinach and artichokes. It’s the meal I make when I need comfort without the guilt.
Imagine the aroma: garlic and oregano melding with the earthy scent of artichokes and the fresh green brightness of spinach, all enveloped in a lightly creamy sauce that’s just thick enough to coat each meatball. The meatballs themselves carry a hint of Parmesan and parsley, with a golden-brown crust from the oven. One bite gives you that satisfying feel of a classic meatball dinner, but with a lighter, healthier twist. The spinach artichoke combination adds a subtle tang and richness that feels indulgent but is actually quite wholesome. I love serving it over a bed of cauliflower rice or whole-wheat pasta for a weeknight dinner that feels company-worthy.
What sets my version apart is the baking method. Many recipes pan-fry the meatballs, but I’ve found that baking them at 400°F keeps the turkey incredibly moist while saving you a messy stovetop step. The sauce, inspired by my Parisian training in béchamel, uses heavy cream for luxury but can be lightened with half-and-half without losing its soul. I’ll show you exactly how to avoid dry meatballs (a common turkey pitfall) and how to build a sauce that’s balanced and bright. Let’s get cooking – this healthy turkey meatball recipe is about to become your new favorite.
Why This Baked Turkey Meatballs Recipe Is the Best
The Flavor Secret: The magic lies in the union of lean ground turkey (93/7) with Parmesan, parsley, and a touch of oregano. These are not bland diet meatballs. The artichoke hearts bring a subtle brininess, and the creamy sauce – finished with a pinch of red pepper flakes – has the complexity of a restaurant-quality dish. It’s the kind of healthy turkey meatball recipe that doesn’t sacrifice taste for nutrition.
Perfected Texture: Baking the meatballs on parchment paper at high heat gives them a beautiful crust without frying. The addition of panko breadcrumbs and a single egg ensures they stay light and fork-tender. When they meet the sauce, they absorb just enough to become luscious but never soggy. I’ve tested this approach over a dozen times to guarantee you perfect results every time.
Foolproof & Fast: With only 15 minutes of active prep and 25 minutes of mostly hands-off cooking, this low carb meatball dinner comes together in 40 minutes flat. It’s a one-pan meal (well, one skillet plus a baking sheet) that’s forgiving enough for beginners yet impressive enough for dinner guests. Follow my tips, and you’ll have a warming, satisfying meal on the table without stress.
Baked Turkey Meatballs in Creamy Spinach Artichoke Sauce Ingredients
Every time I walk through the aisles at the Union Square Greenmarket or my neighborhood Trader Joe’s, I’m reminded of how accessible these ingredients are. The list is short, honest, and full of flavor. Let me walk you through what you’ll need – and a few smart swaps.
Ingredients List
- For the Meatballs:
- 1 lb ground turkey (93/7)
- 1/2 cup panko breadcrumbs
- 1/4 cup grated Parmesan cheese
- 1 large egg, lightly beaten
- 2 cloves garlic, minced
- 1/2 teaspoon onion powder
- 1/2 teaspoon dried oregano
- 1/2 teaspoon salt
- 1/4 teaspoon black pepper
- 2 tablespoons chopped fresh parsley
- For the Sauce:
- 1 tablespoon olive oil
- 3 cloves garlic, minced
- 1 (14-ounce) can artichoke hearts, drained and chopped
- 3 cups fresh spinach
- 1 cup heavy cream
- 1/2 cup chicken broth
- 1/2 cup grated Parmesan cheese
- 1/4 teaspoon red pepper flakes (optional)
- Salt and pepper to taste
Ingredient Spotlight
Ground Turkey (93/7): The lean-to-fat ratio is crucial. 93/7 gives you enough fat to keep the meatballs juicy without making them greasy. If you use extra-lean (99/1), add a tablespoon of olive oil to the mix. I always buy organic, pasture-raised turkey when I can – the flavor is noticeably cleaner.
Artichoke Hearts (canned): I prefer canned quartered artichoke hearts packed in water (not marinated). They’re tender and mild, and chopping them up lets them blend into the sauce beautifully. Frozen artichokes work too – just thaw and pat dry. Avoid the oil-packed ones for this recipe, as they can make the sauce greasy.
Fresh Spinach: Three cups of fresh spinach may seem like a lot, but it wilts down to almost nothing. Use baby spinach for a milder flavor or mature spinach for a more pronounced earthy note. If you’re in a pinch, frozen spinach works – thaw it completely and squeeze out every drop of water before adding.
Heavy Cream: This is the heart of the sauce’s richness. You can substitute half-and-half for a lighter texture, or use full-fat coconut milk for a dairy-free version (the flavor will change slightly but still be delicious). For the classic indulgent experience, stick with heavy cream.
| Original Ingredient | Best Substitution | Flavor / Texture Impact |
|---|---|---|
| Ground turkey | Ground chicken or lean ground pork | Chicken yields similar leanness; pork adds more fat and richness. |
| Panko breadcrumbs | Gluten-free panko or almond flour | Almond flour makes meatballs denser; gluten-free panko works 1:1. |
| Heavy cream | Half-and-half + 1 tsp cornstarch | Lighter sauce with slightly less body; cornstach helps thicken. |
How to Make Baked Turkey Meatballs in Creamy Spinach Artichoke Sauce – Step-by-Step
Follow these steps and you’ll have a stellar dinner – I promise. The key is to work efficiently: prepare the meatballs while the oven preheats, then make the sauce while they bake.
Step 1: Prepare the Meatball Mix
In a large bowl, combine ground turkey, panko, Parmesan, egg, garlic, onion powder, oregano, salt, pepper, and parsley. Use your hands or a rubber spatula – mix gently until everything is just incorporated. Overmixing can make the meatballs tough.
💡 mia’s Pro Tip: To ensure the meatballs don’t soak up too much breadcrumb, let the mixture rest for 5 minutes after mixing. This allows the panko to absorb moisture, resulting in a more tender texture.
Step 2: Form and Bake the Meatballs
Line a baking sheet with parchment paper. Lightly wet your hands to prevent sticking, then form the mixture into 1.5-inch meatballs (you should get 18-20). Place them on the sheet with a little space between each. Bake at 400°F (200°C) for 18-20 minutes, until golden brown and cooked through (165°F internal temp).
⚠️ Common Mistake to Avoid: Don’t crowd the meatballs on the baking sheet – if they’re too close, they’ll steam instead of browning, and you’ll miss that lovely crust. Use two sheets if needed.
Step 3: Make the Creamy Spinach Artichoke Sauce
While the meatballs are in the oven, heat olive oil in a large skillet over medium heat. Add minced garlic and cook for 1 minute until fragrant. Stir in chopped artichoke hearts and cook for 2-3 minutes. Add fresh spinach and cook until wilted, about 2 minutes. Pour in heavy cream and chicken broth, stirring to combine. Bring to a gentle simmer, then stir in Parmesan and red pepper flakes. Season with salt and pepper to taste. Let it simmer 2-3 minutes until slightly thickened.
💡 mia’s Pro Tip: For an even silkier sauce, whisk in a teaspoon of Dijon mustard just before adding the cheese. It adds a subtle depth that lifts the whole dish.
Step 4: Combine and Serve
When the meatballs are done, transfer them directly into the skillet with the sauce. Gently turn them to coat. Let them rest in the warm sauce for a minute before serving. Garnish with extra parsley or a sprinkle of Parmesan.
⚠️ Common Mistake to Avoid: Don’t boil the sauce after adding the meatballs – a gentle simmer is all you need. High heat can curdle the cream and toughen the meatballs.
| Step | Action | Duration | Key Visual Cue |
|---|---|---|---|
| 1 | Mix meatball ingredients | 5 mins | Uniformly combined, not overmixed |
| 2 | Form and bake meatballs | 20 mins | Golden brown, 165°F internal |
| 3 | Make sauce | 10 mins | Spinach wilted, sauce slightly thickened |
| 4 | Combine and serve | 2 mins | Meatballs evenly coated |
Serving & Presentation
I love serving these Turkey Meatballs in Creamy Spinach Artichoke Sauce over a bed of al dente spaghetti or wide pappardelle – the sauce clings beautifully to each strand. For a low-carb option, try them with zucchini noodles or cauliflower rice; the creamy sauce is still a dream. A sprinkle of fresh parsley and a dusting of Parmesan right before serving add a restaurant touch. Sometimes I pair it with roasted broccoli or a simple green salad with lemon vinaigrette to cut through the richness.
When I entertain, I set the skillet right on the table with a crusty baguette for sopping up every last drop of that sauce. It’s the kind of meal that makes everyone lean in and savor. And since it’s made in one skillet (plus the baking sheet), cleanup is easy – a win for any busy cook.
| Pairing Type | Suggestions | Why It Works |
|---|---|---|
| Side Dish | Roasted broccoli, steamed green beans, or a fresh arugula salad | The greens balance the creamy sauce with color and crunch. |
| Starch | Garlic bread, polenta, or mashed potatoes | Absorb the luxurious sauce perfectly. |
| Beverage | Pinot Grigio, Sauvignon Blanc, or sparkling water with lemon | Crisp acidity cuts through the creaminess. |
| Garnish | Fresh parsley, extra Parmesan, red pepper flakes | Adds freshness, saltiness, and a final kick of heat. |
Make-Ahead, Storage & Reheating
My NYC schedule means I’m often prepping meals on Sunday to enjoy during the week. This recipe is a superstar for meal prep. The meatballs and sauce can be made separately and combined when ready to serve. Here’s how I store it all.
| Method | Container | Duration | Reheating Tip |
|---|---|---|---|
| Refrigerator | Airtight container (keep meatballs & sauce together or separate) | Up to 4 days | Reheat gently in a skillet over low heat, adding a splash of broth or milk to loosen the sauce. |
| Freezer | Freezer-safe bag or container with sauce separately | Up to 3 months | Thaw overnight in fridge, then reheat meatballs and sauce together on stove. |
| Make-Ahead | Baked meatballs + sauce in separate containers | Up to 2 days in advance | Combine and reheat in a skillet when ready to serve – 5-7 minutes. |
If you freeze the sauce alone, it may separate slightly when thawed. Don’t worry – just whisk it vigorously over low heat and it will come back together. The meatballs freeze beautifully on their own; I often double the recipe so I have a stash ready for busy weeknights.
Variations & Easy Swaps
This recipe is a canvas for your own twists. Below are three favorite variations I’ve developed over the years, each with its own personality.
| Variation | Key Change | Best For | Difficulty Impact |
|---|---|---|---|
| Moroccan-Spiced Version | Add 1 tsp cumin, 1/2 tsp cinnamon, 1/4 tsp paprika to meatballs | Those who love warm, North African flavors | Easy – just add spices |
| Dairy-Free Delight | Use full-fat coconut cream + 1 tbsp lemon juice instead of heavy cream | Dairy-free and paleo diets | Easy – slight coconut flavor change |
| Lighter Turkey Meatball Dinner | Replace heavy cream with half-and-half + 1 tsp cornstarch | Everyday healthy eating | Easy – minimal change |
Moroccan-Spiced Version
Growing up in Morocco, my mother would add a pinch of cinnamon and cumin to nearly every savory dish. For this spin, I add 1 teaspoon cumin, ½ teaspoon cinnamon, and ¼ teaspoon paprika to the meatball mixture. The warm spices pair beautifully with the creamy sauce – it’s like a fusion of tagine and Italian comfort. Serve with couscous for a truly special meal.
Dairy-Free Delight
For a dairy-free version, replace the heavy cream with full-fat coconut cream (the thick part from a can of coconut milk). Add a tablespoon of lemon juice to brighten the flavor. The sauce will have a subtle coconut note, which I actually love – it complements the artichokes wonderfully. Use nutritional yeast in place of Parmesan for a cheesy, umami finish.
Lighter Turkey Meatball Dinner
When I’m watching my waistline, I swap the heavy cream for half-and-half thickened with a teaspoon of cornstarch dissolved in a little broth. The sauce is still creamy and satisfying, but with fewer calories. You can also use ground chicken instead of turkey – the result is just as tender.
Share Your Version!
I hope you love these Baked Turkey Meatballs in Creamy Spinach Artichoke Sauce as much as I do. When you make them, I’d love to hear how they turn out – did you try the Moroccan spices? Did you go dairy-free? Let me know in the comments below. Tag me on Instagram @exorecipes or pin your photo on Pinterest – I always love seeing your creations.
If you found this healthy turkey meatball recipe helpful, please give it a 5-star rating and share it with a friend who needs a cozy, low-carb dinner. Your support means the world to this small NYC kitchen.
From my NYC kitchen to yours – I hope this recipe brings as much warmth to your table as it does to mine. — mia 🧡
Love This Recipe? Save It to Pinterest!
If you enjoyed this Baked Turkey Meatballs in Creamy Spinach Artichoke Sauce recipe, don’t let it get lost in your browser tabs! 😄 Pin it now so you can find it again anytime — and explore hundreds more tried-and-tested recipes waiting for you on my Pinterest boards.
👉 Follow mia on Pinterest @exorecipe
📌 Pin this recipe · 🔁 Re-pin your favorites · 💬 Tag me when you make it — I love seeing your creations!
How do you keep baked turkey meatballs from drying out?
Keeping turkey meatballs moist starts with the right fat ratio. I always use 93/7 ground turkey (93% lean, 7% fat) – that little bit of fat makes all the difference. Adding panko breadcrumbs that are moistened by the egg and a splash of milk (or just the egg) also helps retain moisture. Baking at 400°F for only 18-20 minutes ensures they cook through without drying. My biggest tip: don’t overmix the meat, and let the mixture rest for 5 minutes before forming. The final step of simmering them in the creamy sauce right before serving adds even more moisture back into the meatballs.
Can I use frozen spinach in the creamy spinach artichoke sauce?
Absolutely – frozen spinach works perfectly as a substitute for fresh. The key is to thaw it completely first, then squeeze out every last drop of excess water. Frozen spinach holds a lot of water, and if you add it without squeezing, your sauce will become watery and thin. Use about ½ cup of thawed, squeezed spinach in place of the 3 cups fresh. I recommend adding it at the same point as you would fresh spinach, after cooking the artichokes. It will wilt quickly. The texture will be slightly softer than fresh, but the flavor remains excellent.
What can I substitute for heavy cream in the sauce?
You have several great options for substituting heavy cream. For a lighter sauce, use half-and-half mixed with 1 teaspoon of cornstarch (dissolved in a little cold broth) to help thicken it. For a dairy-free alternative, full-fat coconut cream from a can of coconut milk works beautifully – add a squeeze of lemon to mimic the tang of cream. Another option is evaporated milk (not sweetened), which is creamier than regular milk but lower in fat. Keep in mind that each substitute will change the richness slightly: half-and-half yields a thinner sauce, coconut adds a subtle coconut flavor, and evaporated milk gives a slightly cooked-milk taste. I recommend using heavy cream for the classic indulgent version.
What temperature should I bake turkey meatballs to ensure they are fully cooked?
Turkey meatballs should be baked at 400°F (200°C) for 18-20 minutes. The internal temperature must reach 165°F (74°C) to be safely cooked. I always recommend using an instant-read thermometer inserted into the center of a meatball to check. If you don’t have a thermometer, look for visual cues: the meatballs should be golden brown on the outside, and when you cut one open, the inside should be white or light brown with no pink. Baking at this relatively high temperature allows the exterior to brown nicely while the interior stays juicy. Avoid opening the oven door frequently, as this can cause temperature fluctuations and uneven cooking.
Can I make these baked turkey meatballs ahead of time?
Yes, this recipe is excellent for advance preparation. You can bake the meatballs up to 2 days ahead and store them in the refrigerator in an airtight container. The sauce can also be made ahead and stored separately. When you’re ready to serve, simply reheat the sauce gently in a skillet, add the meatballs, and warm through for 5-7 minutes. For longer storage, the meatballs freeze beautifully for up to 3 months. I often double the recipe and freeze half the baked meatballs (without sauce) in a freezer bag. Then I make a fresh batch of sauce when I’m ready to use them – it tastes just like the day I made it.
How do I reheat leftover turkey meatballs in creamy sauce without them drying out?
The best way to reheat leftover turkey meatballs is on the stovetop in a skillet over low to medium-low heat. Add a splash of chicken broth, milk, or even water to thin the sauce back to its original consistency, as it will have thickened in the fridge. Cover the skillet and warm gently for 5-7 minutes, stirring occasionally, until the meatballs are heated through. You can also use the microwave in 30-second bursts, but be careful not to overheat, which can make the meatballs tough and rubbery. I avoid using high heat because it can cause the cream sauce to separate. With low-and-slow reheating, your leftovers will taste almost as good as fresh.
Can I use ground chicken instead of ground turkey?
Yes, ground chicken is an excellent substitute for ground turkey in this recipe. They have a very similar fat content and texture, so you can swap them 1:1. I recommend using ground chicken thigh meat if you can find it – it has a bit more fat and stays juicier than breast-only ground chicken. If you use lean ground chicken breast, you may want to add a tablespoon of olive oil to the meatball mixture to prevent dryness. The rest of the ingredients (panko, Parmesan, egg, seasonings) remain exactly the same. The flavor will be slightly milder than turkey, but it still pairs beautifully with the creamy spinach artichoke sauce.
What can I serve instead of pasta with these meatballs?
There are many delicious alternatives to pasta for serving these turkey meatballs. For a low-carb or gluten-free option, I love them over spiralized zucchini noodles (zoodles), cauliflower rice, or spaghetti squash. For something more substantive, try serving them with creamy polenta, mashed potatoes, or a bed of fluffy rice (brown or white). Crusty bread is always a winner for sopping up the creamy spinach artichoke sauce. You can also serve the meatballs on their own as an appetizer or main with a side of roasted vegetables like broccoli, asparagus, or Brussels sprouts. The versatility makes this the perfect easy baked meatballs recipe for any dietary need.
Did you make this recipe? I’d love to see! 🌟
Leave a star rating and a comment below – your feedback helps other readers and means so much to me. Snap a photo and tag me on Instagram or Pinterest @exorecipe so I can share your beautiful creation. And if you have a question or a twist you tried, drop it in the comments – I read every single one!
From my NYC kitchen to yours – I hope this recipe brings as much warmth to your table as it does to mine. — mia 🧡

Baked Turkey Meatballs in Creamy Spinach Artichoke Sauce
- Prep Time: 15 minutes
- Cook Time: 25 minutes
- Total Time: 40 minutes
- Yield: 4-6 servings 1x
- Method: Main Course
- Cuisine: American
Description
These tender baked turkey meatballs are nestled in a rich, creamy spinach artichoke sauce. A wholesome and satisfying meal perfect for any night of the week.
Ingredients
- For the Meatballs:
- 1 lb ground turkey (93/7)
- 1/2 cup panko breadcrumbs
- 1/4 cup grated Parmesan cheese
- 1 large egg, lightly beaten
- 2 cloves garlic, minced
- 1/2 teaspoon onion powder
- 1/2 teaspoon dried oregano
- 1/2 teaspoon salt
- 1/4 teaspoon black pepper
- 2 tablespoons chopped fresh parsley
- For the Sauce:
- 1 tablespoon olive oil
- 3 cloves garlic, minced
- 1 (14-ounce) can artichoke hearts, drained and chopped
- 3 cups fresh spinach
- 1 cup heavy cream
- 1/2 cup chicken broth
- 1/2 cup grated Parmesan cheese
- 1/4 teaspoon red pepper flakes (optional)
- Salt and pepper to taste
Instructions
- Preheat oven to 400°F (200°C). Line a baking sheet with parchment paper.
- In a large bowl, combine ground turkey, panko, Parmesan, egg, garlic, onion powder, oregano, salt, pepper, and parsley. Mix gently until just combined.
- Form into 1.5-inch meatballs (about 18-20) and place on the prepared baking sheet.
- Bake for 18-20 minutes, or until cooked through and golden brown.
- While meatballs bake, make the sauce: In a large skillet, heat olive oil over medium heat. Add garlic and cook for 1 minute.
- Add chopped artichoke hearts and cook for 2-3 minutes. Add spinach and cook until wilted, about 2 minutes.
- Pour in heavy cream and chicken broth, stirring to combine. Bring to a simmer.
- Stir in Parmesan cheese and red pepper flakes (if using). Season with salt and pepper to taste. Simmer for 2-3 minutes until slightly thickened.
- Add the baked meatballs to the sauce, turning to coat. Serve immediately, garnished with additional parsley or Parmesan if desired.
Notes
For a lighter version, substitute half-and-half for the heavy cream. Meatballs can also be made ahead and reheated gently in the sauce.
Nutrition
- Calories: 420
- Sugar: 3g
- Fat: 28g
- Carbohydrates: 12g
- Protein: 32g

Tried This Recipe? Leave a Comment!
Did you make this recipe? I’d love to hear how it turned out! Please leave a comment and a rating below. Your feedback helps other home cooks and supports cheerychop.com!
For more delicious inspiration, follow me on Pinterest!