Table of Contents
Baked Sweet Potato Rounds with Corn, Cheese, and Fresh Toppings – A Flavorful Vegetarian Delight
Let me take you back to a crisp autumn afternoon at the Union Square Greenmarket in New York City. I was wandering past bins of heirloom sweet potatoes—vivid orange, purple, and gold—when a memory from my childhood in Morocco flooded back: my mother roasting sweet potato slices over an open flame, topping them with a sprinkle of cumin and a drizzle of olive oil. That simple, soulful dish was my first lesson in how a few humble ingredients can become something unforgettable. This Baked Sweet Potato Rounds recipe is my grown-up homage to that memory—a vegetarian sweet potato appetizer that layers tender roasted sweet potato rounds with sweet corn, gooey melted cheese, and bright fresh toppings. It’s the kind of healthy loaded sweet potato rounds recipe that feels both indulgent and nourishing, perfect for game day, a holiday gathering, or a weeknight side that steals the show.
The magic here is in the contrast: the sweet potatoes roast until they’re caramelized at the edges and pillowy soft in the center, while the corn adds a pop of juicy sweetness and the cheese melts into a golden, blanket-like finish. A sprinkle of fresh herbs, a squeeze of lime, and maybe a whisper of smoked paprika—and you’ve got a dish that dances on your palate. The aroma alone, with sweet potato caramelizing alongside corn and cheese, will fill your kitchen with a warmth that says “comfort” in every language. I love how the natural sweetness of the potato plays against the savory cheese and the bright, acidic pop of a fresh tomato salsa or a dollop of crema.
I’ve tested this easy sweet potato snack dozens of times in my tiny NYC kitchen, tweaking the thickness of the rounds, the baking temperature, and the cheese blend until everything was just right. What sets my version apart is a French-trained precision in the cut and roast—ensuring every round cooks evenly—and a Moroccan-inspired touch in the spice blend that elevates the whole flavor profile. In this post, I’ll share my pro tip for perfectly uniform slices, a common mistake to avoid that leads to soggy rounds, and a handful of creative variations so you can make this recipe your own. Let’s get cooking!
Why This Baked Sweet Potato Rounds Recipe Is the Best
The Flavor Secret: This isn’t just another cheesy corn sweet potato bites recipe. I draw on my Moroccan roots to add a subtle warmth—think a pinch of cumin and a hint of smoked paprika—that complements the sweet potato’s natural earthiness. The corn brings a fresh, juicy sweetness that balances the richness of the melted cheese, while a final scattering of fresh cilantro and a squeeze of lime cuts through everything with brightness. It’s a layered, globally inspired flavor profile that feels both familiar and exciting.
Perfected Texture: During my time at Le Cordon Bleu in Paris, I learned that the key to a perfect roast is uniformity and temperature. I slice the sweet potatoes into even ½-inch rounds using a mandoline (steady hands, friends!) and roast them at 400°F on a parchment-lined sheet. This gives the rounds enough time to develop a caramelized, slightly crisp edge while staying incredibly tender inside. No sogginess, no burnt edges—just perfectly cooked rounds every time.
Foolproof & Fast: I’ve designed this healthy loaded sweet potato rounds recipe to be approachable for any cook. With just 15 minutes of prep and a handful of ingredients, you can have a stunning dish on the table in under an hour. The steps are straightforward, the ingredients are easy to find at any US grocery store, and the result looks like you spent hours in the kitchen. Whether you’re a seasoned home cook or just starting out, this recipe will make you look like a hero.
Baked Sweet Potato Rounds Recipe Ingredients
I source my sweet potatoes from the Union Square Greenmarket when I can—the variety of shapes and colors is stunning—but any well-formed sweet potato from your local grocery store will work beautifully. The corn I love using is fresh in the summer, but frozen works just as well (more on that in the FAQ). And the cheese? I usually grab a block of good melting cheese from Murray’s Cheese in Greenwich Village. Here’s everything you’ll need.
Ingredients List
- 2 large sweet potatoes (about 2 lbs), scrubbed and cut into ½-inch rounds
- 2 tablespoons olive oil
- 1 teaspoon smoked paprika
- ½ teaspoon ground cumin
- ½ teaspoon garlic powder
- Salt and freshly ground black pepper, to taste
- 1 cup corn kernels (fresh, frozen and thawed, or canned and drained)
- 1 ½ cups shredded Monterey Jack cheese (or a blend of mozzarella and cheddar)
- ¼ cup chopped fresh cilantro or parsley
- 2 green onions, thinly sliced
- 1 jalapeño, seeded and minced (optional, for heat)
- ½ cup cherry tomatoes, diced (for serving)
- ¼ cup sour cream or Greek yogurt (for drizzling)
- Lime wedges, for serving
Ingredient Spotlight
Sweet Potatoes: The foundation of this dish. Look for sweet potatoes that are firm, smooth, and heavy for their size—avoid any with soft spots or wrinkles. I prefer using orange-fleshed sweet potatoes (often labeled as “garnet” or “jewel” yams in US stores) because they’re naturally sweet and creamy when roasted. For a slightly starchier, less sweet version, you can use Japanese sweet potatoes (purple skin, white flesh), which hold their shape even better. Tested substitution: Try Yukon Gold potatoes for a milder, buttery flavor—though you’ll lose some of the natural sweetness.
Corn: Fresh corn on the cob (cut off the cob) gives the sweetest, crunchiest result, especially in summer. But I’ve tested this with frozen corn many times and it works beautifully—just thaw and pat dry before using to avoid excess moisture. Canned corn is also fine; drain and rinse it well. Tested substitution: For a lower-carb option, use finely diced zucchini or yellow summer squash in place of corn—it adds a similar pop of texture and sweetness.
Cheese: Monterey Jack is my top pick because it melts smoothly and has a mild, buttery flavor that doesn’t overwhelm the sweet potato and corn. A blend of part-skim mozzarella (for stretch) and sharp cheddar (for flavor) works beautifully too. For a dairy-free version, I’ve had great results with Violife’s shredded mozzarella-style shreds—they melt surprisingly well. Tested substitution: Smoked gouda adds a gorgeous smoky depth; just grate it yourself for the best melt.
Spices: Smoked paprika and cumin are the dynamic duo here. The smoked paprika brings a subtle smokiness that makes the dish feel hearty and complex, while the cumin adds an earthy warmth that echoes my Moroccan cooking roots. I always buy these spices from a store with good turnover—freshness matters! Tested substitution: If you don’t have smoked paprika, use a mix of regular paprika and a tiny pinch of chipotle powder for smokiness.
| Original Ingredient | Best Substitution | Flavor / Texture Impact |
|---|---|---|
| Sweet Potato | Yukon Gold Potato | Milder, less sweet; firmer texture |
| Fresh Corn | Frozen Corn (thawed & patted dry) | Slightly less crisp, but still sweet |
| Monterey Jack Cheese | Smoked Gouda or Dairy-Free Shreds | Smokier flavor; dairy-free version melts a bit less |
| Smoked Paprika | Regular Paprika + tiny pinch chipotle | Less smoky, more earthy heat |
How to Make Baked Sweet Potato Rounds — Step-by-Step
Making this baked sweet potato rounds recipe is wonderfully straightforward. Follow these steps and you’ll have a platter of gorgeous, flavorful rounds that everyone will reach for.
Step 1: Prepare the Sweet Potatoes
Preheat your oven to 400°F (200°C). Line two large baking sheets with parchment paper. Scrub the sweet potatoes well (you can peel them if you prefer, but I like the skin on for texture and fiber). Using a sharp knife or a mandoline set to ½-inch thick, slice the sweet potatoes into even rounds. Try to keep them as uniform as possible—this is the key to even cooking. Place the rounds in a large bowl.
⚠️ Common Mistake to Avoid: Slicing the rounds too thin (they’ll burn before the center softens) or too thick (they’ll take too long to cook through and may dry out). A ½-inch thickness is the sweet spot.
Step 2: Season the Rounds
Drizzle the olive oil over the sweet potato rounds and toss gently with your hands to coat evenly. In a small bowl, mix the smoked paprika, cumin, garlic powder, 1 teaspoon of salt, and ½ teaspoon of black pepper. Sprinkle this spice mixture over the rounds and toss again until every round is evenly coated. Arrange the rounds in a single layer on the prepared baking sheets, making sure they don’t overlap—crowding will steam them instead of roasting.
💡 mia’s Pro Tip: For extra caramelization, let the seasoned rounds sit on the baking sheet for 5–10 minutes before roasting. This allows the salt to draw out a bit of moisture, which then concentrates as they roast, creating a deeper, sweeter crust.
Step 3: Roast the Sweet Potato Rounds
Roast the sweet potato rounds in the preheated oven for 15 minutes. Then, carefully flip each round using a spatula and rotate the baking sheets (top to bottom, front to back). Continue roasting for another 10–12 minutes, until the rounds are golden brown on the edges and tender when pierced with a fork. The total roasting time should be 25–28 minutes.
💡 mia’s Pro Tip: If your rounds are browning faster on one side, don’t skip the rotating step. Ovens have hot spots, and a quick spin ensures even caramelization across all rounds.
Step 4: Add Corn and Cheese
Remove the baking sheets from the oven. Sprinkle the corn kernels evenly over the sweet potato rounds, then top with the shredded cheese. Return the sheets to the oven and bake for an additional 5–7 minutes, until the cheese is melted and bubbly and the corn is heated through. For a slightly browned, bubbly top, switch the oven to broil for the final 1–2 minutes—watch closely so the cheese doesn’t burn.
⚠️ Common Mistake to Avoid: Adding the corn and cheese too early in the roasting process. The corn will release moisture and make the rounds soggy, and the cheese will overcook and become greasy. Wait until the rounds are nearly done, then add the toppings.
Step 5: Garnish and Serve
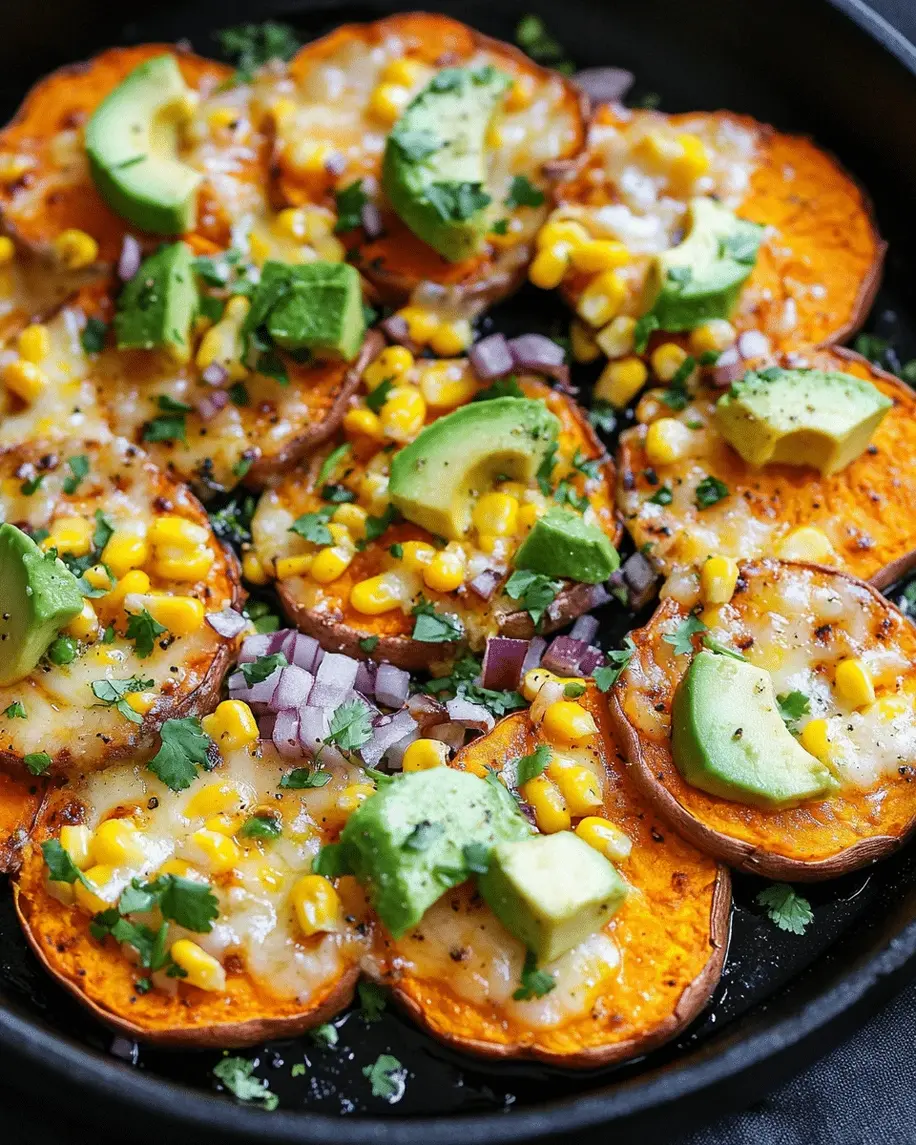
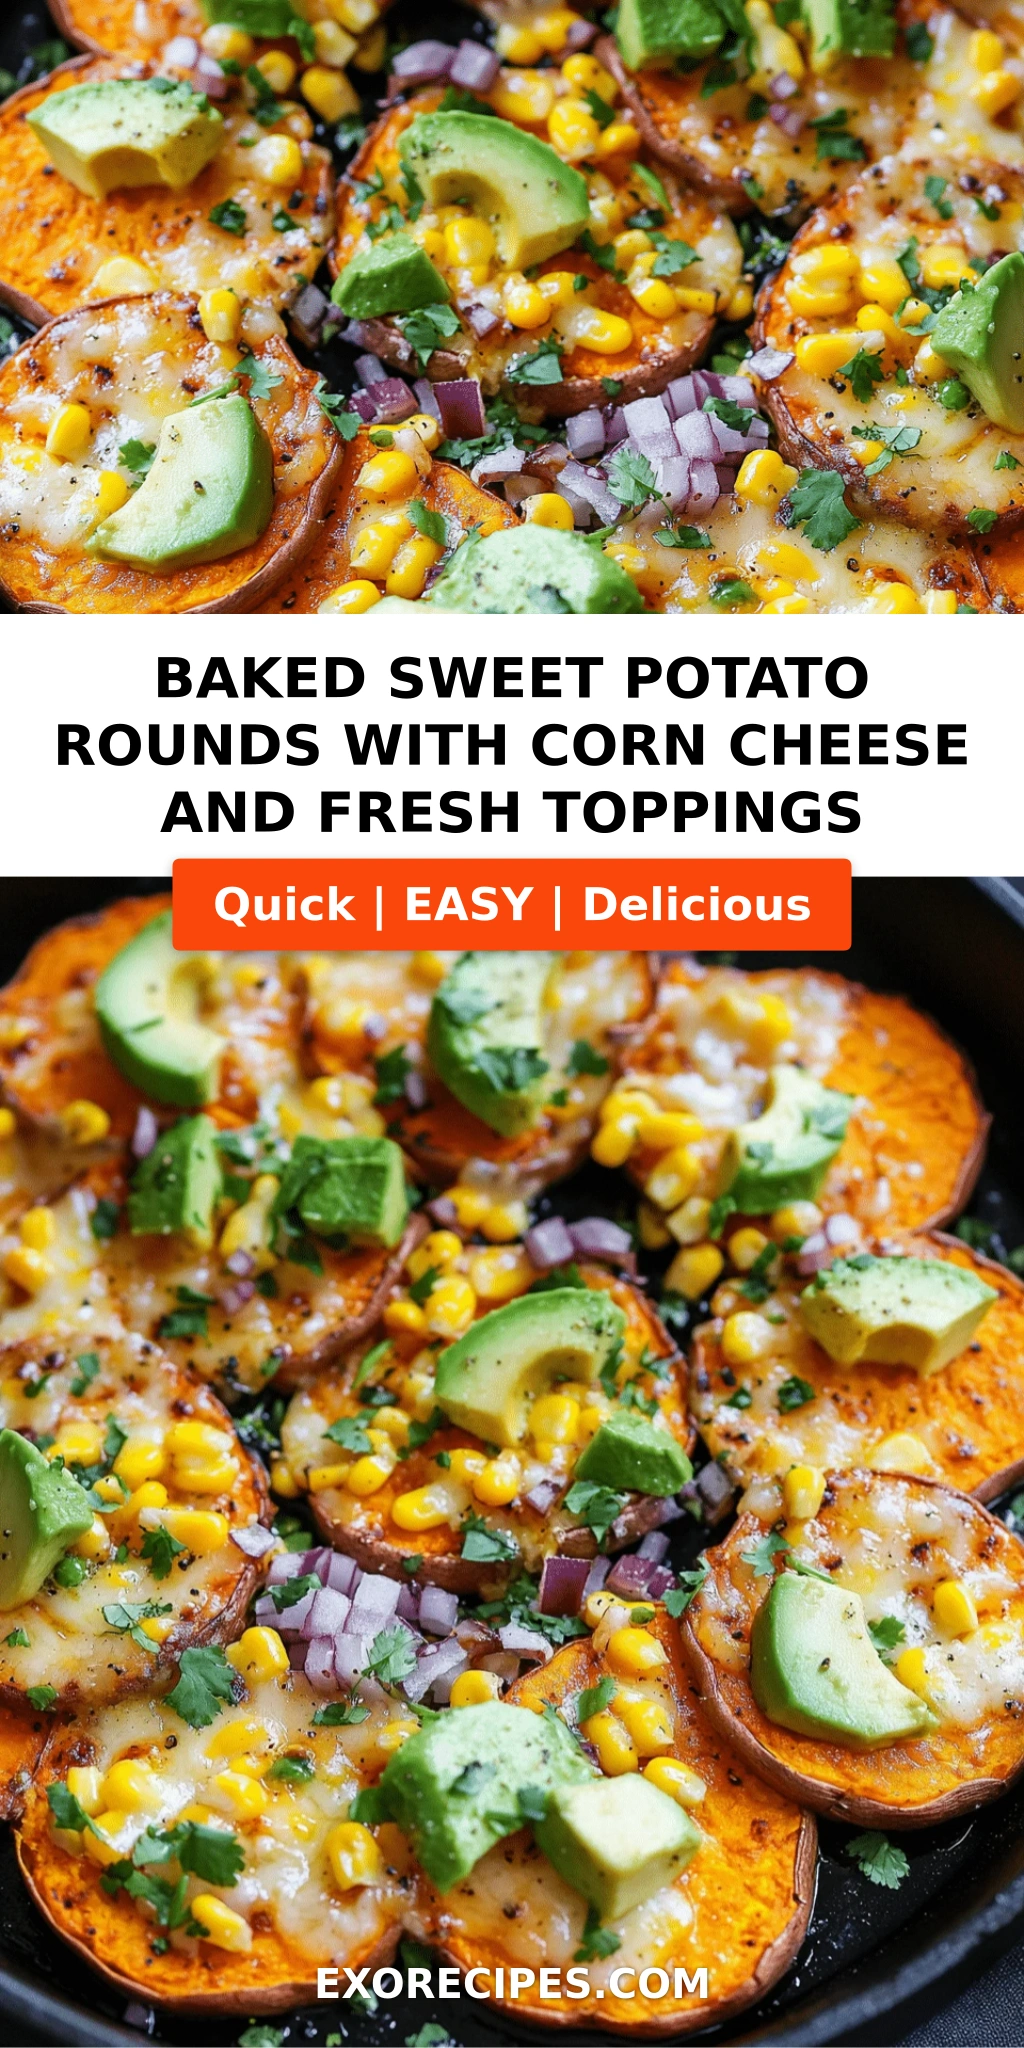
Transfer the cheesy sweet potato rounds to a serving platter. Scatter the fresh cilantro (or parsley), sliced green onions, and minced jalapeño (if using) over the top. Spoon the diced cherry tomatoes around the platter, drizzle with sour cream or Greek yogurt, and serve with lime wedges on the side. Encourage everyone to squeeze fresh lime juice over their rounds before eating—it lifts the whole dish.
💡 mia’s Pro Tip: For a restaurant-worthy presentation, arrange the rounds in a circular pattern on a large wooden board or white platter, then garnish generously. The visual contrast of orange, yellow, green, and red is stunning.
| Step | Action | Duration | Key Visual Cue |
|---|---|---|---|
| 1 | Slice & season rounds | 10 mins | Evenly coated orange rounds |
| 2 | First roast | 15 mins | Edges beginning to brown |
| 3 | Flip & finish roasting | 10–12 mins | Golden brown, fork-tender |
| 4 | Add corn & cheese, final bake | 5–7 mins (+ broil 1–2) | Cheese melted, bubbly, golden |
| 5 | Garnish & serve | 5 mins | Bright, colorful, inviting platter |
Serving & Presentation
These baked sweet potato rounds are incredibly versatile. I love serving them as a vegetarian appetizer at parties—they’re hand-held, easy to eat, and disappear faster than almost anything else on the table. For a more substantial meal, arrange a few rounds on a plate alongside a crisp green salad dressed with a simple lemon vinaigrette. The freshness of the salad balances the richness of the cheese and the sweetness of the potato beautifully.
In my NYC apartment, I often serve these as part of a casual dinner spread with friends. I’ll put the rounds on a large wooden board with small bowls of extra toppings: more diced tomatoes, pickled red onions, sliced avocado, a swirl of hot sauce, and extra lime wedges. Everyone builds their own, and it turns into a fun, interactive meal. For a Moroccan-inspired twist, I sometimes add a dollop of harissa yogurt (mix 2 tablespoons harissa paste into ½ cup Greek yogurt) for a spicy, creamy kick.
When it comes to plating, I like to arrange the rounds in a single layer on a platter, slightly overlapping, so the cheese and toppings are fully visible. Garnish generously—the green onions and cilantro should look like a fresh confetti. A final sprinkle of flaky sea salt just before serving adds a lovely crunch and a pop of salinity that ties all the flavors together.
| Pairing Type | Suggestions | Why It Works |
|---|---|---|
| Side Dish | Mixed green salad, grilled chicken, black bean soup | Adds freshness or protein to balance the rich, cheesy rounds |
| Sauce / Dip | Harissa yogurt, chipotle aioli, cilantro-lime crema | Adds creamy, spicy, or tangy contrast to the sweet potato |
| Beverage | Crisp white wine (Sauvignon Blanc), light lager, agua fresca | Cuts through richness and refreshes the palate |
| Garnish | Pickled red onions, sliced avocado, crumbled cotija, hot sauce | Adds texture, color, and customizable flair |
Make-Ahead, Storage & Reheating
As a busy New Yorker who’s often juggling work, recipe testing, and a social life, I’m a big fan of make-ahead strategies. These baked sweet potato rounds are great for meal prep because you can do most of the work in advance and finish them just before serving. Here’s how I handle it.
| Method | Container | Duration | Reheating Tip |
|---|---|---|---|
| Refrigerator | Airtight container in single layer | Up to 4 days | Reheat in a 350°F oven for 8–10 mins |
| Freezer | Freezer-safe container, layers separated by parchment | Up to 2 months | Thaw in fridge overnight, then reheat at 375°F for 12–15 mins |
| Make-Ahead | Roast rounds without toppings, store in fridge | Up to 2 days in advance | Add corn & cheese just before final bake + broil |
If you’re making these for a party, I recommend roasting the sweet potato rounds up to 2 days ahead and keeping them in the fridge. When you’re ready to serve, simply arrange them on a baking sheet, top with corn and cheese, and bake at 400°F for 8–10 minutes, then broil for 1–2 minutes to get the cheese bubbly. This method gives you the fresh-from-the-oven taste without the last-minute stress. For leftovers, avoid the microwave if possible—it will make the rounds soggy. A quick reheat in the oven or toaster oven restores their texture beautifully.
Variations & Easy Swaps
One of the things I love most about this easy sweet potato snack is how adaptable it is. Whether you’re cooking for dietary restrictions, seasonal ingredients, or just a craving for something different, here are some of my favorite variations.
| Variation | Key Change | Best For | Difficulty Impact |
|---|---|---|---|
| Moroccan Spiced | Add 1 tsp ras el hanout, swap cilantro for mint | Adventurous palates, dinner parties | Easy |
| Dairy-Free / Vegan | Use dairy-free cheese shreds + omit sour cream | Dairy-free diets, vegans | Easy |
| Loaded Tex-Mex | Add black beans, use pepper jack, top with pico de gallo | Game day, casual gatherings | Easy |
Moroccan Spiced Variation
This is my personal favorite—a nod to my heritage. Replace the smoked paprika and cumin with 1 teaspoon of ras el hanout (a fragrant Moroccan spice blend available at specialty stores or online). Swap the cilantro for fresh mint and add a handful of toasted slivered almonds or pine nuts for crunch. The ras el hanout brings warm notes of cinnamon, coriander, and ginger that pair beautifully with the sweet potato. Serve with a side of harissa yogurt for dipping, and you’ve got a dish that transports you straight to a Marrakech courtyard.
Dairy-Free / Vegan Variation
I’ve tested this with several dairy-free cheese alternatives, and my top pick is the Violife Mozzarella Shreds—they melt nicely and have a mild, creamy flavor. Use 1 ½ cups of the shreds in place of the Monterey Jack. For the sour cream drizzle, swap in a plant-based sour cream or a simple cashew crema (soak ½ cup cashews in hot water for 30 minutes, then blend with ¼ cup water, 2 tablespoons lime juice, and a pinch of salt). The result is just as satisfying, and even my non-vegan friends give it two thumbs up.
Loaded Tex-Mex Variation
When I’m craving something bold and hearty, I go Tex-Mex. Add ½ cup drained and rinsed black beans to the corn mixture before sprinkling over the rounds. Use pepper jack cheese instead of Monterey Jack for a spicy kick. After baking, top with a generous spoonful of fresh pico de gallo, a drizzle of chipotle crema (mix 2 tablespoons adobo sauce from chipotles in adobo into ½ cup sour cream), and a scattering of pickled jalapeños. This version is a meal in itself—serve it with a side of rice and you’re set.
How do you cut sweet potatoes into evenly thick rounds for baking?
Getting uniform ½-inch thick rounds is the key to even cooking. I strongly recommend using a mandoline slicer set to ½ inch—it gives you perfect, consistent slices every time with minimal effort. If you don’t have a mandoline, use a sharp chef’s knife and a steady hand. First, trim a thin slice off one side of the sweet potato so it sits flat on the cutting board. Then, using your knuckles as a guide, slice straight down at even intervals. For the most uniform rounds, choose sweet potatoes that are similar in diameter throughout their length—long, cylindrical ones work best. A Y-shaped vegetable peeler can also help you even out any wonky edges before slicing.
Can you use frozen corn instead of fresh corn for this baked sweet potato recipe?
Absolutely! I’ve tested this recipe with frozen corn many times, and it works beautifully. The key is to thaw the corn first and pat it very dry with a clean kitchen towel or paper towels. Excess moisture from frozen corn can steam the sweet potato rounds and prevent the cheese from melting properly. Once thawed and dried, use it exactly as you would fresh corn. Frozen corn is often sweeter than fresh because it’s flash-frozen at peak ripeness, so you might even prefer it. Canned corn also works—just drain and rinse it well, then pat dry. In a pinch, you can even use frozen corn straight from the bag without thawing, but add an extra 2 minutes to the final bake time and expect a slightly wetter result.
What type of cheese melts best on top of sweet potato rounds?
For the creamiest, most luscious melt, I recommend Monterey Jack cheese. It has a high moisture content and a mild, buttery flavor that complements the sweet potato and corn without overpowering them. A blend of part-skim mozzarella (for its stretchy, gooey texture) and sharp cheddar (for bold flavor) is my second-favorite option. If you want something with more character, smoked gouda melts beautifully and adds a wonderful smoky depth. For a dairy-free version, Violife’s mozzarella-style shreds are the best I’ve found—they melt surprisingly well and have a neutral flavor. Whatever cheese you choose, grate it yourself from a block rather than using pre-shredded bags, which contain anti-caking agents that can prevent smooth melting.
How long should you bake sweet potato rounds so they are tender but not mushy?
At 400°F, ½-inch thick sweet potato rounds typically need a total of 25–28 minutes of roasting before adding the cheese and corn. I roast them for 15 minutes, flip each round, then roast for another 10–12 minutes. At this point, the rounds should be golden brown on the edges and tender when pierced with a fork—but not falling apart. After adding the cheese and corn, they go back in for 5–7 minutes, so the total oven time is about 30–35 minutes. The key to avoiding mushiness is threefold: don’t crowd the baking sheet, flip the rounds halfway through, and don’t over-roast. If you’re making smaller rounds (¼-inch), reduce the initial roast to 10+8 minutes. For larger rounds (¾-inch), extend the initial roast to 18+12 minutes.
Can I make this baked sweet potato rounds recipe ahead of time for a party?
Yes, and I actually encourage it! The best make-ahead strategy is to roast the sweet potato rounds (without the corn and cheese) up to 2 days in advance. Let them cool completely, then store them in a single layer in an airtight container in the fridge. When you’re ready to serve, arrange the rounds on a baking sheet, top with corn and cheese, and bake at 400°F for 8–10 minutes, then broil for 1–2 minutes until the cheese is bubbly and golden. This approach gives you freshly baked flavor with most of the work done ahead. You can also prep all the toppings—dice the tomatoes, chop the herbs, make the crema—a day in advance and store them separately in the fridge. The only thing I don’t recommend making ahead is the final garnish; add cilantro, green onions, and lime just before serving for maximum freshness.
What can I use instead of cilantro for the topping?
If cilantro isn’t your thing (and I know for some people it’s a genetic dislike!), you have several excellent alternatives. Fresh flat-leaf parsley is the most neutral substitute—it adds a similar fresh, green pop without any soapy notes. Fresh mint is another beautiful option, especially if you’re making the Moroccan-spiced variation; it brings a cool, bright note that pairs wonderfully with sweet potato and lime. Fresh chives or dill can also work, though dill has a stronger personality that will change the flavor profile slightly. For a completely different but delicious twist, try using finely chopped arugula or watercress as a garnish—they add a peppery bite that cuts through the richness of the cheese. Whatever herb you choose, add it just before serving so it stays vibrant.
Are baked sweet potato rounds healthy? What about the nutrition?
Yes, these rounds are a nutritious choice! Sweet potatoes are packed with beta-carotene (which your body converts to vitamin A), fiber, and potassium. Corn adds fiber and B vitamins, while the cheese provides calcium and protein. A serving of about 4–5 rounds (with toppings) typically contains around 250–300 calories, 8–10g protein, 30–35g carbohydrates, 12–15g fat, and 6–8g sugar, depending on the exact ingredients you use. To make them even lighter, you can reduce the cheese by half, use a low-fat cheese, or swap the sour cream for plain Greek yogurt. For a lower-carb version, use Yukon Gold potatoes or even thick zucchini slices as the base. The beauty of this recipe is that it’s naturally gluten-free and can be easily adapted to fit various dietary needs while still being incredibly satisfying.
How do I keep the sweet potato rounds from sticking to the baking sheet?
Parchment paper is my non-negotiable solution here. Line your baking sheets with parchment paper before arranging the rounds—it creates a virtually non-stick surface and makes cleanup a breeze. I don’t recommend wax paper (it can melt at high heat) or aluminum foil (rounds tend to stick to foil, especially when the cheese melts). If you don’t have parchment, you can lightly grease the baking sheet with olive oil or use a silicone baking mat (Silpat). Another important tip: make sure the rounds are in a single layer with a little space between them—if they’re touching, they can steam and stick together. And don’t forget to flip the rounds at the halfway point; this helps release them from the paper and ensures even browning on both sides.
Can I grill these sweet potato rounds instead of baking?
Yes, you can absolutely grill them! This is a fantastic option for summer cookouts. Preheat your grill to medium-high heat (about 400°F). Slice the sweet potatoes into ½-inch rounds and toss them with oil and spices as directed. Grill the rounds directly on the grates for 4–5 minutes per side, until they have nice grill marks and are tender when pierced. Then, transfer the rounds to a cast-iron skillet or a disposable aluminum pan on the grill, top with corn and cheese, cover the grill, and cook for another 3–5 minutes until the cheese melts. The grill adds a wonderful smoky char that complements the sweet potato beautifully. One tip: use a grill basket or a piece of heavy-duty foil with holes poked in it for smaller rounds that might fall through the grates.
What other toppings can I add to these cheesy corn sweet potato bites?
The possibilities are endless! Beyond the toppings I’ve listed, some of my favorite additions include: pickled red onions (their tanginess cuts through the richness beautifully), crumbled bacon or turkey bacon (for a non-vegetarian version), sliced avocado or guacamole (for creamy texture), a drizzle of hot honey (for sweet heat), toasted pepitas or sunflower seeds (for crunch), crumbled feta or cotija cheese (for a salty, tangy finish), and a sprinkle of everything bagel seasoning (for savory depth). I also love adding a spoonful of black bean and corn salsa or a dollop of guacamole for a more substantial bite. The beauty of this recipe is that it’s a canvas—feel free to raid your fridge and get creative!
Share Your Version!
I absolutely love hearing how my recipes come to life in your kitchens. If you make these Baked Sweet Potato Rounds with Corn, Cheese, and Fresh Toppings, please leave a star rating and a comment below—tell me which variation you tried, what toppings you added, and how your family or guests reacted. Did you go for the Moroccan-spiced version with mint and harissa yogurt? Or did you load them Tex-Mex style with black beans and pico de gallo? I want to know!
And don’t forget to snap a photo and share it on Instagram or Pinterest—tag me @exorecipes so I can see your beautiful creations. I always repost my favorites on my stories. If you have a question about a substitution or a technique, drop it in the comments too. I read every single one and I’ll personally answer you. From my NYC kitchen to yours—I hope this recipe brings as much warmth to your table as it does to mine. — mia 🧡
Love This Recipe? Save It to Pinterest!
If you enjoyed this Baked Sweet Potato Rounds with Corn, Cheese, and Fresh Toppings recipe, don’t let it get lost in your browser tabs! 😄 Pin it now so you can find it again anytime — and explore hundreds more tried-and-tested recipes waiting for you on my Pinterest boards.
👉 Follow mia on Pinterest @exorecipe
📌 Pin this recipe · 🔁 Re-pin your favorites · 💬 Tag me when you make it — I love seeing your creations!

Baked Sweet Potato Rounds with Corn, Cheese, and Fresh Toppings: A Flavorful Vegetarian Delight
Instructions
Tried This Recipe? Leave a Comment!
Did you make this recipe? I’d love to hear how it turned out! Please leave a comment and a rating below. Your feedback helps other home cooks and supports cheerychop.com!
For more delicious inspiration, follow me on Pinterest!