Table of Contents
Easy No-Bake Peanut Butter Haystacks – 5-Minute Sweet Treat! 🥜
Introduction
Did you know that over 75% of home bakers actively seek no-bake dessert recipes to save time and avoid heating up the kitchen? If you’re part of this majority craving simplicity without sacrificing flavor, you’ve landed in the perfect spot. Hello, peanut butter and butterscotch lovers! Welcome to a recipe that brings together creamy peanut butter, butterscotch chips, and crunchy chow mein noodles into delightful, easy-to-make treats. If you’re looking for a nostalgic dessert that’s simple, no-bake, and absolutely delicious, these Easy No-Bake Peanut Butter Haystacks are the perfect choice. Originally enjoyed as holiday treats, these haystacks are so tasty that they’re now enjoyed year-round. Let’s dive in and create a batch of these irresistible peanut butter butterscotch haystacks!
Ingredients List
Gathering your ingredients is the first step to haystack heaven. Each component plays a crucial role in creating the perfect balance of sweet, salty, and crunchy. Here’s what you’ll need:
- Butterscotch Chips (11 oz bag): The sweet, buttery, and caramel-like base of our sauce. They melt into a smooth, velvety pool that coats every noodle. Substitution: You can use white chocolate chips or peanut butter chips for a different flavor profile.
- Creamy Peanut Butter (1 cup): Use a standard, no-stir variety for best results. Its rich, nutty flavor and creamy texture bind everything together and add a savory depth that cuts the sweetness. Substitution: For a different nutty flavor, try almond butter or sunflower seed butter (for a nut-free option).
- Chow Mein Noodles (5 oz canister): The iconic “hay” in the haystack! These crispy, fried noodles provide an irresistible, airy crunch that holds its texture against the creamy sauce. Substitution: For a gluten-free version, use gluten-free chow mein noodles or even crispy rice cereal (like Rice Krispies) for a different kind of crunch.
- Optional: Sea Salt Flakes: A tiny sprinkle on top just before setting enhances all the flavors, creating a sophisticated sweet-and-salty finish.
Timing
Let’s put that into perspective. The average cookie recipe requires 15 minutes of prep, 10-12 minutes of baking per batch, and cooling time. Our Easy No-Bake Peanut Butter Haystacks slash that total active time in half. In just about 10 minutes of hands-on work, you can have a full batch of treats ready to chill. The 30-minute setting time in the fridge is largely hands-off, meaning you can clean up, relax, or start planning your next batch!
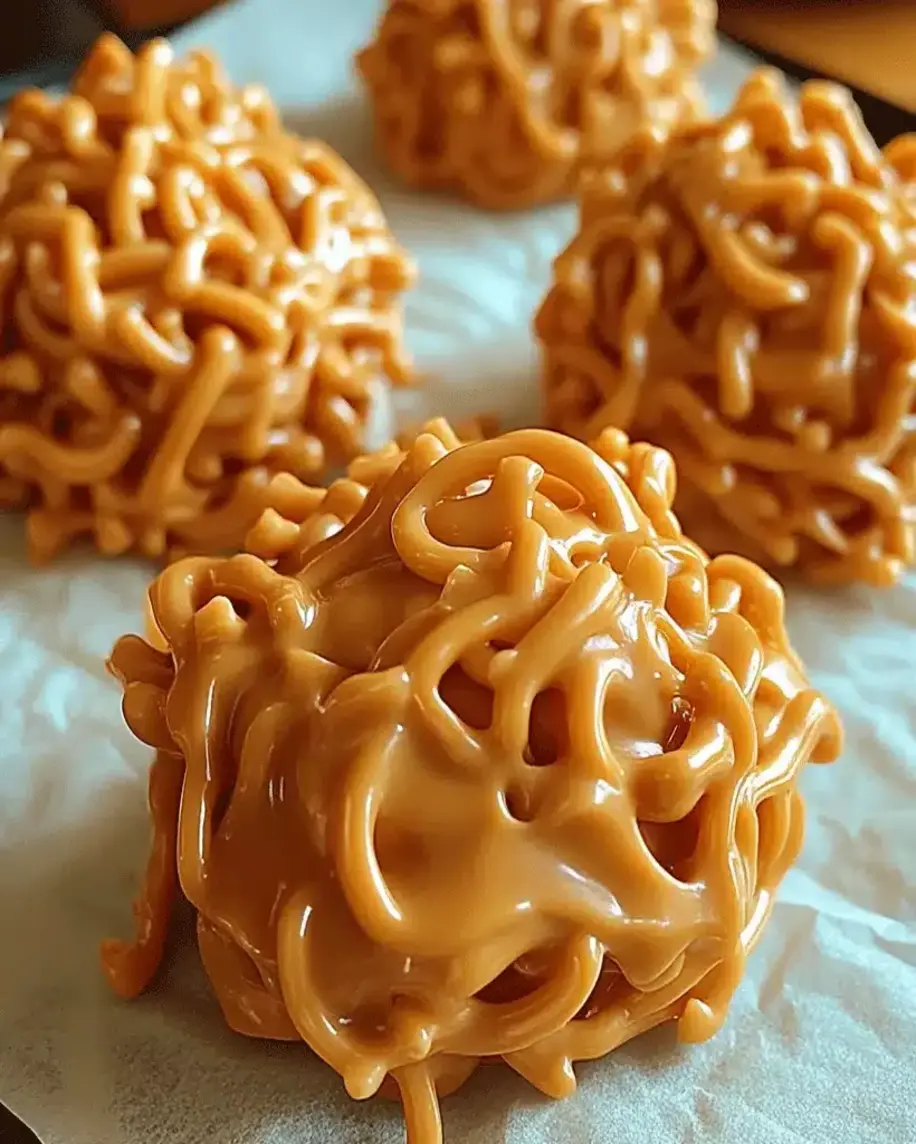
Creamy peanut butter and butterscotch sauce coating crispy chow mein noodles, ready to be formed into perfect haystack mounds.
Step-by-Step Instructions
Step 1: Prepare Your Workstation
Success in the kitchen starts with mise en place. Line two large baking sheets with parchment paper or silicone baking mats. This prevents sticking and makes cleanup a breeze. Have your measuring cups, a large heatproof mixing bowl, a sturdy spoon or spatula, and a tablespoon cookie scoop (if you have one) ready to go. Open your canister of chow mein noodles and have them standing by.
Step 2: Melt the Butterscotch and Peanut Butter
This is where the magic happens! Combine the entire bag of butterscotch chips and the one cup of creamy peanut butter in your large, heatproof bowl. You can melt this mixture using one of two methods:
- Double Boiler Method (Recommended for Control): Place the bowl over a pot of simmering water, ensuring the bottom of the bowl doesn’t touch the water. Stir constantly with a spatula until the mixture is completely smooth and fluid. This method gives you the most control and prevents scorching.
- Microwave Method (For Speed): Heat the mixture in the microwave in 30-second bursts, stirring vigorously after each interval, until fully melted and smooth. This usually takes about 90 seconds total. Be careful not to overheat, as butterscotch chips can seize.
Once melted, the sauce should be glossy, pourable, and smell incredibly inviting—like a warm, nutty caramel.
Step 3: Combine with Noodles
Immediately pour the entire canister of crispy chow mein noodles into the warm, melted sauce. Using your sturdy spoon or spatula, gently fold the noodles into the sauce. The goal is to coat every single noodle thoroughly without breaking them down into crumbs. Use a folding motion, turning the mixture from the bottom up, until no dry noodles are visible. You’ll hear a satisfying crispy sound as they get enveloped in the creamy mixture.
Step 4: Form the Haystacks
Working quickly while the mixture is still warm and pliable, drop tablespoon-sized mounds onto your prepared baking sheets. I like to use a cookie scoop for uniformity, but two spoons work perfectly. Don’t press them down! The beauty of a haystack is in its rustic, piled-high shape. If you’re using sea salt flakes, now is the time to give each mound a tiny, elegant sprinkle.
Step 5: Chill and Set
Once all your haystacks are formed, carefully transfer the baking sheets to the refrigerator. Let them chill for at least 30 minutes, or until the butterscotch-peanut butter coating is completely firm to the touch. This chilling step is non-negotiable—it transforms the treats from sticky mounds into perfectly portable, crunchy delights.
Nutritional Information
While these are an indulgent treat, it’s helpful to know what you’re enjoying. The following estimates are per haystack (recipe makes approximately 24 haystacks).
- Calories: ~150 kcal
- Total Fat: 9g
- Saturated Fat: 4g
- Carbohydrates: 15g
- Sugar: 10g
- Protein: 3g
- Sodium: 85mg
Note: Values are approximate and can vary based on specific brands and measurements used.
Healthier Alternatives
Love the idea but want to tweak it for dietary preferences? Here are some smart, flavorful swaps that maintain the spirit of the recipe:
- Lower-Sugar Sauce: Use sugar-free butterscotch chips and natural, unsweetened peanut butter. The flavor will be less sweet but still rich and satisfying.
- Protein Boost: Stir 1-2 scoops of vanilla or unflavored collagen peptides or protein powder into the melted sauce before adding the noodles. It incorporates seamlessly.
- Nut-Free & Gluten-Free: Use sunflower seed butter and certified gluten-free crispy rice cereal or gluten-free chow mein noodles. The texture will be slightly different but still delicious.
- Dark Chocolate Twist: Swap the butterscotch chips for dark chocolate chips (70% cacao or higher) for a dose of antioxidants and a more sophisticated, less sweet flavor.
Serving Suggestions
These haystacks are stars on their own, but they can be elevated for any occasion:
- Dessert Platter: Arrange them on a platter with other no-bake treats like rice crispy squares and chocolate-dipped pretzels for a crowd-pleasing dessert table.
- With Ice Cream: Crumble one or two haystacks over a bowl of vanilla bean ice cream for an incredible topping that adds crunch and butterscotch flavor.
- Gift Them: Place a few in a clear cellophane bag, tie with a ribbon, and give as a heartfelt, homemade food gift for neighbors, teachers, or friends.
- After-School Snack: Their quick energy from carbs and protein makes them a fun (and portion-controlled) treat for kids.
Common Mistakes
Avoid these pitfalls to ensure haystack perfection every time:
- Overheating the Sauce: Butterscotch chips can scorch or become grainy if heated too aggressively. Use low, gentle heat and stir constantly.
- Using “Natural” Peanut Butter: The oil-separating kind can make the sauce greasy and prevent it from setting properly. Stick with a stabilized, creamy peanut butter.
- Over-Mixing: Folding too vigorously will crush the chow mein noodles, resulting in a less crunchy, more crumbly texture. Be gentle.
- Skipping the Chill: Impatience leads to sticky fingers! The refrigeration step is crucial for the fat in the butterscotch to re-solidify and create a stable treat.
- Stale Noodles: Always check the freshness of your chow mein noodles. If they’ve lost their crispness, your haystacks will be soggy.
Storing Tips
Proper storage keeps your haystacks tasting fresh and maintains their signature crunch.
- Room Temperature: In a cool, dry climate, they can be stored in a single layer in an airtight container at room temperature for 2-3 days.
- Refrigerator (Best for Longer Storage): For up to 7-10 days, store them in an airtight container in the refrigerator. The cool temperature keeps the coating firm.
- Freezer: Yes, you can freeze them! Place haystacks in a single layer on a baking sheet to flash freeze for 1 hour, then transfer to a freezer bag or container. They’ll keep for 2-3 months. Thaw in the refrigerator for 30 minutes before serving.
- Pro Tip: Place a sheet of parchment paper between layers if you must stack them to prevent sticking.
Conclusion
In a world of complicated desserts, these Easy No-Bake Peanut Butter Hay