Table of Contents
Cream Cheese Filled Cookies
Introduction
Did you know that over 65% of home bakers are actively searching for dessert recipes that combine classic flavors in a novel, handheld form? If you’re part of that majority, you’ve landed on the perfect recipe. These Cream Cheese Filled Cookies are a game-changer, merging the tangy, rich delight of cheesecake with the sweet, fruity burst of fresh strawberries, all wrapped in a soft, pillowy cookie. Imagine biting into a tender, slightly chewy strawberry cookie only to discover a luscious, sweet cream cheese center that melts in your mouth. This recipe is designed for bakers of all levels who want to impress at bake sales, family gatherings, or simply treat themselves to a gourmet cookie experience. Let’s dive into creating these irresistible pockets of joy.
Ingredients List
Gather high-quality ingredients for the best flavor and texture. Here’s what you’ll need, organized by component, with sensory notes and substitutions.
For the Strawberry Cookie Dough:
- 2 ¼ cups (281g) All-Purpose Flour: The backbone of our cookie, providing structure. For a lighter texture, you can substitute with 1:1 gluten-free flour blend.
- 1 tsp Baking Soda: Our leavening agent for a soft, airy rise.
- ½ tsp Salt: Enhances all the flavors and balances the sweetness.
- ¾ cup (170g) Unsalted Butter, softened: Should be at cool room temperature, yielding slightly to pressure. It creates a rich, tender crumb and buttery aroma. For a dairy-free version, use high-quality vegan butter sticks.
- ¾ cup (150g) Granulated Sugar: Adds sweetness and promotes spreading and browning.
- ¼ cup (50g) Light Brown Sugar: Introduces a hint of molasses flavor and moisture for a chewier texture.
- 1 Large Egg + 1 Egg Yolk: The extra yolk adds richness and a fudgy, soft interior. The egg should be at room temperature for better emulsion.
- 2 tsp Pure Vanilla Extract: Use the real stuff for a warm, complex fragrance.
- ⅓ cup (80g) Strawberry Purée: The star flavor! Made from fresh or frozen strawberries blended until smooth. It gives the dough a beautiful pink hue and a natural, fruity tang. You can substitute with raspberry or mango purée for a different twist.
- Optional: 2-3 drops Pink or Red Gel Food Coloring: For a more vibrant, visually appealing cookie. Gel coloring is preferred as it doesn’t add liquid.
For the Cream Cheese Filling:
- 8 oz (226g) Full-Fat Cream Cheese, softened: Must be very soft for a lump-free, silky filling. The full-fat version provides the best creamy texture and tangy flavor. Low-fat can be used but may result in a slightly looser filling.
- ¼ cup (50g) Granulated Sugar: Sweetens the filling perfectly without making it grainy.
- 1 tsp Pure Vanilla Extract: Echoes the flavor in the cookie dough.
- 1 tsp Lemon Zest (optional): A bright, citrusy note that cuts through the richness beautifully.
Timing
Compared to the average drop cookie recipe, this one requires a bit more hands-on time for the filling and assembly. However, the 30-minute active prep time is highly efficient, and the chilling step is crucial for flavor development and preventing the cookies from spreading too thin. The result—a gourmet, filled cookie—is well worth the slight time investment over a standard chocolate chip cookie.
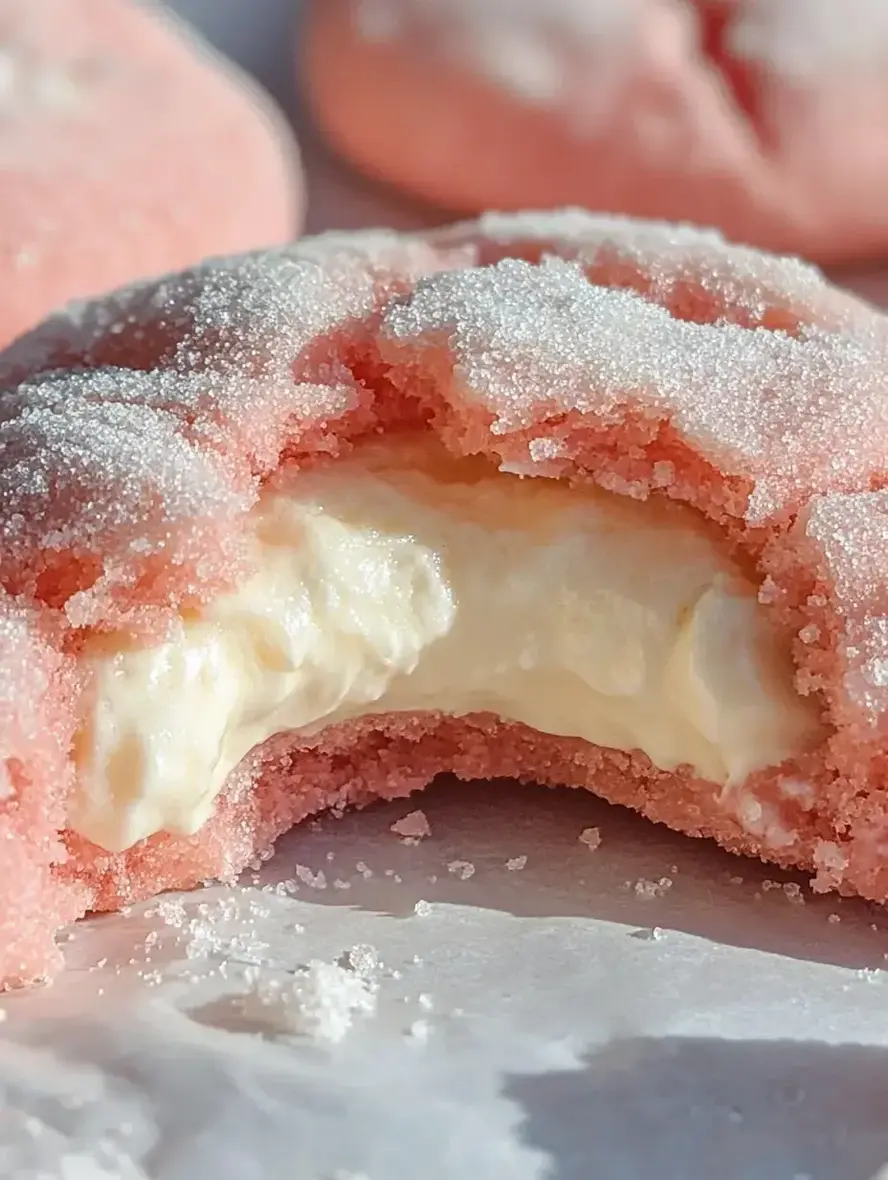
Soft, pink strawberry cookies with a surprise cream cheese filling in every bite.
Step-by-Step Instructions
Step 1: Prepare the Strawberry Cookie Dough
In a medium bowl, whisk together the flour, baking soda, and salt. Set this dry mixture aside. In the bowl of a stand mixer fitted with the paddle attachment (or using a hand mixer), cream the softened butter, granulated sugar, and brown sugar on medium-high speed for 2-3 minutes. You’re looking for a light, fluffy, and pale mixture. This step incorporates air, which is key for texture. Scrape down the bowl. Add the whole egg, egg yolk, and vanilla extract. Mix on medium until fully combined, about 1 minute. The mixture may look slightly curdled—this is normal. Now, with the mixer on low, gradually add the dry ingredients in two additions, mixing just until a few flour streaks remain. Finally, add the strawberry purée (and food coloring if using) and mix on low just until a soft, uniformly pink dough forms. Avoid overmixing. Cover the bowl and chill the dough for at least 30 minutes. This firms it up, making it easier to handle and preventing excessive spread.
Step 2: Make the Cream Cheese Filling
While the dough chills, prepare the filling. Ensure your cream cheese is very soft. In a clean bowl, beat the softened cream cheese with the sugar, vanilla, and lemon zest (if using) on medium speed until completely smooth, creamy, and lump-free, about 2 minutes. Scrape the bowl well. For easy assembly, transfer this filling to a piping bag fitted with a large round tip, or simply use a small spoon. Place the filled piping bag or a bowl with the filling in the refrigerator to firm up slightly while you portion the cookie dough.
Step 3: Assemble and Fill the Cookies
Preheat your oven to 350°F (175°C). Line two large baking sheets with parchment paper. Using a cookie scoop or tablespoon, portion the chilled dough into balls of about 1.5 tablespoons each. You should get around 24 dough balls. Take one dough ball and flatten it slightly in the palm of your hand to create a small disc. Pipe or place about 1 teaspoon of the chilled cream cheese filling into the center. Gently bring the edges of the dough up and over the filling, pinching them together to seal completely. Roll the sealed ball gently between your palms to smooth it out. It’s crucial that the filling is fully enclosed to prevent leakage during baking. Place the filled dough balls seam-side down on the prepared baking sheets, spacing them about 2 inches apart.
Step 4: Bake to Perfection
Bake the cookies, one sheet at a time, in the preheated oven for 12-14 minutes. The cookies are done when the edges are just set and very lightly golden. The centers will still look quite soft and puffy—this is perfect! They will firm up as they cool. Do not overbake, as this will dry out the cookie and potentially cause the filling to burst. For even baking, rotate the baking sheet halfway through the bake time.
Step 5: Cool and Serve
Remove the baking sheet from the oven and let the cookies cool on the sheet for 5 minutes. This allows them to set enough to handle. Then, using a spatula, transfer them to a wire rack to cool completely. The filling will be very hot initially, so allow them to cool for at least 20-30 minutes before serving. This cooling period lets the cream cheese center set into its perfect creamy consistency.
Nutritional Information
The following is an approximate nutritional breakdown per cookie (based on a yield of 24 cookies).
- Calories: 180 kcal
- Total Fat: 10g
- Saturated Fat: 6g
- Cholesterol: 35mg
- Sodium: 120mg
- Total Carbohydrates: 21g
- Dietary Fiber: 0.5g
- Sugars: 12g
- Protein: 2g
Healthier Alternatives
You can make thoughtful swaps to tailor this recipe to different dietary needs without sacrificing the indulgent experience.
- Flour: Use whole wheat pastry flour or a 50/50 blend with all-purpose for added fiber and a nuttier flavor. The cookies will be slightly denser but still delicious.
- Sugar: Replace granulated sugar with coconut sugar or a monk fruit/erythritol blend for a lower glycemic index. Note that color and spread may be slightly affected.
- Butter: Substitute with an equal amount of unsweetened applesauce or mashed ripe banana for a fat-reduced version. The texture will be more cake-like.
- Cream Cheese: Opt for a Neufchâtel or light cream cheese. For a dairy-free filling, use a high-quality, firm vegan cream cheese alternative.
- Purée: Boost nutrition by adding a handful of spinach to the strawberry purée before blending. The flavor remains fruity, and you get a hidden veggie boost!
Serving Suggestions
These cookies are stars on their own but can be elevated with simple pairings.
- With Beverages: Serve slightly warm with a cold glass of milk, a hot cup of coffee, or a glass of sparkling rosé for a truly decadent treat.
- Dessert Platter: Include them on a dessert board alongside fresh berries, dark chocolate shavings, and a dollop of whipped cream for dipping.
- A La Mode: Take a warm cookie and top it with a scoop of vanilla bean ice cream and a drizzle of strawberry sauce for an instant mini cheesecake sundae.
- Gift Idea: Package 3-4 cookies in a clear cellophane bag tied with a ribbon for a heartfelt, homemade gift that will impress anyone.
Common Mistakes
- Using Cold Ingredients: Butter and cream cheese must be properly softened. Cold ingredients won’t cream properly, leading to dense cookies and lumpy filling.
- Skipping the Chill: Not chilling the dough results in cookies that spread too much, becoming thin and potentially leaking filling.
- Overmixing the Dough: Mixing once the flour is incorporated develops gluten, making the cookies tough instead of tender.
- Inadequate Sealing: If the dough isn’t completely sealed around the filling, it will o