Indulge in Berrylicious Strawberry Crunch Cheesecake Delight Today!

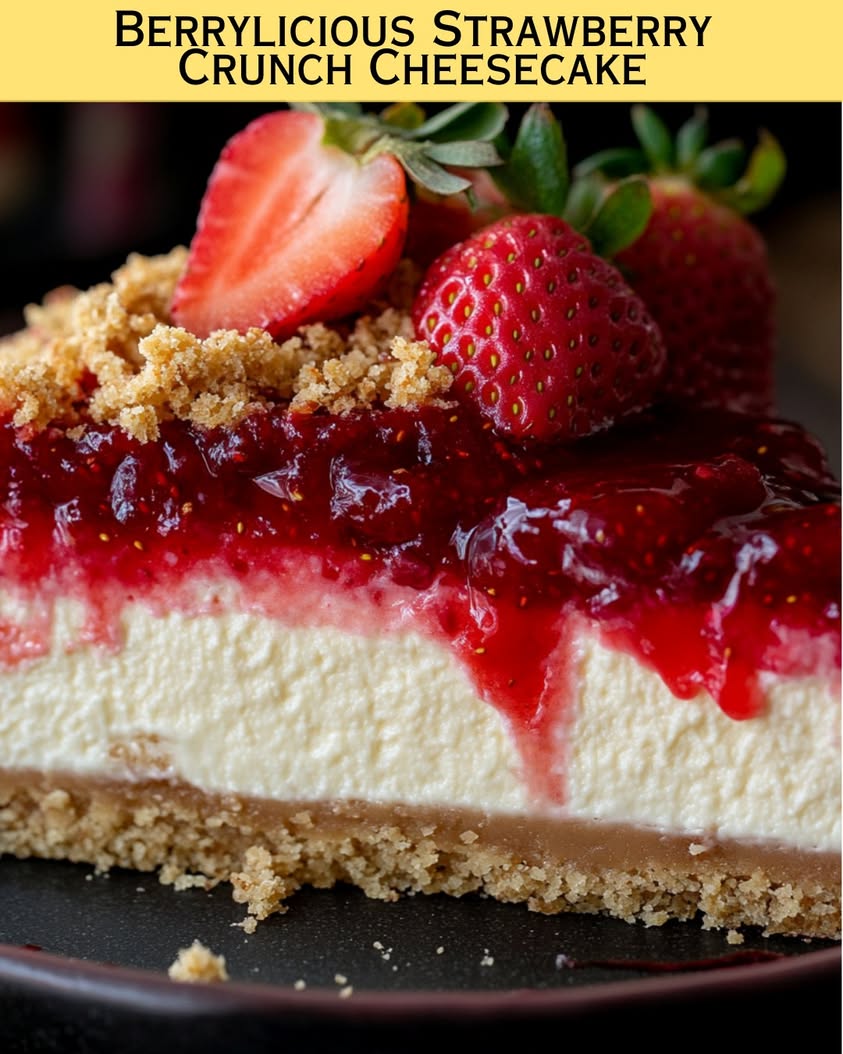
Berrylicious Strawberry Crunch Cheesecake: A Delightful Dessert

⚖️
Difficulty
Medium

⏲️
Prep Time
30 mins

🕒
Cook Time
45 mins

⏱️
Total Time
1 hour 15 mins

🍽️
Servings
8 servings

Are you ready to indulge in a dessert that intertwines the sweet and tangy flavors of strawberries with a luscious creaminess, all atop a crunchy base? Introducing our Berrylicious Strawberry Crunch Cheesecake! This delightful dessert is not only visually stunning with its vibrant strawberry topping but also offers a heavenly taste experience that will leave your taste buds dancing. It’s perfect for gatherings, dinner parties, or simply a sweet treat to enjoy at home. With a rich cream cheese filling and a crunch that complements the smoothness beautifully, every slice is an explosion of flavor.

Creating the perfect cheesecake can seem daunting; however, our recipe breaks it down into manageable steps. The balance of the butter, sugar, and crushed cookies creates an aromatic and texturally pleasing crust, while the strawberry layer provides a seasonal freshness that enhances the overall flavor. This cheesecake is not just about taste; it’s a visual masterpiece, with layers that entice the eye and tease the palate, making it a showstopper for any occasion.

Quick Recipe Highlights

  • Flavor Profile: This cheesecake features a delightful contrast between the rich cream cheese filling, the sweetness of fresh strawberries, and the buttery cookie crust.
  • Texture: The smooth and creamy filling melts in your mouth while the crunchy crust adds a satisfying bite.
  • Aroma: Expect a fragrant blend of vanilla, butter, and fresh strawberries that fills your kitchen as the cheesecake cools.
  • Visual Appeal: With its glistening strawberry topping and layered presentation, this cheesecake is as beautiful as it is delicious.
  • Skill Level Needed: This recipe requires a medium skill level; however, detailed instructions make it approachable for novice bakers.
  • Special Equipment: A springform pan is ideal for easy removal of the cheesecake, ensuring a beautiful presentation.

Recipe Overview

  • Difficulty Level: This medium-difficulty recipe involves specific steps like mixing the filling, baking, and carefully layering the strawberries, making it a rewarding challenge.
  • Category: This dessert falls under sweet treats, perfect for any occasion from birthdays to holiday celebrations.
  • Cuisine: While rooted in classic American cheesecake traditions, this recipe adds a fruit twist that resonates with seasonal freshness.
  • Cost: The ingredients are relatively affordable, with an estimated total cost of $15-20 for all components.
  • Season: Spring and summer are the best seasons to prepare this cheesecake, as fresh strawberries are abundant and in peak flavor.
  • Occasion: Ideal for celebrations, family gatherings, or as a refreshing dessert during warm weather.

Why You’ll Love This Recipe

The Berrylicious Strawberry Crunch Cheesecake is simply irresistible. The combination of creamy filling balanced with the bright flavor of strawberries makes each bite a delight. The delightful crunch from the base adds an unexpected texture that elevates the dessert experience to new heights. Not only does this cheesecake taste phenomenal, but it also looks stunning on any dessert table, making you the star of the show.

Preparation of this cheesecake is quite straightforward, allowing even novice bakers to achieve impressive results. With its uncomplicated components, you can prepare the filling and the crust quickly, leaving you time to focus on arranging the strawberries beautifully on top before the final chill. This convenience makes it an excellent choice for busy cooks who still want to impress guests.

From a nutritional standpoint, strawberries are loaded with vitamin C, fiber, and antioxidants, making this cheesecake a somewhat healthier dessert option when paired with the protein-rich cream cheese. The lightheartedness offered by the strawberries also contrasts the heavier elements of cheesecake, providing a lighter finish after a meal.

Socially, presenting this cheesecake during a gathering is bound to ignite conversations and compliments, enhancing your hosting experience. Not only does it taste amazing, but the effort you put in will impress friends and family, creating memories around the dinner table.

This dessert is also cost-effective since it utilizes basic ingredients found in most kitchens, with the splurge of fresh strawberries being offset by the rest of the affordable components. You’ll love the quality of this dessert without breaking the bank.

Historical Background and Cultural Significance

The origins of cheesecake can be traced back to ancient Greece, making it a beloved treat for centuries. The modern cheesecake, however, has evolved significantly with influences from various cultures, especially in America where cream cheese became a popular ingredient in the late 19th century. The addition of fruit highlights the versatility of cheesecake, allowing for delightful variations to suit seasonal availability.

Culturally, cheesecake has become synonymous with celebration across different societies, often served at birthdays, weddings, and holiday festivities. This dessert reflects creativity in both preparation and presentation, allowing bakers to put a personal touch on each recipe while maintaining roots in traditional practices.

Over the years, recipes have adapted to accommodate evolving tastes and dietary preferences, leading to a wide range of cheesecake variations from classic New York-style to fruit-infused delights. This adaptation showcases the continuing popularity of cheesecake and its ability to fit into contemporary culinary trends.

Regional variations of cheesecake can be observed in various countries, from the Italian ricotta cheesecake to the Japanese cotton cheesecake. Each version carries its unique flavors and textures, allowing for endless possibilities and personal exploration within the cheesecake family.

Ingredient Deep Dive

Strawberries: Strawberries are rich in antioxidants, vitamin C, and manganese. They have a significance in many cultures as symbols of love and fertility. When selecting strawberries, look for bright red, plump berries without blemishes. Store them in the refrigerator in a breathable container and wash them just before use to maintain freshness. Substitutions can include raspberries or blueberries for variations in flavor.

Cream Cheese: This soft cheese is essential for achieving the rich, creamy filling characteristic of cheesecakes. Originally developed in the United States, cream cheese has become a staple in many cuisines. It’s high in fat, providing a rich texture, but it also contains protein. When purchasing, opt for full-fat varieties for the best results. Store in the refrigerator and use within a few weeks. For a lighter version, consider using Neufchâtel cheese.

Common Mistakes to Avoid

  • Not using room temperature ingredients: Room temperature cream cheese blends more smoothly, preventing lumps in the filling.
  • Overmixing the batter: This can lead to cracks in your cheesecake, so mix just until combined.
  • Baking at too high a temperature: A high temperature can cause the cheesecake to rise and then crack as it cools. Use a moderate oven temperature.
  • Skipping the water bath: A water bath helps maintain moisture and even baking, preventing cracking.
  • Not chilling properly: The cheesecake should cool in the oven with the door ajar before refrigerating to prevent sudden temperature changes that can cause cracking.
  • Using expired ingredients: Always check the expiration dates on dairy products for best flavor and texture.
  • Inadequate cooling time: Allow sufficient cooling for the cheesecake to set, as skimping on time may result in a runny filling.
  • Forgetting to spray the springform pan: Always grease the pan to ensure easy removal.
  • Omitting toppings: Fresh or flavored toppings enhance the cheesecake, so don’t skip this step for visual appeal and taste.
  • Serving too warm: Chill the cheesecake thoroughly before serving; this enhances the flavor and texture.

Essential Techniques

Baking in a water bath: This technique is crucial for cheesecakes as it provides a moist environment that prevents cracking. To master it, wrap your springform pan with foil to prevent leaks, and place it in a larger pan filled with water. Keep an eye on the water level during baking, and top off if necessary. Look for visual cues, such as a firm outer edge and a slightly jiggly center, for success.

Proper creaming method: When creaming your cream cheese, it’s important to break it up first before adding sugars. This technique helps achieve a smooth, lump-free filling. Mix at medium speed until fluffy, which makes incorporating eggs easier. Avoid overmixing after adding eggs; mix just until combined, allowing for a light, airy texture.

Pro Tips for Perfect Berrylicious Strawberry Crunch Cheesecake

1. Always use fresh, high-quality strawberries for the best flavor. Aim for locally sourced or organic when possible.

2. Let your cheesecake cool in the oven with the door slightly ajar to prevent drastic temperature changes, which lead to cracks.

3. To enhance the strawberry topping, macerate the strawberries in sugar for about 30 minutes before layering them on top for an added sweetness.

4. If your filling becomes too thick, add a tablespoon of milk or cream to thin it out for a smooth texture.

5. Serve slices with a dollop of whipped cream or a drizzle of chocolate sauce to elevate the dessert.

6. Be patient! Cheesecake is best after chilling overnight, allowing flavors to meld beautifully.

7. For added flavor depth, introduce a splash of lemon zest into the filling for a refreshing brightness.

8. When removing from the springform pan, run a knife around the edge before unlatching to ensure a clean release.

Variations and Adaptations

For a regional twist, consider using seasonal fruits like peaches or blueberries. During the fall, swap the strawberries for pumpkin puree to create a pumpkin cheesecake variation. Dietary modifications could include using gluten-free cookies for the crust or substituting dairy components to cater to vegan diets. Flavor variations might involve adding extracts like almond or coconut for an exotic twist. Texture modifications could include adding crushed nuts to the base for added crunch, while presentation alternatives may involve serving in individual jars for fun dessert cups.

Serving and Presentation Guide

When plating your cheesecake, consider using a decorative cake stand to elevate its beauty. Garnish with mint leaves or edible flowers for a fresh touch. Serve slices with a side of whipped cream and a drizzle of strawberry sauce for added appeal. Pay attention to temperature; serve chilled for the best flavor, and consider small portions for a more sophisticated presentation. For a fun twist, pair slices with tea or coffee for a delightful after-dinner treat.

Wine and Beverage Pairing

For wine pairings, go for a light dessert wine like Moscato to complement the sweetness of the cheesecake. A sparkling wine also works well, as its effervescence cuts through the richness of the cream cheese. For non-alcoholic options, consider a fruity iced tea or a refreshing lemonade. If serving coffee, opt for a medium roast to balance the sweetness while enhancing the dessert’s flavors.

Storage and Shelf Life

Store your cheesecake in an airtight container in the refrigerator, where it will remain fresh for up to one week. For longer storage, consider freezing; wrap the cheesecake tightly in plastic wrap and aluminum foil. Thaw it overnight in the refrigerator before serving. Signs of spoilage include an off smell or visible mold. When reheating, use a low microwave setting, or enjoy cold for a refreshing snack.

Make Ahead Strategies

To streamline your baking process, you can prepare the crust and filling a day in advance. Chill the crust as directed, then pour in the filling and bake. After cooling, the cheesecake can sit in the fridge overnight, enhancing its flavors. If you’re adding fresh toppings, like strawberries, wait until you’re ready to serve for maximum freshness. Consider storing any leftovers for quick treats during the week!

Scaling Instructions

If you only need a smaller cake, halving the ingredients will work perfectly for a more personal dessert. For larger gatherings, consider doubling or tripling the recipe but ensure to use larger baking pans. Baking times may need slight adjustments, so keep an eye on the cheesecake during baking. Also, plan for larger containers for storing any remaining cheesecake.

Nutritional Deep Dive

This Berrylicious Strawberry Crunch Cheesecake has a good balance of macronutrients, providing protein from cream cheese and healthy fats from the crust. Strawberries add fiber and essential vitamins, making each slice not only delicious but nourishing. When considering dietary considerations, it’s crucial to look at portion sizes; small slices can help with weight management. The indulgent nature of the dessert means savoring each bite rather than overindulging.

Dietary Adaptations

For a gluten-free version, substitute the cookie crust with gluten-free options or crushed nuts. A good dairy-free option includes using vegan cream cheese in the filling, while a keto adaptation might involve using almond flour instead of traditional crust ingredients. For those following vegan diets, you can use silken tofu blended with agave syrup as an alternative for the filling. Each of these substitutions allows for a personalized twist on this classic cheesecake recipe.

Troubleshooting Guide

If your cheesecake turns out too dense, consider using room temperature ingredients and ensuring you don’t overmix to keep it light and airy. For flavor balance issues, taste before baking for adjustments; adding a bit of lemon juice can brighten the flavors. If your cheesecake is undercooked, return it to the oven and check every 5 minutes. Temperature problems arise when excessive heat is applied; prevent cracks with a water bath and ensure even heat distribution. If needed, adjust cooking times based on your oven’s characteristics.

Recipe Success Stories

Countless bakers have shared their successes with the Berrylicious Strawberry Crunch Cheesecake, highlighting its incredible taste and presentation. Many users have reported that this recipe wowed guests at their gatherings and found its balance of flavors to be perfect for any palate. Some innovative cooks have introduced variations, from adding layers of chocolate to substituting fruit toppings, generating a wealth of inspiration for others trying out the recipe. Experimentation has yielded stunning results, showcasing how adaptable and delightful this cheesecake truly is.

Frequently Asked Questions

Q: Can I use frozen strawberries instead of fresh?
A: Yes, you can use frozen strawberries, but they should be thawed and drained to remove excess moisture. Fresh strawberries will provide the best texture and taste.

Q: How do I know when my cheesecake is done?
A: Your cheesecake should be set around the edges but still slightly jiggly in the center. It will firm up as it cools.

Q: Can I make this cheesecake in advance?
A: Absolutely! This cheesecake can be made a day or two in advance and chilled until ready to serve. In fact, chilling enhances the flavors.

Q: How do I prevent my cheesecake from cracking?
A: Use a water bath during baking to maintain moisture, avoid overmixing, and allow it to cool gradually in the oven.

Q: What can I substitute for cream cheese?
A: For a lighter option, you can use Greek yogurt or ricotta, but the texture and flavor will differ from traditional cream cheese.

Q: Can I add other fruits to this cheesecake?
A: Yes, other berries like blueberries or raspberries can be used, or you could make a mixed berry topping.

Q: What type of crust can I use?
A: This recipe traditionally uses a graham cracker crust, but you can also use digestive biscuits or a nut-based crust for a gluten-free option.

Q: Is it possible to turn this cheesecake into mini cheesecakes?
A: Yes, simply adjust baking time and use a muffin tin. Fill each cup with the same amount of batter for delightful mini portions.

Q: Can I freeze the cheesecake?
A: Yes, you can freeze the cheesecake for up to 2 months; just be sure to wrap it tightly to prevent freezer burn.

Q: What should I serve with this cheesecake?
A: Whipped cream, chocolate sauce, or a berry compote are excellent accompaniments that enhance the cheesecake’s flavors.

Additional Resources

For those looking to expand their cheesecake repertoire, consider exploring variations such as no-bake cheesecakes or using different flavor infusions. Check out technique guides for tips on mastering the perfect crust or creating fruit toppings that complement the cheesecake. Look for ingredient information that dives deeper into the nutritional values of cream cheese and fruit options. Equipment recommendations can help in choosing the right baking pans and tools to streamline your baking experience. Explore seasonal variations, like pumpkin cheesecake in the fall or coconut cheesecake for a tropical escape in the summer.

Join the Conversation

We’d love to hear your thoughts, feedback, and variations on the Berrylicious Strawberry Crunch Cheesecake! Share your photos and experiences on social media, and join other enthusiasts as we explore new recipes together. Let your creativity shine by daring to add your twist on classic flavors, and inspire others in the community with your delicious results!

The Recipe

Berrylicious Strawberry Crunch Cheesecake

Serves: 8 servings

Prep Time: 30 mins

Cook Time: 45 mins

Total Time: 1 hour 15 mins

Kitchen Equipment Needed

  • Springform pan
  • Mixing bowls
  • Electric mixer
  • Measuring cups and spoons
  • Rubber spatula
  • Plastic wrap
  • Knife
  • Cooling rack

Ingredients

  • 1 ½ cups graham cracker crumbs
  • ½ cup unsalted butter, melted
  • 2 cups cream cheese, softened
  • 1 cup granulated sugar
  • 3 large eggs
  • 1 teaspoon vanilla extract
  • 2 cups fresh strawberries, hulled and sliced
  • ¼ cup strawberry jam

Directions

  1. Preheat your oven to 325°F (160°C).
  2. In a medium bowl, combine graham cracker crumbs and melted butter. Press the mixture firmly into the bottom of the springform pan to form the crust.
  3. In another large bowl, beat the cream cheese until smooth. Gradually add sugar, then mix in eggs one at a time, followed by the vanilla extract.
  4. Pour the cream cheese mixture over the prepared crust and smooth the top with a spatula.
  5. Bake for 45 minutes or until the outer edges are set but the center still has a slight jiggle. Turn off the oven, crack the door, and let the cheesecake cool for about an hour.
  6. Refrigerate the cheesecake for a minimum of 4 hours, preferably overnight.
  7. Before serving, arrange the sliced strawberries over the top and warm the strawberry jam in the microwave until it is pourable. Drizzle the warm jam over the strawberries.
  8. Slice, serve, and enjoy!

Recipe Notes

  • For a gluten-free crust, replace graham crackers with gluten-free cookies.
  • Try adding lemon zest or juice to the cream cheese mixture for extra flavor.
  • Using a water bath while baking can help prevent cracks in the cheesecake.

Best Chocolate Chip Cookies Recipe – Soft and Chewy

Chocolate Chip Cookies: The Ultimate Comfort Dessert

⚖️
Difficulty
Easy

⏲️
Prep Time
15 mins

🕒
Cook Time
10 mins

⏱️
Total Time
25 mins

🍽️
Servings
24 cookies

Chocolate chip cookies are the quintessential treat that bridges the gap between childhood nostalgia and adult indulgence. The warm, gooey chocolate melts in your mouth, perfectly complemented by the classic buttery richness of the cookie dough. This recipe will guide you through crafting the perfect cookie, building on a simple foundation of quality ingredients and straightforward techniques.

In just 25 minutes, you can bring this comforting delicacy into your home. Picture yourself pulling a batch from the oven, the rich aroma wafting through your kitchen and inviting everyone to gather. Each cookie is a delightful balance of crispy edges and a soft, chewy center, capturing the essence of what makes chocolate chip cookies an all-time favorite. Whether served warm out of the oven or enjoyed days later, these cookies promise satisfaction with every bite.

Quick Recipe Highlights

  • Flavor Profile: Rich buttery cookies with semi-sweet chocolate chips create a harmonious sweetness.
  • Texture: Crispy edges with a soft, gooey center, delivering that ultimate comforting bite.
  • Aroma: The scents of melted chocolate and baked butter combine for a heavenly experience.
  • Visual Appeal: Golden-brown cookies dotted with melting chocolate chips—irresistible!
  • Skill Level Needed: Perfect for beginners with simple steps that lead to delicious results.
  • Special Equipment: Only basic baking tools are needed, making this recipe accessible.

Recipe Overview

  • Difficulty Level: This chocolate chip cookie recipe is incredibly easy, ideal for bakers of all levels. With minimal techniques involved, anyone can achieve cookie perfection.
  • Category: Cookies are a beloved dessert and perfect for snack time, after dinner, or sharing at gatherings.
  • Cuisine: This recipe is rooted in American baking traditions, particularly popular in homes across the United States.
  • Cost: The cost of ingredients is fairly low, making chocolate chip cookies an economical choice for dessert.
  • Season: Perfectly enjoyed year-round, but especially comforting in cooler months when warmth is craved.
  • Occasion: Ideal for any occasion, from family gatherings to holiday parties or casual evenings at home.

Why You’ll Love This Recipe

Chocolate chip cookies are a timeless treat that never fails to bring joy. Their combination of buttery dough and rich chocolate delivers a taste experience unlike any other. The classic flavor profile appeals to all ages, making them perfect for family events or gatherings with friends.

The convenience of this recipe cannot be overstated. With quick prep and cook times, you can whip up a batch of cookies in less than 30 minutes. This means spontaneous dessert cravings can be satisfied with ease! The uncomplicated instructions make it accessible even for novice bakers.

Not only are these cookies delicious, but they can also be made to accommodate nutritional preferences. By adjusting ingredients slightly, you can create a cookie that fits dietary needs without sacrificing taste.

Socially, cookies are an excellent choice for gatherings. Whether sharing warm cookies at a picnic or giving a box as a gift, they create moments of connection and happiness.

Lastly, the cost-effectiveness of homemade cookies is significant. With just a few affordable ingredients, you can produce a large batch of delicious treats, making them an ideal choice for budget-conscious bakers.

Historical Background and Cultural Significance

The origin of chocolate chip cookies dates back to the 1930s when Ruth Wakefield, who owned the Toll House Inn, created the first chocolate chip cookie recipe. The story goes that she was experimenting with a new chocolate bar for her cookie dough, leading to the iconic dessert we know today.

Culturally, chocolate chip cookies have become a symbol of comfort and home, featured in countless family recipes. They have encouraged baking traditions passed down through generations, making them an important part of American culinary history.

Over the years, recipes have evolved, adapting to new tastes and dietary needs. Today, there are countless variations, from double chocolate to oatmeal chocolate chip that celebrate the beloved cookie’s versatility.

Regionally, you can find adaptations that reflect local flavors. Some homes add nuts, while others may use different types of chocolate, showcasing personal touches in a classic recipe.

Ingredient Deep Dive

Flour is the backbone of any cookie dough. Considered a staple in baking, its ability to structure the cookie is unmatched. When selecting flour, choose all-purpose flour for versatility, ensuring smooth mixing. Stored in a cool, dry place, flour can last months, but for a fresher taste, consider buying whole grain or specialty flour later.

Sugar, particularly brown sugar, offers a depth of flavor that transforms cookies from simple treats to delightfully rich desserts. Brown sugar contains molasses, which not only sweetens but also adds moisture, giving the cookies their chewy texture. For freshness, store in an airtight container; substituting it with coconut sugar can bring a different taste while appealing to health-conscious bakers.

Butter is essential for both flavor and texture in chocolate chip cookies. The high-fat content ensures a rich, melt-in-your-mouth experience. For best results, use unsalted butter to control the salt levels in your cookie dough accurately. However, if you are in need of a dairy-free option, coconut oil or vegan butter can serve as great substitutes.

Chocolate chips are the stars of this recipe. Semi-sweet chocolate chips are traditional but don’t hesitate to explore milk chocolate, dark chocolate, or even white chocolate for a unique twist. Properly stored in a cool, dry place, chocolate can last long; however, consider using high-quality brands for the best taste.

Eggs work as a binding agent, holding all the ingredients together and contributing to moisture. Fresh, organic eggs offer the best flavor, but aquafaba can be an excellent vegan substitute, providing similar binding properties. Store eggs in their original carton in the fridge for maximum freshness.

Common Mistakes to Avoid

  • Overmixing the dough can lead to tough cookies due to gluten development. Mix until just combined for the best texture.
  • Underbaking can result in mushy cookies; ensure they have a light golden color before removing them from the oven.
  • Using cold butter can affect the dough’s consistency and spread. Room temperature butter is ideal for even mixing.
  • Forgeting to preheat the oven can throw off baking times. Always preheat to ensure even cooking.
  • Skipping chilling the dough can lead to excessive spreading in the oven. A chill gives cookies a better structure.
  • Not measuring ingredients accurately can disrupt the balance of flavors; use measuring cups and spoons for precision.
  • Neglecting to line the baking sheet can cause cookies to stick; parchment paper or silicone mats are a baker’s best friend.
  • Be cautious of baking soda versus baking powder, as their roles differ; using the wrong one can impact your cookies’ rise and texture.
  • Overcrowding the baking sheet can result in uneven baking; leave space between cookies so they have room to spread.
  • Failing to cool the cookies on a wire rack can lead to soggy bottoms. It’s crucial for maintaining their texture.

Essential Techniques

Properly creaming butter and sugar is fundamental. This technique aerates the mixture, creating a light texture. Aim for an airy consistency, and avoid overmixing to maintain tenderness.

Chilling the dough is equally important. Allowing dough to rest in the refrigerator not only enhances flavor but also controls spread during baking. Aim for at least 30 minutes of chill time for optimal results.

Measuring your ingredients accurately helps eliminate inconsistencies in taste and texture. Always use labeled measuring cups for precise amounts and avoid packing flour too tightly.

Lastly, using a cookie scoop ensures equal-sized cookies, leading to uniform baking. A quality scoop can eliminate the hassle and result in evenly baked batches.

Pro Tips for Perfect Chocolate Chip Cookies

When baking chocolate chip cookies, always use room temperature ingredients. This allows for better emulsification and a smoother dough, leading to a better final product.

Experiment with different types of chocolate for added depth. A mix of dark and milk chocolate can provide a more complex flavor that appeals to different palates.

Consider adding a sprinkle of sea salt on top before baking. This enhances the chocolate flavor and adds a delightful crunch.

For a unique twist, try incorporating nuts or dried fruit into the dough. It adds texture and can elevate traditional recipes.

Adjust the baking time based on your oven performance. Set a timer but keep an eye on the cookies to avoid over-baking.

Don’t forget to let cookies cool for at least 5 minutes on the baking sheet before transferring them to a cooling rack. This ongoing cooking helps ensure the right texture.

Try using brown butter for deeper flavor. Simply melt the butter, letting it cook until it turns golden brown, then proceed with the recipe.

Finally, store cookies in an airtight container with a piece of bread to keep them soft as they age.

Variations and Adaptations

For regional variations, consider incorporating local flavors or ingredients. For instance, adding a pinch of cinnamon can draw on choco-bread traditions common in certain areas.

Incorporating seasonal flavors, like pumpkin or ginger spice during fall, can provide a festive twist. Likewise, try adding festive-themed chocolate or colors during holidays.

For dietary modifications, consider making gluten-free versions using almond or oat flour. These flours provide unique textures while remaining delicious.

To enhance flavors, use flavored chocolate chips, such as espresso or mint, to cater to specific tastes.

Texture modifications could involve adding oats for a heartier bite or using a mix of flours to create a chewier cookie.

When it comes to presentation alternatives, drizzle melted chocolate over the top or sprinkle colorful sprinkles for a fun look.

Serving and Presentation Guide

For plating, stack cookies on a rustic wooden board or a decorative platter. This creates an inviting display that’s perfect for sharing.

Garnish with fresh mint sprigs or seasonal fruits for an added touch of color and freshness against the golden-brown cookies.

Traditional accompaniments could feature a glass of cold milk or a scoop of vanilla ice cream on the side for ultimate indulgence.

For modern serving suggestions, consider cookie ice cream sandwiches. Place a scoop of your favorite ice cream between two cookies for a delightful treat.

Consider serving cookies warm from the oven for an incredible melting chocolate experience.

Portion control is essential — aim for a standard size that allows everyone to enjoy their treat without going overboard.

Wine and Beverage Pairing

When it comes to wine pairings, a sweet dessert wine like Port or a fruity red like Zinfandel can complement the sweetness of the chocolate.

For non-alcoholic alternatives, consider serving with cold milk or a vanilla bean soda. These beverages provide a refreshing contrast to the richness of the cookies.

If coffee is more your style, a dark roast coffee pairs beautifully with chocolate, enhancing the richness while contrasting with the sweetness.

Temperature considerations are key. Serve beverages chilled but allow coffee to cool slightly to avoid overpowering the cookies’ delicate flavors.

For serving suggestions, consider creating a dessert plate with cookies and your beverage of choice, enhancing the presentation.

Storage and Shelf Life

To store freshly made cookies, place them in an airtight container at room temperature. This method preserves their softness and flavor.

For longer shelf life, cookies can be frozen. Simply layer between sheets of parchment paper, store in a freezer-safe bag, and freeze for up to three months.

Signs of spoilage include an off smell or changes in texture; if they feel excessively hard or dry, it’s time to discard.

Reheating cookies can be done in a preheated oven or microwave for a few seconds to bring back their warmth and gooey texture.

If freezing, ensure they cool completely before packing to prevent condensation, which can affect texture.

Make Ahead Strategies

When planning to make cookies ahead, prepare the dough and refrigerate it for up to 2 days before baking. This enhances flavors and saves time on busy baking days.

You can also pre-scoop the dough, placing individual balls on a baking sheet to freeze. Once frozen, transfer them to a storage bag, allowing for easy baking later.

Quality can be affected by how long the dough sits; consider baking within 2-5 days for optimal freshness.

For assembly, pre-baking the dough means you simply need to pop cookies in the oven when guests arrive, guaranteeing warm treats.

Finally, when reheating, add a few extra seconds in the microwave or allow a brief oven time to refresh the cookies’ warmth and chocolatey goodness.

Scaling Instructions

If you want to halve the recipe, simply divide all ingredients by two while keeping ratios consistent for best results.

For doubling or tripling, ensure your mixing bowl is large enough to accommodate all the ingredients, and check baking times as larger batches may take longer.

Equipment adjustments are essential; use larger baking sheets or bake in batches if necessary to avoid overcrowding.

Timing modifications may also be necessary; monitor closely as amount of dough affects bake time.

Finally, store any excess dough appropriately while waiting for cookies to be baked again.

Nutritional Deep Dive

Analyzing the macro breakdown, chocolate chip cookies typically contain key nutrients including carbohydrates from flour and sugar, fats from butter, and a touch of protein from eggs.

Micronutrient analysis shows that while the cookies are rich in sugars and fats, they can be enhanced with whole grain or nut flours for more fiber and nutrients.

Moderation is key with these sweet treats as indulging responsibly allows for a balanced diet.

For portion analysis, consider that a single cookie can provide a fair amount of calories and sugars, making it suitable for a satisfying dessert.

Weight management can be supported by enjoying these cookies in smaller portions, emphasizing balance while engaging in active lifestyles.

Dietary Adaptations

For gluten-free versions, substitutes like almond flour or coconut flour can create a delicious alternative while maintaining an enjoyable texture.

Dairy-free chocolate chips allow for a vegan version, while coconut oil can replace butter for further dietary adjustments.

For a low-carb option, try almond and coconut flour again while opting for sugar substitutes like erythritol.

Keto adaptations follow similar principles, with a focus on low-carb ingredients that ensure delicious flavor profiles remain.

Paleo options customize recipes with natural sweeteners such as honey and grains that fit within paleo guidelines, while enhancing the baked goods’ nutritional value.

Low-FODMAP ingredients can also be included, focusing on the types of sugars and potential intolerances individuals may have.

Troubleshooting Guide

If your cookies are too tough, consider reducing mixing time, ensuring no overdevelopment of the gluten occurs.

Flat cookies often stem from using warm dough or not enough flour; chill the dough for optimal texture.

Flavor balance issues could arise from missing or miscommunicating ingredient amounts; taste your dough before baking to adjust accordingly.

If temperatures are problematic, check your oven calibration; an accurate oven is crucial for achieving the perfect bake.

Ensure adequate equipment is in place for proper baking; using baking sheets with different materials can alter results.

Timing concerns can affect cookies’ textures; investing in a good timer or visual cues can help create consistent outcomes.

Recipe Success Stories

Community feedback often focuses on the nostalgia of classic chocolate chip cookies, with personal stories of shared family experiences while baking together.

Many variations have brought about new successes—such as adding espresso powder or nuts—leading to delicious adaptations of the classic recipe.

Reader suggestions on social media underscore how people seek comfort foods, creating invaluable conversation around these cookies’ warm-hearted essence.

Photography tips are shared, emphasizing natural light and rustic, home-style settings that bring cookie moments to life visually as well as gastronomically.

Examples of cookie swaps spark creativity, allowing for diversification and shared innovation—the community thrives on adaptations and inclusivity.

Frequently Asked Questions

1. Can I freeze chocolate chip cookie dough? Yes, you can freeze the dough. Scoop into individual balls and freeze them. Store them in a bag for easy baking later, baking time may require adjusting.

2. How do I make my cookies softer? To achieve softer cookies, slightly underbake them and allow them to cool on the baking sheet. Additionally, using more brown sugar can provide a chewier texture.

3. What’s the difference between light and dark brown sugar? Light brown sugar contains less molasses than dark brown sugar, which impacts flavor and moisture. Use dark brown sugar for a richer taste.

4. Can I use margarine instead of butter? While you can use margarine, note that it may change the flavor and texture of the cookies. Use variations that suit your needs, but stick to what’s recommended for best results.

5. What kind of chocolate is best for cookies? Semi-sweet chocolate chips are traditional, but any combination of chocolate can work. Experiment with dark chocolate or milk chocolate for varied experiences!

6. Is it necessary to chill the dough? Chilling the dough helps with texture and prevents spreading. It’s not strictly necessary, but it can significantly improve your cookies.

7. How long do cookies last? Properly stored cookies can last up to a week at room temperature. You can also freeze them for several months for long-term storage.

8. Can I substitute eggs in this recipe? Yes, substitutes like flax eggs or applesauce can work as replacements, but results may vary—the texture could change based on the sub used!

9. What’s the best way to store cookies? Store cookies in an airtight container at room temperature for maximum freshness. You can use a slice of bread to maintain softness.

10. Can I add nuts to the cookie dough? Absolutely! Walnuts or pecans can add great texture and flavor. Just fold them in gently after mixing your dough.

Additional Resources

If you enjoyed this chocolate chip cookie recipe, explore related recipes such as oatmeal raisin or double chocolate chip cookies for more variety.

Consider technique guides that delve into cake baking or advanced pastry skills to enhance your overall baking knowledge.

Ingredient information can inform your choices about flavors; insights into alternative sweeteners or flour types expand your palette.

Equipment recommendations point to essential tools every baker should have, ensuring each baking session is smooth and efficient.

Lastly, seasonal variations in recipes can inspire themes for festivities, including pumpkin-spiced cookies or gingerbread during the holidays—celebrate with baking year-round!

Join the Conversation

We love seeing how our cookie recipes resonate with your baking adventures! Share your cookie photos on social media and join the discussions around variations and adaptations you’ve made.

Photography tips worth sharing include setting up in natural light and striving for cozy backgrounds that evoke warmth and heartiness, just like these cookies.

Recipe reviews help us grow; your feedback can positively inspire future recipes as we engage with our beloved baking community.

Engage with us—share how you’ve personalized your cookies to suit your tastes. Your creativity can lead to exciting new avenues for others to explore, enhancing our shared passion for baking!

The Recipe

Chocolate Chip Cookies

Serves: 24 cookies

Prep Time: 15 mins

Cook Time: 10 mins

Total Time: 25 mins

Kitchen Equipment Needed

  • Mixing bowl
  • Measuring cups and spoons
  • Cookie sheet
  • Silicone spatula
  • Oven mitts

Ingredients

  • 2 1/4 cups all-purpose flour
  • 1/2 tsp baking soda
  • 1 cup unsalted butter, softened
  • 3/4 cup granulated sugar
  • 3/4 cup brown sugar, packed
  • 1 tsp salt
  • 2 tsp vanilla extract
  • 2 large eggs
  • 2 cups semi-sweet chocolate chips

Directions

  1. Preheat your oven to 375°F (190°C).
  2. In a bowl, whisk together flour and baking soda; set aside.
  3. In a large bowl, cream butter, granulated sugar, brown sugar, and salt until light and fluffy.
  4. Add vanilla extract and eggs, mixing until combined.
  5. Gradually add the flour mixture, mixing until just combined.
  6. Fold in chocolate chips.
  7. Drop rounded tablespoons of dough onto ungreased cookie sheets, spacing them 2 inches apart.
  8. Bake for 9-11 minutes or until cookies are golden brown.
  9. Allow cookies to cool on the baking sheet for 2 minutes before transferring them to wire racks to cool completely.

Recipe Notes

  • For chewier cookies, consider refrigerating the dough for at least 30 minutes before baking.
  • Experiment with different types of chocolate chips for added flavors.
  • Ensure to store cookies in an airtight container to maintain freshness.

Delicious Pillsbury Crescent Roll Taco Bake Recipe for Dinner

Pillsbury Crescent Roll Taco Bake: A Delicious Twist on Taco Night

⚖️
Difficulty
Easy

⏲️
Prep Time
15 mins

🕒
Cook Time
25 mins

⏱️
Total Time
40 mins

🍽️
Servings
6 servings

If you’re looking for a quick and easy weekday dinner that the whole family will love, the Pillsbury Crescent Roll Taco Bake is a fantastic choice! This delightful recipe combines the classic flavors of tacos with the flaky goodness of crescent rolls, creating a dish that’s not only delicious but visually appealing as well. Imagine the delightful experience of biting into a warm, golden crescent roll encasing seasoned beef, melty cheese, and your favorite taco toppings. It’s a comforting meal that brings the joy of taco night to a new level!

This Pillsbury Taco Bake is perfect for those busy nights when you need to whip up something fast yet satisfying. With minimal prep time and simple steps, you can have this meal on the table in no time. The harmonious blend of spices and savory ingredients makes each bite burst with flavor, while the crescent roll crust provides a wonderfully flaky and soft texture that complements the filling beautifully. Not to mention, this dish is versatile—you can easily customize it with various toppings and ingredients to suit your family’s taste.

Quick Recipe Highlights

  • Flavor Profile: A rich combination of seasoned beef, zesty taco spices, and gooey cheese. Each mouthful is a fiesta of flavors!
  • Texture: The crunchy, yet tender, crescent roll exterior pairs beautifully with the juicy filling, creating an exciting contrast.
  • Aroma: Savory scents of taco seasoning and melting cheese fill the kitchen, making it irresistibly inviting.
  • Visual Appeal: The golden-brown crescent roll crust topped with vibrant garnishes makes this dish as eye-catching as it is delicious.
  • Skill Level Needed: Suitable for beginner cooks and busy families, this recipe requires no advanced culinary skills.
  • Special Equipment: Just a baking pan and a mixing bowl are needed to prepare this delightful meal.

Recipe Overview

  • Difficulty Level: This easy recipe is perfect for novice home cooks or anyone looking for a hassle-free dinner. With clear instructions and low prep time, you’ll feel confident in the kitchen.
  • Category: This dish fits wonderfully into the categories of main dishes and comfort food, making it a staple for family dinners.
  • Cuisine: Influenced by traditional Mexican flavors, this taco bake represents a fusion of classic American and Mexican comfort foods.
  • Cost: An affordable recipe, you can easily prepare this meal for under $15, making it budget-friendly for families.
  • Season: Ideal for any time of year; however, it shines particularly bright during taco Tuesdays or casual family gatherings.
  • Occasion: Great for weeknight dinners, potlucks, or as a fun dish for gatherings with friends and family.

Why You’ll Love This Recipe

This Pillsbury Crescent Roll Taco Bake is not only a feast for the eyes but also a delight for the palate. Each bite delivers a satisfying crunch, followed by the juicy richness of seasoned beef and melted cheese. The taco flavors are nostalgic, reminiscent of your favorite taco joint, yet made conveniently at home. Whether enjoyed on a busy weeknight or at a casual gathering, this dish is guaranteed to make mouths water and smiles widen.

In addition to its incredible taste, the convenience of preparation makes this recipe a winner in busy households. With only a handful of ingredients and a quick baking time, this taco bake allows you to enjoy homemade comfort food without dedicating hours in the kitchen. It’s an excellent solution for parents juggling work and family commitments or anyone looking to savor a great meal with minimal fuss.

Nutritionally, this taco bake can be a hearty addition to your dinner rotation. Using lean ground beef or turkey provides a good protein source, and the addition of toppings such as lettuce, tomatoes, and avocados can contribute valuable nutrients and healthy fats. As an approachable dish, it encourages families to share a meal together and nurture an appreciation for homemade cooking.

When hosting friends or family, the Pillsbury Taco Bake becomes a social centerpiece. Its adaptable nature allows guests to customize their servings with various toppings, making it interactive and enjoyable. Whether served at a game night, family reunion, or casual dinner, it’s bound to spark conversation and laughter around the table.

Lastly, the cost-effectiveness of this recipe stands out. With its simple ingredients and the ability to serve multiple servings, it’s an economical choice while ensuring satisfaction. Enjoying flavorful, homemade food doesn’t have to break the bank, and this taco bake exemplifies wholesome, budget-friendly meal ideas.

Historical Background and Cultural Significance

While tacos trace their history back to Mexican cuisine, the fusion of these flavors with a crescent roll represents a modern twist influenced by American culinary creativity. The concept of combining traditional dishes with ready-to-use convenience items like Pillsbury crescent rolls has gained popularity as busy lifestyles demand quicker meal solutions.

This recipe highlights how cultural influences can transform and adapt classic cuisines into accessible dishes for a wider audience. While it may not be a traditional taco recipe, the essential elements remain—spiced beef, cheese, and fresh toppings—creating a unique experience that pays homage to its roots.

As recipes evolve, this taco bake showcases the flexibility of cooking, where cultural traditions meet modern-day demands. It reflects the advent of convenience cooking in American households while still embracing beloved flavors that evoke warmth and familiarity.

Regional variations of the taco are numerous; this bake provides the opportunity for families to explore flavors from different places, whether it be through spices, additional toppings, or even meat alternatives, thus broadening culinary horizons.

Ingredient Deep Dive

For this Pillsbury Crescent Roll Taco Bake, the primary ingredients are crescent rolls, ground beef, taco seasoning, shredded cheese, and toppings.

Crescent rolls have a fascinating history, originating in Austria and becoming popular in America through companies like Pillsbury in the 20th century. Their buttery-flaky texture makes them a versatile ingredient suitable for both savory and sweet recipes. When selecting crescent rolls, look for fresh, unopened packages, and ensure they are stored in a cool, dry place. Leftover rolls can be frozen for future baking.

Ground beef is a staple protein in many households, known for its affordability and adaptability. It is rich in iron and protein, making it an excellent choice for hearty meals. Opt for leaner cuts to reduce fat content, and use it immediately or store in the refrigerator for up to two days. Ground beef can be substituted with turkey or even plant-based meat alternatives for a healthier or vegetarian option.

Taco seasoning blends various spices that bring depth and complexity to dishes. They often include chili powder, cumin, garlic powder, and paprika, each contributing to the rich, warm flavors characteristic of taco preparations. To customize the seasoning, consider blending spices at home to create a blend that suits your taste. Store taco seasoning in an airtight container, and replenish as needed.

Shredded cheese is also a star ingredient in this recipe, contributing creaminess and flavor. Cheddar is commonly used, but feel free to experiment with pepper jack, Monterey jack, or a Mexican blend. When purchasing cheese, fresh bags yield the best results, and shredded cheese can be mixed with cornstarch to prevent clumping.

Toppings like lettuce, tomatoes, and avocado not only enhance the flavor but also add freshness to the dish. Select ripe vegetables that are vibrant in color for the most appealing presentation, and remember to thoroughly wash them before use. Any extra toppings can be easily stored in the fridge and used in future meals or snacks.

Common Mistakes to Avoid

  • Using old or expired ingredients: Always check the expiration dates on your crescent rolls and other perishables to ensure they are fresh.
  • Overcooking the filling: Keep an eye on your meat; overcooking it can lead to a dry and less flavorful result. Cook until just browned and then mix in the seasoning.
  • Not sealing the crescent rolls properly: Ensure the seams are pressed together to avoid leaks, which can create a mess in the oven and an unappealing appearance.
  • Skipping the seasoning: Remember that taco seasoning is essential for flavor; don’t skip or skimp on it!
  • Neglecting to preheat the oven: Preheating ensures that your bake cooks evenly and achieves that perfect golden color.
  • Rushing the cooling process: Let the dish cool for a few minutes after baking to allow flavors to meld and make slicing easier.
  • Forgetting the toppings: Toppings shouldn’t be an afterthought; they add vital flavor and texture that elevates the dish.
  • Using too much filling: Overstuffing can lead to spillage. Keep the filling within recommended amounts for best results.
  • Not letting leftovers cool: Allow any leftovers to cool completely before storing them to prevent condensation and sogginess.
  • Ignoring storage guidelines: Improper storage can reduce shelf life and flavor; ensure you store any leftovers in an airtight container.

Essential Techniques

For this recipe, keeping your crescent roll dough from overworking is crucial for achieving the desired texture. Over-handling can lead to dense rolls rather than airy crescents. To master this, roll out the dough gently and use minimal force when assembling.

The technique of browning meat evenly is another key step. Ensure your skillet is hot before adding the meat, as this will help achieve a good sear and prevent the meat from steaming. Use a spatula to break up the meat as it cooks so it cooks evenly through.

Lastly, learning how to properly assemble the bake will make for a visually appealing result. Layer the filling evenly and fold over the dough gently to create a sealed pocket. This prevents filling from leaking and gives you a neat, attractive presentation.

Pro Tips for Perfect Pillsbury Crescent Roll Taco Bake

– For an extra flavorful filling, sauté onions and peppers with the ground beef before adding taco seasoning.
– Consider using homemade taco seasoning for a fresher flavor; it’s easy to combine spices you likely already have.
– Experiment with the type of cheese; combos such as mozzarella and cheddar add depth without overpowering the dish.
– Brush the tops of the crescent rolls with melted butter before baking for added golden color and richness.
– Allow the dish to rest for about 5 minutes before slicing; this helps the filling set and prevents spillage.
– Use parchment paper on your baking pan for easy cleanup and to prevent sticking.
– Add a layer of tortilla chips on the bottom of the pan for a unique twist and more crunch.
– Customize your toppings based on guest preferences; set up a taco bar for a fun, interactive meal!

Variations and Adaptations

Exploring regional variations can enhance your Pillsbury Crescent Roll Taco Bake experience. Consider a southwestern approach by adding black beans and corn to the filling, or making it spicy with chopped jalapeños.

Adapting the dish for seasonal ingredients can also freshen it up—think fresh summer corn or diced bell peppers in the mix. When it comes to dietary needs, substituting ground beef with lentils or mushrooms can provide hearty vegetarian options.

For flavor variations, experiment with specific spice profiles, such as adding taco chipotle seasoning for smokiness or using shredded chicken instead of beef for a twist.

Incorporating alternative toppings, such as fresh cilantro, sliced olives, or a drizzle of sour cream, can elevate flavors and presentation. You can also consider an assembly look by using a cast iron skillet for a rustic finish.

Serving and Presentation Guide

For an appealing platter, serve your taco bake in the baking dish, garnished with fresh cilantro or green onions. Add colorful toppings on the side for guests to mix and match. Using small bowls for toppings such as guacamole, salsa, or sour cream keeps the serving neat and customizable.

Plating techniques, such as slicing triangular pieces and layering them slightly askew, provide a modern look. Pair with a fresh green salad for a refreshing complement and extra nutrition.

When serving, consider temperature—ideally, the dish should be enjoyed warm but not piping hot, as cooled flavors develop beautifully. Portion control can be achieved with uniform slices or even mini-sized versions for an appetizer feel.

Wine and Beverage Pairing

When pairing beverages with this Pillsbury Crescent Roll Taco Bake, consider a light-bodied red wine, such as a Pinot Noir, which complements the flavors of the seasoned beef without overwhelming the dish. For white wine enthusiasts, a crisp Sauvignon Blanc can enhance the freshness of any toppings used.

Non-alcoholic options like a citrus-infused sparkling water can cleanse the palate while adding a refreshing twist. If coffee is your preference, consider a lightly roasted blend that won’t overshadow the flavors of the meal.

When serving wine, temperatures are crucial; white wines are best chilled while reds should be at room temperature. Offer a variety of beverage choices to cater to all palates and set the tone for a delightful meal.

Storage and Shelf Life

Proper storage for your Pillsbury Crescent Roll Taco Bake is essential for maintaining flavor and freshness. Store any leftovers in an airtight container in the refrigerator, where they will last up to three days. When it comes to reheating, use an oven or toaster oven, as these methods maintain the flaky texture of the crescent rolls better than microwaving.

Freezing is also an option for this dish. To freeze, it’s best to first ensure that the taco bake is completely cooled, then wrap it tightly in plastic wrap followed by aluminum foil. This method will keep it fresh for up to three months.

When thawing, do so in the refrigerator overnight. Reheat gently in the oven to reclaim that crispy texture while ensuring thorough warming. Always check for signs of spoilage such as off smells or a change in texture before consuming.

Make Ahead Strategies

For a time-saving approach, consider prepping components ahead of time. You can brown the meat and mix the taco seasoning in advance, storing it in the refrigerator to save time on busy cooking days. Additionally, you can prepare the crescent roll base and fill it right before baking.

When assembling, layering the filling into the crescent rolls and refrigerating before baking allows the flavors to marry well overnight. Just ensure that the rolls are covered to prevent drying out. This method offers both convenience and flavor enhancement.

Quality will remain intact if you follow proper storage measures before assembly. Be mindful of freshness with chilled components and remember to bring refrigerated filled rolls to room temperature before baking.

Finally, for extra color and freshness, consider adding garnishes right before serving, ensuring everything remains vibrant and inviting.

Scaling Instructions

Scaling your Pillsbury Crescent Roll Taco Bake is straightforward and can be done easily for larger gatherings. If you need to halve the recipe, consider reducing the primary ingredients while maintaining the seasoning ratios for optimal flavor balance.

If doubling or tripling the recipe, adjust your baking dish size accordingly to accommodate the increased volume—think large enough to avoid overcrowding while ensuring even baking.

Timing may need slight modifications depending on the size of the baking dish used; larger portions may require an extra 5-10 minutes in the oven. Keep an eye on the bake to ensure it achieves that lovely golden color before serving.

Finally, for scaled versions, remember to do thorough storage considerations. Larger portions take longer to cool, so store in a way that maintains flavor integrity without compromising freshness.

Nutritional Deep Dive

This Pillsbury Crescent Roll Taco Bake offers a balance of macronutrients, with protein from the beef or alternative meats, healthy fats from cheese, and carbohydrates from the crescent rolls. Each serving provides the essential energy needed for an active lifestyle.

Micronutrient analysis is crucial too; vegetables and toppings add valuable vitamins such as Vitamin C, while various spices contribute beneficial antioxidants. Understanding these elements helps bolster the meal’s overall health benefits, encouraging varied ingredient use for enhanced nutrition.

For those keeping a close eye on weights and portions, assessing the serving size is essential. Adjusting portion sizes based on dietary needs—whether for weight management or dietary restrictions—will make this meal adaptable while still being delicious.

Finally, moderating components can suit individual dietary goals; opt for lower-fat dairy options or additional vegetables to enhance the nutritional profile without sacrificing flavor.

Dietary Adaptations

For a gluten-free Pillsbury Crescent Roll Taco Bake, consider substituting crescent rolls with gluten-free dough varieties available at most grocery stores, ensuring all other components are also gluten-free.

Dairy-free adaptations are possible by using plant-based shredded cheese and lactose-free sour cream. This adjustment maintains creaminess while catering to dairy-sensitive individuals.

Vegans can replace ground beef with lentils or crumbled tofu, and utilize dairy-free cheese to recreate the comforting qualities of the original version without animal products.

Those on low-carb or keto diets can change crescent rolls for cauliflower crust or a baked mixture of eggs, cheese, and ground meats, yielding a filling, low-carb option that still satisfies.

Paleo adherents can opt for ground meats, spices, and vegetable toppings while avoiding processed items, ensuring wholesome, minimally processed ingredients.

Lastly, those on low-FODMAP diets may use lactose-free cheese and minimize or omit high-FODMAP toppings to avoid digestive discomfort.

Troubleshooting Guide

If your crescent rolls aren’t rising properly, ensure the dough is fresh and hasn’t been exposed to heat before baking. Over-handling the dough can also prevent proper rise.

For flavor balance issues, consider adjusting your seasonings. If the dish is too salty, adding a small amount of sugar or acid can maintain balance without compromising the overall flavor.

Temperature-related problems can arise if the oven temperature isn’t consistent; ensure that the oven temperature is accurate by using an oven thermometer.

If using different equipment, such as a non-stick pan, pay attention to cooking times and adjust accordingly, as different materials can retain heat differently.

Ingredient substitutions can lead to unexpected results; be cautious when changing primary components, and try to aim for similar flavors and textures.

If the bake is unevenly cooked, rotating it halfway through baking can ensure it cooks evenly across all sections.

Lastly, if you’re pressed for time, keep an eye on all cooking stages to avoid overbaking, especially since timing can vary with different ingredients or oven types.

Recipe Success Stories

Community feedback surrounding the Pillsbury Crescent Roll Taco Bake has been overwhelmingly positive. Many home cooks share stories of successfully adapting the recipe to their family’s tastes, with creative ingredient swaps leading to delightful new variations.

Readers appreciate how easily the dish can accommodate dietary needs while remaining flavorful and satisfying. They often highlight experimenting with fillings, sharing successful modifications like adding black beans for extra texture and plant-based protein.

Adaptation stories reveal innovative spins on cooking techniques, with many employing slow cookers for the filling and then using the crescent rolls as a fresh topping at baking time.

Photography tips from the community also shine, with many showcasing their colorful presentations, emphasizing the visual appeal as an integral part of enjoying this dish.

Feedback not only celebrates the ease of preparation but also underscores the comforting nature of taco night while transforming it into a new family favorite.

Frequently Asked Questions

1. Can I use chicken instead of beef for this recipe?
Yes! Shredded or ground chicken works perfectly in this taco bake. It lends a lighter taste while still delivering on protein and flavor. Just ensure to season it well to enhance the taste.

2. How do I store leftovers from this dish?
Cool any leftovers completely before transferring them into an airtight container. They can be kept in the refrigerator for up to three days or frozen for longer storage.

3. Can the recipe be made vegetarian or vegan?
Absolutely! You can easily substitute the meat with lentils, beans, or crumbled tofu, and opt for dairy-free cheese to maintain a vegan approach.

4. How can I increase the spice level?
To increase the spice in your taco bake, add diced jalapeños or hot sauce to the meat mixture. You may also consider using spicy taco seasoning for that extra kick.

5. What can I use if I don’t have crescent rolls on hand?
If you don’t have crescent rolls, puff pastry or homemade biscuit dough can be great alternatives, though the texture might vary slightly.

6. Can I make this ahead of time?
Yes! Prepping the filling and assembling the bake the night before is a great time-saver. Just bake it fresh when you are ready to serve.

7. Is it necessary to use taco seasoning?
While it’s not strictly necessary, taco seasoning enhances the dish’s flavor profile dramatically. You can make your own blend with chili powder, cumin, and garlic powder if preferred.

8. Can I freeze the taco bake before cooking?
Yes! Prepare the taco bake fully, then wrap it tightly and store it in the freezer. Bake it directly from frozen, allowing for a longer cooking time.

9. How can I ensure my crescent rolls are golden brown?
Brushing the tops with an egg wash before baking can add beautiful color to your crescent rolls, helping them achieve that perfect golden-brown appearance.

10. What toppings can I add?
You can customize with various toppings such as sour cream, guacamole, fresh cilantro, onions, and more, allowing for creative expression tailored to personal tastes.

Additional Resources

If you loved this Pillsbury Crescent Roll Taco Bake, you might want to check out similar recipes such as baked enchiladas or shredded chicken taquitos. These dishes offer similar comforting flavors but with unique twists.

For technique guides, exploring how to make your own tortilla chips or guacamole elevates the meal and gives you more kitchen skills in the process.

Ingredient information can help you understand the best brands for taco seasoning and which cheese varieties complement this dish the best.

Equipment recommendations for cookware can assist you in choosing the best baking pans or kitchen gadgets that make this meal even easier or more enjoyable to prepare.

Lastly, look for seasonal variations of the taco bake that can provide freshness and local produce incorporation, enhancing both taste and nutrition in your meals.

Join the Conversation

We love hearing from our readers! Share your successes, tips, and variations on the Pillsbury Crescent Roll Taco Bake on social media. Whether it’s a unique version you’ve perfected or a gorgeous shot from your kitchen, we’re eager to see your take on this dish.

If you have photography tips or cooking techniques, please share them in the comments to foster community engagement and inspire others. Your input not only enhances our recipes but enriches the experience for everyone seeking delicious meals made simple.

Feel free to review this recipe and let us know how it turned out for you. Sharing personal experiences can lead to creative entries that everyone can enjoy. Join our growing community focused on food, creativity, and culinary adventures!

The Recipe

Pillsbury Crescent Roll Taco Bake

Serves: 6 servings

Prep Time: 15 mins

Cook Time: 25 mins

Total Time: 40 mins

Kitchen Equipment Needed

  • Baking Dish
  • Skillet
  • Mixing Bowl
  • Spatula
  • Measuring Cups and Spoons

Ingredients

  • 2 cans of Pillsbury crescent rolls
  • 1 lb ground beef (or turkey)
  • 1 packet taco seasoning
  • 1 cup shredded cheese (cheddar or your choice)
  • Toppings like lettuce, tomatoes, sour cream, and avocado

Directions

  1. Preheat your oven to 375°F (190°C) and prepare a baking dish by spraying it lightly with cooking spray.
  2. In a skillet over medium heat, cook the ground beef until brown, breaking it apart as it cooks. Drain any excess fat.
  3. Add the taco seasoning to the meat, stirring in ⅓ cup of water. Cook for an additional 2-3 minutes until the sauce thickens.
  4. Unroll the crescent rolls and spread them onto the bottom of your baking dish, pressing them together to cover the base entirely.
  5. Spoon the taco filling evenly across the crescent roll base, then sprinkle the shredded cheese on top.
  6. Unroll the remaining crescent rolls and layer them on top, pinching the seams to seal well.
  7. Bake in the preheated oven for 20-25 minutes or until the top is golden brown.
  8. Once out of the oven, let it rest for 5 minutes, garnish with your choice of toppings, and serve.

Recipe Notes

  • This recipe is easily customizable; feel free to swap out the ground meat for an alternative protein source.
  • Adding fresh ingredients like cilantro, diced onions, or corn can enhance the flavor profile immensely.
  • Consider increasing the spice levels with jalapeños or spicy salsa if you prefer a kick.

Best Chocolate Chip Cookies Recipe – Soft and Chewy

Classic Chocolate Chip Cookies: The Ultimate Comfort Treat

⚖️
Difficulty
Easy

⏲️
Prep Time
15 mins

🕒
Cook Time
10 mins

⏱️
Total Time
25 mins

🍽️
Servings
24 cookies

Chocolate chip cookies are the quintessential comfort treat, loved by people of all ages. The combination of sweet, melt-in-your-mouth chocolate and the buttery flavor of freshly baked cookies is simply irresistible. As the dough bakes, your kitchen fills with a warm, inviting aroma that evokes memories of childhood baking sessions. Each bite is a perfect blend of chewy and slightly crisp textures, offering satisfaction and indulgence.

Whether you’re enjoying them with a cold glass of milk or serving them at a gathering, these classic cookies are always a hit. They are perfect as a sweet snack, a thoughtful homemade gift, or a simple dessert to delight friends and family. The beauty of this chocolate chip cookie recipe is in its simplicity, making these cookies both approachable and rewarding to make.

Quick Recipe Highlights

  • Flavor Profile: Rich chocolate flavors beautifully balanced with a hint of vanilla and a buttery sweetness, creating the ultimate indulgence.
  • Texture: These cookies offer a delightful contrast between a crisp outer edge and a soft, chewy center that melts in your mouth.
  • Aroma: The warm scent of baking cookies is complemented by a fragrant hint of vanilla and chocolate, making it hard to resist sneaking a taste.
  • Visual Appeal: Golden-brown edges with gooey chocolate chips peeking through make these cookies visually tempting on any dessert table.
  • Skill Level Needed: No prior baking experience is needed, making this cookie recipe an excellent choice for beginners and seasoned bakers alike.
  • Special Equipment: All you need is a mixing bowl, baking sheet, and oven to create these delicious chocolate chip cookies.

Recipe Overview

  • Difficulty Level: With just a few simple steps and no special skills required, this chocolate chip cookie recipe is easy and straightforward, perfect for novice bakers.
  • Category: These cookies fit well into dessert and snack categories, delighting guests at casual gatherings or festive celebrations.
  • Cuisine: Originating from American kitchens, chocolate chip cookies have become an iconic dessert in many cultures, cherished for their classic taste.
  • Cost: The ingredients are mostly pantry staples, making these cookies a budget-friendly treat for everyday indulgence.
  • Season: Ideal for any season, chocolate chip cookies are especially popular during holidays when baking traditions bloom.
  • Occasion: Perfect for parties, holiday gatherings, or simply as an afternoon snack, these cookies bring joy and comfort wherever they are served.

Why You’ll Love This Recipe

Chocolate chip cookies are a beloved treat, offering an array of flavors and textures that appeal to all ages. The sweet, buttery dough combined with rich, melty chocolate creates a harmonious balance that is simply irresistible. Each cookie provides that perfect crispiness on the outside, while the center remains soft and chewy, allowing for a delightful mouthfeel with every bite. The flavor is not only satisfying but also brings a wave of nostalgia for many, making this recipe a family favorite.

In addition to the wonderful taste, convenience is key with this chocolate chip cookie recipe. It requires minimal time and effort; you can whip up a batch in just 25 minutes. With simple ingredients that are typically found in your pantry, you won’t need to make a special shopping trip. This ease of preparation allows for spontaneous baking sessions and sweet treats whenever the craving strikes.

Nutritionally speaking, while cookies are a dessert, they can also be made with some thoughtful choices. For instance, using high-quality dark chocolate can introduce antioxidants, and incorporating whole wheat flour might provide added fiber. Balance is essential, and enjoying these cookies within a varied diet makes them a delightful part of your culinary repertoire.

Socially, these cookies shine during gatherings. They serve as conversation starters, create connections over shared memories, and are a go-to dessert for diverse occasions. Their familiar appeal makes them ideal for events like birthdays, potlucks, and bake sales, giving everyone a taste of classic comfort.

Lastly, chocolate chip cookies are cost-effective. Many ingredients are affordable, and the recipe produces a generous yield, ensuring you get the most for your money. Plus, if you have unexpected guests, showing you’ve baked a fresh batch of cookies is sure to impress without breaking the bank.

Historical Background and Cultural Significance

The history of chocolate chip cookies dates back to the late 1930s in New England, where Ruth Wakefield invented this iconic treat. A necessity for her business at the Toll House Inn, Ruth decided to add chopped chocolate bars to cookie dough. This delightful creation quickly gained popularity, leading to a package of Toll House chocolate chips being produced for home bakers everywhere.

In the years following Ruth’s invention, chocolate chip cookies evolved from the kitchen staple to a symbol of American comfort food. The ubiquity of these cookies in homes, bakeries, and cafes speaks volumes about their cultural importance. They have become a quintessential dessert associated with childhood, family gatherings, and festive celebrations.

The recipe’s evolution has also included various adaptations worldwide, where different ingredients and techniques reflect regional tastes. While American recipes favor a thick and chewy style, other variations can be found with a thinner, crisper texture, showcasing the playful versatility of this beloved cookie.

Moreover, chocolate chip cookies hold a special place in popular culture. They often make appearances in films, books, and social gatherings, further solidifying their status as a beloved treat. From simple family baking sessions to gourmet innovations in upscale bakeries, their story continues to resonate with generations, making them a timeless classic.

Ingredient Deep Dive

Chocolate Chips

Chocolate chips are at the heart of any chocolate chip cookie recipe, bringing rich, sweet flavors and a delightful melt that enhances the overall cookie experience. Deriving from cacao beans, chocolate has a deep history that stretches back to ancient Mesoamerican cultures. Beyond indulgence, chocolate contains antioxidants and may also provide heart health benefits when consumed in moderation.

When selecting chocolate chips, the quality matters. Look for options that list cocoa solids and cocoa butter as main ingredients. Chocolate chips come in various forms, including semisweet, milk, and dark chocolate, allowing for personal preference in sweetness and richness. Store chocolate chips in a cool, dry place to maintain freshness, and consider baking with high-quality chocolate for a gourmet twist.

Butter

Butter is essential for creating the rich, creamy texture in chocolate chip cookies. It contributes fat to the dough, helping achieve a tender crumb. Traditionally made by churning cream, butter has been a kitchen staple for centuries, forming the base for countless baked goods. Not only does it enhance flavor, but butter also plays a significant nutritional role, providing vitamin A and healthy fats.

For optimal baking results, it is best to use unsalted butter to control the saltiness of the finished cookie. When selecting butter, consider varieties from grass-fed cows, which tend to have higher levels of nutrients. To store, keep butter wrapped, away from strong odors, and be mindful of checking the use-by date to prevent spoilage.

Granulated Sugar

Granulated sugar serves as one of the main sweeteners and helps create the ideal texture in chocolate chip cookies. It provides the necessary sweetness while promoting browning and softening the cookies’ structure. Sugar has a long history in culinary traditions, originating from sugarcane and sugar beets, and is a critical ingredient in baking.

When measuring sugar, use a level cup to achieve accurate results. Experiment with different sugars, such as brown sugar, which adds a deeper flavor and moisture due to its molasses content. Store granulated sugar in a cool, dry place in an airtight container to prevent clumping and maintain freshness.

Common Mistakes to Avoid

  • Overmixing the dough: This can lead to tough cookies. Mix just until the ingredients are combined to keep them tender and chewy.
  • Using cold butter: Cold ingredients can lead to cookies that don’t spread properly during baking. Make sure to use softened butter for even texture.
  • Not measuring flour accurately: Too much flour can result in dry cookies. Use a spoon to fluff the flour before spooning it into the measuring cup for accuracy.
  • Skipping the chilling step: Chilling the dough prevents spreading and enhances flavor, so don’t skip this important step!
  • Underbaking cookies: Cookies continue to firm up after they are removed from the oven. Aim for a light golden color for perfectly chewy cookies.
  • Not greasing the baking sheet properly: Ensure your baking sheets are adequately greased or lined with parchment paper to prevent sticking.
  • Using stale ingredients: Always check expiration dates on baking soda, flour, and chocolate chips to ensure the best results.
  • Ignoring cooling time: Let cookies cool on the baking sheet for a few minutes before transferring them to a wire rack to maintain structure.

Essential Techniques

Creaming Butter and Sugar

Creaming butter and sugar is a crucial step in cookie making, as it helps incorporate air into the dough, allowing your cookies to rise and achieve a light texture. To master this technique, use room temperature ingredients and beat them until light and fluffy, usually about 2-3 minutes. A common pitfall is not creaming long enough, resulting in dense cookies. Success can be identified by a pale color and a fluffy consistency.

Chilling the Dough

Chilling the dough is essential for achieving a better texture and preventing the cookies from spreading too much during baking. After mixing the ingredients, wrap your dough in plastic wrap and refrigerate for at least 30 minutes. A common mistake is trying to bake without chilling, which leads to thin, crispy cookies. Look for the dough to firm up and develop a more intense flavor once chilled.

Pro Tips for Perfect Chocolate Chip Cookies

1. Use high-quality chocolate for a richer taste that elevates your cookies to a gourmet level. Dark chocolate chips or a mix of chocolate types can provide a deeper flavor profile.
2. Experiment with half brown sugar and half granulated sugar for a chewier cookie with a wonderful caramel flavor.
3. Adjust baking times according to your oven, and keep an eye on cookies as they bake to achieve your desired texture.
4. Try adding a pinch of sea salt on top of each cookie before baking to enhance the chocolate flavor.
5. Use parchment paper on your baking sheets to ensure even baking and easier clean-up.
6. For an extra special twist, mix in nuts or toffee bits for added crunch and flavor variations.
7. Store baked cookies in an airtight container with a slice of bread to maintain moisture and softness.
8. To make ahead, you can freeze cookie dough balls and bake them directly from the freezer when a fresh batch is needed.

Variations and Adaptations

Chocolate chip cookies can be easily modified to cater to a variety of tastes and dietary preferences. Consider adding oats for a chewy texture or experimenting with nut flours to create gluten-free versions. Additionally, you can infuse different flavors, such as almond extract, or incorporate spices like cinnamon for a unique twist.

For seasonal adaptations, think about adding pumpkin spice during the fall or holiday-themed variations, incorporating cranberries and nuts as festive alternatives. Different chocolate types can also provide delightful variations—try using white chocolate, or even mixing in seasonal goodies like peppermint candies for the winter holidays.

For those with dietary restrictions, making cookies vegan is simple with substitutes like applesauce for eggs and using plant-based butter alternatives. For a lower-carb version, sugar alternatives like erythritol can be utilized, catering to those on keto diets.

Serving and Presentation Guide

When presenting chocolate chip cookies, consider using a decorative platter or tiered cake stand to create an appealing display. Garnishing them with a light dusting of powdered sugar or drizzling melted chocolate on top can add an elegant touch. For a modern twist, serve them in jars, layered with cookie crumbs and ice cream for a delightful dessert.

Temperature plays an important role in serving. Cookies are best enjoyed warm, so providing warm cookies directly from the oven alongside a scoop of ice cream is a fantastic treat. When portioning, consider small to medium-sized cookies for easy handling and to encourage sharing among guests, enhancing the communal enjoyment of treats.

Wine and Beverage Pairing

Pairing beverages with chocolate chip cookies can elevate your dessert experience. A glass of dessert wine, such as a late harvest Riesling, complements the sweetness of the cookies beautifully. Alternatively, a rich Cabernet Sauvignon can enhance the chocolate flavor, making it a sophisticated pairing.

For non-alcoholic options, try pairing with a creamy vanilla milkshake or iced coffee for a delightful treat. Both enhance the cookie’s flavor profile without overpowering it. If you prefer tea, a chai latte can provide a spicy contrast that excels with the sweetness of the cookies. Serve these beverages slightly chilled or warm for a delightful counterbalance to fresh cookies.

Storage and Shelf Life

Proper storage of chocolate chip cookies is essential to maintain freshness. Store them in an airtight container at room temperature for up to one week; add a piece of bread to help retain moisture. If you want to keep your cookies longer, consider freezing them. Wrap individual cookies in plastic wrap and place them in a freezer bag; they can last up to 3 months in the freezer.

Make sure to check cookies for signs of spoilage, such as an off smell or changes in texture. To enjoy frozen cookies, simply let them thaw at room temperature or reheat them in the oven for a few minutes to achieve that freshly baked warmth again.

Make Ahead Strategies

Preparing chocolate chip cookies ahead of time makes entertaining or spontaneous treat-sharing easy. The dough can be made 1-2 days in advance and stored in the refrigerator, making it convenient to bake fresh cookies on short notice. Portion the dough into balls before chilling to simplify baking right from the fridge.

Another option is to freeze the portioned cookie dough. When ready to bake, allow the dough to thaw in the fridge overnight, then proceed with baking. This method maintains dough quality and makes sure your cookies are fresh whenever you need them.

You can also prepare cookie mixes ahead by combining dry ingredients and storing them in jars, only needing to add wet ingredients and chocolate chips later. This allows you to save time while still enjoying the homemade experience.

Scaling Instructions

If you need more or fewer cookies, scaling this chocolate chip cookie recipe is simple. To halve the recipe, just divide all the ingredients by two, ensuring each portion maintains the same measurement accuracy to preserve texture and taste.

For larger gatherings, doubling or tripling the recipe is feasible as well. Be mindful of your mixing bowl size; it may require multiple batches if you increase the quantities significantly. Adjust baking times slightly if you’re using larger baking sheets or different oven racks to ensure consistent cooking.

Storing variations after scaling is essential. With increased yield, some cookies may require longer cooling times or extra care in packaging to keep them fresh for sharing.

Nutritional Deep Dive

Each chocolate chip cookie serves as a delightful treat but can also provide insight into nutritional balance. Typically, one cookie offers a combination of carbohydrates, fats, and proteins. For a single serving, a cookie may contain approximately 150 calories, depending on size and ingredients.

Analyzing the macronutrients, cookies primarily consist of simple sugars and fats, contributing to energy while offering little in terms of vitamins and minerals. Incorporating whole grain flour or adding nuts can enhance their nutritional value, providing fiber and essential nutrients.

For those conscious of their dietary needs, moderation is key. Understanding portion sizes and the balance of indulging can help maintain a healthy approach while enjoying the decadence of chocolate chip cookies. Keeping them as an occasional treat allows for guilt-free indulgence as part of a diversified diet.

Dietary Adaptations

Chocolate chip cookies can easily adapt to various dietary preferences without sacrificing flavor. For gluten-free versions, substitute all-purpose flour with almond flour or a gluten-free baking blend to create delicious cookies that everyone can enjoy.

For dairy-sensitive individuals or vegans, using plant-based butter and egg substitutes, like flaxseed meal or mashed bananas, can yield equally delightful cookies. The use of dairy-free chocolate chips ensures that no one misses out on this classic treat.

Keto and low-carb adaptations can switch high-carb ingredients with sugar alternatives like erythritol or stevia and use almond flour instead of traditional wheat flour. In addition, creating lower-sugar recipes can suit many diets without compromising on taste, ensuring delightful cookies suitable for all.

Troubleshooting Guide

If your chocolate chip cookies don’t come out as expected, there are solutions to common issues. For cookies that are too flat, check the butter temperature—melted butter can lead to excess spreading. Ensure you’re using softened, not melted butter, and chilling the dough can also help maintain shape.

In cases of dry or crumbly cookies, this often results from too much flour or overmixing. Ensure accurate measuring techniques and gently combine ingredients until just blended. The dough should remain slightly sticky to yield that desired chewy texture.

If cookies are not cooking evenly or are burnt on the edges, check your oven temperature with an oven thermometer. Oven discrepancies can lead to uneven baking, so rotating sheets during the baking process can enhance evenness.

Recipe Success Stories

Community engagement around chocolate chip cookies has flourished through shared experiences and adaptations. Many bakers have shared their personal variations, from unique flavor additions to healthier ingredient swaps, inspiring others to try new twists on the classic recipe.

Reader suggestions have also included creative baking methods, such as using a cast-iron skillet to create a giant cookie dessert shared among friends. Success stories often focus on the joy these cookies bring to gatherings, bringing people together to bond over baking adventures.

Photographers in the community love to showcase their homemade cookies, adding an artistic touch to a universally loved recipe. The visual appeal of beautifully baked cookies continues to ignite passion and creativity in home bakers everywhere.

Frequently Asked Questions

Can I freeze chocolate chip cookie dough?

Absolutely! You can portion cookie dough into balls, wrap them tightly, and store them in the freezer for up to three months. When ready to bake, just pop them straight into the oven without thawing for a fresh-baked experience.

Why are my cookies tough?

Tough cookies often result from overmixing the dough or using too much flour. Ensure you measure your ingredients accurately and mix just until combined for a tender texture.

What can I substitute for chocolate chips?

If you don’t have chocolate chips, consider using chunks of baking chocolate, white chocolate, peanut butter chips, or even dried fruits like raisins for a different spin.

How can I make my cookies chewier?

To achieve chewier cookies, try adding extra brown sugar and refrigerate the dough before baking. Baking slightly longer can also help create that perfect chewy texture.

Can I make gluten-free chocolate chip cookies?

Certainly! Substitute all-purpose flour with a gluten-free flour blend or almond flour for delicious gluten-free chocolate chip cookies.

How do I avoid flat cookies?

Ensure your butter is softened, not melted, and chill the dough before baking. Check your baking soda for freshness as well—the right leavening is key to perfect cookies!

Is it okay to use margarine instead of butter?

While butter provides better flavor and texture, margarine can be used as a substitute. Just make sure to use the stick variety for best results.

Can I add nuts to my cookie dough?

Yes, nuts add wonderful texture and flavor! Chopped walnuts or pecans work beautifully—just fold them into your cookie dough before baking.

What’s the best way to store cookies?

Store cookies in an airtight container at room temperature, and include a slice of bread to keep them moist. For longer storage, freeze them wrapped in foil or plastic.

Why are my cookies too sweet?

If your cookies are too sweet, adjust the sugar in your recipe next time. You can also balance sweetness by adding a touch of sea salt on top before baking.

Additional Resources

Explore other delicious cookie recipes that utilize simple ingredients with exciting flavor profiles. Techniques for mastering cookie baking, such as how to gauge doneness and perfecting your measuring skills, can help elevate your baking experience.

Learn about ingredient facts, including variations available for flour and sugar types to suit dietary needs, and find the best baking equipment to streamline the process. Additionally, discover seasonal variations that provide a fresh twist on your cookie game throughout the year.

Join the Conversation

Engage with us on social media to share your chocolate chip cookie creations! Post photos of your baked goods, sharing variations and special tips that made your cookies successful. We love to hear from our community members—join the conversation to share your experiences, tips, and suggestions for future recipes.

By sharing your story, you inspire others on their baking journeys. Let’s celebrate the joy of cookie baking together, creating a warm, welcoming environment for all dessert lovers!

The Recipe

Chocolate Chip Cookies

Serves: 24 cookies

Prep Time: 15 mins

Cook Time: 10 mins

Total Time: 25 mins

Kitchen Equipment Needed

  • Mixing bowl
  • Measuring cups and spoons
  • Baking sheets
  • Electric mixer or whisk
  • Spatula
  • Parchment paper (optional)

Ingredients

  • 1 cup (2 sticks) unsalted butter, softened
  • 3/4 cup granulated sugar
  • 3/4 cup brown sugar, packed
  • 1 teaspoon vanilla extract
  • 2 large eggs
  • 2 1/4 cups all-purpose flour
  • 1 teaspoon baking soda
  • 1/2 teaspoon salt
  • 2 cups semi-sweet chocolate chips

Directions

  1. Preheat your oven to 375°F (190°C).
  2. In a mixing bowl, cream together the softened butter, granulated sugar, brown sugar, and vanilla extract until light and fluffy.
  3. Add eggs, one at a time, beating well after each addition.
  4. In a separate bowl, combine flour, baking soda, and salt. Gradually add to the butter mixture until fully mixed.
  5. Stir in the chocolate chips until evenly distributed.
  6. Drop rounded tablespoons of dough onto ungreased baking sheets.
  7. Bake for 9 to 11 minutes or until golden brown around the edges but still soft in the center.
  8. Allow to cool on the baking sheet for 2 minutes before transferring to wire racks to cool completely.

Recipe Notes

  • For thicker cookies, chill the dough before baking for at least 30 minutes.
  • Try mixing different types of chocolate chips or adding nuts to customize flavors.
  • Store baked cookies in an airtight container with a slice of bread to keep them soft.

Delicious Cowboy Cookies: The Ultimate Treat for Everyone

Cowboy Cookies: A Sweet Journey to the West

⚖️
Difficulty
Easy

⏲️
Prep Time
15 mins

🕒
Cook Time
12 mins

⏱️
Total Time
27 mins

🍽️
Servings
24 cookies

Cowboy Cookies are not just a delightful treat; they are a celebration of bold flavors and a beloved staple of many homes. Combining the rustic charm of the Wild West with a medley of textures, these cookies are hearty yet sweet, making them an instant favorite. Imagine biting into one to find a warm, gooey chocolate chip alongside the crunch of oats and the chewy goodness of coconut; it’s a sweet adventure that keeps you coming back for more.

As you savor each bite, you’ll notice how the buttery base complements the richness of dark brown sugar, providing depth in flavor while delivering a comforting sweetness. With a hint of cinnamon and the nutty notes from pecans or walnuts, these Cowboy Cookies are inviting and rich – perfect for sharing with friends around a campfire or as a special treat at home. Their delightful aroma, reminiscent of a country kitchen, will transport you to a simpler time, making these cookies the ultimate comfort dessert.

Quick Recipe Highlights

  • Flavor Profile: Cowboy Cookies feature a sweet, buttery base elevated by rich chocolate, toasty nuts, and a hint of cinnamon.
  • Texture: The contrast of a crisp exterior with a chewy and soft interior offers a satisfying mouthfeel that’s sure to please.
  • Aroma: The warm scent of baked cookies infused with vanilla and chocolate draws you in and creates a welcoming atmosphere.
  • Visual Appeal: Golden brown edges with gooey chocolate chips and speckles of oats create an eye-catching presentation.
  • Skill Level Needed: This cookie recipe is beginner-friendly, making it perfect for aspiring bakers and experienced hands alike.
  • Special Equipment: You will need basic baking equipment like mixing bowls, a baking sheet, and an electric mixer.

Recipe Overview

  • Difficulty Level: With simple steps and easily accessible ingredients, anyone can whip up these delicious cookies without any prior baking experience.
  • Category: These cookies are perfect as a dessert or snack, making them versatile enough for any time of day.
  • Cuisine: Inspired by American cowboy culture, these cookies bring a taste of the Old West into modern kitchens.
  • Cost: The recipe is cost-effective, using pantry staples that are usually on hand, making it friendly for any budget.
  • Season: Great year-round, Cowboy Cookies are especially popular during fall and winter holidays when cozy baking is in full swing.
  • Occasion: Perfect for casual get-togethers, family picnics, or as homemade gifts, embodying the spirit of generosity and warmth.

Why You’ll Love This Recipe

You’ll be drawn to the inviting taste and texture of Cowboy Cookies, which are not too sweet yet deeply satisfying. The combination of wholesome ingredients ensures each bite is filled with chocolate, nuts, and oats, providing both comfort and indulgence. The chewy oats and chocolate create a wonderful contrast that satisfies cravings without being overwhelming.

Preparation is a breeze, making it an approachable recipe for novice bakers and a delightful project for families. Because the ingredients are relatively simple, you can involve children in the mixing process, creating a memorable experience of baking together. From stirring to spooning, it’s a fun way to explore culinary creativity.

These cookies can also be nutritionally robust, with oats providing valuable fiber, and nuts adding healthy fats and protein. Each cookie delivers a balanced snack option that can easily be enjoyed post-workout or as an afternoon pick-me-up.

Socially, Cowboy Cookies are excellent for sharing. Their rustic charm and homely taste invite everyone to enjoy, making them perfect for parties or gatherings. There’s something special about homemade cookies that foster a sense of community and togetherness.

Cost-effective and easy to make, the recipe requires minimal investment while delivering a large batch of cookies that can satisfy a crowd. Whether packed for lunch or served at a potluck, they embody good value with delicious rewards.

Historical Background and Cultural Significance

Cowboy Cookies originate from the heart of American culture, weaving a tale of the adventurous cowboy lifestyle in the Wild West. This recipe embodies the spirit of cowboys who roamed the plains, often in need of hearty nourishment that could withstand their travels. The cookies, packed with essential nutrients, became a staple for these rugged individuals.

Over the years, cookies like these evolved, influenced by various baking traditions and home cooks who sought to create a treat that combined convenience with flavor. The notion of adding oats, nuts, and chocolate chips became a popular twist, transforming traditional cookie recipes into something more substantial.

Regionally, variations of the Cowboy Cookie emerged across the United States, with some incorporating local favorites like dried fruit or different nut varieties. Each region adapted the cookies to reflect local flavors and ingredients, highlighting the versatile nature of this sweet treat.

Today, Cowboy Cookies are recognized not just as a recipe but as a symbol of American baking heritage, capturing the essence of comfort food that transcends generations. They are a reminder of simpler times, where food was a way to connect and share stories.

Ingredient Deep Dive

Oats: Oats have a rich history dating back to ancient times, often celebrated for their health benefits and versatility. Packed with fiber, they promote heart health and provide long-lasting energy, making them an ideal ingredient in Cowboy Cookies. When selecting oats for baking, opt for old-fashioned rolled oats for the best texture. Store in a cool, dry place for optimal freshness. If you need alternatives, quick oats can be used, although the texture might differ slightly.

Chocolate Chips: Chocolate chips have become a quintessential baking ingredient, originating in the early 20th century with the popularization of cookies. They provide a sweet flavor that balances the heartiness of the oats and nuts. Choose high-quality dark chocolate for an intense flavor, and store them in a cool pantry to prevent melting. If you’re looking for substitutions, try using chopped chocolate bars or even white chocolate for a different twist.

Nuts: Nuts have been a staple in many cultures, valued not just for their taste but also for their nutritional profile, boasting healthy fats and protein. Pecans and walnuts are both excellent choices for Cowboy Cookies as they add crunch and depth. Look for unsalted nuts for baking to control the saltiness, and store them in airtight containers to maintain freshness. Substitute with sunflower seeds for a nut-free version, ensuring allergen considerations.

Common Mistakes to Avoid

  • Overmixing the dough can lead to tough cookies. Mix just until combined to maintain a tender texture.
  • Using cold butter instead of softened butter affects the cookie spread and texture. Make sure to let it sit at room temperature.
  • Not measuring ingredients accurately can ruin the cookie’s texture. Use a kitchen scale for the best results.
  • Skipping the chilling step can prevent the cookies from achieving the right chewiness; always chill the dough for at least 30 minutes.
  • Using different types of sugar can alter the flavor; stick to the recipe for optimal taste.
  • Baking at too high of a temperature can burn the edges while leaving the centers raw. Always preheat your oven correctly.
  • Not checking for doneness can lead to under-baked cookies; they should be lightly golden around the edges.
  • Failing to line your baking sheet can result in cookies sticking. Use parchment paper or a silicone mat for easy removal.
  • Baking too close together can lead to the cookies spreading into one another; give them enough space on the baking sheet.
  • Not allowing cookies to cool on the tray can lead to mishaped cookies; let them cool for a few minutes before transferring.

Essential Techniques

Mixing Dough Properly: Properly mixing your dough is essential for achieving the right cookie texture. Begin by creaming butter and sugar until light and fluffy, which incorporates air for a tender cookie. Add eggs one at a time, mixing thoroughly between additions. The key is to combine until just mixed; overmixing can lead to dense cookies.

Measuring Ingredients Accurately: Accurate measurements are crucial for cookie perfection. Use weight measurements for precision, especially with flour and sugar, as incorrect volumes can result in a too-dry or too-wet dough. Spoon flour into a measuring cup and level it off without packing to ensure accuracy.

Pro Tips for Perfect Cowboy Cookies

Utilize a cookie scoop to ensure uniform size and even baking, making it easy to achieve that perfect shape. Experiment with different combinations of nuts and chocolate to make unique variations of Cowboy Cookies that suit your preferences. Consider adding a sprinkle of sea salt on top before baking to enhance flavor balance.

For a gooey center, slightly underbake the cookies; they will continue to set while cooling. If you prefer softer cookies, store them in an airtight container with a slice of bread to maintain moisture. Always preheat your oven thoroughly before baking to ensure even results.

Rotate your baking sheet halfway through the baking time to promote consistent baking, especially if your oven has hot spots. Finally, consider using a silicone baking mat for easy removal and less sticking.

Variations and Adaptations

For a regional twist, try adding cinnamon for a spiced flavor profile that complements the sweetness of the chocolate. Seasonal adaptations might include dried cranberries or pumpkin spice during fall for a festive touch. Dietary modifications can be made by using gluten-free flour and oats for those with sensitivities.

Flavor variations such as espresso powder or mint extract can enhance the basic recipe. If you seek a crunchy texture, add shredded coconut to the mix or for a softer bite, include more chocolate chips. Presentation alternatives could involve drizzling melted chocolate on top for an elegant look.

Serving and Presentation Guide

Present your Cowboy Cookies on a rustic wooden platter for a charming homemade touch. Garnish with a sprinkle of powdered sugar for a visually appealing contrast against the golden cookies. Pair them with a tall glass of cold milk or a warm cup of coffee for delightful serving suggestions.

Consider stacking cookies in a clear glass jar for an inviting display that showcases their yummy appeal. When serving at events, label your cookies with creative names, capturing their Western charm while sharing the love of baking. Be mindful of serving sizes to avoid overwhelming guests; two cookies per person is generally a good rule of thumb.

Wine and Beverage Pairing

For a delightful pairing, consider serving your Cowboy Cookies with a glass of rich Merlot, which complements the chocolate well. If you prefer a non-alcoholic choice, cold brew coffee with a splash of cream enhances the cookies’ flavors. For winter gatherings, a warm spiced cider can create a cozy atmosphere alongside these baked treats.

When serving warm cookies, ensure that beverages are at an optimal temperature to avoid them cooling too quickly. If you enjoy tea, a strong English Breakfast or chai can be paired perfectly, enhancing the spiced flavors.

Storage and Shelf Life

To store your Cowboy Cookies, place them in an airtight container at room temperature for up to a week. For longer shelf life, freeze cookies by separately wrapping them in plastic wrap and then placing them in a freezer bag.

When thawing frozen cookies, let them sit at room temperature to retain their chewy texture. To check for spoilage, look for any signs of mold or an off smell. Reheat cookies in the microwave for a few seconds to regain their comforting warmth.

Make Ahead Strategies

To save time, you can prepare the dough in advance and refrigerate it for up to three days before baking. This allows the flavors to meld beautifully. Consider rolling the dough into balls and freezing them; when you’re ready to bake, simply place them straight from the freezer to the oven, adjusting the baking time accordingly.

If you want to enhance freshness, reserve adding chocolate chips or nuts until right before baking. This ensures they remain intact and provide texture.

Scaling Instructions

To halve the recipe, simply divide each ingredient in half while keeping the mixing method the same for consistency. If doubling or tripling, consider using larger mixing bowls and more baking sheets to accommodate the increased volume. Timing adjustments may be required based on batch size, as baking times could vary slightly.

When scaling, keep in mind that oven space is finite. If you’re preparing a large batch, you might need to bake in stages. Always ensure proper storage considerations; larger batches may also necessitate larger containers.

Nutritional Deep Dive

Cowboy Cookies provide a balanced macro breakdown with a good mix of carbohydrates from oats, healthy fats from nuts, and protein from both nuts and eggs. Each cookie packs a nutritious punch, boasting valuable fiber that supports digestion and helps maintain fullness.

In terms of micronutrients, nuts enhance vitamin E and magnesium content, while oats boost iron intake. These cookies can be part of a healthy lifestyle; however, portion control is vital to balance the indulgent aspects with overall nutrition.

For those focused on dietary considerations, maintain an eye on sugar content and consider variations that utilize less sugar without sacrificing taste. With the right ratios, these cookies can fit into any balanced diet.

Dietary Adaptations

You can easily adapt Cowboy Cookies to suit various dietary preferences. For gluten-free versions, substitute all-purpose flour for a gluten-free blend, ensuring it includes xanthan gum for structure.

Dairy-free adaptions involve using plant-based butter and dairy-free chocolate chips, making this treat accessible for those with lactose intolerance. A vegan version can be achieved by replacing eggs with flaxseed meal and using agave syrup instead of sugar.

For low-carb or keto diets, consider using almond flour and sugar substitutes to create a guilt-free cookie. If you want to adopt a paleo approach, evaluate the ingredients closely, ensuring they meet the criteria for such diets while maintaining the overall cookie appeal.

Troubleshooting Guide

Common texture issues arise from incorrect oven temperatures; always ensure the oven is preheated. If cookies spread too much, check butter temperature; it should be soft but not melted. If cookies are too tough, this may result from overmixing the dough or excessive baking time.

For flavor balance, adjust sugar levels; sometimes reducing sugar slightly enhances the overall taste. If you run into ingredient substitution issues, consulting conversion charts can guide you towards appropriate alternatives in ratios and cooking techniques.

If shaping cookies poses challenges, chilling the dough can simplify the process while maintaining a cleaner, defined cookie shape. Recognizing these potential pitfalls ensures a more pleasant baking experience.

Recipe Success Stories

Many home bakers rave about the joy of making Cowboy Cookies, praising their ease and irresistible flavor. Community feedback highlights how simple ingredient swaps can lead to delicious variations, encouraging others to try their twists on the classic recipe.

Readers often share adaptation stories, demonstrating flexibility by introducing local ingredients or flavors. The experience of baking these cookies brings families together, creating opportunities for engagement and bonding in the kitchen.

Photography tips emerge as well since cookies look gorgeous when styled properly. People enjoy sharing their cookie creations through social media, amplifying their love for this recipe in the community.

Frequently Asked Questions

1. Can I make Cowboy Cookies without nuts?

Absolutely! If you have nut allergies or simply prefer not to use nuts, feel free to omit them from the recipe. You can replace them with additional oats or chocolate chips for extra texture and flavor.

2. How do I get my cookies to be chewy?

To ensure chewy cookies, avoid overbaking; take them out of the oven when they appear slightly undercooked in the center. Also, letting them sit on the baking sheet for a few minutes before transferring helps maintain moisture and chewiness.

3. Are Cowboy Cookies freeze-friendly?

Yes! You can freeze unbaked dough for up to three months. Just roll the dough into balls, freeze them on a baking sheet, then transfer to a freezer bag. Bake directly from frozen, adding a couple of minutes to the cooking time.

4. What’s the best way to store leftover cookies?

Store your Cowboy Cookies in an airtight container at room temperature for up to a week. For longer storage, you can freeze them, which will help maintain their texture and flavor over time.

5. Can I use quick oats instead of rolled oats?

While you can use quick oats, the texture of your cookies may change slightly. Rolled oats provide a better chew and texture in Cowboy Cookies, but if that’s what you have on hand, they will still turn out tasty!

6. Why did my cookies turn out flat?

Flat cookies often happen due to melted butter or not enough flour. Ensure your butter is softened and properly measured to prevent excess spread during baking.

7. Can I add other mix-ins to the dough?

Absolutely! Feel free to incorporate dried fruit, different types of chocolate, or seeds based on your preference. Just keep an eye on the proportions to maintain the overall balance.

8. Do I have to chill the dough?

While it’s not mandatory, chilling the dough for at least 30 minutes helps the cookies maintain their shape and improves the flavors. If you’re in a hurry, you can skip this step, but the cookies might spread more.

9. What if I don’t have brown sugar?

You can substitute brown sugar with an equal amount of granulated sugar plus a tablespoon of molasses, or you can use white sugar, though the flavor will differ slightly.

10. Can I use oil instead of butter?

While it’s possible to use oil, it may alter the texture and flavor of cookies. Butter provides crucial flavor and helps create that desired cookie structure. If oil is your only option, consider using melted coconut oil for added flavor.

Additional Resources

If you enjoyed this Cowboy Cookies recipe, check out our related recipes for oatmeal raisin cookies and chocolate chip cookies for more delicious treats. Learn about proper baking techniques that can elevate your baking game, ensuring you never have a bad batch again.

Explore ingredient information for more insights on using oats and nuts, including selecting high-quality products and understanding their health benefits. Check out equipment recommendations to ensure you’re using the best tools for every baking adventure and don’t miss our seasonal variations that highlight the best flavors throughout the year.

Join the Conversation

We would love to hear your thoughts on this Cowboy Cookies recipe! Share your experiences on social media by tagging us or using our hashtag. Don’t forget to post your beautiful cookie photos, as they inspire others to try baking as well.

Feel free to leave your recipe reviews in the comments section, as your feedback not only helps us improve but also engages new bakers looking for delicious ideas. We encourage you to experiment with variations and share your unique takes on this classic cookie, as creativity is always welcome in the kitchen!

The Recipe

Cowboy Cookies

Serves: 24 cookies

Prep Time: 15 mins

Cook Time: 12 mins

Total Time: 27 mins

Kitchen Equipment Needed

  • Mixing bowls
  • Electric mixer
  • Baking sheet
  • Parchment paper or silicone mat
  • Cookie scoop

Ingredients

  • 1 cup unsalted butter, softened
  • 1 cup brown sugar, packed
  • 1/2 cup granulated sugar
  • 2 large eggs
  • 2 teaspoons vanilla extract
  • 2 cups all-purpose flour
  • 1 cup oats (old-fashioned)
  • 1 teaspoon baking soda
  • 1/2 teaspoon salt
  • 1 cup chocolate chips
  • 1 cup chopped nuts (pecans or walnuts)

Directions

  1. Preheat your oven to 350°F (175°C) and line a baking sheet with parchment paper.
  2. In a large mixing bowl, cream together the softened butter, brown sugar, and granulated sugar until light and fluffy.
  3. Add the eggs, one at a time, beating well after each addition. Mix in the vanilla extract.
  4. In a separate bowl, combine the flour, oats, baking soda, and salt. Gradually add this dry mixture to the wet ingredients, mixing just until combined.
  5. Fold in the chocolate chips and chopped nuts until evenly distributed throughout the dough.
  6. Using a cookie scoop, drop rounded tablespoons of dough onto the prepared baking sheet, leaving space between each cookie.
  7. Bake in the preheated oven for 10-12 minutes or until the edges are lightly golden. Let cool on the baking sheet for 5 minutes before transferring to a wire rack.

Recipe Notes

  • For chewier cookies, slightly underbake them for a moist center.
  • You can add dried fruits or coconut for variation.
  • Store leftover cookies in an airtight container at room temperature or freeze for later enjoyment.