Best Garlic Butter Brussels Sprouts and Mushrooms Recipe
Introduction
If you crave a side dish that feels indulgent yet wholesome, this Garlic Butter Brussels Sprouts and Mushrooms Recipe will hit the spot. Crispy Brussels sprouts and savory mushrooms caramelize in a rich garlic butter sauce, creating a dish that’s both comforting and elegant. Whether you need a quick weeknight side or a showstopper for gatherings, this recipe delivers flavor without fuss. Plus, it pairs perfectly with everything from roasted chicken to a hearty steak—making it a versatile favorite you’ll return to again and again.
Garlic Butter Brussels Sprouts and Mushrooms Recipe transforms humble ingredients into something extraordinary. Brussels sprouts, often misunderstood, become tender and slightly charred, while mushrooms soak up the garlicky butter for an umami-packed bite. This dish matters because it bridges the gap between simple and sophisticated, proving that side dishes can steal the show. It fits our blog’s tone by focusing on approachable yet elevated cooking, much like our Easy Roasted Vegetables or Creamy Garlic Mushrooms. With minimal prep and maximum flavor, it’s ideal for busy home cooks who refuse to compromise on taste.
Why I Love This Recipe
This recipe holds a special place in my heart because it reminds me of cozy family dinners. My grandmother used to roast Brussels sprouts with bacon, but when I discovered the magic of garlic butter and mushrooms, I knew I’d found my own twist. The aroma alone takes me back to her kitchen, yet the dish feels entirely new. It’s the kind of recipe that makes even veggie skeptics ask for seconds—and that’s a win in my book.
Health and Nutrition
Why it’s good for your body
Garlic Butter Brussels Sprouts and Mushrooms Recipe packs a powerful nutritional punch while delighting your taste buds. First, Brussels sprouts deliver fiber, which supports digestion and keeps you full longer. Additionally, they’re rich in vitamin C, boosting immunity and skin health. Meanwhile, mushrooms add a hearty dose of antioxidants, helping your body fight oxidative stress.
Moreover, garlic butter elevates this dish with its anti-inflammatory properties. Garlic contains allicin, a compound known to support heart health and lower blood pressure. Together, these ingredients create a meal that’s as nourishing as it is flavorful. Whether you’re aiming for better gut health or stronger immunity, Garlic Butter Brussels Sprouts and Mushrooms Recipe delivers.
Finally, this dish offers a low-carb, nutrient-dense option for those watching their macros. Brussels sprouts and mushrooms are naturally low in calories but high in essential vitamins. With every bite, you’re fueling your body with plant-based goodness. For a meal that’s both satisfying and wholesome, Garlic Butter Brussels Sprouts and Mushrooms Recipe checks all the boxes.
How it fits in a healthy lifestyle
Garlic Butter Brussels Sprouts and Mushrooms Recipe fits seamlessly into balanced eating habits. If you’re following a gluten-free or plant-based diet, this dish naturally aligns with your needs. It’s also a great way to incorporate more vegetables into your weeknight dinners without sacrificing flavor.
For those focused on heart health, the combination of garlic and olive oil in this recipe supports cholesterol management. Pair it with a lean protein like grilled chicken or salmon for a complete, nutrient-packed meal. If you’re meal prepping, you’ll love how well it stores and reheats for quick lunches.
Looking for more ways to enjoy healthy, veggie-forward meals? Try our Roasted Vegetable Medley for another simple side dish. Or, if you’re exploring low-carb options, our Zucchini Noodles with Pesto offers a light yet satisfying alternative. Garlic Butter Brussels Sprouts and Mushrooms Recipe proves that eating well never has to mean missing out on flavor.
A flavorful side dish featuring roasted Brussels sprouts and mushrooms tossed in a rich garlic butter sauce.
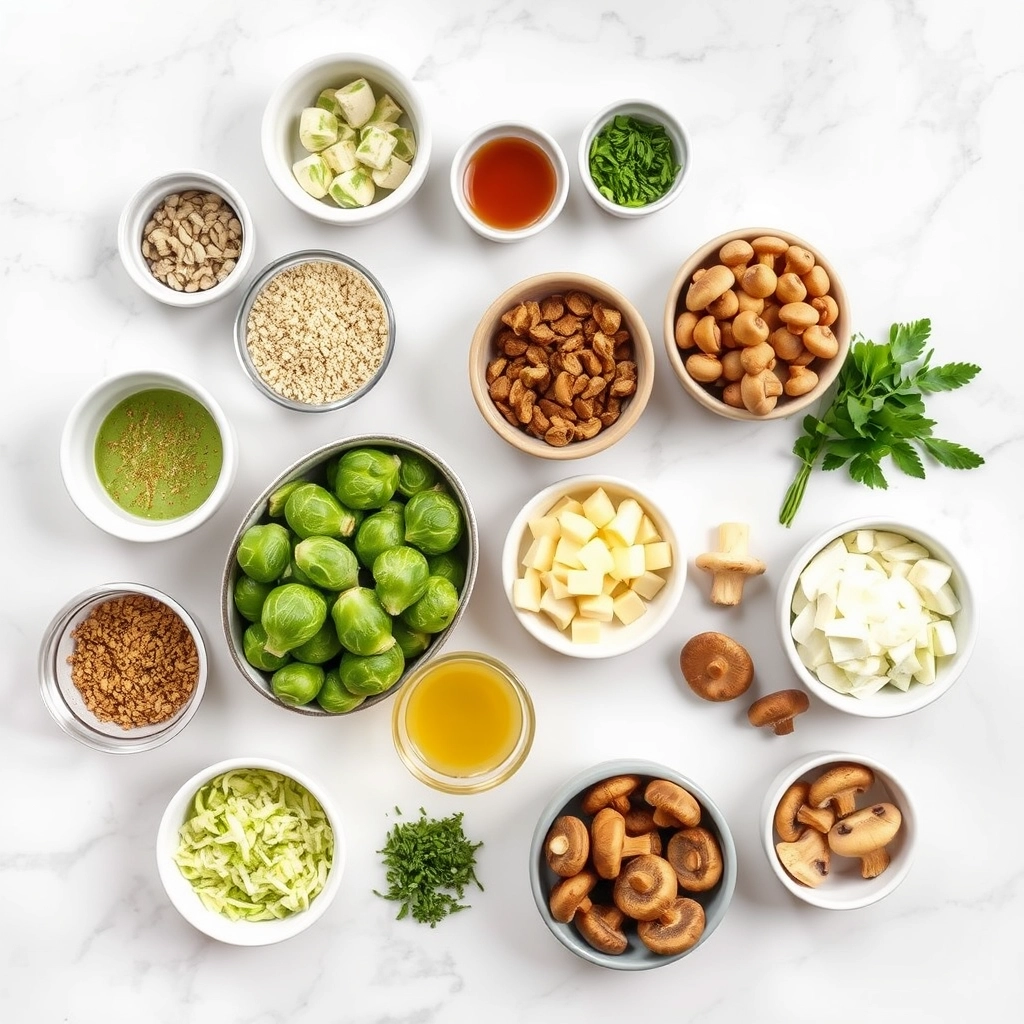
Ingredients
Scale
For the Crust:
1 lb Brussels sprouts, trimmed and halved
8 oz mushrooms, sliced
3 tbsp unsalted butter, melted
3 cloves garlic, minced
1 tbsp olive oil
1/2 tsp salt
1/4 tsp black pepper
1/4 tsp red pepper flakes (optional)
1 tbsp fresh parsley, chopped
Instructions
1. Prepare the Crust:
Preheat oven to 400°F (200°C). Line a baking sheet with parchment paper.
In a large bowl, toss Brussels sprouts and mushrooms with olive oil, salt, and black pepper. Spread evenly on the prepared baking sheet.
Roast for 20-25 minutes, stirring halfway, until vegetables are tender and slightly browned.
In a small bowl, mix melted butter, minced garlic, and red pepper flakes (if using). Drizzle over the roasted vegetables and toss to coat.
Garnish with fresh parsley before serving.
Notes
You can customize the seasonings to taste.
s-dish">How to Prepare This Dish
Steps and time-saving tips
Start by preheating your oven to 400°F to ensure it’s ready when you finish prepping. While the oven heats, trim the Brussels sprouts and slice them in half for even cooking. Next, clean the mushrooms with a damp cloth and slice them into uniform pieces so they roast evenly. Toss both vegetables in a large bowl with olive oil, salt, and pepper until they’re lightly coated. Spread them in a single layer on a baking sheet to prevent steaming and promote crispiness. Meanwhile, melt butter in a small saucepan over low heat and whisk in minced garlic, a pinch of red pepper flakes, and a squeeze of lemon juice for brightness. Drizzle this garlic butter over the vegetables halfway through roasting, then toss gently to coat. Roast for another 10-15 minutes until the edges turn golden and crispy. For a time-saving hack, prep the garlic butter while the vegetables roast or use pre-minced garlic. If you’re short on time, chop the Brussels sprouts and mushrooms ahead and store them in the fridge. Serve immediately for the best texture, garnished with fresh parsley or grated Parmesan if desired.
Mistakes I’ve made and learned from
I once overcrowded the baking sheet, thinking I could save time by roasting everything at once. Instead, the Brussels sprouts steamed and turned mushy instead of crispy. Now I always use two sheets or roast in batches for perfect results. Another blunder? Adding the garlic butter too early—it burned before the vegetables cooked through. I learned to drizzle it halfway, as mentioned in my perfect roasted vegetables guide. Also, skipping the lemon juice left the dish feeling heavy; that acidic kick makes all the difference, just like in my balancing flavors post. Trust me, these small tweaks transform good sides into unforgettable ones.
n-and-variations">Cultural Connection and Variations
Where this recipe comes from
Garlic Butter Brussels Sprouts and Mushrooms Recipe feels like a cozy hug from the kitchen, blending earthy flavors with rich, buttery goodness. Originally, Brussels sprouts trace back to Belgium, where they thrived in cool climates. Meanwhile, mushrooms have been foraged and cherished worldwide for centuries. Together, they create a dish that bridges rustic European roots with modern comfort food.
In Italy, cooks might toss Brussels sprouts and mushrooms with olive oil and rosemary for a Mediterranean twist. Across Asia, stir-frying them with soy sauce and ginger adds umami depth. Some families, like mine, roast everything with crispy pancetta for extra crunch. No matter the variation, Garlic Butter Brussels Sprouts and Mushrooms Recipe adapts beautifully to local tastes.
Seasonally, this dish shines in fall and winter, when Brussels sprouts peak. Yet, it’s versatile enough for spring picnics or summer BBQs with a lighter garlic-lemon glaze. Whether served at holidays or weeknight dinners, it carries a timeless appeal.
ays-cooking">How it fits in today’s cooking
Today, Garlic Butter Brussels Sprouts and Mushrooms Recipe fits perfectly into healthy, flavor-packed meals. Busy cooks love its quick prep time, while meal preppers stash it for easy sides. It’s a star at Thanksgiving, but also pairs well with one-pot chicken and rice for a fuss-free dinner.
Modern twists include air-frying for extra crispness or swapping butter for vegan alternatives. Some even add a drizzle of balsamic glaze for gourmet flair. For those exploring global flavors, this dish complements spicy miso ramen as a hearty side. Ultimately, its adaptability keeps it relevant—whether you’re craving nostalgia or something new.
Taste and Texture
What makes it delicious
The Garlic Butter Brussels Sprouts and Mushrooms Recipe delivers a rich, savory experience with every bite. The Brussels sprouts caramelize into tender, slightly crisp morsels, while the mushrooms soak up the garlicky butter, becoming irresistibly juicy. Fragrant garlic and melted butter coat each vegetable, creating a luxurious mouthfeel. Meanwhile, a hint of salt enhances the natural sweetness of the sprouts, and a touch of black pepper adds a subtle warmth. Together, these ingredients make the Garlic Butter Brussels Sprouts and Mushrooms Recipe a dish that’s both comforting and deeply flavorful.
r">Boosting the flavor
For an extra layer of richness, try sprinkling grated Parmesan or crumbled feta over the finished dish. If you love a bit of crunch, toasted pine nuts or chopped walnuts add a delightful contrast. A drizzle of balsamic glaze or a squeeze of lemon brightens the flavors, balancing the dish’s richness. For more inspiration, explore our guide on garlic butter sauce variations or discover how to pair this recipe with other roasted vegetables. Small tweaks can transform the Garlic Butter Brussels Sprouts and Mushrooms Recipe into a showstopping side or even a hearty main.
Tips for Success
Best practices for results
For the best Garlic Butter Brussels Sprouts and Mushrooms Recipe, always slice your Brussels sprouts evenly so they cook uniformly. Meanwhile, use fresh mushrooms for maximum flavor and avoid overcrowding the pan to ensure proper caramelization. Additionally, melt your butter slowly to prevent burning, and toss the vegetables frequently for even coating. Finally, season generously with salt and pepper right before serving to enhance the dish’s savory notes.
>Mistakes to avoid
One common mistake is undercooking the Brussels sprouts, which leaves them tough and bitter. Instead, roast or sauté them until they’re fork-tender and slightly crispy. On the other hand, overcooking the mushrooms can make them rubbery, so remove them from heat as soon as they release their juices. For more vegetable prep tips, check out our guide on how to chop vegetables like a pro. Also, avoid using cold butter straight from the fridge, as it won’t blend smoothly with the other ingredients. For better results, learn how to master kitchen temperatures for perfect cooking every time.
Serving and Pairing Suggestions
How to serve this dish
For a stunning presentation, arrange the Garlic Butter Brussels Sprouts and Mushrooms Recipe in a wide, shallow bowl or on a rustic wooden platter. Sprinkle fresh parsley or thyme leaves on top to add a pop of color and freshness. Meanwhile, serve this dish warm to highlight the rich garlic butter flavors, making it perfect for holiday gatherings or cozy weeknight dinners. If you’re hosting a brunch, pair it with other vibrant sides to create a balanced spread that delights the senses.
What goes well with it
This Garlic Butter Brussels Sprouts and Mushrooms Recipe pairs beautifully with a crisp white wine like Sauvignon Blanc, which cuts through the richness of the butter. Alternatively, try it alongside a hearty main like our Herb-Crusted Pork Tenderloin for a satisfying meal. For a lighter option, serve it with a refreshing Lemony Quinoa Salad to balance the savory depth of the dish. Each pairing enhances the flavors while keeping the meal well-rounded and delicious.
How do you make garlic butter Brussels sprouts and mushrooms crispy?
To achieve crispy Garlic Butter Brussels Sprouts and Mushrooms, roast them at a high temperature (around 400°F) and spread them in a single layer on the baking sheet. Tossing them in melted garlic butter and ensuring they aren’t overcrowded helps them caramelize and crisp up perfectly.
Can I use frozen Brussels sprouts for this recipe?
Yes, you can use frozen Brussels sprouts for Garlic Butter Brussels Sprouts and Mushrooms, but thaw and pat them dry first to avoid excess moisture. Fresh sprouts yield better texture, but frozen work in a pinch—just roast them a few minutes longer.
ank-math-faq-item">
What type of mushrooms work best with garlic butter Brussels sprouts?
Cremini or baby bella mushrooms are ideal for Garlic Butter Brussels Sprouts and Mushrooms because they hold their shape and absorb flavors well. Shiitake or white button mushrooms also work, but avoid delicate varieties like enoki for roasting.
How long does it take to cook garlic butter Brussels sprouts and mushrooms?
Garlic Butter Brussels Sprouts and Mushrooms typically take 20–25 minutes to roast at 400°F. Stir halfway through for even browning. The sprouts should be tender with crispy edges, and the mushrooms golden brown.
Easy Sheet Pan Lemon Herb Salmon and Veggies Recipe
Introduction
There’s something magical about a meal that comes together effortlessly yet tastes like you spent hours in the kitchen. If you’re craving a dish that’s vibrant, healthy, and packed with flavor, this Sheet Pan Lemon Herb Salmon and Veggies Recipe delivers on every level. Whether you’re juggling a busy weeknight or hosting a casual dinner, this one-pan wonder simplifies cooking without sacrificing taste. Plus, the bright citrus and fresh herbs elevate simple ingredients into a restaurant-worthy meal. Let’s dive into why this recipe deserves a permanent spot in your rotation.
The Sheet Pan Lemon Herb Salmon and Veggies Recipe combines tender salmon fillets with crisp, colorful vegetables, all roasted to perfection on a single pan. This method not only saves time but also minimizes cleanup, making it ideal for hectic schedules. The lemon-herb marinade infuses every bite with zesty, aromatic flavors, while the high-heat roasting locks in moisture and creates a lightly caramelized finish. Beyond convenience, this dish aligns with healthier eating goals, offering lean protein and nutrient-rich veggies in one balanced meal. If you love fuss-free dinners that don’t skimp on taste, you’ll appreciate how this recipe fits seamlessly into our collection of easy weeknight dinners. It’s also a fantastic way to incorporate more seafood into your diet, much like our popular garlic butter shrimp, but with a lighter, herbaceous twist.
Why I Love This Recipe
This Sheet Pan Lemon Herb Salmon and Veggies Recipe holds a special place in my kitchen because it’s the ultimate crowd-pleaser. I first made it for a family gathering, and the way the lemon brightens the salmon while the herbs mingle with the roasted veggies won everyone over. Even my pickiest eater asked for seconds. Since then, it’s become my go-to when I need something reliable yet impressive. The simplicity lets the quality of the ingredients shine, and every time I make it, I’m reminded how good food can be both effortless and unforgettable.
Health and Nutrition
Why it’s good for your body
Sheet Pan Lemon Herb Salmon and Veggies Recipe packs a powerful nutritional punch while keeping flavors bright and fresh. First, salmon delivers high-quality protein and heart-healthy omega-3 fatty acids, which support brain function and reduce inflammation. Meanwhile, the colorful veggies like bell peppers and asparagus provide fiber, vitamins, and antioxidants to boost immunity and digestion. Together, they create a meal that fuels your body without weighing you down.
Another benefit of Sheet Pan Lemon Herb Salmon and Veggies Recipe is its simplicity. Because everything cooks together, you retain more nutrients compared to boiling or overcooking ingredients separately. The lemon and herbs add more than just flavor—they enhance nutrient absorption and offer anti-inflammatory properties. Plus, the dish is naturally low in refined carbs, making it a smart choice for balanced blood sugar levels.
Finally, this recipe keeps portion control effortless. With lean protein and fiber-rich veggies filling most of the plate, you’ll feel satisfied without overeating. Whether you’re aiming for better energy or long-term wellness, Sheet Pan Lemon Herb Salmon and Veggies Recipe makes healthy eating deliciously achievable.
How it fits in a healthy lifestyle
Sheet Pan Lemon Herb Salmon and Veggies Recipe fits seamlessly into almost any dietary plan. If you follow a gluten-free or Mediterranean diet, this dish already aligns with your goals. The omega-3s in salmon promote heart health, while the veggies deliver essential micronutrients without excess calories. It’s also a great option for meal prepping—just double the recipe and enjoy leftovers for lunch.
For those focused on high-protein eating, the salmon provides a lean, satisfying base. Pair it with a side like our quinoa salad for an extra nutrient boost. Busy weeknights? This one-pan wonder cuts cleanup time, making it easier to stick to healthy habits. If you’re exploring more balanced dinners, check out our guide to balanced meals for additional inspiration. No matter your routine, this recipe keeps nutrition simple and flavorful.
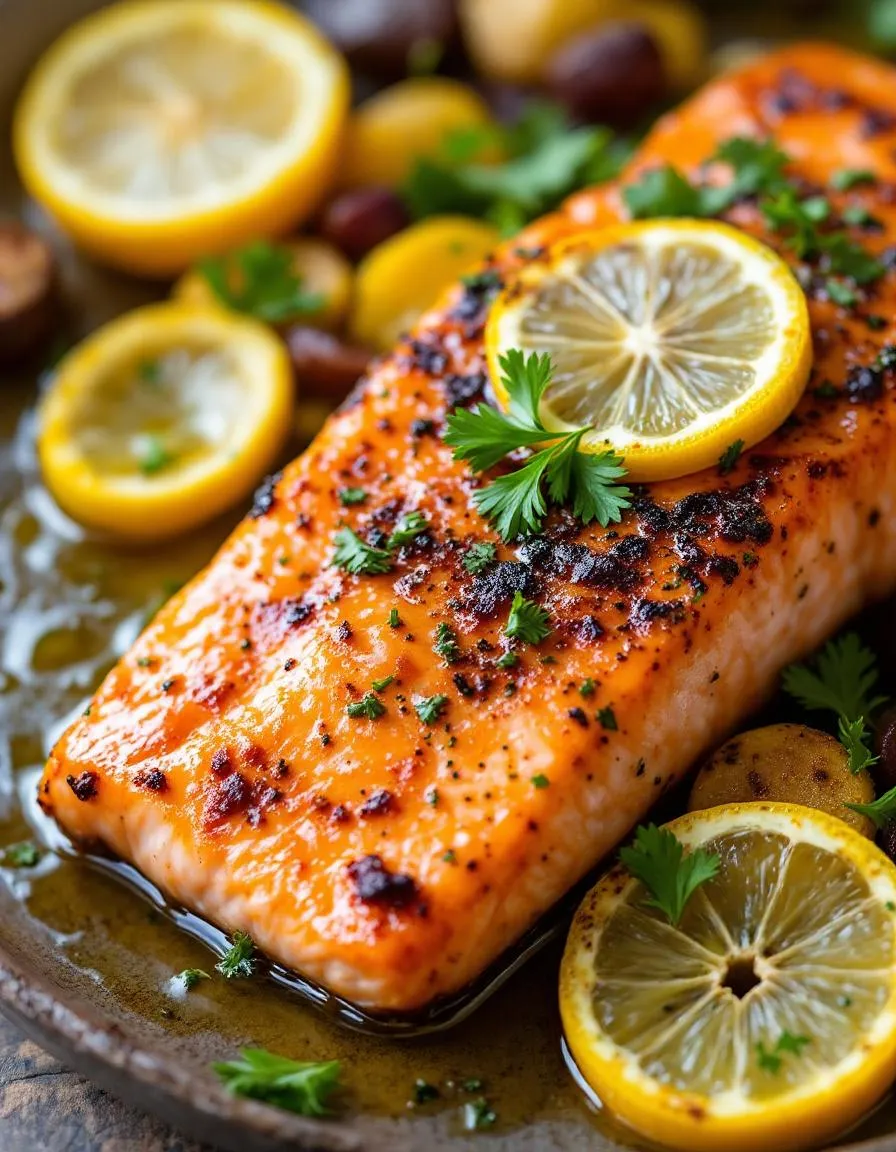
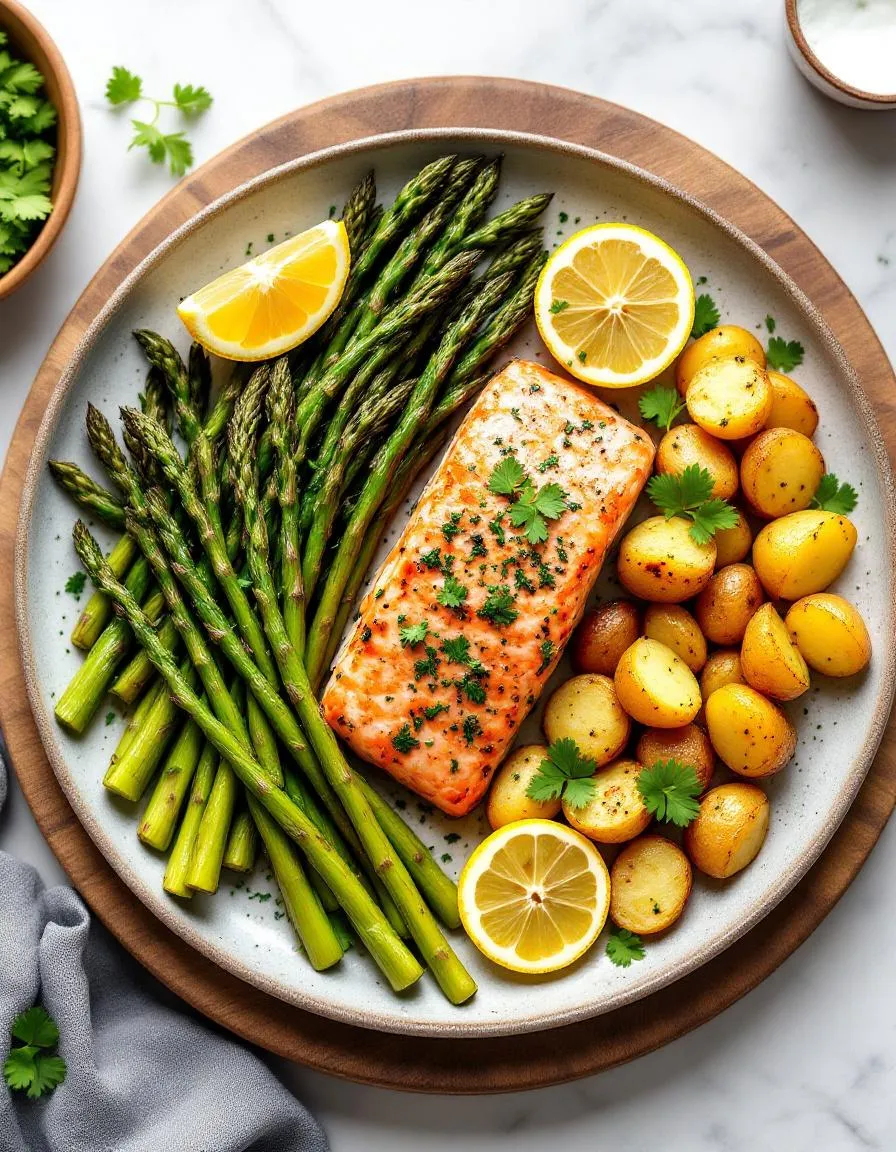
A simple, healthy, and flavorful one-pan meal with lemon herb salmon and roasted vegetables.
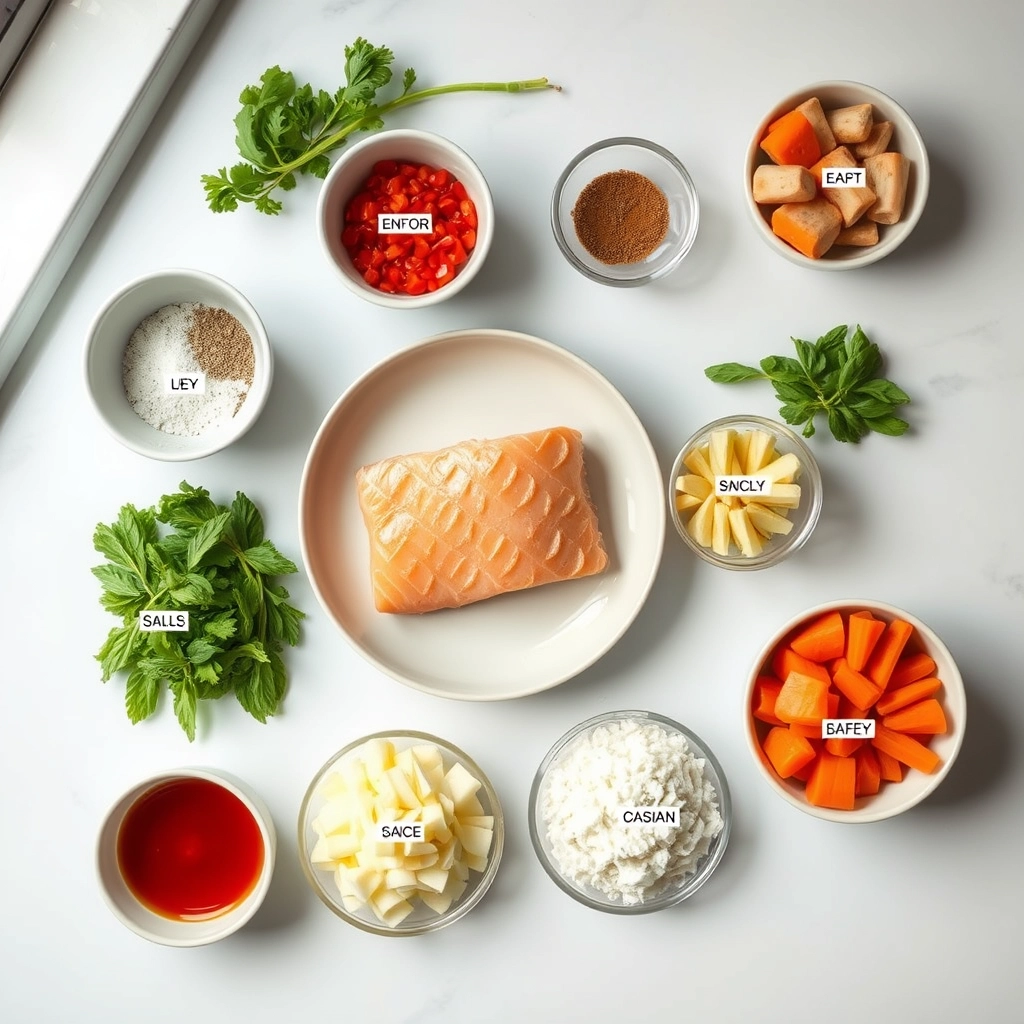
Ingredients
Scale
For the Crust:
4 salmon fillets (6 oz each)
1 lb baby potatoes, halved
1 bunch asparagus, trimmed
1 lemon, sliced
3 tbsp olive oil
2 cloves garlic, minced
1 tsp dried oregano
1 tsp dried thyme
Salt and pepper to taste
Fresh parsley for garnish
Instructions
1. Prepare the Crust:
Preheat oven to 400°F (200°C). Line a sheet pan with parchment paper.
Toss potatoes with 1 tbsp olive oil, half the garlic, oregano, thyme, salt, and pepper. Spread on the pan and roast for 15 minutes.
Add asparagus to the pan with salmon fillets. Drizzle with remaining olive oil and season with remaining garlic, salt, and pepper. Top salmon with lemon slices.
Roast for another 12-15 minutes until salmon is cooked through and veggies are tender.
Garnish with fresh parsley before serving.
Notes
You can customize the seasonings to taste.
s-dish">How to Prepare This Dish
Steps and time-saving tips
Preheat your oven to 400°F and line a large sheet pan with parchment paper for easy cleanup. While the oven heats, whisk together olive oil, lemon juice, minced garlic, dried oregano, and a pinch of salt and pepper in a small bowl. Place fresh salmon fillets in a separate dish and drizzle half of the lemon herb marinade over them, coating both sides. Next, chop your favorite veggies—like asparagus, bell peppers, and zucchini—into even-sized pieces so they cook uniformly. Toss the veggies with the remaining marinade, then spread them in a single layer on the prepared sheet pan. Nestle the salmon fillets among the vegetables, skin-side down if they have skin. Slide the pan into the oven and bake for 12-15 minutes, or until the salmon flakes easily with a fork and the veggies are tender-crisp. For a time-saving twist, prep the marinade and chop veggies the night before, storing them separately in the fridge. If you’re short on time, swap fresh herbs for dried ones—they’re just as flavorful. Serve the Sheet Pan Lemon Herb Salmon and Veggies Recipe straight from the oven with a sprinkle of fresh parsley for a bright finish.
Mistakes I’ve made and learned from
I once overcrowded the sheet pan, thinking I could fit extra veggies, but they steamed instead of roasting and turned soggy. Now I stick to a single layer and use two pans if needed. Another blunder? Forgetting to pat the salmon dry before marinating, which diluted the flavors. A quick towel-dry fixes that. If your salmon sticks, check out my guide on perfectly cooked salmon every time for foolproof tips. Also, I’ve learned that under-seasoning the veggies makes them bland, so I taste the marinade first—just like I do with my must-know seasoning tricks. Trust me, a little extra salt and lemon zest go a long way.
n-and-variations">Cultural Connection and Variations
Where this recipe comes from
The Sheet Pan Lemon Herb Salmon and Veggies Recipe feels like a love letter to coastal kitchens everywhere. While salmon has been a staple in Pacific Northwest Indigenous diets for centuries, the bright, herby flavors we know today reflect Mediterranean influences. Families in Greece might swap dill for oregano, while in Japan, they’d likely add a touch of miso or soy sauce. My grandmother, though, always insisted on extra lemon—enough to make your lips pucker.
In Scandinavia, they roast salmon with simple dill and butter, often serving it alongside root vegetables. Meanwhile, in the American South, you’ll find bold Cajun spices sneaking into the mix. The beauty of the Sheet Pan Lemon Herb Salmon and Veggies Recipe lies in its adaptability. Whether you’re cooking for a weeknight dinner or a festive gathering, it effortlessly bridges cultures and tastes.
How it fits in today’s cooking
Today, the Sheet Pan Lemon Herb Salmon and Veggies Recipe shines as a go-to for busy home cooks. It’s a one-pan wonder that fits into meal prep routines, Sunday dinners, or even holiday spreads. Modern twists include swapping seasonal veggies—think asparagus in spring or Brussels sprouts in winter. Some cooks even pair it with a tangy creamy dill sauce for extra flair.
Health-conscious eaters
love it for its lean protein and veggie-packed goodness, while families appreciate how quickly it comes together. For those hosting gatherings, it’s a lifesaver—just double the batch and add a side of garlic herb potatoes. No matter how you serve it, this dish proves that simple, flavorful cooking never goes out of style.
Taste and Texture
What makes it delicious
The Sheet Pan Lemon Herb Salmon and Veggies Recipe delivers a bright, savory experience with every bite. The salmon flakes apart tenderly, soaking up the zesty lemon and aromatic herbs, while the roasted veggies caramelize into a satisfying crisp-tender texture. Fresh garlic and thyme infuse the dish with a fragrant depth, and a hint of olive oil ties everything together in a rich, buttery finish. Meanwhile, the lemon cuts through with a refreshing tang, balancing the natural richness of the salmon. Whether you savor the melt-in-your-mouth fish or the hearty medley of veggies, the Sheet Pan Lemon Herb Salmon and Veggies Recipe keeps each element vibrant and full of flavor.
Boosting the flavor
For an extra burst of flavor, try swapping the herbs with a smoky paprika or a sprinkle of crushed red pepper for heat. A drizzle of garlic aioli or a squeeze of fresh lime right before serving can also elevate the dish. If you love bold pairings, consider adding roasted cherry tomatoes or tossing the veggies with a balsamic glaze. For more inspiration, check out our guide on herb pairings for seafood or explore ways to perfect roasted vegetables. Small tweaks make the Sheet Pan Lemon Herb Salmon and Veggies Recipe even more irresistible.
Always pat the salmon dry before seasoning to ensure the lemon herb crust sticks perfectly. For even cooking, cut the veggies into uniform sizes and spread them in a single layer on the sheet pan. Additionally, preheat the oven so the Sheet Pan Lemon Herb Salmon and Veggies Recipe cooks evenly from the start. Finally, drizzle the lemon sauce just before serving to keep the salmon moist and flavorful.
Mistakes to avoid
Avoid overcrowding the pan, as this steams the salmon and veggies instead of roasting them. For crispier results, check out our guide on perfect roasted vegetables. Also, don’t skip resting the salmon for a few minutes after baking—this locks in juices. If you’re unsure about seasoning, our herb pairing guide helps balance flavors without overpowering the dish.
g-suggestions">Serving and Pairing Suggestions
How to serve this dish
Brighten up any meal by serving Sheet Pan Lemon Herb Salmon and Veggies Recipe on a large platter for family-style dining. For a polished look, arrange the salmon fillets atop the roasted veggies and drizzle with extra lemon juice. Meanwhile, garnish with fresh parsley or dill to add a pop of color. This dish works beautifully for casual weeknight dinners yet also shines at brunch gatherings or holiday feasts. If you want to impress guests, pair it with a simple side salad for a restaurant-worthy presentation.
What goes well with it
Elevate your Sheet Pan Lemon Herb Salmon and Veggies Recipe with a crisp white wine like Sauvignon Blanc, which highlights the citrusy flavors. Alternatively, try our Herbed Quinoa Pilaf for a wholesome, protein-packed side that balances the dish. For a refreshing contrast, serve it with a tangy yogurt dill sauce or our Garlic Parmesan Roasted Asparagus to enhance the savory herb notes. Each pairing brings out the best in this vibrant, flavorful meal.
math-faq-block">
What vegetables go well with Sheet Pan Lemon Herb Salmon and Veggies?
For Sheet Pan Lemon Herb Salmon and Veggies, asparagus, zucchini, bell peppers, and cherry tomatoes work best. These veggies roast evenly and complement the salmon’s flavors. Broccoli and carrots also pair well if you prefer heartier vegetables.
How long does it take to bake Sheet Pan Lemon Herb Salmon and Veggies?
Sheet Pan Lemon Herb Salmon and Veggies typically takes 15–20 minutes at 400°F (200°C). The salmon should flake easily with a fork, and the veggies should be tender. Always check for doneness to avoid overcooking.
Can I use frozen salmon for Sheet Pan Lemon Herb Salmon and Veggies?
Yes, but thaw the salmon completely first for even cooking. Pat it dry to prevent excess moisture in your Sheet Pan Lemon Herb Salmon and Veggies. Fresh salmon is ideal, but frozen works in a pinch.
ank-math-faq-item">
What herbs are best for Sheet Pan Lemon Herb Salmon and Veggies?
Dill, thyme, and parsley are classic choices for Sheet Pan Lemon Herb Salmon and Veggies. Rosemary and oregano add bolder flavors. Fresh herbs work best, but dried herbs can be substituted in smaller quantities.
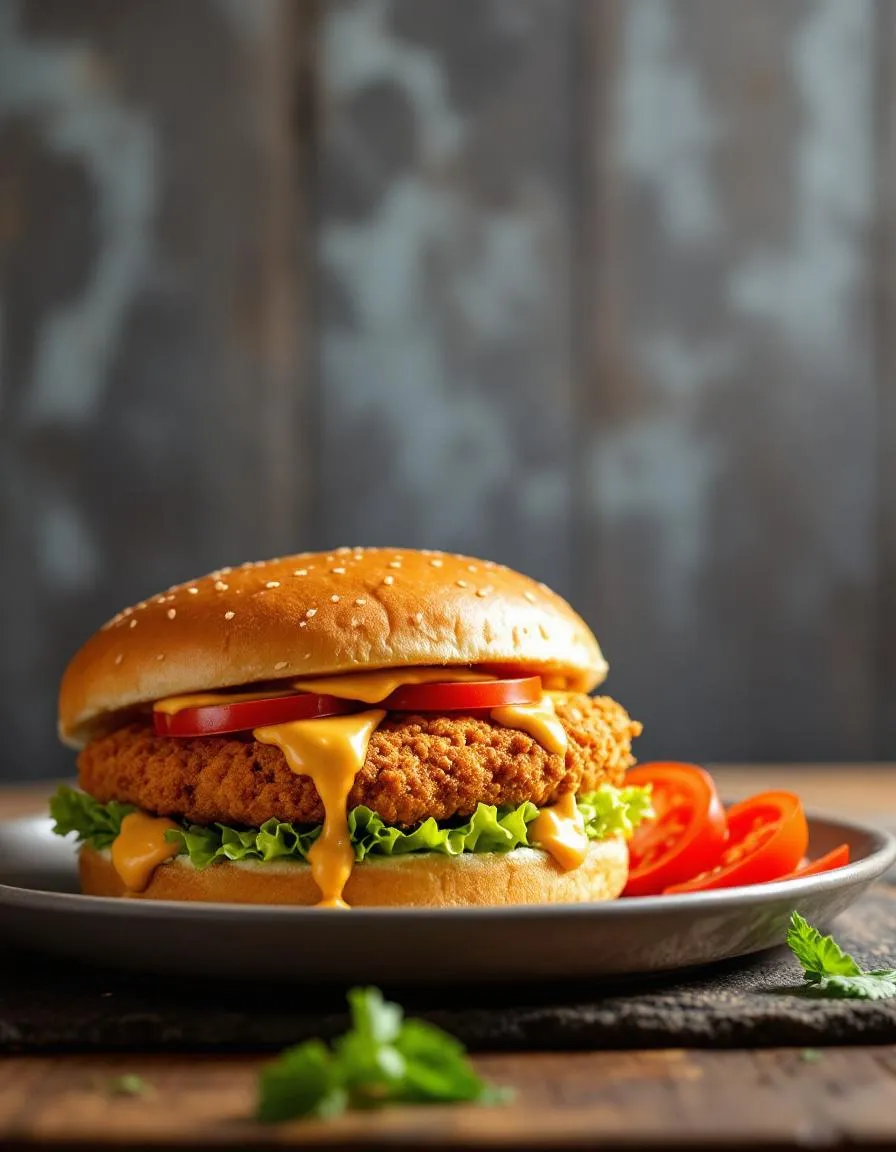
Ultimate Crispy Chicken Burger – Best Homemade Recipe
Introduction
There’s something undeniably comforting about biting into a perfectly crispy chicken burger—juicy on the inside, golden and crunchy on the outside, and packed with flavor in every bite. If you’ve ever craved that restaurant-quality experience at home, you’re in the right place. Today, I’m sharing my Ultimate Crispy Chicken Burger Recipe, a foolproof way to recreate that irresistible texture and taste without any fuss. Whether you’re cooking for a weeknight dinner or a weekend gathering, this recipe delivers every time. Plus, it’s customizable, so you can tweak it to suit your cravings.
The Ultimate Crispy Chicken Burger Recipe isn’t just another fried chicken sandwich. It’s a carefully crafted balance of seasoning, technique, and quality ingredients that elevate it from good to unforgettable. First, we marinate the chicken to lock in moisture, then coat it in a crispy, well-seasoned breading that stays crunchy even after stacking it with your favorite toppings. What makes this recipe stand out? It’s reliable. Unlike some homemade versions that turn soggy or bland, this one guarantees consistent results, thanks to a few chef-approved tricks. If you love crispy chicken as much as I do, you’ll appreciate how this recipe fits into a busy lifestyle while still feeling indulgent. For more inspiration, check out our homemade burger sauces to pair with it or explore our guide to perfect fries for the ultimate meal.
Why I Love This Recipe
This Ultimate Crispy Chicken Burger Recipe holds a special place in my kitchen because it’s the dish that turned my skeptical family into believers. My kids used to beg for fast-food versions, but after testing (and tweaking) this recipe, they now request it weekly. What I love most is how adaptable it is—swap the spices for a smoky kick or add a tangy slaw for extra crunch. It’s also a crowd-pleaser; I’ve served it at backyard barbecues and casual dinners alike, and it never fails to impress. Most importantly, it proves that homemade can outshine takeout, every single time.
Health and Nutrition
Why it’s good for your body
The Ultimate Crispy Chicken Burger Recipe packs a nutritious punch while satisfying your cravings. First, lean chicken breast serves as the star ingredient, delivering high-quality protein to fuel your muscles and keep you full longer. Additionally, this recipe skips heavy frying by using a light breading and baking method, cutting unnecessary fats without sacrificing crunch.
Moreover, the Ultimate Crispy Chicken Burger Recipe includes whole-grain buns or lettuce wraps for a fiber boost. Fiber supports digestion and helps stabilize blood sugar levels. You also get a dose of vitamins from fresh toppings like crisp lettuce, juicy tomatoes, and antioxidant-rich onions. Together, these ingredients create a balanced meal that tastes indulgent but nourishes your body.
Finally, homemade versions like the Ultimate Crispy Chicken Burger Recipe let you control sodium and additives. By avoiding processed fast-food options, you reduce preservatives and excess salt. Whether you pair it with a side salad or roasted veggies, this dish fits seamlessly into a mindful eating plan.
How it fits in a healthy lifestyle
The Ultimate Crispy Chicken Burger Recipe adapts easily to different dietary needs. For a gluten-free twist, swap the bun for a lettuce wrap or gluten-free bread. If you’re focusing on heart health, use avocado spread instead of mayo for healthy fats. This flexibility makes it a go-to meal for families with varied preferences.
Pairing this recipe with smart sides keeps your diet balanced. Try our Roasted Veggie Medley for extra nutrients or a light Quinoa Salad to boost protein intake. Since the Ultimate Crispy Chicken Burger Recipe uses simple, wholesome ingredients, it aligns with clean eating goals. Enjoy it as a post-workout meal or a weekend treat without derailing your progress.
A deliciously crispy chicken burger with a perfect crunch and juicy interior, served with fresh toppings and a tangy sauce.
Ingredients
Scale
For the Crust:
4 boneless chicken breasts
1 cup buttermilk
1 cup all-purpose flour
1 tsp paprika
1 tsp garlic powder
1 tsp salt
1/2 tsp black pepper
4 burger buns
1 cup lettuce, shredded
1 tomato, sliced
1/4 cup mayonnaise
1 tbsp hot sauce
Vegetable oil for frying
Instructions
1. Prepare the Crust:
Marinate chicken breasts in buttermilk for at least 1 hour or overnight for best results.
In a bowl, mix flour, paprika, garlic powder, salt, and black pepper.
Heat vegetable oil in a deep pan over medium-high heat.
Dredge each chicken breast in the flour mixture, ensuring full coverage.
Fry the chicken for 5-6 minutes per side until golden brown and cooked through.
Mix mayonnaise and hot sauce to prepare the spicy mayo.
Toast the burger buns lightly.
Assemble the burger by spreading spicy mayo on the bun, adding lettuce, tomato, and the crispy chicken.
Notes
You can customize the seasonings to taste.
“`html
="how-to-prepare-this-dish">How to Prepare This Dish
Steps and time-saving tips
Start by marinating the chicken for your Ultimate Crispy Chicken Burger Recipe. Whisk together buttermilk, hot sauce, and spices in a bowl, then add the chicken breasts. Cover and refrigerate for at least 30 minutes, though overnight works even better for maximum flavor. Meanwhile, prep your breading station with flour, paprika, garlic powder, and a pinch of salt in one bowl and beaten eggs in another. When ready, dredge each piece of chicken in the flour mixture, dip it in the egg, then coat it again in flour for that extra-crunchy texture. Heat oil in a deep skillet or Dutch oven until it reaches 350°F, then fry the chicken for about 5-6 minutes per side until golden brown. Drain on a wire rack to keep it crispy. Toast the buns lightly in a dry pan, then layer them with mayo, lettuce, pickles, and your perfectly fried chicken. For a time-saving twist, use an air fryer for the chicken—just spritz with oil and cook at 375°F for 12-15 minutes, flipping halfway. Serve your Ultimate Crispy Chicken Burger Recipe immediately with extra napkins because it’s gloriously messy.
Mistakes I’ve made and learned from
I’ve definitely rushed the marinating step for the Ultimate Crispy Chicken Burger Recipe, thinking 10 minutes would suffice—big mistake. The chicken lacked flavor and tenderness. Now I always plan ahead or use a quick-tenderizing trick from my kitchen hacks guide. Another blunder? Crowding the pan while frying, which dropped the oil temperature and left me with soggy coating. I learned to fry in batches and use a thermometer, just like I do for my perfect fried chicken method. If your breading falls off, pat the chicken dry before dredging—moisture is the enemy of crispiness. And don’t skip the wire rack; stacking fried chicken on paper towels steams the crust instead of keeping it crunchy. Trust me, these small tweaks make all the difference.
The Ultimate Crispy Chicken Burger Recipe has roots in Southern comfort food, where fried chicken reigns supreme. Picture hot summer days, family picnics, and the satisfying crunch of golden-brown chicken. Over time, this dish traveled far beyond its origins, morphing into global favorites like Japan’s karaage burgers or Korea’s spicy yangnyeom chicken sandwiches. Even in my own kitchen, we tweak the recipe—sometimes adding buttermilk for tenderness or cayenne for a kick.
Interestingly, the Ulti
mate Crispy Chicken Burger Recipe also adapts to local tastes. In Nashville, they drench it in fiery hot sauce, while in Australia, they top it with beetroot and pineapple. My grandma swore by a secret paprika blend, proving how one dish can tell countless stories. Whether served at a backyard BBQ or a trendy food truck, this recipe bridges cultures through crispy, juicy perfection.
How it fits in today’s cooking
Today, the Ultimate Crispy Chicken Burger Recipe thrives as both comfort food and a blank canvas for creativity. Busy parents love it for quick weeknight dinners, while foodies elevate it with artisanal buns or homemade spicy mayo. It’s also a star at gatherings—imagine game-day spreads or summer potlacks where everyone crowds around the platter.
Modern twists keep it fresh, like air-frying for a lighter crunch or swapping in gluten-free flour. Some even repurpose leftovers into next-day salads, proving its versatility. For more inspiration, check out these easy weeknight dinners that pair perfectly with this timeless recipe. No matter how you serve it, the Ultimate Crispy Chicken Burger Recipe remains a beloved classic for good reason.
>Taste and Texture
What makes it delicious
The Ultimate Crispy Chicken Burger Recipe delivers a mouthwatering explosion of flavors and textures. First, you’ll notice the golden, shatteringly crisp coating that gives way to juicy, tender chicken inside. The buttery brioche bun adds a soft, slightly sweet contrast, while fresh lettuce and ripe tomato bring a refreshing crunch. A tangy, creamy sauce ties everything together with a hint of garlic and herbs. Every bite of the Ultimate Crispy Chicken Burger Recipe balances richness, brightness, and satisfying crunch—making it impossible to resist.
Boosting the flavor
Want to take your Ultimate Crispy Chicken Burger Recipe to the next level? Try swapping the standard mayo for a smoky chipotle aioli to add a spicy kick. For extra freshness, pile on quick-pickled onions or avocado slices. If you love bold flavors, sprinkle the chicken with a dash of homemade Cajun seasoning before frying. A drizzle of hot honey or a smear of garlic herb butter on the bun can also elevate the taste without extra effort. Get creative—your taste buds will thank you!
Tips for Success
Best practices for results
For the best Ultimate Crispy Chicken Burger Recipe, always pat the chicken dry before seasoning to ensure maximum crispiness. Additionally, use a meat thermometer to check that the internal temperature reaches 165°F for perfect doneness. Meanwhile, let the chicken rest for 5 minutes after frying so the juices redistribute evenly. Finally, toast the buns lightly to add texture and prevent sogginess when assembling your Ultimate Crispy Chicken Burger Recipe.
Mistakes to avoid
Avoid overcrowding the pan when frying the chicken, as this lowers the oil temperature and leads to uneven cooking. Instead, fry in batches for consistent crispiness. Also, don’t skip the buttermilk marinade—it tenderizes the chicken and locks in moisture. For more on perfect frying techniques, check out our guide on frying tips. Another common mistake is using cold toppings, which can make the burger soggy. For fresh, crisp ideas, explore our burger toppings suggestions.
Serving and Pairing Suggestions
How to serve this dish
Serve your Ultimate Crispy Chicken Burger Recipe on a wooden board or a vibrant plate to make it pop. For a fun twist, skewer a pickle or onion ring on top for extra crunch and color. Meanwhile, this dish shines at casual gatherings like game nights or summer cookouts. If you want to elevate the presentation, drizzle a zigzag of sauce across the plate or add a side of crispy sweet potato fries in a mini fry basket. Ultimately, the Ultimate Crispy Chicken Burger Recipe tastes even better when it looks as good as it smells.
h-it">What goes well with it
Pair your Ultimate Crispy Chicken Burger Recipe with a tangy homemade lemonade or an ice-cold craft beer to balance the rich flavors. For sides, try our creamy coleslaw for a refreshing contrast or crispy garlic parmesan fries for extra indulgence. Additionally, a spicy sriracha mayo or cool ranch dip adds the perfect finishing touch. Whether you prefer something light or hearty, these pairings will make your meal unforgettable.
What makes a chicken burger crispy?
The secret to a crispy chicken burger lies in the breading and frying technique. For the Ultimate Crispy Chicken Burger Recipe, double-dredging the chicken in flour and buttermilk creates a thick, crunchy crust. Frying at the right temperature (350°F) ensures golden perfection without greasiness.
ank-math-faq-item">
How do you keep a crispy chicken burger from getting soggy?
To prevent sogginess in your Ultimate Crispy Chicken Burger Recipe, let the fried chicken rest on a wire rack after cooking. Assemble the burger just before serving, and use a barrier like lettuce or a thin layer of mayo between the bun and chicken to absorb moisture.
What’s the best bun for a crispy chicken burger?
A brioche or potato bun works best for the Ultimate Crispy Chicken Burger Recipe because they’re sturdy enough to hold the crispy chicken without falling apart. Lightly toasting the bun adds texture and helps prevent sogginess from the juicy chicken and toppings.
Can I make a crispy chicken burger without deep frying?
Yes! For a lighter version of the Ultimate Crispy Chicken Burger Recipe, try air frying or oven-baking with a spray of oil. While not identical to deep-fried, panko breadcrumbs and proper seasoning can still deliver satisfying crunch. The key is pressing the coating firmly onto the chicken.
div>
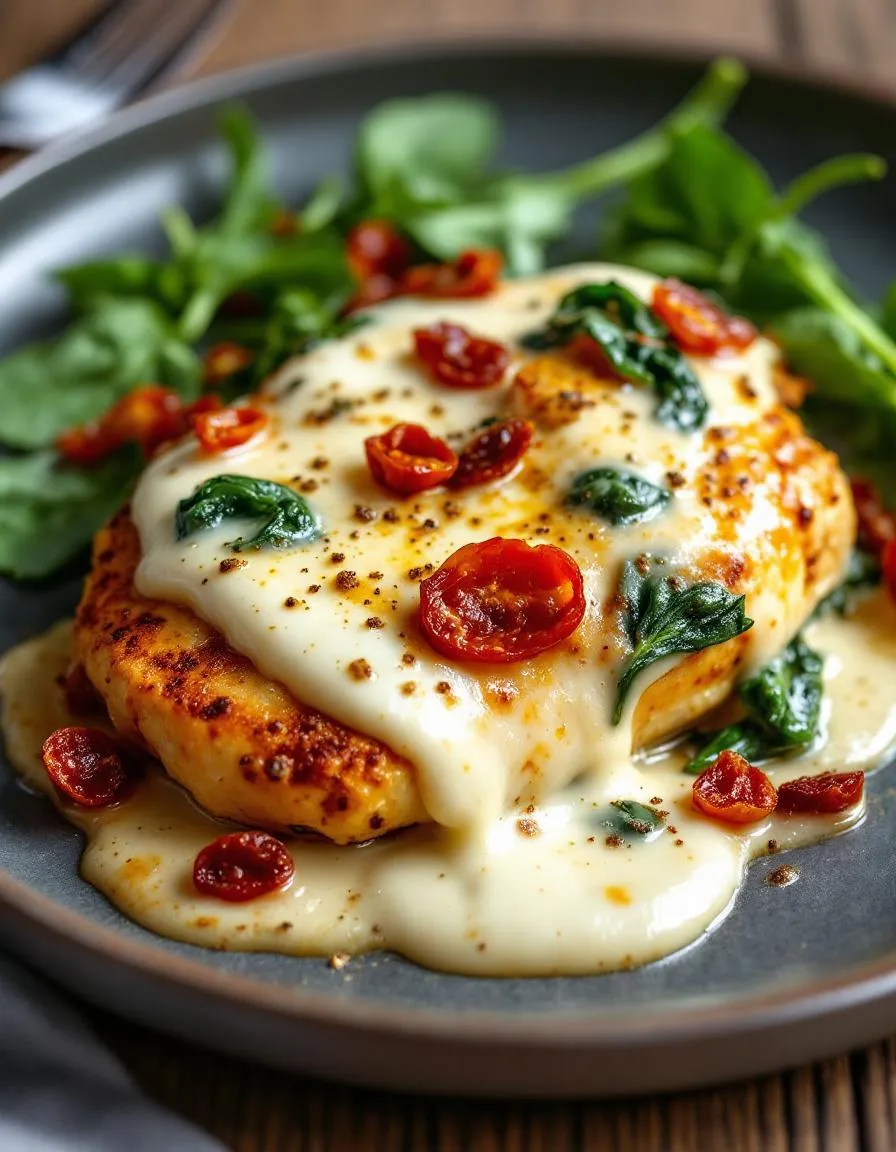
Best Creamy Baked Tuscan Chicken with Mozzarella
Introduction
Imagine cutting into tender, juicy chicken smothered in a creamy Tuscan-inspired sauce, topped with melted mozzarella that stretches with every bite. Sounds irresistible, right? This Creamy Baked Tuscan Chicken with Mozzarella Recipe brings the warmth of Italy to your dinner table, combining rich flavors with effortless comfort. Whether you’re cooking for a weeknight family meal or impressing guests, this dish delivers restaurant-quality taste without the fuss. Plus, it’s packed with sun-dried tomatoes, spinach, and garlic—ingredients that elevate every forkful. Ready to dive in? Let’s explore why this recipe deserves a spot in your regular rotation.
The Creamy Baked Tuscan Chicken with Mozzarella Recipe is a one-pan wonder that balances indulgence and simplicity. First, it starts with seared chicken breasts, which lock in moisture before baking. Then, a luscious sauce made with heavy cream, Parmesan, and aromatic spices coats the chicken, while fresh spinach and sun-dried tomatoes add vibrant color and tangy sweetness. Finally, a blanket of melted mozzarella ties everything together. This dish matters because it turns basic ingredients into something extraordinary, proving that gourmet meals don’t require complicated techniques. If you love creamy pasta dishes like our Creamy Garlic Parmesan Pasta, you’ll adore this chicken version. It fits our blog’s tone by offering approachable yet elevated recipes that inspire confidence in the kitchen. Plus, it pairs perfectly with sides like our Roasted Garlic Mashed Potatoes for a complete, satisfying meal.
Why I Love This Recipe
This Creamy Baked Tuscan Chicken with Mozzarella Recipe holds a special place in my heart because it reminds me of cozy dinners with loved ones. The first time I made it, the aroma of garlic and herbs filled my kitchen, instantly lifting my mood. What I adore most is how versatile it is—you can swap spinach for kale or add a pinch of red pepper flakes for heat. Every time I serve it, guests rave about the flavors, and I love that it feels fancy without demanding hours of prep. It’s the kind of dish that turns an ordinary evening into something memorable, and that’s why I keep coming back to it.
Health and Nutrition
Why it’s good for your body
Creamy Baked Tuscan Chicken with Mozzarella Recipe packs a nutritious punch while delivering rich, satisfying flavors. First, the lean chicken breast provides high-quality protein, which helps build and repair muscles. Additionally, the dish includes spinach, a leafy green loaded with iron and vitamins A and C to support immunity and energy levels.
Moreover, the creamy sauce features garlic and sun-dried tomatoes, both known for their antioxidant properties. These ingredients may help reduce inflammation and promote heart health. Meanwhile, the mozzarella cheese adds calcium for strong bones, making Creamy Baked Tuscan Chicken with Mozzarella Recipe a well-rounded meal.
Furthermore, olive oil, a staple in Tuscan cooking, contributes healthy monounsaturated fats. These fats support brain function and may help lower bad cholesterol. Finally, the balanced macronutrients in this dish keep you full longer, preventing unnecessary snacking. Whether you seek protein, vitamins, or heart-healthy fats, Creamy Baked Tuscan Chicken with Mozzarella Recipe delivers.
How it fits in a healthy lifestyle
Creamy Baked Tuscan Chicken with Mozzarella Recipe fits seamlessly into a balanced diet. If you follow a high-protein meal plan, the chicken and cheese provide ample fuel for active lifestyles. For gluten-free eaters, this dish naturally avoids grains, making it a safe and flavorful option.
Pair it with a light salad or roasted vegetables to keep the meal nutrient-dense without excess calories. If you love meal prepping, this recipe stores well, so you can enjoy healthy lunches all week. For more high-protein ideas, check out our protein-packed dinners.
Even on busy nights, you can whip up this dish quickly without sacrificing nutrition. Its wholesome ingredients align with heart-healthy eating, especially when you control portion sizes. Craving more Mediterranean-inspired meals? Explore our Mediterranean diet favorites for similar balanced options.
Juicy chicken breasts baked in a creamy Tuscan-inspired sauce with spinach, sun-dried tomatoes, and melted mozzarella.
Ingredients
Scale
For the Crust:
4 boneless, skinless chicken breasts
1 tbsp olive oil
1 tsp garlic powder
1 tsp Italian seasoning
1/2 tsp salt
1/4 tsp black pepper
1 cup heavy cream
1/2 cup chicken broth
1 cup shredded mozzarella cheese
1/2 cup grated Parmesan cheese
2 cups fresh spinach
1/3 cup sun-dried tomatoes, chopped
2 cloves garlic, minced
Instructions
1. Prepare the Crust:
Preheat oven to 375°F (190°C). Season chicken breasts with garlic powder, Italian seasoning, salt, and pepper.
Heat olive oil in a large oven-safe skillet over medium-high heat. Sear chicken for 3-4 minutes per side until golden. Remove and set aside.
In the same skillet, add minced garlic and sauté for 30 seconds. Pour in chicken broth and heavy cream, stirring to combine.
Add spinach, sun-dried tomatoes, and Parmesan cheese. Simmer for 2-3 minutes until spinach wilts.
Return chicken to the skillet. Top with mozzarella cheese. Bake for 15-20 minutes until chicken is cooked through and cheese is bubbly.
Notes
You can customize the seasonings to taste.
How to Prepare This Dish
Steps and time-saving tips
Start by preheating your oven to 375°F so it’s ready when you finish prepping the Creamy Baked Tuscan Chicken with Mozzarella Recipe. While the oven heats, season boneless chicken breasts generously with salt, pepper, and Italian herbs for maximum flavor. Next, heat olive oil in a large skillet and sear the chicken until golden—about 4 minutes per side—then set it aside. In the same skillet, sauté minced garlic and sun-dried tomatoes until fragrant, then whisk in heavy cream, chicken broth, and a pinch of red pepper flakes for a subtle kick. Let the sauce simmer until slightly thickened, then stir in fresh spinach until wilted. Layer the seared chicken in a baking dish, pour the creamy Tuscan sauce over it, and top with shredded mozzarella. Bake for 20 minutes until the cheese melts into a bubbly golden crust. For a time-saving hack, prep the sauce ahead and store it in the fridge—just reheat before assembling. Serve the dish over pasta or with crusty bread to soak up every drop of that rich sauce.
Mistakes I’ve made and learned from
I once rushed searing the chicken for this Creamy Baked Tuscan Chicken with Mozzarella Recipe, and it turned out dry after baking. Now I take the extra minute to get a deep golden crust—it locks in moisture and adds so much flavor. Another blunder? Overcrowding the skillet while sautéing the garlic, which made it burn instead of toast. I learned to keep the heat medium-low and stir constantly. If your sauce ever splits, don’t panic—whisk in a splash of warm broth to bring it back together. For more foolproof tips, check out my guide on fixing broken sauces or how to perfectly sear chicken every time. Trust me, these small tweaks make all the difference.
The Creamy Baked Tuscan Chicken with Mozzarella Recipe whispers of sun-drenched Italian countryside kitchens, where rustic flavors meet hearty family gatherings. Originating in Tuscany, this dish embodies the region’s love for simple yet rich ingredients—think ripe tomatoes, fragrant garlic, and velvety cream. Tuscan cooks often prepare it for Sunday suppers, layering tender chicken with local mozzarella and a splash of white wine for depth. Meanwhile, in other parts of Italy, you might find versions with pancetta or a dusting of Parmesan for extra umami.
Beyond Italy, the Creamy Baked Tuscan Chicken with Mozzarella Recipe adapts beautifully. In the American South, some add a pinch of cayenne or swap mozzarella for sharp cheddar. Greek variations might include Kalamata olives and feta, while French cooks could stir in herbes de Provence. My own family tweaks it seasonally—adding mushrooms in fall or fresh basil in summer. No matter where it’s made, this dish always feels like a warm embrace.
ays-cooking">How it fits in today’s cooking
Today, the Creamy Baked Tuscan Chicken with Mozzarella Recipe thrives as both a weeknight hero and a special-occasion star. Busy cooks love its one-pan ease, while meal preppers stash leftovers for next-day lunches. It’s also a hit at potlucks, pairing perfectly with crusty bread or a light summer salad. Modern twists, like gluten-free flour or dairy-free cream, keep it inclusive without losing its soul.
Seasonally, it shines year-round. In winter, it’s cozy comfort food. Come spring, fresh herbs brighten it up. Some even serve it as a festive centerpiece during holidays, alongside dishes like decadent desserts. Whether you stick to tradition or reinvent it, this recipe bridges the gap between timeless and trendy—just like the best comfort foods do.
Taste and Texture
What makes it delicious
The Creamy Baked Tuscan Chicken with Mozzarella Recipe delivers a rich, indulgent experience with every bite. Tender chicken soaks up a velvety, garlic-infused cream sauce, while sun-dried tomatoes add bursts of tangy sweetness. Fresh spinach lends a subtle earthiness, and melted mozzarella creates gooey, stretchy perfection. Meanwhile, the golden crust on top adds a satisfying crunch. Every forkful balances creamy, savory, and slightly herbaceous notes, thanks to aromatic basil and oregano. The dish smells irresistible as it bakes—think buttery garlic mingling with toasted cheese. Ultimately, the Creamy Baked Tuscan Chicken with Mozzarella Recipe feels like a cozy hug for your taste buds.
r">Boosting the flavor
For an extra flavor kick, try swapping mozzarella with smoked provolone or adding crispy pancetta bits for salty depth. A sprinkle of red pepper flakes or a drizzle of truffle oil elevates the dish with a gourmet touch. Pair it with a side of garlic butter rolls to soak up every drop of the creamy sauce. Fresh herbs like thyme or rosemary also brighten the dish, while a squeeze of lemon adds a refreshing zing. Don’t shy away from experimenting—each tweak makes the recipe even more memorable.
Tips for Success
Best practices for results
For the best Creamy Baked Tuscan Chicken with Mozzarella Recipe, always pat the chicken dry before seasoning to ensure a golden crust. Meanwhile, preheat your oven fully so the dish cooks evenly from the start. Additionally, use fresh mozzarella instead of shredded for a smoother, creamier melt. Finally, let the dish rest for 5 minutes after baking so the flavors settle perfectly.
>Mistakes to avoid
Avoid overcrowding the pan when searing the chicken, as this steams instead of browns the meat. Instead, cook in batches if needed for even results. Also, don’t skip reducing the cream sauce enough before baking—otherwise, it may turn out too thin. For more sauce tips, check out our guide to perfect sauces. Lastly, resist overbaking the mozzarella, as it can become rubbery. For ideal cheese textures, explore our cheese melting techniques.
Serving and Pairing Suggestions
How to serve this dish
For a stunning presentation, plate your Creamy Baked Tuscan Chicken with Mozzarella Recipe on a warm, rustic platter. Drizzle the creamy sauce lightly over the top and sprinkle fresh basil or parsley for a pop of color. Alternatively, serve it family-style in a cast-iron skillet to keep it warm and inviting. This dish shines at dinner parties, but it also makes a comforting weeknight meal. To elevate the experience, pair it with crusty bread for soaking up every last bit of that rich sauce.
What goes well with it
First, try pairing Creamy Baked Tuscan Chicken with Mozzarella Recipe with a crisp white wine like Pinot Grigio. The acidity balances the dish’s richness perfectly. For sides, roasted garlic Parmesan potatoes add a satisfying crunch, while a simple arugula salad with lemon vinaigrette brings freshness. If you love bread, our homemade rosemary focaccia makes an excellent companion. Finally, finish the meal with a light dessert, such as our lemon ricotta cookies, to round out the Tuscan flavors.
What sides go well with Creamy Baked Tuscan Chicken with Mozzarella Recipe?
Creamy Baked Tuscan Chicken with Mozzarella Recipe pairs perfectly with garlic bread, roasted vegetables, or a crisp green salad. For a heartier meal, try serving it with mashed potatoes or buttered pasta to soak up the delicious sauce.
Can I use chicken breasts instead of thighs for Creamy Baked Tuscan Chicken with Mozzarella Recipe?
Yes, you can substitute chicken breasts for thighs in Creamy Baked Tuscan Chicken with Mozzarella Recipe, but adjust cooking time since breasts cook faster. To keep them juicy, pound them to an even thickness and monitor internal temperature (165°F).
ank-math-faq-item">
How do I store leftovers of Creamy Baked Tuscan Chicken with Mozzarella Recipe?
Store leftovers in an airtight container in the refrigerator for up to 3 days. Reheat Creamy Baked Tuscan Chicken with Mozzarella Recipe gently in the oven or microwave, adding a splash of cream to revive the sauce if needed.
What’s the best way to get the mozzarella perfectly melted in Creamy Baked Tuscan Chicken with Mozzarella Recipe?
For optimal melt, add fresh mozzarella during the last 5 minutes of baking and broil briefly until bubbly. Low-moisture mozzarella works best in Creamy Baked Tuscan Chicken with Mozzarella Recipe as it melts evenly without making the dish watery.
Best Creamy Butternut Squash and Sweet Potato Soup
Introduction
There’s something deeply comforting about a warm bowl of soup on a chilly day, especially when it’s as rich and velvety as this Creamy Butternut Squash and Sweet Potato Soup Recipe. Whether you’re craving a cozy weeknight dinner or a nourishing meal to share with loved ones, this recipe delivers both flavor and comfort in every spoonful. Plus, it’s packed with wholesome ingredients that make it as satisfying as it is delicious. Let’s dive into why this soup deserves a spot in your recipe rotation.
Creamy Butternut Squash and Sweet Potato Soup Recipe blends the natural sweetness of roasted butternut squash and sweet potatoes with savory spices, creating a perfectly balanced dish. The velvety texture comes from blending the vegetables until smooth, while a touch of cream or coconut milk adds richness. This soup isn’t just a meal—it’s a hug in a bowl, perfect for fall and winter or anytime you need a hearty, healthy pick-me-up. It’s also incredibly versatile, whether you serve it as a starter or pair it with crusty bread for a full meal. If you love easy, flavorful recipes, you’ll appreciate how this one fits seamlessly into busy weeknights or relaxed weekend cooking. For more cozy soup ideas, check out our comforting soup recipes collection. And if you’re looking for ways to customize it, our guide to soup toppings offers plenty of inspiration.
Why I Love This Recipe
This Creamy Butternut Squash and Sweet Potato Soup Recipe holds a special place in my heart because it reminds me of family gatherings during the holidays. My grandmother used to make a similar version, and the aroma of roasting squash and spices always filled the house with warmth. Now, whenever I prepare it, I feel that same sense of comfort and connection. It’s also one of those dishes that everyone loves—even picky eaters—and it never fails to impress guests. Simple, wholesome, and deeply satisfying, this soup is more than just food—it’s a memory maker.
Health and Nutrition
Why it’s good for your body
Creamy Butternut Squash and Sweet Potato Soup Recipe packs a powerful nutritional punch. First, it’s rich in beta-carotene, which your body converts to vitamin A. This nutrient supports vision, immunity, and skin health. Additionally, the fiber in butternut squash and sweet potatoes keeps digestion smooth and helps you feel full longer.
Moreover, this soup delivers a hearty dose of antioxidants. These compounds fight inflammation and may lower the risk of chronic diseases. Since both main ingredients are naturally sweet, you won’t need excessive added sugars. Instead, you’ll enjoy a balanced flavor that satisfies cravings without spiking blood sugar.
Furthermore, Creamy Butternut Squash and Sweet Potato Soup Recipe provides essential vitamins like C and B6. Vitamin C boosts collagen production, while B6 aids brain function. The creamy texture often comes from healthy fats like coconut milk or olive oil, which support heart health. Ultimately, this soup nourishes your body while tasting indulgent.
How it fits in a healthy lifestyle
Creamy Butternut Squash and Sweet Potato Soup Recipe fits seamlessly into a balanced diet. It’s naturally gluten-free and vegan-friendly, making it ideal for diverse dietary needs. If you’re meal prepping, this soup stores well and reheats quickly for busy weeknights.
For heart-healthy eating, the ingredients promote lower cholesterol and blood pressure. Pair it with a protein like grilled chicken or garlic herb quinoa for a complete meal. If you’re watching calories, the high fiber content helps manage portions without leaving you hungry.
This recipe also aligns with clean-eating goals. It uses whole, unprocessed ingredients, unlike many store-bought soups. For more ways to incorporate nutritious meals, check out our guide to easy meal prep tips. Whether you’re fueling a workout or winding down for dinner, this soup supports your wellness journey.
A velvety smooth soup with the natural sweetness of butternut squash and sweet potatoes, perfect for chilly days.
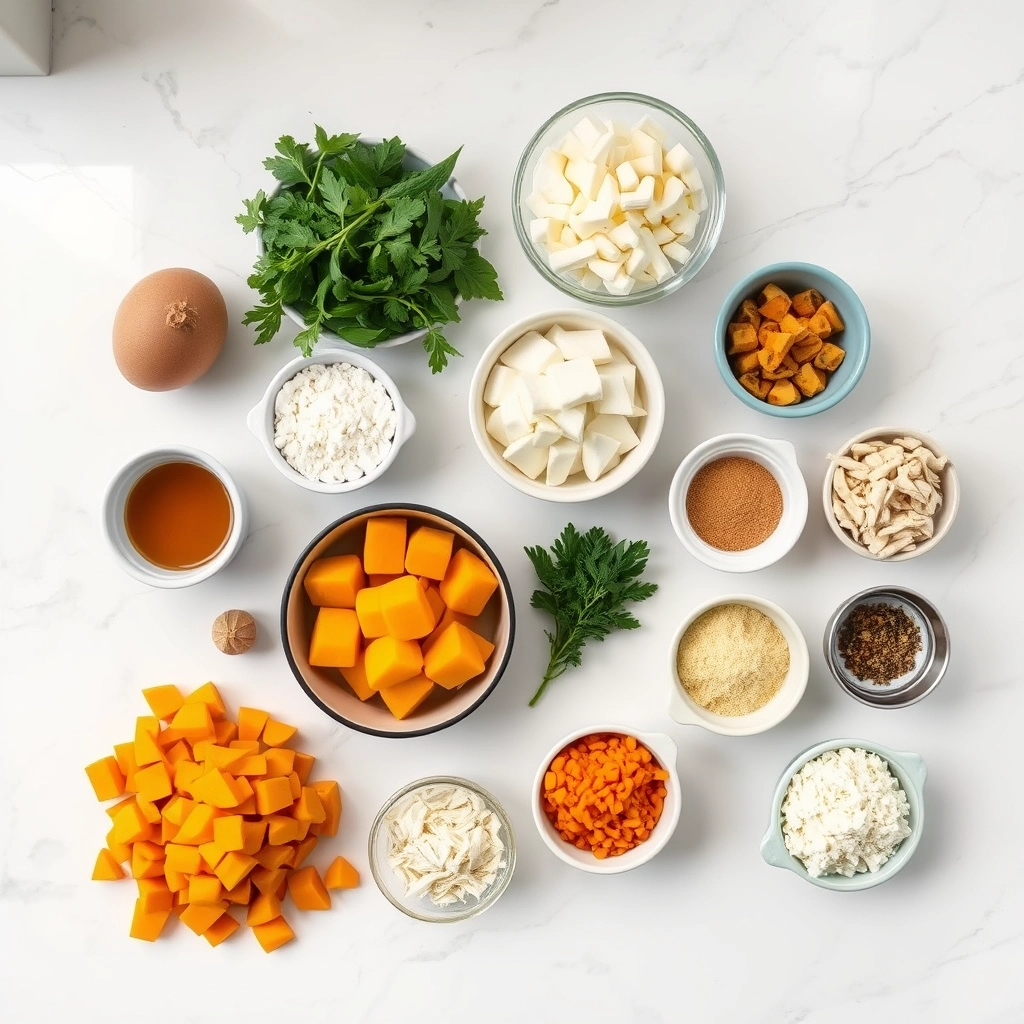
Ingredients
Scale
For the Crust:
1 medium butternut squash, peeled and cubed
2 large sweet potatoes, peeled and cubed
1 onion, diced
3 cloves garlic, minced
4 cups vegetable broth
1 cup coconut milk
2 tbsp olive oil
1 tsp ground cumin
1/2 tsp ground cinnamon
Salt and pepper to taste
Instructions
1. Prepare the Crust:
Heat olive oil in a large pot over medium heat. Add onion and garlic, sauté until fragrant.
Add butternut squash and sweet potatoes. Stir in cumin, cinnamon, salt, and pepper. Cook for 5 minutes.
Pour in vegetable broth and bring to a boil. Reduce heat, cover, and simmer for 20-25 minutes until vegetables are tender.
Use an immersion blender to puree the soup until smooth. Stir in coconut milk and adjust seasoning if needed.
Serve warm, optionally garnished with a drizzle of coconut milk or fresh herbs.
Notes
You can customize the seasonings to taste.
How to Prepare This Dish
Steps and time-saving tips
Start by peeling and cubing the butternut squash and sweet potatoes into even chunks so they cook uniformly. Meanwhile, heat a large pot over medium heat and drizzle in olive oil. Toss in diced onions and minced garlic, then sauté until fragrant and golden. Next, add the cubed squash and sweet potatoes, stirring gently to coat them in the aromatics. Pour in vegetable broth until the ingredients are just submerged, then bring the mixture to a gentle boil. Reduce the heat, cover the pot, and let everything simmer until the vegetables turn fork-tender, usually about 20 minutes. While waiting, toast some pumpkin seeds in a dry skillet for a crunchy garnish later.
Once the vegetables soften, carefully blend the soup in batches until silky smooth. For extra creaminess, stir in a splash of coconut milk or heavy cream. Season with salt, pepper, and a pinch of nutmeg to enhance the natural sweetness. If you’re short on time, roast the squash and sweet potatoes ahead—this deepens their flavor and cuts down active cooking. Serve the Creamy Butternut Squash and Sweet Potato Soup Recipe hot, topped with those toasted seeds and a drizzle of olive oil. Leftovers? They taste even better the next day as the flavors meld.
and-learned-from">Mistakes I’ve made and learned from
Early on, I rushed the sauté step, leaving the onions undercooked and bitter in my Creamy Butternut Squash and Sweet Potato Soup Recipe. Now, I take my time until they’re deeply caramelized—patience pays off. Another blunder? Over-blending while the soup was piping hot, which made it splatter everywhere. Letting it cool slightly saves mess and stress. If your soup turns out too thick, thin it with warm broth instead of water for richer flavor. For more tips on balancing textures, check out my guide on fixing soup consistency. And if you’re new to working with squash, my peeling butternut squash easily tutorial avoids those frustrating slips.
Cultural Connection and Variations
Where this recipe comes from
Warm, velvety, and packed with earthy sweetness, the Creamy Butternut Squash and Sweet Potato Soup Recipe feels like a hug in a bowl. This dish traces its roots to the hearty, nutrient-rich soups of Indigenous American and African cuisines, where squash and sweet potatoes thrived as staple ingredients. Over time, European settlers embraced these flavors, blending them with creamy dairy traditions to create the comforting version we know today.
In the Caribbean, cooks
often add coconut milk and warming spices like allspice or Scotch bonnet peppers for a tropical twist. Meanwhile, in parts of West Africa, you might find a similar soup enriched with peanuts or served with fermented cornbread. Even within the U.S., regional takes shine—some Southern kitchens stir in a splash of bourbon, while New Englanders might crown their Creamy Butternut Squash and Sweet Potato Soup Recipe with toasted pecans or maple syrup.
My grandmother always made hers with a dash of nutmeg and a swirl of heavy cream, turning it into a holiday centerpiece. Whether served as a humble weeknight meal or dressed up for festivities, this soup carries stories of adaptation and comfort across generations.
How it fits in today’s cooking
Today, the Creamy Butternut Squash and Sweet Potato Soup Recipe holds its own as a versatile star of modern kitchens. Busy home cooks love its meal-prep potential, while health-conscious eaters appreciate its vitamin-packed ingredients. Many now tweak it for dietary needs—swapping dairy for coconut milk or blending in protein-rich lentils. It’s also a favorite for cozy gatherings, especially when paired with crusty bread or a crisp salad.
Seasonal eating trends
keep this soup in rotation, too. As autumn leaves fall, it becomes a Thanksgiving staple, but its simplicity makes it just as fitting for a quick winter lunch. For those hosting bigger feasts, try serving it alongside other crowd-pleasers like garlic herb roasted chicken or a fresh fall kale salad. Whether you stick to tradition or experiment with global flavors, this soup bridges the past and present with every spoonful.
Taste and Texture
What makes it delicious
The Creamy Butternut Squash and Sweet Potato Soup Recipe wraps your taste buds in a velvety, rich embrace. First, the natural sweetness of roasted butternut squash and sweet potatoes shines through, balanced by a hint of earthy warmth from cumin and smoked paprika. Meanwhile, a touch of coconut milk adds a luscious, silky texture that glides across your tongue. As you take a spoonful, the aroma of caramelized onions and garlic wafts up, making every bite deeply comforting. Finally, a sprinkle of fresh thyme or cracked black pepper elevates the Creamy Butternut Squash and Sweet Potato Soup Recipe with bright, herbal notes that cut through the richness.
Boosting the flavor
For an extra flavor punch, try swirling in a spoonful of homemade pesto or a drizzle of spicy chili oil before serving. Alternatively, top each bowl with toasted pepitas or crumbled feta for a crunchy, salty contrast. If you love bold spices, a pinch of cayenne or a dash of garlic herb seasoning will deepen the soup’s complexity. Whether you keep it simple or experiment, these tweaks make the Creamy Butternut Squash and Sweet Potato Soup Recipe even more irresistible.
For the best Creamy Butternut Squash and Sweet Potato Soup Recipe, always roast the vegetables first to deepen their flavor. Additionally, blend the soup in batches to ensure a silky-smooth texture. Use full-fat coconut milk for extra creaminess, and don’t skip the fresh ginger—it adds a bright, warming note. Finally, taste and adjust the seasoning just before serving, as flavors develop while cooking.
Mistakes to avoid
One common mistake is overcooking the vegetables, which can make them mushy. Instead, roast them until just tender for the best texture in your Creamy Butternut Squash and Sweet Potato Soup Recipe. Another error is using a weak blender, which leaves chunks behind. For perfectly smooth results, try a high-powered blender like the one we recommend in our kitchen tools guide. Also, avoid adding all the broth at once—start with half and adjust as needed. For more tips on balancing soup consistency, check out our soup thickening guide.
g-suggestions">Serving and Pairing Suggestions
How to serve this dish
Elevate your Creamy Butternut Squash and Sweet Potato Soup Recipe by serving it in rustic bread bowls for a cozy, autumnal touch. Alternatively, drizzle a swirl of coconut milk or crème fraîche on top and sprinkle with toasted pepitas for a pop of color and crunch. This soup shines at holiday gatherings, but it also makes a comforting weeknight meal when paired with a simple green salad. For a festive twist, garnish with fresh thyme or crispy sage leaves to enhance both flavor and presentation.
What goes well with it
Pair your Creamy Butternut Squash and Sweet Potato Soup Recipe with warm, crusty artisan bread or fluffy garlic knots for dipping. The savory notes in our Garlic Parmesan Knots perfectly balance the soup’s natural sweetness. For a refreshing contrast, try a crisp apple and kale salad with a tangy vinaigrette. If you’re hosting a dinner party, serve it alongside our Herb-Roasted Chicken for a hearty, well-rounded meal. Finally, a glass of chilled Chardonnay or spiced apple cider enhances the warm, velvety flavors of this seasonal soup.
math-faq-block">
How do you thicken creamy butternut squash and sweet potato soup?
For a thicker consistency, blend half the soup longer or add a cooked potato during blending. You can also simmer the Creamy Butternut Squash and Sweet Potato Soup Recipe uncovered to reduce liquid. Avoid flour or cornstarch—the natural starches from the vegetables work best.
Can I freeze creamy butternut squash and sweet potato soup?
Yes! This Creamy Butternut Squash and Sweet Potato Soup Recipe freezes well for up to 3 months. Cool it completely before transferring to airtight containers, leaving 1-inch headspace for expansion. Thaw overnight in the fridge and reheat gently on the stove.
What toppings go well with butternut squash and sweet potato soup?
Try toasted pepitas, crumbled bacon, a swirl of coconut milk, or fresh herbs like thyme. For extra richness, add a dollop of Greek yogurt or grated Parmesan to your Creamy Butternut Squash and Sweet Potato Soup Recipe. Crusty bread or croutons make perfect sides.
ank-math-faq-item">
Is butternut squash and sweet potato soup healthy?
Absolutely! This Creamy Butternut Squash and Sweet Potato Soup Recipe packs fiber, vitamins A and C, and antioxidants. Using vegetable broth and minimal cream keeps it light. For a vegan version, substitute coconut milk and omit dairy toppings.