Table of Contents
Italian Meatball Lasagna Roll-Ups
Introduction
Did you know that over 70% of home cooks crave the comforting, layered flavors of lasagna but are intimidated by the time and assembly? If you’re looking for a fun, flavorful twist on the classic that delivers all the satisfaction in a fraction of the time, you’ve found your answer. These Italian Meatball Lasagna Roll-Ups are the ingenious fusion of two beloved Italian-American staples: juicy, herbaceous meatballs and cheesy, baked pasta. Each lasagna noodle is lovingly rolled around a savory meatball and smothered in rich marinara and melted cheese, creating individual portions that are as impressive to serve as they are delicious to eat. This recipe is perfect for weeknight dinners, meal prep, or entertaining a crowd with minimal fuss and maximum flavor.
Ingredients List
Gather these fresh, high-quality ingredients for the most authentic flavor. Don’t worry—I’ve included smart substitutions for flexibility.
- For the Meatballs:
- 1 lb ground beef (80/20 blend): Provides juicy, rich flavor. Substitute: Ground turkey or a 50/50 mix of beef and pork for extra tenderness.
- 1/2 cup Italian breadcrumbs: Creates a tender, binding texture. Substitute: Panko breadcrumbs or gluten-free breadcrumbs.
- 1/4 cup grated Parmesan cheese: Adds a salty, umami punch. Use freshly grated for the best melt.
- 1 large egg: The essential binder that holds everything together.
- 2 cloves garlic, minced: For that unmistakable aromatic base.
- 1/4 cup fresh parsley, finely chopped: Brings a bright, herbaceous note. Dried parsley (1 tbsp) can work in a pinch.
- 1 tsp dried oregano & 1/2 tsp dried basil: The classic Italian seasoning duo. Rub between your palms before adding to release their oils.
- Salt and black pepper to taste: Season generously.
- For the Roll-Ups:
- 12 lasagna noodles: Use traditional, not no-boil, for the best pliability. Look for noodles with a rough texture to hold sauce better.
- 24 oz marinara sauce (about 3 cups): Choose a robust, high-quality jarred sauce or use your favorite homemade recipe. You’ll want a sauce with a deep, tomatoey flavor.
- 2 cups ricotta cheese: Look for whole-milk ricotta for a creamier, richer filling. Part-skim works for a lighter version.
- 1 1/2 cups shredded mozzarella cheese: For that iconic, stretchy, golden-brown top. Low-moisture mozzarella melts best.
- 1/2 cup shredded Parmesan cheese: Divided—some for mixing, some for topping.
- 1 tsp olive oil: For brushing the baking dish to prevent sticking.
Timing
Compared to a traditional layered lasagna, which can take over 2 hours from start to finish, these roll-ups streamline the process significantly. The active prep time is focused and efficient, and the bake time is nearly 25% shorter because the individual rolls heat through more quickly than a dense, deep dish. This makes it a fantastic “fancy-feeling” recipe that fits into a standard weeknight timeline.
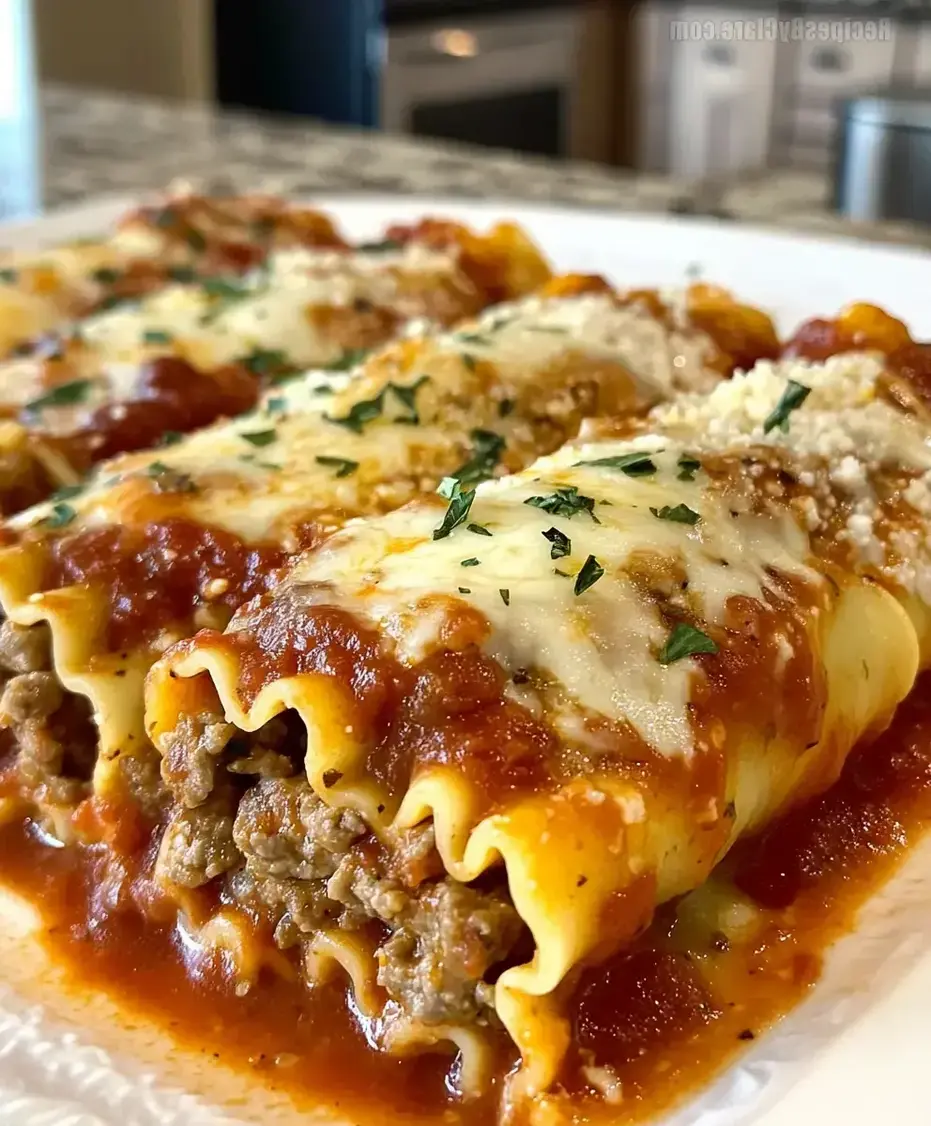
Golden, cheesy, and bubbling straight from the oven—these roll-ups are the ultimate comfort food.
Step-by-Step Instructions
Step 1: Prepare the Meatballs
In a large mixing bowl, combine the ground beef, breadcrumbs, grated Parmesan, egg, minced garlic, chopped parsley, oregano, basil, salt, and pepper. My pro tip? Use your hands to mix gently but thoroughly. Overworking the meat can lead to tough meatballs. Once combined, roll the mixture into 12 small, evenly-sized meatballs—about 1 to 1.5 inches in diameter. They should be just slightly smaller than the width of a cooked lasagna noodle. You can bake these at 400°F for 15-18 minutes, or pan-sear them in a skillet for a richer, caramelized exterior. Set them aside once cooked.
Step 2: Cook the Noodles
Bring a large pot of generously salted water to a rolling boil. Add the lasagna noodles and cook according to package directions until al dente—they should be pliable but still have a slight bite. This is crucial; overcooked noodles will tear when you try to roll them. Immediately drain the noodles and lay them flat in a single layer on parchment paper or clean kitchen towels. This prevents them from sticking together. Lightly drizzle with a tiny bit of olive oil if you’re concerned about sticking, but it’s often not necessary if you work quickly.
Step 3: Assemble the Roll-Ups
Preheat your oven to 375°F (190°C). Lightly brush a 9×13 inch baking dish with olive oil. Spread about 1 cup of marinara sauce evenly across the bottom. In a medium bowl, stir together the ricotta cheese and 1/4 cup of the Parmesan cheese. Take one cooked lasagna noodle and lay it flat on your work surface. Spread about 1.5 tablespoons of the ricotta mixture evenly along the length of the noodle. Place one cooked meatball at one end of the noodle. Now, carefully roll the noodle around the meatball, starting from the meatball end, until you have a neat, compact roll. Place it seam-side down in the prepared baking dish. Repeat with the remaining noodles and meatballs.
Step 4: Bake to Perfection
Once all roll-ups are snug in the dish, pour the remaining marinara sauce over the top, ensuring each roll gets some coverage. Sprinkle the shredded mozzarella and remaining Parmesan cheese evenly over everything. Cover the dish tightly with aluminum foil. Bake for 20 minutes. Then, remove the foil and bake for an additional 10-15 minutes, or until the cheese is melted, bubbly, and starting to develop golden spots. For an extra crispy top, you can broil for the last 1-2 minutes, but watch it closely! Let the dish rest for 5-10 minutes after baking. This allows the cheeses to set slightly, making serving much cleaner.
Nutritional Information
The following estimates are per serving (one lasagna roll-up), based on a total of 12 servings. Values are approximate and can vary based on specific ingredients and brands used.
Healthier Alternatives
You can easily adapt this recipe for various dietary needs without sacrificing flavor:
- Leaner Protein: Swap the ground beef for 93% lean ground turkey or chicken. For a plant-based version, use a high-quality meatless ground crumble or finely chopped mushrooms and lentils.
- Whole Grains: Use whole wheat or legume-based lasagna noodles for a boost of fiber and protein.
- Lighter Cheese: Opt for part-skim ricotta, part-skim mozzarella, and reduce the Parmesan by half. You can also blend low-fat cottage cheese with a little lemon juice for a ricotta substitute.
- Sneak in Veggies: Add finely grated zucchini, carrots, or spinach to the meatball mixture or ricotta filling. They add moisture, nutrients, and a subtle sweetness.
- Low-Sodium: Use no-salt-added canned tomatoes for your homemade marinara and reduce or omit added salt in the meatballs.
Serving Suggestions
These roll-ups are a complete meal on their own, but pairing them thoughtfully elevates the dining experience. Serve them alongside a crisp Caesar salad or a simple arugula salad with lemon vinaigrette to cut through the richness. For a classic Italian-American feast, add a side of garlic bread or soft, warm focaccia for dipping into any extra sauce. A glass of medium-bodied red wine like a Chianti or Sangiovese complements the tomato and meat flavors perfectly. For a family-style presentation, garnish the baking dish with fresh basil or parsley just before serving.
Common Mistakes
- Overcooking the Noodles: Mushy noodles tear. Always cook to al dente and lay them out flat immediately.
- Overfilling the Rolls: Using too much ricotta or meatballs that are too large makes rolling difficult and can cause the noodles to burst open during baking.
- Skipping the Resting Time: Cutting into the roll-ups straight from the oven causes the filling to ooze out. A brief rest lets everything set.
- Using Watery Ricotta: If your ricotta seems wet, drain it in a fine-mesh sieve for 15-20 minutes before using to prevent a soggy bake.
- Not Seasoning the Meatballs Enough: Taste-test your meatball mixture by cooking a tiny patty in a skillet before rolling all of them. Adjust seasoning as needed.
Storing Tips
- Refrigeration: Cool completely, then store in an airtight container in the fridge for up to 4 days.
- Freezing: These roll-ups freeze beautifully. Assemble them in a freezer-safe dish, but do not bake. Wrap tightly with plastic wrap and foil. Freeze for up to 3 months. Thaw overnight in the fridge before baking as directed, adding a few extra minutes to the bake time if needed.
- Reheating: Reheat individual portions in the microwave until hot. For best texture, reheat larger portions in a covered baking dish at 350°F for 15-20 minutes, or until heated through. Add a splash of water or extra sauce to the dish to prevent drying out.
Conclusion
These Italian Meatball Lasagna Roll-Ups are more than just a recipe—they’re a guaranteed crowd-pleaser that simplifies a classic while amplifying the fun and flavor. They combine the hearty satisfaction of a meatball sub with the cheesy, baked goodness of lasagna, all in a neat, individual package. Whether you’re cooking for a busy family, prepping meals for the week, or hosting a casual dinner party, this dish delivers impressive results every time. The process is straightforward, the ingredients are adaptable, and the final product is utterly delicious