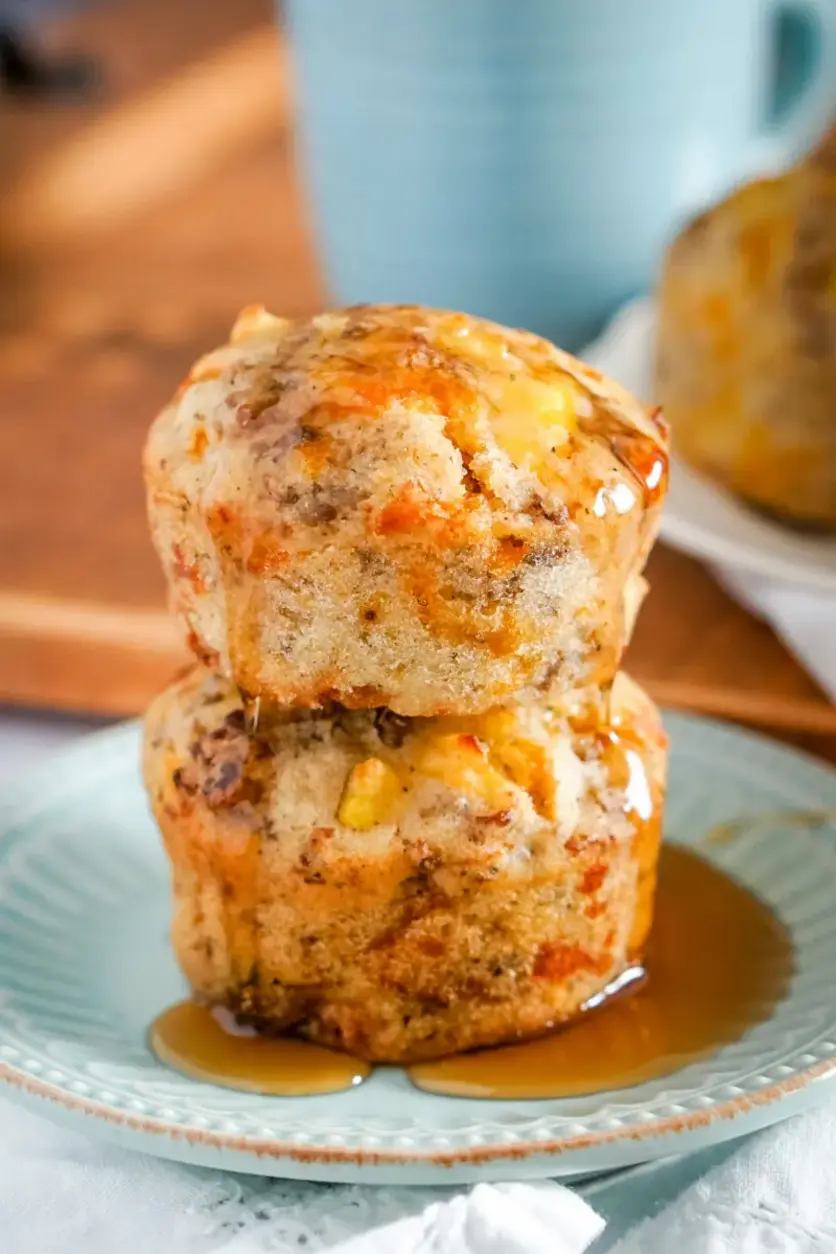
Did you know that over 70% of home bakers crave the iconic, gooey, bakery-quality cinnamon roll but are intimidated by the time-consuming process of making dough from scratch? What if I told you there’s a genius shortcut that delivers a Cinnabon-like treat in a fraction of the time? Welcome to the world of enhanced cinnamon rolls, where we transform humble store-bought dough into a spectacular, melt-in-your-mouth dessert or breakfast showstopper. By adding just a few simple ingredients—rich heavy cream, a homemade cinnamon sugar butter, and a luscious cream cheese frosting—you can elevate a convenient product into something truly extraordinary. This recipe is perfect for busy weekends, surprise guests, or when you simply need a comforting, warm, and indulgent pastry without the all-day commitment. Let’s unlock the secret to making the easiest, most decadent cinnamon rolls you’ve ever tasted.
Ingredients List
Gathering the right components is key to this transformation. Here’s what you’ll need, along with sensory notes and smart substitutions.
The Base:
1 package (12.4 oz / 354g) refrigerated cinnamon roll dough with icing – The canvas for our masterpiece. Look for brands with a soft, pliable dough. The pre-packaged icing is a backup, but we’re making something far superior.
The Magic Pour:
1/2 cup (120ml) heavy whipping cream – This is the non-negotiable secret! As it bakes, it steams the rolls from below, creating an unbelievably moist, tender, and almost custard-like bottom layer. Substitution: For a slightly lighter version, half-and-half can work, but the richness won’t be the same.
Homemade Cinnamon Sugar Butter:
4 tablespoons (1/2 stick / 56g) unsalted butter, softened – The base for our flavor paste. Softened to room temperature for easy spreading.
1/4 cup (50g) packed light brown sugar – Adds a deep molasses flavor and moisture. Substitution: Dark brown sugar for a more robust taste.
1 1/2 tablespoons ground cinnamon – The star spice. Use fresh, high-quality cinnamon for the best aromatic punch.
1/8 teaspoon fine sea salt – Balances the sweetness and enhances all the flavors.
Cream Cheese Frosting (The Crown Jewel):
4 ounces (113g) full-fat cream cheese, softened – Provides tangy richness and structure. Do not use spreadable tubs.
4 tablespoons (1/2 stick / 56g) unsalted butter, softened – For a silky, spreadable consistency.
1 cup (120g) powdered sugar, sifted – Sifting is crucial for a lump-free, smooth frosting.
1/2 teaspoon pure vanilla extract – Adds a warm, floral note. Use the real thing, not imitation.
1-2 tablespoons milk or heavy cream – To adjust frosting consistency to your liking.
Timing
Prep Time10 minutes
Cook Time25-30 minutes
Total Time40 minutes
The beauty of this recipe lies in its incredible efficiency. Compared to traditional from-scratch cinnamon rolls, which require 3-4 hours for proofing, kneading, and rising, this enhanced method gets you from package to plate in well under an hour. The active prep time is a mere 10 minutes—most of which is spent mixing the simple butter and frosting. The oven does the rest of the work, transforming your ingredients into a bubbling, fragrant pan of joy. It’s the ultimate hack for instant gratification without sacrificing an ounce of quality or flavor.
Golden-brown, pillowy soft cinnamon rolls enhanced with heavy cream and topped with homemade cream cheese frosting.
Step-by-Step Instructions
Step 1: Prepare the Cinnamon Sugar Butter
Preheat your oven to 375°F (190°C). Take your softened butter and place it in a small mixing bowl. Add the packed brown sugar, ground cinnamon, and salt. Using a fork or a small whisk, mash and stir until you have a uniformly mixed, fragrant, paste-like consistency. It will be thick and spreadable. This mixture is your flavor bomb—it’s going to melt into every nook and cranny of the rolls.
Step 2: Pour the Heavy Cream
Open the package of cinnamon rolls and separate them. Arrange them in a standard 9-inch round cake pan or pie dish, placing them snugly but not squished. Now, take your heavy cream and pour it evenly over and around the rolls in the pan. You’ll hear a satisfying sizzle if the pan is warm. This cream is the key to the magical, gooey texture. Next, take your prepared cinnamon sugar butter. Using a spoon or your fingers, dollop small amounts of the butter mixture over the top of each cinnamon roll. Don’t worry about being perfect—it will melt and spread beautifully in the oven.
Step 3: Bake to Perfection
Place the pan in the preheated oven on the center rack. Bake for 25-30 minutes. You’re looking for the rolls to be deeply golden brown on top, the cream and butter mixture to be bubbling vigorously around the edges, and the centers to be fully cooked through (a toothpick inserted should come out clean, not doughy). The incredible aroma filling your kitchen will be your first sign of success.
Step 4: Whip Up the Cream Cheese Frosting
While the rolls bake, make the frosting. In a medium bowl, combine the softened cream cheese and softened butter. Using a hand mixer or a sturdy whisk, beat them together on medium speed until completely smooth, creamy, and lump-free—about 2 minutes. Reduce the mixer speed to low and gradually add the sifted powdered sugar. Once incorporated, add the vanilla extract and 1 tablespoon of milk or cream. Beat on medium-high speed for 1-2 minutes until light and fluffy. If the frosting seems too thick for drizzling, add the remaining tablespoon of liquid, one teaspoon at a time, until you reach your desired consistency.
Step 5: Frost and Serve
Once the cinnamon rolls are out of the oven, let them cool in the pan for exactly 5 minutes. This allows them to set slightly so they don’t fall apart, but they’re still warm enough to melt the frosting gloriously. Using a spoon, offset spatula, or piping bag, generously drizzle or spread the cream cheese frosting over the warm rolls. Watch as it slowly melts into the crevices. Serve immediately while they are warm, soft, and irresistibly gooey.
Nutritional Information
The following is an approximate nutritional breakdown per serving (1 enhanced cinnamon roll), based on a yield of 8 rolls. Values may vary based on specific brand ingredients used.
Calories: ~420 kcal
Total Fat: 25g
Saturated Fat: 15g
Cholesterol: 70mg
Sodium: 320mg
Total Carbohydrates: 45g
Dietary Fiber: 1g
Sugars: 28g
Protein: 4g
Healthier Alternatives
Indulgence is the goal, but you can make thoughtful swaps for a slightly lighter version without losing the soul of the recipe.
Dough: Seek out whole-wheat or reduced-sugar cinnamon roll dough options if available.
Heavy Cream: Substitute with full-fat canned coconut milk for a dairy-free, still-rich alternative. For lower fat, use 2% milk, though the bottom will be less custardy.
Cinnamon Sugar Butter: Reduce the butter to 3 tablespoons and use a sugar substitute like monk fruit or erythritol that measures 1:1 like brown sugar.
Cream Cheese Frosting: Use Neufchâtel cheese (1/3 less fat) instead of full-fat cream cheese. For the powdered sugar, a confectioners’ style sugar substitute works well. You can also use Greek yogurt thinned with a little honey for a tangy, protein-packed drizzle.
Serving Suggestions
These cinnamon rolls are a star on their own, but you can build an unforgettable experience around them.
Breakfast Spread: Pair with crispy bacon, scrambled eggs, and fresh fruit to balance the sweetness.
Dessert Platter: Serve warm with a scoop of vanilla bean ice cream and a drizzle of salted caramel sauce for the ultimate decadence.
Beverage Pairings: A strong cup of black coffee, a cold glass of milk, or a chai latte are perfect companions.
Special Touch: Garnish with a sprinkle of toasted pecans or walnuts for added crunch and flavor.
Common Mistakes
Avoid these pitfalls to ensure perfect results every time.
Using Cold Ingredients: Cold butter and cream cheese won’t blend smoothly. Ensure they are truly softened at room temperature for 30-60 minutes.
Skipping the Heavy Cream Pour: This is the transformative step. Don’t omit it, or you’ll have dry, standard rolls.
Overbaking: Set a timer! Baking beyond 30 minutes can dry out the rolls, especially in a hot oven. Look for visual cues like golden brown color and bubbling sauce.
Frosting While Too Hot: Applying frosting straight from the oven will cause it to melt into a thin, invisible layer. The 5-minute cool-down is essential for that perfect, visible, creamy topping.
Not Sifting Powdered Sugar: Lumps in your frosting are avoidable. Take the extra 60 seconds to sift.
Did you know that chicken wings are the most popular game-day food in America, with over 1.4 billion wings consumed during the Super Bowl alone? What if you could elevate that classic experience with a sauce that masterfully balances heat, sweetness, and umami? These Crispy Sweet Chili Wings are the answer. They feature an impossibly crunchy exterior that gives way to juicy, tender meat, all glazed in a sticky, complex sauce made with Korean gochujang, floral honey, and nutty sesame oil. This recipe is engineered for flavor and texture, making it the ultimate centerpiece for any gathering. Let’s dive into how you can create this crowd-pleasing masterpiece.
Ingredients List
Gathering high-quality ingredients is the first step to wing perfection. Here’s what you’ll need, with sensory notes and smart substitutions.
For the Crispy Wings:
2 lbs chicken wings, split into drumettes and flats, patted completely dry. (The key to crispiness is removing all surface moisture. For a shortcut, ask your butcher for party wings.)
1 cup cornstarch(This is our secret weapon! It creates a lighter, shatteringly crisp crust compared to flour. For a gluten-free option, it’s already perfect.)
2 tsp baking powder (NOT baking soda) (A professional trick—it raises the pH of the skin, helping it dehydrate and crisp up dramatically in the hot oil.)
1 tsp garlic powder(Adds a savory, aromatic base note.)
1 tsp onion powder
1.5 tsp kosher salt
1 tsp freshly ground black pepper
Neutral oil for frying (like peanut, vegetable, or canola) – enough for 2-3 inches in your pot.
For the Sweet Chili Sauce:
1/3 cup gochujang (Korean chili paste)(This fermented paste provides a deep, spicy, slightly sweet umami flavor. Substitution: Mix 3 tbsp sriracha with 1 tbsp soy sauce and 1 tsp sugar, but the flavor profile will be different.)
1/4 cup honey(For that glossy, sticky-sweet glaze. Agave nectar or maple syrup work for a vegan version.)
3 tbsp rice vinegar(Adds necessary acidity to cut through the richness. Apple cider vinegar is a fine substitute.)
3 tbsp soy sauce(Use tamari for a gluten-free option.)
2 tbsp toasted sesame oil(DO NOT skip this! It gives the sauce its signature nutty aroma.)
4 cloves garlic, minced
1 tbsp freshly grated ginger
1-2 tsp gochugaru (Korean chili flakes) or crushed red pepper flakes(Adjust for your desired heat level.)
Toasted white sesame seeds and sliced green onions for garnish.
Timing
Efficiency is key for party cooking. This recipe is streamlined for optimal results without cutting corners.
Prep Time20 minutes
Cook Time25 minutes
Total Time45 minutes
Compared to many baked wing recipes that can take over an hour, this frying method delivers superior texture in under 30 minutes of active cooking. The 20-minute prep includes making the sauce and coating the wings, making the entire process achievable in well under an hour.
Golden-brown, crispy wings coated in a glossy, irresistible sweet chili sauce.
Step-by-Step Instructions
Follow these detailed steps for foolproof, restaurant-quality wings every single time.
Step 1: Prepare the Chicken
Place your thoroughly dried chicken wings in a large bowl. The drier they are, the better the coating will adhere and the less the oil will splatter. In a separate bowl or a large zip-top bag, whisk together the cornstarch, baking powder, garlic powder, onion powder, salt, and pepper. Add the wings to the coating mixture and toss or shake until every wing piece is evenly and completely coated. Let them sit on a wire rack for 5-10 minutes while you heat the oil. This resting period helps the coating set.
Step 2: Make the Crispy Coating
While the wings rest, prepare your frying station. Choose a heavy-bottomed pot or Dutch oven and add enough neutral oil to reach a depth of 2-3 inches. Attach a deep-fry or candy thermometer to the side. Heat the oil over medium-high heat to 375°F (190°C). This high initial temperature is crucial for creating an immediate seal around the wing, locking in juices and preventing oil absorption.
Step 3: Fry to Perfection
Working in batches to avoid overcrowding (which drops the oil temperature), carefully add the coated wings to the hot oil using tongs. Fry for 10-12 minutes, turning occasionally, until they are deeply golden brown, crispy, and the internal temperature reaches 165°F (74°C). Transfer the cooked wings to a wire rack set over a baking sheet—this keeps them crispy on all sides. Let the oil return to 375°F before adding the next batch.
Step 4: Create the Sweet Chili Sauce
While the wings fry, make the sauce. In a medium saucepan, combine the gochujang, honey, rice vinegar, soy sauce, sesame oil, minced garlic, grated ginger, and chili flakes. Whisk well and bring to a gentle simmer over medium heat. Let it bubble for 3-4 minutes, stirring frequently, until the sauce thickens slightly and becomes glossy. It should coat the back of a spoon. Remove from heat. Taste and adjust heat or sweetness if desired.
Step 5: Toss and Serve
Once all wings are fried and still hot, place them in a large, clean bowl. Pour about two-thirds of the warm sweet chili sauce over them. Using tongs or two large spoons, gently toss the wings until they are evenly and generously coated. Add more sauce if you prefer them extra saucy. Transfer the glazed wings to a serving platter. Drizzle with any remaining sauce, then shower with toasted sesame seeds and a generous handful of sliced green onions. Serve immediately while they’re hot and crispy.
Nutritional Information
(Approximate values per serving, based on 4 servings.)
Calories: 580
Total Fat: 32g
Saturated Fat: 8g
Cholesterol: 95mg
Sodium: 1250mg
Total Carbohydrates: 45g
Dietary Fiber: 1g
Sugars: 20g
Protein: 28g
Healthier Alternatives
You can enjoy incredible flavor with some mindful swaps:
Air Fryer Method: For a significantly lower fat content, skip the deep fry. Toss the cornstarch-coated wings with 1 tbsp of oil and air fry at 400°F for 22-25 minutes, shaking halfway. The texture will be slightly different but still very satisfying.
Baking Option: Place coated wings on a wire rack over a baking sheet. Bake at 425°F for 40-50 minutes, flipping halfway, until crispy and cooked through.
Sauce Modifications: Reduce the honey by half and use a sugar-free substitute like monk fruit syrup. Use low-sodium soy sauce to cut down on salt.
Protein Swap: For a lighter option, use this same sauce and coating method on cauliflower florets or firm tofu cubes.
Serving Suggestions
Turn these wings into a complete, balanced feast:
Cooling Dips: Serve with a side of cool, creamy ranch dressing, blue cheese dip, or a quick cucumber-yogurt sauce (tzatziki) to balance the heat.
Fresh Sides: A simple, crunchy Asian-inspired slaw or a cucumber salad with rice vinegar cuts through the richness perfectly.
Starchy Bases: For a heartier meal, serve over a bed of steamed jasmine rice or with a side of crispy french fries or roasted sweet potato wedges.
Beverage Pairings: The sweet-spicy profile pairs wonderfully with a cold, crisp lager, a hoppy IPA, or a non-alcoholic ginger beer.
Common Mistakes
Avoid these pitfalls for the best possible outcome:
Not Drying the Wings: This is the #1 mistake. Wet wings steam instead of fry, leading to a soggy, greasy coating.
Overcrowding the Pot: Adding too many wings at once causes the oil temperature to plummet, resulting in oily, limp wings. Fry in small, manageable batches.
Using the Wrong Oil Temperature: Oil that’s too cool makes wings greasy; oil that’s too hot burns the coating before the inside cooks. Use a thermometer.
Tossing Wings in Sauce Too Early: If you toss the wings while they are piping hot and fresh from the oil, the steam will make the sauce slide right off. Let them rest for just a minute on the rack first.
Confusing Baking Powder with Baking Soda: Baking soda will give the wings an unpleasant, metallic aftertaste. Double-check your container!
Storing Tips
Short-Term (Best Served Fresh): Wings are at their peak within 30 minutes of cooking. If you must store, place unsauced, cooled wings in a single layer in an airtight container in the fridge for up to
Did you know that searches for “Korean chicken bao” have surged by over 150% in the past year, according to Google Trends? This explosion in popularity isn’t surprising—it’s the perfect fusion of soft, pillowy comfort and explosive, crave-worthy flavor. Today, we’re diving deep into the art of creating the ultimate crowd-pleasing party appetizer: soft steamed bao buns filled with crispy fried chicken tossed in a sweet-spicy Korean sauce. This recipe is designed not just to guide you, but to empower you with detailed make-ahead tips that will transform your next gathering. Imagine biting into a warm, cloud-like bun that gives way to a crunchy, juicy piece of chicken coated in a glossy, sticky sauce that balances heat, sweetness, and tang in every bite. Let’s make that a reality.
Ingredients List
Gather these ingredients for a complete flavor and texture experience. I’ve included sensory notes and substitutions to ensure success no matter your pantry situation.
For the Steamed Bao Buns:
All-purpose flour (2 cups): The foundation for a soft, slightly chewy texture. For a lighter, airier bun, you can substitute with cake flour.
Instant yeast (1 tsp): The magic leavener that creates those signature air pockets. Ensure it’s fresh for the best rise.
Sugar (2 tbsp) & Baking powder (1 tsp): Sugar feeds the yeast and adds a hint of sweetness, while baking powder gives a final lift for that perfect dome.
Milk & Water (½ cup each, lukewarm): Creates a tender crumb. For a dairy-free version, use all water or a plant-based milk like oat milk.
Vegetable oil (1 tbsp): Keeps the dough supple and prevents sticking.
For the Korean Chicken & Sauce:
Boneless, skinless chicken thighs (1.5 lbs): Thighs are my go-to for their inherent juiciness and flavor that stands up to frying. For a leaner option, use chicken breast, but be vigilant not to overcook.
Buttermilk (1 cup): The secret to ultra-tender chicken with a subtle tang. No buttermilk? Mix 1 cup milk with 1 tbsp lemon juice or vinegar and let it sit for 5 minutes.
Gochujang (¼ cup): The heart of the sauce—a fermented Korean chili paste with deep, savory, spicy, and slightly sweet notes. This is non-negotiable for authentic flavor.
Gochugaru (1 tbsp): Korean chili flakes that add a vibrant red color and a different layer of heat than the paste. Can sub with crushed red pepper flakes in a pinch.
Honey (3 tbsp) & Soy sauce (2 tbsp): For the signature sweet-salty balance. Use maple syrup for a vegan sweetener.
Rice vinegar (1 tbsp) & Toasted sesame oil (1 tsp): The vinegar cuts through the richness, and the sesame oil adds a nutty, aromatic finish.
Garlic & Ginger (3 cloves & 1-inch knob, minced): Fresh is best here for a pungent, aromatic base.
Cornstarch & All-purpose flour (for coating): The cornstarch is key for an incredibly crispy, almost glass-like crust on the chicken.
For Garnish:
Thinly sliced scallions (green parts)
Toasted sesame seeds
Quick-pickled cucumbers or carrots (optional but highly recommended for crunch and acidity)
Timing
Prep Time 45 minutes (includes dough resting)
Cook Time 25 minutes
Total Time 1 hour 10 minutes
Compared to many bao recipes that require multiple proofing stages over hours, this streamlined version delivers fantastic results in just over an hour. The active cooking time is efficient, and the make-ahead tips below allow you to break the work into manageable stages, making it perfect for entertaining without last-minute stress.
Soft, steamed bao buns cradling crispy Korean fried chicken—a perfect bite of texture and flavor.
Step-by-Step Instructions
Step 1: Prepare the Bao Dough
In a large bowl, whisk together the flour, instant yeast, sugar, and baking powder. Create a well in the center and pour in the lukewarm milk-water mixture and the vegetable oil. Using a wooden spoon or your hands, mix until a shaggy dough forms. Turn it out onto a lightly floured surface and knead for 8-10 minutes. You’re looking for a smooth, elastic dough that springs back slowly when poked. Place the dough in a lightly oiled bowl, cover with a damp cloth or plastic wrap, and let it rest in a warm, draft-free spot for 30 minutes. It won’t double in size like bread dough, but it will become noticeably puffy.
Step 2: Make the Korean Chicken
While the dough rests, cut the chicken thighs into 1-inch bite-sized pieces. Place them in a bowl and cover with the buttermilk, ensuring each piece is coated. Let them marinate for at least 20 minutes (or up to overnight in the fridge). In a separate shallow dish, prepare your dredge by whisking together ¾ cup all-purpose flour and ¼ cup cornstarch with a generous pinch of salt and pepper. When ready to fry, heat about 2 inches of neutral oil (like canola or vegetable) in a heavy-bottomed pot or Dutch oven to 350°F (175°C). Shake excess buttermilk off each chicken piece, dredge thoroughly in the flour mixture, and carefully lower into the hot oil. Fry in batches for 4-5 minutes until golden brown, crispy, and cooked through. Drain on a wire rack set over a baking sheet—this keeps them crispy.
Step 3: Cook the Sauce
In a small saucepan, combine the gochujang, honey, soy sauce, rice vinegar, minced garlic, and minced ginger. Whisk over medium-low heat until smooth and bubbling gently. Let it simmer for 2-3 minutes to allow the flavors to meld and the sauce to thicken slightly. Remove from heat and stir in the toasted sesame oil. The sauce should be glossy and coat the back of a spoon. Pro Tip: For a smoother sauce, you can blend it briefly with an immersion blender after cooking.
Step 4: Steam the Buns
After the dough has rested, punch it down and divide it into 10-12 equal pieces. Roll each piece into a smooth ball, then use a rolling pin to flatten into a 3-4 inch oval. Lightly brush the top of each oval with a touch of oil and fold it in half. Place each bun on a small square of parchment paper. Set up your steamer (bamboo or metal) over boiling water. Steam the buns in batches, ensuring they aren’t touching, for 10-12 minutes. They will puff up beautifully. Keep them covered with a cloth after steaming to stay soft.
Step 5: Assemble and Serve
In a large bowl, toss the crispy fried chicken pieces with the warm Korean sauce until evenly and generously coated. Gently pry open a steamed bao bun. Layer in a few pieces of the saucy chicken, top with sliced scallions, a sprinkle of sesame seeds, and a few slices of quick-pickled cucumber. Serve immediately while the buns are soft and warm and the chicken is still crispy.
Nutritional Information
The following is an approximate nutritional breakdown for one serving (one filled bao bun).
Calories: 320 kcal
Carbohydrates: 38g
Protein: 18g
Fat: 12g
Saturated Fat: 2g
Fiber: 2g
Sugar: 9g
Sodium: 480mg
Healthier Alternatives
You can enjoy this iconic flavor profile with some clever, nutrition-friendly swaps that don’t sacrifice taste:
Air Fryer Chicken: Skip the deep fry. After marinating and dredging, spray the chicken pieces lightly with oil and air fry at 400°F for 12-15 minutes, shaking halfway, until crispy. Toss in the sauce as usual.
Whole-Wheat Bao Buns: Substitute half of the all-purpose flour with whole-wheat flour for added fiber and a nuttier flavor. The texture will be slightly denser but still delicious.
Sauce Sweetener Swap: Replace the honey with a monk fruit sweetener or reduce the amount by half and add a touch of grated apple for natural sweetness and moisture.
Load Up on Veggies: Bulk out your filling with shredded cabbage, julienned bell peppers, or extra pickled vegetables to increase volume, fiber, and nutrients per bite.
Serving Suggestions
While these Korean chicken bao are stars on their own, they shine even brighter as part of a curated spread. Serve them as the main appetizer at a game-day party or a casual dinner. Pair them with a light, refreshing Korean cucumber salad (Oi Muchim) or a simple ginger-scallion noodle salad to balance the richness. For drinks, a crisp lager, a fizzy soju cocktail, or even a sparkling ginger lemonade are perfect companions to cut through the spice and refresh the palate.
Common Mistakes
Overproofing the Dough: Bao dough doesn’t need a long rise. Overproofing leads to a sour taste and a collapsed, dense texture after steaming.
Crowding the Fryer: Adding too much chicken at once drops the oil temperature drastically, resulting in greasy, soggy chicken. Fry in small, consistent batches.
Saucing Too Early: Tossing the crispy chicken in the sauce more than 5 minutes before serving will cause the crust to soften. Always sauce right before assembly.
Using Cold Dough: When dividing and shaping your buns, ensure the dough is at room temperature. Cold dough is harder to shape and won’t steam as evenly.
Storing Tips
The true power of this recipe lies in its make-ahead potential.
Did you know that a high-protein breakfast can boost metabolism by up to 30% for the day? If you’re looking for a delicious, satisfying, and protein-packed way to start your morning, this Cheesy Protein Egg Bake is your ultimate solution. This hearty egg bake is more than just a breakfast casserole; it’s a versatile, make-ahead powerhouse loaded with creamy cottage cheese, vibrant vegetables, and gooey melted cheese. Perfect for busy weekdays, weekend brunches, or feeding a hungry crowd, this recipe delivers incredible flavor and a massive protein punch to keep you full and energized for hours. Let’s dive into how to create this simple yet spectacular dish.
Ingredients List
Gather these simple, wholesome ingredients for a bake that’s bursting with flavor and texture.
Eggs (10 large): The foundational protein source, providing structure and a rich, golden color.
Full-fat cottage cheese (2 cups): The secret weapon for ultra-creamy texture and a massive protein boost. For a tangier twist, substitute with ricotta cheese.
Shredded cheddar cheese (1 ½ cups): Use sharp cheddar for a bold, cheesy flavor that melts beautifully. A Monterey Jack blend works wonderfully for a milder taste.
Bell peppers (1 red, 1 green), diced: Adds a sweet, crisp bite and vibrant color. Feel free to use any color you have on hand.
Onion (1 medium), finely diced: Provides a savory, aromatic base. A yellow or white onion works best.
Baby spinach (2 cups), roughly chopped: Wilts down perfectly, adding iron and a pop of green. Kale or Swiss chard are excellent, hearty substitutes.
Cooked ham or cooked sausage (1 cup), diced (optional): For an extra savory, meaty layer. Omit for a vegetarian version.
Garlic (3 cloves), minced: For that essential aromatic depth.
Olive oil (1 tablespoon): For sautéing the vegetables.
Baking powder (½ teaspoon): A little lift for a fluffier texture.
Kosher salt (1 teaspoon) & black pepper (½ teaspoon): To season every layer.
Paprika or smoked paprika (½ teaspoon): Adds a warm, subtle smokiness.
Timing
Prep Time
15 minutes
Cook Time
45-50 minutes
Total Time
60-65 minutes
Compared to many egg bakes that require pre-cooking multiple components separately, this recipe streamlines the process. The active prep time is a swift 15 minutes—nearly 30% faster than the average casserole recipe—thanks to simple chopping and one quick sauté. The hands-off baking time allows you to multitask, making the total investment just over an hour for a dish that yields 8 generous servings. It’s the epitome of efficient, high-yield cooking.
A golden, bubbly, and protein-packed Cheesy Protein Egg Bake fresh from the oven.
Step-by-Step Instructions
Step 1: Prepare Your Vegetables
Preheat your oven to 375°F (190°C) and lightly grease a 9×13 inch baking dish. In a large skillet, heat the olive oil over medium heat. Add the diced onion and bell peppers. Sauté for 5-7 minutes until they begin to soften and become fragrant. Add the minced garlic and cook for another minute until golden. Finally, toss in the chopped spinach and stir just until it wilts, about 1-2 minutes. Remove the skillet from the heat and let this colorful veggie mix cool slightly. This step is crucial—adding hot vegetables directly to the eggs can start cooking them prematurely.
Step 2: Whisk the Egg Base
In an extra-large mixing bowl, crack all 10 eggs. Add the cottage cheese, baking powder, salt, black pepper, and paprika. Using a whisk or an electric hand mixer on low, beat the mixture vigorously for about 2-3 minutes. You want it to be well-combined and slightly frothy. The cottage cheese will break down a bit, creating a wonderfully creamy, lumpy texture that promises richness in every bite. This is where the magic protein fusion happens!
Step 3: Combine and Bake
To the egg mixture, add 1 cup of the shredded cheddar cheese, the cooled sautéed vegetables, and the diced ham or sausage (if using). Gently fold everything together until evenly distributed. Pour this hearty mixture into your prepared baking dish. Spread it out into an even layer with a spatula. Top with the remaining ½ cup of shredded cheddar cheese, creating that irresistible golden, cheesy crust.
Carefully place the dish in the preheated oven. Bake for 45-50 minutes. You’ll know it’s done when the edges are golden brown, the center is fully set (no jiggle), and a knife inserted into the middle comes out clean. The top will be beautifully puffed and bubbly.
Step 4: Rest, Slice, and Serve
This is the most important step for perfect slices! Remove the bake from the oven and let it rest on a wire rack for at least 10-15 minutes. This allows the proteins to settle, making it much easier to cut clean squares or rectangles. Slice into 8 large portions. Serve warm, garnished with fresh herbs like chives or parsley if desired.
Nutritional Information
(Approximate values per serving, based on 8 servings with ham)
Calories: 320
Protein: 28g
Fat: 21g
Saturated Fat: 9g
Carbohydrates: 6g
Fiber: 1g
Sugar: 3g
Sodium: 780mg
This macro profile makes it an excellent choice for those following high-protein, low-carb, or keto-friendly diets.
Healthier Alternatives
Lower-Fat Cheese: Swap full-fat cheddar for a reduced-fat variety or use part-skim mozzarella. For the cottage cheese, low-fat or fat-free versions work perfectly.
Boost the Veggies: Add more volume and nutrients by incorporating diced mushrooms, zucchini, or broccoli florets. This increases fiber and vitamins without significantly raising calories.
Leaner Protein: Instead of ham or sausage, use diced, cooked chicken breast or turkey. For a plant-based protein punch, add a can of rinsed and drained black beans or crumbled firm tofu.
Reduce Sodium: Use low-sodium cottage cheese, skip the added salt, and choose a no-salt-added diced tomato option if you add them.
Serving Suggestions
This egg bake is a complete meal on its own, but it pairs beautifully with other elements to create a feast.
For Breakfast/Brunch: Serve with a side of fresh fruit salad, avocado slices, or whole-grain toast.
For Lunch/Dinner: Pair with a simple green salad dressed with a light vinaigrette or a cup of tomato soup.
Condiments: A dollop of salsa, hot sauce, sour cream, or Greek yogurt adds a fantastic finishing touch.
Common Mistakes
Skipping the Veggie Cool-Down: Adding hot vegetables to the egg mixture can cause it to curdle or start cooking unevenly. Always let them cool first.
Overmixing After Adding Veggies: Fold gently. Vigorous stirring can deflate the egg mixture and lead to a denser bake.
Not Letting it Rest: Cutting immediately will cause it to fall apart. Patience is key for picture-perfect slices.
Using a Wet Cottage Cheese: If your cottage cheese is very watery, drain it slightly in a fine-mesh strainer for a few minutes to prevent a soggy bottom.
Storing Tips
Refrigeration: Let the bake cool completely, then cover the baking dish tightly with plastic wrap or transfer portions to an airtight container. It will stay fresh in the fridge for up to 4 days.
Freezing: This is a fantastic freezer meal. Slice the cooled bake into individual portions. Wrap each slice tightly in plastic wrap and then place them in a freezer-safe bag or container. Freeze for up to 3 months. Thaw overnight in the fridge.
Reheating: For best results, reheat single slices in the microwave for 60-90 seconds. For a larger portion or to restore crispness, reheat in a 350°F (175°C) oven for 10-15 minutes, covered with foil.
Conclusion
This Cheesy Protein Egg Bake is the ultimate trifecta: delicious, nutritious, and incredibly convenient. It solves the “what’s for breakfast?” dilemma for the whole week and impresses guests with minimal effort. The combination of eggs and cottage cheese delivers a serious protein hit that supports muscle health and sustained energy, while the colorful vegetables and melted cheese ensure every bite is a delight. Give this recipe a try this weekend—your future self will thank you on busy weekday mornings!
Did you make this Cheesy Protein Egg Bake? We’d love to see your creation! Tag @exorecipes on social media or leave a comment below with your favorite add-ins or substitutions. Your feedback helps our community of food lovers discover their next favorite meal!
FAQs
Can I make this egg bake the night before?
Absolutely! Assemble the entire dish (through Step 3) the night before. Cover it tightly with plastic wrap and refrigerate. In the morning, let it sit on the counter while the oven preheats, then bake as directed. You may need to add 5-10 minutes to the baking time since it’s starting from cold.
I don’t like cottage cheese. Can I really not taste it?
When baked, cottage cheese melts into the eggs, creating an incredibly creamy, rich texture without a distinct “cottage cheese” flavor. The dominant tastes
Did you know that a study published in the Journal of Nutrition found that individuals who consume at least one plant-based meal per day have a 25% higher intake of fiber and key micronutrients? If you’re looking for a delicious way to boost your plant-powered nutrition, these Veggie Chickpea Power Bowls are your answer. This isn’t just another salad; it’s a symphony of textures and flavors designed to fuel your body and delight your taste buds. Imagine tender, caramelized roasted vegetables mingling with irresistibly crispy, spiced chickpeas, all brought together by a lusciously creamy maple-dijon tahini dressing. It’s a complete, nourishing meal that proves healthy eating doesn’t have to be boring or bland. Perfect for meal prep, a quick weeknight dinner, or impressing guests, these bowls are a testament to how simple ingredients can create something truly extraordinary. Let’s dive in and build your ultimate power bowl.
Ingredients List
Gather these fresh, vibrant ingredients. I’ve included substitutions to make this recipe work for you, no matter your pantry.
For the Roasted Veggies & Chickpeas:
1 can (15 oz) chickpeas: Drained, rinsed, and thoroughly patted dry. This is crucial for crispiness! They offer a satisfying, nutty bite and plant-based protein.
1 large sweet potato: Peeled and diced into ½-inch cubes. They become wonderfully soft and sweet inside with caramelized edges. Substitute: Butternut squash or regular potatoes.
1 red bell pepper: Chopped into bite-sized pieces for a pop of color and sweet, smoky flavor.
1 head of broccoli: Cut into florets. Roasting transforms it, bringing out a deep, almost nutty flavor.
1 red onion: Sliced into wedges. It caramelizes beautifully, adding a touch of sweetness.
3 tablespoons olive oil: For roasting. Use a good quality extra virgin for the best flavor.
1 teaspoon smoked paprika: Adds a warm, smoky depth.
1/4 cup tahini: The creamy, sesame seed paste base. Ensure it’s well-stirred. Substitute: For a nut-free version, use sunflower seed butter.
2 tablespoons fresh lemon juice: Brightens the entire dressing. Fresh is non-negotiable here.
1 tablespoon pure maple syrup: Balances the tang with a hint of natural sweetness. Substitute: Agave nectar or honey.
1 tablespoon Dijon mustard: Adds a sharp, tangy complexity that cuts through the richness.
1 small garlic clove, minced: For a fresh, pungent kick.
3-4 tablespoons warm water: To thin the dressing to a creamy, pourable consistency.
Salt to taste.
For Serving:
Cooked quinoa or brown rice (about 2 cups cooked): The hearty, fiber-rich base. Substitute: Farro, couscous, or mixed greens for a lower-carb option.
Fresh parsley or cilantro, chopped: For a final burst of freshness.
Optional toppings: Avocado slices, pumpkin seeds, a sprinkle of red pepper flakes.
Timing
Prep Time20 minutes
Cook Time30 minutes
Total Time50 minutes
At just under an hour from start to finish, this recipe is significantly faster than many elaborate grain bowl recipes that can take over 75 minutes. The secret? Everything roasts on a single sheet pan (or two), and the dressing comes together in a minute in a jar. The active prep time is a manageable 20 minutes, making this an ideal choice for a busy weeknight where you want a wholesome meal without spending all evening in the kitchen.
Vibrant, nourishing Veggie Chickpea Power Bowls ready to fuel your day.
Step-by-Step Instructions
Step 1: Prepare the Vegetables and Chickpeas
Preheat your oven to 425°F (220°C). This high heat is key for achieving caramelization and crispiness. On a large rimmed baking sheet (use two if crowded), toss the diced sweet potato, bell pepper, broccoli florets, and red onion wedges with 2 tablespoons of the olive oil, half the smoked paprika, garlic powder, cumin, salt, and pepper. In a separate bowl, toss the thoroughly dried chickpeas with the remaining 1 tablespoon of olive oil and the rest of the spices. This ensures the chickpeas get extra crispy and flavorful. I like to keep them on a separate section of the pan or on their own small tray so they don’t steam among the veggies.
Step 2: Roast to Perfection
Spread everything in a single layer, ensuring the vegetables aren’t piled on top of each other. Crowding leads to steaming, not roasting. Place the pan in the preheated oven. Roast for 25-30 minutes, but here’s my pro tip: give the pan a good shake or stir at the 15-minute mark. Check the chickpeas—if they feel crispy to your liking, you can remove them a few minutes early to prevent burning. The vegetables are done when the sweet potatoes are fork-tender and the broccoli tips are slightly charred. That char equals flavor!
Step 3: Whip Up the Maple-Dijon Tahini Dressing
While the roasting magic happens, make the dressing. In a medium bowl or jar, combine the tahini, fresh lemon juice, maple syrup, Dijon mustard, and minced garlic. Whisk vigorously. It will look thick and possibly seize up at first—don’t panic! This is normal. Start adding the warm water, one tablespoon at a time, whisking after each addition until you reach a smooth, creamy, pourable consistency. Season with a pinch of salt. Taste and adjust: want more tang? Add lemon. More sweetness? A drizzle more maple syrup. Set aside.
Step 4: Assemble Your Power Bowls
This is the fun part! Divide your cooked quinoa or brown rice among four bowls. Pile on the glorious roasted vegetables and crispy chickpeas. Drizzle generously with the creamy maple-dijon tahini dressing. Finish with a shower of fresh chopped herbs and any other toppings you love, like creamy avocado slices or crunchy pumpkin seeds. Serve immediately while the chickpeas are still crisp and the veggies are warm.
Nutritional Information
(Per serving, based on 4 servings with quinoa)
Calories: ~480
Protein: 15g
Carbohydrates: 68g
Dietary Fiber: 14g (Over 50% of the daily recommended intake!)
Sugars: 16g (Primarily natural from sweet potato and maple syrup)
Fat: 18g
Saturated Fat: 2.5g
This bowl is a powerhouse of complex carbs for energy, plant-based protein for muscle repair, and healthy fats for satiety and nutrient absorption.
Healthier Alternatives
Lower-Calorie Base: Swap the grain base for a massive bed of leafy greens like spinach, kale, or massaged romaine. This significantly reduces carbs and calories while upping the vitamin content.
Oil-Free Roasting: For an oil-free version, use vegetable broth or aquafaba (the liquid from the chickpea can) to toss the veggies and chickpeas before roasting. They won’t get *as* crispy but will still be delicious.
Reduced-Sugar Dressing: Omit the maple syrup and add a pinch more Dijon mustard and a splash of apple cider vinegar for tang. A single pitted date blended with the tahini can also provide natural sweetness without refined sugar.
Boost the Protein: Add a scoop of cooked lentils or edamame to the bowl, or crumble over some baked tofu or tempeh.
Serving Suggestions
Meal Prep Champion: Keep components separate in airtight containers. Store dressing in a small jar. Assemble just before eating to maintain textures.
Dinner Party Star: Set up a “Power Bowl Bar” with all the components, extra toppings (like sliced radishes, pickled red onions, different seeds), and let guests build their own.
Next-Day Lunch: These bowls taste fantastic cold, making them the ultimate packed lunch. The flavors meld even more overnight.
With a Side: Serve with a warm bowl of soup, like a creamy tomato or lentil soup, for an extra-cozy meal.
Common Mistakes
Not Drying the Chickpeas: This is the #1 reason for soggy chickpeas. Take the time to pat them bone-dry with a clean kitchen towel or paper towels.
Crowding the Pan: Overcrowding creates steam, leading to soggy, steamed vegetables instead of caramelized, roasted ones. Use two pans if necessary.
Using Old/Bitter Tahini: Tahini can go rancid. Taste it before using. Good tahini should smell and taste nutty and pleasant, not bitter.
Adding Dressing Too Early: If meal prepping, add the dressing right before eating to keep your grain base from getting soggy and your veggies crisp.
Underseasoning: Don’t be shy with the spices and salt! They are essential for bringing out the natural flavors of the vegetables.