Best Pumpkin Oatmeal Cream Pies Recipe

best-pumpkin-oatmeal-cream-pies

Introduction

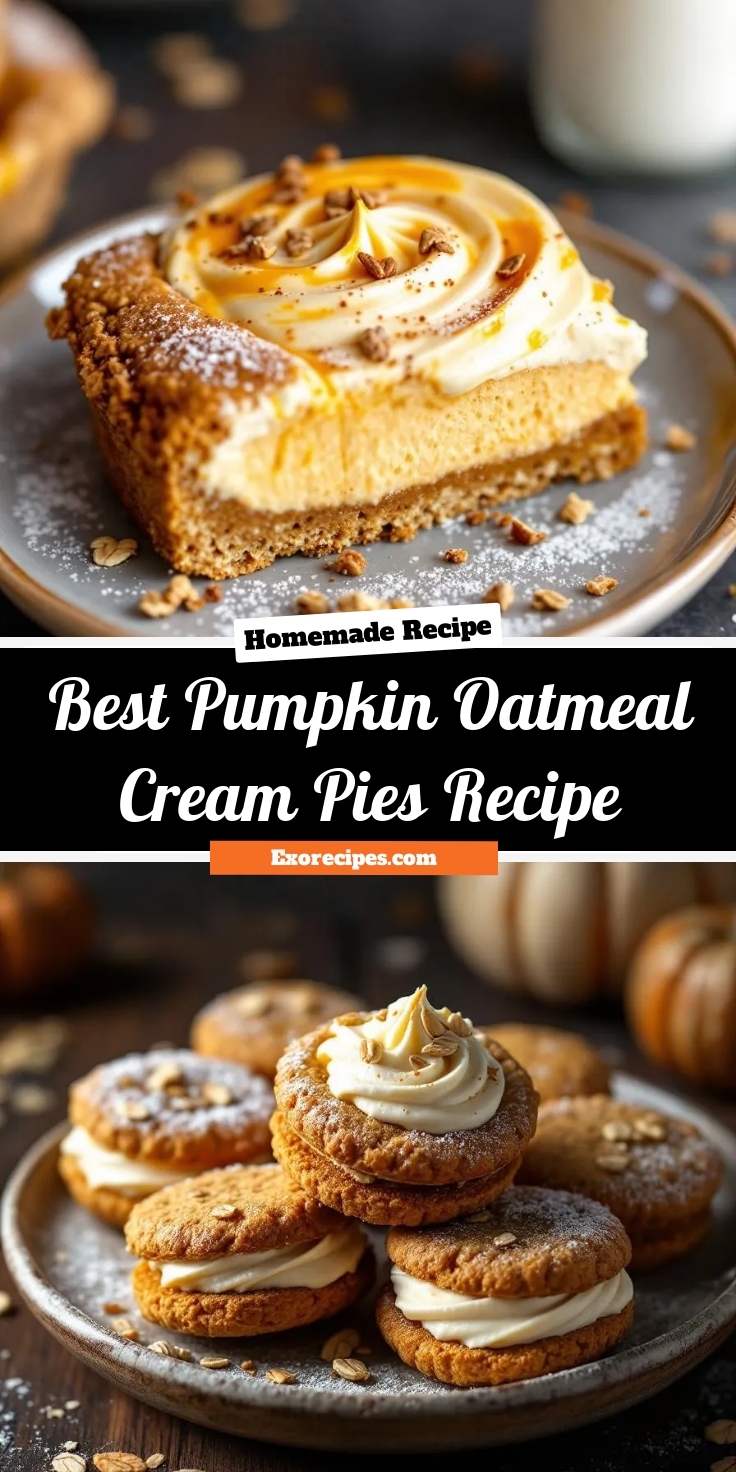
Do you ever crave a taste that instantly wraps you in a warm, nostalgic hug? Furthermore, do those cravings hit hardest when the air turns crisp and the leaves begin to change? If so, you have found your ultimate autumn baking project. These soft, spiced pumpkin oatmeal cream pies deliver that exact feeling in every single bite. They are the cozy, homemade answer to that familiar store-bought treat, but with a soul-satisfying flavor that far surpasses the original.

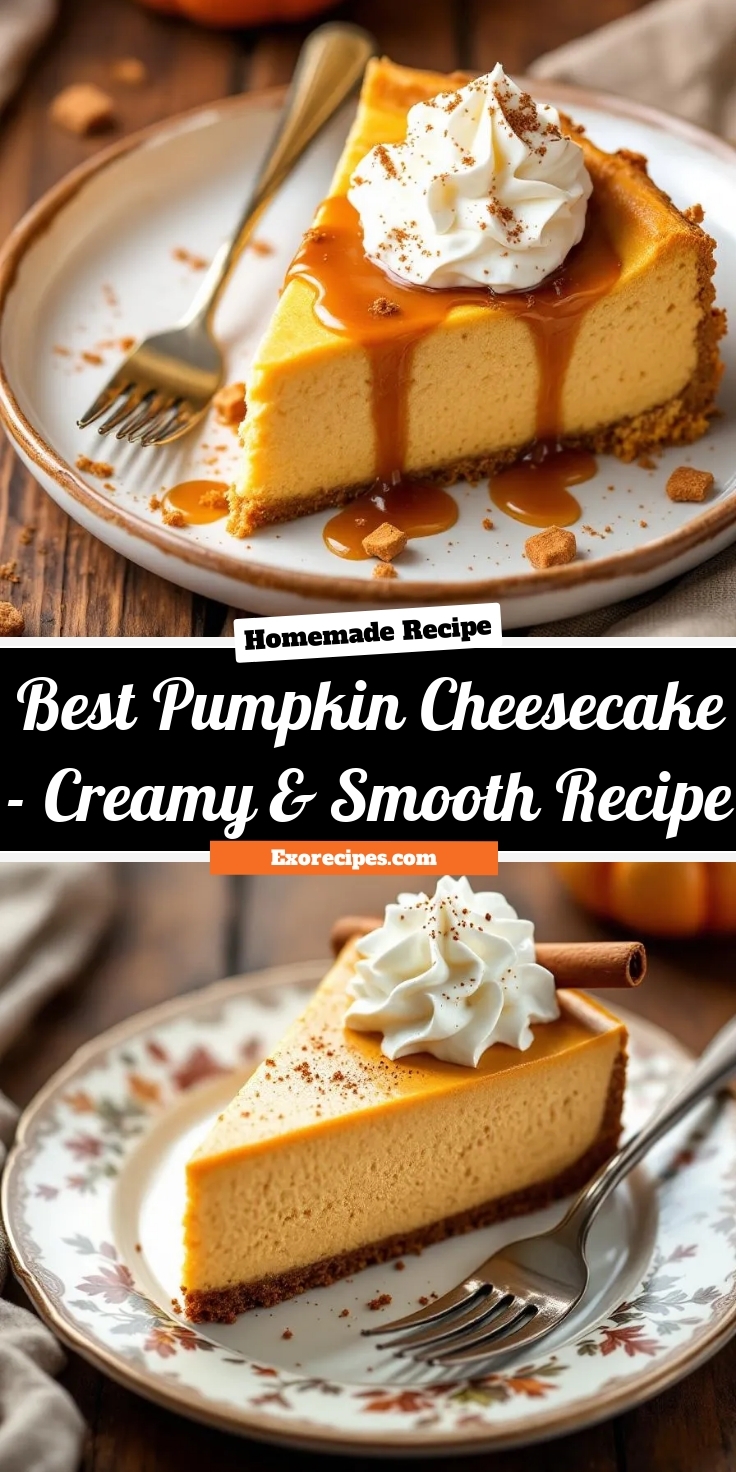
Pumpkin oatmeal cream pies are a delightful fall twist on the classic lunchbox favorite. Essentially, they consist of two incredibly soft, cake-like pumpkin oatmeal cookies sandwiching a generous layer of sweet, creamy frosting. This recipe matters because it transforms simple, wholesome ingredients into a spectacular dessert that feels both indulgent and somewhat wholesome. The warm spices, rich pumpkin flavor, and chewy oatmeal texture create a symphony of autumn flavors. Moreover, this treat perfectly fits our blog’s mission to create from-scratch versions of beloved foods that everyone can master at home. For instance, if you enjoy making classic treats, you might also love our recipe for homemade oatmeal cream pies, which serves as the wonderful inspiration for this seasonal variation. Ultimately, baking a batch of pumpkin oatmeal cream pies fills your kitchen with an incredible aroma and provides the deeply satisfying experience of sharing something made with love.

Why I Love This Recipe

This recipe holds a special place in my heart because it truly marks the start of my favorite baking season. Firstly, the scent of cinnamon and pumpkin puree mixing together instantly signals that fall has officially arrived in my home. Additionally, I love how these pumpkin oatmeal cream pies consistently bring my family together, with everyone eagerly gathering in the kitchen to steal a warm cookie or volunteer to lick the frosting spoon. The process is wonderfully straightforward, yet the final result always feels impressively special and never fails to spark joy.

Health and Nutrition

Why it’s good for your body

Pumpkin oatmeal cream pies offer a surprisingly wholesome twist on a classic treat. First, pumpkin puree packs a powerful nutritional punch. It provides a fantastic source of vitamin A, which actively supports healthy vision and a strong immune system. Furthermore, pumpkin delivers a good amount of vitamin C and potassium, essential nutrients for overall wellness.

Next, the oatmeal component adds a hearty dose of soluble fiber. Consequently, this fiber helps you feel full and satisfied longer, which can prevent overeating. Moreover, oats actively contribute to maintaining healthy cholesterol levels, supporting heart health. The warm spices, like cinnamon and nutmeg, not only create that iconic flavor but also bring their own anti-inflammatory properties to these pumpkin oatmeal cream pies.

Additionally, when you compare them to many conventional desserts, these cream pies often contain less refined sugar. Instead, they often derive natural sweetness from the pumpkin itself and perhaps a touch of maple syrup or coconut sugar. Ultimately, enjoying a pumpkin oatmeal cream pie means you are treating yourself to a dessert that actively nourishes your body with beneficial vitamins, minerals, and fiber.

How it fits in a healthy lifestyle

These pumpkin oatmeal cream pies can absolutely fit into a balanced eating plan. Think of them as a satisfying treat that contributes valuable nutrients, not just empty calories. You can easily enjoy one as a hearty afternoon snack with a cup of tea or as a mindful dessert after a nutritious meal.

For those with specific dietary needs, you can easily adapt the recipe. Use gluten-free oats to make it celiac-friendly, or swap the filling for a dairy-free cream cheese alternative to create a vegan version. The fiber from the oats and pumpkin supports digestive health and helps maintain steady energy levels, preventing the sharp sugar crash you get from more processed options.

Remember, a healthy lifestyle is all about balance and enjoyment. Including treats you love, especially ones made with whole food ingredients, makes sticking to your goals sustainable and enjoyable. For more inspiration on creating wholesome desserts, explore our guide on simple healthy baking swaps that can upgrade any recipe.

Print
clock clock iconcutlery cutlery iconflag flag iconfolder folder iconinstagram instagram iconpinterest pinterest iconfacebook facebook iconprint print iconsquares squares iconheart heart iconheart solid heart solid icon

Pumpkin Oatmeal Cream Pies

  • Author: Chef Mia

Description

Soft pumpkin oatmeal cookies sandwiching a sweet cream cheese filling, perfect for fall.
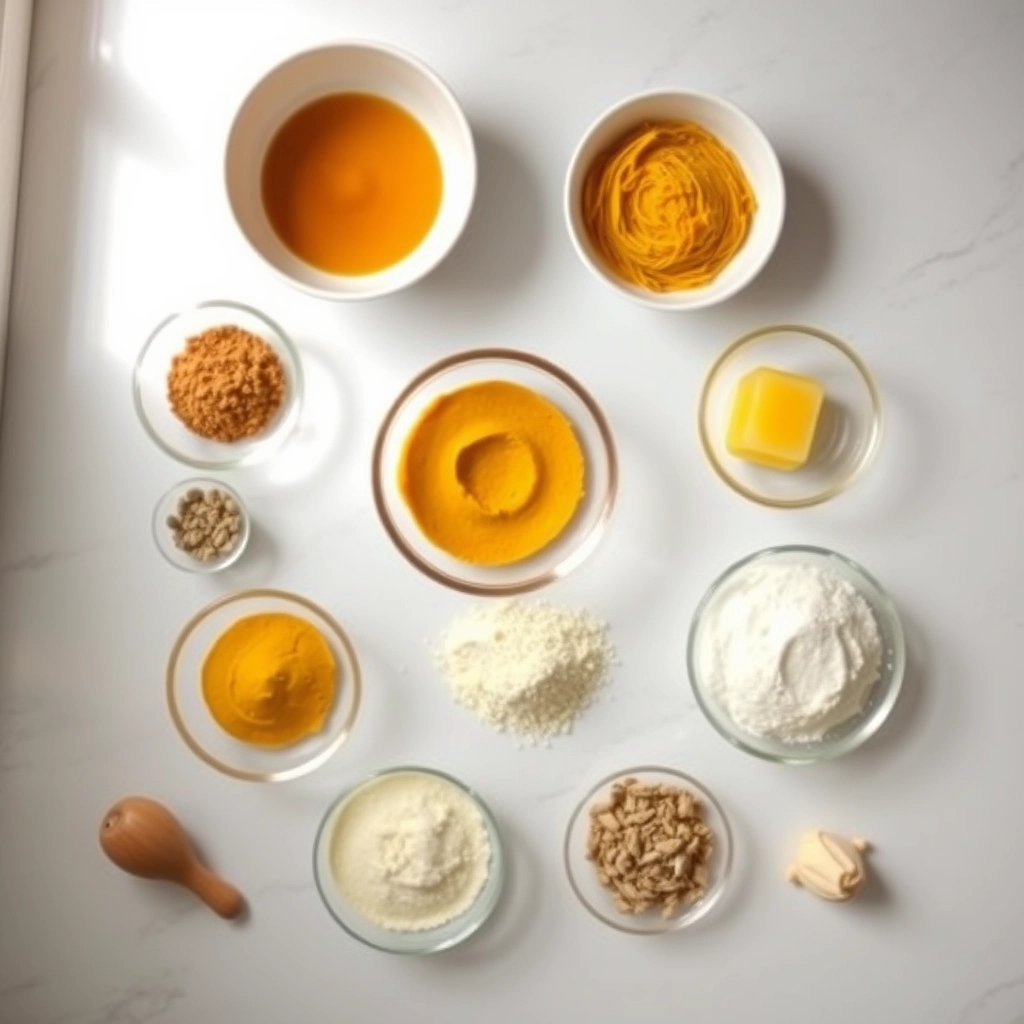

Ingredients

Scale

For the Crust:

  • 1 cup canned pumpkin puree
  • 1 cup old-fashioned oats
  • 1 cup all-purpose flour
  • 1/2 cup brown sugar
  • 1/4 cup granulated sugar
  • 1/2 cup unsalted butter, softened
  • 1 large egg
  • 1 tsp vanilla extract
  • 1 tsp pumpkin pie spice
  • 1/2 tsp baking soda
  • 1/4 tsp salt
  • 4 oz cream cheese, softened
  • 2 tbsp unsalted butter, softened
  • 1 cup powdered sugar
  • 1/2 tsp vanilla extract

Instructions

1. Prepare the Crust:

  1. Preheat oven to 350°F (175°C). Line baking sheets with parchment paper.
  2. In a bowl, cream together butter, brown sugar, and granulated sugar. Beat in egg, pumpkin, and vanilla.
  3. Whisk together flour, oats, pumpkin pie spice, baking soda, and salt. Gradually mix into wet ingredients.
  4. Drop tablespoon-sized dough onto baking sheets. Bake for 10-12 minutes. Cool completely.
  5. For filling, beat cream cheese and butter until smooth. Add powdered sugar and vanilla; mix until creamy.
  6. Spread filling on flat side of one cookie; top with another cookie to form a sandwich.

Notes

You can customize the seasonings to taste.

How to Prepare This Dish

Steps and time-saving tips

First, preheat your oven and line your baking sheets with parchment paper. Meanwhile, whisk together your dry ingredients like oats, flour, and warming spices in one bowl. In a larger separate bowl, cream your butter and sugars until the mixture becomes light and fluffy. Next, beat in the pumpkin puree, egg, and vanilla until everything is just combined. Gradually add your dry ingredients to this wet mixture, and then fold them together until no flour streaks remain. Scoop the dough onto your prepared sheets, but remember to leave room for spreading. Bake until the edges turn a beautiful golden brown. For a major time-saving tip, use a cookie scoop to ensure each cookie is perfectly uniform, which also helps them bake evenly. Let the cookies cool completely on the pan before you even think about filling them. This patience prevents a melty, messy situation and is absolutely crucial for the best texture.

Now, for the creamy filling, simply beat the butter until it is smooth. Gradually mix in the powdered sugar and a pinch of salt. Finally, add a splash of milk or cream to achieve your perfect, spreadable consistency. Once your cookies are completely cool, generously spread the filling onto the flat side of one cookie and then gently press a second cookie on top to create your sandwich. For the ultimate experience, I highly recommend chilling the assembled pumpkin oatmeal cream pies for about thirty minutes. This step allows the flavors to meld together wonderfully and makes them much easier to handle. Consequently, you will achieve a treat with a soft, cake-like cookie and a luxuriously smooth, sweet center.

and-learned-from">Mistakes I’ve made and learned from

I have definitely learned a few lessons the hard way with these pumpkin oatmeal cream pies. My biggest mistake was using canned pumpkin pie mix instead of pure pumpkin puree. The added sugar and spices in the pie mix completely threw off the balance of my recipe, resulting in cookies that spread way too much and were far too sweet. Another common error I made was not letting the cookies cool entirely before assembling them. The residual heat would melt the creamy filling, creating a slippery, unstable mess that was impossible to eat neatly. I also learned that properly measuring your flour is non-negotiable for the right chewy texture; scooping it directly from the bag packs in too much and leads to a dry, cakey cookie. For flawless results every time, I now rely on my trusty guide on how to measure flour correctly. And if you love the warm spices in these, my pumpkin spice bread recipe uses a similar blend that you can easily customize for these cookies.

Cultural Connection and Variations

Where this recipe comes from

My family always associates the warm scent of pumpkin and spice with crisp autumn afternoons. Consequently, our recipe for pumpkin oatmeal cream pies feels like a direct line to those cherished memories. We originally adapted it from a beloved oatmeal cookie recipe, eagerly adding pumpkin puree and a generous dash of warming spices. This twist created a wonderfully soft, cake-like cookie that simply begged for a creamy filling. Ultimately, these handheld treats became our signature contribution to every fall potluck and Halloween party.

Naturally, variations o

f this concept appear across different kitchens. In some regions, bakers might use molasses for a deeper, gingerbread-like flavor in their pumpkin oatmeal cream pies. Alternatively, others may fold in pecans or walnuts for a satisfying crunch. Meanwhile, the cream cheese filling remains a non-negotiable for us, providing a tangy contrast that perfectly balances the sweet, spiced cookies. No matter the small changes, however, the heart of this dessert always celebrates the cozy essence of the season.

How it fits in today’s cooking

Today, these pies perfectly bridge nostalgic tradition and modern convenience. They effortlessly fit into our current cooking routines, especially for those seeking easy fall desserts that deliver on both flavor and comfort. Furthermore, contemporary bakers enthusiastically adapt the recipe to suit various dietary needs. For instance, many successfully use gluten-free oat flour or a flax egg to make everyone feel included at the table.

Their portability also makes them ideal for today’s on-the-go lifestyle. You can pack them in a lunchbox for a sweet surprise or serve them as a standout treat at a casual gathering. Moreover, their seasonal charm makes them a fantastic addition to any holiday spread. Ultimately, whether you are a seasoned baker or just starting out, mastering a great pumpkin cookie base is a rewarding skill. This recipe, therefore, continues to hold a special and relevant place in our kitchens and our hearts.

>Taste and Texture

What makes it delicious

These pumpkin oatmeal cream pies deliver a perfect symphony of cozy flavors and comforting textures. First, you experience the soft, chewy oatmeal cookie, fragrant with warm cinnamon and nutmeg. Then, the rich, velvety cream cheese filling melts on your tongue, creating a luxurious contrast. Ultimately, the distinct, earthy sweetness of pumpkin puree weaves through every bite, making these treats irresistibly moist and tender. Every element in these pumpkin oatmeal cream pies works together for a truly autumnal experience.

Boosting the flavor

Fortunately, you can easily elevate your dessert with a few creative twists. For instance, try a sprinkle of flaky sea salt on the cream cheese filling to heighten the sweet and savory notes. Alternatively, a dash of extra ginger or a pinch of cardamom will amplify the warm spice profile beautifully. Furthermore, consider serving them slightly warm alongside a scoop of vanilla bean ice cream for a decadent treat. If you love the flavor of cream cheese frosting, explore our guide on perfect cream cheese frosting for more inspiration. For another fantastic fall baking project that uses similar spices, our pumpkin cinnamon rolls are a must-try.

Tips for Success

Best practices for results

Always chill your cookie dough for at least thirty minutes because this crucial step prevents your pumpkin oatmeal cream pies from spreading too thin in the oven. Furthermore, use a cookie scoop to guarantee uniform size and even baking for every single cookie. For the best texture, allow your cookies to cool completely on the baking sheet before you fill them; this patience ensures they hold their shape. Moreover, beat your cream cheese filling on high until it becomes perfectly light and fluffy for an incredible texture contrast.

Mistakes to avoid

Avoid overmixing your cookie dough after you add the oats, as this common error can lead to a tough final texture instead of the desired chewy consistency. Additionally, do not use warm cream cheese for your filling, since it will become too soft and make your pumpkin oatmeal cream pies difficult to assemble neatly; for a stable frosting, always start with room temperature ingredients as outlined in our guide to perfect buttercream. Finally, ensure you do not overbake the cookies, otherwise they might turn out dry and brittle instead of soft and cakey; for more on this, learn about the signs of common baking mistakes to avoid.

Serving and Pairing Suggestions

How to serve this dish

Present your pumpkin oatmeal cream pies on a rustic wooden board for a cozy, homemade feel. Furthermore, dust them lightly with a sprinkle of cinnamon or nutmeg to make the spices pop visually. These handheld treats absolutely shine at autumn gatherings, from holiday cookie exchanges to festive brunch spreads. For a truly special touch, stack them into a miniature tower on a cake stand. Ultimately, their inviting aroma and soft texture promise to make any occasion feel instantly more celebratory.

h-it">What goes well with it

A hot mug of spiced chai tea wonderfully complements the warm spices in pumpkin oatmeal cream pies. Alternatively, a glass of cold milk remains a classic pairing that perfectly balances the sweet cream filling. For a larger dessert spread, consider serving them alongside a slice of our creamy classic New York cheesecake. Moreover, a scoop of our simple homemade vanilla ice cream transforms this treat into a decadent, warm-and-cold dessert experience.

What is the best way to store pumpkin oatmeal cream pies?

Store your pumpkin oatmeal cream pies in an airtight container at room temperature for up to 3 days. For longer storage, you can keep them in the refrigerator for about a week, but let them come to room temperature before serving for the best texture and flavor.

ank-math-faq-item"> Can I make pumpkin oatmeal cream pies ahead of time?

Absolutely! You can bake the oatmeal cookies a day or two in advance and store them separately in an airtight container. Assemble the pumpkin oatmeal cream pies with the filling the day you plan to serve them to prevent the cookies from becoming too soft.

Can I freeze pumpkin oatmeal cream pies?

Yes, these treats freeze very well. Place the assembled pumpkin oatmeal cream pies in a single layer on a baking sheet to flash freeze, then transfer them to a freezer-safe bag or container. They will keep for up to 3 months; thaw at room temperature when ready to enjoy.

How do you keep oatmeal cookies soft for cream pies?

The key is to not overbake the cookies. Take them out of the oven when they are just set but still look a little soft in the center, as they will continue to firm up as they cool. Using a cream cheese or butter-based filling also helps lock in moisture, keeping the entire pumpkin oatmeal cream pie deliciously soft.

div>

Perfect Homemade Stuffing Recipe – Classic & Easy

perfect-homemade-stuffing-recipe

Introduction

Is there any dish that whispers “home” more than a classic stuffing? The warm, savory aroma that fills your kitchen promises comfort and creates lasting memories around the table. Furthermore, achieving that ideal balance of fluffy and crisp texture can feel elusive. This guide removes all guesswork, however, and delivers the ultimate side dish for your holiday feast or any cozy Sunday supper. Ultimately, you deserve to make this incredible Perfect Homemade Stuffing that will have everyone asking for your secret.

So, what exactly defines Perfect Homemade Stuffing? Fundamentally, it is a savory bread pudding that transforms simple, humble ingredients into the undeniable star of the meal. Unlike the dry, crumbly stuff from a box, the perfect version boasts a custardy-soft interior with a beautifully crisp, golden-brown top. This dish matters because it is the heart of tradition; it is the taste of celebration and togetherness. Moreover, it is incredibly versatile. You can easily customize your Perfect Homemade Stuffing with different herbs, breads, or add-ins like sausage or dried fruits to make it uniquely yours. This recipe fits our blog’s mission perfectly because we believe every cook deserves reliable, foolproof recipes that build confidence and create joy. For instance, mastering a classic like this is a culinary milestone. Additionally, once you perfect the base recipe, you can explore other comforting dishes, perhaps even using leftover bread for a fantastic Savory Bread Pudding another night. The skills you learn here, like properly drying bread and building flavor with aromatics, apply to countless other recipes. In fact, the same attention to detail that makes this stuffing spectacular will also elevate your Classic Roast Turkey.

Why I Love This Recipe

This recipe holds a special place in my heart because it connects me directly to my grandmother. I can still vividly remember standing on a stool in her kitchen, carefully tearing loaves of stale bread into pieces while she sautéed the celery and onions. The smell was absolutely intoxicating. She taught me that the secret was not in fancy ingredients, but in patience and using your hands to gently combine everything so the bread stayed light. Now, every time I make this Perfect Homemade Stuffing, I feel that same sense of warmth and anticipation. It is more than just a side dish; it is my edible heritage, and I am so thrilled to share that feeling with you.

Health and Nutrition

Why it’s good for your body

This Perfect Homemade Stuffing delivers more than just incredible flavor. Furthermore, it packs a powerful nutritional punch with its whole-food ingredients. For instance, the celery and onions provide essential vitamins and antioxidants that support your immune system. Meanwhile, the whole-grain bread offers a fantastic source of dietary fiber.

Consequently, this fiber actively promotes healthy digestion and helps you feel fuller for longer. Additionally, you control the sodium and fat content completely, unlike with store-bought versions. Therefore, you can create a heart-friendly dish that aligns with your wellness goals. Ultimately, this Perfect Homemade Stuffing nourishes your body with every wholesome bite.

Moreover, herbs like sage and thyme do more than add aroma. In fact, they bring their own set of anti-inflammatory properties to your holiday table. Finally, crafting this dish from scratch ensures you avoid unnecessary preservatives and additives. So, you can confidently enjoy this Perfect Homemade Stuffing knowing it fuels your body with real, recognizable ingredients.

How it fits in a healthy lifestyle

This stuffing fits beautifully into a balanced diet, especially when you consider portion size and pair it with lean proteins and vegetables. You can easily adapt the recipe to meet specific dietary needs, making it a versatile side dish for almost any gathering. For a gluten-free version, simply swap the bread for your favorite gluten-free loaf. If you are focusing on heart health, you can use a low-sodium broth and a heart-healthy oil.

Enjoying this homemade stuffing is a practical way to incorporate more whole grains and vegetables into your meals. It complements a gluten-free lifestyle perfectly and can be a part of your strategic plan for healthy eating. Remember, balance is key. A sensible serving of this stuffing alongside a green salad and some roasted turkey creates a complete, satisfying meal. For more inspiration on building nourishing plates, explore our guide on creating balanced meals that support your energy levels all week long.

Print
clock clock iconcutlery cutlery iconflag flag iconfolder folder iconinstagram instagram iconpinterest pinterest iconfacebook facebook iconprint print iconsquares squares iconheart heart iconheart solid heart solid icon

Perfect Homemade Stuffing

  • Author: Chef Mia

Description

A classic, savory stuffing made with toasted bread cubes, aromatic vegetables, and herbs. Perfect for holiday meals or any cozy dinner.


Ingredients

Scale

For the Crust:

  • 1 loaf day-old bread, cubed
  • 1/2 cup unsalted butter
  • 1 large onion, diced
  • 3 celery stalks, diced
  • 2 cloves garlic, minced
  • 2 tsp dried sage
  • 1 tsp dried thyme
  • 1 tsp dried rosemary
  • 1/2 tsp black pepper
  • 1 tsp salt
  • 2 cups chicken or vegetable broth
  • 2 large eggs, beaten

Instructions

1. Prepare the Crust:

  1. Preheat oven to 350°F (175°C). Spread bread cubes on a baking sheet and toast for 10-15 minutes until lightly golden.
  2. Melt butter in a large skillet over medium heat. Add onion and celery, sauté until softened, about 5-7 minutes. Add garlic and cook for 1 more minute.
  3. In a large bowl, combine toasted bread cubes, sautéed vegetables, sage, thyme, rosemary, pepper, and salt. Pour in broth and beaten eggs, mix gently until evenly moistened.
  4. Transfer mixture to a greased baking dish. Cover with foil and bake for 25 minutes. Remove foil and bake for another 10-15 minutes until top is crispy and golden.

Notes

You can customize the seasonings to taste.

How to Prepare This Dish

Steps and time-saving tips

First, preheat your oven to 350°F and generously grease your baking dish. Next, spread your cubed bread on a large sheet pan and toast it for about 15 minutes until it feels dry and slightly crisp; this crucial step prevents a soggy final product. Meanwhile, melt a generous amount of butter in a large skillet over medium heat. Then, sauté your diced onions and celery until they become beautifully soft and translucent, which should take roughly 8-10 minutes. After that, stir in your favorite poultry seasoning and fresh herbs, toasting them for just a minute until the aroma fills your kitchen. Now, transfer the toasted bread cubes into a very large mixing bowl and pour the savory vegetable and herb mixture over the top. Drizzle the broth and beaten eggs evenly across everything. Gently toss the entire mixture until every single piece of bread gets coated and the ingredients combine thoroughly; however, avoid overmixing to keep the texture light. Finally, transfer your Perfect Homemade Stuffing into the prepared dish, cover it with foil, and bake for 40 minutes. For a fantastic crispy top, remove the foil and bake for another 15-20 minutes. Let it rest for 10 minutes before serving for the best texture.

Mistakes I’ve made and learned from

I have absolutely learned the hard way that using soft, fresh bread is the fastest route to a mushy, disappointing stuffing. My early attempts lacked that essential firm texture, so now I always toast my cubes thoroughly. Another common error I made was skimping on the broth, which resulted in a dry and crumbly dish that nobody enjoyed. Furthermore, I used to just dump all the liquid in at once, but now I add it gradually and let the bread absorb it for a few minutes before baking; this ensures every bite is perfectly moist. Getting the seasoning right was another hurdle for me, as I often under-seasoned this large-volume dish. I’ve since learned to taste the mixture before it goes into the oven, and I lean on my herb garden guide for the freshest flavors. For anyone new to this, remember that the type of bread you choose makes a huge difference. In fact, choosing the right base is as important as it is for any great meal, much like selecting the perfect thanksgiving turkey brine to complement your main course. Trust me, these small adjustments will transform your Perfect Homemade Stuffing from good to absolutely legendary.

rc="https://exorecipes.com/wp-content/uploads/2025/09/perfect-homemade-stuffing-recipe-recipe.webp" />

Cultural Connection and Variations

Where this recipe comes from

Every family seems to guard their own sacred version of this dish, a recipe often passed down through generations with a whisper and a secret ingredient. My own grandmother, for instance, always insisted on a specific type of sourdough bread and a generous handful of fresh sage from her garden. Meanwhile, across the ocean, the British might call it “forcemeat” and pack it into a bird, while in Germany, you might find “füllung” with apples and chestnuts adding a sweet, earthy twist. Southern cooks often jazz it up with cornbread and spicy andouille sausage, creating a entirely different but equally beloved experience. Ultimately, the beauty of Perfect Homemade Stuffing lies in its incredible adaptability. It acts as a culinary canvas, reflecting local ingredients and family history in every single bite.

Furthermore, its very existence is deeply woven into the fabric of celebration, particularly Thanksgiving. The aroma of onions and celery sautéing in butter signals the official start of the holiday season for countless households. This dish does more than just fill a plate; it fills the room with a sense of warmth and shared history. Whether your version includes oysters from the Northeast, spicy chorizo from the Southwest, or is simply your mom’s classic herb blend, it tells a story. Preparing the ultimate Perfect Homemade Stuffing connects us to our past and to each other around the table.

ays-cooking">How it fits in today’s cooking

Thankfully, this classic side dish has effortlessly transitioned into modern cooking routines. Busy home cooks now find brilliant ways to adapt it, perhaps by using a slow cooker to free up oven space or by preparing components ahead of time for a stress-free assembly. Its role has also expanded far beyond the holiday turkey. Nowadays, people enjoy it as a standalone comfort food meal, a hearty side for a weeknight rotisserie chicken, or even as a savory filling for other dishes.

Moreover, contemporary diets have inspired countless creative variations that honor the spirit of the original. You can easily find gluten-free, vegan, and protein-packed versions that ensure everyone gets to enjoy this timeless comfort food. Its versatility truly knows no bounds. For a complete modern comfort food experience, try pairing your stuffing with a side of incredibly creamy garlic mashed potatoes. Consequently, this humble dish continues to earn its place on our tables, proving that some traditions only get better with time.

Taste and Texture

What makes it delicious

This Perfect Homemade Stuffing delivers a symphony of comforting textures. You first notice the crisp, golden top layer that gives way to a wonderfully soft and chewy interior. Savory, herbaceous notes from fresh sage and thyme mingle with the sweet, aromatic base of sautéed onions and celery. Every bite feels incredibly moist and rich, thanks to the broth and butter that soak into the bread. Ultimately, the dish fills your kitchen with a warm, inviting fragrance that promises a truly delicious experience.

r">Boosting the flavor

For an even more memorable side, consider a few simple upgrades. First, stir in a cup of spicy breakfast sausage or sweet apples for a fantastic sweet and savory twist. Next, a sprinkle of crispy fried onions or toasted pecans on top just before serving introduces a delightful crunch. Furthermore, a drizzle of rich gravy right at the end truly brings all the elements together. If you love experimenting with herbs, our guide on fresh vs dried herbs can help you maximize flavor. Finally, serving this Perfect Homemade Stuffing alongside a tangy side, like our easy cranberry sauce, creates a perfect balance on your plate.

Tips for Success

Best practices for results

Always dry your bread cubes thoroughly beforehand, as this step creates the ideal texture for your Perfect Homemade Stuffing. Furthermore, generously season your broth mixture and taste it before combining it with the bread. Additionally, gently fold the wet and dry ingredients together until just moistened to prevent a mushy final product. Finally, let your assembled Perfect Homemade Stuffing rest for ten minutes before baking so the bread fully absorbs the liquid.

>Mistakes to avoid

A common error involves using bread that is too soft, which unfortunately results in a soggy stuffing. Instead, always use stale or oven-dried cubes for the best texture. Moreover, many home cooks over-pack the stuffing into the baking dish, which then steams rather than bakes. For a perfectly crispy top, loosely spoon the mixture in. Also, remember that seasoning is key; underseasoned broth is the main reason for a bland final dish. Consequently, always taste your mixture before baking, much like you would when preparing our Best Mashed Potatoes. If you are considering adding other ingredients, ensure they are properly prepared first, similar to the techniques for our Sauteed Green Beans.

Serving and Pairing Suggestions

How to serve this dish

Present your Perfect Homemade Stuffing in a beautiful rustic casserole dish for a truly inviting tablescape. Alternatively, you can scoop individual portions into ramekins for a charming, personalized touch at holiday gatherings. For a festive garnish, simply sprinkle some freshly chopped parsley or thyme on top just before serving. This dish truly shines as the centerpiece of a Thanksgiving feast, but it also makes a wonderful comfort food side for a cozy Sunday supper.

Consider serving it straight from the oven while it’s still steaming for the ultimate comforting aroma and texture. Ultimately, this versatile Perfect Homemade Stuffing complements any table setting from casual to elegant.

h-it">What goes well with it

For a classic pairing, serve this Perfect Homemade Stuffing alongside a juicy roasted turkey and our incredibly smooth Creamy Garlic Mashed Potatoes. The rich, savory notes of the stuffing beautifully complement the creamy potatoes and succulent meat. Furthermore, a bright, acidic side cuts through the richness wonderfully; try a crisp Apple Walnut Salad for a refreshing crunch that balances every bite.

To complete the meal, a glass of chilled Chardonnay or a sparkling apple cider both offer a fantastic flavor contrast that highlights the herbaceous qualities of your Perfect Homemade Stuffing.

math-faq-block">
What is the secret to moist stuffing?

The key to moist stuffing is using enough liquid. Ensure your bread cubes are fully saturated with a rich broth (chicken or turkey work best) and melted butter before baking. Covering the dish with foil for most of the cooking time traps steam, which is essential for achieving that perfectly moist texture in your Perfect Homemade Stuffing.

Should you put eggs in stuffing?

Eggs are a common binder that helps hold the stuffing together and prevent it from becoming too crumbly. Beaten eggs are typically mixed in with the broth to help the ingredients set into a cohesive dish. For a classic, firm texture in your Perfect Homemade Stuffing, one or two eggs is a standard addition.

Is it better to make stuffing the day before?

Yes, preparing stuffing the day before is a great time-saving strategy. You can sauté the vegetables and dry out the bread cubes ahead of time. Simply combine all the dry ingredients and store them in an airtight container, then mix with the wet ingredients and bake the next day for a flavorful Perfect Homemade Stuffing.

ank-math-faq-item"> What kind of bread is best for homemade stuffing?

A sturdy, neutral bread with a tight crumb is ideal, as it soaks up the broth without turning to mush. Day-old French bread, sourdough, or a classic white sandwich bread are all excellent choices. Avoid very soft or pre-sliced bread, as it can become too pasty and won’t provide the right texture for your stuffing.

Easy Apple Pie Egg Rolls Recipe

easy-apple-pie-egg-rolls

Introduction

Do you ever crave the warm, comforting hug of a classic apple pie but feel completely overwhelmed by the idea of making a crust? I know that feeling all too well. Thankfully, we have a magical solution that delivers all that cozy flavor without any of the stress. These Apple Pie Egg Rolls are about to become your new favorite dessert hack, offering a fun and incredibly delicious twist on two beloved classics.

So what exactly are Apple Pie Egg Rolls? Essentially, they are the soul-warming filling of a traditional apple pie, expertly spiced with cinnamon and nutmeg, all wrapped up in a crispy, golden egg roll wrapper. This brilliant fusion matters because it takes a seemingly complex dessert and makes it shockingly accessible. Moreover, this recipe perfectly fits our blog’s mission to share creative, crowd-pleasing recipes that bring joy to your kitchen without requiring professional skills. You can achieve a spectacular result with simple ingredients and a few straightforward steps. For another fantastic way to enjoy classic flavors with a twist, you must try our incredible Easy Apple Turnovers. This approach to cooking, which prioritizes flavor and fun over difficulty, is exactly what we champion. Consequently, you get a impressive dessert that feels special but is actually simple enough for a weeknight treat. Furthermore, the portable nature of these egg rolls makes them ideal for parties, potlucks, or simply eating over the sink while they are still gloriously warm. Ultimately, they bridge the gap between nostalgic homemade taste and modern convenience. If you enjoy this kind of innovative dessert, our collection of No-Bake Desserts is full of similar brilliant ideas.

Why I Love This Recipe

This recipe holds a special place in my heart because it reminds me of chaotic, happy family gatherings. My aunt first introduced them at a Thanksgiving potluck years ago, and they disappeared from the plate in minutes. I love that I can now recreate that same feeling of joy and surprise for my own friends and family. They are my secret weapon for making any occasion feel a little more festive and a whole lot more delicious.

Health and Nutrition

Why it’s good for your body

Apple Pie Egg Rolls deliver a surprisingly nutritious twist on a classic dessert. For instance, the apples inside provide a powerful dose of soluble fiber, which actively supports healthy digestion and helps you feel full. Furthermore, this fiber works to regulate blood sugar levels, preventing those sharp energy spikes and crashes. Apples also bring essential vitamins like vitamin C to the table, bolstering your immune system.

Moreover, baking these egg rolls instead of deep-frying them significantly cuts down on unnecessary fats and calories. Consequently, you can savor a warm, satisfying treat without the guilt. The cinnamon spice not only adds that iconic flavor but also offers its own anti-inflammatory properties. Ultimately, Apple Pie Egg Rolls give your body beneficial nutrients while still tasting like a decadent indulgence.

How it fits in a healthy lifestyle

You can absolutely enjoy Apple Pie Egg Rolls as part of a balanced diet. Think of them as a smarter dessert option that satisfies your sweet tooth without derailing your goals. We specifically designed this recipe for baking, making it a heart-friendlier choice that aligns with mindful eating habits.

Pair one of these warm egg rolls with a scoop of Greek yogurt for a boost of protein that makes a complete snack. You can also easily adapt the recipe to fit various needs; for example, use gluten-free wrappers to make it celiac-friendly. Remember, healthy living is all about balance and finding joy in your food. For more inspiration on making better choices, explore our guide on healthy ingredient swaps. If you are looking for other delicious ways to enjoy fruit, our berry breakfast bowl is another fantastic option.

Print
clock clock iconcutlery cutlery iconflag flag iconfolder folder iconinstagram instagram iconpinterest pinterest iconfacebook facebook iconprint print iconsquares squares iconheart heart iconheart solid heart solid icon

Apple Pie Egg Rolls

  • Author: Chef Mia

Description

A fun fusion dessert that combines the flavors of classic apple pie with the crispy texture of egg rolls.


Ingredients

Scale

For the Crust:

  • 4 large apples, peeled and diced
  • 1/4 cup brown sugar
  • 1 tsp ground cinnamon
  • 1/4 tsp nutmeg
  • 1 tbsp lemon juice
  • 1 tbsp cornstarch
  • 8 egg roll wrappers
  • 2 tbsp melted butter
  • 1/4 cup granulated sugar for coating
  • Oil for frying

Instructions

1. Prepare the Crust:

  1. Combine apples, brown sugar, cinnamon, nutmeg, lemon juice, and cornstarch in a bowl. Mix well and let sit for 10 minutes.
  2. Place an egg roll wrapper diagonally. Spoon 2-3 tbsp of apple mixture in the center. Fold bottom corner over filling, then fold sides toward center. Roll tightly and seal edge with water.
  3. Heat oil to 350°F (175°C). Fry egg rolls for 2-3 minutes per side until golden brown. Drain on paper towels.
  4. Brush with melted butter and roll in granulated sugar while still warm. Serve with vanilla ice cream if desired.

Notes

You can customize the seasonings to taste.

How to Prepare This Dish

Steps and time-saving tips

First, grab a large mixing bowl and combine your finely diced apples with sugar, cinnamon, and a pinch of nutmeg. Toss everything together until the apples are evenly coated; this ensures every bite is perfectly spiced. Meanwhile, lay out your egg roll wrappers on a clean surface, and keep a small bowl of water nearby. Next, place a generous spoonful of the apple mixture onto the center of each wrapper. Then, fold the bottom corner over the filling, fold in the sides, and roll it up tightly. Use a dab of water to seal the final corner securely; this prevents any filling from escaping during frying. For a time-saving tip, use a pre-made apple pie filling to skip the chopping and mixing step entirely. However, if you prefer baking, you can achieve a golden, flaky crust by brushing the rolls with melted butter and baking them at 400°F for about 15 minutes. Finally, let them cool for a few minutes before serving. Ultimately, the result is a delicious, handheld treat that everyone will love.

Mistakes I’ve made and learned from

I learned the hard way that overfilling these rolls is a recipe for disaster. My first batch burst open in the oil because I was too generous with the apple mixture, creating a huge mess and uneven cooking. Now, I use just two tablespoons of filling per wrapper, which is the perfect amount for a secure seal. Another common issue I faced was soggy egg rolls, which happened when I didn’t properly drain the cooked apples. If your filling is too wet, it will steam inside the wrapper instead of letting it get crispy. I found that cooking the apple mixture first to evaporate excess liquid makes a world of difference. For more tips on getting that perfect, crispy texture every time, check out my guide on achieving the perfect fry. Also, if you’re new to working with wrappers, my post on working with phyllo dough has great tips that apply to egg roll wrappers too, helping you avoid tearing and ensure a perfect golden finish.

rc="https://exorecipes.com/wp-content/uploads/2025/09/easy-apple-pie-egg-rolls-recipe.webp" />

Cultural Connection and Variations

Where this recipe comes from

Every culture, frankly, has a brilliant way of wrapping delicious things in dough. We can trace the concept of the Apple Pie Egg Rolls directly to this beautiful culinary crossroads. Of course, the heart is all-American apple pie, a symbol of comfort and home. Meanwhile, the form borrows from the egg roll, a staple of Chinese-American cuisine. This fusion creates something uniquely delightful and modern.

My own family puts its spin on the classic. For instance, my grandmother always insisted on adding a pinch of cardamom to the filling. Conversely, a friend’s family uses phyllo dough for a flakier, lighter version. Across different regions, you might find a cheddar cheese slice tucked inside for a savory twist. Alternatively, some cooks in the South might drizzle them with a bourbon caramel sauce. Ultimately, every variation celebrates the same idea: familiar flavors in a fun, new package.

This recipe truly invit

es personalization. Therefore, feel free to make it your own. You can create the ultimate Apple Pie Egg Rolls by choosing your favorite apple variety or adding nuts for crunch.

How it fits in today’s cooking

This treat fits perfectly into our modern approach to cooking. Firstly, it delivers that deep, nostalgic comfort we all crave, especially during the holidays. Moreover, its handheld format makes it ideal for parties and gatherings. Consequently, you often see it appearing on game day spreads and at autumn festivals.

Today’s cooks also love its versatility. For example, you can easily prepare a large batch for a crowd or just a few for a cozy night in. Furthermore, many are adapting the recipe for air fryers, making it a lighter option. This method creates a wonderfully crispy exterior without deep frying. If you enjoy this, you might also love exploring other creative dessert ideas, like our churro cupcakes.

Ultimately, the Apple P

ie Egg Rolls remains a relevant and beloved treat. It cleverly bridges tradition and innovation. Similarly, if you’re looking for another classic dessert with a twist, our guide on making the perfect pie crust can elevate your next baking project.

Taste and Texture

What makes it delicious

These Apple Pie Egg Rolls deliver a spectacular crunch with every single bite. Consequently, the delicate, crispy wrapper shatters to reveal a warmly spiced, tender apple filling. You immediately notice the fragrant cinnamon and nutmeg, which perfectly complement the sweet, slightly tart apples. Moreover, the filling becomes wonderfully gooey, creating a delightful contrast against the flaky, golden shell. Ultimately, the experience of eating these Apple Pie Egg Rolls is like enjoying a handheld piece of classic pie, but with an irresistible, fun texture that keeps you reaching for more.

Boosting the flavor

You can easily amplify these delicious treats with a few creative twists. For instance, a scoop of vanilla bean ice cream melting over the warm Apple Pie Egg Rolls creates a heavenly hot-and-cold contrast. Alternatively, a simple drizzle of our homemade caramel sauce adds a rich, buttery depth that enhances the spiced apples. Furthermore, consider adding a pinch of cardamom to the filling for a unique, aromatic twist. Finally, serving them with a side of cinnamon whipped cream introduces a light, creamy element that makes the entire dessert feel even more special.

rc="https://exorecipes.com/wp-content/uploads/2025/09/easy-apple-pie-egg-rolls.webp" />

Tips for Success

Best practices for results

Always ensure your apple pie filling is completely cool before you begin assembling the egg rolls; otherwise, the heat will make the wrappers soggy and difficult to seal. Furthermore, keep your unused egg roll wrappers under a damp paper towel to prevent them from drying out and cracking while you work. For a golden, non-greasy finish, maintain your oil temperature at a steady 350°F and avoid overcrowding the pot. Finally, let your Apple Pie Egg Rolls rest on a wire rack after frying so the excess oil can drip away and the crispy exterior stays perfect.

Mistakes to avoid

A common error is overfilling the wrappers, which often causes them to burst open during cooking; consequently, use just two tablespoons of filling per wrapper for the best results. Additionally, do not neglect to seal the edges properly with a flour paste or egg wash, as this crucial step keeps the filling securely inside. If you find your filling is too runny, you can thicken it with a bit of cornstarch, much like the method we use for our Classic Cherry Pie. Moreover, never skip the step of dusting your finished Apple Pie Egg Rolls with powdered sugar while they are still warm, as it creates a delicious glaze. For more guidance on achieving the perfect dessert texture, explore our tips on Baking with Apples.

g-suggestions">Serving and Pairing Suggestions

How to serve this dish

Present your Apple Pie Egg Rolls with style for a memorable dessert. For instance, arrange them standing up in a tall glass for a fun and elegant touch. Alternatively, dust them with a generous shower of powdered sugar and a sprinkle of cinnamon just before serving. This simple garnish makes them look absolutely irresistible. Furthermore, serve them warm on a beautiful platter for any holiday gathering or potluck. They will undoubtedly become the star of the show. Ultimately, their handheld shape makes them perfect for parties where guests can easily mingle and enjoy.

What goes well with it

A scoop of vanilla ice cream is the classic partner for these warm Apple Pie Egg Rolls. Its cool creaminess creates a wonderful contrast with the hot, spiced filling. For a truly decadent experience, however, you must try a drizzle of our rich and creamy salted caramel sauce. Moreover, a hot cup of coffee or a chilled glass of milk perfectly cuts through the sweetness. Finally, consider serving these egg rolls after a lighter meal like our popular creamy tomato soup for a satisfying lunch or dinner finale.

math-faq-block">
What are apple pie egg rolls made of?

Apple pie egg rolls are made with a simple filling of diced apples, sugar, cinnamon, and a touch of lemon juice, all wrapped in egg roll or spring roll wrappers. The key is to use a flour-based wrapper that crisps up beautifully when fried or baked. These delicious Apple Pie Egg Rolls offer a fun and portable twist on the classic dessert.

Can you bake apple pie egg rolls instead of frying?

Absolutely! For a lighter option, you can bake apple pie egg rolls instead of frying them. Simply brush the assembled rolls with melted butter or an egg wash and bake at 400°F (200°C) for 15-20 minutes, or until they are golden brown and crispy. Baking yields a slightly different texture but is a fantastic and less messy way to prepare this treat.

What dipping sauce goes with apple pie egg rolls?

The classic pairing for apple pie egg rolls is a creamy caramel sauce, which mirrors the flavors of a traditional caramel apple. Vanilla ice cream, whipped cream, or a simple dusting of powdered sugar also make excellent toppings. The warm, spiced filling of the Apple Pie Egg Rolls contrasts perfectly with a cool, sweet dip.

ank-math-faq-item"> How do you keep egg rolls from getting soggy?

To prevent soggy apple pie egg rolls, ensure your apple filling is not too watery by cooking it beforehand to evaporate excess moisture. Also, avoid overfilling the wrappers and make sure your oil is at the correct temperature (around 350-375°F) if frying, as this seals the wrapper instantly. Let them drain on a wire rack after cooking instead of a paper towel-lined plate.

Easy Baked Apple Cider Donuts Recipe

easy-baked-apple-cider-donuts

Introduction

Is there anything that truly captures the cozy, comforting essence of fall more perfectly than a warm, spiced donut? The crisp air, the colorful leaves, and the unmistakable aroma of cinnamon and apples baking simply define the season. Furthermore, that nostalgic feeling is exactly what we crave, and today, we are bringing that magic straight to your kitchen. Consequently, we are skipping the messy fryer for a simpler, healthier method. Ultimately, these easy Baked Apple Cider Donuts will fill your home with an incredible fragrance and deliver all the flavor you love without any of the fuss.

So, what exactly are Baked Apple Cider Donuts? Essentially, they are a tender, cake-style donut that we prepare entirely in the oven. Instead of frying, we bake the batter in a special pan, which results in a treat that feels indulgent but is considerably lighter. The star ingredient, reduced apple cider, packs a powerful punch of autumnal apple flavor into every single bite. Moreover, we coat these warm delights in a simple cinnamon-sugar mixture that creates a delightful crunch with each mouthful. This recipe matters because it transforms a classic fairground favorite into an achievable, everyday snack that you can feel good about sharing with your family. It perfectly fits our blog’s mission to deliver incredibly delicious, approachable recipes that actually work. For instance, if you adore apple flavors, you must try our ultimate Apple Crisp, which offers another fantastic way to enjoy the season’s best fruit. This recipe for Baked Apple Cider Donuts follows that same ethos of simple, satisfying comfort food. Additionally, it uses common pantry staples and a straightforward process, making it an ideal project for a relaxing weekend morning. The entire experience, from reducing the cider to enjoying the final product, is a rewarding ritual that celebrates the best of fall baking.

Why I Love This Recipe

This recipe for Baked Apple Cider Donuts holds a special place in my heart because it reminds me of annual family trips to the orchard. We would always bring home a gallon of fresh cider, and my grandmother would use some of it to make her version of these donuts. Her kitchen would smell like heaven, and we kids would hover by the oven, waiting impatiently for the first batch. My version honors her tradition but simplifies the process significantly, making it accessible for any home baker. I love that I can now recreate those cherished memories and that warm, spiced flavor for my own children on a random Tuesday, proving that you do not need a special occasion to enjoy a little piece of autumnal joy. For another simple baking project, our Easy Pumpkin Bread is a fantastic companion to these donuts during the fall season.

Health and Nutrition

Why it’s good for your body

These baked apple cider donuts offer a more nutritious twist on a classic treat. First, the baking process itself significantly reduces the fat content compared to traditional frying. Consequently, you enjoy a deliciously moist pastry without the heavy grease. Moreover, apple cider, the star ingredient, provides a natural sweetness and a powerful dose of antioxidants. These compounds actively fight oxidative stress in your body.

Additionally, apples contribute beneficial soluble fiber, which supports healthy digestion and helps maintain stable blood sugar levels. Furthermore, warm spices like cinnamon and nutmeg do more than just add flavor; they also possess anti-inflammatory properties. Enjoying a baked apple cider donut means you are treating yourself to real fruit and spices. Ultimately, this recipe transforms a simple indulgence into a snack that actively contributes to your well-being with every wholesome bite.

How it fits in a healthy lifestyle

These baked apple cider donuts perfectly align with a balanced approach to eating. You can mindfully enjoy them as a satisfying afternoon treat or a fun weekend breakfast without derailing your health goals. Because we bake them instead of fry, they naturally fit into a heart-smart diet. For anyone exploring gluten-free options, you can easily substitute your favorite 1:1 gluten-free flour blend to make this recipe work for you.

Pairing a donut with a source of protein, like a handful of almonds or a glass of milk, can make it an even more sustaining snack. Remember, the key is balance and enjoying the foods you love. If you are looking for more ways to incorporate wholesome ingredients into your baking, explore our guide to healthy baking substitutions. For another fantastic baked treat that uses fruit for natural sweetness, try our popular whole wheat banana bread.

Print
clock clock iconcutlery cutlery iconflag flag iconfolder folder iconinstagram instagram iconpinterest pinterest iconfacebook facebook iconprint print iconsquares squares iconheart heart iconheart solid heart solid icon

Baked Apple Cider Donuts

  • Author: Chef Mia

Description

Warm, spiced donuts baked to perfection with reduced apple cider for a cozy fall treat.


Ingredients

Scale

For the Crust:

  • 2 cups all-purpose flour
  • 1 1/2 teaspoons baking powder
  • 1 1/2 teaspoons cinnamon
  • 1/2 teaspoon nutmeg
  • 1/4 teaspoon salt
  • 1/2 cup apple cider, reduced to 1/4 cup
  • 1/2 cup milk
  • 2 tablespoons unsalted butter, melted
  • 1/2 cup granulated sugar
  • 1/4 cup brown sugar
  • 1 large egg
  • 1 teaspoon vanilla extract

Instructions

1. Prepare the Crust:

  1. Preheat oven to 350°F (175°C). Grease a donut pan.
  2. Whisk together flour, baking powder, cinnamon, nutmeg, and salt in a bowl.
  3. In another bowl, mix reduced apple cider, milk, melted butter, sugars, egg, and vanilla.
  4. Combine wet and dry ingredients, stirring until just mixed. Spoon batter into donut pan.
  5. Bake for 10-12 minutes until a toothpick comes out clean. Cool slightly before glazing.

Notes

You can customize the seasonings to taste.

How to Prepare This Dish

Steps and time-saving tips

First, preheat your oven and generously grease your donut pan. This simple step ensures your Baked Apple Cider Donuts release perfectly every single time. Meanwhile, reduce your apple cider in a small saucepan. Let it simmer until it becomes a slightly syrupy, concentrated version of itself; this intensifies the flavor dramatically. In a large bowl, whisk together the flour, baking powder, spices, and salt. In a separate bowl, vigorously whisk the eggs, both sugars, and melted butter until the mixture looks pale and smooth. Now, gently fold the reduced cider and the wet ingredients into the dry ones. Remember, do not overmix! A few lumps in the batter are perfectly fine and will yield a tender crumb. Carefully spoon the batter into the prepared pan, filling each cavity about two-thirds full. For a truly time-saving tip, use a piping bag or a sturdy zip-top bag with a corner snipped off; this method is far cleaner and much faster than using spoons. Bake the donuts until they spring back lightly when touched. Finally, let them cool slightly before dipping them in that irresistible cinnamon-sugar coating.

Mistakes I’ve made and learned from

I have absolutely overmixed this batter in a rush, and it taught me a tough lesson. The result was a batch of tough, dense Baked Apple Cider Donuts that nobody wanted to eat. Now, I mix by hand and stop the second the flour disappears. Another classic error of mine was skipping the cider reduction step. Using straight cider creates a wet batter that bakes up gummy instead of cakey and light. Reducing it is non-negotiable for authentic flavor and texture, a lesson I learned from perfecting my apple cake recipe. Finally, I used to dunk my piping hot donuts in melted butter and sugar, which created a sad, soggy mess. Letting them cool for just five minutes on a wire rack makes all the difference, allowing for a crisp, sugary shell that sticks beautifully, much like the technique I use for my cinnamon sugar muffins. Learn from my errors for perfect donuts on your first try!

rc="https://exorecipes.com/wp-content/uploads/2025/09/easy-baked-apple-cider-donuts-recipe.webp" />

Cultural Connection and Variations

Where this recipe comes from

Every autumn, orchards across New England transform into bustling hubs, and the scent of these spiced cakes absolutely defines the season. Farmers often fry their donuts fresh for customers, but many home bakers prefer a simpler, less messy method. Consequently, the baked version we love today was born. My family, for instance, always makes a pilgrimage to our local farm stand. We pick apples, sip cold cider, and then rush home to recreate that iconic flavor in our own oven.

Different regions put their own spin on this classic treat. In Pennsylvania Dutch country, for example, bakers might add a hearty sprinkle of crushed peanuts for extra crunch. Meanwhile, some Midwestern versions often incorporate a tangy buttermilk glaze, balancing the sweetness beautifully. No matter the variation, the goal remains the same: to capture the cozy, spiced essence of fall in every single bite. Ultimately, a batch of warm Baked Apple Cider Donuts feels like a hug on a crisp day.

ays-cooking">How it fits in today’s cooking

This recipe absolutely thrives in modern kitchens because it merges nostalgia with our current desire for simpler, homestyle baking. Furthermore, it has become a non-negotiable part of many family Halloween and Thanksgiving breakfast traditions. Today’s cooks brilliantly adapt the recipe to fit various dietary needs, easily creating gluten-free or vegan Baked Apple Cider Donuts without losing any of that classic charm.

Moreover, these donuts perfectly complement a contemporary brunch spread. They pair wonderfully with a cup of hot coffee or a glass of cold milk, making them a hit with both kids and adults. For another fantastic baked treat that captures a different seasonal flavor, you must try these Pumpkin Chocolate Chip Muffins. Ultimately, this recipe’s enduring appeal lies in its powerful ability to evoke cherished memories while simultaneously fitting seamlessly into our current routines. If you are looking for more inspiration to use your fresh-picked apples, this incredible Apple Cinnamon Bread is an absolute must-make.

Taste and Texture

What makes it delicious

These Baked Apple Cider Donuts deliver a wonderfully warm and cozy experience. First, you smell the fragrant blend of cinnamon and nutmeg, which perfectly complements the sweet, tangy aroma of reduced apple cider. Consequently, each bite feels incredibly soft and tender, almost melting in your mouth with a moist, cake-like crumb. The flavor is a delightful harmony of sweet brown sugar and tart apple, creating a deeply autumnal taste. Ultimately, the subtle spice notes and rich apple essence make these Baked Apple Cider Donuts an irresistible treat.

r">Boosting the flavor

You can easily elevate your donuts with a few creative twists. For example, try rolling the warm donuts in a cinnamon-sugar blend that includes a pinch of cardamom for an exotic kick. Alternatively, a simple drizzle of salted caramel sauce adds a delicious buttery richness that pairs beautifully with the apple. Furthermore, consider serving them alongside a glass of spiced mulled apple cider for the ultimate fall flavor experience. Finally, a dollop of vanilla bean whipped cream turns them into an elegant dessert.

Tips for Success

Best practices for results

First, always properly reduce your apple cider to a syrup for the most intense flavor in your Baked Apple Cider Donuts. Furthermore, make sure you do not overmix the batter; simply stir until the ingredients are just combined for a tender crumb. For best results, use a piping bag or a sturdy plastic bag with the corner snipped off to neatly fill the donut pan. Finally, let the donuts cool in the pan for just five minutes before transferring them to a wire rack to prevent steaming.

>Mistakes to avoid

Avoid overfilling the donut cavities, as the batter will rise and then lose its classic ring shape. Consequently, aim to fill each cavity only two-thirds full for the perfect form. Many bakers also forget to properly grease the pan, which leads to frustrating breakage. Therefore, use a non-stick spray or brush with melted butter to guarantee a clean release every time, just like with our favorite muffin recipe. Moreover, do not skip the step of dusting them with cinnamon sugar while they are still slightly warm so the topping sticks perfectly, a technique we also use for our Cinnamon Sugar Puffs.

Serving and Pairing Suggestions

How to serve this dish

Present your Baked Apple Cider Donuts warm for the ultimate cozy experience. For a beautiful brunch spread, arrange them on a rustic wooden board or a vintage cake stand. Meanwhile, dust them with a final snowfall of cinnamon sugar right before serving. These donuts truly shine during autumn holidays and crisp weekend mornings. Furthermore, a simple garnish of thinly sliced apple or a cinnamon stick beside each plate adds a lovely festive touch.

Always serve these Baked Apple Cider Donuts with plenty of napkins. Ultimately, their delightful aroma will gather everyone in the kitchen, so be ready to share.

h-it">What goes well with it

A hot mug of coffee makes the perfect companion for Baked Apple Cider Donuts. Specifically, the robust bitterness of the brew beautifully cuts through the sweet, spiced notes of the donut. Alternatively, a cold glass of milk offers a classic, comforting pairing that everyone loves.

For a truly decadent treat, consider serving them with a side of vanilla ice cream. Consequently, you create an easy and impressive dessert. Similarly, a dollop of our creamy Homemade Cinnamon Whipped Cream takes them to another level. Finally, for a complete autumn brunch, pair these donuts with a savory option like our Savory Breakfast Muffins to balance the meal perfectly.

math-faq-block">
What is the best way to store baked apple cider donuts?

Store your baked apple cider donuts in an airtight container at room temperature for up to 2 days. For longer storage, freeze them for up to 3 months; just thaw at room temperature and warm slightly before serving to restore that fresh-baked texture.

Can I make baked apple cider donuts without a donut pan?

Yes, you can make baked apple cider donuts without a specialized pan. Simply spoon the batter into a greased muffin tin, filling each cup about halfway, to create delicious “donut muffins” that have all the same warm, spiced flavor.

How do you reduce the apple cider for donuts?

To reduce apple cider, simply simmer 2 to 3 cups of cider in a saucepan over medium heat for 20-30 minutes, until it reduces down to about ½ cup of a thick, syrupy liquid. This concentrated cider is the key to packing intense apple flavor into every bite of your baked apple cider donuts.

ank-math-faq-item"> Why are my baked donuts dry?

Dry baked donuts are often caused by overmixing the batter, which develops too much gluten, or by overbaking. To ensure moist baked apple cider donuts, mix the batter just until combined and check for doneness a minute or two before the recipe’s suggested bake time.

Best Pumpkin Cheesecake – Creamy & Smooth Recipe

best-pumpkin-cheesecake-creamy-smooth

Introduction

Is there anything more comforting than the warm, spiced aroma of pumpkin and cinnamon filling your kitchen? Honestly, this scent alone signals the arrival of cozy sweaters, vibrant leaves, and cherished gatherings. Furthermore, it promises one of the most decadent desserts of the season: a perfectly creamy, spiced Pumpkin Cheesecake. This iconic treat beautifully marries the rich, tangy flavor of classic cheesecake with the soul-warming essence of autumn, creating a show-stopping finale for any holiday meal or a simply wonderful weekend indulgence.

So what exactly defines a great Pumpkin Cheesecake? Essentially, it is a velvety smooth cheesecake batter that weaves together rich cream cheese, warm autumn spices like cinnamon, nutmeg, and ginger, and of course, the star ingredient: pure pumpkin puree. This combination bakes into an incredibly lush and firm yet creamy texture that simply melts in your mouth. Importantly, this dessert holds a special place on our holiday tables, often serving as a beloved alternative to or alongside the traditional pumpkin pie. Its importance goes beyond mere taste; it becomes the centerpiece of memory-making, from Thanksgiving feasts to casual Friendsgiving potlucks. Consequently, mastering this recipe means you bring a piece of heartfelt, homemade joy to every occasion. Moreover, this recipe perfectly fits the tone of our blog, which celebrates from-scratch cooking that feels both approachable and elevated. For instance, if you adore classic desserts, you might also love our guide to creating the ultimate Classic New York Cheesecake. Ultimately, we believe that baking should be a joyful and rewarding experience, and this Pumpkin Cheesecake delivers exactly that with every single blissful bite. Additionally, the process of creating this dessert is surprisingly straightforward, especially when you begin with a no-fuss Graham Cracker Crust.

Why I Love This Recipe

This particular Pumpkin Cheesecake recipe holds a very special place in my heart because it is the one my grandmother always made. I vividly remember standing on a stool in her kitchen, carefully sprinkling the spice blend into the mixing bowl while she told me stories. Now, every time I bake it, the familiar scent transports me right back to those warm, happy moments. Ultimately, it represents more than just a dessert; it is a tangible connection to family, tradition, and the simple, profound joy of sharing something made with love.

Health and Nutrition

Why it’s good for your body

Pumpkin Cheesecake offers some surprisingly wholesome benefits. For instance, pumpkin puree provides a powerful dose of vitamin A, which actively supports healthy vision and a strong immune system. Moreover, this delicious dessert contains valuable antioxidants like beta-carotene that help protect your cells from damage. Consequently, enjoying a slice means you are giving your body essential nutrients.

Additionally, spices like cinnamon and nutmeg do more than just add warmth and flavor. In fact, they possess natural anti-inflammatory properties that can contribute to overall wellness. Therefore, each bite of Pumpkin Cheesecake delivers more than just incredible taste. Furthermore, the eggs and dairy in the recipe offer a good source of protein and calcium for maintaining muscle and bone health. Ultimately, this makes your treat a more nourishing choice compared to many other desserts.

How it fits in a healthy lifestyle

You can absolutely enjoy Pumpkin Cheesecake as part of a balanced diet. Think of it as a celebratory food rather than an everyday indulgence. Savoring a reasonable portion allows you to satisfy your sweet tooth without derailing your nutritional goals. For those with specific dietary needs, you can easily adapt the recipe to be gluten-free by using a nut-based crust or to be lower in sugar with natural sweeteners.

Pairing your dessert with a healthy lifestyle is all about balance. If you are looking for more wholesome dessert ideas that fit into your wellness plan, explore our guide to healthy dessert alternatives. Remember, the key is mindful eating. Planning your meals and understanding portions makes room for treats. For more tips on incorporating your favorite foods into a balanced routine, check out our advice on smart meal planning.

Print
clock clock iconcutlery cutlery iconflag flag iconfolder folder iconinstagram instagram iconpinterest pinterest iconfacebook facebook iconprint print iconsquares squares iconheart heart iconheart solid heart solid icon

Pumpkin Cheesecake

  • Author: Chef Mia

Description

A creamy, spiced pumpkin cheesecake with a graham cracker crust, perfect for autumn gatherings.


Ingredients

Scale

For the Crust:

  • 1 1/2 cups graham cracker crumbs
  • 1/4 cup granulated sugar
  • 1/2 cup unsalted butter, melted
  • 24 oz cream cheese, softened
  • 3/4 cup granulated sugar
  • 1/4 cup brown sugar
  • 1 cup canned pumpkin puree
  • 3 large eggs
  • 1 tsp vanilla extract
  • 1 tsp ground cinnamon
  • 1/2 tsp ground ginger
  • 1/4 tsp ground nutmeg
  • 1/4 tsp ground cloves

Instructions

1. Prepare the Crust:

  1. Preheat oven to 325°F (165°C). Combine graham cracker crumbs, 1/4 cup sugar, and melted butter. Press into a 9-inch springform pan.
  2. In a large bowl, beat cream cheese, granulated sugar, and brown sugar until smooth. Mix in pumpkin puree.
  3. Add eggs one at a time, then mix in vanilla, cinnamon, ginger, nutmeg, and cloves until well combined.
  4. Pour filling over crust. Bake for 55-60 minutes until center is set. Cool completely, then refrigerate for at least 4 hours before serving.

Notes

You can customize the seasonings to taste.

How to Prepare This Dish

Steps and time-saving tips

First, gather all your ingredients to make the process smooth and efficient. For the crust, simply combine graham cracker crumbs, melted butter, and a pinch of sugar in a bowl. Firmly press this mixture into the bottom of your springform pan, then pop it in the freezer for ten minutes to set. Meanwhile, beat the cream cheese until it becomes perfectly smooth and creamy. Gradually add the sugar, and then incorporate the eggs one at a time. Next, whisk in the pumpkin puree, spices, and a splash of vanilla until everything is beautifully combined. However, avoid overmixing the batter once you add the eggs to prevent too much air from getting in. Carefully pour the filling over your chilled crust and gently tap the pan on the counter to release any air bubbles. Finally, bake your Pumpkin Cheesecake in a water bath for even, crack-free cooking. Let it cool completely on a wire rack before you chill it for several hours, preferably overnight. This patience truly rewards you with the ideal texture and flavor.

Mistakes I’ve made and learned from

I learned the importance of room temperature ingredients the hard way. One time, I used cold cream cheese straight from the fridge, and my Pumpkin Cheesecake filling turned out lumpy no matter how long I mixed it. Now, I always set everything out at least an hour before I start. Another common error I made was overbaking, which resulted in a dry, cracked top instead of that signature creamy custard texture. I finally invested in an oven thermometer and learned to trust the jiggle test—the center should have a slight wobble when you gently shake the pan. For more detailed guidance on achieving that perfect bake, my post on common baking mistakes covers this in depth. Also, rushing the cooling process led to a soggy crust, so now I practice patience. If you’re looking for the perfect pairing to complete your dessert spread, my fall dessert recipes offer some fantastic inspiration.

rc="https://exorecipes.com/wp-content/uploads/2025/09/best-pumpkin-cheesecake-creamy-smooth-recipe.webp" />

Cultural Connection and Variations

Where this recipe comes from

Pumpkin Cheesecake tells a beautiful story of cultural fusion. Essentially, it marries the classic New York-style cheesecake with the quintessential American harvest ingredient: pumpkin. Immigrants brought their cherished cheesecake traditions from Europe in the late 19th and early 20th centuries. Meanwhile, pumpkin pie had already cemented its status as a Thanksgiving staple. Eventually, a clever baker decided to combine the two, creating a richer, creamier alternative to the traditional pie.

Different regions put their own spin on this dessert. For example, in the South, you might find a version with a pecan shortbread crust and a generous dash of bourbon. Conversely, some Midwestern families swear by adding a layer of sweetened sour cream on top. My own grandmother always stirred in a handful of toasted pecans for extra crunch. Globally, the concept adapts beautifully. In Australia, they might use a native wattleseed for spice, while bakers in Japan often create stunningly elegant individual servings.

Ultimately, every famil

y seems to have their own secret for the perfect Pumpkin Cheesecake.

How it fits in today’s cooking

Today, this dessert absolutely thrives as a modern holiday classic. It bridges generations, offering a delicious twist on tradition that feels both familiar and exciting. Furthermore, contemporary home cooks continuously find new ways to enjoy it. For instance, many now create stunning mini cheesecakes for easier serving at large gatherings.

Its relevance extends beyond Thanksgiving, too. Actually, it has become a beloved symbol of autumn comfort cooking. People eagerly await pumpkin season to bake this treat. Modern adaptations also cater to various dietary needs, using alternatives like gluten-free graham crackers or lactose-free cream cheese. Moreover, its make-ahead nature perfectly suits our busy lifestyles. You can prepare a show-stopping dessert days before your event. For those seeking the ultimate experience, mastering a water bath cheesecake method ensures that famously smooth, crack-free surface. This Pumpkin Cheesecake securely holds its place at our tables, blending cherished memory-making with contemporary convenience.

>Taste and Texture

What makes it delicious

This Pumpkin Cheesecake delivers a velvety smooth and luxuriously creamy texture that melts on your tongue. Each bite releases a warm, fragrant aroma of cinnamon, nutmeg, and ginger, which perfectly complements the rich, tangy cream cheese base. Furthermore, the earthy sweetness of real pumpkin puree creates a deeply comforting flavor. Ultimately, the classic graham cracker crust provides a sweet, crisp contrast to the lush filling, making every forkful a perfect balance.

Boosting the flavor

For an instant upgrade, consider adding a generous dollop of homemade whipped cream on top. Alternatively, a drizzle of salted caramel sauce introduces a wonderful sweet-and-salty complexity that enhances the warm spices. You can also amplify the cozy aroma by adding a pinch of freshly ground cardamom to your cheesecake batter. For more inspiration on complementary toppings, explore our guide to the perfect whipped cream. Moreover, serving a slice alongside a warm drink creates a delightful pairing; discover some ideal options in our collection of coffee recipes.

Tips for Success

Best practices for results

First, always bring your cream cheese to room temperature for a completely smooth and lump-free filling. Furthermore, use canned pure pumpkin puree instead of pumpkin pie filling for the best flavor. Be sure to mix your ingredients on low speed to prevent too much air from incorporating into the batter. Consequently, you will avoid cracks in your beautiful Pumpkin Cheesecake. Finally, allow the cheesecake to cool gradually in the turned-off oven to prevent it from falling.

Mistakes to avoid

Avoid overbaking, as this is the primary cause of a dry and cracked texture. Instead, look for the edges to be set while the center still has a slight jiggle. Moreover, do not skip the water bath, as it provides essential gentle and even heat. For more guidance, our detailed guide on how to prevent cracks in cheesecake covers this crucial step. Additionally, never open the oven door during the first half of baking, since a sudden temperature drop can make the cake fall. If you are unsure about your oven’s accuracy, you can always check out our tips on how to tell when cheesecake is done without any guesswork.

Serving and Pairing Suggestions

How to serve this dish

For a stunning presentation, serve your Pumpkin Cheesecake chilled. Furthermore, garnish each slice with a generous swirl of fresh whipped cream. A sprinkle of cinnamon or a drizzle of warm caramel sauce also adds a beautiful and delicious touch. This Pumpkin Cheesecake truly shines as the centerpiece of any holiday dessert table. Alternatively, you can make individual servings in small jars for a charming and convenient option at a brunch gathering.

h-it">What goes well with it

A hot cup of coffee perfectly cuts through the rich, creamy texture of this Pumpkin Cheesecake. For a decadent dessert pairing, consider serving it alongside a scoop of our Homemade Vanilla Ice Cream. The classic vanilla flavor beautifully highlights the warm pumpkin spices. Additionally, a small glass of dessert wine, like a late-harvest Riesling, offers a lovely sweet complement. If you enjoy baking seasonal treats, this Pumpkin Cheesecake would also pair wonderfully with our popular Apple Crisp for a fantastic fall dessert spread.

Why did my pumpkin cheesecake crack?

Cracking usually happens from overmixing the batter, which incorporates too much air, or from a drastic temperature change causing the custard to contract quickly. To prevent a cracked pumpkin cheesecake, avoid overbeating after adding the eggs and let it cool gradually in the oven with the door slightly ajar.

ank-math-faq-item"> How do you know when pumpkin cheesecake is done?

The best test is the jiggle test; the edges should look set but the center (about a 3-inch circle) should have a slight, gentle jiggle when you lightly shake the pan. The internal temperature should also read around 150°F (65°C) on an instant-read thermometer for a perfectly baked pumpkin cheesecake.

Does pumpkin cheesecake need to be refrigerated?

Yes, absolutely. Due to its dairy and egg content, pumpkin cheesecake must be refrigerated. Always chill it for at least 4 hours, though overnight is best, to allow it to set properly and develop its full flavor. Keep it covered in the refrigerator until you are ready to serve.

Can you freeze pumpkin cheesecake?

Yes, you can freeze pumpkin cheesecake for up to 2-3 months. For best results, freeze the whole cheesecake or individual slices uncovered until solid, then wrap them tightly in plastic wrap and aluminum foil to prevent freezer burn. Thaw it overnight in the refrigerator before serving.

div>