“`html
Table of Contents
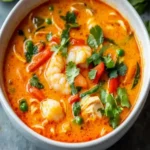
Thai Red Curry Soup Recipe – Easy, Spicy & Delicious!
Craving a Cozy Bowl of Flavor? Let’s Make Thai Red Curry Soup!
Welcome to our culinary corner! Today, we’re diving into the vibrant and aromatic world of Thai cuisine with a delightful Thai Red Curry Soup recipe. This delicious soup boasts a perfect balance of sweet, spicy, and tangy flavors, making it a must-try dish for anyone looking to experience the essence of Thai cooking at home. But have you ever wondered what makes Thai red curry so uniquely captivating? It’s the harmonious blend of fresh chilies, fragrant galangal, lemongrass, and a touch of creaminess from coconut milk that creates a symphony of taste and aroma. Whether you’re a seasoned chef or just starting out, this Thai Red Curry Soup is simple to prepare and incredibly satisfying, offering a comforting yet invigorating culinary adventure. Let’s get started on crafting this bowl of goodness!
Ingredients to Ignite Your Senses
Gathering fresh, quality ingredients is the first step to an unforgettable Thai Red Curry Soup. The vibrant colors and potent aromas are key to its charm.
Aromatic Base
- 2 tablespoons neutral oil (like vegetable or coconut oil): The foundation for sautéing, unlocking the flavors of our aromatics.
- 1 large onion, finely chopped: Provides sweetness and depth. Yellow or white onions work best.
- 3 cloves garlic, minced: A pungent powerhouse essential for most savory dishes.
- 1 tablespoon grated fresh ginger or galangal: Adds a zesty, slightly peppery warmth. Galangal offers a more authentic Thai flavor, but ginger is a great substitute.
- 1 stalk lemongrass, tough outer layers removed, finely minced (or 1 tsp lemongrass paste): Imparts a unique citrusy, floral aroma. If using a whole stalk, only use the tender inner part.
Curry Paste & Liquid Gold
- 2-4 tablespoons Thai red curry paste: This is where the magic happens! The amount depends on your spice preference. Look for brands with good quality ingredients for the best flavor. (Substitution: If you can’t find Thai red curry paste, a mix of chili paste, a pinch of cumin, coriander, and a hint of cardamom can approximate the flavor, but it won’t be the same.)
- 1 can (13.5 oz) full-fat coconut milk: The essential creamy, rich base that balances the spice. Shake well before opening.
- 4 cups chicken or vegetable broth: For body and savory depth.
Vegetables (Choose 2-3!)
- 1 red bell pepper, thinly sliced: Adds a touch of sweetness and vibrant color.
- 1 cup broccoli florets: Offers a pleasant, slightly bitter crunch.
- 1 cup snap peas or snow peas: For a fresh, crisp texture and bright green hue.
- 1 cup sliced mushrooms (shiitake or cremini): Adds an earthy, umami note.
- 1 cup bamboo shoots, sliced: A classic Thai ingredient for a satisfying chew.
Protein (Optional)
- 8 oz chicken breast or thighs, thinly sliced: Tender and flavorful.
- 8 oz firm or extra-firm tofu, pressed and cubed: A vegetarian staple that absorbs flavors beautifully.
- 8 oz shrimp, peeled and deveined: Cooks quickly and adds a delightful sweetness.
Flavor Enhancers & Garnishes
- 1-2 tablespoons fish sauce: The umami secret weapon of Southeast Asian cooking. (Substitution: Soy sauce or tamari for a vegetarian/vegan option, though it won’t have the same depth.)
- 1-2 teaspoons brown sugar or palm sugar: Balances the spice and acidity with a touch of sweetness.
- 1 tablespoon lime juice (from half a lime): Brightens all the flavors with a refreshing tang.
- Fresh cilantro, chopped: For a fresh, herbaceous finish.
- Fresh basil leaves (Thai basil if possible): Adds a distinct, anise-like aroma.
- Optional: Sliced red chilies or jalapeños for extra heat.
- Optional: A drizzle of sriracha.
Timing is Everything
This Thai Red Curry Soup is a weeknight marvel, ready in under an hour. Compared to many complex curries that can take hours, this recipe offers authentic flavors with impressive speed. The prep involves chopping vegetables and aromatics, and the cooking is a straightforward sauté-and-simmer process.

Crafting Your Culinary Masterpiece: Step-by-Step
Follow these simple steps to create a bowl of Thai Red Curry Soup that transports you straight to the bustling streets of Bangkok.
Step 1: Sauté the Aromatics
Grab a large pot or Dutch oven and heat the neutral oil over medium heat. Add the chopped onion and sauté until softened and translucent, about 5-7 minutes. This process gently sweetens the onion, forming a beautiful flavor base.
Step 2: Bloom the Curry Paste
Add the minced garlic, grated ginger (or galangal), and minced lemongrass to the pot. Stir and cook for about 1 minute until fragrant – be careful not to burn the garlic! Now, add the Thai red curry paste. Stir it into the aromatics and cook for another 1-2 minutes. This step, known as “blooming” the paste, toasts the spices and releases an incredible aroma, deepening the curry’s flavor profile.
Step 3: Add Liquids and Simmer
Pour in the shaken coconut milk and broth. Whisk vigorously to combine the curry paste with the liquids, ensuring no clumps remain. Bring the mixture to a gentle simmer, then reduce the heat to low, cover, and let it simmer for 10 minutes. This allows the flavors to meld beautifully.
Step 4: Cook the Protein and Vegetables
Increase the heat slightly to medium-low. Add your chosen protein (chicken, tofu, or shrimp) and the firmer vegetables (like bell pepper and broccoli). Simmer for about 5-7 minutes, or until the protein is cooked through and the vegetables are tender-crisp. Add faster-cooking vegetables like snap peas or mushrooms in the last 2-3 minutes so they retain their satisfying crunch.
Step 5: Finish and Garnish
Stir in the fish sauce and brown sugar (or palm sugar). Taste and adjust seasonings. You might want more fish sauce for saltiness/umami, more sugar for sweetness, or even a pinch more curry paste for heat! Finally, stir in the fresh lime juice for that essential burst of brightness. Ladle the soup into bowls and garnish generously with fresh cilantro and basil leaves. Add sliced chilies if you desire extra fire!
Nutritional Highlights
While exact nutritional values can vary based on specific ingredients and portion sizes, a typical serving of this Thai Red Curry Soup (without added protein) is approximately:
- Calories: 250-350 kcal
- Fat: 18-25g (primarily from coconut milk)
- Carbohydrates: 10-15g
- Protein: 5-10g (will increase significantly with added protein)
- Sodium: Varies based on broth and fish sauce
Note: Adding chicken, tofu, or shrimp will increase protein and calorie counts. Using light coconut milk will reduce fat and calories.
Healthier Swaps for a Lighter Bowl
Want to lighten up this delicious soup without sacrificing flavor? Try these smart substitutions:
- Light Coconut Milk: Use light coconut milk instead of full-fat to significantly reduce calorie and fat content. The soup will be less rich, but still wonderfully flavorful.
- Lean Protein: Opt for chicken breast, turkey, or extra-firm tofu. For seafood, shrimp is a lean choice.
- Load up on Veggies: Replace some of the broth with water and add extra non-starchy vegetables like spinach, bok choy, or zucchini noodles for added nutrients and volume with fewer calories.
- Reduced Sodium Broth & Fish Sauce: Choose low-sodium broth and use a reduced-sodium fish sauce if available, or use soy sauce/tamari sparingly.
Serving Suggestions: How to Enjoy
Serve this aromatic Thai Red Curry Soup piping hot! It’s a complete meal on its own, but here are some ideas to elevate your dining experience:
- With Rice: Ladle the soup over a bed of fluffy jasmine rice. The rice will soak up all that delicious, spicy broth.
- Noodles: Add cooked rice noodles (like vermicelli or pho noodles) directly into the soup bowls for a heartier noodle soup experience.
- Garnishes Galore: Don’t skimp on the fresh cilantro, basil, and lime wedges. A sprinkle of toasted cashews or peanuts can add a delightful crunch.
Common Mistakes to Avoid
To ensure your Thai Red Curry Soup is a triumph, keep an eye out for these common pitfalls:
- Burning the Aromatics: Garlic and ginger cook quickly. Sauté them until fragrant, not brown or burnt, which can lead to a bitter taste.
- Not Blooming the Curry Paste: Skimping on the step where you cook the curry paste with the aromatics means you miss out on developing its full flavor potential.
- Overcooking Vegetables: Aim for tender-crisp vegetables that still have a bit of bite. Mushy vegetables can detract from the soup’s texture.
- Under-seasoning: Thai cooking relies on balancing sweet, salty, sour, and spicy. Taste and adjust your soup with fish sauce, sugar, and lime juice until it sings!
- Using Low-Quality Curry Paste: The quality of your curry paste significantly impacts the final dish. Choose a reputable brand known for fresh ingredients.
Storing Your Delicious Creation
Leftover Thai Red Curry Soup can be stored in an airtight container in the refrigerator for up to 3-4 days. The flavors often meld and deepen overnight, making it even tastier the next day!
- Reheating: Gently reheat on the stovetop over low heat, stirring occasionally. You may need to add a splash more broth or water if the soup has thickened too much.
- Freezing: This soup freezes reasonably well, although the texture of some vegetables and the creaminess of the coconut milk might change slightly upon thawing. Freeze in single-serving portions for easy reheating.
A Taste of Thailand Awaits!
There you have it – a simple yet authentic Thai Red Curry Soup recipe that brings the vibrant flavors of Thailand right into your kitchen. It’s a comforting, spicy, and incredibly satisfying dish that’s perfect for any night of the week. Don’t be intimidated by the ingredients; most are readily available in ethnic grocery stores or well-stocked supermarkets. Give this recipe a try, and let the aromatic spices and creamy coconut milk transport you to Southeast Asia!
Feeling inspired? Share your Thai Red Curry Soup creations with us in the comments below or tag us on social media! What are your favorite additions? We’d love to hear from you!
Frequently Asked Questions
***How spicy is Thai red curry paste?***
Thai red curry paste can range in spice level depending on the brand and recipe. It’s made with dried red chilies, so it generally has a noticeable kick. It’s always best to start with the lower amount recommended and add more if you prefer it spicier.
***Can I make this vegetarian or vegan?***
Absolutely! Use vegetable broth instead of chicken broth, and replace the fish sauce with soy sauce or tamari. Ensure your red curry paste is also vegan-friendly, as some may contain shrimp paste.
***What kind of coconut milk is best?***
For the richest and creamiest soup, full-fat canned coconut milk is highly recommended. Light coconut milk can be used for a lower-fat version, but the soup will be less creamy.
***Can I use different vegetables?***
Yes! This recipe is very forgiving. Feel free to add other vegetables like carrots, zucchini, baby corn, green beans, or even spinach. Adjust cooking times accordingly.
Thai Red Curry Soup Recipe – Easy, Flavorful & Spicy Dish
Description
Welcome to our culinary corner! Today, we’re diving into the vibrant and aromatic world ofThai cuisinewith a delightfulThai Red Curry Souprecipe. This delicious soup boasts a perfect balance of sweet, spicy, and tangy flavors, making it a must-try dish for anyone looking to experience the essence of Thai cooking at home. Whether you’re a seasoned chef or just starting out, thisThai Red Curry Soupis simple to prepare and incredibly satisfying. Let’s get started on crafting this bowl of goodness!
Ingredients
- 2 Tbsp. avocado oil or olive oil
- 1/2 cupdiced yellow onion
- 1/2 cupdiced red bell pepper
- 1/2 cupdiced carrots
- 3garlic cloves, minced
- 1 Tbsp. freshly grated ginger
- 1/4 cupred curry paste
- 6 cupschicken broth or vegetable stock
- 1(14 oz.) can full-fat coconut milk
- 3 Tbsp. fish sauce
- 4–5oz. ramen or rice noodles(Note: Choose gluten-free rice noodles for a GF option)
- 1 Tbsp. fresh lime juice, plus more to taste
- 1/2 cupfresh chopped cilantro, plus more for serving
- Lime wedges, for serving
Instructions
- Start by heating the oil over medium heat in a large Dutch oven. Once hot, add the diced yellow onion, red bell pepper, and carrots. Sauté for 5-7 minutes until the vegetables become tender and slightly caramelized, enhancing their sweetness.
- Next, stir in the minced garlic, freshly grated ginger, and red curry paste. Cook for about 1 minute, stirring continuously, until the mixture becomes fragrant. This step helps to release the essential oils in the spices, deepening the flavor of your soup.
- Pour in the chicken broth and full-fat coconut milk, stirring well to combine. Bring the mixture to a simmer over medium heat and cook, uncovered, for about 5 minutes. This will allow the flavors to meld beautifully.
- Add the ramen or rice noodles to the simmering soup. Depending on the type of noodles used, cook time will vary. Refer to package instructions and adjust the timing accordingly. The noodles should be tender but not mushy.
- Once the noodles are cooked, stir in the fresh lime juice and chopped cilantro. Taste and adjust seasoning with salt, pepper, or more lime juice as needed. Serve hot, garnished with extra cilantro and lime wedges.
Notes
Use Fresh Ingredients: Fresh ginger and garlic are key to achieving the authentic flavor profile.
Control the Spice Level: If you prefer a milder soup, reduce the amount of red curry paste or add more coconut milk to balance the heat.
Get Creative with Vegetables: Feel free to add mushrooms, zucchini, or baby spinach for additional texture and nutrition.
“`