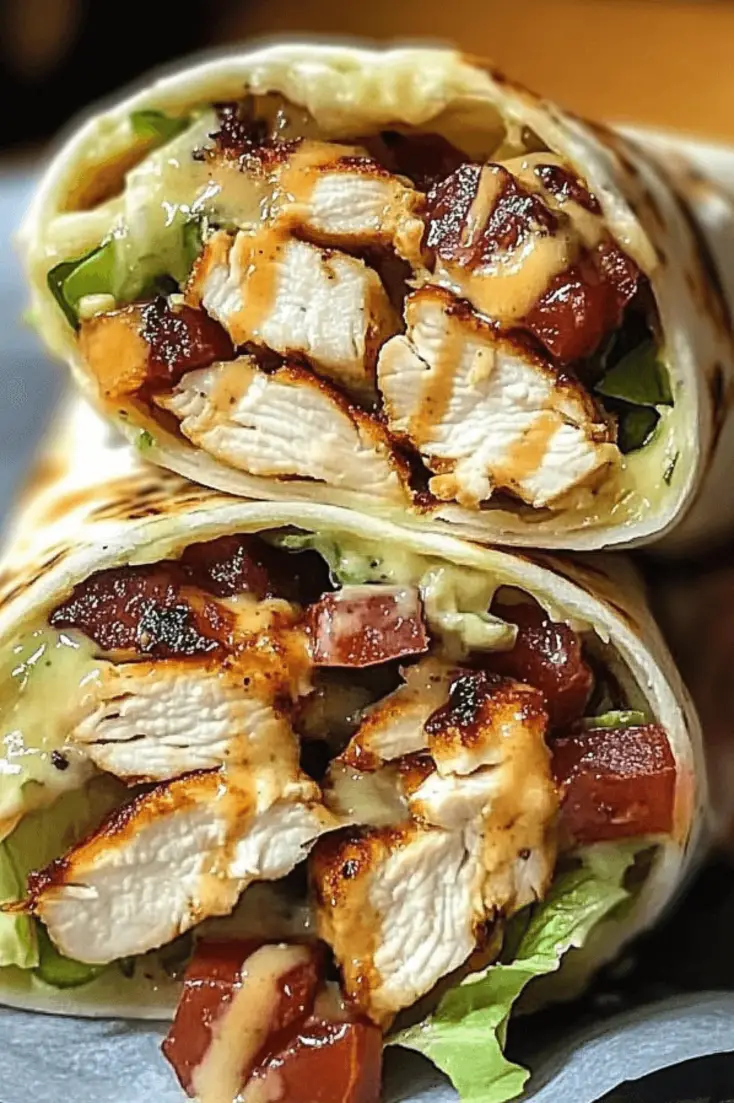
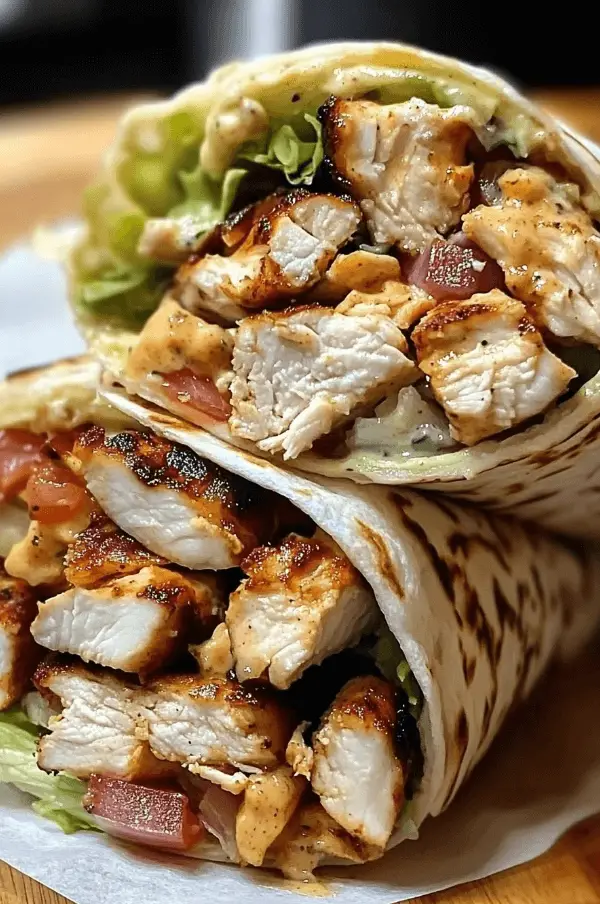
Delicious Cheesecake Fruit Salad Recipe for Healthy Indulgence

Cheesecake Fruit Salad: A Delightful Fruity Twist on a Classic Dessert

⚖️
Difficulty
Easy

⏲️
Prep Time
15 mins

🕒
Cook Time
0 mins

⏱️
Total Time
15 mins

🍽️
Servings
6 servings

Cheesecake fruit salad is the perfect summer dessert — vibrant, refreshing, and infused with the creamy richness of cheesecake flavors. This delightful dish marries the sweetness of seasonal fruits with the luscious texture of cheesecake, creating a dessert that’s not only beautiful to behold but also a feast for the taste buds. Imagine sliced strawberries, blueberries, and juicy melons all coated in a light cheesecake dressing, offering a scoop of decadence in every bite. This makes it ideal for gatherings, potlucks, or simply indulging during those warm afternoons.

What sets this cheesecake fruit salad apart is not just its visual appeal, but the exquisite blend of textures and flavors. Each spoonful provides a satisfying crunch from the fruits, coupled with the silken creaminess of the dressing. The subtle tang of cream cheese complements the sweetness of the fruits beautifully, making every bite a sweet reminder of why we love cheesecake. Moreover, it’s a no-bake recipe that requires minimal effort, making it a stress-free option for any occasion.

Quick Recipe Highlights

  • Flavor Profile: This dessert showcases a delightful balance of sweetness from ripe fruits and a creamy, slightly tangy cheesecake dressing.
  • Texture: The fresh, juicy fruit contrasts wonderfully with the smooth creaminess of the cheesecake mixture.
  • Aroma: The enticing scent of mixed fruits blends beautifully with hints of vanilla and cream cheese, creating an inviting atmosphere.
  • Visual Appeal: Bursting with color, this salad presents a stunning rainbow of fruits that enhances its overall attractiveness.
  • Skill Level Needed: This recipe is simple and suitable for cooks of all skill levels, perfect for beginners.
  • Special Equipment: All you need is a mixing bowl and a whisk, making this an accessible recipe for any kitchen.

Recipe Overview

  • Difficulty Level: Cheesecake fruit salad is easy to prepare, requiring no special skills or baking expertise, making it perfect for novice cooks or busy hosts.
  • Category: This recipe falls under the dessert category, ideal for those seeking a sweet treat that’s also refreshing.
  • Cuisine: While it doesn’t belong to any traditional cuisine, it draws inspiration from classic American desserts, particularly the beloved cheesecake.
  • Cost: The ingredients are generally affordable, with fresh fruits being the most significant cost factor depending on seasonality.
  • Season: This dish is best enjoyed in the summer when fruits are at their peak ripeness and flavor.
  • Occasion: Perfect for summer picnics, barbeques, parties, or as a light dessert after dinner.

Why You’ll Love This Recipe

The taste and texture of this cheesecake fruit salad are unforgettable. The combination of creamy dressing with fresh fruits creates a unique experience that is both comforting and indulgent. Every bite offers a burst of sweetness and freshness, which is especially satisfying during hot weather.

Preparation is incredibly convenient with this recipe, allowing you to whip up a crowd-pleasing dish in just about 15 minutes. The no-bake aspect means you can prepare it quickly, without the need for any baking time. This is especially beneficial for busy days when you want dessert without a lot of fuss.

Health enthusiasts will appreciate that this salad can be a healthier dessert alternative. By using a variety of colorful fruits, this dish packs in vitamins and minerals, contributing to a well-rounded diet. Additionally, the cream cheese can be substituted with a lighter option to further enhance its nutritional profile.

Socially, this cheesecake fruit salad is an instant hit at gatherings. Its vibrant colors and rich flavors prompt conversations and smiles, making it a great centerpiece for any table. Friends and family are bound to ask for the recipe, ensuring that it becomes a staple in your entertaining repertoire.

Cost-effectiveness plays a role in its appeal as well. With easy and inexpensive ingredients, making this dish repeatedly won’t break the bank. Plus, it’s perfect for utilizing leftover fruits and maintaining minimal food waste.

Historical Background and Cultural Significance

The origins of cheesecake extend back to ancient Greece, where it was enjoyed at the first Olympic Games. However, the combination of fruit and cream cheese in a salad is a more contemporary Western development. This dish brings together classic cheesecake flavors in a fun, accessible format that has gained popularity in recent years.

In American culture, cheesecake has long been celebrated, particularly in New York-style versions. The dessert’s evolution into a fruit salad has made it a go-to for health-conscious diners who still crave dessert. This playful version allows for enjoyment without the heaviness often associated with traditional cheesecakes.

Over time, variations of cheesecake have proliferated across kitchens, with countless adaptations surfacing to cater to diverse palates. The fruit salad adaptation embraces seasonal fruits, making it versatile and adaptable to different tastes and preferences, reflecting a shift towards lighter, refreshing desserts in modern culinary culture.

Regional variations can be found, especially in the use of local fruits like peaches or berries. This dish has transcended its simple roots to become a favorite in many summer gatherings across America and beyond, embracing the spirit of sharing and celebration.

Ingredient Deep Dive

Fruits are the stars of this cheesecake fruit salad. Each fruit brings its unique flavor and nutrients to the dish. For instance, strawberries are rich in vitamin C and antioxidants, while blueberries offer fiber and additional vitamins. Selecting ripe fruits not only improves flavor but also enhances the overall presentation of the dish. When storing, keep fruits refrigerated to maintain freshness, and consume them within a few days for the best taste.

Cream cheese is the second key ingredient, providing the rich, creamy essence that ties the salad together. Originating as a simple dairy food, cream cheese has evolved into a fundamental element in many desserts. It’s beneficial as it contains calcium and protein if consumed in moderation. Choosing full-fat versus low-fat options can adjust the richness of the dish.

Sugar plays a critical role in balancing flavors. While white sugar is traditionally used, alternatives like honey or agave syrup can introduce a different sweetness profile. Pay attention to the amount of sugar; too much can overpower the natural sweetness of the fruits. Ideally, store sugar in a cool, dry place to preserve quality.

Vanilla extract enhances the flavor of the cream cheese, adding depth and warmth to the dish. Often made from vanilla pods, it’s a favorite in desserts for its aromatic qualities. When purchasing, opt for pure extract for the richest flavor and store it in a dark place to maintain its potency.

Common Mistakes to Avoid

  • Using overripe fruits can lead to an undesirable texture; always choose firm and fresh produce.
  • Neglecting to chill the salad before serving can make the dressing too thin; refrigerate it for optimal creaminess.
  • Over-mixing the dressing can cause it to become too runny – mix just until smooth.
  • Using low-quality cream cheese can affect the overall taste; opt for a reputable brand for the best results.
  • Forgetting to taste-test can result in an unbalanced flavor; adjust sweetness to taste based on the fruits you use.
  • Not allowing the salad to sit can overlook the opportunity for flavors to meld; let it rest for at least 30 minutes in the fridge.
  • Adding acidic fruits, like citrus, without balance may overpower the salad; pair them wisely with sweeter ingredients.
  • Overcrowding the bowl may prevent a thorough mix, leading to uneven distribution of ingredients.
  • Forgetting to check for allergies with guests can lead to avoidable issues; ask about dietary restrictions beforehand.
  • Skipping garnishes can make the salad look less appealing; vibrant garnishes help elevate the dish’s presentation.

Essential Techniques

The key technique to master while making cheesecake fruit salad is mixing the dressing. This is crucial for achieving a smooth consistency. It’s important not to overwhip; whisk the ingredients just until homogenous to prevent a runny texture. Look for a creamy texture with no lumps, which indicates successful mixing.

Another essential technique is selecting and preparing the fruits. Ensuring you wash, peel, and cut fruits into bite-sized pieces allows for a better presentation and enjoyable texture. Always cut them evenly to promote a well-distributed balance in each bite, ensuring a feast for both the eyes and the palate.

Pro Tips for Perfect Cheesecake Fruit Salad

1. Opt for seasonal fruits to enhance flavor and reduce costs. Fresh fruits at their peak yield the best taste.
2. Chill the ingredients beforehand to keep the salad refreshing and enhance the overall flavor.
3. Experiment with different fruit combinations; the versatility allows for personalization to suit various tastes and preferences.
4. Use a mix of textures by incorporating fruits like crunchy apples or pears to contrast with softer berries.
5. Serve in clear bowls to emphasize the colorful layers and make the dessert visually appealing.
6. For added crunch, consider topping with crushed graham crackers, mimicking the cheesecake crust.
7. If preparing ahead, keep the dressing separate until just before serving to maintain freshness.
8. Don’t hesitate to try flavored cream cheese or yogurt variations for a different twist on the dressing.

Variations and Adaptations

Regional variations of this cheesecake fruit salad can include local fruits, which enhance the dish’s flavor and uniqueness. For example, using tropical fruits like pineapple and mango in the summer brings a refreshing zest to the classic recipe, while autumn fruits like apples and pears can be introduced for a seasonal update.

Seasonal adaptations can also be made. During winter months, consider adding roasted or caramelized fruits for depth and warmth. On the other hand, in spring, a selection of delicate berries can add lightness and celebration of the season.

Dietary modifications are achievable with this recipe. For gluten-free options, ensure that sugar and other additives are certified gluten-free. To create a vegan version, substitute the cream cheese with cashew cream or dairy-free yogurt, maintaining the creamy texture with a plant-based twist.

Flavor variations are endless! Trying flavored extracts like almond or coconut can change the profile of your dressing dramatically, creating unique experiences. Alternatively, adding a dash of spices such as cinnamon or nutmeg can introduce complexity.

Texture modifications can also dramatically shift your dish. Adding nuts or seeds can provide additional crunch, while incorporating pudding to the dressing can create a thicker consistency, making it versatile for every occasion.

Serving and Presentation Guide

When serving your cheesecake fruit salad, presentation is key. Layer the fruits in a clear glass bowl to showcase the vibrant colors, and consider serving it in individual cups for an elegant touch. For garnishing, fresh mint leaves can add a pop of color and freshness that enhances the overall appeal.

Traditional accompaniments can be served alongside, including an extra dollop of whipped cream or a drizzle of honey on top for added sweetness. Modern suggestions may include pairing it with a scoop of vanilla ice cream to enrich the experience.

Temperature considerations should be kept in mind, as serving the salad chilled enhances its refreshing qualities. Ensure the salad isn’t left out for prolonged periods, particularly in warmer weather, to maintain its quality.

Portion control tips can include using small cups for serving, particularly for gatherings, as it helps guests manage their portions while allowing them to enjoy a variety of flavors without waste.

Wine and Beverage Pairing

Pairing wine with cheesecake fruit salad can enhance flavors significantly. A light sparkling wine or Moscato complements the sweetness of the fruits and the creamy texture of the dressing, creating a balanced treat. For white wine lovers, a crisp Sauvignon Blanc can also provide a delightful pairing.

Non-alcoholic alternatives such as flavored sparkling water or a refreshing mocktail made with fresh fruit juices can make enticing accompaniments. Chamomile or mint teas can provide relaxing options for those who prefer warm beverages.

When serving, consider temperature, ensuring that wines are chilled to enhance their refreshing qualities. Offering a variety of pairing options can invite guests to explore flavors and make their dining experience more varied and enjoyable.

Storage and Shelf Life

Proper storage extends the shelf life of your cheesecake fruit salad significantly. Keep the salad in a tightly sealed container in the refrigerator to maintain freshness for up to two days. If using ingredients such as bananas, be mindful that they may turn brown quickly, affecting the dish’s overall appearance.

Temperature requirements are vital; always store salad composed of dairy and fruits at temperatures below 40°F (4°C) to prevent spoilage. Signs of spoilage include off smells, excessive liquid separation, or visible mold growth, in which case it’s best to discard the salad.

For reheating, if the salad has outlasted its peak fresh period, consider incorporating it into a smoothie for a blended refreshment rather than attempting to serve it cold again.

Freezing is not recommended for this fruit salad, as the fruits will lose their texture and degrade when thawed, rendering them mushy and unappealing.

Make Ahead Strategies

Preparing the cheesecake fruit salad ahead of time can alleviate stress on gathering days, allowing flavors to meld beautifully. Plan to prepare your fruits and dressing a day prior, ensuring the dressing is placed separately to prevent wilt.

Storage between steps is essential. Store fruits in a sealed container with a paper towel to absorb moisture and avoid browning. The dressing can also be made in advance and stored in the refrigerator, ideally consumed within two days.

Assessing quality impact, keep in mind that salad’s optimal flavor lies in its freshness; consume shortly after combining, ideally within 12 hours for peak taste and texture.

Assembly tips involve combining the dressing with fruits right before serving. This can maintain the vibrant appearance, ensuring that each ingredient looks fresh and appetizing.

Reheating guidelines are generally not necessary; serving this dish cold enhances its refreshing qualities and maintains the delightful textures of the fruits and dressing.

Scaling Instructions

Scaling this cheesecake fruit salad is straightforward. If halving the recipe, simply divide all ingredients accordingly; maintain proportions for flavors to ensure quality isn’t compromised.

When doubling or tripling the recipe, be mindful of space. Use larger mixing bowls to prevent spills while preparing and ensure adequate refrigeration space to chill the salad as needed.

Equipment adjustments may involve larger mixing tools or additional storage containers for increased quantities. Timing modifications generally don’t apply since prep time remains constant regardless of batch size.

For storage considerations, be mindful of how long the salad will remain fresh and adapt accordingly when prepping for larger gatherings to ensure minimal waste and high quality.

Nutritional Deep Dive

The macro breakdown of this cheesecake fruit salad showcases its balanced nutrition; typical servings provide a healthy dose of carbohydrates primarily from the fruits while offering healthy fats from the cream cheese. This balance promotes sustained energy levels for those enjoying the dish.

Micronutrient analysis reveals that the colorful fruits contribute significant amounts of vitamins C and A, along with important dietary fiber, aiding in digestive health. Cream cheese adds calcium and protein, creating a harmonious blend of nutrients across diverse food groups.

Health benefits of consuming fruit are well-established, ranging from improved immune function to enhanced skin health due to antioxidant properties. This salad also promotes hydration, especially vital during warmer months.

Dietary considerations should account for sugar levels; opting for low-sugar variations of the dressing ensures compatibility with diverse diets and promotes mindful eating.

Portion analysis plays a role in understanding caloric consumption, as moderation is key. Smaller servings of this dessert allow individuals to satisfy their sweet cravings without excessive calorie intake, making it a mindful choice for those managing their diet as well.

Dietary Adaptations

Making cheesecake fruit salad gluten-free is easily achievable; simply select gluten-free ingredients and avoid any additions containing gluten. For those needing a dairy-free option, substituting the cream cheese with dairy-free alternatives results in an equally creamy taste alongside fruit’s natural sweetness.

For vegan adaptations, opt for a combination of silken tofu and plant-based yogurt, mimicking the creamy texture while adhering to dietary restrictions. To maintain flavor, add additional sweeteners to offset the tofu’s subtle taste.

Low-carb variations are accessible by replacing traditional fruits with lower sugar options such as berries or avocados, perfect for those following ketogenic diets while still enjoying a refreshing dessert.

Keto adaptations can further reduce carbohydrates by using sugar substitutes like erythritol or stevia for the dressing and carefully selecting fruits accordingly.

Paleo-friendly cheesecake fruit salad can leverage pure, natural sweeteners and avoid dairy altogether, allowing for a wholesome perfectly aligned to paleo principles while offering a satisfying and delicious outcome.

Troubleshooting Guide

When addressing texture issues in cheesecake fruit salad, consider the balance of creamy dressing with fruits. If the dressing appears too runny, additional cream cheese or a dash of cornstarch can thicken it effectively, enhancing the overall mouthfeel.

Flavor balance can be adjusted through taste-testing. If the salad is too sweet, add a hint of lemon juice for acidity to bring equilibrium; conversely, slightly increasing sweetness can counteract overly tart fruits.

Temperature problems may arise if the salad is warmed during serving. Ensure it remains chilled before serving to preserve the refreshing quality, especially during gatherings.

Equipment challenges often occur with larger batches. Ensuring the use of appropriately sized mixing tools prevents difficulty in achieving an even blend, which can lead to inconsistencies in presentation.

Ingredient substitutions might be necessary based on seasonality or availability. If you can’t find a certain fruit, experiment with similar flavors while keeping an eye on sweetness levels, ensuring the integrity of the salad remains intact.

Timing concerns can lead to overcrowding in refrigeration; if serving soon after preparation, use smaller or shallow containers for the salad to optimize cooling time without compromising quality.

Recipe Success Stories

Community feedback on this cheesecake fruit salad has been overwhelmingly positive, often highlighting its versatility and appealing taste. Many have shared their unique adaptations, adding personal flair while retaining the essence of the original recipe.

Variation successes have emerged, with readers frequently experimenting with different fruits for seasonal celebrations. Its ability to adapt to various fruits allows for an ever-evolving dessert option, driving engagement and enjoyment.

Adaptation stories highlight how cooks have made this recipe their own, sharing unique combinations that reflect family traditions or regional influences, enriching the story behind this beloved dish.

Reader suggestions often include tips on enhancing flavor or presentation, creating a collaborative environment where everyone can learn and grow while enjoying the art of cooking.

Lastly, photography tips have encouraged home cooks to showcase their creations, emphasizing the beauty of fresh ingredients and elegant presentations that inspire others to try making the recipe for themselves.

Frequently Asked Questions

Can I make cheesecake fruit salad a day in advance?

Yes, you can prepare the dressing and cut the fresh fruits a day in advance. Store the ingredients separately until just before serving to maintain freshness.

How long can I store leftovers in the fridge?

The cheesecake fruit salad is best enjoyed fresh, but it can be stored in the refrigerator for up to 2 days. After that, the fruits may lose their texture and freshness.

Can I substitute the cream cheese in this recipe?

Absolutely! You can use dairy-free cream cheese, Greek yogurt, or even a mixture of silken tofu blended until smooth for a healthier alternative.

Which fruits work best for this salad?

Popular choices include strawberries, blueberries, kiwi, melons, and pineapple. Feel free to mix and match based on what’s in season and to your taste preference.

Is cheesecake fruit salad a healthy dessert option?

Yes, when made with fresh fruits, it’s a nutrient-rich dessert option. It provides vitamins, minerals, and fiber while offering a satisfying sweetness to curb dessert cravings.

Can this recipe be made vegan?

Yes! By substituting the cream cheese with plant-based yogurt or a creamy cashew mix, you can create a delightful vegan version of cheesecake fruit salad.

What should I do if the dressing is too thin?

If the dressing is too runny, try adding a little more cream cheese to thicken it. You can also incorporate a tablespoon of cornstarch mixed with a bit of water.

How do I prevent fruits from browning?

To prevent browning, consider adding a splash of lemon juice to fruits like apples and bananas. Store them in a sealed container to maintain lack of exposure to air.

What can I serve with cheesecake fruit salad?

Common accompaniments include whipped cream, ice cream, or granola placed on top. Serving it alongside other desserts can further enhance the experience.

Can I freeze cheesecake fruit salad?

It is not recommended to freeze cheesecake fruit salad, as the fruits can become mushy and lose their texture upon thawing.

Additional Resources

To elevate your culinary journey, explore related recipes that celebrate fruits and creaminess, such as berry parfaits or fruit trifle desserts. Technique guides on whipping cream or creating homemade dressings can add depth to your cooking skills.

Ingredient information ensures you’re up to date on seasonal fruits, offering tips on selecting the freshest produce. Equipment recommendations could further enhance your kitchen efficiency, suggesting tools for fruit preparation and storage.

Seasonal variations highlight dishes perfect for every time of year. Keep your dessert rotation fresh by experimenting with different flavors and techniques to create exciting new recipes.

Join the Conversation

We invite you to share your versions of cheesecake fruit salad on social media, using specific hashtags to connect with others who love this delightful dish. Photography tips encourage capturing the beauty of your salad, showcasing the vibrant colors of the fruits.

Leave your recipe reviews and feedback, as community engagement is vital in shaping the evolution of our shared culinary experiences. Suggestions for variations promote creativity, allowing everyone to leave their unique mark on this beloved dessert.

The Recipe

Cheesecake Fruit Salad

Serves: 6 servings

Prep Time: 15 mins

Cook Time: 0 mins

Total Time: 15 mins

Kitchen Equipment Needed

  • Mixing bowl
  • Whisk
  • Knife and cutting board
  • Serving bowl or cups

Ingredients

  • 2 cups strawberries, hulled and sliced
  • 1 cup blueberries
  • 1 cup kiwi, peeled and sliced
  • 1 cup pineapple, diced
  • 1 cup cream cheese, softened
  • ½ cup sugar (or to taste)
  • 1 teaspoon vanilla extract

Directions

  1. In a large mixing bowl, whip the softened cream cheese until smooth.
  2. Add sugar and vanilla extract; continue to mix until well combined.
  3. In a separate bowl, combine all the fresh fruits gently to preserve their texture.
  4. Pour the cream cheese dressing over the fruits, and gently toss to coat all of the fruits.
  5. Refrigerate the salad for at least 30 minutes before serving for optimal flavor.
  6. Serve chilled and enjoy your delicious cheesecake fruit salad!

Recipe Notes

  • Feel free to substitute fruits based on seasonal availability and personal preferences.
  • For a lighter version, consider using Greek yogurt in place of some or all of the cream cheese.
  • Add a sprinkle of graham cracker crumbs on top just before serving for added texture.

Best Nespresso Iced Coffee Recipes to Try This Summer

16 Nespresso Iced Coffee Recipes To Try: Cool Down with These Delicious Brews

⚖️
Difficulty
Easy

⏲️
Prep Time
5 mins

🕒
Cook Time
0 mins

⏱️
Total Time
5 mins

🍽️
Servings
1 serving

Indulging in summer delights calls for a refreshing drink, and what better way to chill out than with Nespresso iced coffee recipes? These cool concoctions capture the rich flavors of your favorite espresso while adding a twist of ice-cold refreshment. From creamy blends topped with whipped cream to vibrant options enhanced with flavored syrups, these 16 Nespresso iced coffee recipes are perfect for warm afternoons or gatherings with friends.

Whether you’re an espresso enthusiast or someone simply looking for a delightful caffeine boost, these recipes cater to all tastes. Each icy beverage showcases the gourmet qualities of Nespresso coffee, artfully combined with various ingredients that enhance flavor and texture. Let’s dive into the cool world of Nespresso iced coffees and discover how to elevate your brew game.

Quick Recipe Highlights

  • Flavor Profile: Revel in balanced tastes of rich coffee, creamy textures, and sweet notes that tantalize your palate.
  • Texture: Enjoy the perfect blend of creamy smoothness and refreshing icy crunch with each sip.
  • Aroma: Experience enticing scents of coffee intertwined with hints of caramel, vanilla, or seasonal spices.
  • Visual Appeal: Feast your eyes on layered drinks with contrasting colors and vibrant garnishes that invite you to indulge.
  • Skill Level Needed: These recipes are straightforward, ideal for novice coffee drinkers and seasoned aficionados alike.
  • Special Equipment: All you need is a Nespresso machine and a few common kitchen tools to whip up these delightful drinks.

Recipe Overview

  • Difficulty Level: The simplicity of these recipes encourages everyone to try their hand at crafting homemade iced coffee with minimal effort.
  • Category: Perfect for breakfast, afternoon snacks, or post-dinner indulgence, these recipes bridge all parts of the day.
  • Cuisine: These iced coffee variations reflect global influences, integrating gourmet coffee culture with local tastes.
  • Cost: With affordable ingredients, making iced coffee at home becomes a budget-friendly alternative to café purchases.
  • Season: Summer is the perfect season for these chilled beverages; the refreshing qualities offer respite from the heat.
  • Occasion: These recipes are suitable for everything from casual brunches to elegant outdoor parties.

Why You’ll Love This Recipe

The taste and texture of these Nespresso iced coffee recipes will captivate your senses and make each sip an exhilarating experience. Combining the bold flavors of espresso with creamy milk or plant-based alternatives results in a delightful contrast that tantalizes your taste buds. You’ll enjoy the added layer of flavor from sweet syrups and spices, all balanced perfectly over ice.

In addition to their delightful flavor, these iced coffee recipes offer ultimate convenience. They come together quickly, requiring just a few minutes and minimal equipment. Whether you’re rushing out the door or hosting friends, these recipes allow you to present an impressive beverage without the fuss of elaborate preparation.

Nutritionally, these Nespresso iced coffee recipes can be tailored to meet specific dietary needs, allowing you to indulge without compromising health goals. You can opt for low-fat milk, sugar substitutes, or dairy-free creams based on your preference, making each drink enjoyable and guilt-free.

Socially, sharing delicious iced coffee recipes can bring friends and family together for a shared experience. They provide an opportunity for tasting parties, inviting guests to explore unique flavor combinations and share their favorites, enhancing the joy of connection.

Cost-effectiveness is another appealing factor; creating your iced coffee creations at home not only saves money but also gives you the freedom to experiment with different ingredients and customize each beverage to suit your tastes.

Historical Background and Cultural Significance

The origins of iced coffee can be traced back centuries, with variations emerging globally as coffee culture flourished. Initially a means of preserving coffee during heat, iced coffee evolved into a beloved drink enjoyed by many. Countries like Japan and Vietnam have uniquely crafted their own iced coffee styles, showcasing diverse flavor profiles and techniques, with each culture putting its own spin on this refreshing beverage.

Culturally, iced coffee has significant importance in various regions. In places like Italy, coffee is a ritual, and incorporating cold methods brings a novel touch to traditional practices. Enjoying iced coffee signifies relaxation and leisure; it’s the perfect drink for enjoying sunny days and long afternoons.

The evolution of iced coffee from a simple refreshment to an artisanal specialty reflects the growing appreciation for coffee globally. As people increasingly seek innovative ways to enjoy coffee, the creation of gourmet iced coffee blends has become a popular trend.

Regional variations abound, offering inspired combinations of flavors and making the iced coffee experience truly diverse. These include adding local ingredients such as spices, fruits, or flavored creams, demonstrating how various cultures adapt this drink to complement their unique tastes.

Ingredient Deep Dive

Espresso is the heart of these Nespresso iced coffee recipes, characterized by its concentrated flavor and rich body. This small but mighty ingredient carries a robust caffeine punch and is the foundation for countless beverages. The art of espresso-making dates back to the early 20th century in Italy and has since gained global prominence, gaining respect in both culinary and cultural contexts.

The nutritional benefits of espresso are noteworthy; it is low in calories and high in antioxidants, making it a healthy choice for coffee drinkers. When selecting espresso pods, look for quality brands and blends that match your flavor preferences.

Milk and dairy alternatives play a crucial role in crafting creamy iced coffee drinks. Whether you opt for whole milk, almond milk, or oat milk, each brings unique flavors and textures to enhance your coffee experience. The history of milk in coffee beverages traces back to early Italian cappuccinos, continuing to grow in popularity as millions enjoy creamy additions to their daily brews.

For storage, keep milk in a cold refrigerator, ideally at 35°F to 40°F. Consider shelf-stable options for longer-lasting alternatives. When selecting milk, ensure to check for fat content to suit your taste and recipe needs. These providers often have alternatives that cater to various dietary restrictions.

Common Mistakes to Avoid

  • Using warm coffee: Ensure your coffee is chilled before mixing to avoid a diluted flavor.
  • Over-diluting: Avoid adding excessive ice that can quickly water down the drink.
  • Poor quality ingredients: Always use fresh, high-quality coffee and milk for optimal taste.
  • Neglecting flavor balance: Be mindful of sweetness and creaminess; adjust syrups and milk as necessary.
  • Skipping garnishes: Enhance the visual appeal and flavor with simple garnishes like whipped cream or chocolate shavings.
  • Wrong ratios: Carefully measure ingredients to achieve the desired taste and consistency.
  • Inadequate blending: Mix thoroughly to integrate flavors and ensure an enjoyable drinking experience.
  • Ignoring preparation time: Allow your iced coffee to chill adequately for the best results.
  • Using expired ingredients: Always check the freshness of your ingredients, particularly cream and milk.
  • Inconsistent brewing: Follow your Nespresso machine’s instructions for a consistent espresso extraction.

Essential Techniques

Brewing an excellent espresso is key to any iced coffee recipe. Mastering the espresso-making technique ensures your coffee retains its bold flavor even when chilled. Be attentive to the grind size, tamping pressure, and extraction time to achieve the perfect shot consistently. Watch for a rich crema; this golden frothy layer indicates a well-extracted espresso.

Another essential technique is the layering method. When preparing iced coffee, pour the ingredients slowly to maintain distinct layers. This improves presentation and enhances the sensory experience, allowing drinkers to appreciate the flavors as they meld. Practice gently pouring over the ice or milk to create beautiful, visible sections.

Pro Tips for Perfect Nespresso Iced Coffee

Choose strong espresso shots to ensure the flavor stands up against the ice and milk, achieving a robust flavor profile. Use frozen coffee cubes instead of regular ice to prevent dilution as they melt. Experiment with flavored syrups and add ins to create unique and satisfying combinations. Don’t hesitate to personalize each drink, adjusting sweetness and dairy to your taste preference.

Enhance your iced coffee by using different spices like cinnamon or nutmeg sprinkled on top for added warmth. Opt for chilled glassware to maintain cold temperatures for longer throughout your drink’s consumption. Lastly, consider the texture by blending with frosty ingredients for a whipped-feel if you desire creamy iced coffees.

Variations and Adaptations

Each Nespresso iced coffee recipe can embrace regional twists, such as a Vietnamese iced coffee enriched with sweetened condensed milk or a Greek freddo served with foamed milk. Seasonal adaptations can include pumpkin spice flavors in the fall or refreshing mint additions for summer sips.

For dietary modifications, consider using low-carb sweeteners or dairy alternatives for those seeking healthier options. These substitutions ensure everyone can indulge. Experiment with flavors like caramel, hazelnut, or chocolate to find your signature iced coffee that aligns with your taste preferences.

Texture modifications can also enhance your iced coffee experience; add whipped cream for a luxurious feel or blend for a smoothie-like consistency. Presentation alternatives like serving in mason jars or creatively layered glasses can make your iced coffee even more appealing.

Serving and Presentation Guide

When serving your Nespresso iced coffee, attention to plating can elevate the experience. Use tall glassware to showcase the beautiful layers of color and texture. Garnishes like a sprig of mint or a sprinkle of cocoa can add freshness and vibrancy. Consider pairing your iced coffee with pastries or cookies to create an inviting snack experience.

Keep temperature considerations in mind; serving straws can enhance comfort and convenience as guests savor their beverages. Portion control is crucial to avoid overwhelming guests; typically, an 8 oz serving is ideal for most drinks.

Wine and Beverage Pairing

Pairing wine with your Nespresso iced coffee can enhance the flavor experience. Opt for sweet wines, such as Moscato or dessert wines, that complement the coffee’s richness. Non-alcoholic alternatives like sparkling water can cleanse the palate, creating a refreshing balance alongside your drinks.

Consider coffee-based cocktails for a unique twist; beverages like espresso martinis blend rich coffee flavors with a hint of indulgence. Serve chilled options alongside coffee to offer variety for guests and enhance their experience.

Storage and Shelf Life

To store any leftover iced coffee, keep it in an airtight container in the refrigerator for up to 24 hours. Avoid adding milk or cream until serving to maintain freshness and prevent spoilage. Coffee can lose its vibrant flavors over time, which is why it is best to consume as soon as possible.

If freezing iced coffee, use ice cube trays to create individual frozen portions that are easy to blend into smoothies. Reheating leftover espresso should always be done gently to avoid altering its taste.

Make Ahead Strategies

When planning a gathering, consider prepping elements in advance. Brew espresso and store in the refrigerator for up to 24 hours, allowing you to assemble iced coffee drinks quickly on the day of the event. Gather all ingredients beforehand, ensuring they’re chilled for immediate use.

For iced coffees served with sweeteners or syrups, prepare these in bulk and store them in the refrigerator for easy access. Assemble drinks shortly before serving for the freshest results.

Scaling Instructions

To scale your recipe down for a smaller gathering, simply halve the ingredients while maintaining the same preparation techniques. Conversely, for larger crowds, double or triple the recipe, ensuring adequate storage and blending accommodations.

Adjust equipment sizes as necessary; for example, larger batches may require bigger containers or blenders. Monitor your brewing times to ensure consistent quality, especially with espresso, as larger quantities may necessitate slightly adjusted brewing times.

Nutritional Deep Dive

Exploring the nutritional composition of iced coffee can further enhance your understanding and enjoyment of the drink. An average iced coffee made with espresso typically contains minimal calories unless sweeteners or creams are added. Monitoring your additions allows for customization based on your dietary goals.

Breaking down macronutrients helps identify suitable options for various diets. For instance, staying aware of sugar content in flavored syrups can ensure accommodations for those monitoring their intake for health reasons.

Incorporating nutrients from alternative milk can also provide added health benefits, such as vitamins and minerals that enhance the coffee experience.

Dietary Adaptations

Iced coffee is versatile and can easily accommodate various dietary needs. To make your drink gluten-free, ensure all added ingredients, especially flavored syrups, are certified gluten-free. For those following a dairy-free lifestyle, opt for almond, coconut, or oat milk to achieve a similar creamy texture without lactose.

Vegan adaptations can be achieved simply by replacing milk with plant-based options. For low-carb or keto followers, sugar-free syrups and unsweetened milk alternatives can help maintain carbohydrate limits without sacrificing flavor.

Whether following a paleo or low-FODMAP diet, selecting specific ingredients can align your iced coffee with dietary guidelines while still allowing enjoyment of this chilled beverage.

Troubleshooting Guide

Texture issues may arise if too much ice is added, leading to a watery drink. Limit ice or use coffee ice cubes to maintain integrity. If flavors appear unbalanced, experiment with varying levels of sweeteners and cream ratios to find the perfect blend.

For temperature problems, ensure your coffee is adequately chilled, and consider using cold brew methods for an even smoother finish. Equipment challenges, like an espresso machine not heating correctly, may require cleaning or checking water levels for optimal function.

Ingredient substitutions may alter the taste and texture; therefore, be mindful of ratios. Keep an eye on timing, especially with brewing, to ensure quality espresso shots, resulting in delicious iced coffee.

Recipe Success Stories

Community feedback on Nespresso iced coffee recipes often celebrates easy preparation and delicious results. Many readers express excitement about discovering new flavor combinations and enhancing their summer gatherings.

Variations shared within the community show creative twists, such as incorporating seasonal ingredients like peppermint during the holidays or fruit purees during summer months. Each recipe serves as a foundation for experimentation, inspiring personal adaptations.

Suggestions from readers often highlight additional garnishes or the use of local ingredients, leading to beautiful presentations. Success stories feature captivating photography that captures the visual glory of various iced coffee drinks, inviting even more engagement and inspiration.

Frequently Asked Questions

Can I use decaffeinated coffee in these recipes? Absolutely! Feel free to swap out regular espresso with decaffeinated versions for a caffeine-free treat, maintaining the iced coffee experience without jitters.

What’s the best way to sweeten my iced coffee? Popular options include flavored syrups, honey, or natural sweeteners like agave. Experiment to find the right level of sweetness for your palate.

Can I make these recipes dairy-free? Yes, you can easily substitute traditional dairy with almond, coconut, or oat milk for a delicious dairy-free iced coffee.

How do I store leftover iced coffee? Store any leftover iced coffee in an airtight container in the refrigerator for up to 24 hours; however, it’s best consumed fresh for the best flavor.

Can I use flavored Nespresso pods? Absolutely! Flavored pods can add a delightful twist to your iced coffee, making it even more exciting.

What’s the ideal ratio of coffee to milk? A common ratio is 1:1, but you can adjust it according to your preference for a stronger or creamier coffee drink.

Can I add alcohol to my iced coffee? Yes! Consider adding a splash of coffee liqueur for a delightful cocktail twist, perfect for an evening treat.

Is it safe to freeze iced coffee? While you can freeze coffee, it’s best to use it in cold brew or blended drinks, as traditional iced coffee may lose some flavor during freezing.

How long does it take to brew espresso? Brewing a shot of espresso typically takes about 25-30 seconds; ensure you’re using a finely ground coffee for the best extraction.

Are there seasonal variations for iced coffee? Absolutely! Seasonal ingredients like pumpkin spice can be added in the fall, while summer fruits can elevate your iced coffee experience during warmer months.

Additional Resources

If you’re eager to expand your culinary repertoire, explore related recipes like dynamic cold brews, exotic frappes, and various coffee drinks perfect for entertaining. Technique guides can assist you in perfecting espresso brewing methods or enhancing your foam techniques for toppings and garnishes.

For ingredient information, consider exploring the benefits of various milks and their flavor profiles, allowing for more informed choices in your iced coffee. Equipment recommendations, including must-have tools for coffee enthusiasts, will elevate your home brewing experience and simplify preparation.

Seasonal variations in ingredients and flavors can also inspire creativity and excitement with your iced coffee preparation. Keep things fresh and engaging by experimenting periodically.

Join the Conversation

We invite you to engage with us and share your Nespresso iced coffee creations via social media! Post your favorite photos, offer tips, and connect with others who appreciate the art of iced coffee making. Participate in recipe reviews, sharing your personal adaptations and successes to inspire the community.

Explore variations on the classic recipes together, fostering creativity and providing feedback on flavor pairings and presentation ideas. Together, we can create and celebrate iced coffee as not just a drink but an experience to be savored.

The Recipes

Nespresso Iced Coffee Variations

Serves: 1

Prep Time: 5 mins

Cook Time: 0 mins

Total Time: 5 mins

Kitchen Equipment Needed

  • Nespresso machine
  • Ice cube tray (optional for coffee cubes)
  • Blender (for frappes)
  • Long spoon
  • Glasses or cups for serving

Ingredients

  • 1 Nespresso espresso pod
  • Ice cubes
  • Milk or cream (to taste)
  • Syrup or sweetener (to taste)
  • Optional spices or flavorings (e.g., vanilla, caramel, or spices)
  • Garnishes (e.g., whipped cream, chocolate shavings)

Directions

  1. Brew 1 shot of Nespresso espresso using your machine.
  2. Fill a glass with ice cubes.
  3. Pour the brewed espresso over the ice.
  4. Add milk or cream according to your preference.
  5. Sweeten with syrup or sweetener, adjusting to taste.
  6. Optional: Add spices or flavorings as desired.
  7. Garnish with whipped cream or toppings if desired.
  8. Stir gently and enjoy your refreshing iced coffee!

Recipe Notes

  • Try different syrups for a unique twist.
  • Use frozen coffee cubes to enhance chill without watering down.
  • A variety of spices can change the flavor profile dramatically.
  • Experiment with different types of milk or non-dairy alternatives.

Delicious Cheddar-Crusted Ground Beef and Rice Casserole Recipe

Cheddar-Crusted Ground Beef and Rice Casserole: Comfort Food at Its Best

⚖️
Difficulty
Easy

⏲️
Prep Time
15 mins

🕒
Cook Time
35 mins

⏱️
Total Time
50 mins

🍽️
Servings
4

Cheddar-Crusted Ground Beef and Rice Casserole is the epitome of comfort food, combining savory ground beef, fluffy rice, and a rich cheddar cheese topping. This dish appeals to families and individuals alike, as it provides a hearty meal that warms the soul. With its melty cheese and perfectly seasoned beef, each bite delivers a satisfying combination of flavor and texture that will leave you wanting more.

Imagine savoring the flavors of a delicious casserole on a chilly evening with your loved ones gathered around the dinner table. The aroma of ground beef cooked with aromatic spices fills your kitchen, while the bubbling cheese creates an inviting atmosphere. This casserole not only feeds your belly but also provides a sense of home and comfort that everyone craves.

Quick Recipe Highlights

  • Flavor Profile: This casserole features a savory ground beef base, seasoned with herbs and spices topped with a robust layer of sharp cheddar cheese that melts beautifully.
  • Texture: Expect a delightful combination of tender beef, fluffy rice, and a crunchy cheese crust that adds an additional layer of satisfaction with each bite.
  • Aroma: The dish boasts a mouthwatering aroma of sautéed beef mixed with a hint of garlic and onion, layered with the richness of melted cheddar cheese.
  • Visual Appeal: A golden-brown crust envelops a rich blend of beef and rice, presenting an inviting and comforting dish perfect for family meals.
  • Skill Level Needed: The casserole is uncomplicated, ideal for beginner cooks looking to build confidence in the kitchen with simple assembly and cooking techniques.
  • Special Equipment: Basic kitchen gear is all that’s needed, including a skillet, mixing bowl, and an oven-safe casserole dish.

Recipe Overview

  • Difficulty Level: This easy-level recipe is perfect for those new to cooking and is user-friendly, allowing for quick preparation and assembly.
  • Category: A nourishing main dish that fits perfectly into family dinners, potluck gatherings, or weeknight meals.
  • Cuisine: It’s a classic American casserole, drawing inspiration from comfort food traditions that prioritize warmth and satisfaction.
  • Cost: The ingredients are affordable and commonly found, making this dish budget-friendly without sacrificing flavor.
  • Season: Ideal for any season, but particularly comforting during cooler months that call for heartwarming meals.
  • Occasion: Perfect for family dinners, potlucks, and casual get-togethers where everyone appreciates a hearty meal.

Why You’ll Love This Recipe

First and foremost, the taste and texture of the Cheddar-Crusted Ground Beef and Rice Casserole are unparalleled. The contrasting layers of flavor from the well-seasoned beef and the sharpness of cheddar harmonize beautifully, evoking comforting memories of home-cooked meals. The crispy cheese crust adds an enjoyable textural element, making each bite a delightful experience.

Additionally, the convenience of this recipe is a major advantage. With just one dish to prepare, cooking becomes a breeze—especially after a long day. The assembly is straightforward, requiring minimal prep time, which means you can quickly whip this casserole together and move on to the more enjoyable aspects of your evening.

When it comes to nutrition, this casserole provides balanced macronutrients, featuring protein from the beef, carbohydrates from rice, and essential fats from cheese. This makes it a satisfying choice for families aiming to provide hearty meals without compromising on health.

Moreover, this recipe shines in social settings, where you can easily double or triple the quantities to accommodate a crowd. Sharing such a comforting dish with friends and family fosters an inviting atmosphere, encouraging everyone to relax and enjoy each other’s company.

Lastly, the cost-effectiveness of this dish makes it accessible to a variety of households. Utilizing simple ingredients means you can prepare a filling meal without breaking the bank, making it an excellent choice for daily dining as well as special occasions.

Historical Background and Cultural Significance

The origins of the casserole can be traced back to early French cooking, where dishes were often baked in covered pots. American households embraced this cooking method in the mid-20th century, leading to the popularization of casseroles as easy, one-dish meals suitable for feeding families.

Over the years, the casserole has evolved, incorporating diverse ingredients and regional flavors, reflecting the culinary preferences of various cultures. The Cheddar-Crusted Ground Beef and Rice Casserole encapsulates the rich flavors of American comfort food, celebrating the simplicity and creativity that defines this beloved genre.

As home cooks became busier, the casserole transitioned from a special occasion treat to a staple in American kitchens—perfect for families looking to save time while still providing wholesome meals. This transition speaks to the ongoing desire for convenience in cooking while retaining the heartwarming qualities that define comfort food.

While this dish carries a strong American influence, variations can be found in many cultures around the world, where layered baking remains a common practice. Each region adds its unique ingredients or spices, showcasing the adaptability of this beloved dish.

Ingredient Deep Dive

Ground Beef:
Culturally, ground beef has marked its significance as a versatile protein throughout culinary history. It is a mainstay in American households, known for its ability to adapt to various cuisines. Nutritionally, it’s rich in protein, iron, and B vitamins, contributing positively to a balanced diet. When selecting ground beef, look for a bright red color and avoid packages with excess liquid. Proper storage is crucial—keep it refrigerated and consume within a couple of days, or freeze for extended periods. For variation, ground turkey or chicken can serve as excellent substitutes.

Rice:
Rice is a staple in many cultures, symbolizing nourishment and sustenance. This grain is an excellent source of carbohydrates, providing energy and being naturally gluten-free. When selecting rice, choose varieties based on the desired texture; long-grain works well for fluffy casseroles. To store cooked rice, ensure it’s cooled quickly, then refrigerate; it can be frozen for later use as well. Substitutes for rice in this recipe could include quinoa or farro for a nutritional twist.

Cheddar Cheese:
Originating from the village of Cheddar in England, cheddar cheese has become a cornerstone in many dishes across several countries. Rich in calcium and protein, cheddar enhances flavor and texture. When selecting cheese, aim for blocks, as grated cheese can contain additives that affect meltability. Store in the refrigerator wrapped to maintain freshness. For variations, try Monterey Jack or mozzarella for different taste profiles.

Common Mistakes to Avoid

  • Using over-cooked meat: This can result in dryness in the casserole. Always brown the ground beef just until it’s no longer pink to keep it juicy.
  • Not seasoning enough: Neglecting to properly season the beef can lead to bland flavors. Make sure to use enough salt and spices to elevate the dish.
  • Skipping the cheese topping: The cheese crust is what makes this casserole special. Skipping it would result in missing out on the crunchy, delightful layer.
  • Overpacking the casserole dish: Leave enough space for the rice to expand during cooking. Overpacking can lead to uneven cooking.
  • Using cold ingredients: Make sure ingredients, such as cooked rice or beef, are warm before assembling to ensure even cooking.
  • Not covering the dish initially: Covering the dish in the first half of cooking helps to retain moisture and heat.
  • Incorrect oven temperature: Ensure your oven is preheated and correctly set to avoid undercooking.
  • Cooking time miscalculations: Always follow the time guidelines closely, as different ovens can vary in temperature accuracy.
  • Ignoring visual cues: Watch for a golden brown crust on top of your casserole, as this indicates doneness.
  • Not letting it rest: Allow the casserole to sit for about 10 minutes after baking to set, making serving easier.

Essential Techniques

Browning Ground Beef:
Browning ground beef is fundamental for flavor development. It’s essential to break up the meat for even cooking and to create those delicious browned bits that enhance the dish’s overall taste. To master this technique, use medium-high heat and don’t overcrowd the pan; this allows the beef to brown rather than steam.

Cooking Rice:
Cooking rice properly ensures the right texture for your casserole. Always wash the rice to remove excess starch which can cause it to become gummy. A general rule of thumb is to use a 2:1 water to rice ratio. Check for doneness by tasting; it should be tender yet firm.

Assembling the Casserole:
Layering is key when assembling your casserole. Start with a layer of beef, then rice, and finish with cheese on top. This ensures that all flavors meld beautifully while the cheese creates that desired crust. Master the art of layering by ensuring each component is evenly distributed.

Baking Techniques:
Preheating your oven ensures that the casserole cooks evenly. Covering your dish with aluminum foil in the early stages keeps moisture in, while removing the cover allows the top to brown perfectly. Watch it closely towards the end to prevent burning while ensuring the cheese melts beautifully.

Pro Tips for Perfect Cheddar-Crusted Ground Beef and Rice Casserole

1. Experiment with different cheese blends for varied flavors—try gouda or a spicy pepper jack for a kick.
2. Incorporate vegetables like bell peppers or spinach for added nutrients and flavor; just ensure they are pre-cooked.
3. For added flavor, consider adding Worcestershire sauce to the beef while it cooks for a deeper taste.
4. Test different herbs and spices, such as oregano or smoked paprika, to customize the spice profile.
5. Get creative with presentation by layering the ingredients in a visually appealing way before baking.
6. If you’re pulling leftovers from the fridge, give them a splash of broth when reheating to add moisture.
7. For an extra crunchy topping, mix breadcrumbs with the cheese before layering on top.
8. Set aside some extra cheese to sprinkle on just before the casserole finishes baking for a gooey top.

Variations and Adaptations

Regional variations of the casserole can include adding ingredients such as chorizo or jalapeños for a southwestern twist. Seasonal adaptations can involve incorporating seasonal vegetables, like zucchini in the summer or squash in the fall, enhancing the nutrition while celebrating each season’s bounty. For dietary modifications, consider using brown rice instead of white for a whole grain option or low-fat cheese to reduce calories without sacrificing flavor. Texture modifications might include adding crushed tortilla chips on top for a twist or using cooked quinoa for a protein boost while maintaining the casserole’s hearty feel. Presentation alternatives could be individual servings in ramekins for a stylish touch at dinner parties.

Serving and Presentation Guide

When plating the casserole, scoop carefully to achieve clean cuts. Use a spatula to lift portions and allow them to sit for a few minutes before serving; this enhances the presentation. Garnish each serving with freshly chopped parsley or a sprinkle of paprika to add color. Pair this hearty dish with a simple side salad or roasted vegetables to complete the meal. When serving, consider offering additional cheese on the side for guests who may want a little extra. Warmth is key; serve the casserole steaming hot right from the oven to keep everyone cozy. For portion control, use a measuring cup or ladle to ensure consistent servings.

Wine and Beverage Pairing

For wine pairings, a robust red wine like Cabernet Sauvignon beautifully complements the richness of the cheddar cheese and ground beef. If you prefer white, a full-bodied Chardonnay can add a delightful richness without overwhelming the flavors. For non-alcoholic alternatives, consider a sparkling apple cider—its crispness will balance the dish’s savory notes. If coffee is appropriate for your gathering, opt for a light roast, as its acidity can provide a wonderful contrast to the dish’s richness. When serving beverages, ensuring they’re at the right temperature, chill wines in an ice bucket and serve hot beverages freshly brewed.

Storage and Shelf Life

To store leftovers, place the casserole in an airtight container and refrigerate; it will last for up to 3–4 days. Ensure it’s completely cooled before sealing to avoid condensation inside the container. For longer storage, freeze portions in airtight containers for up to 3 months. When reheating, do so in the oven at 350°F for about 20 minutes, or until heated through, adding a splash of broth to maintain moisture. Signs of spoilage include an off-smell or visible mold. Always trust your senses—when in doubt, throw it out.

Make Ahead Strategies

For those short on time during the week, consider preparing this casserole ahead of time. Cook the beef and rice, then assemble the casserole, cover, and refrigerate for up to 1 day before baking. This practice allows the flavors to meld beautifully. Store components separately if preparing more than a day in advance —keeping rice and beef in separate containers. When ready to bake, allow the assembled casserole to sit at room temperature for about 15-20 minutes to ease cooking time. Fresh elements like herbs can be added just before serving for extra vibrancy and flavor.

Scaling Instructions

For those planning to serve a bigger crowd, doubling the recipe is simple and requires minimal adjustments. Use a larger casserole dish and increase cooking time by about 10-15 minutes, as needed to ensure everything cooks thoroughly. When halving the recipe, ensure that smaller dishes are used, as this can affect the baking time; check periodically for doneness. Always take careful note of ingredient proportions, particularly with seasonings, to maintain flavor consistency at any scale.

Nutritional Deep Dive

This casserole provides a balanced macro breakdown, approximately consisting of 25 grams of protein per serving, essential for muscle growth and repair. The carbohydrate content primarily comes from rice, making it an excellent energy source, crucial for active lifestyles. In micronutrient terms, cheddar cheese adds calcium for bone health, while beef provides iron, which plays a fundamental role in energy levels. For those focused on dietary considerations, this filling meal can function well in various balanced diets; pay attention to portion sizes to align with individual nutritional goals.

Dietary Adaptations

To cater to gluten-free needs, simply ensure that all ingredients, including sauces, are certified gluten-free. For a dairy-free version, substitute the cheddar cheese with a plant-based cheese and use ground turkey or jackfruit in place of beef. A vegan rendition can be made by utilizing lentils or chickpeas paired with quinoa instead of rice. Low-carb enthusiasts can replace the rice with cauliflower rice, providing a similar texture without the carbs. Each adaptation maintains the core essence of the dish while catering to various dietary needs.

Troubleshooting Guide

If you find your casserole is too dry, it may not have been covered during baking. Always ensure to cover during the early cooking stages. If it turns out too watery, consider using less liquid next time or allowing it to bake for longer to evaporate excess moisture. For flavor imbalance, an additional pinch of salt or a splash of Worcestershire sauce can elevate dull flavors. If utilizing a different type of meat, be aware that cooking times may vary, so adjust accordingly. Lastly, if your cheese doesn’t brown as desired, try finishing under the broiler for a couple of minutes—just watch closely to avoid burning.

Recipe Success Stories

The Cheddar-Crusted Ground Beef and Rice Casserole has garnered numerous praises from home cooks for its forgiving nature and adaptability in ingredients. Community feedback often highlights successful variations that incorporate seasonal veggies, making it a versatile option throughout the year. Many readers share their personal adaptations, showcasing creativity and personal tastes that reflect their family traditions. Additionally, the dish remains a favorite at potlucks, with attendees often requesting the recipe after savoring the hearty flavors, emphasizing the dish’s ability to please a crowd.

Frequently Asked Questions

Can I use brown rice instead of white rice?
Absolutely! Brown rice can be used for additional fiber and nutrients. Just adjust the cooking time and liquid amounts, as brown rice typically requires longer to cook.

Can I make this casserole ahead of time?
Yes! You can prepare and assemble the casserole a day in advance. Store it covered in the refrigerator and bake before serving.

What’s the best way to reheat leftovers?
To reheat, cover the casserole with foil and bake at 350°F until heated through, or microwave individual portions for convenience.

Can I add other vegetables to this recipe?
Yes! Feel free to add in cooked vegetables, like bell peppers, mushrooms, or spinach, to enhance the dish’s nutritional value and flavor.

Can I freeze the casserole?
Yes, this dish freezes well. Assemble it, then wrap tightly in plastic wrap and foil before freezing. It will last up to three months.

What type of cheese is best?
While sharp cheddar is preferred, you can experiment with other cheeses like Monterey Jack or a blend for different flavors.

How do I avoid a watery casserole?
Ensure your rice is well-drained and consider baking uncovered for the last few minutes to allow excess moisture to evaporate.

Is there a vegetarian option available?
Absolutely! Substitute the beef with lentils or mushrooms and omit the cheese or use a plant-based alternative for a vegan-friendly dish.

How long can I leave the casserole in the fridge?
Leftovers can be stored in an airtight container in the refrigerator for 3-4 days for the best flavor and freshness.

What other meats can I use in this casserole?
Ground turkey or chicken can be excellent substitutes if you’re looking for a leaner option without sacrificing taste.

Additional Resources

For more comforting recipes that embody the same warm flavors as the Cheddar-Crusted Ground Beef and Rice Casserole, check out our collection of easy casseroles and family-friendly dishes. Enhance your cooking skills with technique guides focused on baking and cooking rice perfectly. If you’re interested in ingredient-specific knowledge, explore our database on various grains and cheese varieties to bring depth to your cooking. Finally, seasonal variations provide insight on how to adapt your meals with fresh, local ingredients throughout the year.

Join the Conversation

We invite you to share your experiences with the Cheddar-Crusted Ground Beef and Rice Casserole on social media! Use the hashtag #CheddarCasserole to connect with fellow home cooks and share your unique twists on this recipe. We encourage photography tips and storytelling, as these elements deepen the joy of cooking. Add your reviews and variations to enrich our community and inspire others to try their hands at this comforting dish.

The Recipe

Cheddar-Crusted Ground Beef and Rice Casserole

Serves: 4

Prep Time: 15 mins

Cook Time: 35 mins

Total Time: 50 mins

Kitchen Equipment Needed

  • Skillet
  • Casserole dish
  • Mixing bowl
  • Spatula
  • Oven mitts

Ingredients

  • 1 pound ground beef
  • 2 cups cooked white rice
  • 1 cup sharp cheddar cheese, shredded
  • 1 small onion, diced
  • 2 cloves garlic, minced
  • 1 teaspoon soy sauce
  • Salt and pepper, to taste
  • 1 cup beef broth

Directions

  1. Preheat your oven to 350°F (175°C).
  2. In a skillet, brown the ground beef over medium heat until fully cooked. Drain excess fat.
  3. Add the diced onion and minced garlic, cooking until softened.
  4. Mix in the cooked rice, soy sauce, beef broth, salt, and pepper until well combined.
  5. Transfer the mixture to a greased casserole dish, spreading evenly.
  6. Top with shredded cheddar cheese, ensuring even coverage.
  7. Bake for 25–30 minutes, or until the cheese is bubbly and golden.
  8. Remove from oven and let sit for 10 minutes before serving. Enjoy!

Recipe Notes

  • Feel free to add vegetables for extra nutrition.
  • Use leftover rice if available to save time.
  • Substitute ground beef with ground turkey for a leaner option.
  • This dish can be frozen for up to 3 months; just reheat in the oven when ready to serve.

Easy Iced Vanilla Chai Latte Recipe for a Refreshing Treat

Cool Down with This Easy Iced Vanilla Chai Latte Recipe!

⚖️
Difficulty
Easy

⏲️
Prep Time
10 mins

🕒
Cook Time
5 mins

⏱️
Total Time
15 mins

🍽️
Servings
2 servings

Indulge in the refreshing bliss of a homemade Iced Vanilla Chai Latte, a perfect drink to cool down on a warm day! This delightful beverage combines the warm spices of chai with smooth vanilla and cold milk, resulting in a flavor explosion that delights the senses. The creamy texture, infused with notes of cinnamon and cardamom, combines beautifully with the soothing vanilla, making each sip a luxurious escape.

Imagine sitting on your porch, sipping this chilled, spiced drink while the sun sets. The aroma of freshly brewed chai wafts through the air, creating a cozy ambiance that is both invigorating and comforting. Plus, making this easy iced vanilla chai latte at home means you can customize the sweetness and spice levels to your liking, making it not just a treat, but also a personal favorite.

Quick Recipe Highlights

  • Flavor Profile: This iced vanilla chai latte boasts a balance of sweet and spicy flavors, with deep notes of cinnamon, ginger, and rich vanilla.
  • Texture: It has a creamy consistency that feels smooth on the palate, complemented by the refreshing chill of ice.
  • Aroma: The aromatic blend of warm spices and fragrant vanilla makes every sip a sensory delight.
  • Visual Appeal: The beautiful layering of chai and milk creates an eye-catching beverage, perfect for summer gatherings.
  • Skill Level Needed: This recipe requires minimal cooking techniques, making it accessible for anyone to create.
  • Special Equipment: All you need is a good quality blender or shaker and a glass to serve this delicious drink!

Recipe Overview

  • Difficulty Level: Easy! This iced vanilla chai latte is simple to make and perfect for kitchen novices. The recipe includes straightforward steps that anyone can follow.
  • Category: This drink falls into the category of beverages and can be enjoyed anytime—whether it’s breakfast, an afternoon pick-me-up, or a refreshing dessert.
  • Cuisine: Chai is traditionally an Indian drink, rich in history and culture. It has gained global popularity, often enjoyed in various forms across different regions.
  • Cost: This recipe is budget-friendly, with ingredients that are easily sourced and can be found in most grocery stores.
  • Season: While it’s ideal for warm summer days, this drink can be enjoyed year-round, providing comfort during colder months as well.
  • Occasion: Perfect for casual gatherings, brunch parties, or even quiet afternoons alone with a good book!

Why You’ll Love This Recipe

First and foremost, the taste of this iced vanilla chai latte is simply irresistible! The balance between the cool creaminess and warm spices makes this drink a unique favorite. With the ability to customize sugar and spice levels, experimentation is part and parcel of the fun. You can easily adjust it to suit your taste buds, meaning you can enjoy a perfectly personalized beverage each time.

Convenience is key in today’s fast-paced world. This recipe not only takes minimal time to prepare, but it also allows you to use pantry staples. The quick prep and easy cleanup make this drink an accessible treat for coffee lovers and non-coffee drinkers alike. Imagine a hot summer day where you can whip up a refreshing drink in just 15 minutes!

Nutritionally, chai tea boasts health benefits, including antioxidant properties and digestive support from varied spices. Utilizing real spices keeps the drink wholesome, thus letting you savor it without guilt. The addition of milk or alternative dairy options also contributes to a balanced drink, giving you a little protein hit alongside the serving of flavor.

Socially, sharing this iced vanilla chai latte with friends can transform a simple afternoon into a delightful occasion. Whether you’re hosting a tea party or enjoying it alone, the inviting aroma and beautiful presentation make it a drink to be shared and enjoyed together.

In terms of cost-effectiveness, making your drinks at home can save you a significant amount compared to cafe prices. Not only do you get to indulge in a delectable beverage, but you also gain the satisfaction of crafting a quality drink from the comfort of your kitchen.

Historical Background and Cultural Significance

The origin of chai tea dates back centuries, rooted in Ayurvedic traditions from India. Originally consumed for medicinal benefits, chai has evolved into a beloved everyday drink, swept into cafes and homes worldwide. Each sip pays homage to this rich cultural history.

Culturally, chai is more than just a drink; it embodies warmth and hospitality. In India, serving chai to guests is a cherished tradition, symbolizing welcome and community. It stands as a testament to the art of conversation and connection over shared experiences.

As chai gained international fame, various iterations emerged, leading to adaptations like the iced chai latte. This evolution shows how culinary traditions can reshape and adapt to new tastes while preserving beloved flavors.

Regional variations of chai differ significantly, yet they all reflect local flavors. From the spiciness of masala chai to the creaminess of Kashmiri chai, the concept of chai brings diverse tastes and houses unique stories that contribute to its cultural significance.

Ingredient Deep Dive

Chai Tea: Traditionally brewed with black tea and infused with spices like cinnamon, cardamom, and ginger, chai tea carries a rich heritage from Indian culture. For an iced version, you can steep it stronger for a bolder flavor or opt for tea bags for convenience. The key is to select quality tea that can withstand dilution from ice without losing flavor.

The spices used not only enhance flavor but also offer health benefits such as anti-inflammatory properties. When selecting chai tea, look for blends that incorporate whole spices for an authentic experience. After brewing, store leftover tea in the refrigerator, and make sure to consume it within a few days.

Milk: The choice of milk can significantly impact the overall experience of your iced vanilla chai latte. Whether using dairy, oat, almond, or coconut milk, each variation introduces a different flavor and texture. When going non-dairy, be mindful of the thickness of the alternative; this can alter the drink’s creamy quality.

Choosing the right milk depends on personal taste and dietary preferences. Store milk in a cool environment, and always check the expiry date for optimal freshness. Remember, when substituting, the sweetness of some plant-based milks may change the drink’s flavor profile.

Vanilla Syrup: Vanilla syrup infuses sweetness and an aromatic flavor, enhancing the iced latte’s overall taste. You can either buy premade syrups or make your own from sugar and vanilla extract. A homemade version provides control over sweetness and freshness.

When selecting syrup brands, look for those made with real vanilla for an authentic taste. Store purchased syrups in a cool place after opening. Homemade syrups should be refrigerated and can typically last for a few weeks.

Common Mistakes to Avoid

  • Not brewing tea long enough: Brewing for the right duration ensures a full-bodied flavor, essential for iced drinks where tea flavor may get diluted.
  • Using boiling water for steeping: Pouring boiling water over tea can result in bitterness. Allow it to cool slightly before pouring.
  • Skipping sweeteners: While chai can be enjoyed unsweetened, using some form of sweetener brings out the flavors more effectively—don’t be shy!
  • Not refrigerating the brewed tea: If you’re not using the tea immediately, refrigerating it will preserve the flavor and freshness longer.
  • Choosing low-quality ingredients: A good iced vanilla chai latte starts with high-quality tea and vanilla. Investing in premium ingredients can elevate your drink significantly.
  • Filling the glass with ice before adding the latte: Ice may dilute quickly; to keep your drink cold without watering it down, add your latte first and then ice.
  • Forgetting to balance spice levels: Depending on the brand of chai, the spice profiles can vary significantly; tasting and adjusting is crucial.
  • Not using a large enough glass: This drink looks best in a tall glass, allowing for beautiful layers of chai and milk.

Essential Techniques

Brewing Chai: Brewing chai tea properly is crucial. To enhance the full-bodied flavor, steep the tea longer. Use a fine mesh strainer for easy removal of leaves and spices, and let the aromas deepen by allowing the tea to sit for a moment before serving.

Ice Avoidance: Prevent too much dilution by allowing freshly brewed tea to reach room temperature before mixing with ice. This helps maintain a potent flavor.

Layering: For visual appeal, layer your chai and milk. Pour slowly to create distinct layers, enhancing both appearance and flavor as you sip, inviting drinkers to savor the experience.

Sweetening: Incorporate sweeteners gradually, tasting as you go. Syrups blend differently than granulated sugar, so adjust accordingly to achieve your desired sweetness without overwhelming the drink.

Pro Tips for Perfect Iced Vanilla Chai Latte

1. Always brew the chai stronger than usual since it will be diluted with ice. Aim for a robust flavor.

2. Chill brewed tea in the fridge prior to mixing with ice to keep the drink colder longer.

3. Try experimentation with spices—cardamom and black pepper can add unique twists that elevate your latte.

4. For extra creaminess, consider blending the latte to froth it up before pouring over ice.

5. Use flavored milk or milk alternatives to add an additional flavor dimension to your iced latte.

6. Garnish with a sprinkle of cinnamon or a vanilla bean for a chic presentation.

7. Don’t skimp on the is; fill the glass adequately to keep your drink cold and refreshing.

8. Serve with a straw for an immersive experience—each sip should envelop you in the delightful flavors!

Variations and Adaptations

Experimenting with variations of the iced vanilla chai latte can enhance your experience. Adding seasonal spices such as nutmeg in the fall or pumpkin spice can introduce exciting new flavors.

Consider dietary adaptations; using almond milk makes it suitable for vegan diets, while dairy can bring richness for hearty individuals. Adjusting sweetness levels can cater to those aiming for lower sugar intake.

Regional variations might include the addition of flavored syrups, like hazelnut or caramel, to provide a unique twist on this classic beverage. You can also play around with textures by blending for a frozen chai latte effect, offering a fun summer cooler.

When it comes to presentation, serving in vibrant glassware or incorporating colorful straws might add a delightful visual note. No matter the adaptation, each change brings the iced vanilla chai latte into the realm of your personal tastes!

Serving and Presentation Guide

Plating this iced vanilla chai latte leaves ample room for creativity. Use tall, clear glasses to showcase the beautiful layers of chai and milk. For garnishing, add a garnish of cinnamon or a sprig of mint to introduce a pop of color and aroma.

Traditional accompaniments could include sweet biscuits or a light pastry, enhancing your latte experience. When serving, be aware of temperature; ice should be added just before guests arrive to prevent dilution.

Consider modern serving suggestions like a curated coffee or tea bar, where guests can customize their iced vanilla chai latters, experimenting with various milk options, sweeteners, and spices.

For portion control, consider using smaller glasses for a tasting menu, allowing guests to sample different versions of the latte without overindulging.

Wine and Beverage Pairing

While wine may not be the typical choice to accompany a chai latte, a light Sparkling Rosé can complement the spiced flavors without overshadowing the drink. Its refreshing bubbles enhance the experience of sipping spicy, creamy beverages.

For non-alcoholic alternatives, a light herbal iced tea can balance the rich flavors of the chai without taking away from its intricate taste.

Pairing the iced vanilla chai latte with lighter snacks, such as fruit tarts or mini quiches can enhance the overall experience, as they won’t compete with the strong chai flavors.

When enjoying your iced vanilla chai latte with friends, serving it alongside a variety of beverages can create a wonderful communal experience, making every sip more delightful.

Storage and Shelf Life

Storing brewed iced vanilla chai latte is relatively easy. If you have leftovers, keep the drink in the fridge for no longer than two days to maintain quality. If you prepare in bulk, separate the different components—storing brewed tea, milk, and syrup individually is optimal.

Make sure to use airtight containers for tea and milk, avoiding potential spoilage due to exposure. The ice should always be added at serving time to prevent moisture build-up. For reheating, allow your latte to come back to a mild temperature on low heat or cold-blend to reinstate its chilled aspect.

If you need to store your ingredients, the brewed chai tea can last up to a week in the refrigerator, while dairy items should be consumed within the recommended shelf life of fresh products.

Make Ahead Strategies

Planning smartly for your iced vanilla chai latte can elevate your hosting possibilities. Brew a larger batch of chai tea at the beginning of the week, and store it, allowing you to whip up drinks in an instant.

When making ahead, measure out syrup and refrigerate. For an immediate flavorful boost, consider freezing ice cubes made from brewed chai tea, preventing dilution while keeping the drink flavorful.

Quality impacts when prepared in advance can be minimized by ensuring ingredients are kept fresh and only mixing the drink before serving. You may wish to combine components just before your event to ensure that flavors are vibrant and enjoyable.

Scaling Instructions

Scaling your iced vanilla chai latte is straightforward. If you want to halve the recipe, simply divide all ingredients by two and adjust brewing methods accordingly.

For those looking to double or triple the amounts, consider brewing in larger pots, ensuring that everything is infused according to your desired strength. You may need to adjust brewing times slightly based on quantity.

When working with larger quantities, ensure your serving container is large enough to accommodate sufficient ice and sweeteners. Timing modifications may require a more immediate mixing strategy to ensure every part is enjoyed at its best.

Nutritional Deep Dive

Breaking down macros, a standard iced vanilla chai latte contains protein from milk, healthy fats, and carbohydrates from the sugar and syrup. If made with plant-based alternatives, it can shift nutritionally to cater to specific dietary needs.

The micronutrient analysis shows benefits like calcium from milk, along with vitamins and minerals from spices like cinnamon, known for its anti-inflammatory properties. For health benefits, chai is rich in antioxidants, contributing to overall wellness.

When assessing dietary considerations, balance sweeteners to keep sugars to a minimum. A simple syrup can be swapped for alternative sweeteners, helping manage caloric intake without sacrificing flavor.

In terms of portion analysis, keep in mind that larger serving sizes will elevate calorie counts. If managing weight is a goal, measuring portions can help you enjoy the drink while staying on track with dietary goals.

Dietary Adaptations

This Iced Vanilla Chai Latte can easily adapt to various diets. For gluten-free options, ensure all ingredients, particularly those from mixed spices, are certified gluten-free.

Achieving a dairy-free option is simple by substituting your choice of almond, soy, or oat milk. These alternatives can alter flavor profiles, so choose according to your palate preference!

For a vegan version, replace any dairy components with plant-based options, including using agave or maple syrup for sweetening to avoid honey. The heartiness remains intact.

If you’re following a low-carb or keto diet, consider using sugar substitutes like erythritol or monk fruit sweeteners, allowing you to enjoy the beverage without added sugars!

Paleo and low-FODMAP adaptations can focus on using natural sweeteners and ensuring that the spices used align with dietary restrictions while keeping the drink fresh and flavorful.

Troubleshooting Guide

In the case of texture issues, ensure that chai is brewed strongly enough to stand up to the ice—this prevents the drink from feeling watered down. If you find it too watery after adding ice, try using less ice or brewing a stronger tea base next time.

If the flavor balance seems off, consider adjusting spice quantities. The natural sweetness from the vanilla can overwhelm, so tasting and adjusting sweetener levels throughout the making process is vital.

Temperature problems can sometimes arise when not brewing and chilling tea properly. Allowing brewed chai to cool on the counter before refrigerating ensures there’s no condensation dilution.

For equipment challenges, ensure your blender or shaker is large enough to accommodate the quantities you’re preparing. If not blended well, ingredients can separate—giving an unsightly appearance and uneven texture.

Ingredient substitutions may lead to unexpected results, so always test a small batch before serving larger quantities. This can prevent unwanted surprises and ensure quality experiences.

Timing concerns may crop up when hosting, especially if a group is gathered. Prepare components ahead, but ensure to mix just before serving for freshly blended flavor!

Recipe Success Stories

Community feedback about this recipe has been overwhelmingly positive—readers have shared their variations, such as adding coconut milk or incorporating seasonal fruits, creating individualized experiences.

Many have had success in creating iced vanilla chai latte kits, gifting them to friends as a fun DIY project. The flexibility of this drink has made it a favorite amongst readers.

Adaptation stories have risen, with readers sharing their successful experiences in local cafes using this recipe as a guide to create a business, highlighting the versatility of making a cherished drink!

Photography tips abound, with fans sharing stunning images of their creations on social media. The vibrant colors and elegant garnishes have inspired many to create their versions and share!

Frequently Asked Questions

Can I make this drink vegan? Absolutely! Simply swap the milk for a plant-based option like almond or oat milk and use a vegan sweetener.

How can I make my chai stronger? Brew the chai tea for a longer duration or use more tea leaves to intensify the flavor and spice elements.

Can I store leftover chai mix? Yes, brewed chai can be stored in the refrigerator for up to a week in an airtight container.

What sweeteners work best? Popular choices include regular sugar, honey, or flavored syrups. For lower-calorie options, consider erythritol or stevia.

Is this recipe suitable for kids? Yes! This iced vanilla chai latte is an enjoyable treat for children but monitor the sweetness level according to preference.

Can I freeze leftover chai? Yes, freeze leftover brewed chai in an ice cube tray for later use in iced drinks!

What spices can I add for extra flavor? Experiment with nutmeg, pepper, or cardamom to elevate the traditional chai flavors even further.

Is it possible to adjust the amount of vanilla? Yes, you can increase or decrease the vanilla syrup to your taste. Start small and adjust as desired!

Can I use instant chai mix? While it’s not the traditional method, instant chai mix can work if you’re short on time; adjust milk and sweetness accordingly.

What kind of tea is best for chai? Black tea is traditionally used; however, you can experiment with green tea for a different flavor profile.

Additional Resources

Explore related recipes like Mint Iced Tea or Mocha Iced Coffee to complement your summer beverage repertoire. Dive deeper into technique guides for brewing exceptional chai, or investigate ingredient information for innovative uses of spices in your cooking.

For equipment recommendations, consider investing in a quality tea infuser or milk frother to elevate your drink. Seasonal variations are abundant with chai, allowing for endless possibilities; try adding pumpkin spice in the fall or fresh fruit during spring and summer!

Join the Conversation

We invite you to share your experiences with the iced vanilla chai latte! Share your photos and variations on social media, using the hashtag #IcedVanillaChaiLatte. Join our growing community of chai enthusiasts, where we exchange tips, tricks, and unique presentations to create delightful experiences.

Participation doesn’t just stop with sharing photos; we encourage you to leave feedback and reviews on this recipe! Your insights inspire others and help evolve our recipe collection further.

As you create your perfect iced vanilla chai latte, remember to adapt and share, as every story enriches the tradition behind this cherished drink!

The Recipe

Iced Vanilla Chai Latte

Serves: 2 servings

Prep Time: 10 mins

Cook Time: 5 mins

Total Time: 15 mins

Kitchen Equipment Needed

  • Blender or shaker
  • Measuring cups and spoons
  • Stove or kettle for brewing
  • Fine mesh strainer
  • Tall glasses for serving

Ingredients

  • 2 cups chai tea (brewed strongly)
  • 1 cup milk (dairy or plant-based)
  • 2 tablespoons vanilla syrup
  • Ice cubes
  • Cinnamon for garnish (optional)

Directions

  1. Brew the chai tea according to package instructions, allowing it to steep for 8-10 minutes for a stronger flavor.
  2. In a glass, mix the brewed chai with vanilla syrup.
  3. In another glass, fill with ice cubes, and pour the chai mixture over the ice.
  4. Top with milk, and stir gently to combine. Optionally, you can blend or shake for a frothy texture.
  5. Garnish with a sprinkle of cinnamon and enjoy your iced vanilla chai latte!

Recipe Notes

  • You can adjust the sweetness and spice levels to suit your taste preferences.
  • Store leftover chai in the refrigerator for up to a week for later use.
  • Experiment with different milk alternatives for unique flavor profiles.

Delicious No-Bake Lemon Oatmeal Cookies Recipe to Try Today

Lemon Oatmeal No-Bake Cookies: A Zesty Delight for Your Sweet Tooth

⚖️
Difficulty
Easy

⏲️
Prep Time
10 mins

🕒
Cook Time
0 mins

⏱️
Total Time
10 mins

🍽️
Servings
12 cookies

Lemon Oatmeal No-Bake Cookies are the perfect treat for those who crave sweet and tangy flavors without the need for baking. In just a quick ten minutes, you can whip up these delightful cookies that require minimal ingredients and effort. Imagine biting into a chewy cookie filled with the bright, refreshing taste of lemon, complemented by hearty oats and a hint of sweetness. These cookies not only satisfy your sweet tooth but also evoke memories of summer days, bringing a burst of sunshine into your kitchen.

These no-bake cookies are not only easy to prepare but also perfect for any occasion—whether it’s a family gathering, a picnic, or simply a cozy night at home with a cup of tea. The vibrant lemon flavor sets them apart from traditional oatmeal cookies, making them a zesty alternative that everyone will enjoy. Plus, they are a great treat for kids, and can even be a fun project to make together.

Quick Recipe Highlights

  • Flavor Profile: Bursting with fresh lemon zest and a hint of vanilla, these cookies offer a perfect balance of tartness and sweetness.
  • Texture: Chewy and hearty from the oats, these cookies have a satisfying bite with a soft center.
  • Aroma: The bright and refreshing scent of lemon fills your kitchen, creating an inviting atmosphere.
  • Visual Appeal: Golden-brown cookies dotted with a hint of zest make for an eye-catching dessert.
  • Skill Level Needed: This recipe is perfect for beginners, requiring no baking skills, just basic mixing and chilling.
  • Special Equipment: No special equipment is needed besides mixing bowls and parchment paper.

Recipe Overview

  • Difficulty Level: This recipe is straightforward and forgiving, making it excellent for novice bakers or anyone looking for a quick treat.
  • Category: These cookies fall into the dessert and snack categories, perfect for a sweet bite at any time of day.
  • Cuisine: Inspired by classic American cookie traditions, but with a zesty twist that adds an element of surprise.
  • Cost: Economical to make, with common pantry ingredients keeping costs low.
  • Season: Ideal for warm weather, when a no-bake option is desirable, but enjoyable year-round.
  • Occasion: Great for summer BBQs, birthday parties, or as a delightful afternoon snack.

Why You’ll Love This Recipe

These Lemon Oatmeal No-Bake Cookies offer a delightful combination of taste and texture that will have you reaching for seconds. The refreshing lemon flavor is invigorating, hugging the creamy sweetness of the oats. Their chewy consistency makes them a fulfilling snack, and the absence of baking keeps them soft and moist. Plus, because these cookies set in the fridge, they are easy to make ahead and store for later.

Convenience is another major advantage of this recipe. With only ten minutes required for preparation, you’ll have a homemade treat ready to go in no time. There’s no oven preheating, no messy cleanup from baking sheets, and no waiting around for cookies to cool. Instead, you can quickly mix everything together, scoop it out, and let the fridge do the work.

Packed with wholesome oats, these cookies have nutritional benefits to offer. Oats are a good source of fiber, helping to keep you satisfied longer. Combined with the healthy fats from nut butter, this treat becomes not only delicious but also a great option for a nutritious snack.

Socially, these cookies are perfect for sharing. They make an inviting addition to gatherings and can easily be presented with a cup of tea for afternoon visitors. Their unique flavor also makes them a topic of conversation amongst friends and family.

The cost-effectiveness of this recipe cannot be overlooked. Using simple and easily sourced ingredients, you can create a batch of cookies that satisfy your cravings without breaking the bank. This makes it an excellent choice for budget-friendly baking.

Historical Background and Cultural Significance

Originating in America, no-bake cookies became popular in the mid-20th century as a convenient option for those who wanted sweets without the intricacies of baking. The versatility of the no-bake method allowed for innovative flavors, including this delightful lemon version. The inclusion of oats provides a nod to the traditional oatmeal cookie, while the bright lemon flavor reflects a more modern culinary trend focusing on fresh, zesty ingredients.

Culturally, no-bake cookies often symbolize summer and childhood memories. Many people associate them with family gatherings, pool parties, and fun times spent in the kitchen. They evoke feelings of nostalgia as they remind us of carefree days, often made together with loved ones. The bright yellow color of lemon adds a cheerful note to any dessert tray.

As the recipe evolved, various adaptations emerged, each adding its regional flair. Some variations might incorporate different nuts, fruits, or even chocolate. This continual evolution showcases the adaptability of the no-bake cookie format.

In different regions, you can find variations built around local flavors. For example, in areas where coconut is popular, shredded coconut may be added for a tropical twist. These variations not only highlight the appeal of no-bake cookies but also emphasize the creativity often found in home kitchens.

Ingredient Deep Dive

Oats: Oats are a staple in many cultures, valued for their nutritional benefits and hearty texture. They are low in calories and high in fiber, making them an excellent choice for healthy snacks. Look for rolled oats for the best texture in these cookies. Store oats in an airtight container to prolong freshness, and feel free to substitute rolled oats with quick oats in a pinch.

Lemon: Lemons have a rich history, dating back thousands of years in culinary traditions around the world. Their bright, zesty flavor plays a crucial role in this recipe, providing a refreshing contrast to the sweetness of the cookies. When selecting lemons, look for firm, smooth-skinned fruit. Store them at room temperature for a short time, or refrigerate for longer shelf life. If fresh lemons aren’t available, bottled lemon juice can be used as a substitute.

Nut Butter: Nut butter, whether almond, peanut, or cashew, adds creaminess and a rich flavor to the cookies. Nut butters are great sources of protein and healthy fats, offering nutritional density in a small package. Choose a natural nut butter without added sugars or oils. Store unopened jars in a cool place, and once opened, refrigerate for longevity. Sunflower seed butter can be a great alternative for those with nut allergies.

Sweetener: Natural sweeteners like honey or maple syrup, commonly used in no-bake recipes, lend a healthy twist. Each offers unique flavors that can enhance the overall taste profile of the cookies. Opt for pure varieties without additives for the best quality. Store in a cool, dark place to maintain flavor integrity, and sub out for sugar if preferred.

Common Mistakes to Avoid

  • Skipping the chilling time: Allowing the cookies to set in the fridge is crucial for achieving the right texture.
  • Using too much liquid: Over-measuring your liquid ingredients can result in overly sticky cookies that won’t hold shape.
  • Not mixing thoroughly: Ensure all ingredients are well combined to avoid inconsistency in flavor and texture.
  • Neglecting to use old-fashioned rolled oats: Quick oats may lead to a mushy texture, so stick with rolled oats for the best results.
  • Rushing the process: Patience is key! Allow these cookies to cool completely before diving in for the best results.
  • Forgetting to press down the mixture: Pressing the mixture firmly into the cookie shapes helps them hold together once set.
  • Choosing the wrong nut butter: Some nut butters can be oily or thick; stick with a consistent, creamy texture for the best results.
  • Not adjusting flavors: Taste your mixture before setting to ensure the balance of sweetness and lemon is perfect for your liking.

Essential Techniques

Mixing Ingredients: Mixing is foundational in no-bake cookies. Ensure that all ingredients are evenly distributed for consistent flavor in each bite. Use a sturdy mixing bowl and appropriate tools, like a wooden spoon or spatula, to achieve a thorough blend.

Setting in the Fridge: Allowing the cookies to set properly in the fridge is critical for texture. Chilling hardens the mixture, allowing it to achieve the chewy consistency expected in no-bake cookies. Make sure to spread the mixture evenly in the pan to maintain even cooling.

Pro Tips for Perfect Lemon Oatmeal No-Bake Cookies

1. Experiment with different sweeteners like agave syrup or natural sweeteners to find your ideal flavor balance.

2. For a richer flavor, add a splash of vanilla extract or almond extract to complement the lemon.

3. Incorporate add-ins like mini chocolate chips or dried fruit to elevate your cookie experience.

4. Play with textures by topping your cookies with chopped nuts or seeds once shaped.

5. Ensure your mixing bowl is large enough to accommodate all ingredients without overflowing.

6. If the mixture is too crumbly, add a small amount of coconut oil or nut butter to improve consistency.

7. Keep a close eye on your chilling time—don’t let them set for too long, or they may harden excessively.

8. To easily release cookies from the parchment paper, lightly grease the surface beforehand.

Variations and Adaptations

Changing the flavor profile can quickly adapt the base recipe. For instance, substitute lemon with lime for a tangy twist or use orange for a sweeter flavor. Seasonal fruits can also be folded into the dough, offering fruits like blueberries or strawberries for a summer treat.

For those seeking dietary modifications, nuts can be swapped for seeds for a nut-free version. Crushed graham crackers can substitute oats for a different texture. Adjusting sweetness can also suit dietary preferences; try sugar alternatives like stevia or monk fruit.

Serving and Presentation Guide

When plating these cookies, consider using a bright platter that resonates with the lemon’s vibrant color. Garnishing with a sprinkle of grated lemon peel adds visual appeal and emphasizes the fresh flavor. For serving, these cookies are delightful chilled or at room temperature, perfect alongside an iced tea or lemonade for a refreshing treat.

Wine and Beverage Pairing

For a delightful pairing, consider a crisp white wine like Sauvignon Blanc, which complements the citrus flavors beautifully. If you prefer non-alcoholic options, a sparkling lemonade or herbal tea can enhance the refreshing quality of the cookies. Just ensure your beverages are chilled for a refreshing contrast.

Storage and Shelf Life

Store your cookies in an airtight container in the fridge to maintain freshness, where they will last for up to a week. For longer storage, consider freezing them in a single layer, then transfer to a freezer-safe container. Thaw them in the fridge before serving to maintain their texture.

Make Ahead Strategies

These cookies are perfect for make-ahead planning. You can prepare the dough up to two days in advance and simply roll into shape before chilling. This makes them a convenient option for parties or gatherings. If you’re looking to surprise guests, assembling the cookies earlier in the day allows flavors to meld beautifully by serving time.

Scaling Instructions

If you’d like to halve the recipe, simply divide each ingredient by two while keeping the process the same. Doubling or tripling the recipe is easy, too, just ensure you use a large mixing bowl to accommodate the larger quantity, and consider using multiple baking sheets for chilling if necessary.

Nutritional Deep Dive

These cookies are nutritional powerhouses. With a balance of carbohydrates, healthy fats, and protein from the oats and nut butter, they provide lasting energy. Additionally, the lemon offers vitamin C, boosting your immune system and adding to the overall health benefits these cookies provide.

Dietary Adaptations

If you’re looking for gluten-free options, ensure you use certified gluten-free oats in your recipe. For a vegan option, substitute honey with maple syrup and ensure your nut butter is dairy-free. Low-carb and keto variations can easily be made by using sugar substitutes and almond flour instead of oats.

Troubleshooting Guide

If your cookies aren’t setting properly, check the ratios of liquid to dry ingredients; adding a touch more oats or allowing more chilling time often solves the issue. If flavor is too strong or weak, adjust with additional zest or sweetener as needed.

Recipe Success Stories

Feedback from our community has been overwhelmingly positive, with many sharing their own variations like the addition of coconut flakes or chocolate chips. Readers appreciate how easy and quick the recipe is, and some suggest using nut butter combinations for unique flavors, showcasing the flexibility of this no-bake treat!

Frequently Asked Questions

Can I make these cookies vegan?

Yes! Simply substitute honey with maple syrup and ensure your nut butter does not contain dairy.

How long do these cookies last?

Stored in an airtight container in the fridge, these cookies will last up to one week and even longer in the freezer.

Can I substitute other dried fruits?

Absolutely! Dried cranberries, apricots, or raisins work wonderfully and add to the flavor and texture.

What type of oats should I use?

Old-fashioned rolled oats are ideal for the best texture. Quick oats can be used in a pinch but may result in a softer texture.

What if my mixture is too dry?

If your mixture seems dry and crumbly, a small amount of additional nut butter or sweetener can help bind it together.

Are these cookies gluten-free?

They can be made gluten-free by using certified gluten-free oats.

Can I add chocolate to the recipe?

Yes! Mini chocolate chips or drizzles make a delicious addition to these cookies.

Can I use coconut oil instead of nut butter?

Coconut oil may replace nut butter, but it will alter the flavor and texture slightly; it’s best used in combination with nut butter.

How do I make the cookies firmer?

For a firmer cookie, increase the chilling time and ensure the ratio of oats to liquid is balanced.

What is the best way to serve these cookies?

These cookies are best served chilled or at room temperature, alongside a refreshing beverage such as iced tea or lemonade.

Additional Resources

If you loved this recipe, be sure to check out our other dessert recipes, like no-bake chocolate energy bites and peanut butter protein bars. For tips on mastering no-bake techniques, explore our guide on essential techniques in no-bake baking.

Join the Conversation

We encourage you to share your photos and variations of the Lemon Oatmeal No-Bake Cookies on social media! Your feedback and experiences are valuable and contribute to our community. Let us know how your cookies turned out and any creative twists you added to the recipe!

The Recipe

Lemon Oatmeal No-Bake Cookies

Serves: 12 cookies

Prep Time: 10 mins

Cook Time: 0 mins

Total Time: 10 mins

Kitchen Equipment Needed

  • Mixing bowls
  • Spatula or wooden spoon
  • Parchment paper
  • Cookie scoop or spoon

Ingredients

  • 1 ½ cups rolled oats
  • ½ cup nut butter (peanut or almond)
  • ¼ cup honey or maple syrup
  • ¼ cup fresh lemon juice
  • 1 tablespoon lemon zest
  • 1 teaspoon vanilla extract

Directions

  1. In a mixing bowl, combine rolled oats, nut butter, honey, lemon juice, lemon zest, and vanilla extract.
  2. Mix thoroughly until all ingredients are well combined.
  3. Using a cookie scoop or spoon, drop portions of the mixture onto parchment paper lined on a baking sheet.
  4. Press down each cookie slightly to help it hold its shape.
  5. Place the baking sheet in the fridge for about 30 minutes or until firm.
  6. Once set, remove the cookies from the parchment and enjoy!

Recipe Notes

  • Feel free to experiment with add-ins like chocolate chips or dried fruits.
  • For a nut-free option, substitute nut butter with sunflower seed butter.
  • Store leftover cookies in an airtight container in the fridge for up to a week.