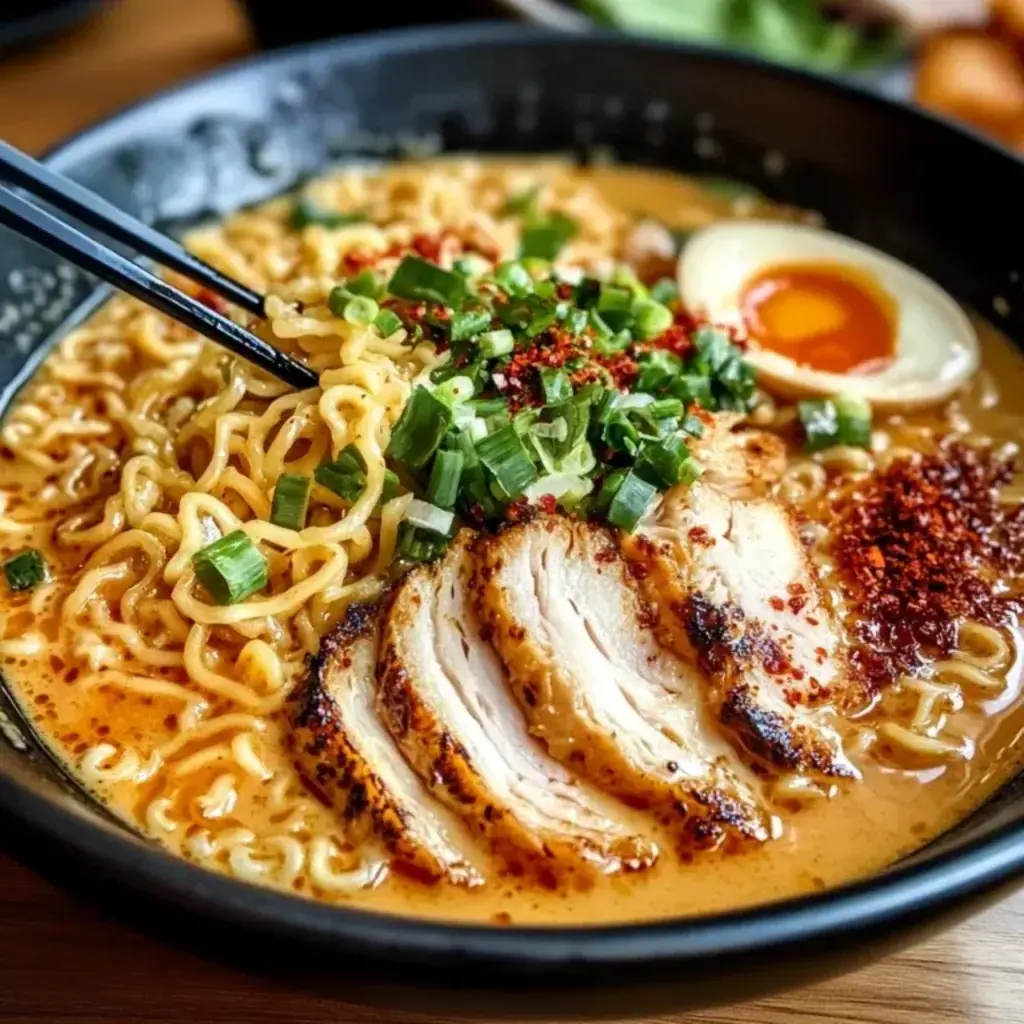
There’s something incredibly comforting about a meal that practically cooks itself while filling your home with irresistible aromas. That’s exactly why I adore this Crock Pot Chicken and Rice Recipe. Whether you’re juggling a busy schedule or simply craving a hearty, no-fuss dinner, this dish delivers every time. Plus, it’s the kind of meal that brings everyone to the table—just like my grandma’s cooking always did. If you’re looking for a reliable, flavorful, and fuss-free recipe, you’re in the right place.
The Crock Pot Chicken and Rice Recipe is a one-pot wonder that combines tender chicken, fluffy rice, and savory seasonings into a dish that feels like a warm hug. What makes it special? For starters, it’s incredibly versatile. You can customize it with your favorite veggies, spices, or even a splash of broth for extra depth. Beyond its adaptability, this recipe embodies the essence of home cooking—simple, satisfying, and packed with flavor. It’s perfect for weeknights when time is tight but you still want something wholesome. And let’s be honest, who doesn’t love coming home to a meal that’s ready to serve? If you’re new to slow cooking, this recipe is a fantastic starting point. For more beginner-friendly ideas, check out my easy slow cooker recipes. Or, if you’re curious about the best ingredients to stock up on, my pantry essentials guide has you covered.
Why I Love This Recipe
This Crock Pot Chicken and Rice Recipe holds a special place in my heart because it’s the first meal I ever made for my now-husband. Back then, I was still learning my way around the kitchen, but this dish turned out perfectly—tender, flavorful, and impossibly easy. It became our go-to during those early days of late-night study sessions and hectic work schedules. Even now, years later, the smell of it simmering takes me right back to those cozy, chaotic moments. That’s the beauty of food—it’s not just about nourishment, but the memories we create around it.
Health and Nutrition
Why it’s good for your body
Crock Pot Chicken and Rice Recipe delivers a powerhouse of nutrients in every bite. First, lean chicken breast provides high-quality protein to support muscle growth and repair. Additionally, brown rice offers complex carbs for steady energy, while also packing fiber to aid digestion. Moreover, this dish includes wholesome vegetables like carrots and peas, which add vitamins A and C for immune support.
Since Crock Pot Chicken and Rice Recipe cooks slowly, it retains more nutrients compared to faster methods. Furthermore, the minimal oil used keeps the dish light yet satisfying. The balance of protein, carbs, and healthy fats makes it a well-rounded meal. Plus, the natural flavors from herbs and spices reduce the need for excess salt, supporting heart health.
Finally, Crock Pot Chicken and Rice Recipe is rich in selenium and B vitamins from the chicken, which boost metabolism and cell function. Whether you need a post-workout meal or a family-friendly dinner, this recipe nourishes your body without compromise.
How it fits in a healthy lifestyle
Crock Pot Chicken and Rice Recipe fits seamlessly into a balanced diet. For gluten-free eaters, it’s a safe and flavorful option since all ingredients are naturally free of gluten. If you’re focusing on heart health, the lean protein and whole grains help maintain cholesterol levels. Pair it with a fresh salad from our healthy side dishes collection for extra fiber and nutrients.
Meal preppers love this recipe because it stores well and reheats beautifully. It’s also ideal for busy weeknights when you need a nutritious meal without the hassle. For those tracking macros, Crock Pot Chicken and Rice Recipe offers a solid ratio of protein to carbs. Explore our meal prep tips to make it even easier to incorporate into your routine. With simple ingredients and effortless preparation, this dish helps you stay on track without sacrificing flavor.
A comforting and easy one-pot meal with tender chicken and fluffy rice cooked in a crock pot.
Ingredients
Scale
For the Crust:
4 boneless, skinless chicken breasts
1 cup long-grain white rice
2 cups chicken broth
1 can (10.5 oz) cream of chicken soup
1 teaspoon garlic powder
1 teaspoon onion powder
1/2 teaspoon paprika
Salt and pepper to taste
Instructions
1. Prepare the Crust:
Place chicken breasts at the bottom of the crock pot.
In a bowl, mix rice, chicken broth, cream of chicken soup, garlic powder, onion powder, paprika, salt, and pepper.
Pour the rice mixture over the chicken in the crock pot.
Cover and cook on low for 4-5 hours or until chicken is cooked through and rice is tender.
Fluff the rice with a fork and serve warm.
Notes
You can customize the seasonings to taste.
s-dish">How to Prepare This Dish
Steps and time-saving tips
Start by gathering all your ingredients for the Crock Pot Chicken and Rice Recipe to save time later. Lightly grease the slow cooker insert to prevent sticking, then layer the chicken breasts at the bottom. Next, whisk together the broth, cream of chicken soup, and seasonings in a bowl until smooth. Pour this mixture over the chicken, ensuring even coverage. Stir in the uncooked rice, making sure it’s fully submerged in the liquid. Cover and cook on low for 4-5 hours or high for 2-3 hours, depending on your schedule. Avoid lifting the lid too often, as this slows cooking. Once done, shred the chicken with two forks directly in the pot, then fold in frozen peas or diced carrots for extra color and nutrition. Let everything sit for 5 minutes to thicken before serving. For a quicker version, use pre-cooked chicken and reduce the cooking time by an hour. If you’re short on prep time, swap fresh veggies for frozen—they’ll cook just as well.
Mistakes I’ve made and learned from
Early on, I learned the hard way that overcooking the Crock Pot Chicken and Rice Recipe turns the rice mushy. Now, I set a timer and check for doneness 30 minutes early. Another blunder? Skipping the grease step—stuck-on food is no fun to scrub. A light spray of oil fixes that. I also used to stir too often, which made the rice gummy. Trust the process and resist the urge! For more slow cooker hacks, check out my guide on slow cooker tips. And if you’ve ever wondered why your chicken turns out dry, my post on perfect chicken texture breaks down the science behind juicy results.
n-and-variations">Cultural Connection and Variations
Where this recipe comes from
The Crock Pot Chicken and Rice Recipe has roots in comfort food traditions across cultures. In the American South, slow-cooked chicken and rice often appears as a hearty, one-pot meal, blending Cajun spices or Creole flavors. Meanwhile, in Latin America, arroz con pollo steals the spotlight with saffron, peppers, and a splash of beer. Even across the pond, Spanish cooks layer their version with smoky paprika and chorizo.
My grandma’s take on Crock Pot Chicken and Rice Recipe always included a dash of thyme and a splash of broth, simmering all day until the rice soaked up every bit of flavor. Families everywhere tweak the dish—some add coconut milk for a Caribbean twist, while others toss in mushrooms and white wine for a French-inspired touch. No matter the variation, this recipe brings people together, whether it’s a weeknight dinner or a Sunday feast.
How it fits in today’s cooking
Today, the Crock Pot Chicken and Rice Recipe stays popular because it’s a lifesaver for busy cooks. Modern kitchens love how the slow cooker does the work, letting you prep in the morning and come home to a ready meal. Plus, it’s a blank canvas for dietary tweaks—swap white rice for quinoa or cauliflower rice for a lighter spin. For meal preppers, it’s a staple, pairing perfectly with easy meal prep ideas to streamline weekday dinners.
Seasonal twists keep it
fresh, too. In winter, hearty root vegetables join the pot, while summer versions might feature zucchini and fresh herbs. Holiday tables often include it as a cozy side, especially alongside comfort food classics. Whether you’re feeding a crowd or just craving simplicity, this dish adapts without losing its soul-warming charm.
Taste and Texture
What makes it delicious
The Crock Pot Chicken and Rice Recipe delivers a comforting, savory experience with every bite. Tender chicken melts in your mouth, while fluffy rice soaks up the rich, garlicky broth for a deeply satisfying texture. Aromatic onions and herbs like thyme infuse the dish with warmth, making your kitchen smell irresistible. Meanwhile, subtle hints of butter add a creamy richness that balances the hearty flavors. Whether you crave something cozy or crave-worthy, the Crock Pot Chicken and Rice Recipe never disappoints.
Boosting the flavor
For an extra flavor kick, try stirring in a splash of lemon juice or a sprinkle of Parmesan cheese just before serving. If you love heat, a dash of smoked paprika or red pepper flakes elevates the dish beautifully. Pair it with a crisp side salad or roasted veggies for contrast—our Easy Roasted Vegetables complement the creamy rice perfectly. Craving more depth? Swap chicken broth for bone broth, or explore our Homemade Spice Blends to customize the seasoning. With these tweaks, your Crock Pot Chicken and Rice Recipe will shine even brighter.
Always use long-grain white rice for the best texture in your Crock Pot Chicken and Rice Recipe, as it holds up well during slow cooking. Additionally, sear the chicken thighs before adding them to the pot to lock in flavor and moisture. For even cooking, stir the rice halfway through if possible, and make sure to fully submerge it in liquid. Finally, let the dish rest for 10 minutes after cooking to allow the rice to absorb any remaining broth.
Mistakes to avoid
Avoid overcooking the rice by sticking to the recommended time—otherwise, it can turn mushy. Also, resist the urge to lift the lid frequently, as this releases heat and extends cooking time. If your chicken turns out dry, try brining it first or using bone-in pieces for extra juiciness. For more slow cooker tips, check out our guide on slow cooker basics. And if you’re unsure about rice ratios, our perfect rice guide will help you nail the consistency every time.
g-suggestions">Serving and Pairing Suggestions
How to serve this dish
For a cozy family dinner, serve Crock Pot Chicken and Rice Recipe straight from the slow cooker to keep it warm. Meanwhile, garnish each bowl with fresh parsley or sliced green onions for a pop of color. If you’re hosting a potluck, transfer it to a rustic ceramic dish and surround it with warm bread rolls. Additionally, this dish shines during holiday gatherings when paired with seasonal sides like roasted vegetables. Finally, for a casual weeknight meal, let everyone scoop their portions directly from the Crock Pot for minimal cleanup.
What goes well with it
A crisp green salad balances the heartiness of Crock Pot Chicken and Rice Recipe perfectly. Try our Simple Avocado Salad for a creamy contrast. Next, roasted Brussels sprouts add a satisfying crunch and pair wonderfully with the tender chicken. For drinks, a chilled glass of white wine or sparkling water with lemon elevates the meal. Alternatively, serve it with our Garlic Butter Dinner Rolls to soak up every flavorful bite.
math-faq-block">
How long does it take to cook chicken and rice in a Crock Pot?
A Crock Pot Chicken and Rice Recipe typically takes 4–6 hours on low or 2–3 hours on high, depending on your slow cooker settings. Always ensure the chicken reaches an internal temperature of 165°F for safety. The rice should absorb the liquid and become tender.
Can I use brown rice instead of white rice in Crock Pot Chicken and Rice?
Yes, but brown rice requires more liquid and cooking time than white rice in a Crock Pot Chicken and Rice Recipe. Adjust by adding ½ cup extra broth and extending the cook time by 1–2 hours. Stir occasionally to prevent sticking.
What’s the best way to keep the rice from getting mushy in Crock Pot Chicken and Rice?
To avoid mushy rice in your Crock Pot Chicken and Rice Recipe, use long-grain white rice and add it during the last 1–2 hours of cooking. Avoid stirring too often, as this releases extra starch. Check for doneness before serving.
rank-math-faq-item">
Can I make Crock Pot Chicken and Rice with frozen chicken?
Yes, but thawed chicken works best for even cooking in a Crock Pot Chicken and Rice Recipe. If using frozen, extend the cook time by 1–2 hours and ensure the chicken is fully cooked before serving. Always check the internal temperature.
Classic German Bee Sting Cake – Easy Recipe
Introduction
If you’ve ever craved a dessert that feels like a warm hug, you’re in the right place. Today, I’m sharing my take on the beloved German Bee Sting Cake, a tender, honey-kissed treat that’s as delightful to make as it is to eat. Whether you’re baking for a special occasion or simply treating yourself, this recipe promises to bring joy to every bite. Plus, its unique combination of flavors—creamy custard, caramelized almonds, and fluffy sponge—will leave you wondering why you didn’t try it sooner.
The German Bee Sting Cake, or Bienenstich as it’s traditionally called, holds a special place in European baking. Legend says it earned its name from the honey-glazed topping that supposedly attracted bees. Beyond the folklore, this cake stands out for its perfect balance of textures and flavors. The light yeast-based dough pairs beautifully with the rich vanilla custard, while the crunchy almond topping adds a satisfying contrast. For anyone who adores desserts that aren’t overly sweet but still feel indulgent, this is a must-try. At brekcakes.com, we celebrate recipes that tell a story, and the German Bee Sting Cake does just that—connecting generations through its timeless appeal. If you’re new to yeast-based cakes, don’t worry. Our baking tips for beginners will guide you through the process. And if you love European desserts, you’ll also enjoy our Classic Black Forest Cake.
Why I Love This Recipe
My love for German Bee Sting Cake began during a trip to Bavaria, where I first tasted its delicate layers at a cozy village bakery. The way the custard melted into the soft sponge and the almonds crackled under my fork felt like pure magic. Since then, I’ve made it my mission to recreate that moment in my own kitchen. What I adore most is how this cake feels both nostalgic and exciting—a reminder that some recipes are worth savoring slowly, one delicious slice at a time.
Health and Nutrition
Why it’s good for your body
German Bee Sting Cake delivers more than just irresistible flavor. First, its honey-infused glaze offers natural sweetness, which means you can enjoy a treat without relying on refined sugars. Additionally, the almond topping provides healthy fats and a dose of vitamin E, supporting skin health and immunity. Unlike many desserts, German Bee Sting Cake balances indulgence with nourishing ingredients.
Moreover, the yeast-based dough contributes complex carbohydrates, giving you steady energy instead of a sugar crash. The custard filling adds protein and calcium, making each slice more satisfying. Because German Bee Sting Cake includes wholesome components like almonds and eggs, it packs nutrients alongside its rich taste. Finally, the honey drizzle offers antioxidants, which help combat inflammation.
While it’s still a dessert, German Bee Sting Cake stands out for its thoughtful ingredients. Whether you savor it as an occasional treat or a celebratory dessert, you’re choosing a pastry with substance. Next time you crave something sweet, remember that German Bee Sting Cake brings both pleasure and benefits to the table.
How it fits in a healthy lifestyle
German Bee Sting Cake fits into a balanced diet when enjoyed mindfully. Pair a small slice with fresh berries or a protein-rich snack like Greek yogurt to create a satisfying dessert that won’t spike your blood sugar. If you follow a heart-healthy eating plan, the almonds in the topping provide unsaturated fats, which support cardiovascular wellness.
For those exploring gluten-free options, you can adapt German Bee Sting Cake using alternative flours like almond or coconut flour. Check out our guide to gluten-free baking for easy swaps. If you’re managing portion control, try cutting the cake into smaller servings and freezing extras for later. Our meal-prep desserts article shares more tips for enjoying sweets without overindulging.
German Bee Sting Cake proves that treats can have a place in a healthy routine. By savoring it in moderation and pairing it with nutrient-dense foods, you can relish every bite guilt-free.
A traditional German dessert featuring a soft yeast cake topped with caramelized almonds and filled with vanilla custard.
Ingredients
Scale
For the Crust:
2 cups all-purpose flour
1/4 cup sugar
1 packet active dry yeast
1/2 cup warm milk
1/4 cup unsalted butter, softened
1 egg
1/2 tsp salt
1/2 cup sliced almonds
1/4 cup honey
2 tbsp heavy cream
2 tbsp unsalted butter
2 cups vanilla custard (store-bought or homemade)
Instructions
1. Prepare the Crust:
In a bowl, dissolve yeast in warm milk. Let sit for 5 minutes until frothy.
Mix flour, sugar, salt, softened butter, and egg in a large bowl. Add yeast mixture and knead into a smooth dough. Let rise for 1 hour.
Preheat oven to 350°F (175°C). Roll dough into a rectangle and place on a baking sheet.
In a saucepan, melt butter, honey, and cream. Stir in almonds. Spread mixture over the dough.
Bake for 20-25 minutes until golden. Cool completely.
Slice cake horizontally and fill with vanilla custard. Reassemble and serve.
Notes
You can customize the seasonings to taste.
s-dish">How to Prepare This Dish
Steps and time-saving tips
Start by preheating your oven to 350°F and greasing a 9-inch springform pan. Meanwhile, whisk together flour, sugar, and baking powder in a large bowl for the German Bee Sting Cake base. In another bowl, beat softened butter with eggs and vanilla until creamy, then gradually fold in the dry ingredients. Spread this thick batter evenly into the pan—don’t worry if it’s sticky; a lightly wet spatula helps smooth it. For the iconic honey-almond topping, melt butter in a saucepan, stir in sugar and honey, then quickly mix in sliced almonds before pouring it over the batter. Bake for 25-30 minutes until golden. Let it cool completely before slicing to avoid crumbling. To save time, toast extra almonds in advance or use store-bought vanilla pudding for the filling. If the topping hardens too fast, gently reheat it with a splash of milk.
Mistakes I’ve made and learned from
My first German Bee Sting Cake was a mess—I overmixed the batter, leaving it dense like bread. Now, I stop stirring as soon as the flour disappears. Another disaster? Cutting the cake warm, which made the layers collapse. Patience pays off! Letting it cool ensures clean slices, just like I learned from my common baking mistakes guide. Also, I once burned the almond topping by multitasking. Now, I stay nearby and stir constantly, as detailed in my caramel techniques post. Trust me, these small fixes make all the difference.
n-and-variations">Cultural Connection and Variations
Where this recipe comes from
German Bee Sting Cake, or “Bienenstich” as locals call it, carries a sweet legend. Some say bakers created it to celebrate a victorious battle against angry bees, while others believe the honey-glazed topping inspired the name. Either way, this cake has deep roots in German baking traditions, often appearing at family gatherings and regional festivals. In the Rhineland, bakers might layer the dough thicker for a heartier bite, while Bavarian versions sometimes add a splash of rum to the custard.
Families pass down their own twists, too. My neighbor’s Oma, for instance, swears by almond slices instead of slivered almonds for extra crunch. Meanwhile, modern bakers experiment with fillings like chocolate cream or seasonal fruit. Across Europe, you’ll find similar treats—like the French “gâteau à la broche” or Dutch “bokkepootjes”—but German Bee Sting Cake stands out with its perfect balance of caramelized topping and velvety filling. Whether served at a Sunday Kaffeezeit or a wedding, it’s a bite of nostalgia.
How it fits in today’s cooking
Today, German Bee Sting Cake bridges tradition and convenience. Busy home cooks streamline the recipe with pre-made dough or quick custard mixes, yet the soul of the dessert remains. It’s a star at holidays like Oktoberfest, but also shines as a weeknight treat with coffee. For a lighter take, some swap the classic buttercream for whipped cream frosting, while gluten-free bakers use almond flour for the base.
Food bloggers and cafes
keep it relevant, too. You might spot it on brunch menus beside apple strudel, or reinvented as cupcakes. What hasn’t changed? That first bite—crispy, sweet, and comforting. German Bee Sting Cake isn’t just a recipe; it’s a conversation starter, a slice of heritage, and proof that some flavors never go out of style.
Taste and Texture
What makes it delicious
German Bee Sting Cake delivers a symphony of textures and flavors that make every bite irresistible. The soft, buttery yeast dough cradles a luscious vanilla custard filling, while the golden almond-honey topping crackles with a delicate crunch. Fragrant notes of toasted almonds and warm honey mingle with the rich creaminess of the custard, creating a balanced sweetness that never overwhelms. Meanwhile, the cake’s tender crumb melts in your mouth, contrasting perfectly with the crisp, caramelized topping. Whether served warm or chilled, German Bee Sting Cake offers a comforting yet elegant treat that lingers on the palate.
Boosting the flavor
For an extra layer of indulgence, drizzle warm honey over each slice just before serving to amplify the nutty sweetness. Alternatively, swap the vanilla custard for a cinnamon-infused cream to add a cozy spice note. A sprinkle of flaky sea salt on top heightens the caramelized flavors, while a side of berry compote introduces a tangy contrast. Experiment with orange zest in the dough or a dash of cardamom in the custard for a fragrant twist. With these tweaks, German Bee Sting Cake becomes even more memorable.
Always chill the dough before rolling it out to prevent sticking and ensure even baking. For the best texture in your German Bee Sting Cake, use parchment paper to line the pan, which helps the cake release cleanly. Additionally, toast the almond topping gently to avoid burning, as it adds the perfect crunch. Finally, let the cake cool completely before slicing to keep the layers intact.
Mistakes to avoid
Avoid overmixing the dough, as this can make the cake dense instead of light and fluffy. If the almond topping browns too quickly, tent it with foil to prevent overcaramelization. For more troubleshooting tips, check out our guide on fixing dense cakes. Also, don’t skip the custard layer—it’s essential for authentic German Bee Sting Cake flavor. Learn how to perfect it in our custard tutorial.
g-suggestions">Serving and Pairing Suggestions
How to serve this dish
Showcase your German Bee Sting Cake as the star of any gathering by serving it on a rustic cake stand for a charming touch. Meanwhile, dust the top with powdered sugar or drizzle honey for extra elegance. Since this cake shines at brunches or afternoon tea, slice it into generous portions and pair with fresh berries for a pop of color. Alternatively, serve it warm with a scoop of vanilla ice cream for a cozy dessert. Whether you present it at holidays or casual get-togethers, German Bee Sting Cake always impresses.
What goes well with it
Elevate your German Bee Sting Cake experience by pairing it with a steaming cup of spiced chai tea. The warm spices beautifully balance the cake’s honeyed sweetness. For a refreshing contrast, try it with a cold glass of homemade lemonade, which cuts through the rich custard filling. If you love serving desserts with complementary treats, consider adding our Homemade Apple Strudel or Classic Black Forest Cake for a delightful German-inspired spread. Each pairing enhances the flavors while keeping the focus on this irresistible cake.
math-faq-block">
What is German Bee Sting Cake made of?
German Bee Sting Cake, or Bienenstich, consists of a soft yeast dough base, a creamy vanilla custard or pudding filling, and a caramelized almond-honey topping. The name comes from the honey glaze that “stings” like a bee, giving the cake its unique flavor and texture. It’s a classic German dessert loved for its sweet yet balanced taste.
Why is it called Bee Sting Cake?
The name “Bee Sting Cake” comes from the legend that a baker was stung by a bee attracted to the honey glaze on top. Another theory suggests the caramelized almond-honey topping resembles bee stings. Either way, German Bee Sting Cake is a delightful treat with a name as intriguing as its flavor.
Can I make German Bee Sting Cake ahead of time?
Yes! German Bee Sting Cake actually tastes better when made a day ahead, as the flavors meld together. Store it in the refrigerator, but let it sit at room temperature for about 30 minutes before serving to enhance the texture. The honey-almond topping stays crisp, and the custard filling remains creamy.
rank-math-faq-item">
Is German Bee Sting Cake the same as Bienenstich?
Yes, German Bee Sting Cake is the English name for Bienestich, the traditional German dessert. Both terms refer to the same cake with a yeast base, custard filling, and honey-almond topping. The name “Bienenstich” directly translates to “bee sting,” keeping the playful origin story intact.
If you’re craving a meal that’s both comforting and bursting with flavor, you’re in the right place. Ground Beef Tostadas deliver that perfect balance of crispy, savory, and fresh—all in one bite. Whether you’re cooking for a busy weeknight or a festive gathering, this dish brings people together effortlessly. Plus, with endless topping options, everyone can customize their plate just the way they like it. Trust me, once you try these, they’ll become a regular in your rotation.
Ground Beef Tostadas are a vibrant, versatile dish that combines crispy tortillas with seasoned beef, creamy refried beans, and a rainbow of fresh toppings. Originating from Mexican cuisine, they’ve become a beloved staple in many households for good reason. Not only do they come together quickly, but they also pack a punch of texture and flavor in every bite. For those nights when you want something satisfying yet simple, this recipe shines. It aligns perfectly with brekcakes.com’s mission to share approachable, crowd-pleasing meals that don’t sacrifice taste or creativity. If you love dishes like Easy Chicken Tacos, you’ll adore the bold, layered experience of tostadas. And if you’re new to Mexican-inspired cooking, don’t worry—this recipe guides you every step of the way, just like our Beginner’s Guide to Mexican Spices.
Why I Love This Recipe
Ground Beef Tostadas hold a special place in my heart because they remind me of family taco nights growing up. My mom would set out all the toppings, and we’d pile our plates high with whatever combinations we craved. Now, I love recreating that same joy in my own kitchen. The sizzle of the beef, the crunch of the tortillas, and the freshness of the toppings—it’s a symphony of flavors that never gets old. Most importantly, this recipe invites everyone to gather around the table, share stories, and enjoy a meal that feels like home.
Health and Nutrition
Why it’s good for your body
Ground Beef Tostadas pack a nutritious punch while delivering bold flavors. First, lean ground beef provides high-quality protein, which helps build muscle and keeps you full longer. Additionally, the beef delivers essential nutrients like iron, zinc, and B vitamins, which support energy levels and immune function. When you pair it with fiber-rich toppings like beans, lettuce, and tomatoes, Ground Beef Tostadas become a well-rounded meal.
Moreover, the dish offers versatility for boosting nutrition. For example, using whole-grain or corn tortillas adds complex carbs for sustained energy. Meanwhile, avocado or Greek yogurt as toppings contribute healthy fats and probiotics. Even better, the combination of protein, fiber, and healthy fats in Ground Beef Tostadas helps stabilize blood sugar, making them a smart choice for sustained energy.
Finally, the dish encourages mindful eating. Because you layer fresh ingredients, you control portions and nutrient balance. Whether you load up on veggies or opt for lighter toppings, Ground Beef Tostadas adapt to your health goals without sacrificing taste.
How it fits in a healthy lifestyle
Ground Beef Tostadas fit seamlessly into balanced eating habits. If you follow a high-protein diet, the lean beef and beans deliver a powerful protein boost. For gluten-free eaters, corn tortillas make this dish a safe and satisfying option. Plus, by loading up on fresh vegetables, you easily increase your daily fiber intake.
This meal also supports heart health when you choose lean beef and healthy fats like avocado. If you need meal prep ideas, Ground Beef Tostadas store well, making them perfect for busy weeknights. For more gluten-free inspiration, check out our gluten-free meal ideas. And if you love high-protein recipes, explore our protein-packed dinners for more hearty options.
With simple swaps and fresh ingredients, Ground Beef Tostadas help you enjoy flavorful meals while staying on track with your health goals.
Crispy tostadas topped with seasoned ground beef, fresh veggies, and cheese for a quick and delicious meal.
Ingredients
Scale
For the Crust:
1 lb ground beef
1 packet taco seasoning
8 tostada shells
1 cup refried beans
1 cup shredded lettuce
1 cup diced tomatoes
1/2 cup diced onions
1 cup shredded cheddar cheese
1/2 cup sour cream
1/4 cup chopped cilantro
Instructions
1. Prepare the Crust:
Brown the ground beef in a skillet over medium heat until fully cooked. Drain excess fat.
Add taco seasoning and water according to packet instructions. Simmer for 5 minutes.
Warm the refried beans in a small saucepan or microwave.
Spread a layer of refried beans on each tostada shell.
Top with seasoned ground beef, shredded lettuce, diced tomatoes, onions, and cheese.
Finish with a dollop of sour cream and a sprinkle of chopped cilantro.
Serve immediately and enjoy.
Notes
You can customize the seasonings to taste.
“`html
s-dish">How to Prepare This Dish
Steps and time-saving tips
Start by heating a large skillet over medium heat and browning the ground beef until it crumbles easily. Stir in your favorite taco seasoning and a splash of water, then let it simmer for a few minutes while you prep the toppings. Meanwhile, warm the tostada shells in the oven for just 3-4 minutes to keep them crisp. Spread a thin layer of refried beans on each shell—this helps the toppings stick. Next, layer the seasoned ground beef evenly over the beans. Top with shredded lettuce, diced tomatoes, and a sprinkle of cheese for a fresh crunch. Drizzle with sour cream or guacamole, and don’t forget a squeeze of lime for brightness. If you’re short on time, use pre-shredded lettuce and store-bought salsa to speed things up. For a make-ahead option, cook the beef a day in advance and reheat it gently before assembling. The key is to keep the shells crisp and the toppings fresh, so serve immediately for the best texture.
Mistakes I’ve made and learned from
One of my biggest mistakes was overloading the tostada shells, which made them soggy and hard to eat. Now, I stick to a light, even layer of toppings and serve extra sides like homemade salsa on the side. Another lesson? Skipping the bean layer—it seemed optional, but without it, the beef slid right off. A thin spread of refried beans acts like glue, and I’ll never skip it again. If you’re new to Mexican cooking, check out my taco seasoning hacks to avoid bland beef. Trust me, a well-seasoned filling makes all the difference!
Ground Beef Tostadas trace their roots to Mexico, where crispy tortillas serve as the foundation for endless flavor combinations. Families often pass down their own versions, layering seasoned beef with fresh toppings like lettuce, cheese, and salsa. In coastal regions, you might find seafood replacing the beef, while inland areas stick to heartier proteins. My abuela always added a sprinkle of crumbled queso fresco and a dash of smoky chipotle for extra depth.
Across the border, Ground Beef Tostadas take on local twists. In Texas, they pile on refried beans and jalapeños, while California versions might feature avocado crema. Even beyond North America, similar dishes pop up—think Colombian “tostadas” with shredded chicken or Salvadoran “pupusas” with a thicker base. No matter the variation, the magic lies in that satisfying crunch and the freedom to customize each bite.
ays-cooking">How it fits in today’s cooking
Today, Ground Beef Tostadas shine as a weeknight hero. Busy cooks love them for their quick assembly and crowd-pleasing versatility. They fit perfectly into meal prep routines, too—just store toppings separately and crisp the tortillas last minute. For a fresh spin, try swapping beef for turkey or adding pickled onions for tang, like in these easy Mexican recipes.
They’re also a star at gatherings. Whether it’s a game-day spread or a summer fiesta, everyone can build their own. Plus, they pair wonderfully with lighter sides, such as the healthy salads that balance the richness. From family dinners to festive occasions, Ground Beef Tostadas keep bringing people together—one crispy bite at a time.
Taste and Texture
What makes it delicious
Ground Beef Tostadas deliver a mouthwatering mix of bold flavors and satisfying textures. First, the crispy corn tortilla shatters with every bite, giving way to savory, well-seasoned ground beef that’s rich and slightly caramelized. Fresh toppings like cool, creamy avocado and tangy crumbled queso fresco balance the warmth of the meat, while a squeeze of lime adds a bright, zesty finish. The contrast between the crunchy base, tender beef, and smooth toppings makes every bite exciting. Plus, aromatic spices like cumin and smoked paprika infuse the dish with a deeply fragrant, smoky aroma that’ll have everyone gathering around the table. Ground Beef Tostadas aren’t just tasty—they’re a full sensory experience.
r">Boosting the flavor
Want to take your Ground Beef Tostadas to the next level? Try swapping the beef for chorizo for a spicy, smoky twist, or mix in sautéed mushrooms for an earthy depth. A drizzle of creamy chipotle sauce adds a tangy kick, while pickled red onions bring a refreshing crunch. For extra heat, toss in diced jalapeños or a sprinkle of chili powder. Don’t forget a side of mango salsa—its sweet and spicy notes pair perfectly with the savory beef. With these easy tweaks, your tostadas will burst with even more irresistible flavor.
Tips for Success
Best practices for results
For the crispiest Ground Beef Tostadas, always warm your tortillas before frying them. This step prevents tearing and ensures even browning. Additionally, drain excess grease from the beef after browning to keep your toppings fresh and vibrant. Finally, layer your ingredients in the right order—start with refried beans as a base so everything sticks together perfectly.
>Mistakes to avoid
Avoid overloading your Ground Beef Tostadas with toppings, as this makes them messy to eat. Instead, balance flavors by using moderate amounts of each ingredient. Another common mistake is skipping the salt when seasoning the beef. For more seasoning tips, check out our guide on perfectly seasoned meats. Also, don’t forget to crisp your tortillas properly; soggy ones ruin the texture. Learn how to achieve the ideal crunch with our crispy tortilla techniques.
Serving and Pairing Suggestions
How to serve this dish
Ground Beef Tostadas shine when served fresh and loaded with toppings. For a vibrant presentation, layer the crispy shells with seasoned beef, then let everyone customize their own with colorful garnishes like diced tomatoes, shredded lettuce, and avocado slices. Meanwhile, a drizzle of crema or a sprinkle of cotija cheese adds the perfect finishing touch. These tostadas work beautifully for casual weeknight dinners, but they also make a fun centerpiece for game day or festive gatherings. To elevate the experience, serve them on a large wooden board with small bowls of toppings for a build-your-own setup.
What goes well with it
Pair your Ground Beef Tostadas with a refreshing agua fresca or a cold Mexican beer to balance the rich flavors. For sides, try a light mango avocado salad to add a sweet and creamy contrast. Alternatively, a smoky charred corn salsa brings a delightful crunch and tangy kick. Finally, don’t forget a side of warm refried beans or Mexican rice for a heartier meal that keeps everyone satisfied.
What’s the best way to season ground beef for tostadas?
For flavorful Ground Beef Tostadas, season the meat with a mix of chili powder, cumin, garlic powder, smoked paprika, salt, and pepper. Brown the beef first, then simmer it with a splash of beef broth or tomato sauce to keep it moist and packed with flavor.
Can I make Ground Beef Tostadas ahead of time?
Yes! Prep the seasoned ground beef and toppings separately, then store them in airtight containers for up to 3 days. Assemble the Ground Beef Tostadas just before serving to keep the shells crispy.
rank-math-faq-item">
What toppings go well with Ground Beef Tostadas?
Classic toppings include shredded lettuce, diced tomatoes, avocado, sour cream, shredded cheese, and fresh cilantro. For extra crunch, add pickled jalapeños or radishes to your Ground Beef Tostadas.
Are Ground Beef Tostadas gluten-free?
Most Ground Beef Tostadas are naturally gluten-free if you use corn tostada shells and check seasoning labels for hidden additives. Always confirm ingredients if you have celiac disease or gluten sensitivity.
Best Honey Pepper Chicken Pasta Recipe
Introduction
If you’re craving a dish that balances sweet, spicy, and savory flavors effortlessly, you’re in the right place. Honey Pepper Chicken Pasta is one of those recipes that feels like a warm hug after a long day. Whether you’re cooking for a weeknight dinner or impressing guests, this dish delivers comfort and excitement in every bite. Plus, it’s surprisingly simple to make, even if you’re not a seasoned chef.
Honey Pepper Chicken Pasta combines tender chicken, al dente pasta, and a luscious sauce made with honey, black pepper, and a hint of garlic. The sweetness of the honey mellows the heat from the pepper, creating a harmony of flavors that keeps you coming back for more. What makes this recipe special is its versatility. You can tweak the spice level or add veggies like bell peppers or spinach for extra nutrition. If you love easy yet impressive meals, you’ll appreciate how this dish fits into busy schedules without sacrificing taste. For more weeknight dinner inspiration, check out my quick dinner recipes. And if you’re new to cooking with honey, my guide to cooking with honey will help you master its magic.
Why I Love This Recipe
Honey Pepper Chicken Pasta holds a special place in my heart because it reminds me of cozy family dinners. The first time I made it, my kids devoured every last bite, and my husband asked for seconds. That’s when I knew it was a keeper. There’s something incredibly satisfying about watching loved ones enjoy a meal you’ve prepared, especially when it’s as flavorful and comforting as this one. Every time I make it, I’m transported back to those happy moments around the table, and that’s why I’ll always cherish this recipe.
Health and Nutrition
Why it’s good for your body
Honey Pepper Chicken Pasta packs a nutritious punch while delighting your taste buds. First, the lean chicken provides high-quality protein to support muscle repair and keep you full longer. Meanwhile, the honey adds natural sweetness without refined sugar, offering antioxidants and a subtle energy boost. Additionally, the black pepper not only enhances flavor but also aids digestion and reduces inflammation.
Whole wheat pasta, if used, boosts fiber intake for better gut health and steady blood sugar levels. Olive oil, often part of the recipe, delivers heart-healthy monounsaturated fats. Together, these ingredients make Honey Pepper Chicken Pasta a balanced meal that fuels your body efficiently. Moreover, the dish includes vitamins from garlic and herbs, which strengthen immunity and add depth to every bite.
Since Honey Pepper Chicken Pasta combines protein, complex carbs, and healthy fats, it stabilizes energy levels. The honey’s antimicrobial properties may even support throat health. Finally, the dish’s versatility lets you tweak ingredients to match dietary needs, ensuring everyone can enjoy its benefits.
How it fits in a healthy lifestyle
Honey Pepper Chicken Pasta fits seamlessly into a balanced diet. For protein-focused eaters, the chicken offers a lean source to meet daily goals. If you prefer gluten-free options, swap regular pasta for chickpea or rice noodles—just like our gluten-free pasta guide suggests. The dish also works well for meal prep, staying fresh and flavorful for days.
Those watching calories can control portions by pairing it with a crisp salad or steamed veggies. The honey’s natural sweetness satisfies cravings, reducing the need for sugary desserts. For heart-healthy eating, use extra virgin olive oil and load up on herbs, as highlighted in our heart-smart cooking tips. Whether you’re fueling workouts or enjoying a family dinner, Honey Pepper Chicken Pasta adapts to your lifestyle without sacrificing taste or nutrition.
Start by seasoning your chicken breasts generously with salt, pepper, and a touch of garlic powder. Heat a skillet over medium-high heat and drizzle in olive oil. Sear the chicken for about 6 minutes per side until golden and cooked through. While the chicken rests, boil your pasta in salted water until al dente. Meanwhile, whisk together honey, soy sauce, and a splash of lemon juice in a small bowl for the glaze. Slice the rested chicken into thin strips. Drain the pasta, then toss it back into the pot with a bit of butter and minced garlic. Fold in the chicken and drizzle the honey pepper glaze over everything, stirring gently to coat. For a time-saving hack, use pre-cooked rotisserie chicken and skip the searing step. Garnish with fresh parsley or red pepper flakes for an extra kick. Serve immediately while the Honey Pepper Chicken Pasta is warm and flavorful.
Mistakes I’ve made and learned from
Early on, I rushed the searing process and ended up with rubbery chicken—patience is key for that perfect golden crust. Now, I let the skillet heat fully before adding the chicken, and I resist the urge to move it too soon. Another blunder? Overcooking the pasta. I’ve learned to set a timer for a minute less than the package suggests, since it keeps cooking slightly after draining. For more tips on nailing pasta textures, check out my guide on perfecting al dente pasta. And if you’ve ever struggled with balancing sweet and savory flavors like I have, my flavor-balancing tricks will save your dish every time.
Honey Pepper Chicken Pasta feels like a love letter to comfort food, blending sweet and savory flavors in a way that spans cultures. While the dish doesn’t belong to one specific tradition, it draws inspiration from Italian pasta dishes and American Southern-style glazed chicken. In Italy, they might skip the honey and opt for a spicy arrabbiata sauce, while in the South, cooks often pair fried chicken with honey drizzle. This recipe merges the best of both worlds.
Families put their own spin on Honey Pepper Chicken Pasta, too. Some add a splash of cream for richness, while others toss in roasted veggies for extra texture. My grandma used to make a version with extra black pepper, claiming it “woke up the flavors.” Meanwhile, in Asian fusion kitchens, chefs might swap traditional pasta for udon or soba noodles, proving how versatile this dish really is.
ays-cooking">How it fits in today’s cooking
Honey Pepper Chicken Pasta still shines in modern kitchens because it balances simplicity and bold taste. Busy home cooks love it for weeknight dinners, while food bloggers dress it up for date nights with a side of garlic butter rolls. Its adaptability makes it a year-round favorite—light enough for summer but hearty enough for winter.
Today’s cooks also tweak the recipe to fit dietary needs, like using gluten-free pasta or plant-based chicken. Some even pair it with a fresh avocado cucumber salad for a balanced meal. Whether you stick to the classic or experiment, Honey Pepper Chicken Pasta remains a crowd-pleaser that bridges tradition and innovation.
Taste and Texture
What makes it delicious
Honey Pepper Chicken Pasta delivers a mouthwatering balance of sweet, savory, and spicy flavors. The honey caramelizes the tender chicken, creating a sticky, golden glaze with a subtle kick from cracked black pepper. Meanwhile, the al dente pasta soaks up the rich, buttery sauce, offering a satisfying chew with every bite. Fresh garlic and herbs add a fragrant depth, while a splash of lemon brightens the dish. Together, these elements make Honey Pepper Chicken Pasta irresistibly creamy, slightly smoky, and packed with layers of flavor.
r">Boosting the flavor
For an extra flavor boost, try swapping regular pasta for a garlic-infused variety or tossing in roasted cherry tomatoes for a burst of sweetness. A sprinkle of grated parmesan or crumbled feta adds a salty tang, while toasted pine nuts lend a delightful crunch. If you love heat, a pinch of red pepper flakes or a drizzle of honey sriracha glaze amps up the spice. Pair it with a light citrus avocado salad to balance the richness. Small tweaks can elevate Honey Pepper Chicken Pasta from great to unforgettable.
Tips for Success
Best practices for results
Always cook the chicken until golden brown before adding it to the Honey Pepper Chicken Pasta, as this locks in flavor and keeps it tender. Use fresh honey for the best balance of sweetness, and don’t skip toasting the black pepper—it intensifies the dish’s signature warmth. Meanwhile, reserve a cup of pasta water before draining; it helps the sauce cling perfectly to every noodle. Finally, toss everything together off the heat to prevent overcooking and maintain vibrant flavors.
>Mistakes to avoid
Avoid overcrowding the pan when searing the chicken, as this steams instead of browns the meat. For evenly coated noodles, stir the Honey Pepper Chicken Pasta gently but thoroughly—check out our guide on sauces that stick for more tips. Also, don’t substitute ground pepper for freshly cracked; the pre-ground version lacks depth. If your sauce seems too thick, gradually add reserved pasta water until it reaches the right consistency. For more troubleshooting, explore our pasta perfection techniques.
Serving and Pairing Suggestions
How to serve this dish
For a stunning presentation, serve Honey Pepper Chicken Pasta in wide, shallow bowls to showcase its glossy sauce and tender chicken. Meanwhile, garnish with fresh parsley or basil leaves for a pop of color. If you’re hosting a dinner party, pair it with warm breadsticks or a crisp salad to round out the meal. Alternatively, this dish shines at casual weeknight dinners or even potlucks, where its bold flavors win over any crowd. To elevate the experience, drizzle a touch of extra honey right before serving for a sweet, aromatic finish.
What goes well with it
A chilled glass of crisp white wine, like Sauvignon Blanc, balances the sweetness of Honey Pepper Chicken Pasta perfectly. For a non-alcoholic option, try sparkling lemonade with a hint of mint. On the side, roasted garlic bread or a light arugula salad adds texture without overpowering the dish. If you love bold flavors, our Spicy Honey Glazed Carrots make a vibrant companion. For dessert, keep it simple with our Lemon Ricotta Cookies, which offer a refreshing contrast to the rich pasta.
Honey Pepper Chicken Pasta is a flavorful dish combining tender chicken, al dente pasta, and a sweet-spicy sauce made with honey and black pepper. The balance of flavors makes it a popular choice for weeknight dinners or special occasions. You can customize it with vegetables or extra spices to suit your taste.
How do you make Honey Pepper Chicken Pasta creamy?
To make Honey Pepper Chicken Pasta creamy, add heavy cream, half-and-half, or cream cheese to the sauce while cooking. Stir in Parmesan cheese for extra richness. The creamy version still highlights the honey and pepper flavors but with a smoother texture.
rank-math-faq-item">
Can I use a different protein instead of chicken in Honey Pepper Pasta?
Yes! Shrimp, turkey, or even tofu work well as substitutes in Honey Pepper Chicken Pasta. Adjust cooking times based on your protein choice, but keep the honey-pepper sauce for the signature flavor. The dish remains delicious with these variations.
What sides go well with Honey Pepper Chicken Pasta?
Garlic bread, a crisp green salad, or roasted vegetables pair perfectly with Honey Pepper Chicken Pasta. For a lighter option, try steamed broccoli or asparagus. These sides complement the dish’s sweet and savory notes without overpowering it.
Best Millionaire Peach Salad – Sweet & Creamy Recipe
Introduction
If you’ve ever craved a dish that feels both indulgent and refreshing, you’re in the right place. Today, I’m sharing my Millionaire Peach Salad—a recipe that balances luxury and simplicity in every bite. Whether you’re hosting a summer gathering or just treating yourself, this salad delivers vibrant flavors and a touch of elegance. Plus, it’s incredibly easy to make, proving that gourmet taste doesn’t require complicated steps.
Millionaire Peach Salad is a celebration of ripe peaches, creamy burrata, and crisp prosciutto, all drizzled with honey and sprinkled with fresh basil. The name might sound fancy, but the magic lies in how effortlessly the ingredients come together. This dish matters because it transforms everyday produce into something extraordinary, perfect for those moments when you want to impress without stress. It fits the brekcakes.com ethos perfectly: approachable recipes with a dash of sophistication. If you love dishes that feel special yet simple, you’ll adore this one. For more inspiration, check out my summer entertaining tips or explore my favorite fruit desserts to pair with this salad.
Why I Love This Recipe
Millionaire Peach Salad holds a special place in my heart because it reminds me of lazy summer afternoons spent with family. The first time I made it, my niece declared it “fancy picnic food,” and that’s exactly the vibe I aim for—elevated yet relaxed. Every time I prepare it, I’m transported back to those sunny days, laughing over shared plates. It’s more than just a recipe; it’s a memory maker, and I hope it becomes one for you too.
Health and Nutrition
Why it’s good for your body
Millionaire Peach Salad packs a powerhouse of nutrients while delivering vibrant flavors. First, the juicy peaches provide a hefty dose of vitamin C, which boosts immunity and promotes glowing skin. Additionally, the leafy greens in Millionaire Peach Salad offer fiber to support digestion and keep you feeling full longer. Meanwhile, the nuts or seeds sprinkled on top contribute healthy fats and protein for sustained energy.
Moreover, Millionaire Peach Salad includes ingredients like avocado or olive oil, which supply heart-healthy monounsaturated fats. These fats help reduce inflammation and support cardiovascular health. Furthermore, the colorful veggies and fruits in this dish deliver antioxidants that combat oxidative stress. As a result, Millionaire Peach Salad not only tastes indulgent but also nourishes your body from the inside out.
Finally, the balance of sweet and savory elements in Millionaire Peach Salad makes it a satisfying yet light option. Whether you enjoy it as a side or a main, you’ll get a mix of vitamins, minerals, and phytonutrients. With every bite, you’re treating yourself to a meal that’s as nutritious as it is delicious.
How it fits in a healthy lifestyle
Millionaire Peach Salad effortlessly fits into a balanced diet, whether you’re aiming for weight management or simply eating cleaner. Its combination of fresh produce and wholesome fats aligns with Mediterranean-style eating, which promotes longevity and heart health. If you’re following a gluten-free or plant-based diet, this salad checks all the boxes without sacrificing flavor.
For those focused on meal prep, Millionaire Peach Salad holds up well in the fridge, making it a convenient grab-and-go option. Pair it with a lean protein like grilled chicken or tofu for a complete meal. If you’re exploring more nutrient-dense recipes, check out our gluten-free meal prep guide for additional inspiration. You might also love our heart-healthy snacks to round out your day with even more wholesome choices.
Whether you’re serving it at a summer barbecue or enjoying it solo, Millionaire Peach Salad proves that eating well doesn’t mean skipping flavor. It’s a simple yet impactful way to fuel your body while savoring every bite.
A luxurious salad featuring fresh peaches, creamy burrata, and a drizzle of honey for a perfect balance of sweet and savory.
Ingredients
Scale
For the Crust:
4 ripe peaches, sliced
8 oz burrata cheese
2 cups arugula
1/4 cup toasted walnuts
2 tbsp honey
1 tbsp olive oil
1 tsp flaky sea salt
1/2 tsp black pepper
Instructions
1. Prepare the Crust:
Arrange arugula on a serving platter.
Place sliced peaches and torn burrata over the arugula.
Sprinkle toasted walnuts on top.
Drizzle with honey and olive oil.
Season with flaky sea salt and black pepper.
Serve immediately.
Notes
You can customize the seasonings to taste.
How to Prepare This Dish
Steps and time-saving tips
Start by washing and slicing four ripe peaches into thin wedges. Meanwhile, toast a cup of pecans in a dry skillet over medium heat for about three minutes until fragrant. Let them cool slightly before roughly chopping. In a large bowl, whisk together a quarter cup of honey, two tablespoons of lemon juice, and a pinch of sea salt until smooth. Gently fold the peaches and pecans into the honey mixture until evenly coated. Next, crumble eight ounces of goat cheese over the top, then drizzle with two tablespoons of balsamic glaze for a tangy finish. For the best flavor, chill the Millionaire Peach Salad for at least 15 minutes before serving. If you’re short on time, use pre-toasted nuts or swap fresh peaches for high-quality canned ones in a pinch. The salad tastes even better the next day, so feel free to prep it ahead.
and-learned-from">Mistakes I’ve made and learned from
I once rushed the toasting process and burned an entire batch of pecans—now I set a timer and shake the pan frequently. Another time, I used overripe peaches that turned mushy when mixed; firmer fruit holds up better. If your peaches aren’t perfectly ripe, try my peach ripening hacks to salvage them. Also, don’t skip the chilling step like I did once—the flavors need time to meld. For more balancing tricks with tangy ingredients, check out my guide to balancing sweet and savory. These small tweaks transformed my Millionaire Peach Salad from good to unforgettable.
Cultural Connection and Variations
Where this recipe comes from
Millionaire Peach Salad has roots in Southern hospitality, where fresh peaches and creamy dressings often take center stage during summer gatherings. Families in Georgia and the Carolinas have passed down versions of this dish for generations, each adding their own twist. Some use canned peaches when fresh ones aren’t in season, while others insist on only the ripest local fruit. In the Midwest, you might find Millionaire Peach Salad with a sprinkle of candied pecans for extra crunch. Meanwhile, coastal regions sometimes swap the traditional dressing for a lighter citrus vinaigrette to complement seafood-heavy menus.
Beyond the U.S., variat
ions pop up in unexpected places. In Australia, cooks might add passionfruit or mango for a tropical spin. In parts of Europe, yogurt often replaces the classic creamy base, making it a tangier side dish. My grandmother’s version included a dash of cinnamon, which she claimed “made the peaches sing.” Whether served at potlucks, picnics, or Sunday suppers, Millionaire Peach Salad always brings a touch of sweetness to the table—and a whole lot of nostalgia.
How it fits in today’s cooking
Today, Millionaire Peach Salad remains a star at summer BBQs and holiday spreads, especially in the South. Modern cooks love its versatility—it pairs just as well with grilled chicken as it does with a flaky Southern-style biscuit. Health-conscious versions now use Greek yogurt or coconut milk, proving this dish can adapt to any dietary preference. Some even layer it into parfaits for a breakfast-friendly twist.
Social media has given the salad new life, with food bloggers showcasing vibrant, Instagram-ready versions topped with edible flowers or honey drizzle. It’s also a go-to for easy meal prep, since the flavors deepen overnight. Whether you stick to tradition or experiment with new ingredients, Millionaire Peach Salad keeps earning its place in modern kitchens—one juicy bite at a time.
>Taste and Texture
What makes it delicious
Millionaire Peach Salad dazzles with a symphony of sweet, tangy, and creamy flavors. Juicy peaches burst with natural sweetness, while crisp greens add a refreshing crunch. Creamy goat cheese melts on the tongue, balancing the brightness of a honey-lime dressing. Toasted pecans lend a buttery richness, and every bite finishes with a hint of fragrant mint. The contrast between soft peaches and crunchy nuts makes Millionaire Peach Salad irresistibly satisfying. Plus, the vibrant colors and fresh aroma make it as appealing to the eyes as it is to the palate.
Boosting the flavor
Elevate your Millionaire Peach Salad by swapping goat cheese for tangy feta or adding a drizzle of balsamic glaze for depth. For extra texture, toss in candied walnuts or crispy prosciutto. A sprinkle of chili flakes or fresh basil amps up the flavor without overpowering the peaches. Pair it with a side of garlic bread to round out the meal. Experiment with seasonal fruits like nectarines or berries to keep the dish exciting year-round.
Tips for Success
Best practices for results
Always use ripe but firm peaches for Millionaire Peach Salad to ensure the perfect balance of sweetness and texture. Meanwhile, chill the dressing for at least 30 minutes before tossing it with the salad to keep the flavors crisp. Additionally, toast the nuts lightly to enhance their crunch and prevent sogginess. Finally, serve Millionaire Peach Salad immediately after assembling to maintain its vibrant freshness.
Mistakes to avoid
Avoid overdressing the salad, as too much liquid can make the ingredients soggy. Instead, drizzle the dressing gradually and toss gently. Also, skip using underripe peaches, which can taste tart and hard. For more tips on selecting the best produce, check out our guide on choosing fresh fruit. Another common mistake is skipping the resting time for the dressing. If you’re short on time, try this quick fast salad dressing alternative that blends instantly.
Serving and Pairing Suggestions
How to serve this dish
Serve Millionaire Peach Salad on a large platter or in individual bowls for a stunning presentation. For a festive touch, arrange the peaches in a circular pattern and drizzle the dressing in a zigzag motion. Meanwhile, fresh mint leaves or edible flowers make perfect garnishes to elevate the visual appeal. This dish shines at summer brunches, holiday gatherings, or even as a light dessert after a hearty meal. If you want to impress guests, layer the salad with arugula for extra texture and color contrast.
h-it">What goes well with it
Pair Millionaire Peach Salad with a crisp white wine like Sauvignon Blanc to highlight its sweet and tangy flavors. Alternatively, a sparkling lemonade adds a refreshing twist for non-alcoholic options. For sides, try our Herb-Crusted Salmon, which balances the salad’s sweetness with savory richness. If you prefer something lighter, our Avocado Toast complements the peaches with creamy, earthy notes. Finally, a dollop of vanilla yogurt or whipped cream turns the salad into a delightful dessert.
What is Millionaire Peach Salad made of?
Millionaire Peach Salad typically combines fresh peaches, creamy burrata or mozzarella, prosciutto, and a drizzle of honey or balsamic glaze. This luxurious dish gets its “millionaire” name from the decadent pairing of sweet peaches and rich, high-quality ingredients. It’s often garnished with fresh basil or mint for extra flavor.
rank-math-faq-item">
How do you keep Millionaire Peach Salad from getting soggy?
To prevent sogginess, assemble Millionaire Peach Salad just before serving and pat the peaches dry after slicing. Keep any dressings or glazes on the side until ready to eat. The crisp texture is key to enjoying this elegant dish at its best.
Can you make Millionaire Peach Salad ahead of time?
You can prep components separately—slice peaches, portion cheese, and chill prosciutto—but assemble right before serving. Millionaire Peach Salad tastes freshest when the peaches haven’t oxidized and the cheese maintains its texture. Store ingredients airtight in the fridge for up to 6 hours beforehand.
What protein pairs well with Millionaire Peach Salad?
Grilled chicken, shrimp, or seared scallops complement Millionaire Peach Salad beautifully. The salad’s sweet and savory profile balances well with lean proteins. For vegetarian options, add toasted nuts or crispy chickpeas for extra texture.