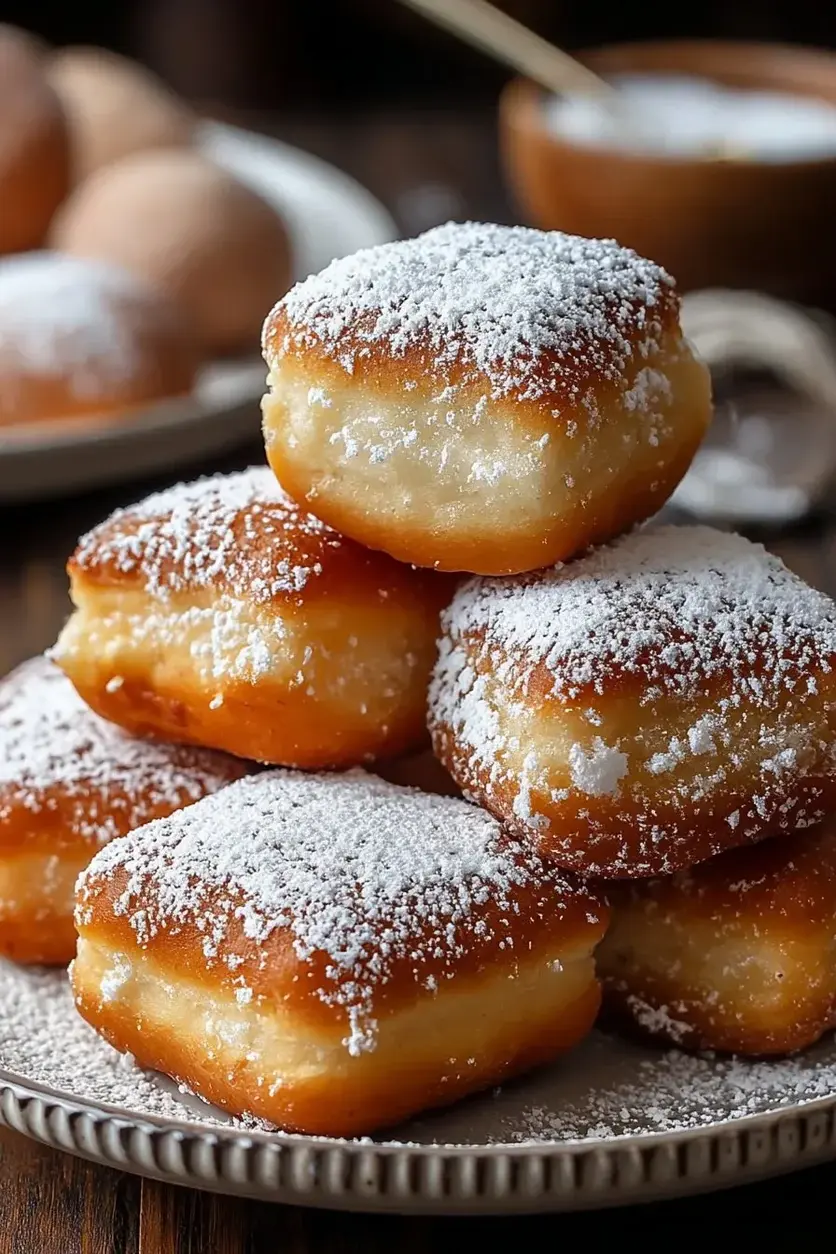
Easy Gluten-Free Breakfast Hash Recipe

easy-gluten-free-breakfast-hash

Introduction

Mornings can feel rushed, but they don’t have to be bland or stressful. That’s why I adore this Gluten-Free Breakfast Hash—it’s hearty, flavorful, and packed with wholesome ingredients to kickstart your day. Whether you’re juggling a busy schedule or simply craving a nourishing meal, this dish brings comfort and energy in every bite. Plus, it’s versatile enough to suit your favorite veggies or proteins, making it a staple in my kitchen and hopefully yours too.

Gluten-Free Breakfast Hash is a vibrant, one-pan wonder that combines crispy potatoes, fresh vegetables, and your choice of protein for a satisfying morning meal. Unlike traditional breakfast hashes that rely on gluten-heavy ingredients, this version keeps things light and nutritious without sacrificing flavor. It’s perfect for those with dietary restrictions, but honestly, everyone at my table loves it. The beauty of this dish lies in its simplicity and adaptability. You can toss in seasonal produce, swap sweet potatoes for russets, or add a sprinkle of cheese for extra richness. If you’re looking for more gluten-free inspiration, check out my fluffy gluten-free pancakes or explore these healthy breakfast ideas to round out your morning routine. Above all, this recipe embodies what brekcakes.com stands for: delicious, approachable food that fuels both body and soul.

Why I Love This Recipe

This Gluten-Free Breakfast Hash holds a special place in my heart because it reminds me of lazy Sunday mornings with my family. I love how the sizzle of potatoes in the pan fills the kitchen with warmth, and how everyone gathers around the table, eager to dig in. It’s more than just a meal—it’s a moment of connection. Plus, knowing I’m serving something wholesome and gluten-free makes it even better. Every time I make it, I’m reminded why cooking is my greatest joy: it brings people together, one delicious bite at a time.

Health and Nutrition

Why it’s good for your body

Gluten-Free Breakfast Hash packs a nutritious punch while keeping your mornings delicious. First, it combines fiber-rich vegetables like sweet potatoes and bell peppers, which support digestion and keep you full longer. Additionally, the dish often includes lean proteins like eggs or turkey sausage, helping you build and repair muscles effortlessly.

Moreover, Gluten-Free Breakfast Hash avoids refined grains, making it a smart choice for those with gluten sensitivities or anyone aiming to reduce inflammation. The healthy fats from ingredients like avocado or olive oil also promote heart health and steady energy levels. Since it’s naturally nutrient-dense, you’ll fuel your body without the crash that comes from sugary breakfast options.

Finally, this dish adapts easily to boost specific nutrients. For instance, you can add spinach for iron or swap regular potatoes for cauliflower to lower carbs. Whether you prioritize gut health, energy, or balanced macros, Gluten-Free Breakfast Hash delivers.

How it fits in a healthy lifestyle

Gluten-Free Breakfast Hash fits seamlessly into a balanced diet, whether you’re gluten-free, keto, or simply mindful of whole foods. Its versatile ingredients let you customize it for high-protein or low-carb goals, making it a staple for meal preppers. Pair it with a gluten-free smoothie bowl for a complete breakfast or enjoy it solo for a hearty start.

For those managing dietary restrictions, this dish avoids common allergens while maximizing flavor. It’s also ideal for active lifestyles since the protein and complex carbs sustain energy. If you’re exploring more gluten-free ideas, check out our gluten-free meal prep guide to keep your week on track. With Gluten-Free Breakfast Hash, you’ll nourish your body without sacrificing taste or convenience.

Print

clock clock iconcutlery cutlery iconflag flag iconfolder folder iconinstagram instagram iconpinterest pinterest iconfacebook facebook iconprint print iconsquares squares iconheart heart iconheart solid heart solid icon

Gluten-Free Breakfast Hash


  • Author:
    Chef Mia


Description

A hearty and healthy breakfast hash made with sweet potatoes, bell peppers, and eggs, perfect for a gluten-free morning meal.


Ingredients


Scale

For the Crust:

  • 2 medium sweet potatoes, diced
  • 1 red bell pepper, diced
  • 1 yellow bell pepper, diced
  • 1 small red onion, diced
  • 2 tbsp olive oil
  • 1 tsp smoked paprika
  • 1/2 tsp garlic powder
  • Salt and pepper to taste
  • 4 large eggs
  • Fresh parsley for garnish (optional)


Instructions

1. Prepare the Crust:

  1. Heat olive oil in a large skillet over medium heat.
  2. Add diced sweet potatoes and cook for 10 minutes, stirring occasionally, until they start to soften.
  3. Add diced bell peppers and red onion to the skillet. Stir in smoked paprika, garlic powder, salt, and pepper. Cook for another 10 minutes until vegetables are tender.
  4. Make four small wells in the hash and crack an egg into each well. Cover the skillet and cook for 5-7 minutes until the eggs are set to your liking.
  5. Garnish with fresh parsley if desired and serve hot.


Notes

You can customize the seasonings to taste.


“`html

s-dish">How to Prepare This Dish

Steps and time-saving tips

Start by heating a large skillet over medium heat and drizzling in a tablespoon of olive oil. While the oil warms, dice your sweet potatoes into small, even cubes so they cook quickly and evenly. Toss them into the skillet and let them sizzle for about 5 minutes, stirring occasionally to prevent sticking. Meanwhile, chop your bell peppers and onions into bite-sized pieces. Add them to the skillet along with a pinch of salt and pepper, then stir everything together. For a time-saving hack, prep your veggies the night before and store them in an airtight container. Once the veggies soften, push them to one side of the pan and crack in a few eggs. Scramble them lightly before folding them into the hash. Sprinkle in your favorite gluten-free seasoning blend for extra flavor, then let everything cook for another 2-3 minutes. Serve hot with a side of fresh avocado or a dollop of salsa for a vibrant finish.

Mistakes I’ve made and learned from

When I first made Gluten-Free Breakfast Hash, I overcrowded the skillet, which steamed the veggies instead of crisping them. Now, I cook in batches or use a larger pan for even browning. Another blunder? Underseasoning. I once skipped tasting as I went and ended up with a bland dish. Lesson learned—season in layers and adjust as needed. If you’re new to gluten-free cooking, check out my guide on gluten-free pantry staples to stock up on essentials. Also, if your hash turns out too dry, a splash of broth or a drizzle of oil can revive it. For more troubleshooting tips, my post on common gluten-free mistakes covers easy fixes for texture and flavor issues.

“`

rc="https://exorecipes.com/wp-content/uploads/2025/06/easy-gluten-free-breakfast-hash-recipe.webp" />

Cultural Connection and Variations

Where this recipe comes from

Gluten-Free Breakfast Hash has roots in humble, hearty cooking, where resourcefulness turned simple ingredients into something delicious. Originally, hash was a way to use up leftovers, especially in farm kitchens where nothing went to waste. Over time, regional twists emerged. In the South, you might find it with smoky sausage and sweet potatoes, while in the Southwest, black beans and peppers add a spicy kick. Even across the pond, the British fry-up includes a similar concept with their bubble and squeak.

In my family, Gluten-Free Breakfast Hash became a weekend staple when my cousin discovered her gluten intolerance. We swapped regular potatoes for sweet ones and added crispy bacon for extra flavor. Now, it’s a dish that brings everyone together, whether we’re camping or hosting brunch. Around the world, cooks adapt it to local tastes—think Middle Eastern za’atar-spiced hash or Mediterranean versions with feta and olives. No matter where you go, Gluten-Free Breakfast Hash always feels like home.

ays-cooking">How it fits in today’s cooking

Today, Gluten-Free Breakfast Hash fits perfectly into modern lifestyles. Busy families love it for meal prep, and health-conscious cooks appreciate its versatility. You can load it with seasonal veggies or keep it simple with pantry staples. Plus, it’s a star at holiday brunches, especially when paired with fluffy gluten-free pancakes or a fresh green smoothie.

Social media has also given this dish new life. Food bloggers reinvent it with trendy ingredients like avocado or turmeric-roasted cauliflower. Meanwhile, busy professionals rely on quick skillet versions for weekday fuel. Whether you’re making it for a cozy Sunday or a fast gluten-free breakfast, this hash proves that comfort food can be both nourishing and effortless.

Taste and Texture

What makes it delicious

Gluten-Free Breakfast Hash delivers a hearty, satisfying bite with layers of flavor and texture. Crispy golden potatoes mingle with tender bell peppers, while smoky bacon or savory sausage adds a rich depth. Fresh herbs like rosemary or thyme infuse every forkful with earthy fragrance, and a sprinkle of sharp cheddar melts into creamy pockets. Meanwhile, caramelized onions lend a subtle sweetness that balances the dish perfectly. The contrast between the crunchy edges and soft centers makes each bite of Gluten-Free Breakfast Hash irresistibly dynamic.

r">Boosting the flavor

Elevate your Gluten-Free Breakfast Hash with a few easy tweaks. For extra zest, toss in a handful of spicy jalapeños or a dash of smoked paprika. A drizzle of avocado crema adds cool creaminess, while crumbled feta or goat cheese brings tangy brightness. If you love heat, try pairing it with a side of chipotle sauce for a smoky kick. Fresh toppings like diced avocado or a squeeze of lime juice also brighten the dish, making every bite even more vibrant.

Tips for Success

Best practices for results

First, always chop your vegetables evenly so they cook at the same rate in your Gluten-Free Breakfast Hash. Next, preheat your skillet properly to avoid soggy results—medium-high heat works best. Additionally, use a mix of starchy and non-starchy vegetables for the perfect texture. Finally, don’t overcrowd the pan; cook in batches if needed to ensure crispiness.

>Mistakes to avoid

Avoid using wet vegetables straight from rinsing, as excess moisture will steam instead of crisp your Gluten-Free Breakfast Hash. Instead, pat them dry thoroughly before cooking. Also, resist stirring too often—let the ingredients develop a golden crust for better flavor. For more on perfecting gluten-free cooking techniques, check out our guide on gluten-free cooking tips. And if you’re unsure about seasoning, taste as you go and refer to our seasoning guide for balanced flavors.

Serving and Pairing Suggestions

How to serve this dish

Bring your Gluten-Free Breakfast Hash to life with vibrant presentation. For a rustic touch, serve it in a cast-iron skillet straight from the oven. Alternatively, layer it on a bright ceramic plate for a pop of color. Top with fresh herbs like parsley or chives to add freshness and contrast. This dish shines at weekend brunches, holiday gatherings, or even as a hearty weekday breakfast. If you want extra flair, add a sprinkle of crumbled goat cheese or avocado slices for creaminess.

What goes well with it

Pair your Gluten-Free Breakfast Hash with a refreshing green smoothie for a balanced meal. The crisp, tangy flavors cut through the richness of the hash. For a cozy brunch, serve it alongside our fluffy Gluten-Free Pancakes to satisfy sweet and savory cravings. Finally, a zesty homemade salsa or our creamy Avocado Dressing adds a burst of flavor that elevates every bite.

rc="https://s3-placid.s3.eu-central-1.amazonaws.com/production/rest-images/rawp1noeia0hh/int-70ab8b813256e046cc2e932bfe187e6f-eowv0qya.jpg" />

What are the best vegetables to use in a gluten-free breakfast hash?

For a delicious Gluten-Free Breakfast Hash, starchy vegetables like sweet potatoes, russet potatoes, or butternut squash work best. Bell peppers, onions, and zucchini add great flavor and texture. Avoid pre-seasoned mixes to ensure your hash stays 100% gluten-free.

Can I make gluten-free breakfast hash ahead of time?

Yes! Gluten-Free Breakfast Hash stores well in the fridge for 3-4 days. Reheat it in a skillet with a little oil to restore crispiness. This makes it perfect for meal prep or quick weekday breakfasts.

rank-math-faq-item"> What protein goes well with gluten-free breakfast hash?

Gluten-Free Breakfast Hash pairs perfectly with eggs, turkey sausage, or smoked salmon. For a plant-based option, try adding black beans or tempeh. Always check labels to ensure any added proteins are gluten-free.

How do I make my breakfast hash crispy without gluten?

The key to crispy Gluten-Free Breakfast Hash is using enough oil and not overcrowding the pan. Cook vegetables in a single layer and let them brown undisturbed. A cast iron skillet works best for achieving that perfect crunch.

Easy Pasta with Zucchini and Tomatoes Recipe

easy-pasta-zucchini-tomatoes

Introduction

There’s something truly special about a dish that feels both comforting and vibrant, and that’s exactly what Pasta with Zucchini and Tomatoes delivers. Whether you’re craving a quick weeknight dinner or a meal that celebrates summer’s bounty, this recipe brings together fresh flavors in a way that feels effortless. Plus, it’s a fantastic way to sneak in extra veggies while keeping things delicious. If you’ve ever wondered how to elevate simple ingredients, this dish will quickly become a favorite.

Pasta with Zucchini and Tomatoes is a celebration of simplicity and flavor. This dish combines tender pasta with sautéed zucchini, juicy tomatoes, and a hint of garlic for a meal that’s both light and satisfying. What makes it stand out is its versatility—you can tweak it with herbs, cheese, or even a splash of cream for extra richness. It’s perfect for busy nights when you want something wholesome without spending hours in the kitchen. On brekcakes.com, we love recipes that balance ease and taste, and this one fits right in. If you’re looking for more veggie-packed inspiration, check out our Vegetable Stuffed Bell Peppers or our Garlic Herb Roasted Potatoes for equally flavorful ideas.

Why I Love This Recipe

Pasta with Zucchini and Tomatoes holds a special place in my heart because it reminds me of lazy summer evenings at my grandmother’s house. She’d toss whatever fresh veggies she had into a pan, and within minutes, we’d have a meal that felt like a hug. Now, whenever I make this dish, it brings back those memories while also giving me a chance to create new ones with my own family. It’s proof that the simplest recipes often carry the most meaning.

Health and Nutrition

Why it’s good for your body

Pasta with Zucchini and Tomatoes packs a nutritious punch while keeping flavors vibrant. First, zucchini delivers a hefty dose of vitamins A and C, which support immune health and glowing skin. Additionally, tomatoes bring lycopene, a powerful antioxidant linked to heart health. Together, these ingredients make the dish a nutrient-rich choice.

Moreover, whole wheat or legume-based pasta boosts fiber content, aiding digestion and keeping you full longer. Since zucchini and tomatoes are low in calories but high in water content, Pasta with Zucchini and Tomatoes helps you stay hydrated and satisfied without overloading on calories. The olive oil often used in this recipe also provides healthy fats, which promote better nutrient absorption.

Finally, this dish balances carbs, veggies, and fats for steady energy. Whether you use gluten-free pasta or stick with traditional options, Pasta with Zucchini and Tomatoes adapts to your needs. With every bite, you get a mix of vitamins, minerals, and antioxidants that support overall wellness.

How it fits in a healthy lifestyle

Pasta with Zucchini and Tomatoes fits seamlessly into a balanced diet. If you follow a Mediterranean eating plan, this dish checks all the boxes with its veggies, whole grains, and olive oil. For gluten-free diets, simply swap regular pasta for a chickpea or brown rice version—just like we recommend in our gluten-free pasta guide.

This recipe also works well for meal prep, making healthy eating convenient during busy weeks. Pair it with a lean protein like grilled chicken or tofu for extra staying power. If you’re watching sodium, skip heavy cheese toppings and let the natural flavors shine. For more heart-smart tips, explore our heart-healthy cooking guide to keep your meals both delicious and nourishing.

Print

clock clock iconcutlery cutlery iconflag flag iconfolder folder iconinstagram instagram iconpinterest pinterest iconfacebook facebook iconprint print iconsquares squares iconheart heart iconheart solid heart solid icon

Pasta with Zucchini and Tomatoes


  • Author:
    Chef Mia


Description

A light and flavorful pasta dish featuring fresh zucchini and tomatoes, perfect for a quick weeknight meal.


Ingredients


Scale

For the Crust:

  • 8 oz pasta (penne or fusilli)
  • 2 medium zucchinis, sliced
  • 1 cup cherry tomatoes, halved
  • 3 cloves garlic, minced
  • 2 tbsp olive oil
  • 1/4 cup grated Parmesan cheese
  • 1/4 tsp red pepper flakes
  • Salt and black pepper to taste
  • Fresh basil leaves for garnish


Instructions

1. Prepare the Crust:

  1. Cook pasta according to package instructions until al dente. Drain and set aside.
  2. Heat olive oil in a large skillet over medium heat. Add garlic and red pepper flakes, sauté for 1 minute until fragrant.
  3. Add zucchini and cook for 5-6 minutes until slightly tender. Stir in cherry tomatoes and cook for another 2-3 minutes.
  4. Toss the cooked pasta into the skillet with the vegetables. Season with salt and black pepper.
  5. Sprinkle with Parmesan cheese and garnish with fresh basil before serving.


Notes

You can customize the seasonings to taste.


ync" src="https://exorecipes.com/wp-content/uploads/2025/06/easy-pasta-zucchini-tomatoes-ingrediants.webp" />

“`html

How to Prepare This Dish

Steps and time-saving tips

Start by heating a large skillet over medium heat and drizzle in olive oil. While the oil warms, slice the zucchini into thin rounds and halve the cherry tomatoes. Toss them into the skillet and sauté until the zucchini softens and the tomatoes burst, about 5 minutes. Meanwhile, bring a pot of salted water to a boil and cook the pasta until al dente, reserving a cup of starchy water before draining. Add the cooked pasta to the skillet, along with a splash of the reserved water, and toss everything together. For extra flavor, fold in minced garlic, red pepper flakes, and a handful of fresh basil. Finish with a generous sprinkle of grated Parmesan and a squeeze of lemon juice. If you’re short on time, prep the veggies ahead or use pre-sliced zucchini from the store. Another trick? Double the recipe and store leftovers for a quick lunch the next day.

and-learned-from">Mistakes I’ve made and learned from

I used to overcrowd the skillet, thinking I could save time, but the zucchini would steam instead of caramelize. Now I cook in batches or use a wider pan for even browning. Another blunder? Skipping the pasta water—it seemed optional until I ended up with a dry, clumpy dish. That starchy liquid is magic for creating a silky sauce. If you’re new to balancing flavors, check out my guide on perfecting pasta sauces for foolproof tips. And if your zucchini turns mushy, try salting it beforehand to draw out excess moisture, a trick I picked up from my post on vegetable prep hacks. Trust me, a little patience goes a long way with this dish.

“`

n-and-variations">Cultural Connection and Variations

Where this recipe comes from

Pasta with Zucchini and Tomatoes whispers of sun-drenched Italian summers, where garden-fresh produce takes center stage. Originating in Southern Italy, this dish celebrates simplicity—farmers once tossed whatever ripe vegetables they had with pasta, creating a vibrant, no-fuss meal. Today, you’ll find it everywhere from rustic trattorias to home kitchens, each version telling a slightly different story. In Tuscany, cooks might sauté zucchini with garlic and chili flakes for a spicy kick, while Sicilian versions often add capers or olives for a briny twist.

My grandmother, however, swore by her method: she slow-roasted the tomatoes until they caramelized, then folded them into al dente pasta with ribbons of zucchini. Meanwhile, in Greece, a similar dish might feature feta cheese and oregano, proving how borders blur when it comes to good food. Even in the U.S., Pasta with Zucchini and Tomatoes adapts effortlessly—some add grilled chicken for protein, while vegans might toss in nutritional yeast for a cheesy flavor. No matter the variation, this dish remains a love letter to seasonal abundance.

How it fits in today’s cooking

Pasta with Zucchini and Tomatoes isn’t just a relic of the past—it’s a weeknight hero. Busy cooks adore it because it’s quick, flexible, and packed with summer’s best flavors. Plus, it fits perfectly into modern meal prep routines; roast a big batch of veggies on Sunday, and you’re halfway to dinner on Wednesday. For those embracing plant-based eating, this dish shines as a hearty yet light option, especially when paired with a crisp salad like our avocado and grapefruit salad.

Seasonal eating trends

also keep this recipe relevant. When zucchini and tomatoes peak, farmers’ markets overflow with them, making this dish a budget-friendly staple. And let’s not forget its role in gatherings—whether it’s a casual backyard BBQ or a cozy family dinner, Pasta with Zucchini and Tomatoes always earns a spot on the table. Craving more summer-inspired meals? Try our grilled peach caprese for a sweet-savory twist. After all, good food bridges generations, and this recipe proves it.

Taste and Texture

What makes it delicious

Pasta with Zucchini and Tomatoes delivers a vibrant, garden-fresh experience with every bite. The zucchini adds a delicate, buttery softness, while the tomatoes burst with juicy sweetness, balancing the dish perfectly. Garlic and olive oil infuse the pasta with a rich, fragrant aroma, and a sprinkle of Parmesan lends a salty, umami depth. The al dente noodles provide a satisfying chew, contrasting beautifully with the tender vegetables. Whether served warm or at room temperature, Pasta with Zucchini and Tomatoes feels light yet deeply comforting, making it a crowd-pleaser any time of year.

Boosting the flavor

For an extra flavor kick, try roasting the zucchini and tomatoes before tossing them with the pasta—this intensifies their natural sweetness. A handful of fresh basil or a pinch of red pepper flakes adds brightness or heat, depending on your preference. If you love creamy textures, swirl in a spoonful of homemade pesto or a dollop of ricotta. Crumbled feta or toasted pine nuts also introduce a salty crunch. For more inspiration, explore our guide to vegetable pasta combos to mix and match seasonal produce. With these tweaks, Pasta with Zucchini and Tomatoes becomes even more irresistible.

rc="https://exorecipes.com/wp-content/uploads/2025/06/easy-pasta-zucchini-tomatoes.webp" />

Tips for Success

Best practices for results

Always slice zucchini evenly so it cooks uniformly in your Pasta with Zucchini and Tomatoes. Meanwhile, use ripe but firm tomatoes to prevent excess moisture from making the dish soggy. Furthermore, toast the garlic lightly in olive oil before adding other ingredients for deeper flavor. Finally, reserve a cup of pasta water to adjust the sauce consistency if needed, ensuring your Pasta with Zucchini and Tomatoes stays perfectly coated.

Mistakes to avoid

Overcrowding the pan with zucchini leads to steaming instead of browning, so cook it in batches if necessary. Additionally, avoid overcooking the pasta since it continues to soften when mixed with the sauce. For more on perfecting pasta texture, check out our guide on cooking pasta like a pro. Another common mistake is skipping the salt in the pasta water, which results in bland flavors. If you need seasoning tips, our balancing flavors post explains how to layer taste effectively.

g-suggestions">Serving and Pairing Suggestions

How to serve this dish

Pasta with Zucchini and Tomatoes shines when you serve it fresh and vibrant. For a casual family dinner, toss it in a large, rustic bowl and let everyone help themselves. Alternatively, plate it individually for a more elegant touch, garnishing with fresh basil leaves or a sprinkle of Parmesan. This dish works beautifully for summer gatherings, especially when paired with a crisp salad or crusty bread. If you want to impress guests, serve it alongside a charcuterie board for a Mediterranean-inspired spread.

What goes well with it

A chilled glass of Sauvignon Blanc perfectly complements the light, fresh flavors of Pasta with Zucchini and Tomatoes. For a non-alcoholic option, try sparkling water with a squeeze of lemon to enhance the dish’s brightness. If you’re craving something heartier, pair it with our garlic bread for a satisfying crunch. For a complete meal, add a side of our Caprese salad, which echoes the tomatoes and fresh herbs in the pasta.

math-faq-block">
What type of pasta works best with zucchini and tomatoes?

Short pasta shapes like penne, fusilli, or farfalle work best with Pasta with Zucchini and Tomatoes because they hold the sauce and vegetables well. Longer noodles like spaghetti can also work, but you may need to chop the zucchini smaller for even distribution.

Can I make Pasta with Zucchini and Tomatoes ahead of time?

Yes, you can prep this dish 1-2 days ahead, but store the cooked pasta separately to prevent mushiness. The zucchini and tomato sauce actually develops more flavor when refrigerated overnight—just reheat gently and toss with freshly cooked pasta before serving.

How do you keep zucchini from getting soggy in pasta?

The key is to sauté zucchini quickly over high heat until just tender-crisp before adding tomatoes. For Pasta with Zucchini and Tomatoes, slice zucchini thick (¼-inch) and avoid overcooking—it should still have slight bite when combined with the pasta.

rank-math-faq-item"> What protein goes well with Pasta with Zucchini and Tomatoes?

Grilled chicken, shrimp, or white beans pair perfectly with this light summer pasta. For vegetarian protein, try adding chickpeas or crumbled feta—their textures complement the soft zucchini and juicy tomatoes beautifully.

Best Garlic Parmesan Rice – Creamy & Flavorful

best-garlic-parmesan-rice

Introduction

If you’ve ever craved a side dish that’s both comforting and bursting with flavor, Garlic Parmesan Rice will quickly become your go-to. Whether you’re whipping up a quick weeknight dinner or hosting a cozy gathering, this dish delivers creamy, savory perfection in every bite. Plus, it pairs beautifully with everything from roasted chicken to grilled veggies, making it a versatile star on any table.

Garlic Parmesan Rice combines fluffy grains with rich, aromatic flavors for a dish that feels indulgent yet effortless. The garlic infuses the rice with a warm, savory depth, while the Parmesan adds a nutty, salty finish that keeps you coming back for more. What makes this recipe special is its balance—simple enough for beginners but impressive enough to serve guests. On brekcakes.com, we celebrate recipes that bring joy to everyday cooking, and this one fits perfectly. For more inspiration, check out our easy weeknight dinners or explore how to elevate basic ingredients in our 5-ingredient meals collection.

Why I Love This Recipe

Garlic Parmesan Rice holds a special place in my heart because it reminds me of family dinners where laughter filled the air and seconds were always mandatory. My grandma used to make a similar version, and now every time I prepare it, I feel that same warmth. It’s more than just a side dish—it’s a little bowl of comfort that turns an ordinary meal into something memorable.

Health and Nutrition

Why it’s good for your body

Garlic Parmesan Rice packs a nutritious punch while delivering rich flavor. First, garlic boosts immunity with its natural antiviral and antibacterial properties. Additionally, it contains allicin, a compound that may help lower blood pressure. Meanwhile, Parmesan cheese adds calcium and protein, supporting strong bones and muscle repair.

Furthermore, the rice in Garlic Parmesan Rice provides steady energy thanks to its complex carbohydrates. Unlike refined grains, this dish keeps you fuller longer, preventing unnecessary snacking. Moreover, the dish includes healthy fats from olive oil or butter, which aid nutrient absorption and promote heart health.

Another benefit of Garlic Parmesan Rice is its versatility. You can easily pair it with lean proteins or vegetables for a balanced meal. For instance, adding grilled chicken or steamed broccoli enhances its nutritional profile. Ultimately, this dish combines taste and wellness in every bite.

How it fits in a healthy lifestyle

Garlic Parmesan Rice fits seamlessly into a balanced diet. If you follow a gluten-free lifestyle, this dish naturally meets your needs since rice is gluten-free. For those focusing on heart health, using olive oil instead of butter keeps saturated fats in check while adding antioxidants.

You can also customize Garlic Parmesan Rice to align with fitness goals. Pair it with a high-protein side for a post-workout meal. Alternatively, serve it alongside a colorful vegetable medley to increase fiber intake. Whether you need a quick weeknight dinner or a meal prep staple, this dish adapts to your routine without sacrificing flavor or nutrition.

Print

clock clock iconcutlery cutlery iconflag flag iconfolder folder iconinstagram instagram iconpinterest pinterest iconfacebook facebook iconprint print iconsquares squares iconheart heart iconheart solid heart solid icon

Garlic Parmesan Rice


  • Author:
    Chef Mia


Description

A flavorful and creamy side dish with garlic and parmesan cheese.


Ingredients


Scale

For the Crust:

  • 1 cup long-grain white rice
  • 2 cups chicken broth
  • 3 cloves garlic, minced
  • 1/4 cup grated parmesan cheese
  • 2 tablespoons butter
  • 1 tablespoon olive oil
  • 1/4 teaspoon salt
  • 1/4 teaspoon black pepper
  • 1 tablespoon fresh parsley, chopped


Instructions

1. Prepare the Crust:

  1. In a medium saucepan, heat olive oil and butter over medium heat. Add minced garlic and sauté until fragrant, about 1 minute.
  2. Add rice to the saucepan and stir to coat with the garlic butter mixture. Toast the rice for 2 minutes.
  3. Pour in chicken broth, salt, and black pepper. Bring to a boil, then reduce heat to low, cover, and simmer for 15-20 minutes until rice is tender and liquid is absorbed.
  4. Remove from heat and stir in grated parmesan cheese until melted and well combined.
  5. Garnish with chopped parsley before serving.


Notes

You can customize the seasonings to taste.


ync" src="https://exorecipes.com/wp-content/uploads/2025/06/best-garlic-parmesan-rice-ingrediants.webp" />

How to Prepare This Dish

Steps and time-saving tips

Start by rinsing the rice under cold water to remove excess starch, which prevents clumping later. Meanwhile, heat olive oil in a large skillet over medium heat and sauté minced garlic until fragrant—just 30 seconds avoids burning. Next, add the rinsed rice and toast it lightly for a minute to enhance its nutty flavor. Pour in chicken or vegetable broth, bring it to a boil, then reduce the heat to low and cover the skillet. Let the rice simmer undisturbed for 15 minutes; resist the urge to peek, as lifting the lid releases steam and extends cooking time. Once the liquid absorbs, fluff the rice with a fork and immediately fold in grated Parmesan, butter, and a pinch of black pepper. For a creamy texture, stir in a splash of warm cream or milk. To save time, use pre-minced garlic or a garlic press, and swap freshly grated Parmesan for a high-quality pre-shredded version. Serve the Garlic Parmesan Rice hot, garnished with chopped parsley for freshness.

Mistakes I’ve made and learned from

I once rushed the garlic sautéing step and ended up with bitter, overcooked bits that ruined the entire batch of Garlic Parmesan Rice. Now I keep the heat medium-low and stir constantly. Another blunder? Skipping the rice rinse, which left the dish gummy. A quick rinse makes all the difference, much like when I learned the importance of perfect rice texture for other recipes. And don’t skimp on the Parmesan quality—I once used a bland, pre-grated brand, and the flavor fell flat. For more cheesy inspiration, check out my cheese selection guide to pick the best options. These small tweaks transformed my results from mediocre to restaurant-worthy.

rc="https://exorecipes.com/wp-content/uploads/2025/06/best-garlic-parmesan-rice-recipe.webp" />

Cultural Connection and Variations

Where this recipe comes from

Garlic Parmesan Rice carries a rich history, blending Italian and American comfort food traditions. While Parmesan cheese roots itself in Northern Italy, the addition of garlic transforms simple rice into a bold, aromatic dish. Families in Italy often serve it as a side to roasted meats, but in the U.S., it’s become a star at potlucks and weeknight dinners alike. Some versions toss in fresh herbs like parsley, while others keep it minimalist—just garlic, butter, and cheese.

Interestingly, regional twists pop up everywhere. In the American South, cooks might add a splash of cream for extra richness. Meanwhile, in coastal areas, a handful of shrimp turns Garlic Parmesan Rice into a full meal. My grandma used to make it with a squeeze of lemon for brightness, proving how adaptable this dish truly is. Whether you grew up with it or discovered it later, Garlic Parmesan Rice always feels like a warm hug from the kitchen.

ays-cooking">How it fits in today’s cooking

Today, Garlic Parmesan Rice shines as a versatile favorite. Busy home cooks love it for its quick prep, while foodies dress it up with truffle oil or crispy pancetta. It’s a staple at holiday gatherings, pairing perfectly with herb-roasted chicken or standing alone as a cozy vegetarian option. Plus, meal preppers swear by it—it reheats beautifully for lunches all week.

Modern twists keep it exciting. Some swap white rice for cauliflower rice, while others layer it into creamy mushroom pasta bakes for extra depth. Whether you’re craving nostalgia or a fresh take, Garlic Parmesan Rice fits right in. It’s proof that some recipes never go out of style—they just evolve with us.

Taste and Texture

What makes it delicious

Garlic Parmesan Rice delivers a rich, savory experience with every bite. The buttery, nutty Parmesan melts into the fluffy grains, while roasted garlic adds a deep, aromatic warmth. Each forkful feels creamy yet light, with a subtle chewiness that keeps it satisfying. Fresh herbs like parsley brighten the dish, balancing the umami depth. Meanwhile, the golden edges of the rice add a delicate crispness for contrast. Garlic Parmesan Rice is comfort food at its finest—bold in flavor but effortless to enjoy.

r">Boosting the flavor

For extra richness, stir in a splash of heavy cream or a dollop of garlic herb compound butter while the rice cooks. Crispy pancetta or toasted pine nuts add crunch and salty depth. If you love heat, a pinch of red pepper flakes or a drizzle of lemon chili oil wakes up the flavors. Fresh lemon zest brightens the dish, while extra grated Parmesan creates a luscious, gooey finish. Experiment with these tweaks to make Garlic Parmesan Rice your own.

Tips for Success

Best practices for results

Always rinse your rice before cooking to remove excess starch and prevent clumping. For the best Garlic Parmesan Rice, toast the minced garlic in butter just until fragrant to avoid bitterness. Use freshly grated Parmesan instead of pre-shredded cheese for a smoother, richer flavor. Additionally, let the rice rest for 5 minutes after cooking so it absorbs all the flavors evenly.

>Mistakes to avoid

Avoid overcooking the rice, as it can turn mushy and lose its texture. Instead, follow the package instructions precisely and check for doneness early. Many cooks also forget to season the cooking water, which results in bland Garlic Parmesan Rice. For more flavor-boosting tricks, check out our guide on seasoning perfect rice. Finally, don’t skip toasting the garlic—raw garlic can overpower the dish. If you’re unsure about balancing flavors, our garlic cooking tips will help you nail it every time.

Serving and Pairing Suggestions

How to serve this dish

For a stunning presentation, scoop Garlic Parmesan Rice into a small bowl and invert it onto a plate for a neat, restaurant-worthy mound. Alternatively, serve it family-style in a rustic ceramic dish with a sprinkle of fresh parsley or chives for a pop of color. This dish shines at holiday gatherings, but it also makes an easy weeknight side when paired with simple proteins. If you want to elevate brunch, try pairing it with poached eggs for a creamy, savory twist.

What goes well with it

Garlic Parmesan Rice pairs beautifully with grilled chicken or shrimp, as the rich flavors balance the smoky char. For a lighter option, serve it alongside a crisp Mediterranean salad to cut through the richness. If you love dipping sauces, try a tangy lemon aioli or our creamy roasted red pepper dip for an extra burst of flavor. A chilled glass of Sauvignon Blanc or sparkling water with lemon also complements the dish perfectly.

rc="https://s3-placid.s3.eu-central-1.amazonaws.com/production/rest-images/rawp1noeia0hh/int-7853083a8dcc897a8d2683440b62fdb8-y0f92v3k.jpg" />

What is the best rice to use for Garlic Parmesan Rice?

Long-grain white rice like jasmine or basmati works best for Garlic Parmesan Rice because it stays fluffy and absorbs flavors well. Avoid short-grain rice, which can become too sticky. The light texture of these varieties complements the rich garlic and parmesan flavors perfectly.

Can I make Garlic Parmesan Rice in a rice cooker?

Yes! Simply sauté garlic in butter before adding rice and broth to your rice cooker. Stir in parmesan after cooking for creamy Garlic Parmesan Rice. This method saves time while delivering the same delicious results as stovetop preparation.

rank-math-faq-item"> How do I prevent Garlic Parmesan Rice from drying out?

Use a 2:1 liquid-to-rice ratio and keep the pot covered while cooking. For extra moisture in Garlic Parmesan Rice, stir in a tablespoon of butter or olive oil with the parmesan. Leftovers stay fresh when stored airtight and reheated with a splash of broth.

What protein pairs well with Garlic Parmesan Rice?

Garlic Parmesan Rice complements grilled chicken, shrimp, or seared salmon beautifully. The savory rice balances lighter proteins, while heartier options like roasted pork loin stand up to its bold flavors. For vegetarian meals, try it with roasted mushrooms or garlic butter white beans.

Easy Santa Fe Chicken Foil Packets Recipe

easy-santa-fe-chicken-foil

Introduction

If you’re craving a meal that’s bursting with flavor yet easy to prepare, you’re in the right place. Santa Fe Chicken Foil Packets deliver a fiesta of smoky, zesty, and slightly spicy goodness with minimal cleanup. Whether you’re grilling outdoors or baking indoors, this recipe brings the vibrant tastes of the Southwest to your table effortlessly. Plus, it’s perfect for busy weeknights or laid-back gatherings—because great food should never feel like a chore.

Santa Fe Chicken Foil Packets combine tender chicken, black beans, corn, and bell peppers with a bold blend of spices, all wrapped in foil for a mess-free cooking experience. The magic happens as the ingredients steam together, locking in moisture and melding flavors into every bite. What makes this dish special is its versatility. You can customize the heat level, swap veggies, or even add cheese for extra indulgence. It’s a crowd-pleaser that fits my blog’s mission: approachable recipes with big flavor and heart. If you love fuss-free meals like my Honey Glazed Salmon, you’ll adore how these foil packets simplify dinner. And for more quick ideas, check out my 20-Minute Vegetable Stir Fry—because life’s too short for complicated cooking.

Why I Love This Recipe

Santa Fe Chicken Foil Packets remind me of summer evenings spent around the grill with friends, laughing as we unwrapped steaming foil bundles straight from the fire. There’s something nostalgic about tearing open a packet to reveal juicy, flavorful chicken and veggies—it feels like a little gift. Beyond the taste, I love how this recipe brings people together without keeping me stuck in the kitchen. It’s the kind of meal that lets you savor the moment, not just the food, and that’s what cooking is all about for me.

Health and Nutrition

Why it’s good for your body

Santa Fe Chicken Foil Packets deliver a powerhouse of nutrients in every bite. First, lean chicken breast provides high-quality protein to support muscle growth and repair. Meanwhile, the colorful mix of bell peppers, black beans, and corn packs fiber, vitamins, and antioxidants to boost digestion and immunity.

Additionally, Santa Fe Chicken Foil Packets keep sodium levels in check compared to restaurant meals. By cooking at home, you control the ingredients, skipping excess salt and unhealthy fats. The olive oil and spices add flavor without empty calories, making this dish both satisfying and nutritious.

Finally, the foil packet method locks in moisture and nutrients. Unlike frying or heavy sauces, this cooking style preserves the natural goodness of each ingredient. Whether you need a post-workout meal or a family-friendly dinner, Santa Fe Chicken Foil Packets offer balanced fuel for any day.

How it fits in a healthy lifestyle

Santa Fe Chicken Foil Packets fit seamlessly into a mindful eating routine. For gluten-free diets, the recipe naturally skips grains or flour, relying on wholesome veggies and protein. If you follow a heart-healthy plan, the lean chicken and fiber-rich beans support cholesterol levels and blood pressure.

Meal preppers love how easy it is to assemble these packets ahead of time. Just like our meal prep ideas, this recipe saves busy weeknights without sacrificing nutrition. Plus, the balanced macros make it ideal for fitness goals, pairing well with our high-protein sides for extra staying power.

Whether you’re counting macros or simply want a fuss-free dinner, Santa Fe Chicken Foil Packets adapt to your needs. They’re proof that healthy eating can be simple, flavorful, and fun.

Print

clock clock iconcutlery cutlery iconflag flag iconfolder folder iconinstagram instagram iconpinterest pinterest iconfacebook facebook iconprint print iconsquares squares iconheart heart iconheart solid heart solid icon

Santa Fe Chicken Foil Packets


  • Author:
    Chef Mia


Description

A flavorful and easy-to-make chicken dish with Southwestern flavors, cooked in foil packets for minimal cleanup.


Ingredients


Scale

For the Crust:

  • 4 boneless, skinless chicken breasts
  • 1 cup black beans, drained and rinsed
  • 1 cup corn kernels (fresh or frozen)
  • 1 red bell pepper, diced
  • 1/2 cup salsa
  • 1 tsp chili powder
  • 1 tsp cumin
  • 1/2 tsp garlic powder
  • 1/2 tsp salt
  • 1/4 tsp black pepper
  • 1/2 cup shredded cheddar cheese
  • 2 tbsp chopped fresh cilantro


Instructions

1. Prepare the Crust:

  1. Preheat oven to 400°F (200°C).
  2. In a bowl, mix black beans, corn, red bell pepper, salsa, chili powder, cumin, garlic powder, salt, and black pepper.
  3. Place each chicken breast on a large piece of aluminum foil. Spoon the vegetable mixture evenly over the chicken.
  4. Fold the foil over the chicken and vegetables, sealing the edges tightly to form a packet.
  5. Place the foil packets on a baking sheet and bake for 25-30 minutes, or until chicken is cooked through.
  6. Carefully open the packets and sprinkle with shredded cheddar cheese. Return to the oven for 2-3 minutes to melt the cheese.
  7. Garnish with chopped cilantro before serving.


Notes

You can customize the seasonings to taste.


ync" src="https://exorecipes.com/wp-content/uploads/2025/06/easy-santa-fe-chicken-foil-ingrediants.webp" />

“`html

How to Prepare This Dish

Steps and time-saving tips

Start by preheating your oven to 400°F so it’s ready when you finish assembling the Santa Fe Chicken Foil Packets. Meanwhile, whisk together olive oil, lime juice, and taco seasoning in a small bowl for a zesty marinade. Toss diced chicken breasts in the mixture until evenly coated, then set aside. Next, layer sheets of heavy-duty aluminum foil on your counter—this prevents leaks and makes cleanup effortless. Divide cooked rice, black beans, corn, and bell peppers evenly among the foil sheets, then top with the marinated chicken. Drizzle a spoonful of salsa over each packet for extra flavor. Fold the foil tightly into sealed packets, leaving room for steam to circulate. Bake for 25 minutes, or until the chicken reaches 165°F. For a time-saving hack, prep the veggies and marinade the night before. If you’re short on time, swap fresh ingredients for frozen corn or pre-cooked rice. Let the packets rest for 5 minutes before opening—this locks in moisture and prevents burns.

and-learned-from">Mistakes I’ve made and learned from

I once rushed the foil-folding step and ended up with a messy oven when the Santa Fe Chicken Foil Packets burst open. Now, I double-fold the edges and press firmly to seal. Another lesson? Overcrowding the packets. I piled in too many ingredients, and the chicken took forever to cook. Sticking to single-layer portions fixed that. For perfectly tender chicken every time, I follow the tips from my grilling mistakes post—yes, even for oven recipes! And if you’re new to foil packets, my meal prep basics guide breaks down portioning like a pro. Trust me, a little patience with assembly pays off in juicy, flavorful results.

“`

n-and-variations">Cultural Connection and Variations

Where this recipe comes from

Santa Fe Chicken Foil Packets bring the bold flavors of the Southwest straight to your table. Inspired by the vibrant cuisine of New Mexico, this dish combines smoky spices, tender chicken, and fresh veggies for a meal that feels like a fiesta. Traditionally, cooks in the region might grill the packets over an open flame, infusing the ingredients with a charred, earthy depth. Meanwhile, families in other parts of the world put their own spin on foil packet cooking. In Japan, for example, they might swap the chili powder for miso and add shiitake mushrooms.

In my own kitchen, Santa Fe Chicken Foil Packets became a summer staple during backyard barbecues. Friends would gather around the grill, each customizing their packet with extra jalapeños or a squeeze of lime. Some regions even skip the foil entirely, wrapping the ingredients in banana leaves for a steamier, more aromatic result. No matter how you prepare it, the dish always carries that same spirit of simplicity and bold flavor.

How it fits in today’s cooking

Today, Santa Fe Chicken Foil Packets fit perfectly into our fast-paced lives. They’re a go-to for busy weeknights, camping trips, or even meal prep Sundays. Modern cooks love how easily they adapt to dietary needs, like swapping chicken for tofu or loading up on extra veggies. Plus, the no-mess cleanup makes them a hit with anyone who dreads doing dishes.

You’ll often fin

d this dish at summer potlucks or cozy winter gatherings, proving its year-round appeal. For more easy dinner ideas, check out our quick weeknight meals collection. And if you’re craving something sweet after your savory foil packet, our decadent desserts roundup has you covered. Whether you’re feeding a crowd or just yourself, Santa Fe Chicken Foil Packets deliver flavor without the fuss.

Taste and Texture

What makes it delicious

Santa Fe Chicken Foil Packets deliver a bold, smoky-sweet flavor with every bite. Juicy chicken soaks up a vibrant mix of spices, while charred bell peppers and corn add a crisp, caramelized sweetness. Melted cheese blankets everything in creamy richness, and a squeeze of lime brightens the dish with a zesty punch. The aroma alone—a mix of sizzling garlic, cumin, and paprika—will make your mouth water. Plus, the tender black beans add a satisfying, hearty texture that contrasts perfectly with the crisp veggies. Whether you grill or bake them, Santa Fe Chicken Foil Packets always come out bursting with Southwest-inspired goodness.

Boosting the flavor

For an extra kick, swap Monterey Jack cheese with pepper jack or sprinkle in diced jalapeños. A drizzle of creamy chipotle sauce adds smoky depth, while fresh cilantro or avocado slices lend a cool, herbal finish. If you love heat, double the chili powder or serve with a side of roasted salsa verde. Experiment with different veggies like zucchini or poblano peppers to keep the flavors fresh and exciting. No matter how you customize it, Santa Fe Chicken Foil Packets stay irresistibly flavorful.

rc="https://exorecipes.com/wp-content/uploads/2025/06/easy-santa-fe-chicken-foil.webp" />

Tips for Success

Best practices for results

Always preheat your grill or oven before assembling Santa Fe Chicken Foil Packets to ensure even cooking. Meanwhile, slice your chicken and vegetables uniformly so everything cooks at the same rate. For extra flavor, marinate the chicken for at least 30 minutes before wrapping it in foil. Additionally, use heavy-duty foil to prevent tearing and seal the edges tightly to lock in moisture. Finally, let the packets rest for a few minutes after cooking to allow the juices to redistribute.

Mistakes to avoid

Avoid overfilling your Santa Fe Chicken Foil Packets, as this can lead to uneven cooking. Instead, leave some space for steam to circulate. Also, resist the urge to peek while cooking—opening the foil too early releases heat and slows down the process. For perfectly tender chicken, check out our guide on how to marinate chicken for optimal results. Another common mistake is skipping the resting time, which can make the dish dry. If you’re unsure about portion sizes, our meal prep basics article offers helpful guidance.

g-suggestions">Serving and Pairing Suggestions

How to serve this dish

Santa Fe Chicken Foil Packets make a vibrant and effortless meal straight from the grill or oven. For a stunning presentation, carefully open the foil at the table to release the aromatic steam, then garnish with fresh cilantro, lime wedges, or a dollop of cool sour cream. These packets shine at casual gatherings, whether you’re hosting a backyard barbecue or a cozy family dinner. Alternatively, prep them ahead for a stress-free weeknight meal—just unwrap and enjoy the bold flavors without the cleanup.

What goes well with it

Pair Santa Fe Chicken Foil Packets with a crisp, refreshing side like our Mango Avocado Salad to balance the smoky spices with a touch of sweetness. For heartier meals, serve them alongside warm, buttery Garlic Herb Roasted Potatoes, which soak up the delicious juices. Finally, a chilled glass of citrusy white wine or a tangy margarita elevates the Southwestern flair of this dish perfectly.

math-faq-block">
How long do you cook Santa Fe Chicken Foil Packets on the grill?

Santa Fe Chicken Foil Packets typically take 15–20 minutes on a preheated grill (medium-high heat). Flip them halfway through to ensure even cooking. The chicken is done when it reaches 165°F internally, and the veggies are tender.

Can you make Santa Fe Chicken Foil Packets ahead of time?

Yes! Assemble Santa Fe Chicken Foil Packets up to 24 hours in advance and refrigerate them until ready to cook. For best results, let them sit at room temperature for 15 minutes before grilling or baking.

What sides go well with Santa Fe Chicken Foil Packets?

Santa Fe Chicken Foil Packets pair perfectly with cilantro lime rice, avocado salad, or warm tortillas. For a lighter option, serve with a simple corn and black bean salsa or grilled vegetables.

rank-math-faq-item"> Can you bake Santa Fe Chicken Foil Packets instead of grilling?

Absolutely! Bake Santa Fe Chicken Foil Packets at 400°F for 25–30 minutes in a preheated oven. Check for doneness—the chicken should be juicy, and the peppers and onions softened.

Easy Chocolate Lasagna – No-Bake Dessert Recipe

easy-chocolate-lasagna-no-bake

Introduction

If you’ve ever craved a dessert that’s both indulgent and effortless, Chocolate Lasagna will steal your heart. Picture layers of creamy cheesecake, fluffy whipped topping, and rich chocolate pudding stacked atop a crunchy Oreo crust—no baking required! Whether you’re hosting a party or treating yourself after a long day, this no-bake masterpiece delivers comfort in every bite. Plus, it’s a crowd-pleaser that even beginner bakers can master with confidence.

Chocolate Lasagna isn’t just a dessert—it’s a celebration of simplicity and joy. Unlike traditional lasagna, this sweet twist swaps pasta for layers of decadence, making it perfect for potlucks, birthdays, or anytime you need a pick-me-up. The best part? You likely already have most ingredients in your pantry. Over the years, I’ve shared countless variations of this recipe, but the classic version remains a staple on brekcakes.com. If you love easy, no-fuss desserts like my No-Bake Cheesecake, you’ll adore this too. And for more chocolatey inspiration, check out my Homemade Chocolate Truffles—they’re another reader favorite!

Why I Love This Recipe

Chocolate Lasagna holds a special place in my heart because it reminds me of lazy summer afternoons with my grandma. She’d let me crush the Oreos while she whipped the filling, and we’d giggle as we “assembled” the layers like edible art. Now, whenever I make it, I feel that same childlike excitement. It’s more than a dessert—it’s a sweet tradition I’m thrilled to pass on to you.

Health and Nutrition

Why it’s good for your body

Chocolate Lasagna might sound indulgent, but it actually offers several surprising health benefits. First, dark chocolate layers provide antioxidants like flavonoids, which support heart health and reduce inflammation. Additionally, the cream cheese or yogurt layers often found in Chocolate Lasagna deliver probiotics for gut health. Meanwhile, the crushed nuts or oats in the crust add fiber and healthy fats to keep you satisfied.

Moreover, Chocolate Lasagna can be a smart way to satisfy cravings without overdoing sugar. By using high-quality cocoa and natural sweeteners, you boost nutrition while keeping flavors rich. The layers also create a balanced texture, so you enjoy every bite without feeling deprived. Furthermore, the protein from dairy or nut-based ingredients helps stabilize blood sugar levels.

Finally, Chocolate Lasagna encourages mindful eating. Its decadent layers slow you down, making it easier to savor portions. Whether you use almond flour for a gluten-free version or swap in Greek yogurt for extra protein, this dessert adapts to your needs. With each ingredient playing a role, Chocolate Lasagna proves treats can be both delicious and nourishing.

How it fits in a healthy lifestyle

Chocolate Lasagna fits perfectly into a balanced diet when enjoyed in moderation. For those watching sugar intake, try using monk fruit sweetener or dark chocolate with 70% cocoa or higher. If you need a gluten-free option, almond flour or oat crusts work beautifully. You can even layer in protein-rich ingredients like Greek yogurt or nut butter to make it more filling.

This dessert also pairs well with heart-healthy habits. For example, the antioxidants in dark chocolate support circulation, while nuts add omega-3s. If you’re looking for more ways to enjoy mindful treats, check out our guide on healthy dessert swaps. And if you love balancing indulgence with nutrition, explore our tips for meal-prepping sweets to stay on track.

Ultimately, Chocolate Lasagna shows that desserts can be part of a vibrant lifestyle. By choosing quality ingredients and controlling portions, you satisfy cravings without compromising health goals. It’s all about balance, and this layered treat delivers flavor and nourishment in every slice.

Print

clock clock iconcutlery cutlery iconflag flag iconfolder folder iconinstagram instagram iconpinterest pinterest iconfacebook facebook iconprint print iconsquares squares iconheart heart iconheart solid heart solid icon

Chocolate Lasagna


  • Author:
    Chef Mia


Description

A decadent no-bake dessert lasagna with layers of chocolate, cream cheese, and whipped topping.


Ingredients


Scale

For the Crust:

  • 36 chocolate sandwich cookies
  • 6 tablespoons butter (melted)
  • 1 (8 oz) package cream cheese (softened)
  • 1/4 cup granulated sugar
  • 2 tablespoons cold milk
  • 1 (12 oz) tub whipped topping (divided)
  • 2 (3.9 oz) packages instant chocolate pudding mix
  • 3 1/4 cups cold milk
  • 1 1/2 cups mini chocolate chips


Instructions

1. Prepare the Crust:

  1. Crush cookies and mix with melted butter. Press into a 9×13 inch pan to form the crust.
  2. Beat cream cheese, sugar, 2 tablespoons milk, and 1 1/4 cups whipped topping until smooth. Spread over crust.
  3. Whisk pudding mixes with 3 1/4 cups milk for 2 minutes. Let stand 5 minutes. Spread over cream cheese layer.
  4. Spread remaining whipped topping over pudding layer. Sprinkle with chocolate chips.
  5. Refrigerate for at least 4 hours before serving.


Notes

You can customize the seasonings to taste.


How to Prepare This Dish

Steps and time-saving tips

First, crush the chocolate sandwich cookies into fine crumbs using a food processor or a rolling pin. Meanwhile, melt the butter and mix it with the crumbs until they hold together. Press this mixture firmly into the bottom of a 9×13-inch dish to form the crust. Next, beat the cream cheese until smooth, then whisk in the sugar and milk until fully combined. Gently fold in half of the whipped topping, then spread this creamy layer over the crust. Now, prepare the chocolate pudding by whisking the mix with cold milk until thick. Let it set for a few minutes before spreading it over the cream cheese layer. Finally, top the Chocolate Lasagna with the remaining whipped topping and sprinkle with mini chocolate chips or shaved chocolate. Chill for at least four hours, or overnight for best results. To save time, use pre-crushed cookie crumbs or store-bought whipped topping. If you’re in a hurry, freeze the dish for two hours instead of chilling.

and-learned-from">Mistakes I’ve made and learned from

When I first made Chocolate Lasagna, I rushed the chilling step and ended up with a messy, runny dessert. Now, I always plan ahead and let it set overnight. Another mistake? Overmixing the cream cheese layer, which made it too dense. A light hand keeps it fluffy. If you’re new to no-bake desserts, check out my guide to no-bake desserts for more troubleshooting tips. Also, I once skipped the butter in the crust, and it fell apart—lesson learned! For a sturdier base, follow my cookie crust secrets. Trust me, these small tweaks make all the difference.

Cultural Connection and Variations

Where this recipe comes from

Chocolate Lasagna might sound like a modern dessert mashup, but its roots stretch back to creative home cooks who loved layering flavors. While traditional Italian lasagna stacks pasta, cheese, and sauce, this sweet twist swaps in cookies, cream, and rich chocolate. Some say the dish gained popularity in the American Midwest, where potlucks and family gatherings demanded showstopping desserts. Others trace it to European no-bake cakes, where crushed biscuits and pudding create similar textures.

Around the world, baker

s adapt Chocolate Lasagna to local tastes. In Mexico, they might add a sprinkle of cinnamon or cayenne for warmth. In Australia, Vegemite fans (bravely!) experiment with savory-sweet versions. My grandma made hers with peppermint patties between the layers, turning it into a holiday favorite. Whether you use Oreos, graham crackers, or homemade wafers, the magic lies in those decadent layers—each bite tells a story.

How it fits in today’s cooking

Today, Chocolate Lasagna thrives as a versatile crowd-pleaser. Busy parents love it for birthday parties, while meal preppers stash slices in the freezer for sweet cravings. During holidays, it pairs perfectly with festive desserts, offering a no-fuss alternative to pies. Modern twists include vegan cream cheese, gluten-free cookies, or even a keto-friendly version with almond flour.

Social media fuels its comeback, with food bloggers showcasing rainbow layers or espresso-infused fillings. For a quick upgrade, try adding caramel drizzle or crushed candy bars—the same tips that elevate easy baking hacks. Whether you serve it at a summer BBQ or a cozy winter gathering, Chocolate Lasagna bridges nostalgia and novelty in every slice.

>Taste and Texture

What makes it delicious

Chocolate Lasagna delivers a decadent, multi-layered experience that delights every sense. The first bite reveals a velvety cream cheese layer, smooth and tangy, balanced by the rich, dark sweetness of chocolate pudding. Crushed Oreos add a satisfying crunch, while the whipped topping melts luxuriously on the tongue. Every forkful blends cool, creamy textures with the faintest hint of salt from the crust, creating a perfect harmony. The aroma alone—warm cocoa mingling with vanilla—will have you reaching for seconds. Chocolate Lasagna isn’t just a dessert; it’s a celebration of contrasts, where silky meets crisp and sweet meets subtly savory.

Boosting the flavor

Elevate your Chocolate Lasagna with a few clever tweaks. Swap the standard chocolate pudding for dark chocolate or even a salted caramel variation to deepen the flavor profile. A sprinkle of espresso powder amplifies the cocoa notes without overpowering the dish. For added texture, top it with toasted nuts or a drizzle of homemade chocolate sauce. If you love fruity contrasts, layer in fresh raspberries or a spoonful of berry compote between the pudding and whipped cream. These small changes make each bite unforgettable while keeping the dessert’s irresistible charm intact.

Tips for Success

Best practices for results

Always chill the crust layer for at least 15 minutes before adding the cream cheese filling—this prevents crumbling. Meanwhile, use room-temperature cream cheese for smoother blending, ensuring your Chocolate Lasagna has the perfect creamy texture. For even layers, spread each component gently with an offset spatula, and press down lightly between additions. Finally, freeze the dessert for at least 4 hours before slicing; this keeps the layers intact for clean cuts.

Mistakes to avoid

Avoid overmixing the crust, as it can make the base too dense. Instead, pulse the ingredients just until combined, like you would for a no-bake Oreo cheesecake. Another common misstep is skipping the parchment paper liner, which makes removing slices messy. For easier serving, line your pan as you would for peanut butter pie. Also, don’t rush the freezing step—soft layers won’t hold their shape when sliced.

Serving and Pairing Suggestions

How to serve this dish

Chocolate lasagna shines as a showstopping dessert for any occasion. For a festive touch, layer it in a glass trifle dish to showcase the rich stripes of chocolatey goodness. Alternatively, slice it into neat squares and plate them with a dusting of cocoa powder or a drizzle of melted chocolate. Meanwhile, fresh berries like raspberries or strawberries add a pop of color and freshness. Serve it chilled at summer gatherings, holiday parties, or even as a decadent treat for weekend brunch. Finally, top each serving with a dollop of whipped cream or a scoop of vanilla ice cream for extra indulgence.

h-it">What goes well with it

A warm cup of coffee balances the sweetness of chocolate lasagna perfectly, especially if you prefer a slightly bitter contrast. For a refreshing option, try pairing it with a glass of cold milk or a creamy milkshake. If you want to elevate the experience, serve it alongside our classic tiramisu for an Italian-inspired dessert spread. Additionally, our salted caramel brownies make a delightful companion, offering a chewy texture that complements the creamy layers. Whether you choose drinks or other desserts, these pairings enhance the rich flavors of chocolate lasagna.

What is Chocolate Lasagna made of?

Chocolate Lasagna typically consists of layers of crushed Oreo cookies, cream cheese filling, chocolate pudding, and whipped topping. This no-bake dessert mimics the layered look of traditional lasagna but swaps pasta for decadent chocolate flavors.

rank-math-faq-item"> How long does Chocolate Lasagna need to set?

For best results, refrigerate Chocolate Lasagna for at least 4 hours or overnight before serving. This allows the layers to firm up properly, making it easier to slice and serve neat portions of this rich dessert.

Can you freeze Chocolate Lasagna?

Yes! Chocolate Lasagna freezes well for up to 2 months when wrapped tightly in plastic. Thaw overnight in the refrigerator before serving to maintain the perfect creamy texture of this crowd-pleasing dessert.

What’s the difference between Chocolate Lasagna and tiramisu?

While both are layered desserts, Chocolate Lasagna uses Oreo crust and chocolate pudding, while tiramisu features ladyfingers soaked in coffee with mascarpone cream. Chocolate Lasagna is an easier, no-bake American dessert with bold chocolate flavors throughout every layer.

>