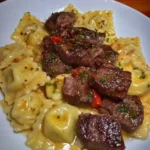
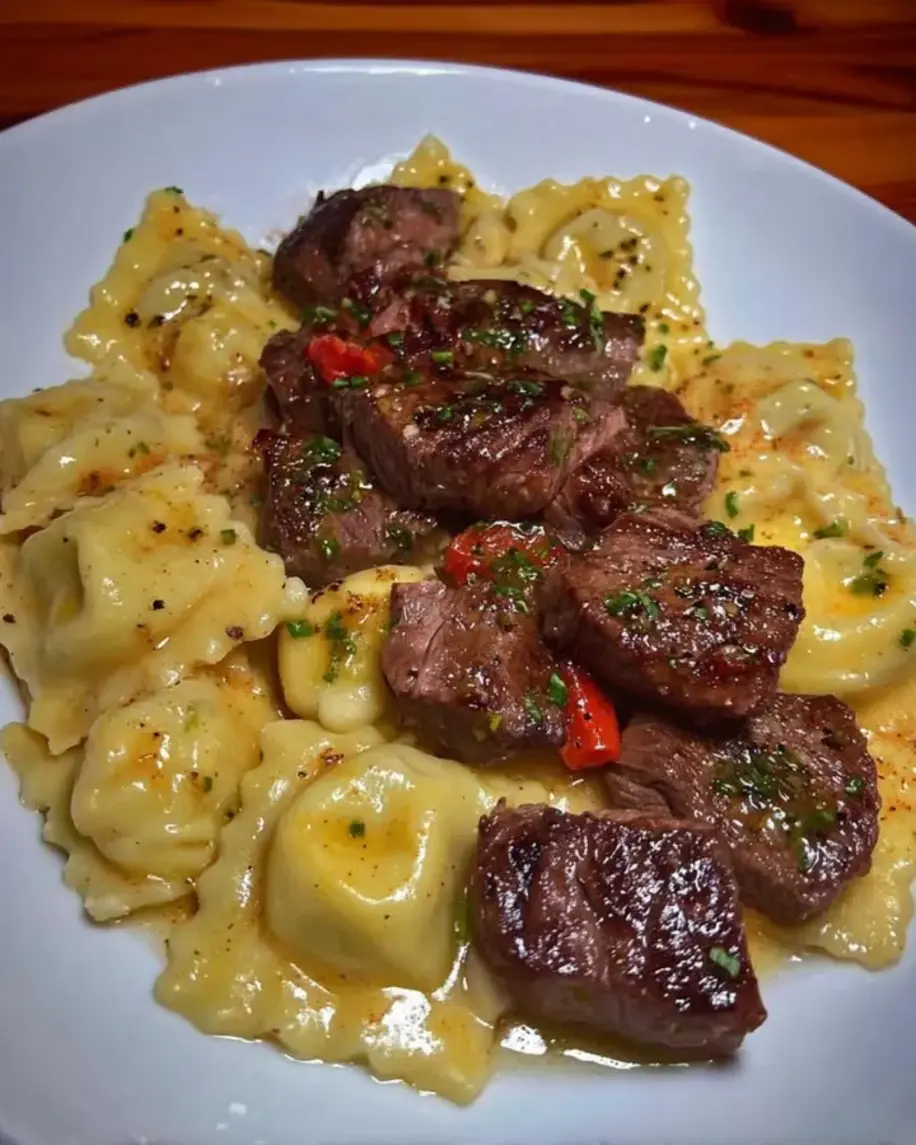
Mom’s Apple Pie: The Perfect Homemade Classic for Every Occasion

homemade apple pie, classic apple pie recipe, easy apple pie, apple pie from scratch, traditional apple pie, best apple pie recipe

Mom’s Apple Pie: A Timeless Family Tradition

There’s nothing quite like the aroma of Mom’s Apple Pie wafting through the kitchen. Whether it’s a holiday gathering or a simple family dinner, this dessert has become a beloved staple in many homes. With a buttery, flaky crust and a filling of tart apples and warm spices, it’s no wonder this recipe is passed down from generation to generation.

For a hearty meal to complement this dessert, consider pairing it with a savory dish like Slow Cooker Baked Ziti, which balances the sweet flavors of the pie with a rich and savory pasta.

Why You Should Make Mom’s Apple Pie

Mom’s Apple Pie is not just a dessert—it’s a piece of family history. The combination of tart Granny Smith apples, cinnamon, and a buttery crust creates a sweet and slightly tangy flavor that’s hard to resist. This recipe is perfect for bakers of all levels, offering a straightforward process that yields a mouth-watering pie every time. It’s also highly customizable, allowing you to make it your own by adjusting the filling or experimenting with different crust techniques.

For those looking for a cozy meal to accompany this pie, try pairing it with a creamy dish like Crockpot Potato Soup with Hashbrowns, a rich and comforting side that complements the flavors of the apple pie.

Ingredients

  • For the Crust:
    • 2 cups all-purpose flour
    • 1 cup unsalted butter (cold, cubed)
    • 1/4 cup ice water
    • 1 tsp salt
  • For the Filling:
    • 6-8 Granny Smith apples (peeled, cored, and sliced)
    • 3/4 cup sugar
    • 1 tsp cinnamon
    • 1/4 tsp nutmeg
    • 2 tbsp lemon juice
    • 1 tbsp cornstarch (optional)

Nutritional Breakdown

Each slice of Mom’s Apple Pie is rich in fiber, thanks to the apples, and provides a satisfying amount of carbohydrates for energy. While the butter in the crust contributes to its flaky texture, it also adds a moderate amount of fats. You can reduce the sugar or use a natural sweetener like honey to make this dessert lighter and healthier.

Step-by-Step Recipe Guide

1. Prepare the Crust

In a large bowl, mix the flour and salt. Cut in the cold butter until the mixture resembles coarse crumbs. Slowly add the ice water, mixing just until the dough comes together. Divide the dough in half, wrap in plastic wrap, and refrigerate for at least 30 minutes.

2. Prepare the Filling

In a large bowl, combine the apple slices, sugar, cinnamon, nutmeg, and lemon juice. Toss the apples until well coated. If you prefer a thicker filling, mix in the cornstarch to absorb the extra juices from the apples as they bake.

3. Assemble and Bake

Preheat your oven to 375°F. Roll out one half of the chilled dough and place it into a pie dish. Add the apple filling, then roll out the remaining dough and place it on top of the apples. Crimp the edges to seal, cut slits in the top to allow steam to escape, and bake for 45-50 minutes, or until the crust is golden and the filling is bubbly.

Tips for Making the Perfect Pie

  • Use cold ingredients: Cold butter and ice water are key to achieving a flaky crust.
  • Mix apple varieties: For a more complex flavor, use a mix of tart and sweet apples, like Granny Smith and Honeycrisp.
  • Pre-bake the crust: If you’re worried about a soggy bottom, pre-bake the bottom crust for about 10 minutes before adding the filling.

Serving Suggestions

Mom’s Apple Pie is best served warm with a generous scoop of vanilla ice cream or a dollop of whipped cream. For a festive touch, drizzle caramel sauce over each slice. This pie also pairs well with a hot cup of coffee or apple cider, making it the perfect autumn dessert.

Looking for more delicious dessert ideas? Try the Decadent Caramel Chocolate Cupcakes to satisfy your sweet tooth!

Creative Variations

  • Dutch Apple Pie: Swap the top crust for a streusel made of oats, brown sugar, and butter for a crumbly, crunchy topping.
  • Caramel Apple Pie: Drizzle caramel sauce over the apple filling before sealing the pie with the top crust.
  • Healthier Apple Pie: Use whole wheat flour in the crust and reduce the sugar in the filling. You can also substitute butter with coconut oil for a vegan version.

FAQs About Mom’s Apple Pie

1. What Apples Should I Use for Apple Pie?

Granny Smith apples are ideal due to their tartness, which balances the sweetness of the sugar. However, combining them with sweeter varieties like Honeycrisp can enhance the flavor profile.

2. Can I Make Apple Pie in Advance?

Yes! You can prepare the pie and refrigerate it unbaked for up to 24 hours. Alternatively, you can bake it and store it at room temperature for up to 2 days or in the fridge for up to 5 days.

3. Can I Freeze Apple Pie?

Absolutely! Freeze the pie unbaked, then bake it straight from frozen, adding an additional 10-15 minutes to the baking time.

4. How Can I Prevent a Soggy Bottom Crust?

To avoid a soggy bottom, pre-bake the bottom crust for about 10 minutes, or add a thickener like cornstarch to the filling to absorb excess moisture.

5. How Do I Make the Crust Extra Flaky?

Use cold butter and handle the dough as little as possible. Overworking the dough will develop gluten, making the crust tough instead of tender.

Storage and Reheating

Leftover pie can be stored at room temperature for up to 2 days or refrigerated for up to 5 days. To reheat, place the pie in a 350°F oven for 10-15 minutes, or microwave individual slices for about 30 seconds.

Nutritional Benefits of Apples

Apples are rich in dietary fiber, which aids digestion, and vitamin C, an essential antioxidant. Using less sugar in the pie filling can enhance its health benefits, while adding nuts like walnuts or pecans boosts the protein and healthy fat content.

Conclusion

Mom’s Apple Pie is a classic, comforting dessert that deserves a place in every baker’s repertoire. With its flaky crust, tender apples, and perfectly balanced sweetness, it’s a treat that brings warmth and nostalgia to every table. Whether you follow the traditional recipe or put your own twist on it, this pie is sure to become a family favorite.


Internal Linking Opportunities from ExoRecipes:

Crockpot Ranch Chicken and Potatoes: Easy and Delicious Comfort Food

Slow cooker ranch chicken, ranch chicken and potatoes, creamy ranch chicken, crockpot chicken dinner, easy chicken and potato recipe

Crockpot Ranch Chicken and Potatoes: A Comfort Food Classic

Introduction

Crockpot Ranch Chicken and Potatoes is a hearty, flavorful dish perfect for busy weeknights or leisurely family dinners. Combining tender chicken, creamy ranch dressing, and perfectly cooked potatoes, this slow-cooked meal requires minimal effort but delivers maximum flavor.

If you’re a fan of easy comfort food dishes, you might also enjoy this Crockpot Potato Soup with Hashbrowns, which offers another rich and satisfying option for busy days.

Why Crockpot Ranch Chicken and Potatoes?

The appeal of Crockpot Ranch Chicken and Potatoes lies in its simplicity and the comfort it brings to the dinner table. With just a few ingredients and the help of your slow cooker, you can create a satisfying meal that the whole family will love. The creamy ranch dressing adds a savory flavor that complements both the chicken and the potatoes.

When preparing this dish, using high-quality ingredients like fresh potatoes and a good ranch seasoning mix is essential for getting the best flavor. For more insights into perfecting slow-cooker meals, check out this guide on making perfect slow cooker meals.

Ingredients and Nutritional Information

To make Crockpot Ranch Chicken and Potatoes, you’ll need the following ingredients:

  • Chicken Breasts or Thighs: Both work well, depending on your preference.
  • Ranch Dressing Mix: Adds the signature flavor.
  • Potatoes: Yukon Gold or red potatoes are ideal.
  • Optional Ingredients: Cream of chicken soup for added creaminess, carrots, or green beans for added vegetables.

Nutritionally, this dish is high in protein and carbs. You can make it healthier by using low-fat ranch dressing or omitting the cream of chicken soup. For more on the nutritional benefits of potatoes, check out this article on the nutritional benefits of potatoes.

How to Make Crockpot Ranch Chicken and Potatoes

1. Preparing the Ingredients
Start by seasoning the chicken with the ranch dressing mix. Chop the potatoes into bite-sized pieces and set aside.

2. Assembling in the Crockpot
Layer the potatoes at the bottom of the crockpot, followed by the chicken. Add optional ingredients like carrots or green beans if desired.

3. Cooking and Serving
Set the crockpot to low and cook for 6-8 hours or on high for 4 hours. Once done, garnish with fresh parsley or cheese and serve warm.

For more creative ways to use ranch seasoning in your meals, check out these creative ways to use ranch seasoning.

Creative Variations of Crockpot Ranch Chicken and Potatoes

There are several ways to customize your Crockpot Ranch Chicken and Potatoes to suit your taste:

  • Bacon and Cheese Variation: Add crumbled bacon and shredded cheddar cheese for a loaded version of the dish.
  • Different Chicken Cuts: Use chicken thighs or drumsticks for added richness and flavor.
  • Vegan/Dairy-Free Option: Substitute plant-based chicken and dairy-free ranch dressing for a vegan-friendly version.

Serving Suggestions and Pairings

Crockpot Ranch Chicken and Potatoes is a versatile dish that can be served in a variety of ways:

  • With a Salad: Pair with a fresh green salad to add lightness to the meal.
  • With Bread: Serve with crusty bread or garlic bread to soak up the creamy sauce.
  • As a Complete Meal: This dish can stand alone as a hearty dinner, especially when served with vegetables like green beans or roasted carrots.

For more ideas on how to create comforting dishes, try pairing this meal with Crockpot Baked Ziti.

Tips for Perfect Crockpot Ranch Chicken and Potatoes

To ensure your Crockpot Ranch Chicken and Potatoes turns out perfectly every time, follow these tips:

  • Prevent Overcooking: Check the potatoes toward the end of cooking to ensure they aren’t too soft.
  • Use Fresh Ingredients: Fresh potatoes, quality chicken, and a good ranch seasoning mix make a big difference in flavor.
  • Layering Matters: Place the potatoes at the bottom of the crockpot to ensure they cook evenly.

Frequently Asked Questions (FAQs)

  1. Can I make this dish ahead of time?
    Yes, you can assemble everything in the crockpot the night before and store it in the refrigerator. Simply start cooking it the next morning.
  2. What type of potatoes work best for this recipe?
    Yukon Gold or red potatoes hold up well in the slow cooker and have a great texture.
  3. How do I prevent the chicken from drying out?
    Using chicken thighs instead of breasts can help prevent dryness. You can also add a bit of chicken broth to keep the chicken moist.
  4. Can I use a different dressing instead of ranch?
    Absolutely! You can use Italian dressing mix or even a garlic herb seasoning for a different flavor.
  5. What are some gluten-free variations of this dish?
    Ensure that your ranch dressing mix and any additional ingredients are gluten-free to make this dish safe for those with gluten sensitivities.

Nutritional Benefits and Health Considerations

Chicken and potatoes are both nutritious and filling ingredients, providing a good balance of protein and fiber. To make the dish lighter, use lean chicken breasts and low-fat ranch dressing. You can also omit the cream of chicken soup for a lighter sauce.

Conclusion

Crockpot Ranch Chicken and Potatoes is a comforting and flavorful dish that’s perfect for busy weeknights or family gatherings. With minimal prep and easy customization, this slow-cooker meal is sure to become a staple in your kitchen.

Mom’s Lemon Cream Pie: A Refreshing and Timeless Dessert

Lemon cream pie, homemade lemon pie, creamy lemon dessert, tangy lemon pie, easy lemon cream pie recipe

Mom’s Lemon Cream Pie: A Refreshing Dessert with a Tangy Twist

Introduction

Mom’s Lemon Cream Pie is a timeless dessert that combines the refreshing tartness of lemons with the smooth creaminess of a rich filling. This pie is a cherished family recipe, often passed down through generations, and is perfect for any occasion, whether it’s a summer gathering or a simple family dinner.

For those who enjoy experimenting with classic dessert recipes, you might also love this Strawberry Freezer Pie, which offers a similarly refreshing flavor profile.

Why Mom’s Lemon Cream Pie?

The appeal of Mom’s Lemon Cream Pie lies in its perfect balance of tart and sweet flavors. The creamy lemon filling, set in a buttery crust, provides a delightful contrast that’s both satisfying and refreshing. This pie is easy to make and always a hit, making it a must-try for anyone who enjoys homemade desserts.

When preparing this pie, using fresh, high-quality lemons is essential for achieving the best flavor. For more tips on perfecting your pie crust, check out this guide on making perfect pie crusts.

Ingredients and Nutritional Information

To make Mom’s Lemon Cream Pie, you’ll need the following ingredients:

  • Lemon Juice: Freshly squeezed for the best flavor.
  • Sweetened Condensed Milk: Provides the creamy texture and sweetness.
  • Egg Yolks: Adds richness and helps set the filling.
  • Graham Cracker Crust or Traditional Pie Crust: Choose based on your preference.
  • Optional Garnishes: Whipped cream, lemon zest, or slices for decoration.

Nutritionally, this pie is a treat rich in flavor and texture. Lemons provide a good source of vitamin C, while the condensed milk and eggs contribute to the pie’s creamy consistency. For a lighter version, consider using low-fat condensed milk or reducing the amount of sugar.

For more insights into the nutritional benefits of lemons, refer to this article on the nutritional benefits of lemons.

How to Make Mom’s Lemon Cream Pie

1. Preparing the Crust
Start by making the graham cracker crust or preparing a traditional pie crust. Press the crust mixture into a pie dish and bake until lightly golden.

2. Making the Lemon Filling
In a bowl, whisk together the lemon juice, sweetened condensed milk, and egg yolks until smooth and creamy. Pour the mixture into the baked crust.

3. Assembling and Baking the Pie
Bake the pie at 350°F (175°C) for 15-20 minutes, or until the filling is set. Allow the pie to cool before chilling in the refrigerator for at least 2 hours.

For more creative lemon dessert ideas, explore these creative lemon dessert ideas.

Creative Variations of Mom’s Lemon Cream Pie

There are several ways to customize your Mom’s Lemon Cream Pie to suit your taste:

  • Meringue Topping: Add a layer of meringue on top of the lemon filling before baking for a classic lemon meringue pie twist.
  • Different Crusts: Try using a shortbread or almond crust for a different texture and flavor.
  • Vegan/Dairy-Free Version: Use coconut milk and an egg substitute to create a vegan-friendly version of this classic pie.

Serving Suggestions and Pairings

Mom’s Lemon Cream Pie is a versatile dessert that can be served in various ways:

  • Chilled: Serve the pie chilled with a dollop of whipped cream for a refreshing treat.
  • With Beverages: Pair with iced tea, lemonade, or a light white wine for a perfect accompaniment.
  • As a Party Dessert: Garnish with lemon slices and serve as a centerpiece dessert for summer gatherings.

For more dessert inspiration, consider pairing this pie with these Delightful Mini Pineapple Upside-Down Cakes, which offer another fruity and sweet option.

Tips for Perfect Mom’s Lemon Cream Pie

To ensure your Mom’s Lemon Cream Pie turns out perfectly every time, keep these tips in mind:

  • Fresh Lemons: Use fresh lemon juice for the best flavor. Bottled lemon juice can have a bitter aftertaste.
  • Balanced Sweetness: Taste the filling before baking to adjust the sweetness if needed.
  • Chill Time: Allow the pie to chill thoroughly in the refrigerator to ensure the filling is fully set.

Frequently Asked Questions (FAQs)

  1. Can I make this pie ahead of time?
    Yes, this pie can be made a day in advance and stored in the refrigerator until ready to serve.
  2. What type of lemons work best for this recipe?
    Meyer lemons are sweeter and less acidic, making them a great choice, but regular lemons work perfectly as well.
  3. How do I prevent the pie from becoming too runny?
    Ensure the pie bakes long enough for the filling to set, and chill it thoroughly before serving.
  4. Can I use a different type of crust?
    Absolutely! Shortbread, almond, or even a cookie crust can be used for a unique twist.
  5. What are some low-sugar variations of this pie?
    Use a sugar substitute in place of regular sugar, or reduce the amount of condensed milk for a lower-sugar version.

Nutritional Benefits and Health Considerations

Lemons are a nutritious fruit, rich in vitamin C and antioxidants. While Mom’s Lemon Cream Pie is a dessert, making small adjustments like using low-fat milk or a sugar substitute can help reduce the calorie content without sacrificing flavor.

Conclusion

Mom’s Lemon Cream Pie is a refreshing and timeless dessert that is perfect for any occasion. Whether you’re making it for a family gathering or just because, this pie is sure to impress with its tangy, creamy filling and buttery crust.

Homemade Cheddar Bacon Potato Chips: A Crispy and Savory Snack Delight

Cheddar bacon chips, crispy bacon potato chips, homemade potato crisps, cheesy bacon chips, baked potato chips

Homemade Cheddar Bacon Potato “Chips”: A Crispy and Savory Snack

Introduction

Homemade Cheddar Bacon Potato “Chips” are the ultimate snack, combining the rich flavors of crispy potatoes, savory bacon, and sharp cheddar cheese. This easy-to-make recipe is perfect for any occasion, whether you’re hosting a party, preparing a game-day snack, or simply craving something indulgent.

For those who enjoy exploring creative snack recipes, you might also like these Crispy Fried Cheesecake Bites, which provide a sweet contrast to the savory cheddar bacon chips.

Why Homemade Cheddar Bacon Potato “Chips”?

The appeal of Homemade Cheddar Bacon Potato “Chips” lies in their perfect balance of flavors and textures. The crispy, golden potato slices are topped with melted cheddar cheese and crumbled bacon, creating a snack that’s both satisfying and flavorful. Unlike store-bought chips, these homemade versions allow you to control the ingredients and customize the flavors to your liking.

When preparing these chips, it’s important to use high-quality ingredients. For more tips on achieving the perfect homemade chips, check out this guide on making perfect homemade chips.

Ingredients and Nutritional Information

To make Homemade Cheddar Bacon Potato “Chips”, you’ll need the following ingredients:

  • Potatoes: Russet or Yukon Gold are ideal for their starchy texture.
  • Bacon: Thick-cut bacon adds a richer flavor.
  • Cheddar Cheese: Sharp or mild, depending on your preference.
  • Optional Seasonings: Garlic powder, smoked paprika, or fresh herbs like chives or thyme.

Nutritionally, these chips are rich in protein and carbohydrates. The bacon and cheese add savory richness, while the potatoes provide a crispy base. To make a lighter version, you can opt for turkey bacon or reduce the amount of cheese.

For more information on the nutritional benefits of potatoes, refer to this article on the nutritional benefits of potatoes.

How to Make Homemade Cheddar Bacon Potato “Chips”

1. Preparing the Ingredients
Start by cooking the bacon until it is crispy. Drain on paper towels and allow it to cool before crumbling it into small pieces. Slice the potatoes thinly using a mandoline or sharp knife for even cooking.

2. Assembling the Chips
Preheat your oven to 400°F (200°C). Arrange the potato slices in a single layer on a baking sheet lined with parchment paper. Sprinkle the crumbled bacon over the potato slices, then top with shredded cheddar cheese.

3. Baking and Serving
Bake the potato slices for 15-20 minutes, or until the edges are golden and crispy and the cheese is melted and bubbly. Remove from the oven and let cool slightly before serving. Garnish with fresh herbs if desired.

For more creative ways to incorporate bacon into snacks, explore these creative ways to use bacon in snacks.

Creative Variations of Homemade Cheddar Bacon Potato “Chips”

There are several ways to customize your Homemade Cheddar Bacon Potato “Chips” to suit your taste:

  • Cheesy Bacon Potato Chips: Experiment with different types of cheese like mozzarella, pepper jack, or blue cheese for unique flavor combinations.
  • Herb-Infused Chips: Add fresh or dried herbs like rosemary, thyme, or chives to the cheese and bacon mixture for an aromatic twist.
  • Vegetarian Option: Use plant-based bacon and cheese to create a vegetarian version that still delivers on flavor.

Serving Suggestions and Pairings

Homemade Cheddar Bacon Potato “Chips” are a versatile snack that pairs well with a variety of dips and beverages:

  • Pairing with Dips: Serve with dips like ranch, sour cream, or garlic aioli to complement the flavors of the chips.
  • As a Snack: Enjoy these chips on their own as a satisfying snack or appetizer.
  • As a Side Dish: Pair with burgers, sandwiches, or grilled meats for a crunchy side.

For more snack ideas, consider pairing these chips with Homemade Pizza Sticks, which offer a savory and cheesy delight.

Tips for Perfect Homemade Cheddar Bacon Potato “Chips”

To ensure your Homemade Cheddar Bacon Potato “Chips” turn out perfectly every time, keep these tips in mind:

  • Thin Slices: Slice the potatoes as thinly as possible for even cooking and maximum crispiness.
  • Crispy Bacon: Cook the bacon until it’s crispy to prevent it from becoming soggy on the chips.
  • Fresh Ingredients: Use fresh potatoes and high-quality bacon and cheese to elevate the flavor of your chips.

Frequently Asked Questions (FAQs)

  1. Can I make these chips ahead of time?
    Yes, you can prepare the chips ahead of time and reheat them in the oven before serving to restore their crispiness.
  2. What type of potatoes work best for homemade chips?
    Russet or Yukon Gold potatoes are ideal due to their starchy texture, which crisps up nicely when baked.
  3. How do I prevent the chips from becoming soggy?
    Ensure the potato slices are thin and evenly spaced on the baking sheet, and bake until the edges are golden and crispy.
  4. Can I use a different type of cheese instead of cheddar?
    Absolutely! Mozzarella, pepper jack, or blue cheese are great alternatives that can add a different flavor profile.
  5. What are some low-carb variations of this dish?
    You can use thinly sliced zucchini or sweet potatoes as a low-carb alternative to traditional potato chips.

Nutritional Benefits and Health Considerations

Potatoes are a nutritious ingredient rich in fiber, vitamins, and minerals. Bacon and cheese add flavor but are higher in fat and sodium, so consider using them in moderation or opting for lighter alternatives like turkey bacon and reduced-fat cheese.

Conclusion

Homemade Cheddar Bacon Potato “Chips” are a delicious and versatile snack that’s perfect for any occasion. Whether you’re serving them at a party, enjoying them as a game-day snack, or simply indulging in a savory treat, these chips are sure to be a hit. With their rich flavors and crispy texture, they’re a must-try for any snack enthusiast.

Ultimate Bacon Potato Casserole: A Comforting Classic Recipe

Discover the ultimate bacon potato casserole recipe, a comforting classic perfect for any meal, with tips for delicious variations.

Bacon Potato Casserole: A Comforting Classic for Any Occasion

Introduction

Bacon potato casserole is a rich and hearty dish that brings together crispy bacon, tender potatoes, and creamy cheese in a satisfying casserole. This versatile dish is perfect for breakfast, brunch, or dinner, and is sure to be a hit at any family gathering or potluck.

For those interested in other comforting recipes, you might also enjoy this Slow Cooker Magic: Unveiling the Ease of Crock-Pot Baked Ziti, which pairs wonderfully with a side of bacon potato casserole.

Why Bacon Potato Casserole?

The appeal of bacon potato casserole lies in its perfect balance of flavors. The smokiness of the bacon, the creaminess of the cheese, and the comforting texture of the potatoes make it a must-try dish. Whether you’re serving it as a main course or a side, this casserole is sure to satisfy.

When preparing this dish, using high-quality ingredients will make a significant difference. For a guide on selecting the best ingredients for casseroles, check out this guide on making the perfect casserole.

Ingredients and Nutritional Information

To make bacon potato casserole, you’ll need the following ingredients:

  • Potatoes: Russet or Yukon Gold are ideal.
  • Bacon: Thick-cut bacon adds the best flavor.
  • Cheese: Cheddar, Gruyère, or mozzarella work well.
  • Cream or Sour Cream: Adds creaminess to the dish.
  • Optional Ingredients: Onions, garlic, or fresh herbs like thyme or parsley.

Nutritionally, this casserole is rich in protein and carbohydrates. The bacon and cheese add a savory richness, while the potatoes provide a hearty base. To make a lighter version, consider using turkey bacon or reducing the amount of cheese.

For more detailed information on the nutritional benefits of potatoes, refer to this article on the nutritional benefits of potatoes.

How to Make Bacon Potato Casserole

1. Preparing the Ingredients
Start by cooking the bacon until it is crispy. Drain on paper towels and allow it to cool before crumbling it into small pieces. Prepare the potatoes by peeling and slicing them into thin, even slices.

2. Assembling the Casserole
Layer the potato slices in a greased baking dish. Sprinkle the bacon pieces evenly over the potatoes. Add a layer of cheese and repeat until all the ingredients are used. Pour cream or sour cream over the top layer to add richness.

3. Baking and Serving
Preheat your oven to 375°F (190°C). Bake the casserole for 45-60 minutes, or until the top is golden brown and the potatoes are tender. Allow it to cool slightly before serving.

For more ideas on how to use bacon in casseroles, explore these creative ways to use bacon in casseroles.

Creative Variations of Bacon Potato Casserole

There are several ways to customize your potato casserole to suit your taste:

  • Cheesy Bacon Potato Casserole: Add different types of cheese like blue cheese or feta for a richer flavor.
  • Vegetable-Enhanced Casserole: Incorporate vegetables like broccoli, spinach, or bell peppers for added nutrition.
  • Vegetarian Option: Use plant-based bacon or smoked tofu for a vegetarian version that still delivers on flavor.

Serving Suggestions and Pairings

Bacon potato casserole is a versatile dish that pairs well with a variety of meals:

  • Pairing with Salads: Serve alongside a fresh green salad to balance the richness of the casserole.
  • As a Side Dish: Perfect with roasted meats, grilled chicken, or even a simple soup.
  • Brunch Option: Serve with scrambled eggs and fresh fruit for a hearty brunch.

For more brunch ideas, consider pairing bacon potato casserole with these Crockpot Potato Soup with Hashbrowns.

Tips for Perfect Bacon Potato Casserole

To ensure your bacon potato casserole turns out perfectly every time, keep these tips in mind:

  • Layering Matters: Layer the ingredients evenly to ensure every bite has a perfect balance of flavors.
  • Crispy Bacon: Cook the bacon until crispy to prevent it from becoming soggy in the casserole.
  • Use Fresh Ingredients: Fresh potatoes and high-quality bacon will elevate the flavor of your casserole.

Frequently Asked Questions (FAQs)

  1. Can I make bacon potato casserole ahead of time?
    Yes, you can assemble the casserole ahead of time and bake it just before serving.
  2. What type of potatoes work best for this casserole?
    Russet or Yukon Gold potatoes are ideal due to their starchy texture.
  3. How do I prevent the casserole from becoming too dry?
    Ensure you add enough cream or sour cream to keep the casserole moist.
  4. Can I use a different type of meat instead of bacon?
    Yes, ham, pancetta, or turkey bacon can be used for a different flavor profile.
  5. What are some gluten-free variations of this dish?
    The dish is naturally gluten-free, but ensure all other ingredients are gluten-free as well.

Nutritional Benefits and Health Considerations

Potatoes are a nutritious ingredient rich in fiber, vitamins, and minerals. While bacon adds flavor, it’s higher in fat and sodium, so consider using it in moderation or opting for a leaner alternative like turkey bacon to reduce the fat content.

Conclusion

Bacon potato casserole is a comforting and versatile dish that’s perfect for any occasion. Whether you’re serving it at a family gathering, a potluck, or a casual