Table of Contents
Steak Shrimp Garlic Pasta: The Only Recipe You’ll Ever Need
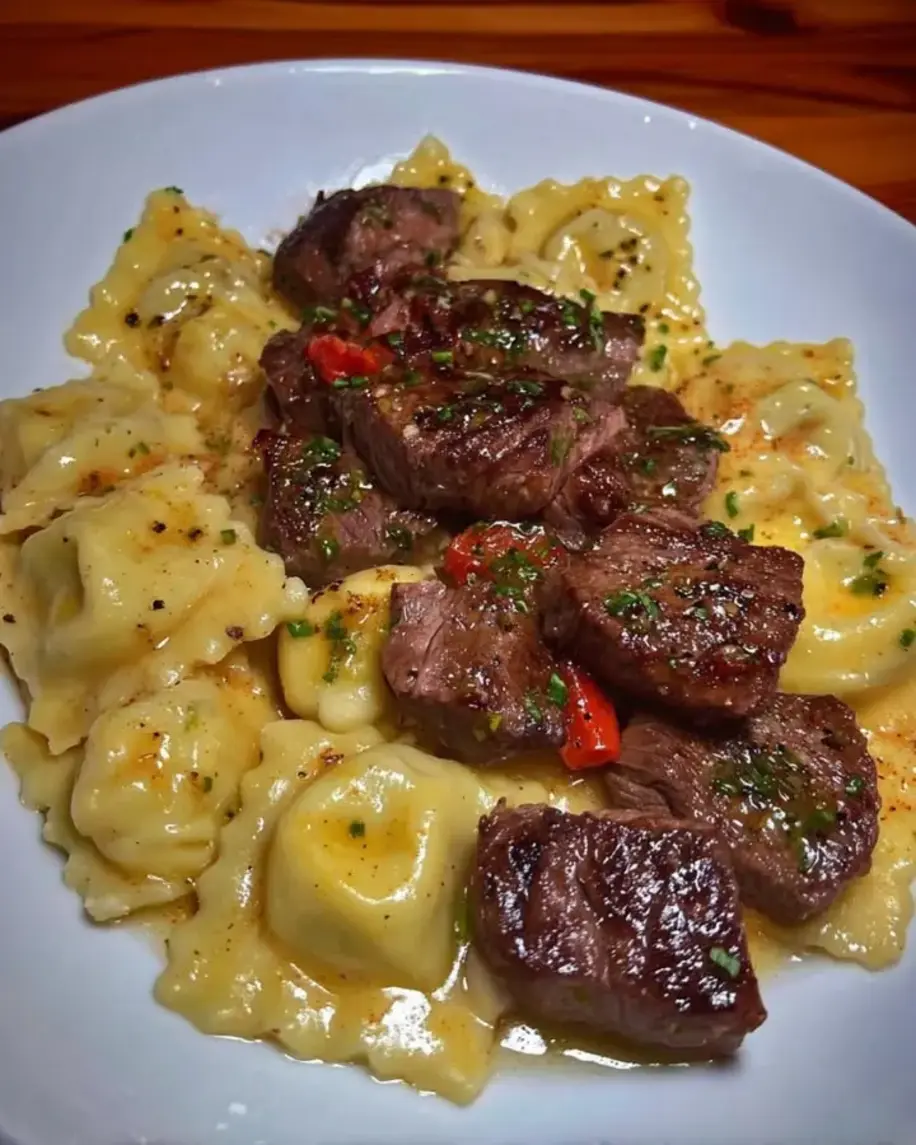
Imagine coming home after a long day, craving a luxurious steak shrimp garlic pasta that’s both hearty and easy to make. This one-pan wonder combines tender steak, succulent shrimp, and aromatic garlic into a creamy delight that elevates your weeknight dinners to gourmet status. As the ultimate steak shrimp garlic pasta recipe on exorecipes.com, it’s designed for busy home cooks who want restaurant-quality results without the fuss. With its simple ingredients and straightforward instructions, you’ll master this steak and shrimp pasta in no time, making it a go-to for family meals or date nights.
The flavors of this steak shrimp garlic pasta are nothing short of sensational. Picture juicy strips of steak searing to perfection, paired with plump, garlic-infused shrimp that burst with oceanic sweetness. The creamy sauce clings to every strand of pasta, delivering a rich, buttery garlic essence that tantalizes your taste buds. Textures play a starring role too—tender pasta contrasts with the slight chew of steak and the soft, yielding shrimp, all enveloped in a velvety sauce that coats your mouth with warmth. Aromatic garlic perfumes the air, turning your kitchen into a haven of Italian-American comfort.
What sets this steak shrimp garlic pasta recipe apart on exorecipes.com is our exclusive one-pan method, perfected by Chef Sally, ensuring minimal cleanup and maximum flavor infusion. You’ll discover chef’s secrets like achieving the ideal creaminess without curdling, plus tips for substitutions and pairings that make this dish foolproof. Whether you’re a novice or a seasoned cook, this comprehensive guide will boost your confidence and deliver consistent results every time. Dive in to learn how to create this garlic butter shrimp pasta masterpiece that’s been tested and refined for home kitchen success.
Why This Steak Shrimp Garlic Pasta Recipe is a Game-Changer
The chef’s secret behind this steak shrimp garlic pasta lies in its innovative one-pan method, which allows all the ingredients to meld together seamlessly, infusing the dish with deep, layered flavors. By cooking everything in a single skillet, we lock in the juices from the steak and shrimp while the garlic blooms without burning, creating an extra creamy sauce that’s richer than traditional recipes. This technique not only saves time but also minimizes dishes, making it ideal for busy weeknights while elevating your steak and shrimp pasta to new heights.
Unbeatable texture comes from the careful balance of high-heat searing for the steak, which caramelizes its exterior for a perfect medium-rare finish, and gentle simmering for the shrimp to keep them tender. The science? The heavy cream stabilizes at medium heat, preventing separation and ensuring a silky sauce that coats the pasta uniformly. This results in a steak pasta recipe that’s not overly heavy, with the proteins staying moist thanks to the residual fats from the olive oil and garlic.
Foolproof for a reason, this recipe has been tested multiple times in our kitchens to guarantee success, even for beginners. We account for common pitfalls like overcooking the shrimp or under-seasoning, providing clear steps that yield consistent results. Trust us—your steak shrimp garlic pasta will become a household favorite, praised for its simplicity and reliability on exorecipes.com.
Ingredient Spotlight: Quality Makes the Difference
Pasta (8 oz): This foundational ingredient absorbs the creamy garlic sauce beautifully, providing a hearty base for the steak and shrimp. Opt for high-quality durum wheat pasta to ensure it holds its shape and texture. Why quality matters: Inferior pasta can become mushy, ruining the dish’s al dente appeal. A tested substitution is whole wheat pasta for a nuttier flavor and added fiber, perfect if you’re watching your carbs in this steak shrimp garlic pasta.
Steak (1 lb, sliced): Choose a premium cut like sirloin or ribeye for its marbling, which melts into the one-pan method for tender, juicy results. This is the star of your steak and shrimp pasta, delivering rich, beefy flavors that complement the garlic butter elements. Quality matters because tough cuts can make the dish chewy; always select fresh, well-marbled steak. Substitution: Flank steak works if sliced thinly against the grain, but avoid pre-packaged options for the best garlic butter shrimp pasta experience.
Shrimp (1/2 lb, peeled and deveined): Fresh or frozen large shrimp add a sweet, succulent contrast to the steak, soaking up the aromatic garlic in this simple steak shrimp pasta. Quality is key to avoid any fishy odors—look for wild-caught for superior taste and texture. This ingredient shines in the one-pan method, cooking quickly to prevent rubberiness. Substitution: Scallops can mimic the seafood element, but adjust cooking time to maintain that perfect bite in your steak shrimp garlic pasta.
Garlic (4 cloves, minced): The heart of this garlic butter shrimp pasta, fresh garlic provides a pungent, aromatic punch that ties the dish together. Its oils release in the skillet, enhancing the creaminess without overwhelming other flavors. Why quality matters: Pre-minced garlic lacks potency, so use fresh for that authentic Italian-American essence. Substitution: Garlic powder in a pinch, but use half the amount to avoid bitterness in this steak and shrimp pasta recipe.
Heavy Cream (1 cup) and Parmesan Cheese (1/2 cup grated): These create the luscious, extra creamy sauce that coats every element. Heavy cream ensures a velvety texture, while Parmesan adds a nutty, salty depth. Quality matters for cream’s fat content, which prevents curdling; choose real, aged Parmesan over substitutes. Substitution: For a lighter version, use half-and-half and Pecorino Romano, but it might alter the richness of your steak shrimp garlic pasta.
Olive Oil (2 tbsp), Salt, Pepper, and Fresh Parsley: Olive oil serves as the base for searing, imparting a subtle earthiness, while salt and pepper enhance flavors. Fresh parsley adds a bright, herbaceous finish. Use extra-virgin olive oil for its purity, and always opt for fresh herbs. Substitution: Avocado oil for olive oil if you’re avoiding Mediterranean flavors, and dried parsley in emergencies, though it won’t match the vibrancy in this simple steak shrimp pasta.
Step-by-Step Instructions
Step 1: Boiling the Pasta
Begin by boiling 8 oz of pasta according to the package instructions until al dente; this typically takes 8-10 minutes. Drain and set aside, reserving a cup of pasta water for later if needed to adjust sauce consistency in your steak shrimp garlic pasta.
Pro Tip: Salt the water generously to infuse flavor into the pasta from the start, enhancing the overall dish.
Step 2: Heating the Skillet
In a large skillet, heat 2 tbsp of olive oil over medium heat, ensuring it’s evenly distributed for even cooking in this one-pan steak and shrimp pasta.
Common Mistake to Avoid: Don’t overheat the oil, as it can burn and impart a bitter taste—aim for a gentle sizzle.
Step 3: Cooking the Steak
Add 1 lb of sliced steak to the hot skillet and cook until browned, about 3-4 minutes per side, for a juicy, flavorful addition to your steak pasta recipe.
Pro Tip: Let the steak rest for a minute before slicing to retain its juices.
Step 4: Adding Garlic and Shrimp
In the same skillet, add 4 minced garlic cloves and 1/2 lb of peeled, deveined shrimp; cook until the shrimp turn pink and opaque, about 2-3 minutes, building layers in your garlic butter shrimp pasta.
Common Mistake to Avoid: Overcrowding the pan can steam the shrimp instead of searing them—cook in batches if necessary.
Step 5: Combining Steak and Cream
Return the cooked steak to the skillet, pour in 1 cup of heavy cream, and stir to combine, allowing the flavors to meld in this simple steak shrimp pasta.
Pro Tip: Stir constantly to prevent the cream from curdling under high heat.
Step 6: Incorporating Pasta and Cheese
Add the cooked pasta and 1/2 cup of grated Parmesan cheese to the skillet; toss everything together until the pasta is evenly coated with the creamy sauce in your steak shrimp garlic pasta.
Common Mistake to Avoid: Add pasta water if the sauce is too thick, ensuring it clings perfectly without drying out.
Step 7: Seasoning and Garnishing
Season the dish with salt and pepper to taste, then garnish with fresh parsley before serving your completed steak and shrimp pasta.
Pro Tip: Taste as you go to adjust seasonings for a balanced flavor profile.
Serving & Presentation
For an impressive presentation of your steak shrimp garlic pasta, plate it in shallow bowls to showcase the vibrant colors and textures. Twirl the pasta into neat nests, top with extra shrimp and steak slices, and finish with a sprinkle of fresh parsley for a pop of green. This not only makes it visually appealing but also enhances the one-pan method’s efficiency. Complement this main course with sides like garlic bread or a crisp salad; for greens, steamed broccoli or asparagus pairs wonderfully, adding a fresh, crunchy contrast to the creamy garlic butter shrimp pasta.
Make-Ahead & Storage Solutions
Make-Ahead Strategy: Prep your ingredients up to 3 days in advance by slicing the steak, peeling the shrimp, and mincing the garlic, then store them in airtight containers in the fridge. This allows you to assemble your steak shrimp garlic pasta quickly on busy nights.
Storing Leftovers: Refrigerate any leftovers in an airtight container for up to 3 days to maintain freshness; for longer storage, freeze portions in freezer-safe bags for up to 2 months, preventing the creamy sauce from separating.
The Best Way to Reheat: Gently warm leftovers in a skillet over low heat with a splash of cream to restore the original texture and flavor, avoiding the microwave which can make the pasta rubbery in your steak and shrimp pasta recipe.
Frequently Asked Questions (FAQ)
How long does steak and shrimp pasta take to cook?
This steak shrimp garlic pasta recipe takes about 20 minutes to cook once your ingredients are prepped, making it a quick option for weeknight dinners. The total time, including prep, is just 35 minutes, allowing you to enjoy a flavorful steak and shrimp pasta without spending hours in the kitchen.
What is the best cut of steak for pasta?
For this garlic butter shrimp pasta, sirloin or ribeye are the best cuts due to their balance of tenderness and flavor, which hold up well in the one-pan method. These cuts provide juicy results when sliced thinly, enhancing your simple steak shrimp pasta without becoming tough.
Can I use frozen shrimp for this pasta dish?
Yes, you can absolutely use frozen shrimp for this steak shrimp garlic pasta recipe; just thaw them first under cold water to prevent excess moisture that could dilute the sauce. Ensure they’re fully deveined and patted dry for the best texture in your steak and shrimp pasta.
What greens pair well with steak and shrimp pasta?
Greens like steamed broccoli, asparagus, or a fresh arugula salad pair excellently with this steak pasta recipe, adding a crisp, healthy contrast to the creamy garlic elements. These options balance the richness without overpowering the one-pan flavors of your steak shrimp garlic pasta.
Can I make this recipe spicier?
To add spice to this steak and shrimp pasta, incorporate red pepper flakes during the garlic and shrimp step, starting with 1/4 teaspoon and adjusting to taste. This enhances the garlic butter profile while keeping the dish versatile for different palates.
Is this recipe suitable for meal prep?
Absolutely, this steak shrimp garlic pasta is great for meal prep; prepare components ahead and store them separately, then combine when ready. It reheats well, making it ideal for lunches or dinners throughout the week.
Can I make this recipe vegan or gluten-free?
To make this steak shrimp garlic pasta vegan, swap the steak for mushrooms or plant-based meat, use coconut cream instead of heavy cream, and opt for vegan Parmesan. For gluten-free, choose gluten-free pasta and ensure all ingredients are certified gluten-free; these swaps maintain the creamy, flavorful essence of the original recipe.
Tried This Recipe? Leave a Comment!
Did you make this steak shrimp garlic pasta? I’d love to hear how it turned out! Please leave a comment and a rating below. Your feedback helps other home cooks and supports exorecipes.com!
For more delicious inspiration, follow me on Pinterest!
.
Print
Steak Shrimp Garlic Pasta
- Prep Time: 15 minutes
- Cook Time: 20 minutes
- Total Time: 35 minutes
- Yield: 4 1x
- Method: Main Course
- Cuisine: Italian-American
Description
A flavorful pasta dish combining juicy steak, succulent shrimp, and aromatic garlic in a creamy sauce.
Ingredients
- 8 oz pasta
- 1 lb steak, sliced
- 1/2 lb shrimp, peeled and deveined
- 4 cloves garlic, minced
- 1 cup heavy cream
- 1/2 cup grated Parmesan cheese
- 2 tbsp olive oil
- Salt and pepper to taste
- Fresh parsley for garnish
Instructions
- Boil pasta according to package instructions; drain and set aside.
- In a large skillet, heat olive oil over medium heat.
- Add sliced steak and cook until browned; remove and set aside.
- In the same skillet, add minced garlic and shrimp; cook until shrimp are pink.
- Return steak to the skillet and add heavy cream; stir to combine.
- Add cooked pasta and Parmesan cheese; toss until coated.
- Season with salt and pepper, and garnish with fresh parsley before serving.
Notes
For a spicier version, add red pepper flakes.
Nutrition
- Calories: 650
- Sugar: 3g
- Fat: 35g
- Carbohydrates: 45g
- Protein: 40g