Cookie Monster Cheesecake Recipe: Fun, Colorful, and Delicious

Fun cheesecake recipe, Blue cheesecake dessert, Oreo cheesecake recipe, Whimsical Cookie Monster cake, Kid-friendly dessert recipe

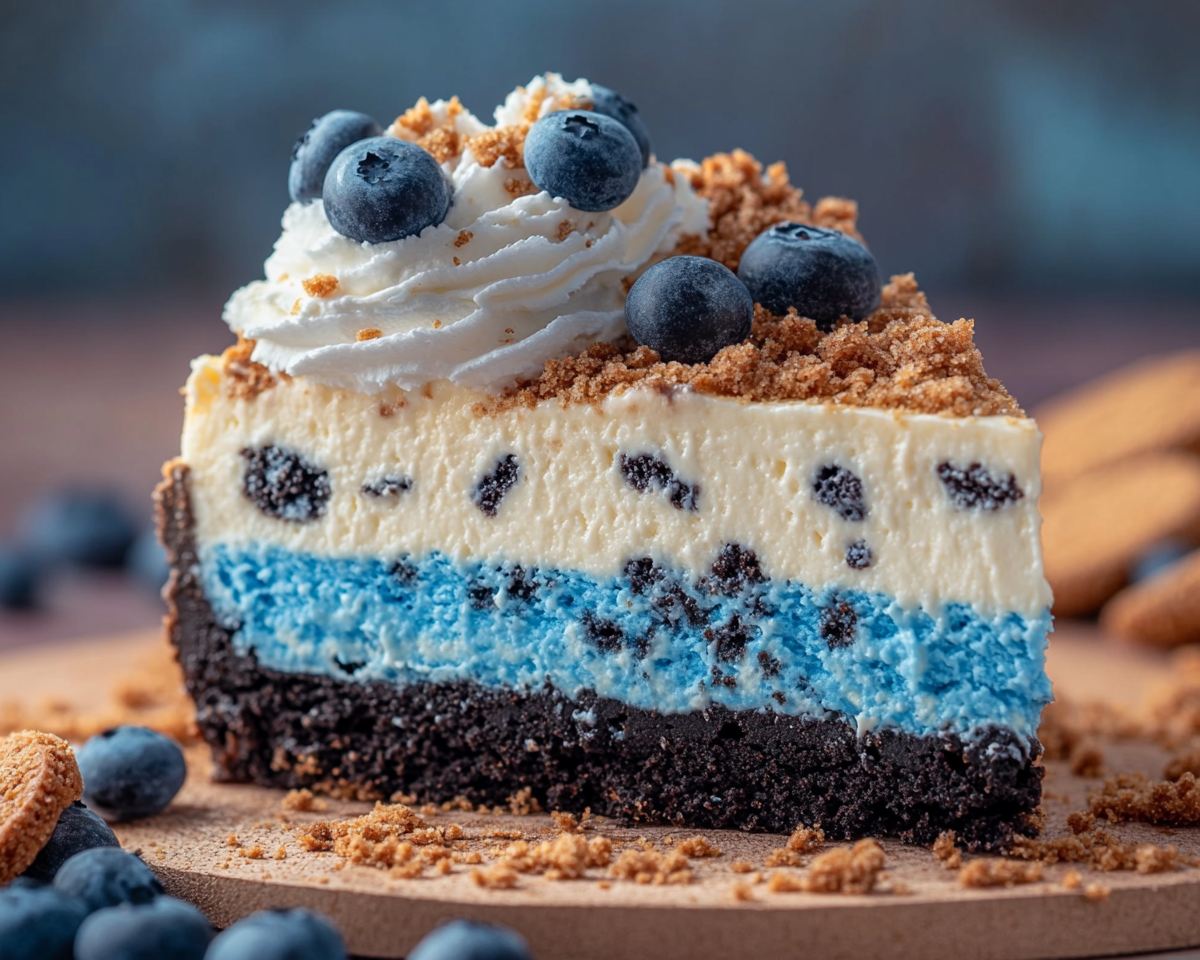
Cookie Monster Cheesecake Recipe: A Fun and Delicious Treat


Introduction

The Cookie Monster Cheesecake is a dessert that’s as delightful to look at as it is to eat. With its vibrant blue hue, cookie-packed layers, and creamy texture, it’s a favorite for both kids and adults. Whether you’re planning a birthday party, a themed event, or just indulging in some whimsical baking, this cheesecake is the perfect choice.

To ensure your cheesecake is smooth and crack-free, check out How to Bake Cheesecake Without Cracks.


What Makes This Recipe Unique

This Cookie Monster Cheesecake combines the rich creaminess of traditional cheesecake with the crunch and flavor of chocolate chip cookies and Oreos. The playful blue color, achieved with gel food coloring, adds a fun twist to an already amazing dessert. For tips on using food coloring effectively, explore Benefits of Gel-Based Food Coloring.


Ingredients

For the Crust:

  • 2 cups crushed chocolate chip cookies or Oreos
  • ¼ cup melted butter

For the Cheesecake Base:

  • 16 ounces cream cheese, softened
  • 1 cup granulated sugar
  • 3 large eggs
  • 1 teaspoon vanilla extract
  • Blue gel food coloring
  • 1 cup crushed Oreos or chocolate chip cookies

For the Topping:

  • Whipped cream
  • Crushed cookies
  • Chocolate ganache or sprinkles

Step-by-Step Recipe

1. Making the Crust

  • Combine crushed cookies and melted butter.
  • Press the mixture into the bottom of a springform pan.
  • Bake at 350°F for 10 minutes, or chill in the refrigerator if no-bake.

2. Preparing the Cheesecake Filling

  • Beat cream cheese and sugar until smooth and fluffy.
  • Add eggs, one at a time, followed by vanilla extract and food coloring.
  • Fold in the crushed cookies for a delightful texture.

3. Baking the Cheesecake

  • Pour the filling into the crust and smooth the top.
  • Bake in a water bath at 325°F for 45–55 minutes, until the center is just set.

4. Cooling and Chilling

  • Let the cheesecake cool in the oven with the door slightly ajar.
  • Refrigerate for at least 4 hours or overnight for the best texture.

5. Decorating

  • Top with whipped cream, crushed cookies, and a drizzle of chocolate ganache.

Creative Variations

1. No-Bake Cookie Monster Cheesecake

  • Use a gelatin-based filling for a no-bake version.

2. Vegan Option

  • Substitute dairy ingredients with vegan cream cheese and plant-based alternatives.

3. Mini Cheesecakes

  • Prepare in cupcake molds for individual servings.

4. Add a Surprise Center

  • Include a layer of cookie dough or fudge in the middle for an extra treat.

Serving and Presentation

  • Use clear plates to showcase the vibrant blue color.
  • Pair with a glass of milk or hot chocolate for the ultimate dessert experience.
  • Add edible googly eyes for a playful Cookie Monster look.

Tips for Success

  • Prevent Cracks: Bake the cheesecake in a water bath for even cooking.
  • Use Gel Food Coloring: It provides vibrant colors without altering the texture.
  • Chill Properly: Refrigeration ensures the cheesecake sets and slices neatly.

FAQs

1. Can I make this dessert ahead of time?

Yes, it can be prepared up to 2 days in advance and stored in the refrigerator.

2. What’s the best way to slice cheesecake cleanly?

Use a sharp knife dipped in warm water, wiping between cuts.

3. Can I freeze Cookie Monster Cheesecake?

Yes, wrap it tightly in plastic wrap and freeze for up to 3 months.

4. What cookies work best for this recipe?

Oreos and Chips Ahoy are classic choices, but feel free to experiment.

5. How can I make the cheesecake more colorful?

Swirl in additional colors like white or black for a marbled effect.


Internal Linking Opportunities

Incorporate these related recipes from ExoRecipes to enhance user engagement:


Conclusion

The Cookie Monster Cheesecake Recipe is a dessert that’s both fun and delicious. Its vibrant color, cookie-packed layers, and creamy filling make it a hit at any gathering. Try this recipe today, and don’t forget to share your creations! For more whimsical and indulgent recipes, explore ExoRecipes.
Red Velvet Oreo Cake Roll: A Perfectly Sweet and Creamy Dessert

Oreo red velvet roll, Red velvet cake roll with Oreos, Cream cheese Oreo filling roll, Chocolate cookie cake roll, Festive red velvet dessert

Red Velvet Oreo Cake Roll: A Decadent Dessert for Any Occasion


Introduction

The Red Velvet Oreo Cake Roll is a visually stunning and delicious dessert that combines the richness of red velvet sponge with the creamy, cookie-filled goodness of an Oreo-based filling. Whether you’re baking for a birthday, a holiday celebration, or just because, this cake roll is sure to impress. With a vibrant red sponge and a filling packed with crushed Oreos, it’s both a treat for the eyes and the taste buds.

Rolling a cake can be intimidating, but techniques like those found in Rolling a Cake Without Cracks can help you achieve flawless results.


Why You’ll Love This Dessert

The Red Velvet Oreo Cake Roll stands out due to its balance of flavors and textures. The sponge is moist yet light, and the filling’s creaminess is offset by the crunch of Oreos. For those interested in exploring the history of red velvet, The History of Red Velvet Cake offers a fascinating look into its origins.


Ingredients

For the Cake:

  • ¾ cup all-purpose flour
  • ¼ cup cocoa powder
  • 1 teaspoon baking powder
  • ½ teaspoon baking soda
  • 3 large eggs
  • ¾ cup granulated sugar
  • ½ cup buttermilk
  • 2 teaspoons red gel food coloring
  • 1 teaspoon vanilla extract

For the Filling:

  • 8 ounces cream cheese, softened
  • ½ cup powdered sugar
  • 1 teaspoon vanilla extract
  • 1 cup heavy cream, whipped
  • 10 crushed Oreo cookies

For the Decoration:

  • Chocolate ganache or melted white chocolate for drizzling
  • Additional crushed Oreos for garnish

Step-by-Step Recipe

1. Preparing the Cake Batter

  • Preheat the oven to 350°F (175°C) and line a jelly roll pan with parchment paper.
  • Whisk together the dry ingredients (flour, cocoa powder, baking powder, baking soda).
  • In a separate bowl, beat eggs and sugar until pale and fluffy. Add vanilla, red gel coloring, and buttermilk.
  • Gradually fold in the dry ingredients, ensuring a smooth batter.

2. Baking the Sponge

  • Spread the batter evenly onto the prepared pan.
  • Bake for 12–15 minutes or until the sponge is springy to the touch.

3. Rolling the Cake

  • Turn the baked sponge onto a clean kitchen towel dusted with powdered sugar.
  • Roll the sponge gently while it’s still warm, starting from the short end. Let it cool completely.

4. Making the Filling

  • Beat cream cheese, powdered sugar, and vanilla extract until smooth.
  • Fold in whipped cream and crushed Oreos to create a light, fluffy filling.

5. Assembling the Cake Roll

  • Unroll the cooled sponge and spread the filling evenly across its surface.
  • Re-roll the sponge tightly, wrap in cling film, and refrigerate for at least 2 hours.

6. Decorating

  • Drizzle melted chocolate or ganache over the chilled roll.
  • Garnish with crushed Oreos and serve.

Creative Variations

1. Mint Oreo Twist

  • Replace regular Oreos with mint-flavored ones and add a drop of peppermint extract to the filling.

2. Gluten-Free Option

  • Substitute all-purpose flour with a gluten-free baking blend.

3. Vegan Adaptation

  • Use a vegan red velvet cake recipe and dairy-free cream cheese.

4. Holiday-Themed Roll

  • Add red and green sprinkles to the filling and use holiday-themed Oreo cookies.

Serving and Presentation Tips

  • Slice the roll into even pieces for a stunning presentation.
  • Serve on a platter with a dusting of powdered sugar or a dollop of whipped cream.
  • Pair with a glass of milk, hot chocolate, or coffee.

Tips for Success

  • Prevent Cracks: Roll the sponge while it’s still warm and pliable.
  • Choose Gel Food Coloring: For vibrant red hues without affecting the texture.
  • Chill Before Serving: Refrigeration helps the roll set and makes slicing easier.

FAQs

1. Can I prepare the cake roll ahead of time?

Yes, the cake roll can be made a day in advance and stored in the refrigerator.

2. What’s the best way to slice the cake roll?

Use a serrated knife and wipe it clean between slices for neat cuts.

3. Can I freeze the cake roll?

Yes, wrap it tightly in plastic wrap and freeze for up to 1 month. Thaw in the refrigerator before serving.

4. How do I prevent the sponge from cracking?

Rolling it while warm and not overbaking are key to avoiding cracks.

5. Are there alternative fillings?

Yes, you can use chocolate ganache, peanut butter filling, or even a fruit compote.


Internal Linking Opportunities

To enhance engagement and connect related content, include these links:


Conclusion

The Red Velvet Oreo Cake Roll is a dessert that’s as delicious as it is beautiful. With its vibrant red sponge and creamy Oreo filling, it’s perfect for celebrations, holidays, or simply treating yourself. Try this recipe and experiment with the variations to create a dessert that’s uniquely yours. For more inspiring recipes, check out ExoRecipes.

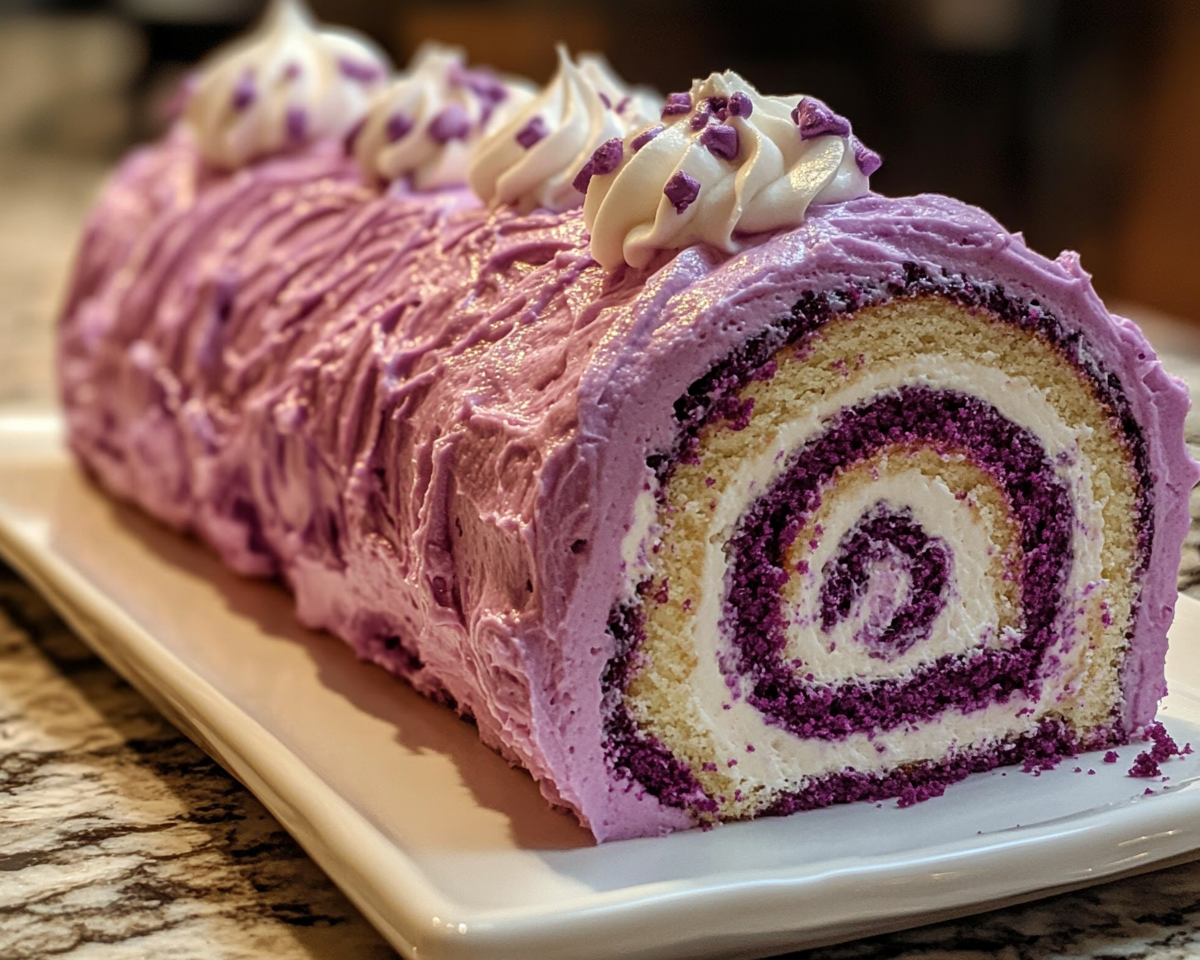
Purple Velvet Cake Roll: A Stunning and Delicious Dessert

Velvet cake roll recipe, Purple cake roll, Cream cheese cake roll, Vibrant dessert ideas, Colorful velvet sponge roll

Purple Velvet Cake Roll: A Stunning Dessert Centerpiece


Introduction

The Purple Velvet Cake Roll is a show-stopping dessert with a rich, velvety sponge and creamy filling. Its vibrant purple hue makes it an eye-catching treat perfect for special occasions, from weddings to birthdays. This cake roll is not just visually appealing but also irresistibly delicious, offering a moist, tender sponge paired with a tangy cream cheese filling.

The concept of velvet cakes stems from classic recipes like red velvet, but this purple rendition brings an exciting twist. To ensure your velvet cakes turn out perfectly every time, consider these Tips for Coloring Velvet Cakes, which guide you in achieving vibrant hues without compromising texture.


Why Purple Velvet?

This dessert isn’t just about its looks. The Purple Velvet Cake Roll combines taste and texture with an easy-to-follow recipe that guarantees consistent results. The use of buttermilk in the batter contributes to its velvety texture. Learn more about the Benefits of Buttermilk in Baking to understand why it’s a staple ingredient in many successful baking recipes.


Ingredients

For the Sponge:

  • ¾ cup all-purpose flour
  • ¼ cup unsweetened cocoa powder
  • 1 teaspoon baking powder
  • ½ teaspoon baking soda
  • 4 large eggs
  • ¾ cup granulated sugar
  • 2 teaspoons vanilla extract
  • Purple gel food coloring
  • ½ cup buttermilk

For the Filling:

  • 8 ounces cream cheese, softened
  • ½ cup powdered sugar
  • 1 teaspoon vanilla extract
  • ½ cup heavy cream

For the Decoration:

  • Powdered sugar for dusting
  • Edible purple glitter or flowers (optional)

Step-by-Step Recipe

1. Preparing the Batter

  • Preheat the oven to 350°F and line a jelly roll pan with parchment paper.
  • Combine dry ingredients (flour, cocoa, baking powder, baking soda) in a bowl.
  • In another bowl, beat eggs and sugar until fluffy. Add vanilla extract and purple food coloring, then fold in dry ingredients alternately with buttermilk.

2. Baking the Sponge

  • Spread the batter evenly in the prepared pan. Bake for 10–12 minutes or until the sponge springs back when touched.

3. Rolling the Sponge

  • Turn the sponge onto a clean kitchen towel dusted with powdered sugar. Roll it up gently while it’s warm to prevent cracking, and allow it to cool completely.

4. Preparing the Filling

  • Beat cream cheese, powdered sugar, and vanilla extract until smooth. Fold in whipped cream for a lighter texture.

5. Assembling the Cake Roll

  • Unroll the sponge, spread the filling evenly, and re-roll tightly. Wrap in cling film and refrigerate for 2–3 hours.

6. Decorating

  • Dust with powdered sugar and add edible decorations as desired. Slice into clean pieces for serving.

Creative Variations

  • Lavender Twist: Add lavender extract for a floral aroma.
  • Galaxy Roll: Swirl darker purple hues into the batter and top with edible glitter for a galaxy effect.
  • Gluten-Free Option: Substitute almond flour for all-purpose flour.
  • Vegan Adaptation: Use almond milk with vinegar as a buttermilk substitute and vegan cream cheese.

Serving Suggestions

  • Serve chilled for a firm texture.
  • Pair with a dollop of whipped cream or fresh berries for a tart contrast.
  • For a festive look, use edible flowers or colorful sprinkles.

Tips for Success

  • Prevent Cracks: Roll the sponge immediately after baking to maintain flexibility.
  • Choose Gel Coloring: Gel-based food coloring creates vibrant hues without thinning the batter.
  • Refrigerate: Chilling helps the flavors meld and makes slicing easier.

FAQs

1. What makes purple velvet different from red velvet?

The key difference lies in the color and the cocoa content. Purple velvet uses less cocoa powder to highlight the vibrant hue.

2. How do I achieve a vibrant purple color?

Use gel-based food coloring for consistent and rich results.

3. Can I prepare this ahead of time?

Yes, refrigerate the roll up to 3 days before serving.

4. What’s the best way to slice the cake?

Use a sharp, serrated knife, cleaning it between slices for neat cuts.

5. Can I freeze the cake roll?

Absolutely. Wrap it tightly in plastic wrap without decoration and freeze for up to 1 month.


Internal Linking Opportunities

Incorporate these internal links to related recipes:


Conclusion

The Purple Velvet Cake Roll isn’t just a dessert; it’s a celebration of creativity and flavor. Its bold color and rich taste make it perfect for impressing guests or treating yourself to something extraordinary. Try this recipe, experiment with flavors, and enjoy a slice of edible art. For more inspiring desserts, explore ExoRecipes for a world of culinary creativity!

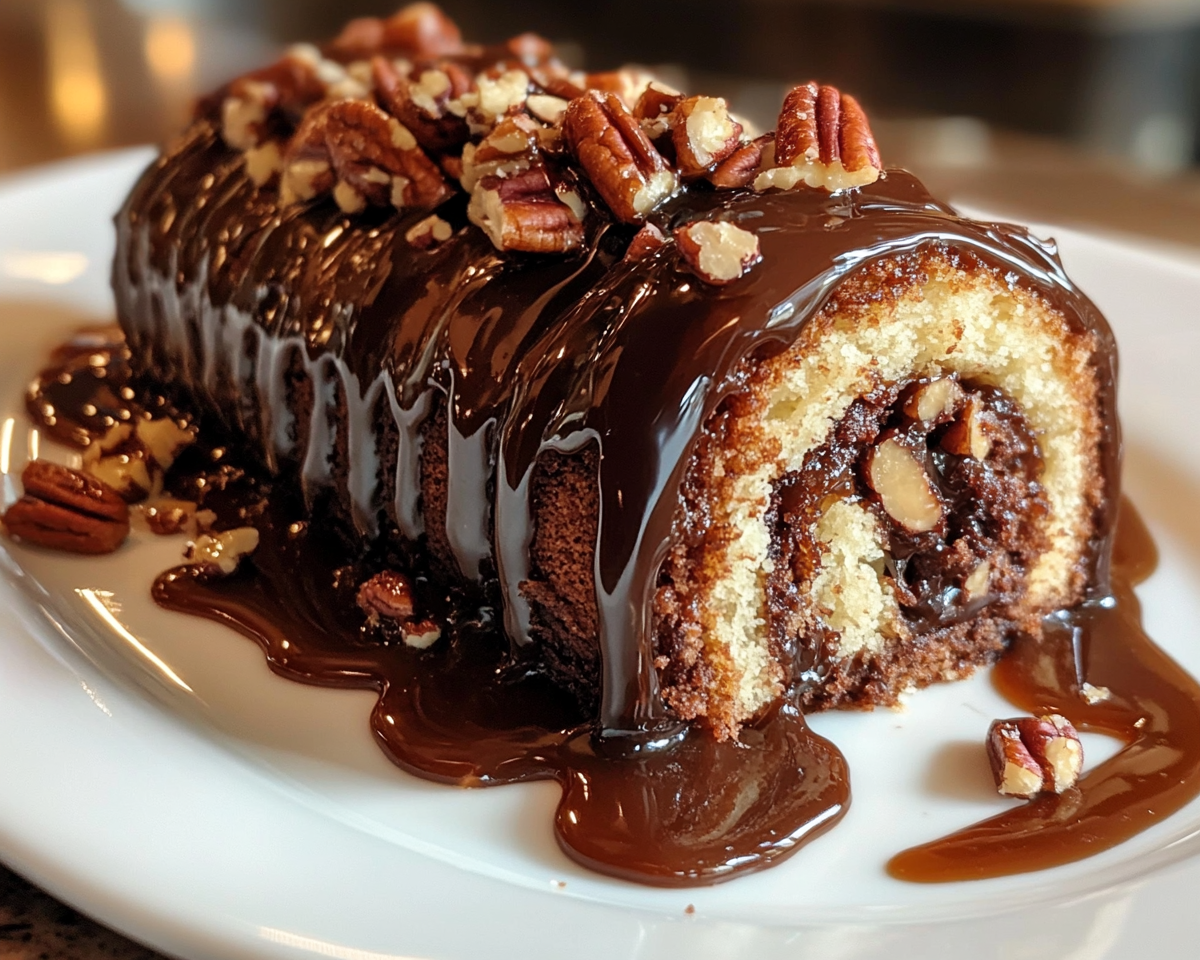
Gooey Chocolate Caramel Pecan Cake Roll: The Ultimate Decadent Dessert

Chocolate caramel pecan roll, Turtle cake roll recipe, Gooey caramel chocolate roll, Decadent chocolate pecan dessert, Caramel-filled chocolate roll

Gooey Chocolate Caramel Pecan Cake Roll: A Decadent Delight


Introduction

Indulgence takes a delicious twist with the Gooey Chocolate Caramel Pecan Cake Roll. Combining the richness of chocolate, the buttery crunch of pecans, and the luscious sweetness of caramel, this dessert is the ultimate treat for any occasion. Whether you’re a seasoned baker or a novice, this recipe is approachable, rewarding, and guaranteed to impress.

For a foolproof chocolate ganache to top your cake, explore Perfect Chocolate Ganache, ensuring a glossy and smooth finish every time.


Why This Cake Roll is Special

The Gooey Chocolate Caramel Pecan Cake Roll is more than just a dessert; it’s an experience. Each bite encapsulates a harmonious blend of flavors and textures that cater to diverse palates. The rich chocolate sponge serves as the perfect base for the gooey caramel filling and crunchy pecan topping, making it a centerpiece-worthy dessert.

If you’re curious about the nutritional benefits of incorporating pecans into your desserts, check out Health Benefits of Pecans.


Ingredients Overview

For the Chocolate Sponge:

  • ¾ cup all-purpose flour
  • ¼ cup unsweetened cocoa powder
  • 1 teaspoon baking powder
  • ½ teaspoon baking soda
  • 4 large eggs
  • ¾ cup granulated sugar
  • 2 teaspoons vanilla extract

For the Filling:

  • ½ cup caramel sauce
  • 1 cup finely chopped pecans
  • ½ cup heavy cream (optional for a creamier filling)

For the Topping:

  • 1 cup dark chocolate ganache (see link above for the recipe)
  • ½ cup caramel drizzle
  • Whole pecans for garnish

Step-by-Step Recipe

1. Preparing the Chocolate Sponge

  • Preheat the oven: Set your oven to 350°F (175°C) and line a 15×10-inch jelly roll pan with parchment paper.
  • Mix dry ingredients: In a bowl, whisk together flour, cocoa powder, baking powder, and baking soda.
  • Beat eggs and sugar: In a separate bowl, beat eggs and sugar until light and fluffy. Add vanilla extract and gradually fold in the dry ingredients.
  • Spread and bake: Pour the batter into the prepared pan, spread evenly, and bake for 10-12 minutes.

2. Rolling the Sponge

  • Turn the baked sponge onto a clean towel dusted with cocoa powder.
  • Roll it gently while it’s still warm to prevent cracks. Let it cool completely in the rolled shape.

3. Making the Filling

  • Combine caramel sauce with chopped pecans. For a creamier texture, fold in whipped heavy cream.

4. Assembling the Cake Roll

  • Unroll the cooled sponge and spread the filling evenly across its surface.
  • Carefully re-roll the sponge, wrap it tightly in cling film, and refrigerate for at least 2 hours.

5. Decorating

  • Pour chocolate ganache over the chilled roll, letting it drip for a dramatic effect.
  • Drizzle caramel sauce and top with whole pecans for an elegant finish.

Creative Variations

Salted Caramel Option

  • Add a sprinkle of sea salt to the caramel sauce for a sophisticated sweet-and-salty flavor.

Nut-Free Version

  • Replace pecans with toffee bits or omit nuts entirely for a nut-free dessert.

Vegan Twist

  • Use flaxseed meal as an egg substitute, plant-based caramel, and dairy-free ganache.

Festive Flair

  • Add crushed peppermint candy to the topping for a holiday-themed roll.

Tips for Success

  • Prevent Cracks: Roll the sponge while warm and handle it gently.
  • Choose Quality Ingredients: High-quality cocoa and chocolate make a noticeable difference.
  • Refrigerate Before Serving: Chilling allows the flavors to meld and the roll to set firmly.

FAQs

1. How do I prevent the sponge from cracking?

Roll the sponge immediately after baking while it’s still warm and pliable.

2. Can I freeze the cake roll?

Yes, wrap it tightly without the ganache topping and freeze for up to one month.

3. How long does it stay fresh?

Store in the refrigerator for up to 3 days. Allow it to come to room temperature before serving.

4. Can I make this without a jelly roll pan?

A standard baking sheet can work, but adjust the thickness and monitor the baking time.

5. What’s the best way to slice the cake?

Use a serrated knife and clean it with a warm, damp cloth between cuts for neat slices.


Internal Linking Opportunities

To enhance user engagement and SEO, link to related recipes on ExoRecipes:


Conclusion

The Gooey Chocolate Caramel Pecan Cake Roll is a dessert that delivers both in taste and presentation. From its moist chocolate sponge to its luxurious caramel filling and nutty topping, it’s a recipe worth mastering. Share this delightful treat at your next gathering and watch it disappear in moments!

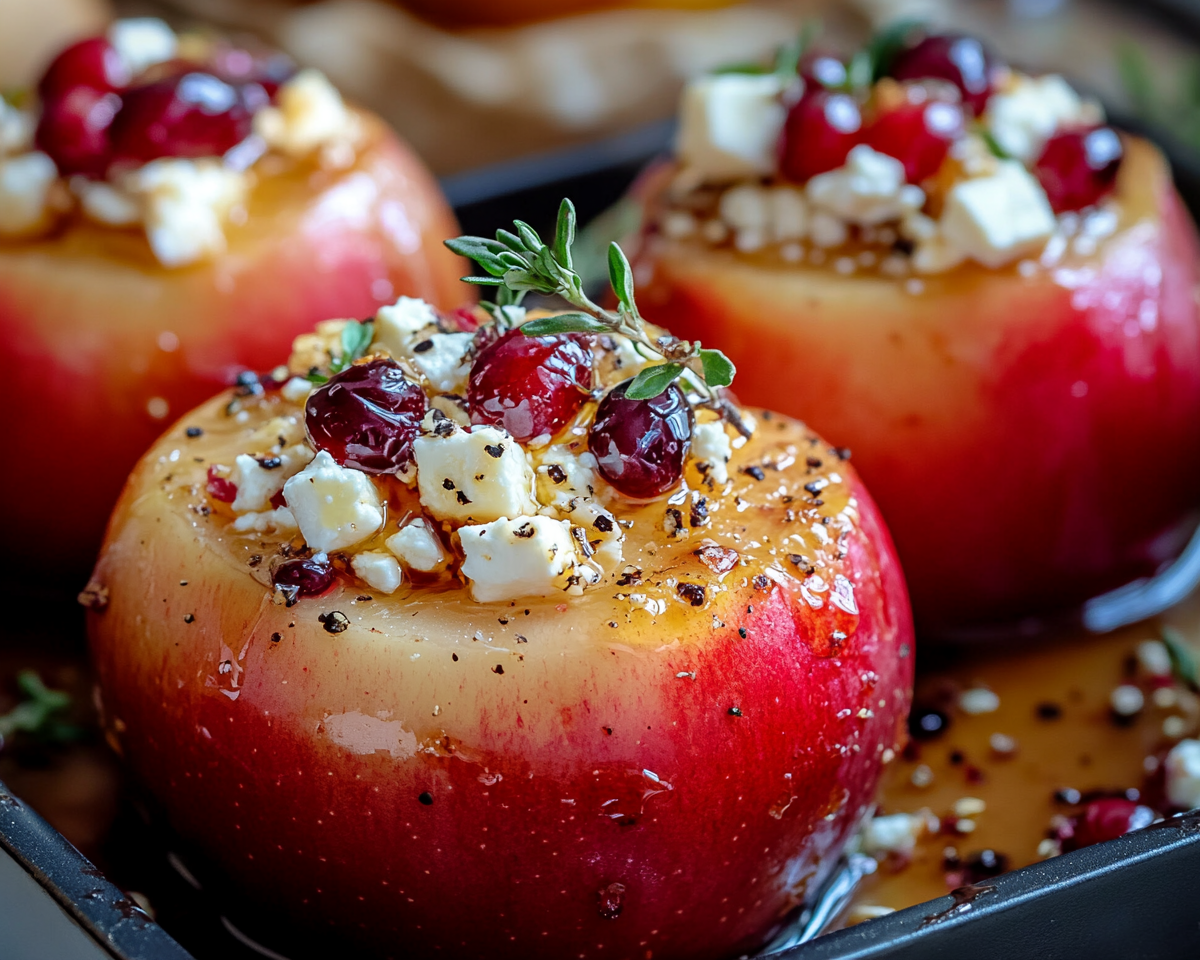
Baked Apples with Feta, Honey, and Cranberries: A Sweet and Savory Delight

Honey baked apples, Apples with feta and cranberries, Cranberry baked apples, Feta honey apple recipe, Sweet and savory baked apples

Baked Apples with Feta, Honey, and Cranberries: A Sweet and Savory Delight

Introduction

When it comes to versatile dishes, few can rival the appeal of baked apples. The natural sweetness of apples, combined with the salty tang of feta cheese, the rich sweetness of honey, and the tartness of cranberries, creates a harmonious blend of flavors. Whether served as an appetizer, side dish, or dessert, this recipe will leave a lasting impression.

The combination of these ingredients is not only delicious but also nutritious. Incorporating ingredients like apples and honey into your meals can provide various health benefits. For more on the benefits of honey, check out Benefits of Honey in Cooking.


Why Baked Apples with Feta, Honey, and Cranberries Stand Out

This dish stands out because of its perfect balance of sweet and savory flavors. It’s a healthier alternative to traditional desserts and can even double as a savory treat for brunch or dinner parties. Using the right type of apples is crucial to achieving the ideal texture and flavor. For tips, see Best Apples for Baking.


Ingredients You’ll Need

Core Ingredients:

  • Apples: Choose firm varieties like Granny Smith or Honeycrisp for baking.
  • Feta Cheese: Provides a salty contrast to the sweetness.
  • Honey: Acts as a natural sweetener.
  • Cranberries: Use dried cranberries for a tart and chewy element.

Optional Additions:

  • Nuts: Walnuts or pecans for added crunch.
  • Cinnamon: Enhances the flavor profile.
  • Granola: For a dessert-like texture.

Step-by-Step Recipe

Preparation Time: 20 minutes

Cooking Time: 30 minutes

1. Prepping the Apples

  • Wash and core the apples. Leave the bottom intact to hold the filling.
  • Create a shallow cavity to stuff the filling.

2. Making the Filling

  • Mix feta cheese, honey, and dried cranberries in a bowl.
  • Add a dash of cinnamon for extra flavor.

3. Assembling the Dish

  • Stuff the apples with the filling.
  • Place the apples in a baking dish and drizzle with honey.

4. Baking the Apples

  • Preheat the oven to 375°F (190°C).
  • Bake for 25–30 minutes, until the apples are tender.

5. Garnishing and Serving

  • Top with nuts or granola if desired.
  • Serve warm with a drizzle of honey or a scoop of vanilla ice cream.

Creative Variations

1. Vegan Option

  • Replace feta cheese with a vegan alternative.
  • Use agave syrup instead of honey.

2. Dessert Twist

  • Add caramel sauce for a richer flavor.
  • Serve with whipped cream or custard.

3. Savory Alternative

  • Incorporate herbs like rosemary or thyme into the filling.
  • Serve alongside roasted chicken or pork.

Tips for Perfect Baked Apples

  • Choose the Right Apples: Firm apples hold their shape better.
  • Avoid Overbaking: Check frequently to prevent the apples from turning mushy.
  • Balance the Sweetness: Adjust the honey based on your sweetness preference.

Nutritional Highlights

This dish is packed with nutrients:

  • Apples are high in fiber and antioxidants.
  • Honey is a natural sweetener with potential health benefits.
  • Feta cheese adds protein and calcium.

For a lighter version, reduce the amount of cheese and honey, or skip the nuts.


Frequently Asked Questions (FAQs)

1. What are the best apples for this recipe?

Firm apples like Granny Smith, Fuji, or Honeycrisp work best as they hold their shape during baking.

2. Can I prepare this dish ahead of time?

Yes, you can assemble the apples and refrigerate them for up to 24 hours. Bake just before serving.

3. Are there alternatives to cranberries?

Raisins, chopped dates, or dried cherries can be excellent substitutes.

4. Can I freeze baked apples?

It’s not recommended, as freezing can alter the texture of the apples.

5. How can I make this recipe nut-free?

Simply omit the nuts and consider adding granola for texture.


Internal Linking Opportunities

To optimize the article’s SEO and provide additional value, consider linking to these related recipes:

These links enhance the reader’s journey and keep them engaged with related content.


Conclusion

Baked apples with feta, honey, and cranberries offer a delightful blend of flavors and textures. Whether you’re preparing it as a comforting dessert or an elegant appetizer, this recipe will impress your family and guests alike. For more inspiration on pairing fruits and cheeses, visit Pairing Cheese with Fruits.