“`html
Table of Contents
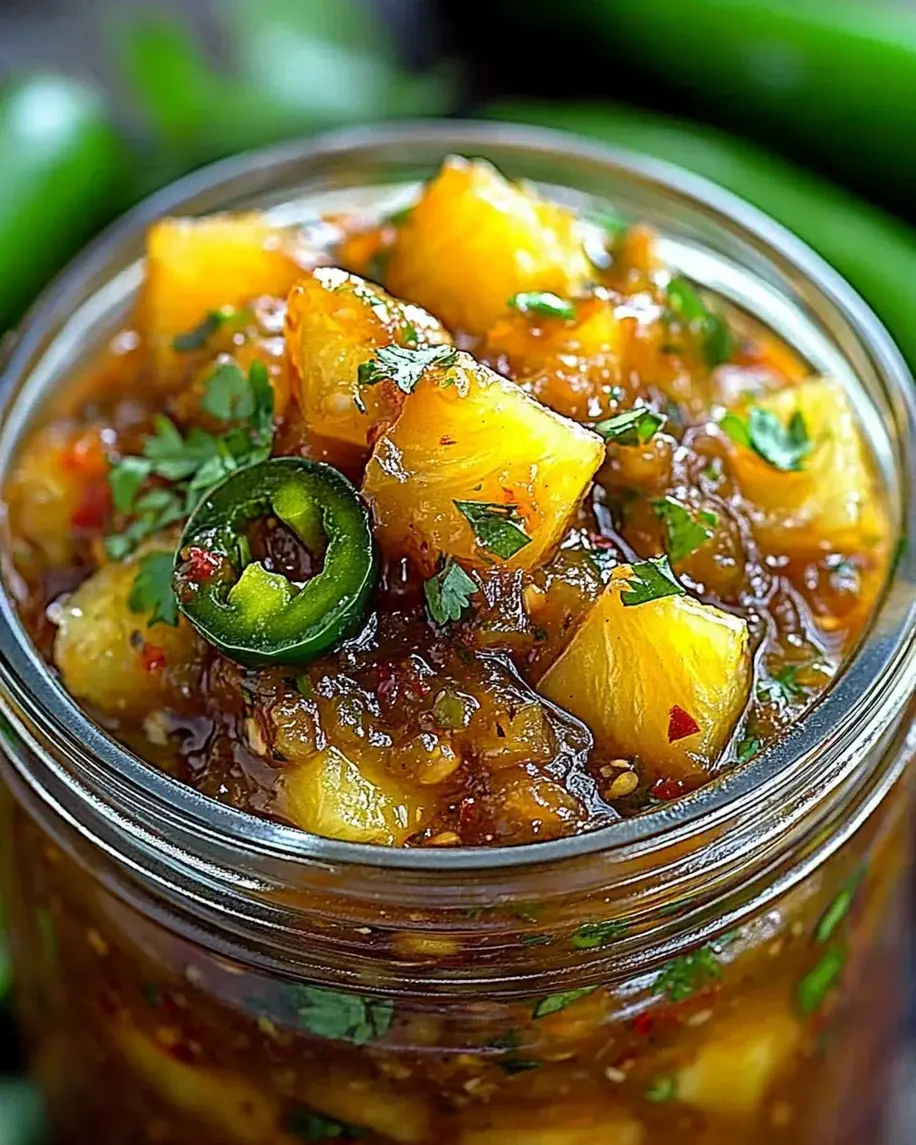
Spicy Pineapple Jalapeño Chutney: A Sweet & Spicy Must-Try!
Did you know that consumers are actively searching for recipes that offer a thrilling combination of sweet and spicy flavors, with monthly searches for “spicy recipes” and “sweet and savory” skyrocketing? If you’re among the 70% of home cooks looking to elevate their dishes with a bold kick, then get ready to fall in love with this Spicy Pineapple Jalapeño Chutney! It’s the perfect balance of tropical sweetness, tangy citrus, and a fiery jalapeño punch that will transform your meals from ordinary to extraordinary. Whether you’re looking to add a bold kick to grilled meats, enhance your cheese board, or spice up your tacos, this chutney is your new kitchen staple!
Ingredients You’ll Need
To create this flavor explosion, gather these vibrant ingredients:
- Fresh Pineapple: About 2 cups, finely diced. Look for a ripe pineapple that’s fragrant and slightly soft to the touch – this ensures maximum sweetness and juiciness. You can use canned pineapple in a pinch, but drain it very well.
- Jalapeños: 2-3 medium, finely minced. This is where the heat comes from! Adjust the quantity based on your spice preference. For a milder chutney, remove the seeds and membranes; for a spicier kick, leave some in. The vibrant green color adds visual appeal.
- Red Onion: 1 medium, finely chopped. Red onions offer a slightly sharper, sweeter flavor than yellow onions and contribute a beautiful color.
- Fresh Ginger: 1 tablespoon, grated or finely minced. Adds a warm, zesty, and pungent kick that complements the fruit and spice beautifully.
- Garlic: 2 cloves, minced. The savory base that rounds out the flavor profile.
- Apple Cider Vinegar: ½ cup. Provides the essential tangy component that balances the sweetness and helps preserve the chutney. Its crisp, fruity notes are perfect here.
- Brown Sugar: ½ cup, packed. Adds a caramelly sweetness that melts and thickens the chutney. You can substitute with coconut sugar or maple syrup for a slightly different flavor profile.
- Lime Juice: 2 tablespoons, fresh. Brightens all the flavors and adds an extra layer of citrusy tang.
- Cilantro: ¼ cup, chopped (optional, for garnish or to stir in at the end). Adds a fresh, herbaceous note that pairs wonderfully with pineapple and spice.
- Salt: ½ teaspoon, or to taste. Enhances all the flavors.
- Optional Spices: A pinch of red pepper flakes for extra heat, or a teaspoon of ground cumin for an earthy depth.
Timing is Everything
This recipe comes together quite quickly, making it an ideal weekend project or a weeknight flavor booster. Compared to simpler sauces, the simmer time allows the flavors to meld beautifully, while more complex preserves might take hours. This is a perfect middle-ground for intense flavor development without a long commitment.
How to Make Spicy Pineapple Jalapeño Chutney
Step 1: Prep the Fruit
Start by preparing your fresh pineapple. If using a whole pineapple, carefully peel, core, and dice it into small, bite-sized pieces. Aim for uniform cubes so they cook evenly. Mince your jalapeños (remember to deseed if you prefer less heat!), finely chop the red onion, mince the garlic, and grate the fresh ginger. Having all your ingredients prepped and ready to go (this is called ‘mise en place’) makes the cooking process smooth and enjoyable.
Step 2: Sauté the Aromatics
In a medium saucepan or pot, heat a tablespoon of neutral oil (like vegetable or canola) over medium heat. Add the chopped red onion and sauté for about 3-5 minutes until it begins to soften and become translucent. Then, add the minced garlic and grated ginger. Stir and cook for another minute until fragrant – be careful not to burn the garlic!
Step 3: Simmer to Perfection
To the softened aromatics, add the diced pineapple, minced jalapeños, apple cider vinegar, packed brown sugar, fresh lime juice, and salt. Stir everything together to combine. Bring the mixture to a gentle simmer over medium-low heat. Once simmering, reduce the heat to low, cover partially, and let it cook for 25-30 minutes. Stir occasionally to prevent sticking. The chutney is ready when the pineapple is tender, the onions are soft, and the mixture has thickened to your desired consistency. It should coat the back of a spoon.
Pro Tip: If you want a smoother chutney, you can mash some of the pineapple pieces against the side of the pot with your spoon during the simmering process. If it gets too thick, add a tablespoon of water or vinegar at a time.
Step 4: Cool and Store
Once the chutney has reached the desired consistency, remove it from the heat. If using fresh cilantro, stir it in now. Allow the chutney to cool completely. As it cools, it will thicken further. Once cooled, transfer the chutney to a clean, airtight jar or container.
Nutritional Information
Please note that nutritional information is an estimate and can vary based on ingredient brands and exact quantities used.
- Calories: Approximately 70-100 per 2-tablespoon serving
- Carbohydrates: 15-20g
- Sugar: 12-17g
- Fiber: 1-2g
- Fat: <1g
- Sodium: 100-150mg
Healthier Alternatives
This recipe is already quite wholesome, but you can make it even healthier:
- Reduce Sugar: Slightly decrease the amount of brown sugar, or use a natural sweetener like stevia or monk fruit for a sugar-free version.
- Less Vinegar: While vinegar is crucial for preservation, you can opt for a milder vinegar like white wine vinegar if apple cider vinegar is too strong for your palate.
- More Fiber: Add finely chopped bell peppers (any color) along with the pineapple for extra vitamins and fiber.
- Spice Control: If jalapeños are too intense, use milder green chilies or half a jalapeño with the seeds removed.
Serving Suggestions
The versatility of this chutney is astounding! Here are a few ideas:
- Grilled Meats: Dollop it onto grilled chicken, pork, or fish for a burst of flavor.
- Cheese Boards: A fantastic accompaniment to cheddar, brie, goat cheese, and other cheeses.
- Sandwiches & Wraps: Adds a gourmet kick to turkey sandwiches, pulled pork sliders, or even a veggie wrap.
- Tacos & Burritos: Spoon it over your favorite Mexican-inspired dishes.
- Dips & Spreads: Blend a small amount into cream cheese or Greek yogurt for a spicy dip.
Common Mistakes to Avoid
- Using Unripe Pineapple: This will result in a tart, less flavorful chutney.
- Overcooking: Don’t cook it for too long, or it might become too jam-like and lose its fresh flavor.
- Not Tasting and Adjusting: Always taste and adjust seasonings (salt, sugar, spice) before cooling and storing.
- Not Dicing Ingredients Uniformly: This can lead to uneven cooking.
Storing Your Chutney
Proper storage ensures your delicious chutney lasts. Once cooled, store the chutney in an airtight container in the refrigerator. It should stay fresh for up to 2-3 weeks. Ensure you use clean utensils when serving to prevent introducing bacteria.
Your New Culinary Companion
This Spicy Pineapple Jalapeño Chutney is more than just a condiment; it’s a flavor enhancer that can elevate any dish. Its vibrant sweet and spicy profile, coupled with its ease of preparation, makes it an indispensable addition to your kitchen repertoire. Don’t wait – gather your ingredients and whip up a batch of this delightful chutney today. Your taste buds will thank you!
Share Your Creation!
Tried this recipe? We’d love to see your creations! Share your experience in the comments below or tag us on social media with #SpicyPineappleChutney. Your feedback fuels our culinary adventures!
Frequently Asked Questions
What if I don’t like spicy food?
If you’re sensitive to heat, you can significantly reduce or omit the jalapeños. You can also use less spicy chili peppers like Anaheim or bell peppers for color and flavor without the heat, or simply remove all seeds and membranes from the jalapeños.
Can I use frozen pineapple?
Yes, frozen pineapple can work. Thaw it completely and drain off as much liquid as possible before using it. The texture might be slightly softer than fresh pineapple.
How long does this chutney last?
When stored correctly in an airtight container in the refrigerator, this chutney should last for about 2 to 3 weeks.
Can I make this chutney in advance?
Absolutely! Chutneys often taste even better after a day or two, as the flavors have more time to meld. It’s a great candidate for making ahead of time.
What is the best way to store it?
Store in a clean, airtight glass jar or food-safe container in the refrigerator. Make sure the chutney is completely cooled before sealing the container.

Spicy Pineapple Jalapeño Chutney: A Sweet & Spicy Must-Try!
Description
Sweet, tangy, and fiery in all the right ways, thisSpicy Pineapple Jalapeño Chutneyis the perfect balance of flavors. Whether you’re looking to add a bold kick to grilled meats, enhance your cheese board, or spice up your tacos, this chutney is your new kitchen staple!
Ingredients
- 1medium fresh pineapple, peeled, cored, and diced
- 2–3fresh jalapeños, seeded and minced (adjust for heat preference)
- 1small red onion, finely chopped
- 1/4 cupapple cider vinegar
- 1/4 cupbrown sugar
- 1 teaspoonground ginger
- 1 teaspoonground cumin
- 1/2 teaspoonsalt
- 1/4 teaspoonblack pepper
- Optional:1 tablespoon lime juice (for extra tanginess)
Instructions
- Prep Your Ingredients:Dice the pineapple, mince the jalapeños (remove seeds for less heat), and finely chop the red onion.
- Cook the Chutney:In a medium saucepan over medium heat, combine all ingredients.
- Simmer to Perfection:Stir occasionally and let the mixture cook for 15-20 minutes until the pineapple softens and the chutney thickens.
- Taste & Adjust:Add lime juice for extra brightness, if desired.
- Cool & Store:Let the chutney cool slightly, then transfer to an airtight container. Refrigerate until ready to use.
Notes
Heat Level:Adjust jalapeño quantity based on your spice tolerance.
Consistency:If you prefer a smoother chutney, blend it lightly after cooking.
Serving Ideas:Try it with grilled meats, tacos, or even as a burger topping!
Nutrition
- Calories: ~45
- Sugar: 9g
- Fat: 0g
- Carbohydrates: 12g
- Protein: 0.5g
“`