“`html
Table of Contents
- Irresistible Cheesy Bacon Ranch Potatoes!
- Why You’ll Love These Potatoes
- Ingredients You’ll Need
- Perfect Timing for Perfect Potatoes
- Step-by-Step Cooking Magic
- Nutritional Snapshot
- Lighter, Yet Luscious Options
- Serving Suggestions to Wow Your Guests
- Don’t Make These Potato Pitfalls!
- Keep Them Delicious: Storing Your Potatoes
- Your New Favorite Side Dish Awaits!
- Frequently Asked Questions
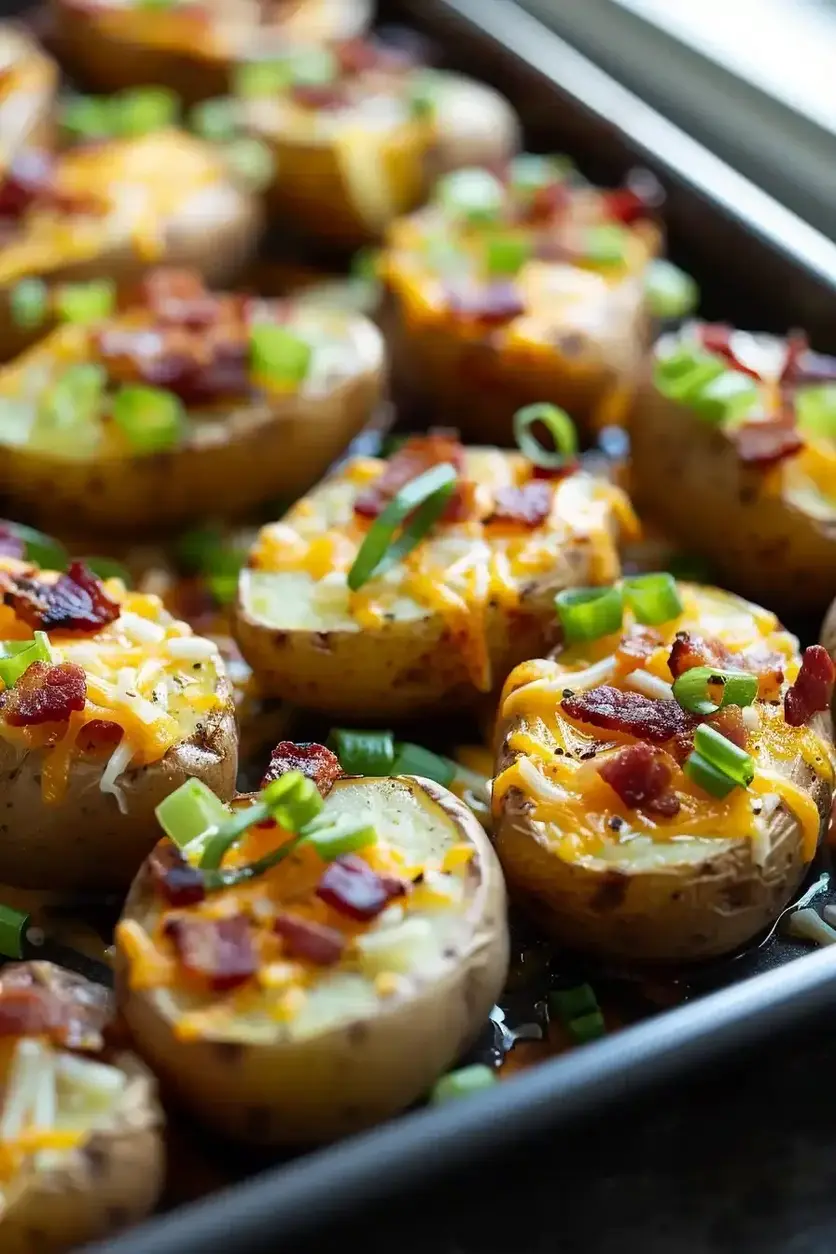
Irresistible Cheesy Bacon Ranch Potatoes Recipe!
Why You’ll Love These Potatoes
Are you constantly on the hunt for that perfect side dish that can steal the show? Do searches for “easy potato recipes” or “comfort food sides” fill your browser history? If you’re nodding along, then get ready to meet your new culinary obsession: Irresistible Cheesy Bacon Ranch Potatoes! This dish is a symphony of flavors and textures – creamy potatoes, crispy bacon, tangy ranch, and gooey cheese, all baked to golden perfection. It’s the ultimate crowd-pleaser, transforming a humble spud into an unforgettable experience that’s perfect for potlucks, BBQs, holiday dinners, or just a Tuesday night when you need a pick-me-up. Forget boring baked potatoes; this is an upgrade your taste buds will thank you for!
Ingredients You’ll Need
Gathering your ingredients is the first step to potato paradise. We aim for a balance of savory, creamy, and crunchy notes. Here’s what you’ll need:
- Potatoes: 2 lbs Yukon Gold or Russet potatoes, scrubbed and cubed into 1-inch pieces. Yukon Golds offer a buttery, creamy texture, while Russets provide a fluffier interior, both absorbing creaminess wonderfully.
- Bacon: 8 slices thick-cut bacon, cooked until crispy and crumbled. The smoky, salty crunch is non-negotiable!
- Ranch Seasoning: 2 tablespoons dry ranch seasoning mix. This is the flavor powerhouse, bringing herbs and tang. (See substitutions below!)
- Sour Cream: 1 cup full-fat sour cream. For that essential creamy, tangy base that coats every potato.
- Shredded Cheese: 1.5 cups shredded cheddar cheese, Monterey Jack, or a mix. Choose a good melting cheese for maximum gooeyness.
- Butter: 1/4 cup unsalted butter, melted. Adds richness and helps achieve that perfect golden finish.
- Milk: 1/4 cup milk (whole or 2%). To achieve the perfect creamy consistency without being too thick.
- Garlic Powder: 1/2 teaspoon garlic powder. A subtle aromatic boost.
- Salt and Black Pepper: To taste. Always season to enhance the natural flavors.
- Fresh Chives or Parsley: For garnish. Adds a pop of color and a hint of freshness.
Ranch Seasoning Substitutions: If you don’t have a dry mix, whip up your own! Combine 1 tablespoon dried parsley, 1 teaspoon dried dill, 1 teaspoon garlic powder, 1 teaspoon onion powder, 1/2 teaspoon salt, and 1/2 teaspoon black pepper. You might need to adjust the amount to taste.
Perfect Timing for Perfect Potatoes
This recipe is wonderfully efficient for a dish packed with so much flavor and texture. While the average potato bake might take an hour or more from start to finish with complex steps, these Cheesy Bacon Ranch Potatoes come together in just over an hour, with a significant portion being hands-off baking time. This makes it an ideal candidate for busy weeknights or when you’re entertaining and want to spend more time with your guests.

Step-by-Step Cooking Magic
Step 1: Preheat and Prep Potatoes
First things first, preheat your oven to 400°F (200°C). This ensures a hot environment for perfectly cooked potatoes. While the oven heats up, give your scrubbed potatoes a good wash. Then, cut them into uniform 1-inch cubes. Uniformity is key here for even cooking – no one likes a mix of mushy and hard potato bits!
Step 2: Par-Boil or Roast (Your Choice!)
For extra tender potatoes, you can par-boil them. Place the cubed potatoes in a pot, cover with cold water, add a pinch of salt, and bring to a boil. Cook for about 5-7 minutes until slightly tender. Drain them well. Alternatively, you can toss the raw potato cubes directly with a tablespoon of oil, salt, and pepper, and roast them for 15-20 minutes until they just start to soften. This method yields a crispier exterior from the start. Today, let’s go with the par-boil method for maximum creamy interior.
Step 3: Mix the Ranch Base
In a large bowl, whisk together the sour cream, melted butter, milk, dry ranch seasoning, garlic powder, salt, and pepper. Whisk until smooth and creamy. This is where all that delicious ranch flavor comes to life! Taste and adjust seasoning if needed. It should be richly flavored and slightly tangy.
Step 4: Combine and Coat
Add the drained par-boiled potatoes (or the par-roasted ones) to the bowl with the ranch mixture. Gently fold everything together, ensuring each potato cube is thoroughly coated in the creamy, herby sauce. Don’t be shy; get in there and make sure every piece is lovingly embraced by the ranch goodness.
Step 5: Layer and Bake
Pour the coated potatoes into a 9×13 inch baking dish. Spread them out evenly. Sprinkle about half of the shredded cheese over the top. Cover the dish tightly with aluminum foil. Place it in the preheated oven and bake for 20-25 minutes, or until the potatoes are fork-tender and the sauce is bubbling.
Step 6: Add Bacon and More Cheese
Remove the foil from the baking dish. Sprinkle the remaining shredded cheese and the crumbled crispy bacon evenly over the top of the potatoes. Return the dish to the oven, uncovered, and bake for another 10-15 minutes, or until the cheese is melted and bubbly and begins to get golden brown. Keep an eye on it to prevent the cheese from burning.
Step 7: Garnish and Serve
Once out of the oven, let the potatoes rest for a few minutes. Garnish generously with fresh chopped chives or parsley. This adds a beautiful contrast of color and a fresh, delicate oniony flavor that cuts through the richness. Serve hot and watch them disappear!
Nutritional Snapshot
While specific nutritional values can vary based on exact ingredients and portion sizes, here’s a general idea of what you can expect per serving (assuming 6 servings):
- Calories: Approximately 450-550 kcal
- Protein: 15-20g
- Fat: 30-40g (mostly from cheese and bacon)
- Carbohydrates: 30-40g
- Fiber: 3-5g
Note: This is an estimate. For precise information, use a nutritional calculator with your specific ingredients.
Lighter, Yet Luscious Options
Love the flavors but looking for a lighter take? You can absolutely lighten up this recipe without sacrificing too much of that deliciousness:
- Lighter Base: Swap full-fat sour cream for plain Greek yogurt (0% or 2%). It adds a protein boost and similar tang. You might need to add a splash more milk to reach the desired consistency.
- Reduced Fat Cheese: Use part-skim mozzarella or cheddar.
- Turkey Bacon: Opt for turkey bacon for a leaner, lower-fat protein. The flavor is slightly different but still delicious.
- More Veggies: Toss in some broccoli florets or chopped bell peppers with the potatoes during the last 15-20 minutes of baking.
- Portion Control: Simply enjoy a smaller serving!
Serving Suggestions to Wow Your Guests
These potatoes are incredibly versatile. They’re a natural fit as a side dish for:
- Grilled steaks, burgers, or chicken breasts.
- Pulled pork or BBQ ribs.
- Roast chicken or turkey.
- A hearty salad for a complete meal.
- Even as a decadent appetizer on their own!
Don’t Make These Potato Pitfalls!
Avoid common errors to ensure potato perfection:
- Uneven Cubing: As mentioned, consistent 1-inch cubes are crucial for even cooking.
- Overcrowding the Pan: If you par-boil, make sure to drain potatoes thoroughly to avoid a watery sauce. If roasting, give them space.
- Skipping the Foil: Covering during the initial bake helps the potatoes steam and become tender within their creamy sauce.
- Not Seasoning Enough: Potatoes need salt and pepper to bring out their best flavor.
Keep Them Delicious: Storing Your Potatoes
Store any leftover Cheesy Bacon Ranch Potatoes in an airtight container in the refrigerator for up to 3-4 days. Reheat gently in the oven or a covered skillet over low heat to maintain their texture. Microwaving can make them a bit mushy. While best enjoyed fresh, they still make a tasty meal the next day!
Your New Favorite Side Dish Awaits!
There you have it – a recipe that’s guaranteed to be a hit! These Irresistible Cheesy Bacon Ranch Potatoes are more than just a side dish; they’re a comforting, flavorful experience that brings smiles to the table. The combination of creamy, cheesy, savory, and smoky is truly addictive. Give this recipe a try this week and prepare for all the compliments!
Give these potatoes a try and let us know what you think in the comments below! Don’t forget to share your creations on social media using #CheesyBaconRanchPotatoes!
Frequently Asked Questions
What kind of potatoes are best for this recipe?
Yukon Gold or Russet potatoes are ideal. Yukon Golds are creamy and buttery, while Russets are fluffier. Both absorb sauces beautifully.
Can I make this ahead of time?
You can prep the ingredients ahead of time. Cook the bacon and chop the potatoes. You can also mix the ranch sauce. However, it’s best to assemble and bake the dish closer to serving time for optimal texture and flavor.
How do I reheat leftovers?
For best results, reheat in the oven at around 350°F (175°C) until heated through. You can also gently reheat them on the stovetop in a covered skillet.
Can I add other vegetables?
Absolutely! Broccoli florets, cauliflower, or chopped bell peppers can be added during the last 15-20 minutes of baking when the cheese is added.
My sauce seems too thick/thin. What should I do?
If it’s too thick, add another tablespoon or two of milk. If it’s too thin, a little more cheese added during the baking stage can help thicken it up as it melts.

Cheesy Bacon Ranch Potatoes
Description
Dive into a dish that’s a true celebration of flavors with my Cheesy Bacon Ranch Potatoes! This recipe brings together the irresistible combination of creamy cheese, savory bacon, and bold ranch dressing, all perfectly paired with tender, crispy-edged potatoes. Whether you’re looking to impress at a family gathering or just spice up your weekday meals, these potatoes promise to deliver satisfaction in every bite. Ready to be the star of your kitchen? Let’s make some potato magic happen!
Ingredients
- 2pounds baby potatoes, halved
- 1 tablespoonolive oil
- 1packet ranch dressing mix
- 1 cupshredded cheddar cheese
- 1/2 cupcooked bacon, chopped
- 1/4 cupgreen onions, sliced
- Optional: sour cream for topping
Instructions
- Preheat yourovento 400°F (200°C) and get ready to transform simple ingredients into something spectacular.
- In a large bowl, toss the halved baby potatoes with olive oil and ranch dressing mix until they are evenly coated. Season with a little salt and pepper to taste.
- Spread the potatoes out on a baking sheet in a single layer to ensure they cook evenly.
- Bake in the preheatedovenfor 25-30 minutes, or until the potatoes are golden brown and tender.
- Remove from theovenand sprinkle the shredded cheddar cheese and chopped bacon over the hot potatoes. Return to theovenfor an additional 5-7 minutes, or just until the cheese is melted and bubbly.
- Garnish with sliced green onions and serve immediately, with a side of sour cream if using.
Notes
For an extra crispy finish, broil the potatoes for the last 2-3 minutes.
Feel free to swap out cheddar for any other melting cheese you prefer, like mozzarella or pepper jack.
Nutrition
- Calories: 300
- Sugar: 2g
- Fat: 18g
- Carbohydrates: 28g
- Protein: 8g
“`