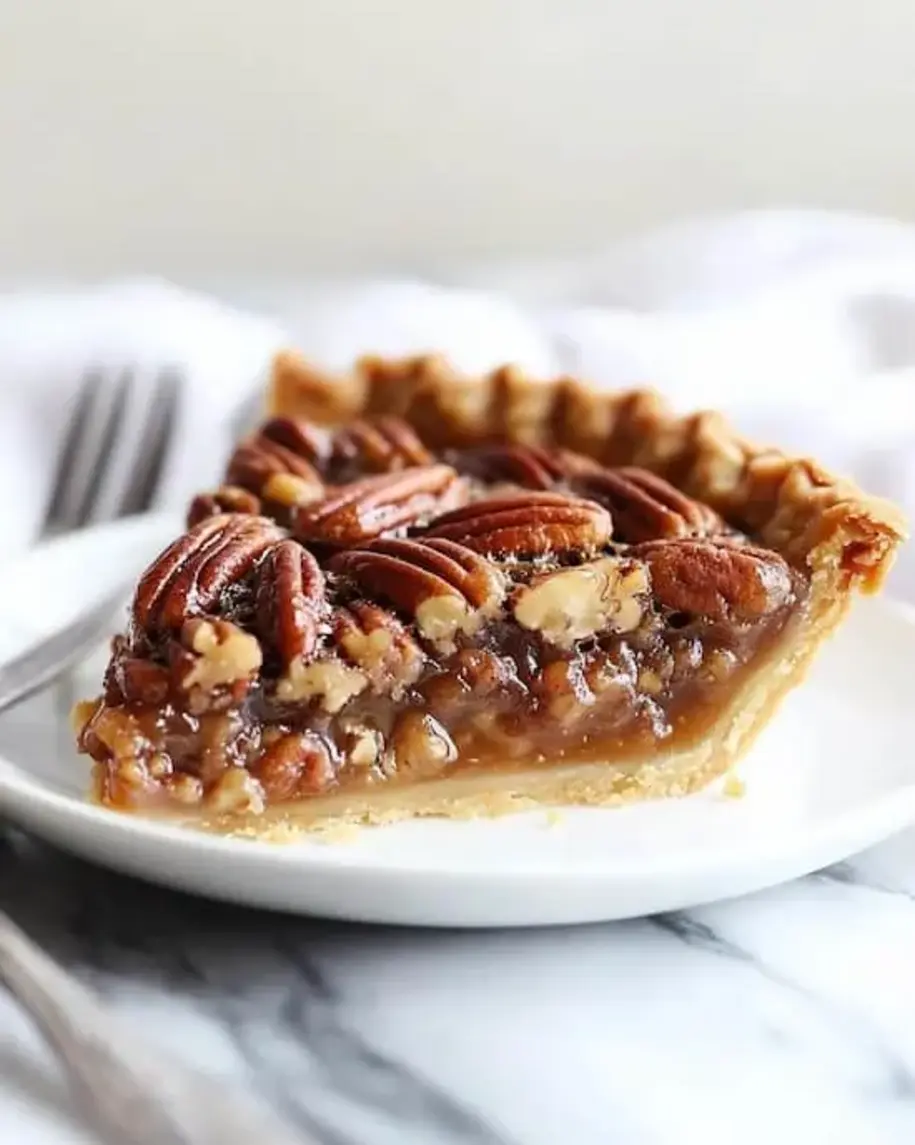
Broccoli, Rice, Cheese, and Chicken Casserole

“`html

Broccoli, Rice, Cheese, and Chicken Casserole

Welcome to Comfort Food Heaven!

Are you looking for a weeknight dinner that’s both incredibly satisfying and surprisingly easy to make? In a world where dinner often feels like a race against time, the average family spends up to 30 minutes preparing a meal. But what if you could whip up a dish that feels like a culinary hug, packed with everything you love, in less time than you think? This Broccoli, Rice, Cheese, and Chicken Casserole is that dish. It’s a symphony of tender chicken, fluffy rice, vibrant broccoli, and gooey cheddar cheese, all baked into a creamy, dreamy casserole that’s truly the ultimate comfort food. It’s hearty, flavorful, and destined to become a staple in your recipe rotation.

The Star Players: Ingredients

The beauty of this casserole lies in its simplicity and the harmonious blend of familiar ingredients. Each component plays a vital role in creating that irresistible texture and rich flavor. Here’s what you’ll need:

Protein Power

  • 2 cups cooked chicken, shredded or diced: The heart of our casserole! Leftover rotisserie chicken is your best friend here for speed and flavor. If cooking from scratch, aim for boiled or baked chicken breasts.

Grainy Goodness

  • 3 cups cooked white or brown rice: Fluffy and filling, rice acts as the perfect base. Day-old rice is ideal as it’s drier and less likely to become mushy.

Veggie Vibrancy

  • 4 cups broccoli florets, lightly steamed or blanched: Adds a pop of color, a touch of freshness, and a healthy boost. Cut into bite-sized pieces for even distribution.

Cheesy Dreams

  • 2 cups shredded cheddar cheese: The star of the cheesy show! Sharp cheddar offers the most robust flavor, but a mild or medium cheddar works beautifully too. You can also use a blend of cheddar and Monterey Jack for extra creaminess.

Creamy Dreaminess

  • 1 can (10.5 oz) condensed cream of mushroom or cream of chicken soup: This is your flavor and binder base. It brings a rich, velvety texture that coats everything. (Substitution: Use a homemade béchamel sauce for a fresher taste.)
  • 1/2 cup milk or half-and-half: To thin out the soup and create a luscious sauce. Use whole milk for richness, or half-and-half for an even creamier consistency.

Seasoning Secrets

  • 1/2 teaspoon garlic powder: For that essential aromatic depth.
  • 1/4 teaspoon black pepper: To taste, adding a subtle bite.
  • Salt to taste: Remember that condensed soup and cheese can be salty, so season cautiously at first.

Optional Add-ins

  • 1/4 cup diced onion, sautéed: Adds a sweet, savory note.
  • 1/2 cup panko breadcrumbs: For a crunchy topping.
  • 1 tablespoon butter, melted: To toss with breadcrumbs for a golden crust.
Prep Time

15 minutes

Cook Time

30 minutes

Total Time

45 minutes

Servings

6-8

Broccoli, Rice, Cheese, and Chicken Casserole ready to be served

Step-by-Step Magic

Let’s turn these simple ingredients into a masterpiece. You’ll be amazed at how quickly this comes together!

Preheat and Prep

First things first, let’s get our oven ready. Preheat it to 375°F (190°C). Lightly grease a 9×13 inch baking dish with cooking spray or butter. This prevents our delicious casserole from sticking.

Cook the Chicken

If you haven’t already, cook your chicken. You can boil chicken breasts until cooked through and then shred them, or cube them. If using rotisserie chicken, simply shred or dice it. You should have about 2 cups.

Cook the Rice

Prepare your rice according to package directions. For this recipe, you’ll need about 3 cups of cooked rice. Using pre-cooked or day-old rice is a fantastic time-saver!

Blanch the Broccoli

To ensure tender-crisp broccoli that’s bright green, blanch it. Bring a pot of lightly salted water to a boil, add your broccoli florets, and cook for just 1-2 minutes. Immediately drain and rinse under cold water (or plunge into an ice bath) to stop the cooking process. Drain thoroughly. This step prevents the broccoli from becoming mushy during baking.

Create the Sauce

In a large bowl, combine the condensed soup, milk (or half-and-half), garlic powder, black pepper, and salt. Whisk until smooth and well combined. Taste and adjust seasoning if necessary.

Combine and Bake

Add the cooked chicken, cooked rice, blanched broccoli, and 1.5 cups of the shredded cheddar cheese to the bowl with the sauce. Gently stir everything together until all ingredients are evenly coated. Pour the mixture into your prepared baking dish and spread it out evenly. If you’re using sautéed onions, stir them in with the other ingredients. If you’re adding a crunchy topping, mix the panko breadcrumbs with melted butter and sprinkle evenly over the top of the casserole. Bake for 20-25 minutes, or until the casserole is heated through and bubbly around the edges. If you’ve added a breadcrumb topping, continue baking for another 5-10 minutes, or until the topping is golden brown and crispy.

Rest and Serve

Once out of the oven, let the casserole rest for about 5-10 minutes. This allows the flavors to meld and the casserole to set slightly, making it easier to serve. Sprinkle the remaining 1/2 cup of cheddar cheese over the top during this resting period if you skipped the breadcrumbs, allowing it to melt into a gooey finish. Serve hot and enjoy the comfort!

Nutritional Highlights

While this casserole is a comfort food classic, an average serving (approximately 1/6th of the recipe) typically contains:

  • Calories: 400-550 kcal
  • Protein: 25-35g
  • Fat: 15-25g
  • Carbohydrates: 30-45g

*Note: Nutritional values are estimates and can vary based on specific ingredients used.

Healthier Alternatives

Want to lighten things up without sacrificing taste? Try these swaps:

  • Reduced-fat soup: Use a light version of cream of mushroom or chicken soup.
  • Low-fat milk: Swap whole milk for skim or 1% milk.
  • Brown rice: Opt for whole grain brown rice for added fiber.
  • More veggies: Add steamed carrots, peas, or cauliflower.
  • Greek yogurt: Substitute half of the cream soup with plain Greek yogurt for a protein boost and reduced fat (ensure it’s unsweetened and full-fat for best texture).
  • Whole wheat breadcrumbs: For a healthier crunchy topping.

Serving Suggestions

This casserole is a meal in itself, but it pairs wonderfully with a crisp green salad to balance the richness. A side of steamed green beans or a simple tomato salad also complements it beautifully.

Common Mistakes to Avoid

  • Overcooked broccoli: Blaching is key! Don’t skip this step or overcook the broccoli.
  • Mushy rice: Use cooked, preferably day-old, rice.
  • Under-seasoning: Taste your sauce before adding it to the other ingredients and adjust salt and pepper accordingly.
  • Not letting it rest: A short rest makes a world of difference in texture and serving ease.

Storing Your Masterpiece

Keep any leftover casserole tightly covered in the refrigerator for up to 3 days. Reheat it in the oven at 350°F (175°C) until heated through, or microwave individual portions.

A Casserole Worth Craving

This Broccoli, Rice, Cheese, and Chicken Casserole is more than just a meal; it’s an experience. It’s the quick, easy, and utterly delicious answer to that age-old question: “What’s for dinner?” With its creamy texture, savory chicken, tender broccoli, and cheesy goodness, it’s guaranteed to please even the pickiest eaters. Give it a try this week and discover your new favorite weeknight go-to!

Frequently Asked Questions

***Can I use frozen broccoli instead of fresh?***

Yes, you absolutely can! Thaw frozen broccoli completely and drain it very well before adding it to the casserole to prevent excess moisture. You may not need to blanch it.

***Can I make this casserole ahead of time?***

Yes! Assemble the casserole, cover it tightly, and refrigerate for up to 24 hours. You may need to add an extra 10-15 minutes to the baking time since it will be cold.

***What kind of cheese is best?***

Cheddar is classic and delicious. For a different flavor profile, try Gruyère, Monterey Jack, or a blend of your favorites.

***My casserole seems a bit dry, what went wrong?***

This can happen if your rice was too dry, or if you didn’t use enough liquid. Ensure your rice is properly cooked and consider adding a splash more milk or cream to the sauce mixture next time.

***Can I add other vegetables?***

Certainly! Diced carrots, peas, corn, or even mushrooms can be added. If using raw vegetables like carrots, consider steaming them slightly before adding to ensure they cook through.

Print
clock clock iconcutlery cutlery iconflag flag iconfolder folder iconinstagram instagram iconpinterest pinterest iconfacebook facebook iconprint print iconsquares squares iconheart heart iconheart solid heart solid icon

Broccoli, Rice, Cheese, and Chicken Casserole

  • Author: Chef Mia

Description

This Broccoli, Rice, Cheese, and Chicken Casserole is the ultimate comfort food. Packed with tender chicken, fluffy rice, vibrant broccoli, and gooey cheddar cheese, it’s a hearty, creamy dish perfect for weeknight dinners or family gatherings. Simple to prepare and bursting with flavor, this casserole will quickly become a household favorite!


Ingredients

Scale
  • 2 cupscooked chicken (shredded or diced)
  • 2 cupscooked rice (white or brown)
  • 2 cupsbroccoli florets (fresh or frozen, blanched if fresh)
  • 2 cupsshredded cheddar cheese (divided)
  • 1can (10.5 oz) cream of chicken soup
  • ½ cupmilk
  • ½ tsponion powder
  • ½ tspgarlic powder
  • Salt and pepper to taste
  • Optional: ½ cup breadcrumbs for topping

Instructions

  1. Preheat your oven to 375°F (190°C). Lightly grease a 9×13-inch baking dish with butter or non-stick spray.
  2. If using fresh broccoli, blanch the florets in boiling water for 2-3 minutes and drain. If using frozen broccoli, thaw and pat dry.
  3. In a large mixing bowl, combine the cooked chicken, rice, broccoli, 1 ½ cups of cheddar cheese, cream of chicken soup, milk, onion powder, garlic powder, salt, and pepper. Mix until evenly combined.
  4. Spread the mixture evenly into the prepared baking dish. Top with the remaining ½ cup of cheddar cheese. Sprinkle breadcrumbs on top, if desired.
  5. Bake in the preheated oven for 25-30 minutes, or until the casserole is hot and bubbly, and the cheese is melted and golden.
  6. Let the casserole rest for 5-10 minutes before serving. Enjoy!

Notes

Substitute cream of chicken soup with cream of mushroom soup or homemade cream sauce for a different flavor.
Add extra veggies like diced bell peppers or mushrooms for more variety.
Store leftovers in an airtight container in the fridge for up to 3-4 days or freeze for up to 2 months.
To reheat, warm in the oven at 350°F (175°C) until heated through or microwave individual portions.

“`

Red Velvet Oreo Cheesecake

“`html

Red Velvet Oreo Cheesecake

What is Red Velvet Oreo Cheesecake?

Are you searching for a dessert that’s dramatic, decadent, and utterly unforgettable? If the thought of combining the rich, chocolatey goodness of Oreos, the tangy creaminess of classic cheesecake, and the visually stunning hue of red velvet excites your taste buds, then you’re in for a treat! This Red Velvet Oreo Cheesecake is not just a dessert; it’s an experience. Imagine a crisp, crunchy Oreo crust providing the perfect foundation, followed by a luxuriously smooth red velvet cheesecake filling studded with generous chunks of Oreos. To top it all off, a vibrant, tangy berry compote cuts through the richness, making every bite a harmonious symphony of textures and flavors. This showstopping dessert is perfect for celebrations, holidays, or simply when you want to indulge in something truly special. Get ready to impress your guests and satisfy your deepest cravings!

Ingredients to Elevate Your Cheesecake Game

The magic of this Red Velvet Oreo Cheesecake lies in the quality and interplay of its components. We’ve carefully selected ingredients that bring out the best in each flavor profile. Feel free to experiment with brands, but ensure you’re using full-fat ingredients for the creamiest cheesecake texture.

For the Oreo Crust

  • 2 cups Oreo cookie crumbs (about 24-28 Oreos, finely crushed): The heart of our chocolatey base. Ensure they are finely crushed to form a cohesive crust. Substitution: You can use chocolate graham crackers or chocolate wafer cookies if Oreos aren’t available.
  • 6 tablespoons unsalted butter, melted: Binds the crumbs together, creating a firm, delicious crust. Substitution: A good quality margarine will work, but butter yields a superior flavor.
  • 1 tablespoon granulated sugar (optional): Adds a touch more sweetness and crispness.

For the Red Velvet Cheesecake Filling

  • 3 (8-ounce) packages cream cheese, softened: The velvety soul of the cheesecake. Make sure it’s truly softened to room temperature to avoid lumps. (Use full-fat for best results). Substitution: Reduced-fat cream cheese can be used, but the texture may be slightly less rich.
  • 1 ¼ cups granulated sugar: Balances the tanginess of the cream cheese and enhances sweetness.
  • 3 large eggs, at room temperature: Essential for structure and richness. Room temperature eggs incorporate more smoothly.
  • 1 teaspoon vanilla extract: Enhances all the flavors and adds a warm aroma.
  • ⅓ cup unsweetened cocoa powder: Provides a subtle chocolate undertone that complements the red velvet and Oreos.
  • 2 tablespoons red food coloring (gel or liquid): The signature vibrant color of red velvet. Gel coloring offers a more intense hue with less liquid. Adjust to your desired shade.
  • 1 teaspoon white vinegar: Reacts with the cocoa and food coloring to intensify the red color.
  • 1 ½ cups crushed Oreos (about 15-18 Oreos): For those irresistible red velvet cheesecake swirls and chunks. Substitution: You can omit these if you prefer a smoother texture, or add chopped chocolate chips for a different kind of indulgence.

For the Tangy Berry Compote (Optional but Recommended!)

  • 2 cups mixed berries (fresh or frozen): Such as raspberries, strawberries, blueberries. For a pop of tartness and color.
  • ¼ cup granulated sugar: Balances the tartness of the berries. Adjust to taste.
  • 1 tablespoon lemon juice: Brightens the berry flavors.
  • 1 tablespoon cornstarch mixed with 2 tablespoons water (slurry): To thicken the compote to a glossy consistency.

Timing Your Masterpiece

Prep time: 30 minutes
Cook time: 60-75 minutes
Chill time: 4+ hours
Total time: ~5 hours 30 minutes (Active: ~45 mins)

Compared to a standard cheesecake (which often has similar bake and chill times), this Red Velvet Oreo Cheesecake requires a bit more prep for the distinct red velvet elements and the optional compote. However, the active prep time is quite efficient, making it manageable for a weekend baking project. The majority of the time is hands-off chilling, allowing the flavors to meld beautifully.

A slice of rich Red Velvet Oreo Cheesecake with a berry compote topping

Step-by-Step Instructions: Crafting Pure Bliss

Follow these steps closely to create a dessert that’s as delightful to look at as it is to eat. Patience is key, especially during the chilling phase!

Step 1: Prepare the Oreo Crust

Preheat your oven to 350°F (175°C). In a medium bowl, combine the finely crushed Oreo crumbs, melted butter, and optional sugar. Mix until the crumbs are evenly moistened. Press this mixture firmly and evenly into the bottom and slightly up the sides of a 9-inch springform pan. Use the bottom of a glass or a measuring cup to ensure a compact and even layer. Bake for 8-10 minutes until the crust is set and fragrant. Let it cool completely on a wire rack while you prepare the filling.

Step 2: Mix the Cheesecake Batter

In a large bowl, beat the softened cream cheese with an electric mixer on medium speed until smooth and creamy, about 2-3 minutes. Gradually add the granulated sugar and continue beating until well combined and no sugar lumps remain. Beat in the eggs one at a time, mixing just until each egg is incorporated. Be careful not to overmix once the eggs are added, as this can lead to cracks in the cheesecake. Stir in the vanilla extract, cocoa powder, red food coloring, and white vinegar until a uniform, vibrant red batter is formed. Gently fold in the 1 ½ cups of crushed Oreos, distributing them throughout the batter.

Step 3: Bake the Cheesecake

Pour the red velvet cheesecake batter evenly over the cooled Oreo crust in the springform pan. For a beautifully smooth top and to prevent cracks, I highly recommend baking the cheesecake in a water bath. Wrap the outside of the springform pan tightly with heavy-duty aluminum foil (at least 2-3 layers) to prevent water from seeping in. Place the foil-wrapped pan inside a larger roasting pan. Carefully pour hot water into the roasting pan, about halfway up the sides of the springform pan. This creates a humid environment for gentle, even baking. Bake for 60-75 minutes, or until the edges of the cheesecake are set and the center is still slightly jiggly when you gently shake the pan. Turn off the oven, crack open the oven door, and let the cheesecake cool inside the oven for 1 hour. This gradual cooling also helps prevent cracks.

Step 4: Make the Berry Compote (If Using)

While the cheesecake is cooling, prepare the compote. In a small saucepan, combine the mixed berries, sugar, and lemon juice. Cook over medium heat, stirring occasionally, until the berries break down and the mixture begins to simmer. Whisk in the cornstarch slurry and continue to cook, stirring constantly, until the compote thickens to a glossy sauce consistency, about 2-3 minutes. Remove from heat and let it cool completely.

Step 5: Assemble and Chill

Once the cheesecake has cooled in the oven for an hour, remove it from the water bath and place it on a wire rack to cool completely to room temperature. Once cooled, cover the cheesecake loosely with plastic wrap and refrigerate for at least 4 hours, or preferably overnight, to allow it to set properly and the flavors to meld. Just before serving, carefully remove the sides of the springform pan. Spoon the cooled berry compote over the top of the cheesecake, or serve it on the side.

Nutritional Information

Here’s an estimated nutritional breakdown per serving (based on 12 servings). Keep in mind that exact values can vary based on ingredients used and precise portioning.

  • Calories: ~550-650 kcal
  • Protein: ~7-9g
  • Fat: ~35-45g (Saturated Fat: ~20-25g)
  • Carbohydrates: ~50-60g (Sugars: ~35-45g)
  • Fiber: ~2-3g

Healthier Alternatives

While this is a decadent dessert, we can make a few mindful swaps:

  • Crust: Use whole wheat graham crackers or a reduced-sugar cookie for the crust. You could also try a nut-based crust for added healthy fats and fiber.
  • Sweetener: Use a sugar substitute like erythritol or stevia in the filling and compote, though this may slightly alter the texture and sweetness profile.
  • Dairy: Use light cream cheese and consider a Greek yogurt swirl for added protein and a tangier base, although this will change the classic cheesecake texture.
  • Compote: Reduce the sugar or omit it entirely, letting the natural sweetness of the berries shine through.

Serving Suggestions

This Red Velvet Oreo Cheesecake is a showstopper on its own, but here are a few ways to enhance its presentation and flavor:

  • Garnish: A dollop of fresh whipped cream, chocolate shavings, or a few whole Oreos and berries can elevate the visual appeal.
  • Accompaniments: A side of unsweetened whipped cream or a scoop of vanilla bean ice cream pairs wonderfully.
  • Portioning: Slice with a sharp knife dipped in hot water and wiped dry between each cut for clean, professional-looking slices.

Common Mistakes to Avoid

Preventing common cheesecake woes is key to achieving a perfect result:

  • Overmixing: Incorporating too much air into the batter, especially after adding eggs, leads to cracks. Mix just until combined.
  • Uneven Baking: A water bath and gradual cooling are crucial for preventing cracks and ensuring even cooking.
  • Not Fully Chilled: Cheesecake needs ample time to set. Rushing the chilling process results in a loose, unset dessert.
  • Lumpy Cream Cheese: Ensure your cream cheese is thoroughly softened to room temperature before beating.

Storing Tips

To keep your Red Velvet Oreo Cheesecake fresh:

  • Refrigeration: Store leftover cheesecake, tightly covered with plastic wrap or in an airtight container, in the refrigerator for up to 4-5 days.
  • Freezing: You can freeze individual slices, tightly wrapped in plastic wrap and then in a layer of aluminum foil, for up to 1 month. Thaw overnight in the refrigerator before serving.

Conclusion

This Red Velvet Oreo Cheesecake is more than just a dessert; it’s a celebration of textures and flavors that harmonize perfectly. The rich Oreo crust, the decadent red velvet cheesecake filling, and the bright berry compote create a dessert experience that is both comforting and exciting. It’s a guaranteed crowd-pleaser that will make any occasion feel extra special. So, gather your ingredients, follow these steps, and prepare to be amazed by the sheer deliciousness you’ve created. Happy baking!

Frequently Asked Questions (FAQs)

***Can I make the cheesecake without a water bath?***

While a water bath is highly recommended for even baking and preventing cracks, you can attempt to bake it without one. However, be prepared for a higher chance of the cheesecake cracking. Ensure you still follow the gradual cooling process.

***How do I know when the cheesecake is done?***

The edges of the cheesecake should appear set, and the center should still have a slight jiggle – about a 2-3 inch wobble. It will continue to set as it cools.

***Why did my cheesecake crack?***

Common causes include overmixing the batter (incorporating too much air), overbaking, and sudden temperature changes during cooling. Using a water bath and gradual cooling helps mitigate these issues.

***Can I use store-bought Oreo cookie crumbs?***

Yes, you can, but for the best texture, it’s recommended to crush whole Oreos yourself. This ensures the finest crumb consistency.

***How far in advance can I make this cheesecake?***

You can make this cheesecake up to 2 days in advance. It actually benefits from chilling time, as the flavors meld.

Print

clock clock iconcutlery cutlery iconflag flag iconfolder folder iconinstagram instagram iconpinterest pinterest iconfacebook facebook iconprint print iconsquares squares iconheart heart iconheart solid heart solid icon

Red Velvet Oreo Cheesecake

  • Author: Chef Mia

Description

ThisRed Velvet Oreo Cheesecakecombines the rich flavors of cheesecake, red velvet, and Oreos into a showstopping dessert. A crunchy Oreo crust, velvety cheesecake filling with red velvet crumbs, and a tangy berry compote topping make this the perfect treat for any special occasion.


Ingredients

Scale
  • 24Oreo cookies (plus extra for decoration)
  • 5 tbspunsalted butter (melted)
  • 16 ozcream cheese (softened)
  • 3/4 cupgranulated sugar
  • 1 tspvanilla extract
  • 1 cupheavy whipping cream (chilled)
  • 1 cupred velvet cake crumbs
  • 1/4 cupraspberry or strawberry compote (for topping)
  • Whipped cream (for garnish)

Instructions

  1. Preheat your oven to 350°F (175°C). Line the bottom of a 9-inch springform pan with parchment paper.
  2. Crush the Oreos into fine crumbs and mix them with the melted butter. Press the mixture firmly into the bottom of the prepared pan to create the crust. Bake for 8-10 minutes, then set aside to cool completely.
  3. In a large mixing bowl, beat the softened cream cheese and granulated sugar until smooth. Mix in the vanilla extract.
  4. Gradually fold in the heavy whipping cream until the filling is light and creamy. For a firmer set, dissolve 1 tsp of gelatin in 2 tbsp water and fold it into the filling.
  5. Gently mix in the red velvet cake crumbs until evenly distributed.
  6. Pour the filling over the cooled crust, spreading it evenly with a spatula. Cover and refrigerate for at least 6 hours or overnight to set.
  7. Once set, spread the berry compote on top of the cheesecake. Decorate with whipped cream and extra Oreo cookies.
  8. Serve chilled and enjoy!

Notes

Optional Additions:Sprinkle with chocolate shavings or chopped nuts for extra flair.
Storage Tips:Store leftovers in the fridge for up to 5 days or freeze slices for up to 1 month. Thaw in the refrigerator overnight before serving.
Make Ahead:Prepare this cheesecake the day before your event to ensure it has enough time to chill and set perfectly.


“`

Cinnamon Raisin Bread Pudding

“`html

Cinnamon Raisin Bread Pudding

This Cinnamon Raisin Bread Pudding is the perfect dessert for any occasion. With its warm, spiced custard, sweet raisins, and golden-baked top, this recipe is comfort food at its finest. Serve it as a cozy dessert, indulgent breakfast, or brunch centerpiece, and watch it disappear in no time!

Cozy Up with Cinnamon Raisin Bread Pudding

Are you constantly searching for a dessert that wraps you in a warm hug, reminiscent of hearth and home? In the vast universe of comforting sweets, how does one find a recipe that perfectly balances nostalgic flavors with effortless preparation? This Cinnamon Raisin Bread Pudding consistently ranks as a favorite, and for good reason. It’s the ultimate comfort food, transforming humble bread into a luxurious, delectable treat. Imagine a rich, creamy custard infused with the warm embrace of cinnamon, studded with plump, sweet raisins, and crowned with a golden, slightly crisp topping. It’s a symphony of textures and tastes that appeals to every palate, making it suitable for a decadent brunch, a special family dessert, or even a sweet breakfast treat. Get ready to fall in love with this timeless classic that’s surprisingly simple to bring to life in your own kitchen.

Irresistible Ingredients for Cinnamon Raisin Bread Pudding

The magic of this bread pudding lies in its simple yet effective combination of pantry staples. Here’s what you’ll need to create this comforting delight:

The Bread Base

  • Stale Bread: 6 cups (about 1 pound), torn or cubed. Day-old or slightly stale bread is key as it soaks up the custard beautifully without becoming mushy. Think challah, brioche, French bread, or even a sturdy white bread. If your bread is fresh, lightly toast it in the oven at 300°F (150°C) for about 10-15 minutes.

Creamy Custard Essentials

  • Eggs: 4 large. These are the binders that give the pudding its rich, custardy texture.
  • Milk: 2 cups. Whole milk provides the creamiest results, but you can use 2% for a slightly lighter version.
  • Heavy Cream: 1 cup. For unparalleled richness and a velvety smooth mouthfeel. (See Healthier Alternatives for substitutions).

Sweetness and Spice

  • Granulated Sugar: 3/4 cup. Adjust to your preference. This balances the spice and the flavors of the raisins.
  • Ground Cinnamon: 2 teaspoons. The fragrant heart of this recipe! Use more or less depending on how potent you like your cinnamon flavor.
  • Nutmeg: 1/2 teaspoon (optional but recommended). A hint of nutmeg adds depth and complements the cinnamon beautifully.
  • Vanilla Extract: 1 teaspoon. Enhances all the other flavors and adds a subtle fragrant note.
  • Salt: 1/4 teaspoon. Essential for balancing sweetness and enhancing flavors.

The Raisin Infusion

  • Raisins: 1 cup. Golden or dark raisins work equally well. For plumper, juicier raisins, you can soak them in warm water or a splash of dark rum for 15-20 minutes before draining.

Perfect Timing for Your Pudding

Prep time: 20 minutes + soaking time (optional)
Cook time: 45-55 minutes
Total time: 1 hour 5 minutes – 1 hour 15 minutes

Compared to average bread pudding recipes, this one offers a balanced timeline. The hands-on prep is relatively quick, with most of the time dedicated to allowing the bread to absorb the custard and for the magic to happen in the oven. Some recipes might call for an overnight soak, but 20-30 minutes is usually sufficient for a delightful texture.

Cinnamon Raisin Bread Pudding

Crafting Your Cinnamon Raisin Bread Pudding

Step 1: Prepare the Bread

Begin by tearing or cubing your stale bread into roughly 1-inch pieces. If you’re using fresh bread, you’ll want to toast it lightly in a 300°F (150°C) oven for about 10-15 minutes until it’s drier but not browned. Place the bread cubes into a large mixing bowl. If you opted to plump up your raisins, drain them well and add them to the bowl with the bread.

Step 2: Whisk the Custard

In a separate medium bowl, whisk together the eggs until well combined. Then, whisk in the milk, heavy cream, granulated sugar, cinnamon, nutmeg (if using), vanilla extract, and salt until everything is smooth and uniformly mixed. It’s important to ensure the sugar and spices are fully dissolved into the liquid mixture.

Step 3: Combine and Soak

Pour the whisked custard mixture evenly over the bread and raisin mixture in the large bowl. Gently fold everything together with a spatula, ensuring all the bread pieces are moistened. Let this mixture sit at room temperature for at least 20-30 minutes, giving the bread ample time to absorb the delicious custard. You can occasionally press down on the bread with your spatula to help it soak more effectively.

Step 4: Bake to Perfection

Preheat your oven to 350°F (175°C). Grease a 9×13 inch baking dish or a similar-sized oven-safe dish. Pour the soaked bread mixture into the prepared baking dish, spreading it out evenly. Bake for 45-55 minutes, or until the pudding is set in the center and the top is beautifully golden brown and slightly puffed. A knife inserted near the center should come out mostly clean, with perhaps a few moist crumbs.

Step 5: Rest and Serve

Once baked, remove the bread pudding from the oven and let it rest for at least 10-15 minutes before serving. This allows the custard to fully set, making it easier to scoop and serve. The aroma will be intoxicating, making it hard to wait, but patience will be rewarded with a perfectly textured dessert.

Nutritional Highlights

While the exact nutritional values can vary based on specific ingredients and portion sizes, a typical serving of this Cinnamon Raisin Bread Pudding (approximately 1/8th of the recipe) contains:

  • Calories: Around 300-400 kcal
  • Fat: 15-25g (depending on cream and milk used)
  • Carbohydrates: 40-50g
  • Protein: 8-12g
  • Sugar: 25-35g (from sugar and raisins)

Note: This is an estimate. For precise calculations, use a nutrition calculator with your specific ingredients.

Lighter Indulgence: Healthier Swaps

You can lighten up this classic dessert without sacrificing too much flavor:

  • Milk: Use 1½ cups of skim or 2% milk and ½ cup of evaporated skim milk instead of whole milk and heavy cream.
  • Sweetener: Reduce the sugar slightly, or opt for a natural sweetener like maple syrup or an equivalent amount of unsweetened applesauce for part of the sugar.
  • Bread: Use whole wheat bread or a multigrain bread for added fiber.
  • Optional Add-ins: Incorporate fresh fruit like diced apples or pears for natural sweetness and nutrients.

Serving Suggestions to Elevate

This bread pudding is delightful on its own, but here are some ways to make it even more special:

  • Classic Poured Custard: A warm vanilla crème anglaise is a traditional and heavenly pairing.
  • Whipped Cream: Lightly sweetened whipped cream, perhaps with a hint of vanilla or cinnamon, adds a creamy, airy contrast.
  • Ice Cream: A scoop of vanilla bean or even salted caramel ice cream is indulgence personified.
  • Fresh Berries: A drizzle of berry coulis or a scattering of fresh raspberries or blueberries can add a refreshing tartness.
  • Caramel Sauce: For an extra decadent treat, a drizzle of warm salted caramel sauce is divine.

Avoid These Common Pudding Pitfalls

  • Using Fresh Bread: Fresh, soft bread will become too soggy and won’t hold its shape. Always use stale or lightly toasted bread.
  • Not Soaking Long Enough: If the bread doesn’t have enough time to absorb the custard, your pudding will be dry and crumbly.
  • Overbaking: Overbaking can lead to a dry, rubbery texture. Keep an eye on it as it approaches the baking time.
  • Not Resting: Allowing the pudding to rest helps it set properly, ensuring a pleasant texture when served.

Smart Storing for Leftovers

Leftover Cinnamon Raisin Bread Pudding can be stored in an airtight container in the refrigerator for up to 3-4 days. To reheat, you can gently warm individual portions in the microwave, or bake a larger portion in a preheated oven at 300°F (150°C) until heated through. It’s also delicious served cold or at room temperature, making it a versatile treat.

Your Sweet Retreat Awaits

This Cinnamon Raisin Bread Pudding is more than just a dessert; it’s an experience. It’s the warmth of cinnamon, the gentle sweetness of raisins, and the luxurious creaminess of custard all coming together to create pure comfort. Whether you’re looking for a standout brunch dish or a simply a soul-soothing treat, this recipe is sure to become a cherished favorite. So gather your ingredients, embrace the comforting process, and prepare to delight your senses with this timeless classic. What are you waiting for? Your kitchen is about to smell amazing, and your taste buds are in for a treat!

Frequently Asked Questions

***What kind of bread is best for bread pudding?***

Stale, day-old bread is ideal because it absorbs the custard better without becoming mushy. Challah, brioche, French bread, or even a good quality white bread work wonderfully. Lightly toasting fresh bread is also a great solution.

***Can I make bread pudding ahead of time?***

Yes! You can assemble the bread pudding and let it soak in the custard for several hours or even overnight in the refrigerator. This often results in a more deeply flavored and moister pudding.

***How do I know when the bread pudding is ready?***

The pudding should be set in the center and golden brown on top. A knife inserted near the center should come out mostly clean. It will firm up more as it cools.

***Can I freeze bread pudding?***

Yes, you can freeze baked bread pudding. Let it cool completely, then wrap it tightly in plastic wrap and then in foil or place it in an airtight container. Thaw in the refrigerator and reheat as directed.

***Why is my bread pudding watery?***

This usually happens if the bread wasn’t stale enough, if it wasn’t soaked long enough, or if it was underbaked. Ensure your bread absorbs the custard well and bake until the center is set.

Print
clock clock iconcutlery cutlery iconflag flag iconfolder folder iconinstagram instagram iconpinterest pinterest iconfacebook facebook iconprint print iconsquares squares iconheart heart iconheart solid heart solid icon

Cinnamon Raisin Bread Pudding

  • Author: Chef Mia

Description

This Cinnamon Raisin Bread Pudding is the perfect dessert for any occasion. With its warm, spiced custard, sweet raisins, and golden-baked top, this recipe is comfort food at its finest. Serve it as a cozy dessert, indulgent breakfast, or brunch centerpiece, and watch it disappear in no time!


Ingredients

Scale
  • 6 cupscinnamon raisin bread, cubed (preferably day-old)
  • 3large eggs
  • 2 cupswhole milk (or1 ½ cupsmilk +½ cupheavy cream for extra richness)
  • ½ cupgranulated sugar
  • 1 tspvanilla extract
  • 1 tspground cinnamon
  • ¼ cupraisins (optional, for extra sweetness)
  • 2 tbspbutter, melted (for greasing the dish or brushing on top)

Instructions

  1. Preheat the oven to 350°F (175°C). Lightly grease a baking dish with melted butter or non-stick spray.
  2. Cut the cinnamon raisin bread into 1-inch cubes. Spread the cubes out on a baking sheet and let them dry for 10-15 minutes or bake at 300°F for 5 minutes.
  3. In a large mixing bowl, whisk together the eggs, milk, sugar, vanilla extract, and cinnamon until smooth.
  4. Arrange the bread cubes in the greased baking dish. Sprinkle the raisins over the bread for an extra pop of sweetness.
  5. Pour the custard mixture evenly over the bread cubes, pressing gently to ensure the bread absorbs the liquid.
  6. Cover the dish loosely with foil and bake for 30 minutes.
  7. Remove the foil and bake for another 15-20 minutes, or until the pudding is set, and the top is golden brown.
  8. Allow to cool for 10 minutes before serving. Serve warm with a drizzle of custard, caramel sauce, or a scoop of vanilla ice cream.

Notes

For extra flavor, sprinkle chopped pecans or walnuts on top before baking.
Substitute cinnamon raisin bread with plain bread and add more raisins and a pinch of nutmeg for variety.
Leftovers can be refrigerated in an airtight container for up to 3 days or frozen for up to 2 months.

“`

Crispy Chicken Tender Recipes for Baked Perfection

“`html

Crispy Chicken Tender Recipes for Baked Perfection

The Quest for Healthier Crispy Chicken Tenders

The allure of crispy chicken tenders is undeniable. That perfect balance of a crunchy exterior and tender, juicy interior has made them a global comfort food. However, traditional fried chicken tenders often come with a hefty amount of oil and calories, making them a treat reserved for special occasions for many health-conscious individuals. But what if you could achieve that same satisfying crispiness and delicious flavor through baking? This recipe for Crispy Baked Chicken Tenders is your answer, offering a delightful way to enjoy this classic dish with a fraction of the fat and calories. We’ll guide you through a foolproof method that guarantees a juicy, flavorful, and wonderfully crunchy result that even the pickiest eaters will adore, proving that healthier can indeed be incredibly delicious and satisfying.

Ingredients for Perfectly Baked Chicken Tenders

The magic of these tenders lies in a simple yet effective breading system that mimics the crispiness of deep-frying but with the goodness of baking. Here’s what you’ll need:

  • 1.5 lbs Boneless, Skinless Chicken Breasts: Look for plump, firm chicken breasts. You can also use chicken tenderloins, which are naturally smaller and more uniform in size.
  • For the Breading Station:
    • All-Purpose Flour: About 1 cup, seasoned with salt and pepper for the initial dredge. This acts as the first layer, helping the egg adhere. Substitution: Whole wheat flour for added fiber, or gluten-free all-purpose flour blend.
    • Eggs: 2 large eggs, beaten with 1 tablespoon of water. This creates a sticky binder for the breadcrumbs. Substitution: Unsweetened applesauce, milk, or a flax egg (1 tbsp flaxseed meal + 3 tbsp water, let sit for 5 mins) for an egg-free option.
    • Panko Breadcrumbs: About 2 cups. Panko offers superior crunch due to its airy, flaky texture. Substitution: Regular breadcrumbs for a finer coating, crushed unsweetened cornflakes, or crushed pretzel pieces for a unique salty-sweet crunch.
  • Seasonings for Breadcrumbs:
    • Smoked Paprika: 1 teaspoon, for a beautiful color and smoky depth.
    • Garlic Powder: 1 teaspoon, for that savory aromatic kick.
    • Onion Powder: 1 teaspoon, to enhance the overall savory profile.
    • Dried Oregano: 1/2 teaspoon, adding a hint of herbaceousness.
    • Salt: 1 teaspoon, or to taste. Crucial for bringing out all the flavors.
    • Black Pepper: 1/2 teaspoon, freshly ground for a subtle bite.
  • Olive Oil Spray or Melted Butter: For lightly coating the breaded tenders to achieve that golden, crispy finish. Around 2-3 tablespoons equivalent.

Timing: Get Your Crispy Tenders on the Table Fast!

Prep time: 20 minutes
Cook time: 20-25 minutes
Total time: 40-45 minutes

This recipe is designed for efficiency. While the average baked chicken tender recipe might take upwards of an hour with marinating or resting steps, these are ready relatively quickly. The prep is straightforward, and the baking time is optimized for achieving perfect crispiness without overcooking.

Crispy baked chicken tenders arranged on a platter, golden brown and tempting

Step-by-Step Instructions for Baked Perfection

Follow these simple steps to achieve chicken tenders that are incredibly crispy on the outside and wonderfully juicy within.

1. Prepare the Chicken

Begin by trimming any excess fat from your chicken breasts. Then, slice them lengthwise into uniform strips, about 1/2 inch thick. Aim for pieces that are roughly the same size to ensure even cooking. If using tenderloins, you can leave them whole or cut them in half if they are particularly large.

2. Set Up Breading Stations

Prepare three shallow dishes or plates for your breading stations:

  • Dish 1: Flour Mixture. Combine the all-purpose flour with 1/2 teaspoon of salt and 1/4 teaspoon of black pepper. Whisk to combine.
  • Dish 2: Egg Wash. In a medium bowl, whisk together the 2 large eggs with 1 tablespoon of water until well combined and slightly frothy.
  • Dish 3: Panko Mixture. Combine the Panko breadcrumbs with all the seasonings: smoked paprika, garlic powder, onion powder, dried oregano, the remaining 1/2 teaspoon of salt, and 1/4 teaspoon of black pepper. Stir thoroughly to ensure the spices are evenly distributed throughout the breadcrumbs. This step is crucial for flavor!

3. Coat the Chicken

Working with one chicken tender at a time, follow this dredging process:

  1. Flour: Dredge the chicken tender in the seasoned flour, ensuring it’s lightly coated on all sides. Gently shake off any excess flour.
  2. Egg Wash: Dip the floured tender into the egg wash, letting any excess drip off. Make sure it is fully coated.
  3. Panko: Immediately transfer the egg-coated tender to the Panko breadcrumb mixture. Press the breadcrumbs firmly onto the chicken to ensure a thick, even coating. Ensure every surface is covered for maximum crunch.

Place the fully breaded tenders on a clean plate or baking sheet as you work. Repeat this process for all the chicken tenders.

4. Bake to Golden Perfection

Preheat your oven to 400°F (200°C). Line a large baking sheet with parchment paper for easy cleanup and to prevent sticking. Arrange the breaded chicken tenders in a single layer on the prepared baking sheet, ensuring they are not overcrowded. Overcrowding can lead to steaming rather than crisping.

Lightly spray or brush the tops of the breaded tenders with olive oil or melted butter. This helps the Panko achieve a beautiful golden-brown and crispy texture. Bake for 10-12 minutes, then carefully flip each tender. Spray or brush the other side with oil/butter and bake for an additional 10-12 minutes, or until the chicken is cooked through (internal temperature reaches 165°F or 74°C) and the coating is deeply golden and crispy.

5. Rest and Serve

Once baked to perfection, remove the chicken tenders from the oven. Let them rest on the baking sheet for 5 minutes before serving. This resting time allows the juices to redistribute, ensuring maximum tenderness and moisture. Serve hot with your favorite dipping sauces!

Nutritional Highlights

These baked chicken tenders offer a significantly healthier profile compared to their fried counterparts. While exact nutritional values can vary based on ingredient brands and portion sizes, a typical serving (about 3-4 tenders) is:

  • Calories: Approximately 250-350 kcal
  • Protein: High; around 25-35g
  • Fat: Significantly lower than fried versions, focusing on healthier fats from oil spray.
  • Carbohydrates: Moderate, depending on the amount of breading.

This makes them an excellent option for a balanced meal or a guilt-free snack.

Healthier Alternatives for Even More Goodness

Don’t hesitate to customize this recipe to fit your dietary needs and flavor preferences:

  • Gluten-Free: Use a gluten-free flour blend in the first station and certified gluten-free Panko breadcrumbs or almond flour/coconut flour blend in the third station. Ensure your seasonings are also gluten-free.
  • Lower Carb: Swap Panko for crushed pork rinds, almond flour, or a mix of almond flour and flaxseed meal. This drastically reduces the carbohydrate count.
  • Whole Wheat: Use whole wheat flour for the first dredge and whole wheat Panko or crushed whole wheat breadcrumbs for a fiber boost.
  • Flavor Boosts: Add a pinch of cayenne pepper for heat, some nutritional yeast for a cheesy flavor without dairy, or dried herbs like rosemary or thyme to the breadcrumb mix.

Serving Suggestions: What to Pair Them With

These versatile chicken tenders are fantastic on their own or as part of a larger meal. Here are a few ideas:

  • Classic Comfort: Serve with classic sides like oven-baked fries, sweet potato fries, mashed potatoes, or a creamy coleslaw.
  • Healthy Bowl: Make it a healthy grain bowl with quinoa, brown rice, roasted vegetables, and a light dressing.
  • Salad Topper: Chop them up and add them to a fresh green salad for a protein boost.
  • Sandwich/Wrap Filling: Tuck them into whole wheat buns or tortillas with lettuce, tomato, and your favorite sauce.
  • Dipping Delights: Offer a variety of dipping sauces such as honey mustard, barbecue sauce, ketchup, ranch dressing, or a spicy sriracha mayo.

Common Mistakes to Avoid

To ensure your chicken tenders are a success every time, be mindful of these common pitfalls:

  • Not Pressing the Breading: Simply tossing the chicken in breadcrumbs won’t create a thick, adhered coating. Gently press the Panko onto the chicken to ensure it sticks well.
  • Overcrowding the Baking Sheet: This is the enemy of crispiness! Ensure there is ample space between each tender for hot air to circulate and crisp them up properly.
  • Skipping the Oil Spray/Brush: While baking is healthier, a light coating of oil helps the breadcrumbs brown and crisp up beautifully, mimicking the texture of fried tenders.
  • Overcooking: Chicken breast can dry out quickly. Use a meat thermometer to ensure they reach 165°F (74°C) without going much further.

Storing Your Crispy Chicken Tenders

Leftover baked chicken tenders can be stored in an airtight container in the refrigerator for up to 3-4 days. For the best results when reheating:

  • Oven Reheating: This is the best method to restore crispiness. Place tenders on a baking sheet in a 350°F (175°C) oven for 5-10 minutes, or until heated through and crisp.
  • Air Fryer: Reheat at 375°F (190°C) for about 4-6 minutes, flipping halfway, for ultimate crispiness.
  • Microwave: This is the fastest but will result in softer tenders. Microwave in 30-second intervals until warm.

Note: They are best enjoyed fresh, so try to make only what you plan to eat in one or two sittings.

Baked to Perfection: A Healthier Favorite

Achieving incredibly crispy chicken tenders without frying is not only possible but incredibly rewarding. This recipe proves that you can enjoy all the delightful textures and flavors of classic chicken tenders while opting for a healthier, guilt-free preparation. The key lies in the Panko breadcrumb coating, a well-seasoned flavor profile, and the magic of oven baking with a touch of oil. Whether you’re making them for a family dinner, a quick lunch, or a crowd-pleasing appetizer, these crispiest baked chicken tenders are sure to become a staple in your recipe repertoire. Give them a try and taste the delicious difference!

Frequently Asked Questions

***Can I make these ahead of time?***

You can prepare the breaded tenders and store them on a baking sheet in the refrigerator for up to 2 hours before baking. For longer storage, freeze them in a single layer on a baking sheet until solid, then transfer to a freezer bag. Bake from frozen, adding a few extra minutes to the cooking time.

***Why aren’t my baked chicken tenders crispy?***

Several factors can contribute to this: overcrowding the pan, not using Panko breadcrumbs (which are key for crispiness), insufficient oil spray/brushing, or not baking at a high enough temperature. Ensure your oven is properly preheated and that the tenders have space to breathe on the baking sheet.

***What’s the best way to season the chicken for flavor?***

The flavor comes primarily from the breading. Ensure you’re generous with the seasonings mixed into the Panko (paprika, garlic powder, onion powder, salt, pepper). You can also add a bit of garlic powder and salt to the flour dredge for an extra layer of flavor.

***Can I use other cuts of chicken?***

Yes, chicken thighs can also be used, though they may require a slightly longer cooking time due to their higher fat content and density. Ensure they are trimmed of excess fat and cut into tender-sized pieces.

Print
clock clock iconcutlery cutlery iconflag flag iconfolder folder iconinstagram instagram iconpinterest pinterest iconfacebook facebook iconprint print iconsquares squares iconheart heart iconheart solid heart solid icon

Crispy Homemade Baked Chicken Tenders

  • Author: Chef Mia

Description

Thesecrispy baked chicken tendersare juicy on the inside and crunchy on the outside, making them the perfect healthier alternative to fried tenders. Packed with flavor from the seasoned breadcrumb coating, they’re a hit with kids and adults alike!


Ingredients

Scale
  • For the chicken:1lb chicken breasts or chicken tenders (cut into 1-inch strips if using chicken breasts)For the breading:2large eggs, beaten1 cuppanko breadcrumbs (or regular breadcrumbs)½ cupgrated Parmesan cheese (optional, for extra flavor)1 tspgarlic powder1 tsppaprika½ tsponion powder½ tspsalt¼ tspblack pepperFor baking:Olive oil spray
  • 1lb chicken breasts or chicken tenders (cut into 1-inch strips if using chicken breasts)
  • For the breading:2large eggs, beaten1 cuppanko breadcrumbs (or regular breadcrumbs)½ cupgrated Parmesan cheese (optional, for extra flavor)1 tspgarlic powder1 tsppaprika½ tsponion powder½ tspsalt¼ tspblack pepperFor baking:Olive oil spray
  • 2large eggs, beaten1 cuppanko breadcrumbs (or regular breadcrumbs)½ cupgrated Parmesan cheese (optional, for extra flavor)1 tspgarlic powder1 tsppaprika½ tsponion powder½ tspsalt¼ tspblack pepper
  • 1 cuppanko breadcrumbs (or regular breadcrumbs)½ cupgrated Parmesan cheese (optional, for extra flavor)1 tspgarlic powder1 tsppaprika½ tsponion powder½ tspsalt¼ tspblack pepper
  • ½ cupgrated Parmesan cheese (optional, for extra flavor)1 tspgarlic powder1 tsppaprika½ tsponion powder½ tspsalt¼ tspblack pepper
  • 1 tspgarlic powder1 tsppaprika½ tsponion powder½ tspsalt¼ tspblack pepper
  • 1 tsppaprika½ tsponion powder½ tspsalt¼ tspblack pepper
  • ½ tsponion powder½ tspsalt¼ tspblack pepper
  • ½ tspsalt¼ tspblack pepper
  • ¼ tspblack pepper
  • For baking:Olive oil spray
  • Olive oil spray

Instructions

  1. 1️⃣Prep the Chicken:If using chicken breasts, slice them into 1-inch wide strips. Chicken tenders can be used as is.2️⃣Prepare the Breading Stations:In a shallow bowl, beat the eggs until smooth.In another shallow bowl, mix together the breadcrumbs, Parmesan cheese (if using), garlic powder, paprika, onion powder, salt, and black pepper.3️⃣Season the Chicken:Lightly season the chicken strips with a pinch of salt and pepper.4️⃣Bread the Chicken:Dip each chicken strip into the beaten egg, letting the excess drip off.Coat the chicken strip in the breadcrumb mixture, pressing gently to ensure the coating adheres.For extra crunch, repeat the egg and breadcrumb dipping process (double coating).5️⃣Prepare the Baking Sheet:Line a baking sheet with parchment paper or a silicone baking mat for easy cleanup.Place a wire rack on top of the baking sheet if available; this allows for even air circulation and a crispier result.6️⃣Arrange the Chicken on the Baking Sheet:Lay the breaded chicken tenders on the prepared baking sheet or wire rack, ensuring space between each piece for even cooking.7️⃣Bake the Chicken Tenders:Preheat your oven to 400°F (200°C).Lightly spray the tenders with olive oil spray for added crispiness.Bake for 20–25 minutes, flipping halfway through. The tenders should be golden brown and crispy.Ensure the chicken reaches an internal temperature of 165°F (74°C) for safety.8️⃣Serve and Enjoy:Remove the tenders from the oven and let them rest for 2–3 minutes.Serve warm with your favorite dipping sauces like honey mustard, BBQ sauce, or ranch dressing
  2. If using chicken breasts, slice them into 1-inch wide strips. Chicken tenders can be used as is.2️⃣Prepare the Breading Stations:In a shallow bowl, beat the eggs until smooth.In another shallow bowl, mix together the breadcrumbs, Parmesan cheese (if using), garlic powder, paprika, onion powder, salt, and black pepper.3️⃣Season the Chicken:Lightly season the chicken strips with a pinch of salt and pepper.4️⃣Bread the Chicken:Dip each chicken strip into the beaten egg, letting the excess drip off.Coat the chicken strip in the breadcrumb mixture, pressing gently to ensure the coating adheres.For extra crunch, repeat the egg and breadcrumb dipping process (double coating).5️⃣Prepare the Baking Sheet:Line a baking sheet with parchment paper or a silicone baking mat for easy cleanup.Place a wire rack on top of the baking sheet if available; this allows for even air circulation and a crispier result.6️⃣Arrange the Chicken on the Baking Sheet:Lay the breaded chicken tenders on the prepared baking sheet or wire rack, ensuring space between each piece for even cooking.7️⃣Bake the Chicken Tenders:Preheat your oven to 400°F (200°C).Lightly spray the tenders with olive oil spray for added crispiness.Bake for 20–25 minutes, flipping halfway through. The tenders should be golden brown and crispy.Ensure the chicken reaches an internal temperature of 165°F (74°C) for safety.8️⃣Serve and Enjoy:Remove the tenders from the oven and let them rest for 2–3 minutes.Serve warm with your favorite dipping sauces like honey mustard, BBQ sauce, or ranch dressing
  3. 2️⃣Prepare the Breading Stations:
  4. In a shallow bowl, beat the eggs until smooth.In another shallow bowl, mix together the breadcrumbs, Parmesan cheese (if using), garlic powder, paprika, onion powder, salt, and black pepper.3️⃣Season the Chicken:Lightly season the chicken strips with a pinch of salt and pepper.4️⃣Bread the Chicken:Dip each chicken strip into the beaten egg, letting the excess drip off.Coat the chicken strip in the breadcrumb mixture, pressing gently to ensure the coating adheres.For extra crunch, repeat the egg and breadcrumb dipping process (double coating).5️⃣Prepare the Baking Sheet:Line a baking sheet with parchment paper or a silicone baking mat for easy cleanup.Place a wire rack on top of the baking sheet if available; this allows for even air circulation and a crispier result.6️⃣Arrange the Chicken on the Baking Sheet:Lay the breaded chicken tenders on the prepared baking sheet or wire rack, ensuring space between each piece for even cooking.7️⃣Bake the Chicken Tenders:Preheat your oven to 400°F (200°C).Lightly spray the tenders with olive oil spray for added crispiness.Bake for 20–25 minutes, flipping halfway through. The tenders should be golden brown and crispy.Ensure the chicken reaches an internal temperature of 165°F (74°C) for safety.8️⃣Serve and Enjoy:Remove the tenders from the oven and let them rest for 2–3 minutes.Serve warm with your favorite dipping sauces like honey mustard, BBQ sauce, or ranch dressing
  5. In another shallow bowl, mix together the breadcrumbs, Parmesan cheese (if using), garlic powder, paprika, onion powder, salt, and black pepper.3️⃣Season the Chicken:Lightly season the chicken strips with a pinch of salt and pepper.4️⃣Bread the Chicken:Dip each chicken strip into the beaten egg, letting the excess drip off.Coat the chicken strip in the breadcrumb mixture, pressing gently to ensure the coating adheres.For extra crunch, repeat the egg and breadcrumb dipping process (double coating).5️⃣Prepare the Baking Sheet:Line a baking sheet with parchment paper or a silicone baking mat for easy cleanup.Place a wire rack on top of the baking sheet if available; this allows for even air circulation and a crispier result.6️⃣Arrange the Chicken on the Baking Sheet:Lay the breaded chicken tenders on the prepared baking sheet or wire rack, ensuring space between each piece for even cooking.7️⃣Bake the Chicken Tenders:Preheat your oven to 400°F (200°C).Lightly spray the tenders with olive oil spray for added crispiness.Bake for 20–25 minutes, flipping halfway through. The tenders should be golden brown and crispy.Ensure the chicken reaches an internal temperature of 165°F (74°C) for safety.8️⃣Serve and Enjoy:Remove the tenders from the oven and let them rest for 2–3 minutes.Serve warm with your favorite dipping sauces like honey mustard, BBQ sauce, or ranch dressing
  6. 3️⃣Season the Chicken:
  7. Lightly season the chicken strips with a pinch of salt and pepper.4️⃣Bread the Chicken:Dip each chicken strip into the beaten egg, letting the excess drip off.Coat the chicken strip in the breadcrumb mixture, pressing gently to ensure the coating adheres.For extra crunch, repeat the egg and breadcrumb dipping process (double coating).5️⃣Prepare the Baking Sheet:Line a baking sheet with parchment paper or a silicone baking mat for easy cleanup.Place a wire rack on top of the baking sheet if available; this allows for even air circulation and a crispier result.6️⃣Arrange the Chicken on the Baking Sheet:Lay the breaded chicken tenders on the prepared baking sheet or wire rack, ensuring space between each piece for even cooking.7️⃣Bake the Chicken Tenders:Preheat your oven to 400°F (200°C).Lightly spray the tenders with olive oil spray for added crispiness.Bake for 20–25 minutes, flipping halfway through. The tenders should be golden brown and crispy.Ensure the chicken reaches an internal temperature of 165°F (74°C) for safety.8️⃣Serve and Enjoy:Remove the tenders from the oven and let them rest for 2–3 minutes.Serve warm with your favorite dipping sauces like honey mustard, BBQ sauce, or ranch dressing
  8. 4️⃣Bread the Chicken:Dip each chicken strip into the beaten egg, letting the excess drip off.Coat the chicken strip in the breadcrumb mixture, pressing gently to ensure the coating adheres.For extra crunch, repeat the egg and breadcrumb dipping process (double coating).5️⃣Prepare the Baking Sheet:Line a baking sheet with parchment paper or a silicone baking mat for easy cleanup.Place a wire rack on top of the baking sheet if available; this allows for even air circulation and a crispier result.6️⃣Arrange the Chicken on the Baking Sheet:Lay the breaded chicken tenders on the prepared baking sheet or wire rack, ensuring space between each piece for even cooking.7️⃣Bake the Chicken Tenders:Preheat your oven to 400°F (200°C).Lightly spray the tenders with olive oil spray for added crispiness.Bake for 20–25 minutes, flipping halfway through. The tenders should be golden brown and crispy.Ensure the chicken reaches an internal temperature of 165°F (74°C) for safety.8️⃣Serve and Enjoy:Remove the tenders from the oven and let them rest for 2–3 minutes.Serve warm with your favorite dipping sauces like honey mustard, BBQ sauce, or ranch dressing
  9. Dip each chicken strip into the beaten egg, letting the excess drip off.
  10. Coat the chicken strip in the breadcrumb mixture, pressing gently to ensure the coating adheres.For extra crunch, repeat the egg and breadcrumb dipping process (double coating).5️⃣Prepare the Baking Sheet:Line a baking sheet with parchment paper or a silicone baking mat for easy cleanup.Place a wire rack on top of the baking sheet if available; this allows for even air circulation and a crispier result.6️⃣Arrange the Chicken on the Baking Sheet:Lay the breaded chicken tenders on the prepared baking sheet or wire rack, ensuring space between each piece for even cooking.7️⃣Bake the Chicken Tenders:Preheat your oven to 400°F (200°C).Lightly spray the tenders with olive oil spray for added crispiness.Bake for 20–25 minutes, flipping halfway through. The tenders should be golden brown and crispy.Ensure the chicken reaches an internal temperature of 165°F (74°C) for safety.8️⃣Serve and Enjoy:Remove the tenders from the oven and let them rest for 2–3 minutes.Serve warm with your favorite dipping sauces like honey mustard, BBQ sauce, or ranch dressing
  11. For extra crunch, repeat the egg and breadcrumb dipping process (double coating).5️⃣Prepare the Baking Sheet:Line a baking sheet with parchment paper or a silicone baking mat for easy cleanup.Place a wire rack on top of the baking sheet if available; this allows for even air circulation and a crispier result.6️⃣Arrange the Chicken on the Baking Sheet:Lay the breaded chicken tenders on the prepared baking sheet or wire rack, ensuring space between each piece for even cooking.7️⃣Bake the Chicken Tenders:Preheat your oven to 400°F (200°C).Lightly spray the tenders with olive oil spray for added crispiness.Bake for 20–25 minutes, flipping halfway through. The tenders should be golden brown and crispy.Ensure the chicken reaches an internal temperature of 165°F (74°C) for safety.8️⃣Serve and Enjoy:Remove the tenders from the oven and let them rest for 2–3 minutes.Serve warm with your favorite dipping sauces like honey mustard, BBQ sauce, or ranch dressing
  12. 5️⃣Prepare the Baking Sheet:
  13. Line a baking sheet with parchment paper or a silicone baking mat for easy cleanup.Place a wire rack on top of the baking sheet if available; this allows for even air circulation and a crispier result.6️⃣Arrange the Chicken on the Baking Sheet:Lay the breaded chicken tenders on the prepared baking sheet or wire rack, ensuring space between each piece for even cooking.7️⃣Bake the Chicken Tenders:Preheat your oven to 400°F (200°C).Lightly spray the tenders with olive oil spray for added crispiness.Bake for 20–25 minutes, flipping halfway through. The tenders should be golden brown and crispy.Ensure the chicken reaches an internal temperature of 165°F (74°C) for safety.8️⃣Serve and Enjoy:Remove the tenders from the oven and let them rest for 2–3 minutes.Serve warm with your favorite dipping sauces like honey mustard, BBQ sauce, or ranch dressing
  14. Place a wire rack on top of the baking sheet if available; this allows for even air circulation and a crispier result.6️⃣Arrange the Chicken on the Baking Sheet:Lay the breaded chicken tenders on the prepared baking sheet or wire rack, ensuring space between each piece for even cooking.7️⃣Bake the Chicken Tenders:Preheat your oven to 400°F (200°C).Lightly spray the tenders with olive oil spray for added crispiness.Bake for 20–25 minutes, flipping halfway through. The tenders should be golden brown and crispy.Ensure the chicken reaches an internal temperature of 165°F (74°C) for safety.8️⃣Serve and Enjoy:Remove the tenders from the oven and let them rest for 2–3 minutes.Serve warm with your favorite dipping sauces like honey mustard, BBQ sauce, or ranch dressing
  15. 6️⃣Arrange the Chicken on the Baking Sheet:
  16. Lay the breaded chicken tenders on the prepared baking sheet or wire rack, ensuring space between each piece for even cooking.7️⃣Bake the Chicken Tenders:Preheat your oven to 400°F (200°C).Lightly spray the tenders with olive oil spray for added crispiness.Bake for 20–25 minutes, flipping halfway through. The tenders should be golden brown and crispy.Ensure the chicken reaches an internal temperature of 165°F (74°C) for safety.8️⃣Serve and Enjoy:Remove the tenders from the oven and let them rest for 2–3 minutes.Serve warm with your favorite dipping sauces like honey mustard, BBQ sauce, or ranch dressing
  17. 7️⃣Bake the Chicken Tenders:Preheat your oven to 400°F (200°C).Lightly spray the tenders with olive oil spray for added crispiness.Bake for 20–25 minutes, flipping halfway through. The tenders should be golden brown and crispy.Ensure the chicken reaches an internal temperature of 165°F (74°C) for safety.8️⃣Serve and Enjoy:Remove the tenders from the oven and let them rest for 2–3 minutes.Serve warm with your favorite dipping sauces like honey mustard, BBQ sauce, or ranch dressing
  18. Preheat your oven to 400°F (200°C).
  19. Lightly spray the tenders with olive oil spray for added crispiness.Bake for 20–25 minutes, flipping halfway through. The tenders should be golden brown and crispy.Ensure the chicken reaches an internal temperature of 165°F (74°C) for safety.8️⃣Serve and Enjoy:Remove the tenders from the oven and let them rest for 2–3 minutes.Serve warm with your favorite dipping sauces like honey mustard, BBQ sauce, or ranch dressing
  20. Bake for 20–25 minutes, flipping halfway through. The tenders should be golden brown and crispy.Ensure the chicken reaches an internal temperature of 165°F (74°C) for safety.8️⃣Serve and Enjoy:Remove the tenders from the oven and let them rest for 2–3 minutes.Serve warm with your favorite dipping sauces like honey mustard, BBQ sauce, or ranch dressing
  21. Ensure the chicken reaches an internal temperature of 165°F (74°C) for safety.
  22. 8️⃣Serve and Enjoy:Remove the tenders from the oven and let them rest for 2–3 minutes.Serve warm with your favorite dipping sauces like honey mustard, BBQ sauce, or ranch dressing
  23. Remove the tenders from the oven and let them rest for 2–3 minutes.Serve warm with your favorite dipping sauces like honey mustard, BBQ sauce, or ranch dressing
  24. Serve warm with your favorite dipping sauces like honey mustard, BBQ sauce, or ranch dressing

Notes

Custom Coating:Add a bit of grated lemon zest to the breadcrumb mixture for a zesty flavor twist.Storage:Store leftovers in an airtight container in the refrigerator for up to 3 days. Reheat in the oven at 375°F (190°C) to maintain crispiness.Freezer-Friendly:Bread the tenders, arrange them on a baking sheet, and freeze. Once frozen, transfer to a freezer bag. Bake from frozen at 400°F (200°C) for 30–35 minutes.
Storage:Store leftovers in an airtight container in the refrigerator for up to 3 days. Reheat in the oven at 375°F (190°C) to maintain crispiness.Freezer-Friendly:Bread the tenders, arrange them on a baking sheet, and freeze. Once frozen, transfer to a freezer bag. Bake from frozen at 400°F (200°C) for 30–35 minutes.
Freezer-Friendly:Bread the tenders, arrange them on a baking sheet, and freeze. Once frozen, transfer to a freezer bag. Bake from frozen at 400°F (200°C) for 30–35 minutes.

“`

Irresistible Pecan Pie Brownies Recipe You Need to Try

“`html

Irresistible Pecan Pie Brownies Recipe You Need to Try

Why You’ll Love These Pecan Pie Brownies

These Pecan Pie Brownie Bites are an absolute game-changer, a delightful fusion that takes two beloved desserts and elevates them into one unforgettable treat. Imagine biting into a perfectly fudgy brownie base, dense and chocolatey, only to discover a layer of gooey, sweet, and gloriously nutty pecan pie filling nestled right on top. It’s a textural and flavor explosion that’s almost too good to be true. This recipe is specifically designed to be approachable, delivering those complex flavors and delightful textures without requiring advanced baking skills. Whether you’re hosting a holiday gathering, planning a potluck, or simply craving a sophisticated yet comforting dessert, these pecan pie brownies are sure to be a showstopper. They’re the perfect bite-sized indulgence, making them ideal for sharing (or not!). Let’s dive into how you can create these little pockets of pure joy in your own kitchen.

Irresistible Ingredients

The magic of these Pecan Pie Brownies lies in the harmonious blend of two distinct yet complementary components: the rich, fudgy brownie base and the luscious, nutty pecan topping. Gathering the right ingredients is the first step to baking bliss.

For the Fudgy Brownie Base

  • 1 cup (2 sticks) unsalted butter, melted (provides a smooth, rich texture; use good quality butter for best flavor)
  • 2 cups granulated sugar (essential for that classic brownie sweetness and fudgy crumb)
  • 4 large eggs, room temperature (binds the ingredients and adds richness; room temp eggs incorporate better)
  • 1 teaspoon pure vanilla extract (enhances the chocolate flavor and adds a subtle depth)
  • 1 cup all-purpose flour (the right amount for structure without making them cakey)
  • 3/4 cup unsweetened cocoa powder (use a good quality Dutch-processed cocoa for a deep, dark chocolate flavor)
  • 1/2 teaspoon baking powder (just a touch for lift, not too much to keep them fudgy)
  • 1/2 teaspoon salt (balances the sweetness and intensifies chocolate flavor)
  • 1 cup chopped pecans, lightly toasted (optional, but adds an extra layer of nutty texture to the brownie itself)

For the Gooey Pecan Pie Topping

  • 1 cup packed light brown sugar (melts into a wonderfully sweet, caramel-like syrup for the filling)
  • 1/2 cup (1 stick) unsalted butter, melted (adds richness and helps create a smooth, pourable filling)
  • 2 large eggs, lightly beaten (act as a binder and add structure to the caramel filling)
  • 2 tablespoons milk or heavy cream (for a silkier, smoother consistency)
  • 1 teaspoon pure vanilla extract (brightens the flavors of the pecan pie filling)
  • 1/4 teaspoon salt (essential to cut through the sweetness and balance the flavors)
  • 2 cups chopped pecans (the star of the show! fresh, crunchy pecans are key for texture and taste)

Timing is Everything

Prep Time: 20 minutes
Cook Time: 30-35 minutes
Total Time: 50-55 minutes
Yields: 16-24 brownies

Compared to a traditional brownie recipe, these pecan pie brownies might take a few minutes longer due to the two-part preparation. However, the combined effort is well worth it for the dual-layered deliciousness. Average brownie recipes often take around 30-40 minutes total, while a classic pecan pie can take similar baking time but with a more involved filling. This recipe cleverly merges both processes for maximum flavor impact in a reasonable timeframe.

Close-up of Pecan Pie Brownie Bites, showcasing the fudgy brownie base and gooey pecan topping.

Crafting Your Masterpiece: Step-by-Step

Let’s get baking! Follow these simple steps to create the most delightful Pecan Pie Brownies.

Step 1: Preheat and Prep

Grab your favorite 9×13 inch baking pan. Line it with parchment paper, leaving an overhang on the sides. This makes lifting out the brownies a breeze. Preheat your oven to 350°F (175°C). This ensures an even, consistent baking temperature for both the brownie base and the pecan topping.

Step 2: Melt Butter and Chocolate

In a medium microwave-safe bowl, combine the melted butter. If you’re adding chopped pecans to the brownie base, toast them lightly in a dry skillet over medium heat until fragrant, then set aside to cool. This step won’t be for the topping. For the brownie base, this step is about getting the fats ready.

Step 3: Whisk Sugar and Eggs

In a large bowl, whisk together the granulated sugar and room temperature eggs until well combined and slightly lighter in color. Add the vanilla extract and whisk again. Don’t over-whisk, just ensure everything is incorporated smoothly.

Step 4: Combine Wet and Dry Ingredients

To the sugar and egg mixture, gradually add the melted butter. Stir until just combined. In a separate small bowl, whisk together the flour, cocoa powder, baking powder, and salt. Gradually add the dry ingredients to the wet ingredients, mixing with a spatula until *just* combined. Be careful not to overmix, as this can lead to tough brownies. If using, gently fold in the toasted chopped pecans for the brownie base.

Step 5: Spread the Brownie Batter

Pour the brownie batter into the prepared baking pan. Use a spatula to spread it evenly to the edges. The batter will be thick but spreadable.

Step 6: Prepare the Pecan Topping

While the brownie batter is in the pan, prepare the gooey pecan pie topping. In a medium bowl, whisk together the melted butter, packed light brown sugar, lightly beaten eggs, milk (or cream), vanilla extract, and salt until smooth and well combined. Stir in the 2 cups of chopped pecans until they are thoroughly coated in the syrupy mixture.

Step 7: Add Topping and Bake

Carefully spoon and spread the pecan pie topping evenly over the brownie batter. Try to cover the entire surface. Place the pan in the preheated oven and bake for 30-35 minutes, or until the edges of the brownies are set and the pecan topping is bubbly. A toothpick inserted near the center of the brownies should come out with moist crumbs, but not wet batter.

Step 8: Cool and Cut

This is crucial! Let the brownies cool completely in the pan on a wire rack. Trying to cut them while warm can be messy. Once fully cooled, use the parchment paper overhang to lift the entire brownie slab out of the pan. Cut into desired squares or bite-sized pieces. For perfect edges, use a sharp knife and wipe it clean between cuts.

Nutritional Spotlight

While individual nutritional values can vary based on exact ingredients and portion sizes, a typical serving of these Pecan Pie Brownies is approximately:

  • Calories: 350-450 kcal
  • Carbohydrates: 40-50g
  • Fat: 20-30g
  • Protein: 5-7g
  • Sugar: 30-40g

Please note: This is an estimated range and not a precise calculation. For exact figures, it’s recommended to use a nutritional calculator with your specific ingredient amounts.

Healthier Twists on a Classic

Craving a slightly lighter version without sacrificing flavor? Try these adjustments:

  • Reduced Sugar: Decrease granulated sugar in the brownie base by 1/4 cup and brown sugar in the topping by 1/4 cup. You can also use a sugar substitute designed for baking.
  • Whole Wheat Flour: Substitute half of the all-purpose flour with whole wheat pastry flour for added fiber.
  • Darker Chocolate: Use a higher percentage cocoa powder (e.g., 70-85%) for a less sweet, more intense chocolate flavor.
  • Healthier Fats: In the brownie base, consider replacing some butter with unsweetened applesauce or avocado puree (this will alter texture slightly). For the topping, a small amount of maple syrup can partially replace brown sugar, though the consistency will change.
  • Portion Control: The easiest way to make them healthier is simply to cut them into smaller, bite-sized pieces!

Serving Perfection

These Pecan Pie Brownies are fantastic on their own, but here are some ideas to elevate them:

  • A la Mode: Serve warm with a scoop of vanilla bean or caramel ice cream. The contrast in temperature and texture is divine.
  • Whipped Cream: A dollop of freshly whipped cream (or a non-dairy alternative) adds a light, airy contrast.
  • Drizzle: A light drizzle of chocolate sauce or caramel adds an extra touch of decadence.
  • Coffee or Tea: They pair wonderfully with a hot cup of coffee or your favorite herbal tea, making them an ideal afternoon pick-me-up.

Avoid These Common Pitfalls

  • Overmixing the Batter: This develops gluten, leading to tough, cakey brownies instead of fudgy ones. Mix until *just* combined.
  • Undercooking or Overcooking: Underbaked brownies can be too gooey and fall apart, while overbaked ones become dry and crumbly. Keep an eye on the bake time and test with a toothpick.
  • Cutting While Warm: Patience is key! Let them cool completely for clean, defined slices.
  • Not Toasting Pecans: While optional, toasting pecans for the brownie base (if you choose to add them) significantly enhances their flavor and crunch.

Storing Your Delicious Creations

Store leftover Pecan Pie Brownies in an airtight container at room temperature for up to 3 days. For longer storage, they can be refrigerated for up to a week. Bring them back to room temperature before serving for the best texture, or gently warm them in the microwave for a few seconds for a comforting treat.

The Final Bite

There you have it – a recipe for Pecan Pie Brownies that’s as delightful to make as it is to devour. This fusion dessert offers a perfect balance of rich chocolate, sweet caramel, and crunchy nuts, all in one irresistible bite. It’s the kind of treat that makes any occasion feel special. Don’t wait; gather your ingredients and bake up some magic!

Frequently Asked Questions

***Can I use other nuts instead of pecans?***

Absolutely! Walnuts are a fantastic substitute and offer a similar texture and flavor profile. You could also experiment with almonds or even a mix of nuts.

***How do I ensure my brownies are fudgy and not cakey?***

The key is not to overmix the batter, using enough fat (butter and eggs), and baking just until moist crumbs form on a toothpick, not completely dry.

***Can I make these ahead of time?***

Yes! These brownies are excellent made a day in advance. They often taste even better as the flavors meld together. Just be sure to store them properly.

***My pecan topping looks a little runny, is that okay?***

A slightly runny topping before baking is perfectly normal! It will thicken and set as it bakes, forming that wonderful gooey layer. Just ensure it covers the brownie batter evenly.

***What is the best way to cut clean brownies?***

Allow the brownies to cool completely. Then, use a large, sharp knife. For extra clean cuts, dip the knife in hot water and wipe it dry between each cut.

Print
clock clock iconcutlery cutlery iconflag flag iconfolder folder iconinstagram instagram iconpinterest pinterest iconfacebook facebook iconprint print iconsquares squares iconheart heart iconheart solid heart solid icon

Irresistible Pecan Pie Brownie Bites

  • Author: Chef Mia

Description

ThesePecan Pie Brownie Bitescombine the fudgy richness of brownies with the gooey, nutty goodness of pecan pie. Perfect for parties, holidays, or as a delightful bite-sized treat, they’re irresistibly delicious and easy to make!


Ingredients

  • For the Brownie Layer:½ cupunsalted butter, melted1 cupgranulated sugar2large eggs1 tspvanilla extract½ cupall-purpose flour⅓ cupunsweetened cocoa powder¼ tspsalt¼ tspbaking powderFor the Pecan Pie Layer:½ cuplight corn syrup¼ cupbrown sugar, packed¼ cupunsalted butter, melted2large eggs1 tspvanilla extract1 ½ cupspecan halves
  • For the Pecan Pie Layer:½ cuplight corn syrup¼ cupbrown sugar, packed¼ cupunsalted butter, melted2large eggs1 tspvanilla extract1 ½ cupspecan halves

Instructions

  1. Preheat your oven to 350°F (175°C). Line a mini muffin tin with paper liners or grease it well.In a medium bowl, whisk together the melted butter and sugar until well combined.Add the eggs and vanilla extract, and whisk until smooth and creamy.In a separate bowl, mix the flour, cocoa powder, salt, and baking powder. Gradually fold the dry ingredients into the wet mixture until just combined.Spoon about 1 tablespoon of brownie batter into each muffin cup, filling each about halfway.Bake for 10–12 minutes, or until a toothpick inserted into the center comes out mostly clean (a little fudgy is fine). Let the brownie bites cool slightly while you prepare the pecan pie layer.
  2. In a medium bowl, whisk together the melted butter and sugar until well combined.Add the eggs and vanilla extract, and whisk until smooth and creamy.In a separate bowl, mix the flour, cocoa powder, salt, and baking powder. Gradually fold the dry ingredients into the wet mixture until just combined.Spoon about 1 tablespoon of brownie batter into each muffin cup, filling each about halfway.Bake for 10–12 minutes, or until a toothpick inserted into the center comes out mostly clean (a little fudgy is fine). Let the brownie bites cool slightly while you prepare the pecan pie layer.
  3. Add the eggs and vanilla extract, and whisk until smooth and creamy.In a separate bowl, mix the flour, cocoa powder, salt, and baking powder. Gradually fold the dry ingredients into the wet mixture until just combined.Spoon about 1 tablespoon of brownie batter into each muffin cup, filling each about halfway.Bake for 10–12 minutes, or until a toothpick inserted into the center comes out mostly clean (a little fudgy is fine). Let the brownie bites cool slightly while you prepare the pecan pie layer.
  4. In a separate bowl, mix the flour, cocoa powder, salt, and baking powder. Gradually fold the dry ingredients into the wet mixture until just combined.Spoon about 1 tablespoon of brownie batter into each muffin cup, filling each about halfway.Bake for 10–12 minutes, or until a toothpick inserted into the center comes out mostly clean (a little fudgy is fine). Let the brownie bites cool slightly while you prepare the pecan pie layer.
  5. Spoon about 1 tablespoon of brownie batter into each muffin cup, filling each about halfway.Bake for 10–12 minutes, or until a toothpick inserted into the center comes out mostly clean (a little fudgy is fine). Let the brownie bites cool slightly while you prepare the pecan pie layer.
  6. Bake for 10–12 minutes, or until a toothpick inserted into the center comes out mostly clean (a little fudgy is fine). Let the brownie bites cool slightly while you prepare the pecan pie layer.
  7. In a medium bowl, whisk together the corn syrup, brown sugar, melted butter, eggs, and vanilla extract until smooth.Stir in the pecan halves, ensuring they are evenly coated in the syrup mixture.
  8. Stir in the pecan halves, ensuring they are evenly coated in the syrup mixture.
  9. Spoon about 1 tablespoon of the pecan pie filling on top of each brownie bite, ensuring an even distribution of pecans.Return the muffin tin to the oven and bake for an additional 12–15 minutes, or until the pecan pie layer is set and bubbly.
  10. Return the muffin tin to the oven and bake for an additional 12–15 minutes, or until the pecan pie layer is set and bubbly.
  11. Allow the bites to cool completely in the pan before removing them to avoid breaking.Serve and enjoy the rich, decadent combination of pecan pie and brownies in every bite!
  12. Serve and enjoy the rich, decadent combination of pecan pie and brownies in every bite!

Notes

These bites are best stored in an airtight container at room temperature for up to 3 days or in the refrigerator for up to a week.For an extra decorative touch, drizzle melted chocolate over the top before serving.Use a silicone muffin tin for easy removal, as the pecan pie layer can get sticky.
For an extra decorative touch, drizzle melted chocolate over the top before serving.Use a silicone muffin tin for easy removal, as the pecan pie layer can get sticky.
Use a silicone muffin tin for easy removal, as the pecan pie layer can get sticky.

“`