Delicious Fruit Bread Recipes to Try Today

“`html

Delicious Fruit Bread Recipes to Try Today

Are you seeking that perfect slice of comfort, a sweet escape that tantalizes your taste buds? With the average person consuming roughly 10 slices of bread per week, it’s no wonder that creative and delicious bread variations are always in demand. Fruit bread, in particular, offers a delightful balance of sweetness, texture, and aroma, making it a versatile treat for any occasion. Whether you’re craving a warm, fruity breakfast, a decadent dessert, or a satisfying afternoon snack, this guide to delicious fruit bread recipes is your ultimate companion. We’ll explore easy-to-follow recipes designed to bring sunshine to your kitchen, no matter the season.

Essential Ingredients for Irresistible Fruit Bread

The magic of fruit bread lies in its ability to transform simple ingredients into a symphony of flavors and textures. Here’s a breakdown of what you’ll typically need, with suggestions for substitutions to suit your pantry and preferences.

  • All-Purpose Flour: The foundation of your bread. Provides structure and a tender crumb. Substitution: You can use a blend of whole wheat and all-purpose flour for a nuttier flavor and added fiber, or a gluten-free flour blend for those with sensitivities.
  • Fresh or Dried Fruits: The stars of the show! Think plump berries, tart cranberries, sweet apples, juicy pears, or zesty citrus segments. Use them fresh, dried, or frozen for a burst of flavor and a delightful chew. Examples: Blueberries, raspberries, chopped apples, dried cranberries, raisins, chopped apricots, candied citrus peel.
  • Sweetener: Sugar, honey, maple syrup, or brown sugar to balance the tartness of fruits and enhance browning. The type of sweetener influences the final flavor and moisture content. Substitution: Maple syrup or agave nectar can be used as liquid sweeteners, though you may need to adjust other liquid ingredients slightly.
  • Fat: Butter, oil (vegetable, canola, or coconut), or yogurt for richness, moisture, and tenderness. Melted butter or oil creates a moister loaf. Substitution: Applesauce or mashed banana can replace some of the oil or butter for a healthier, naturally sweeter loaf.
  • Eggs: Bind ingredients, provide structure, and add richness. Substitution: A flax egg (1 tbsp flaxseed meal + 3 tbsp water, let sit for 5 mins) or a commercial egg replacer can be used for vegan options.
  • Leavening Agent: Baking soda or baking powder is crucial for a light and airy texture. Baking soda reacts with acidic ingredients, while baking powder contains both acid and base. Note: Ensure yours is fresh for optimal lift.
  • Liquid: Milk, buttermilk, water, or juice (like orange or apple) to activate leavening agents and hydrate the flour. Buttermilk and yogurt add a wonderful tang and tenderness. Substitution: Plant-based milks (almond, soy, oat) are excellent dairy-free alternatives.
  • Flavor Enhancers: Vanilla extract, cinnamon, nutmeg, orange zest, or lemon zest add depth and warmth to your bread. A pinch of salt is also vital to balance sweetness.

Timing is Everything: Prep, Cook, and Total Time

Prep Time: 20-25 minutes
Cook Time: 45-60 minutes
Total Time: 1 hour 5 minutes – 1 hour 25 minutes

Compared to a standard quick bread, fruit breads can take slightly longer due to the preparation of fresh fruit and potentially a slightly longer baking time to ensure the center is cooked through without burning the exterior. This bake time can vary based on the moisture content of your fruit and the size of your loaf pan. Always check for doneness with a toothpick inserted into the center – it should come out clean!

Close-up of a delicious fruit bread loaf sliced, showing plump berries and a golden crust.

Step-by-Step: Crafting Your Perfect Fruit Bread

Let’s get baking! This general guide outlines the process for creating a fantastic fruit bread. Remember to preheat your oven and prepare your loaf pan (greased and floured, or lined with parchment paper) before you begin.

Step 1: Prepare the Fruit

If using fresh fruit, rinse and gently pat it dry. For larger fruits like apples or pears, peel, core, and chop them into bite-sized pieces. For berries, you can leave them whole or gently halve them if they are very large. If using dried fruit like raisins or cranberries, give them a quick rinse and pat dry, or soak them in warm water or juice for about 10 minutes to plump them up, then drain well. Tossing your fruit with a tablespoon of the flour from your dry ingredients can help prevent them from sinking to the bottom of the loaf.

Step 2: Whisk Together Dry Ingredients

In a large mixing bowl, whisk together the flour, sugar, baking powder and/or baking soda, salt, and any spices like cinnamon or nutmeg. Whisking thoroughly ensures that the leavening agents and seasonings are evenly distributed throughout the batter, contributing to a uniform rise and flavor.

Step 3: Combine Wet Ingredients

In a separate medium bowl, whisk together the eggs, melted butter or oil, milk (or other liquid), and vanilla extract until well combined. If you’re using a sweetener like honey or maple syrup, add it to the wet ingredients.

Step 4: Gently Incorporate the Fruit

Pour the wet ingredients into the bowl with the dry ingredients. Mix with a spatula or wooden spoon until just combined. Be careful not to overmix; a few streaks of flour are perfectly fine. Overmixing can develop the gluten too much, resulting in a tough bread. Now, gently fold in your prepared fruit. Use a light hand to distribute the fruit evenly throughout the batter without crushing it.

Step 5: Bake to Perfection

Pour the batter into your prepared loaf pan and spread it evenly. Place the pan in your preheated oven. Bake for the recommended time (typically 45-60 minutes). You can test for doneness by inserting a wooden skewer or toothpick into the center of the loaf. If it comes out clean, or with just a few moist crumbs attached, your bread is ready. If it comes out with wet batter, continue baking for another 5-10 minutes and test again.

Step 6: Cool and Enjoy

Once baked, let the fruit bread cool in the pan for about 10-15 minutes before carefully inverting it onto a wire rack to cool completely. Allowing it to cool on a wire rack prevents a soggy bottom and ensures even cooling. Enjoy slices warm or at room temperature!

Nutritional Snapshot

The nutritional content of fruit bread can vary significantly based on the ingredients used. However, a typical slice might offer:

  • Calories: 150-250 kcal
  • Carbohydrates: 25-40g
  • Protein: 3-5g
  • Fat: 5-10g
  • Fiber: 1-3g (higher with whole grains and certain fruits)

Note: This is an approximate range. For precise information, refer to the specific recipe you are following and use a nutritional calculator if needed.

Healthier Swaps for Guilt-Free Indulgence

Looking to make your fruit bread a bit lighter without sacrificing flavor? Here are some delicious and conscious swaps:

  • Flour Power: Replace half of the all-purpose flour with whole wheat flour for added fiber and nutrients.
  • Sweetness Redefined: Reduce the amount of added sugar and rely on the natural sweetness of fruits. You can also use fruit purees like applesauce or mashed banana to replace some of the sugar and fat.
  • Fat Facts: Opt for healthier fats like olive oil or coconut oil, or replace some of the butter/oil with Greek yogurt or applesauce for moisture and a reduced fat content.
  • Fruit Focus: Load up on antioxidant-rich berries, which are naturally lower in sugar and add vibrant color and flavor.

Delicious Serving Suggestions

Fruit bread is wonderfully versatile! Here are some delightful ways to enjoy it:

  • Toasted: A classic for a reason! Toast slices until golden brown and spread with butter, cream cheese, or a dollop of fruit preserves.
  • With Cheese: Pairs beautifully with mild cheeses like brie or goat cheese for a sweet and savory bite.
  • As French Toast: Thicker slices make excellent French toast. Dip them in an egg mixture and pan-fry until golden.
  • With Yogurt or Cream: A simple dollop of fresh yogurt or whipped cream enhances its dessert-like qualities.
  • As a Base for Trifle: Cubed fruit bread can be layered with custard, fruit, and cream for a delightful trifle.

Avoiding Common Fruit Bread Pitfalls

Even the simplest recipes can have a few common hiccups. Here’s how to avoid them:

  • Overmixing: This is the number one culprit for tough, dense bread. Mix wet and dry ingredients until *just* combined.
  • Fruit Sinking: Ensure your fruit is well-coated in flour before adding it to the batter, especially if using very wet or large pieces. Try not to overmix after adding the fruit.
  • Uneven Baking: Ovens can have hot spots. Rotate your pan halfway through baking. If the top is browning too quickly, loosely tent it with foil.
  • Underbaking: Always test for doneness with a toothpick or skewer. A moist crumb is good, but wet batter means it needs more time.

Storing Your Fruit Bread Treasure

Proper storage ensures your delicious fruit bread stays fresh and enjoyable:

  • Room Temperature: Once completely cool, store the bread in an airtight container or wrap it tightly in plastic wrap or foil. It will stay fresh for 2-3 days.
  • Refrigeration: For longer storage (up to a week), keep it in an airtight container in the refrigerator. Note that refrigeration can sometimes dry out bread, so toasting might be preferable.
  • Freezing: Fruit bread freezes beautifully! Wrap it tightly in plastic wrap, then in aluminum foil, or place it in a freezer bag. It can be frozen for up to 3 months. Thaw at room temperature or gently reheat slices in the oven.

Savor the Sweetness: Your Fruit Bread Journey Begins

Fruit bread is more than just a baked good; it’s a delightful expression of comfort, flavor, and creativity. With these tips and techniques, you’re well-equipped to bake a loaf that will impress your family and friends, or simply treat yourself to a moment of pure, fruity bliss. Don’t be afraid to experiment with different fruit combinations and spices to create your signature fruit bread. Happy baking!

Frequently Asked Questions

What kind of fruits work best in fruit bread?

Almost any fruit can be used! Berries (blueberries, raspberries, strawberries), stone fruits (peaches, plums, cherries), apples, pears, bananas, and dried fruits (raisins, cranberries, apricots) are all popular choices. Ensure they are ripe but not overly mushy.

How do I prevent my fruit from sinking to the bottom?

The best trick is to coat your fruit with a tablespoon or two of the dry flour mixture before adding it to the batter. This helps the fruit “cling” to the batter and reduces its tendency to sink. Also, avoid overmixing after adding the fruit.

Can I use frozen fruit instead of fresh?

Yes, you can! It’s often recommended to use frozen fruit without thawing it first, as thawing can release too much moisture. Make sure to coat the frozen fruit directly in the flour mixture. You may need to add a few extra minutes to the baking time.

My fruit bread came out dry. What did I do wrong?

This can happen if the bread is overbaked or if too much liquid evaporated during baking. Ensure you measure your ingredients accurately, don’t overmix the batter, and keep an eye on the baking time. Using ingredients like yogurt, applesauce, or buttermilk can also add extra moisture.

How can I make my fruit bread more flavorful?

Experiment with spices like cinnamon, nutmeg, cardamom, or ginger. Adding citrus zest (lemon or orange) provides a bright, fresh note. A touch of vanilla extract is also a great enhancer. Using a liquid like buttermilk or even a fruit juice instead of plain water can also boost flavor.

Print
clock clock iconcutlery cutlery iconflag flag iconfolder folder iconinstagram instagram iconpinterest pinterest iconfacebook facebook iconprint print iconsquares squares iconheart heart iconheart solid heart solid icon

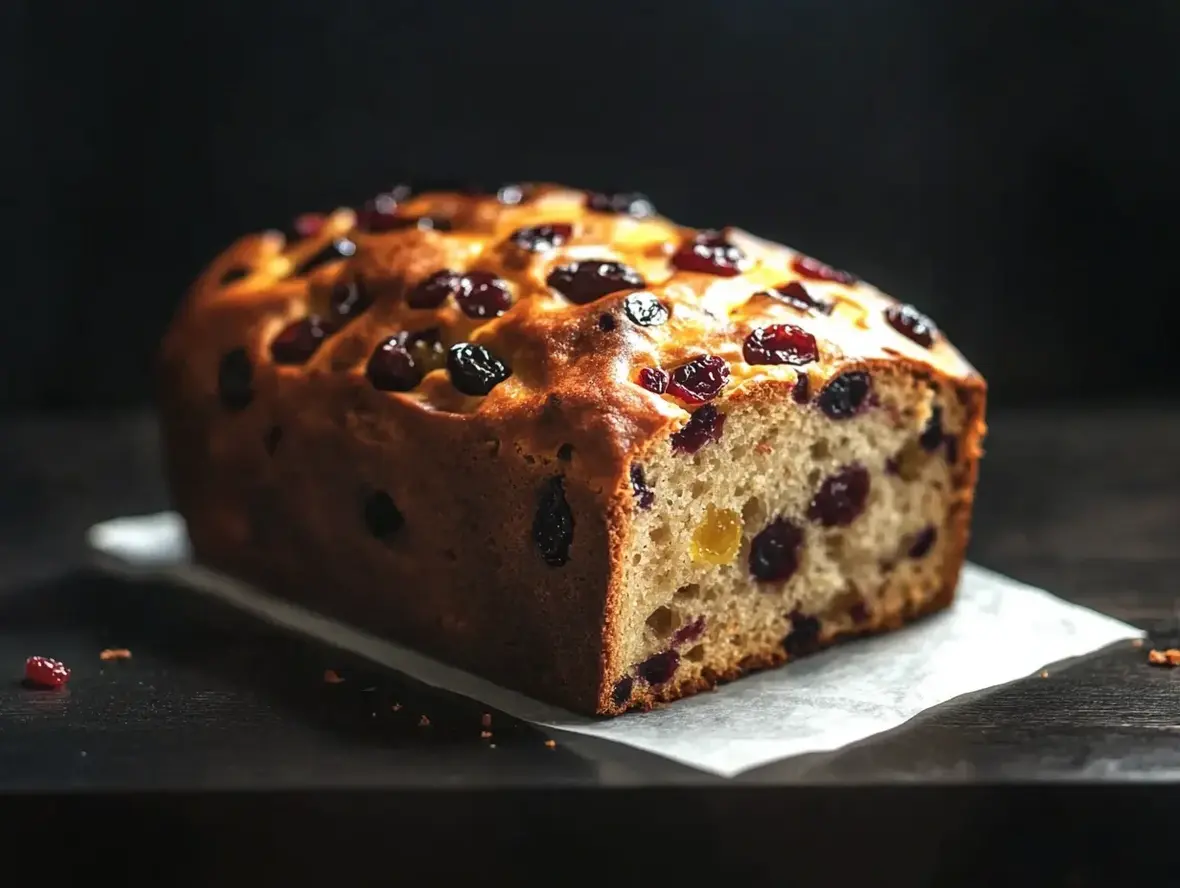
Homemade Fruit Bread

  • Author: Chef Sara

Description

Thisfruit breadis soft, slightly spiced, and packed with a mix of delicious dried fruits. It’s a perfect treat for breakfast, snacks, or even as a base for decadent French toast. The recipe is simple, no-knead, and full of warm spices that complement the sweetness of the dried fruits.


Ingredients

Scale
  • 357 g(2 3/4 cupsloosely packed) all-purpose flour210ml (1 cup minus 2 tbsp) warm water1 tspinstant yeast (or1 1/4 tspactive dry yeast)1 tspsalt (5.9 g)42.6 g(3 tbsp) butter, melted32 g(2 1/2 tbsp) sugar (adjust to taste)
  • 210ml (1 cup minus 2 tbsp) warm water1 tspinstant yeast (or1 1/4 tspactive dry yeast)1 tspsalt (5.9 g)42.6 g(3 tbsp) butter, melted32 g(2 1/2 tbsp) sugar (adjust to taste)
  • 1 tspinstant yeast (or1 1/4 tspactive dry yeast)1 tspsalt (5.9 g)42.6 g(3 tbsp) butter, melted32 g(2 1/2 tbsp) sugar (adjust to taste)
  • 1 tspsalt (5.9 g)42.6 g(3 tbsp) butter, melted32 g(2 1/2 tbsp) sugar (adjust to taste)
  • 42.6 g(3 tbsp) butter, melted32 g(2 1/2 tbsp) sugar (adjust to taste)
  • 32 g(2 1/2 tbsp) sugar (adjust to taste)
  • 8090g (1/2 cup) dried cranberries80–90g (1/2 cup) raisins60–70g (1/2 cup) currants80–90g (1/2 cup) dried whole cherries (optional)1/2 tspcinnamon powder1/4 tspcardamom powder1/4 tspnutmeg powder (optional)1/2 tspvanilla sugar or1/2 tsppure vanilla extract
  • 8090g (1/2 cup) raisins60–70g (1/2 cup) currants80–90g (1/2 cup) dried whole cherries (optional)1/2 tspcinnamon powder1/4 tspcardamom powder1/4 tspnutmeg powder (optional)1/2 tspvanilla sugar or1/2 tsppure vanilla extract
  • 6070g (1/2 cup) currants80–90g (1/2 cup) dried whole cherries (optional)1/2 tspcinnamon powder1/4 tspcardamom powder1/4 tspnutmeg powder (optional)1/2 tspvanilla sugar or1/2 tsppure vanilla extract
  • 8090g (1/2 cup) dried whole cherries (optional)1/2 tspcinnamon powder1/4 tspcardamom powder1/4 tspnutmeg powder (optional)1/2 tspvanilla sugar or1/2 tsppure vanilla extract
  • 1/2 tspcinnamon powder1/4 tspcardamom powder1/4 tspnutmeg powder (optional)1/2 tspvanilla sugar or1/2 tsppure vanilla extract
  • 1/4 tspcardamom powder1/4 tspnutmeg powder (optional)1/2 tspvanilla sugar or1/2 tsppure vanilla extract
  • 1/4 tspnutmeg powder (optional)1/2 tspvanilla sugar or1/2 tsppure vanilla extract
  • 1/2 tspvanilla sugar or1/2 tsppure vanilla extract

Instructions

  1. 1️⃣Prepare the Dough:
  2. In a large bowl, mix warm water, sugar, salt, and yeast until dissolved.Stir in melted butter.Gradually add flour to the liquid mixture, stirring until combined into a shaggy dough with no dry patches.2️⃣First Proofing:Cover the bowl with plastic wrap and let the dough rise in a warm environment for 1 hour, or until doubled in size. If the room is cooler, allow up to 1 1/2 hours.3️⃣Incorporate the Fruit Mix:Mix the dried fruits and spices in a separate bowl.Gently fold the fruit mix into the risen dough, deflating it slightly in the process. Avoid overworking to prevent the dough from becoming too elastic.4️⃣Shape the Dough:Lightly press the dough into a rectangle. The width should match the length of your loaf pan.Roll the rectangle into a log and place it seam-side down in a greased loaf pan. Cover with plastic wrap.5️⃣Final Rising:Let the dough rise again in a warm place for 90 minutes, until it has risen significantly.6️⃣Egg Wash and Bake:Preheat the oven to 350°F (175°C). Brush the dough with a lightly beaten egg for a glossy finish.Bake for 34-35 minutes. Reduce the temperature to 325°F (160°C) and bake for an additional 4-5 minutes.If the top browns too quickly, tent it with foil after 25 minutes.7️⃣Cool the Bread:Remove the bread from the oven and let it sit in the pan for 2-3 minutes. Then demold it to prevent sogginess.Cool completely for 2-3 hours to allow the residual baking to finish.8️⃣Serve and Enjoy:Slice the bread once fully cooled. It’s delicious as-is, toasted, or turned into French toast
  3. Stir in melted butter.Gradually add flour to the liquid mixture, stirring until combined into a shaggy dough with no dry patches.2️⃣First Proofing:Cover the bowl with plastic wrap and let the dough rise in a warm environment for 1 hour, or until doubled in size. If the room is cooler, allow up to 1 1/2 hours.3️⃣Incorporate the Fruit Mix:Mix the dried fruits and spices in a separate bowl.Gently fold the fruit mix into the risen dough, deflating it slightly in the process. Avoid overworking to prevent the dough from becoming too elastic.4️⃣Shape the Dough:Lightly press the dough into a rectangle. The width should match the length of your loaf pan.Roll the rectangle into a log and place it seam-side down in a greased loaf pan. Cover with plastic wrap.5️⃣Final Rising:Let the dough rise again in a warm place for 90 minutes, until it has risen significantly.6️⃣Egg Wash and Bake:Preheat the oven to 350°F (175°C). Brush the dough with a lightly beaten egg for a glossy finish.Bake for 34-35 minutes. Reduce the temperature to 325°F (160°C) and bake for an additional 4-5 minutes.If the top browns too quickly, tent it with foil after 25 minutes.7️⃣Cool the Bread:Remove the bread from the oven and let it sit in the pan for 2-3 minutes. Then demold it to prevent sogginess.Cool completely for 2-3 hours to allow the residual baking to finish.8️⃣Serve and Enjoy:Slice the bread once fully cooled. It’s delicious as-is, toasted, or turned into French toast
  4. Gradually add flour to the liquid mixture, stirring until combined into a shaggy dough with no dry patches.
  5. 2️⃣First Proofing:Cover the bowl with plastic wrap and let the dough rise in a warm environment for 1 hour, or until doubled in size. If the room is cooler, allow up to 1 1/2 hours.3️⃣Incorporate the Fruit Mix:Mix the dried fruits and spices in a separate bowl.Gently fold the fruit mix into the risen dough, deflating it slightly in the process. Avoid overworking to prevent the dough from becoming too elastic.4️⃣Shape the Dough:Lightly press the dough into a rectangle. The width should match the length of your loaf pan.Roll the rectangle into a log and place it seam-side down in a greased loaf pan. Cover with plastic wrap.5️⃣Final Rising:Let the dough rise again in a warm place for 90 minutes, until it has risen significantly.6️⃣Egg Wash and Bake:Preheat the oven to 350°F (175°C). Brush the dough with a lightly beaten egg for a glossy finish.Bake for 34-35 minutes. Reduce the temperature to 325°F (160°C) and bake for an additional 4-5 minutes.If the top browns too quickly, tent it with foil after 25 minutes.7️⃣Cool the Bread:Remove the bread from the oven and let it sit in the pan for 2-3 minutes. Then demold it to prevent sogginess.Cool completely for 2-3 hours to allow the residual baking to finish.8️⃣Serve and Enjoy:Slice the bread once fully cooled. It’s delicious as-is, toasted, or turned into French toast
  6. Cover the bowl with plastic wrap and let the dough rise in a warm environment for 1 hour, or until doubled in size. If the room is cooler, allow up to 1 1/2 hours.3️⃣Incorporate the Fruit Mix:Mix the dried fruits and spices in a separate bowl.Gently fold the fruit mix into the risen dough, deflating it slightly in the process. Avoid overworking to prevent the dough from becoming too elastic.4️⃣Shape the Dough:Lightly press the dough into a rectangle. The width should match the length of your loaf pan.Roll the rectangle into a log and place it seam-side down in a greased loaf pan. Cover with plastic wrap.5️⃣Final Rising:Let the dough rise again in a warm place for 90 minutes, until it has risen significantly.6️⃣Egg Wash and Bake:Preheat the oven to 350°F (175°C). Brush the dough with a lightly beaten egg for a glossy finish.Bake for 34-35 minutes. Reduce the temperature to 325°F (160°C) and bake for an additional 4-5 minutes.If the top browns too quickly, tent it with foil after 25 minutes.7️⃣Cool the Bread:Remove the bread from the oven and let it sit in the pan for 2-3 minutes. Then demold it to prevent sogginess.Cool completely for 2-3 hours to allow the residual baking to finish.8️⃣Serve and Enjoy:Slice the bread once fully cooled. It’s delicious as-is, toasted, or turned into French toast
  7. 3️⃣Incorporate the Fruit Mix:
  8. Mix the dried fruits and spices in a separate bowl.Gently fold the fruit mix into the risen dough, deflating it slightly in the process. Avoid overworking to prevent the dough from becoming too elastic.4️⃣Shape the Dough:Lightly press the dough into a rectangle. The width should match the length of your loaf pan.Roll the rectangle into a log and place it seam-side down in a greased loaf pan. Cover with plastic wrap.5️⃣Final Rising:Let the dough rise again in a warm place for 90 minutes, until it has risen significantly.6️⃣Egg Wash and Bake:Preheat the oven to 350°F (175°C). Brush the dough with a lightly beaten egg for a glossy finish.Bake for 34-35 minutes. Reduce the temperature to 325°F (160°C) and bake for an additional 4-5 minutes.If the top browns too quickly, tent it with foil after 25 minutes.7️⃣Cool the Bread:Remove the bread from the oven and let it sit in the pan for 2-3 minutes. Then demold it to prevent sogginess.Cool completely for 2-3 hours to allow the residual baking to finish.8️⃣Serve and Enjoy:Slice the bread once fully cooled. It’s delicious as-is, toasted, or turned into French toast
  9. Gently fold the fruit mix into the risen dough, deflating it slightly in the process. Avoid overworking to prevent the dough from becoming too elastic.4️⃣Shape the Dough:Lightly press the dough into a rectangle. The width should match the length of your loaf pan.Roll the rectangle into a log and place it seam-side down in a greased loaf pan. Cover with plastic wrap.5️⃣Final Rising:Let the dough rise again in a warm place for 90 minutes, until it has risen significantly.6️⃣Egg Wash and Bake:Preheat the oven to 350°F (175°C). Brush the dough with a lightly beaten egg for a glossy finish.Bake for 34-35 minutes. Reduce the temperature to 325°F (160°C) and bake for an additional 4-5 minutes.If the top browns too quickly, tent it with foil after 25 minutes.7️⃣Cool the Bread:Remove the bread from the oven and let it sit in the pan for 2-3 minutes. Then demold it to prevent sogginess.Cool completely for 2-3 hours to allow the residual baking to finish.8️⃣Serve and Enjoy:Slice the bread once fully cooled. It’s delicious as-is, toasted, or turned into French toast
  10. 4️⃣Shape the Dough:
  11. Lightly press the dough into a rectangle. The width should match the length of your loaf pan.Roll the rectangle into a log and place it seam-side down in a greased loaf pan. Cover with plastic wrap.5️⃣Final Rising:Let the dough rise again in a warm place for 90 minutes, until it has risen significantly.6️⃣Egg Wash and Bake:Preheat the oven to 350°F (175°C). Brush the dough with a lightly beaten egg for a glossy finish.Bake for 34-35 minutes. Reduce the temperature to 325°F (160°C) and bake for an additional 4-5 minutes.If the top browns too quickly, tent it with foil after 25 minutes.7️⃣Cool the Bread:Remove the bread from the oven and let it sit in the pan for 2-3 minutes. Then demold it to prevent sogginess.Cool completely for 2-3 hours to allow the residual baking to finish.8️⃣Serve and Enjoy:Slice the bread once fully cooled. It’s delicious as-is, toasted, or turned into French toast
  12. Roll the rectangle into a log and place it seam-side down in a greased loaf pan. Cover with plastic wrap.5️⃣Final Rising:Let the dough rise again in a warm place for 90 minutes, until it has risen significantly.6️⃣Egg Wash and Bake:Preheat the oven to 350°F (175°C). Brush the dough with a lightly beaten egg for a glossy finish.Bake for 34-35 minutes. Reduce the temperature to 325°F (160°C) and bake for an additional 4-5 minutes.If the top browns too quickly, tent it with foil after 25 minutes.7️⃣Cool the Bread:Remove the bread from the oven and let it sit in the pan for 2-3 minutes. Then demold it to prevent sogginess.Cool completely for 2-3 hours to allow the residual baking to finish.8️⃣Serve and Enjoy:Slice the bread once fully cooled. It’s delicious as-is, toasted, or turned into French toast
  13. 5️⃣Final Rising:
  14. Let the dough rise again in a warm place for 90 minutes, until it has risen significantly.6️⃣Egg Wash and Bake:Preheat the oven to 350°F (175°C). Brush the dough with a lightly beaten egg for a glossy finish.Bake for 34-35 minutes. Reduce the temperature to 325°F (160°C) and bake for an additional 4-5 minutes.If the top browns too quickly, tent it with foil after 25 minutes.7️⃣Cool the Bread:Remove the bread from the oven and let it sit in the pan for 2-3 minutes. Then demold it to prevent sogginess.Cool completely for 2-3 hours to allow the residual baking to finish.8️⃣Serve and Enjoy:Slice the bread once fully cooled. It’s delicious as-is, toasted, or turned into French toast
  15. 6️⃣Egg Wash and Bake:Preheat the oven to 350°F (175°C). Brush the dough with a lightly beaten egg for a glossy finish.Bake for 34-35 minutes. Reduce the temperature to 325°F (160°C) and bake for an additional 4-5 minutes.If the top browns too quickly, tent it with foil after 25 minutes.7️⃣Cool the Bread:Remove the bread from the oven and let it sit in the pan for 2-3 minutes. Then demold it to prevent sogginess.Cool completely for 2-3 hours to allow the residual baking to finish.8️⃣Serve and Enjoy:Slice the bread once fully cooled. It’s delicious as-is, toasted, or turned into French toast
  16. Preheat the oven to 350°F (175°C). Brush the dough with a lightly beaten egg for a glossy finish.
  17. Bake for 34-35 minutes. Reduce the temperature to 325°F (160°C) and bake for an additional 4-5 minutes.If the top browns too quickly, tent it with foil after 25 minutes.7️⃣Cool the Bread:Remove the bread from the oven and let it sit in the pan for 2-3 minutes. Then demold it to prevent sogginess.Cool completely for 2-3 hours to allow the residual baking to finish.8️⃣Serve and Enjoy:Slice the bread once fully cooled. It’s delicious as-is, toasted, or turned into French toast
  18. If the top browns too quickly, tent it with foil after 25 minutes.7️⃣Cool the Bread:Remove the bread from the oven and let it sit in the pan for 2-3 minutes. Then demold it to prevent sogginess.Cool completely for 2-3 hours to allow the residual baking to finish.8️⃣Serve and Enjoy:Slice the bread once fully cooled. It’s delicious as-is, toasted, or turned into French toast
  19. 7️⃣Cool the Bread:
  20. Remove the bread from the oven and let it sit in the pan for 2-3 minutes. Then demold it to prevent sogginess.Cool completely for 2-3 hours to allow the residual baking to finish.8️⃣Serve and Enjoy:Slice the bread once fully cooled. It’s delicious as-is, toasted, or turned into French toast
  21. Cool completely for 2-3 hours to allow the residual baking to finish.8️⃣Serve and Enjoy:Slice the bread once fully cooled. It’s delicious as-is, toasted, or turned into French toast
  22. 8️⃣Serve and Enjoy:
  23. Slice the bread once fully cooled. It’s delicious as-is, toasted, or turned into French toast

Notes

Adjust the fruit mix to your liking—swap in dried apricots, figs, or dates.Smearing the top with butter after baking will soften the crust.Store in an airtight container for up to 4 days or freeze for longer shelf life.
Smearing the top with butter after baking will soften the crust.Store in an airtight container for up to 4 days or freeze for longer shelf life.
Store in an airtight container for up to 4 days or freeze for longer shelf life.

“`

Easy Mediterranean Salmon with Herbs

“`html

Easy Mediterranean Salmon with Herbs

Introduction: Why You’ll Love This Salmon

Are you looking for a weeknight dinner that’s both impressively delicious and incredibly healthy, without spending hours in the kitchen? Studies show that incorporating fatty fish like salmon into your diet a couple of times a week can significantly benefit cardiovascular health. This Easy Mediterranean Salmon with Herbs is your answer! It’s a symphony of fresh flavors: tender, flaky salmon fillets kissed by a vibrant marinade of olive oil, garlic, and zesty lemon, all brightened with a medley of fresh herbs. Crowned with a riot of juicy tomatoes, briny olives, and creamy feta, this dish brings the sunshine of the Mediterranean straight to your plate. It’s so simple, yet so elegant, perfect for those busy evenings when you crave a wholesome meal, or when you want to wow guests with minimal fuss. Get ready to discover your new favorite salmon recipe! 🐟🌿🍋✨

Ingredients You’ll Need

For the Salmon:

  • 2 Salmon Fillets (about 6 oz each): Look for vibrant pink, firm flesh. Wild-caught is fantastic, but Atlantic salmon works beautifully too.
    • Substitution: Any firm white fish like cod or halibut can be used, though cooking times will vary.
  • 3 tbsp Extra Virgin Olive Oil: Choose a good quality oil for its fruity notes and healthy fats.
    • Substitution: Avocado oil or grapeseed oil can be used for a neutral flavor, but olive oil is key to the Mediterranean vibe.
  • 3 cloves Garlic, minced: Freshly minced garlic offers the most pungent, delightful aroma.
    • Substitution: 1 teaspoon garlic powder if fresh is unavailable, but use sparingly.
  • 1 tbsp Fresh Lemon Juice: Bright, tangy, and essential for cutting through the richness of the fish.
    • Substitution: 1 teaspoon white wine vinegar or apple cider vinegar for a similar acidity.
  • 1 tbsp Fresh Dill, chopped: Its feathery fronds add a delicate, slightly anise-like flavor.
    • Substitution: Fresh parsley or chives, or a mix. Dried dill can be used, about 1 tsp, but fresh is superior here.
  • 1 tbsp Fresh Parsley, chopped: Adds a fresh, peppery, and slightly bitter note.
    • Substitution: Fresh mint or chives.
  • Salt and freshly ground Black Pepper: To taste, enhancing all the other flavors.

For the Topping:

  • 1 cup Cherry Tomatoes, halved: Their juicy sweetness bursts with flavor.
    • Substitution: Diced ripe tomatoes.
  • 1/4 cup Kalamata Olives, pitted and halved: For that essential briny, salty punch.
    • Substitution: Other briny olives like Castelvetrano or green olives.
  • 2 tbsp Crumbled Feta Cheese: Creamy, tangy, and a perfect counterpoint to the tomatoes and olives.
    • Substitution: Goat cheese or a sprinkle of Parmesan. For dairy-free, omit or use a vegan feta alternative.
  • Optional: A pinch of Red Pepper Flakes: For a subtle hint of heat.

Perfect Timing

Prep time:
15 minutes
Cook time:
12-15 minutes
Total time:
27-30 minutes

This recipe is significantly faster than the average salmon preparation, often requiring 30+ minutes of active prep and cooking. Perfect for busy weeknights!

Easy Mediterranean Salmon with Herbs recipe preparation with fresh ingredients.

Step-by-Step Culinary Journey

Step 1: Prep the Marinade

Let’s get this flavor party started! In a small bowl, whisk together the extra virgin olive oil, minced garlic, fresh lemon juice, chopped dill, chopped parsley, a generous pinch of salt, and freshly ground black pepper. Give it a good swirl until everything is beautifully combined. This fragrant mixture is the heart of our dish, infusing the salmon with vibrant Mediterranean aromas.

Step 2: Marinate the Salmon

Pat your salmon fillets dry with paper towels – this helps them achieve a lovely sear. Place the salmon fillets in a shallow dish or a resealable plastic bag. Pour about half of the Mediterranean marinade over the salmon, ensuring each piece is well-coated. Let them bask in this herby bath for at least 15 minutes at room temperature, or up to 30 minutes if you have the time. This step is crucial for tenderizing the fish and infusing it with that incredible flavor.

Step 3: Prepare the Topping

While the salmon is getting acquainted with its marinade, let’s prepare the colorful topping. In a medium bowl, gently combine the halved cherry tomatoes, halved pitted Kalamata olives, and crumbled feta cheese. If you’re feeling a little adventurous, toss in a pinch of red pepper flakes for a subtle kick. Set this vibrant mixture aside. It will be the perfect fresh, zesty finish to our baked salmon.

Step 4: Cook the Salmon

Preheat your oven to 400°F (200°C). If you’re using an oven-safe skillet (cast iron is wonderful here), you can sear the salmon first for an extra layer of flavor and crispiness. Add a tablespoon of your remaining marinade to a lightly oiled, preheated skillet and sear the salmon, skin-side down if applicable, for 2-3 minutes until golden. Then, flip the salmon and transfer the skillet to the preheated oven. Alternatively, for a simpler approach, place the marinated salmon fillets on a baking sheet lined with parchment paper. Bake for 10-15 minutes, or until the salmon is cooked through and flakes easily with a fork. The cooking time will depend on the thickness of your fillets.

Step 5: Assemble and Serve

Once the salmon is perfectly cooked, remove it from the oven. Spoon the fresh tomato, olive, and feta topping generously over each fillet. Drizzle with the remaining reserved marinade for an extra burst of freshness. Serve immediately and prepare for the chorus of “oohs” and “aahs”!

Nutritional Spotlight

This recipe is a powerhouse of nutrition. Salmon is rich in Omega-3 fatty acids, which are excellent for heart and brain health. The vegetables provide essential vitamins and fiber, while olive oil contributes healthy monounsaturated fats. A typical serving of this Easy Mediterranean Salmon with Herbs (per fillet, without sides) contains approximately:

  • Calories: 350-450 (depending on fillet size and fat content)
  • Protein: 30-40g
  • Fat: 20-30g (with healthy Omega-3s)
  • Carbohydrates: 5-10g
  • Fiber: 2-4g

Note: Nutritional values are estimates and can vary based on specific ingredients and portion sizes.

Healthier For You Swaps

While this recipe is already quite healthy, here are a few swaps to boost its nutritional profile even further:

  • Reduced Sodium: Use low-sodium feta cheese and olives. Adjust salt seasoning accordingly, tasting as you go.
  • Lower Fat Oil: While extra virgin olive oil is heart-healthy, you could slightly reduce the amount or use a blend with a lighter oil if concerned about calorie count, though flavor might be impacted.
  • Extra Veggies: Incorporate finely chopped red onion, bell peppers, or zucchini into the topping for added nutrients and fiber.
  • Herbs Galore: Feel free to experiment with other fresh herbs like mint, oregano, or basil for different flavor dimensions.

Serving Suggestions

This versatile salmon is delicious served alongside a variety of Mediterranean-inspired sides. Consider pairing it with:

  • Quinoa or Couscous: A light and fluffy base to soak up any juices.
  • Greek Salad: For an extra dose of fresh veggies and tang.
  • Roasted Vegetables: Such as asparagus, broccoli, or zucchini.
  • Crusty Bread: To mop up any of that irresistible herby olive oil marinade.
  • A dollop of Tzatziki: For a creamy, cooling element.

Common Pitfalls to Avoid

To ensure your Mediterranean Salmon is a triumph every time:

  • Overcooking: Salmon dries out quickly. Keep an eye on it and remove it from the heat as soon as it flakes easily.
  • Undermarinating: Don’t skip the marinating step! It’s key to infusing flavor and ensuring tenderness.
  • Not Patting Dry: If searing, patting the salmon dry helps achieve a beautiful crust.
  • Using Dried Herbs Exclusively: While dried can work in a pinch, fresh herbs add a brightness that is essential for this recipe.

Storing Your Delicious Creation

Leftover cooked salmon can be stored in an airtight container in the refrigerator for up to 2-3 days. It’s best enjoyed cold on salads or gently reheated. Be aware that reheating can slightly alter the texture, so avoid overcooking it again. The topping components can be stored separately in the fridge and added just before serving if you’re prepping ahead.

Your Mediterranean Masterpiece Awaits

There you have it – a vibrant, healthy, and incredibly easy Mediterranean Salmon with Herbs that’s guaranteed to impress. It’s proof that you don’t need complicated steps or hours of your time to create a truly delicious and nourishing meal. Whether it’s a quick weeknight dinner or a dish to share with loved ones, this salmon recipe brings a taste of sunshine and good health to your table. So, go ahead, gather your fresh ingredients, and whip up this culinary gem. We’d love to hear how yours turned out! Share your creations and tag us – happy cooking!

Frequently Asked Questions

What kind of salmon is best for this recipe?

Both wild-caught and Atlantic salmon work wonderfully. The key is to choose fillets that are fresh, firm, and have a vibrant color.

Can I use other herbs besides dill and parsley?

Absolutely! Feel free to experiment with other fresh herbs like chives, mint, basil, or oregano. A combination often yields the best flavor.

How do I know when the salmon is cooked?

The salmon is cooked when it turns opaque and flakes easily with a fork. A meat thermometer inserted into the thickest part should register around 145°F (63°C).

Can I make the topping ahead of time?

Yes, you can prepare the tomato and olive mixture a few hours in advance and store it in the refrigerator. Add the feta just before serving to prevent it from getting too mushy.

What if I don’t have olives?

If you don’t have olives, you can omit them or substitute with capers for a briny kick. You could also add some chopped sun-dried tomatoes for a different flavor profile.

Print
clock clock iconcutlery cutlery iconflag flag iconfolder folder iconinstagram instagram iconpinterest pinterest iconfacebook facebook iconprint print iconsquares squares iconheart heart iconheart solid heart solid icon

Easy Mediterranean Salmon with Herbs

  • Author: Chef Sara

Description

“This Mediterranean Salmon features a perfect blend of fresh herbs and olive oil, creating a light and delicious meal for any time of day.”


Ingredients

Scale
  • 2 salmon fillets (6 oz each)
  • 1 tablespoon olive oil
  • 1 teaspoon dried oregano
  • 1 teaspoon dried parsley
  • 1/2 teaspoon garlic powder
  • Salt and pepper to taste
  • 1 tablespoon lemon juice
  • 1 tablespoon fresh parsley, chopped (for garnish)
  • 1 lemon, cut into wedges (for serving)
  • 1 cup cherry tomatoes, halved
  • 1/2 cucumber, sliced
  • 1/4 red onion, thinly sliced

Instructions


    Notes

    For a complete meal, serve with roasted vegetables or a side of quinoa.You can grill the salmon for an added smoky flavor.

    “`

    Easy Pull Apart Pizza Bread Recipe for a Crowd

    “`html

    Easy Pull Apart Pizza Bread Recipe for a Crowd

    Why You’ll Love This Recipe

    This pull-apart pizza bread recipe is a game-changer for any gathering, from casual game nights with friends to birthday parties, or even as a quick and satisfying weeknight dinner. Imagine soft, pillowy dough generously filled with gooey, melted cheese, your favorite savory toppings, and a rich tomato sauce – all baked to golden perfection. It’s the ultimate comfort food that’s incredibly easy to make, requires minimal fuss, and delivers maximum flavor. This dish is designed for sharing, making it the perfect centerpiece for any occasion. Its interactive nature makes it fun for kids and adults alike!

    Gather Your Pizza-Making Arsenal

    The beauty of this recipe lies in its simplicity and adaptability. You can use store-bought dough for ultimate convenience, or make your own if you have a favorite recipe. Feel free to get creative with your cheese and toppings!

    For the Dough:

    • 1 pound pizza dough (store-bought or homemade). Look for a dough that’s soft and pliable, like a good quality refrigerated tube or a ball from your local pizzeria. If using homemade, ensure it has had a good rise for that airy texture.

    For the Sauce & Cheese:

    • 1 cup pizza sauce or marinara sauce. A robust, flavorful sauce is key. Choose one with a good balance of sweetness and acidity. You can even use a high-quality tomato passata if you prefer.
    • 2 cups shredded mozzarella cheese. For that irresistible cheese pull, use whole-milk mozzarella. You can also mix in cheddar or provolone for added depth.
    • 1/2 cup grated Parmesan cheese. Adds a salty, nutty finish that complements the mozzarella beautifully.

    For the Toppings:

    • Your favorite pizza toppings! (e.g., pepperoni, cooked sausage, mushrooms, onions, bell peppers, olives, jalapeños). Aim for about 1-1.5 cups total. Ensure any raw vegetables are thinly sliced for even cooking, and cooked meats are pre-cooked.
    • 1 tablespoon olive oil. For brushing the dough and ensuring a beautiful golden crust.
    • 1 teaspoon Italian seasoning (optional). Adds an extra layer of authentic pizza flavor.
    • Garlic powder, to taste. A little sprinkle enhances the savory notes.

    The Timeline: From Prep to Perfection

    Prep time: 20 minutes
    Cook time: 25-30 minutes
    Total time: 45-50 minutes

    Compared to a traditional pizza, this pull-apart version significantly cuts down on assembly time, especially if you’re using store-bought dough. While the average pizza can take up to an hour from start to finish, this recipe offers a quicker, equally delightful experience.

    Delicious Pull Apart Pizza Bread ready to be served

    Let’s Bake Some Magic!

    Ready to create a crowd-pleasing masterpiece? Follow these simple steps.

    Step 1: Prepare the Dough

    Preheat your oven to 375°F (190°C). Lightly grease a 9×13 inch baking dish or a loaf pan. If using refrigerated dough, unroll it and let it come to room temperature for about 15-20 minutes, making it easier to handle. If using dough from a ball, stretch or roll it out on a lightly floured surface into a rectangle roughly 12×10 inches. The thickness should be about ¼ inch. If it springs back, let it rest for a few minutes before continuing.

    Step 2: Shape and Fill

    Carefully transfer the dough rectangle into your prepared baking dish, pressing it gently to fit. If using a loaf pan, you’ll likely need to cut the dough into smaller pieces to fit as layers. Spread the pizza sauce evenly over the dough, leaving a small border around the edges. Sprinkle about half of the mozzarella and all of the Parmesan cheese over the sauce. Now, distribute your chosen toppings evenly. Finally, sprinkle the remaining mozzarella cheese over the toppings. Drizzle the olive oil lightly over the top and sprinkle with Italian seasoning and garlic powder, if using. For a truly “pull-apart” experience in a loaf pan, you would layer dough, sauce, cheese, toppings, cheese, then repeat, ending with cheese on top.

    Step 3: Bake to Golden Perfection

    Cover the dish loosely with aluminum foil to prevent the top from browning too quickly. Bake for 15-20 minutes. Remove the foil and continue baking for another 10-15 minutes, or until the crust is golden brown and the cheese is bubbly and melted. If you notice any spots browning too fast, you can loosely tent those areas with foil.

    Step 4: Rest and Serve

    This is a crucial step for the perfect pull! Let the pizza bread rest in the dish for at least 5-10 minutes after removing it from the oven. This allows the cheese to set slightly, making it easier to cut and serve. To serve, you can either cut it into squares directly from the baking dish, or if using a loaf pan, carefully invert it onto a cutting board and slice. The magic happens when guests can pull apart individual portions!

    Nutritional Highlights

    • Calories: Approximately 250-350 per serving (varies based on toppings and dough).
    • Protein: Around 10-15g.
    • Fat: Around 12-20g (depending on cheese and meat choices).
    • Carbohydrates: Approximately 20-30g.

    Note: Nutritional information is an estimate and will vary based on specific ingredients and portion sizes.

    Smart Swaps for a Lighter Bite

    Want to lighten things up without sacrificing flavor? Try these simple substitutions:

    • Whole Wheat Dough: Opt for whole wheat pizza dough for added fiber and nutrients.
    • Reduced-Fat Cheese: Use part-skim mozzarella or a reduced-fat blend, though be aware it might not be as gooey.
    • Lean Protein: Load up on lean turkey pepperoni, grilled chicken, or extra veggies instead of fattier meats.
    • Lighter Sauce: Use a sugar-free marinara or a pesto for a different flavor profile with potentially less sodium.
    • Vegetable Boost: Pack in finely chopped spinach, zucchini, or mushrooms to increase vegetable content.

    Serving Suggestions

    Pull-apart pizza bread is a star on its own but truly shines when paired with complementary dishes. Serve it hot as an appetizer, a fun main course, or alongside a fresh green salad for a complete meal. A side of ranch dressing or marinara dipping sauce can also be a delightful addition for those who love to dip!

    Common Pitfalls to Avoid

    • Over-proofing or Under-proofing Dough: Ensure your dough has risen properly if making from scratch, and avoid overworking it when shaping.
    • Soggy Bottom: Make sure your baking dish is well-greased and consider pre-cooking watery vegetables like mushrooms slightly before adding them to the pizza.
    • Cutting Too Soon: Don’t skip the resting step! Patience here is rewarded with cleaner slices and better texture.
    • Overloading Toppings: Too many toppings can make the bread soggy and difficult to bake evenly. Keep it balanced.

    Storing Your Masterpiece

    Leftover pull-apart pizza bread can be stored in an airtight container in the refrigerator for up to 3 days. Reheat gently in the oven or a toaster oven to revive its crispness. Microwaving can make it a bit chewy, but it’s still tasty!

    The Final Slice

    This Easy Pull Apart Pizza Bread recipe is your shortcut to a fun, delicious, and utterly shareable meal. It’s forgiving, adaptable, and always a guaranteed crowd-pleaser. So, gather your ingredients, get creative with your toppings, and prepare to impress your friends and family with this delightful, hands-on pizza experience. Give it a try and let the good times (and great food) roll!

    Frequently Asked Questions

    Can I make this ahead of time?

    You can prepare the pizza bread up to the point of baking and refrigerate it for a few hours. For best results, let it sit at room temperature for about 30 minutes before baking, and you might need to add a few extra minutes to the bake time.

    What kind of pan is best?

    A 9×13 inch baking dish works wonderfully for a spread-out pull-apart loaf. For a more compact, “loaf” style, a standard loaf pan is ideal. Both ensure even baking.

    Can I use biscuit dough?

    Yes, refrigerated biscuit dough can be used as a shortcut! Flatten the biscuits and layer them with sauce, cheese, and toppings. It will result in a softer, more biscuit-like texture.

    How many servings does this recipe make?

    This recipe typically yields about 8-10 servings as an appetizer or 4-6 servings as a main course, depending on portion size and what other dishes are served.

    Print

    clock clock iconcutlery cutlery iconflag flag iconfolder folder iconinstagram instagram iconpinterest pinterest iconfacebook facebook iconprint print iconsquares squares iconheart heart iconheart solid heart solid icon

    Pull-Apart Pizza Bread with Beef Pepperoni

    • Author: Chef Sara

    Description

    A fun, cheesy, and savory appetizer perfect for parties or family gatherings. This pull-apart pizza bread is packed with gooey mozzarella, bold Italian seasoning, and flavorful beef pepperoni for a crowd-pleasing dish!


    Ingredients

    Scale
    • 1can (16 oz) refrigerated pizza dough1 1/2 cupsshredded mozzarella cheese1/2 cupgrated Parmesan cheese1/2 cupmini beef pepperoni slices (or regular beef pepperoni, quartered)2 tablespoonsolive oil1 teaspoongarlic powder1 teaspoonItalian seasoning1/4 cupmarinara sauce (for dipping)
    • 1 1/2 cupsshredded mozzarella cheese1/2 cupgrated Parmesan cheese1/2 cupmini beef pepperoni slices (or regular beef pepperoni, quartered)2 tablespoonsolive oil1 teaspoongarlic powder1 teaspoonItalian seasoning1/4 cupmarinara sauce (for dipping)
    • 1/2 cupgrated Parmesan cheese1/2 cupmini beef pepperoni slices (or regular beef pepperoni, quartered)2 tablespoonsolive oil1 teaspoongarlic powder1 teaspoonItalian seasoning1/4 cupmarinara sauce (for dipping)
    • 1/2 cupmini beef pepperoni slices (or regular beef pepperoni, quartered)2 tablespoonsolive oil1 teaspoongarlic powder1 teaspoonItalian seasoning1/4 cupmarinara sauce (for dipping)
    • 2 tablespoonsolive oil1 teaspoongarlic powder1 teaspoonItalian seasoning1/4 cupmarinara sauce (for dipping)
    • 1 teaspoongarlic powder1 teaspoonItalian seasoning1/4 cupmarinara sauce (for dipping)
    • 1 teaspoonItalian seasoning1/4 cupmarinara sauce (for dipping)
    • 1/4 cupmarinara sauce (for dipping)

    Instructions

    1. 1️⃣Preheat the oven:
    2. Preheat your oven to 375°F (190°C). Grease a Bundt pan or round baking dish with cooking spray or a thin layer of olive oil.2️⃣Prepare the dough:Roll out the pizza dough on a clean surface and cut it into small, bite-sized pieces, about 1-2 inches in size.3️⃣Mix the toppings:In a large mixing bowl, combine the dough pieces with olive oil, garlic powder, Italian seasoning, half of the mozzarella cheese, and the beef pepperoni slices. Toss well to coat the dough evenly.4️⃣Assemble the bread:Layer the seasoned dough pieces into the greased pan, sprinkling the remaining mozzarella and Parmesan cheese throughout as you go to ensure even cheesiness.5️⃣Bake:Place the pan in the preheated oven and bake for 25-30 minutes, or until the bread is golden brown and the cheese is melted and bubbly. Let it cool for 5 minutes before carefully removing it from the pan.6️⃣Serve:Transfer the pull-apart pizza bread to a serving plate. Serve warm with a side of marinara sauce for dipping. Pull apart and enjoy the cheesy, pepperoni-filled goodness!
    3. 2️⃣Prepare the dough:Roll out the pizza dough on a clean surface and cut it into small, bite-sized pieces, about 1-2 inches in size.3️⃣Mix the toppings:In a large mixing bowl, combine the dough pieces with olive oil, garlic powder, Italian seasoning, half of the mozzarella cheese, and the beef pepperoni slices. Toss well to coat the dough evenly.4️⃣Assemble the bread:Layer the seasoned dough pieces into the greased pan, sprinkling the remaining mozzarella and Parmesan cheese throughout as you go to ensure even cheesiness.5️⃣Bake:Place the pan in the preheated oven and bake for 25-30 minutes, or until the bread is golden brown and the cheese is melted and bubbly. Let it cool for 5 minutes before carefully removing it from the pan.6️⃣Serve:Transfer the pull-apart pizza bread to a serving plate. Serve warm with a side of marinara sauce for dipping. Pull apart and enjoy the cheesy, pepperoni-filled goodness!
    4. Roll out the pizza dough on a clean surface and cut it into small, bite-sized pieces, about 1-2 inches in size.
    5. 3️⃣Mix the toppings:In a large mixing bowl, combine the dough pieces with olive oil, garlic powder, Italian seasoning, half of the mozzarella cheese, and the beef pepperoni slices. Toss well to coat the dough evenly.4️⃣Assemble the bread:Layer the seasoned dough pieces into the greased pan, sprinkling the remaining mozzarella and Parmesan cheese throughout as you go to ensure even cheesiness.5️⃣Bake:Place the pan in the preheated oven and bake for 25-30 minutes, or until the bread is golden brown and the cheese is melted and bubbly. Let it cool for 5 minutes before carefully removing it from the pan.6️⃣Serve:Transfer the pull-apart pizza bread to a serving plate. Serve warm with a side of marinara sauce for dipping. Pull apart and enjoy the cheesy, pepperoni-filled goodness!
    6. In a large mixing bowl, combine the dough pieces with olive oil, garlic powder, Italian seasoning, half of the mozzarella cheese, and the beef pepperoni slices. Toss well to coat the dough evenly.4️⃣Assemble the bread:Layer the seasoned dough pieces into the greased pan, sprinkling the remaining mozzarella and Parmesan cheese throughout as you go to ensure even cheesiness.5️⃣Bake:Place the pan in the preheated oven and bake for 25-30 minutes, or until the bread is golden brown and the cheese is melted and bubbly. Let it cool for 5 minutes before carefully removing it from the pan.6️⃣Serve:Transfer the pull-apart pizza bread to a serving plate. Serve warm with a side of marinara sauce for dipping. Pull apart and enjoy the cheesy, pepperoni-filled goodness!
    7. 4️⃣Assemble the bread:
    8. Layer the seasoned dough pieces into the greased pan, sprinkling the remaining mozzarella and Parmesan cheese throughout as you go to ensure even cheesiness.5️⃣Bake:Place the pan in the preheated oven and bake for 25-30 minutes, or until the bread is golden brown and the cheese is melted and bubbly. Let it cool for 5 minutes before carefully removing it from the pan.6️⃣Serve:Transfer the pull-apart pizza bread to a serving plate. Serve warm with a side of marinara sauce for dipping. Pull apart and enjoy the cheesy, pepperoni-filled goodness!
    9. 5️⃣Bake:Place the pan in the preheated oven and bake for 25-30 minutes, or until the bread is golden brown and the cheese is melted and bubbly. Let it cool for 5 minutes before carefully removing it from the pan.6️⃣Serve:Transfer the pull-apart pizza bread to a serving plate. Serve warm with a side of marinara sauce for dipping. Pull apart and enjoy the cheesy, pepperoni-filled goodness!
    10. Place the pan in the preheated oven and bake for 25-30 minutes, or until the bread is golden brown and the cheese is melted and bubbly. Let it cool for 5 minutes before carefully removing it from the pan.
    11. 6️⃣Serve:Transfer the pull-apart pizza bread to a serving plate. Serve warm with a side of marinara sauce for dipping. Pull apart and enjoy the cheesy, pepperoni-filled goodness!
    12. Transfer the pull-apart pizza bread to a serving plate. Serve warm with a side of marinara sauce for dipping. Pull apart and enjoy the cheesy, pepperoni-filled goodness!

    Notes

    For extra flavor, add a sprinkle of crushed red pepper flakes or chopped fresh basil before baking.If you don’t have a Bundt pan, a regular round baking dish works just as well—just make sure it’s well-greased.Leftovers can be stored in an airtight container and reheated in the oven for 5-7 minutes to restore crispiness.
    If you don’t have a Bundt pan, a regular round baking dish works just as well—just make sure it’s well-greased.Leftovers can be stored in an airtight container and reheated in the oven for 5-7 minutes to restore crispiness.
    Leftovers can be stored in an airtight container and reheated in the oven for 5-7 minutes to restore crispiness.


    “`

    Easy Barbecue Meatballs with Pineapple for Any Occasion

    “`html

    Easy Barbecue Meatballs with Pineapple for Any Occasion

    The Ultimate Crowd-Pleasing Appetizer: Barbecue Meatballs with Pineapple

    Are you searching for an appetizer that disappears faster than you can say “delicious”? In today’s fast-paced world, finding recipes that are both incredibly tasty and remarkably quick to prepare can feel like a treasure hunt. Imagine this: succulent, savory meatballs simmered in a sweet and tangy barbecue sauce, studded with juicy chunks of pineapple. This Easy Barbecue Meatballs with Pineapple recipe delivers exactly that – a mouthwatering flavor explosion that appeals to every palate. It’s the perfect solution for busy weeknights when you need a family-pleasing dinner, or for those impromptu gatherings where you want to impress without the stress. This recipe is incredibly versatile and guaranteed to be a hit!

    Irresistible Ingredients for Your Barbecue Meatballs

    The magic of these barbecue meatballs lies in its simple yet harmonious combination of flavors and textures. We’ve outlined the core components below, with notes on how to achieve the best results.

    Meatball Base: The Heart of the Dish

    • 1 lb Ground Beef (80/20 recommended): For juicy, tender meatballs. You can also use a mix of beef and pork, or even ground turkey for a leaner option. The fat content is crucial for moisture and flavor.
    • 1/2 cup Breadcrumbs (Panko preferred): Panko breadcrumbs provide a lighter, crispier texture. Regular breadcrumbs work too, but panko offers a delightful crunch.
    • 1/4 cup Milk (any kind): Helps bind the meatballs and keeps them moist. Almond milk or oat milk can be used as a dairy-free alternative.
    • 1 large Egg, lightly beaten: The essential binder that holds your meatballs together.
    • 1/4 cup finely chopped Onion: Adds a subtle savory depth. For a smoother texture, you can use onion powder (1 tsp).
    • 1-2 cloves Garlic, minced: Fresh garlic provides the most vibrant flavor. Garlic powder (1/2 tsp) is a convenient substitute.
    • 1 tablespoon Worcestershire Sauce: Imparts a complex, umami-rich flavor. Crucial for that classic meatball taste.
    • 1/2 teaspoon Salt: Enhances all the other flavors.
    • 1/4 teaspoon Black Pepper: Freshly ground pepper offers the best aroma and taste.

    Sauce Components: Sweet, Tangy Perfection

    • 18 oz (about 1.5 cups) Barbecue Sauce: Use your favorite store-bought brand or homemade. A classic smoky or sweet barbecue sauce works wonderfully.
    • 1 cup Pineapple Chunks, drained (fresh or canned): The star sweetness! Canned chunks are convenient; fresh pineapple offers a brighter flavor. Ensure they are well-drained to avoid a watery sauce.
    • 2 tablespoons Brown Sugar (optional, for extra sweetness): Adjust based on your barbecue sauce and pineapple sweetness.
    • 1 tablespoon Apple Cider Vinegar (optional, for tang): Balances the sweetness and adds a pleasant acidity.

    Garnish (Optional): A Pop of Freshness

    • Chopped Fresh Parsley: For a touch of green and fresh herbaceousness.
    • Sesame Seeds: Adds a nutty crunch and visual appeal.

    Perfectly Timed: From Prep to Plate

    Prep Time:
    15 minutes
    Cook Time:
    25-30 minutes
    Total Time:
    40-45 minutes

    Compared to other classic meatball recipes that might involve simmering for an hour or more, this barbecue pineapple version is incredibly efficient. The baking method combined with a quick sauce preparation makes it ideal for busy schedules, slashing typical cooking times without sacrificing flavor.

    Easy Barbecue Meatballs with Pineapple

    Crafting Your Delicious Barbecue Meatballs: Step-by-Step

    Follow these simple steps to create a batch of irresistible barbecue meatballs that will have everyone asking for the recipe.

    Step 1: Preheat Oven and Prep Baking Dish

    Begin by preheating your oven to 375°F (190°C). Lightly grease a 9×13 inch baking dish with cooking spray or a little olive oil. This prevents the meatballs from sticking and ensures easy cleanup.

    Step 2: Mix Meatball Ingredients

    In a large bowl, gently combine the ground beef, breadcrumbs, milk, beaten egg, chopped onion, minced garlic, Worcestershire sauce, salt, and pepper. It’s crucial not to overmix the meatball mixture. Overworking the meat can lead to tough, dense meatballs. Mix just until all ingredients are incorporated.

    Step 3: Form and Arrange Meatballs

    Gently roll the mixture into small meatballs, about 1 to 1.5 inches in diameter. Place them in a single layer in the prepared baking dish, ensuring they aren’t too crowded. This allows them to cook evenly and develop a nice exterior crust.

    Step 4: Prepare the Barbecue Pineapple Sauce

    In a separate medium bowl, whisk together the barbecue sauce, drained pineapple chunks, optional brown sugar, and optional apple cider vinegar. Taste and adjust seasonings as needed. If you prefer a smoother sauce, you can pulse some of the pineapple chunks in a blender before adding them, but most people enjoy the texture of whole chunks.

    Step 5: Coat and Bake

    Pour about half of the barbecue pineapple sauce evenly over the meatballs in the baking dish. Gently toss to coat them lightly. Place the baking dish in the preheated oven and bake for 20 minutes. After 20 minutes, remove the dish from the oven, pour the remaining sauce over the meatballs, and gently stir to ensure they are all coated. Return to the oven and bake for another 5-10 minutes, or until the meatballs are cooked through and the sauce is bubbly. The internal temperature of the meatballs should reach 160°F (71°C).

    Step 6: Final Touches

    Once baked, remove the dish from the oven. If desired, garnish with fresh chopped parsley or sesame seeds. Let them rest for a few minutes before serving. This allows the juices to redistribute, making the meatballs even more tender.

    Nutritional Snapshot

    • Calories: Approximately 250-350 per serving (varies based on ingredients and portion size).
    • Protein: High, from the ground beef.
    • Carbohydrates: Moderate, primarily from the BBQ sauce and pineapple.
    • Fat: Moderate, depending on the fattiness of the ground meat.
    • Sugar: Moderate, from the pineapple and BBQ sauce.

    Please note: Nutritional information is an estimate and can vary significantly based on the specific ingredients used (e.g., type of ground meat, brand of BBQ sauce, amount of sugar added).

    Healthier Swaps for a Lighter Bite

    Looking to make this recipe a bit lighter without sacrificing flavor? Try these simple modifications:

    • Leaner Ground Meat: Opt for 90% lean ground turkey or chicken, or 93% lean ground beef. You might need to add a little extra moisture to the meatball mix, like a splash more milk or a bit of almond extract.
    • Whole Wheat Breadcrumbs: Substitute regular breadcrumbs with whole wheat for added fiber.
    • Reduced-Sugar BBQ Sauce: Many brands now offer lower-sugar or sugar-free barbecue sauces. Alternatively, make your own barbecue sauce using tomato paste, vinegar, and spices.
    • Fresh Pineapple: While canned is convenient, fresh pineapple has no added sugar and a vibrant flavor.
    • Baking or Air-Frying: Instead of pan-frying (if you were to do that), stick to baking or try air-frying the meatballs for a crispier exterior with less oil.

    Serving Suggestions: Beyond the Appetizer Plate

    These barbecue meatballs are incredibly versatile. While they shine as a party appetizer, they can also be transformed into a delightful main course:

    • Appetizer: Serve hot with toothpicks, allowing guests to easily grab a bite.
    • Slider Sandwiches: Pile them onto small slider buns with a little extra sauce and perhaps some coleslaw.
    • Over Rice or Quinoa: Serve the saucy meatballs over a bed of fluffy white rice, brown rice, or quinoa for a complete meal.
    • With Pasta: Toss with your favorite cooked pasta for a hearty, weeknight-friendly pasta dish.
    • On Pizza: Chop them up and use as a topping for a unique barbecue chicken or meatball pizza.

    Common Mistakes to Avoid

    To ensure your barbecue meatballs are a resounding success every time, steer clear of these common pitfalls:

    • Overmixing the Meat: This is the most common mistake that leads to tough meatballs. Mix just until combined.
    • Not Draining Pineapple Well: Excess liquid can make your sauce watery and dilute the flavors.
    • Overcrowding the Baking Dish: Meatballs need space to cook evenly and develop a good sear.
    • Undercooking: Always cook meatballs to a safe internal temperature of 160°F (71°C).
    • Skipping the Sauce Toss: Half the sauce baked on, then tossing with the rest ensures maximum flavor distribution.

    Storing and Reheating Your Meatballs

    Leftover barbecue meatballs can be stored and enjoyed later. Here’s how:

    • In the Refrigerator: Once cooled, store leftover meatballs in an airtight container in the refrigerator for up to 3-4 days.
    • Reheating: To reheat, you can gently warm them in a saucepan over low heat, in the microwave, or bake them in a 350°F (175°C) oven until heated through. Add a splash of water or extra BBQ sauce if they seem dry.
    • Freezing: These meatballs freeze well! After baking and cooling, place them in a freezer-safe bag or container. They can be frozen for up to 2-3 months. Thaw in the refrigerator overnight before reheating.

    The Sweet and Savory Finale

    These Easy Barbecue Meatballs with Pineapple are a testament to how simple ingredients can create extraordinary flavors. They are the perfect blend of sweet, tangy, and savory, making them a guaranteed hit for any gathering or a delightful family dinner. Don’t hesitate to try them out – your taste buds will thank you! Give this recipe a try and let us know how *you* customize it in the comments below!

    Frequently Asked Questions

    ***Can I make these meatballs ahead of time?***

    Yes! You can prepare the meatball mixture and refrigerate it for up to 24 hours before shaping and baking. Alternately, you can bake the meatballs completely, let them cool, and then store them in the sauce in the refrigerator for up to 3 days. Reheat gently.

    ***What kind of BBQ sauce should I use?***

    Any of your favorite barbecue sauces will work! A classic Kansas City-style sweet and smoky sauce is a great choice, but feel free to experiment with hickory, mesquite, or even a spicy variety.

    ***Can I use ground turkey or chicken instead of beef?***

    Absolutely! Ground turkey or chicken can be used. Since they are leaner, you might want to add a tablespoon or two of olive oil or melted butter to the meatball mixture to ensure they remain moist and tender. They will bake slightly faster, so keep an eye on them.

    ***How do I prevent the meatballs from drying out?***

    Don’t overmix the meat, avoid overbaking, and ensure they are well-coated in the sauce. The milk and egg in the meatball mixture also contribute to moisture. If they seem dry after baking, you can add a splash of water or broth to the sauce when reheating.

    ***Can I make this a slow cooker recipe?***

    Yes, this recipe is fantastic in a slow cooker! After forming the meatballs (you can bake them for 10-15 minutes first to help them hold their shape better, or go straight from raw), place them in the slow cooker with the barbecue sauce and pineapple mixture. Cook on low for 3-4 hours or on high for 2-3 hours, until cooked through.

    Print
    clock clock iconcutlery cutlery iconflag flag iconfolder folder iconinstagram instagram iconpinterest pinterest iconfacebook facebook iconprint print iconsquares squares iconheart heart iconheart solid heart solid icon

    Slow Cooker Pineapple Barbecue Meatballs

    • Author: Chef Sara

    Description

    Juicy meatballs coated in a sweet and tangy pineapple barbecue sauce, slow-cooked to perfection. This easy dish is perfect for parties, potlucks, or a family dinner!


    Ingredients

    Scale
    • 2pounds frozen meatballs (store-bought or homemade)1 cupbarbecue sauce (hickory, honey, or spicy)1 cuppineapple juice1/2 cupbrown sugar1/4 cupsoy sauce
    • 1 cupbarbecue sauce (hickory, honey, or spicy)1 cuppineapple juice1/2 cupbrown sugar1/4 cupsoy sauce
    • 1 cuppineapple juice1/2 cupbrown sugar1/4 cupsoy sauce
    • 1/2 cupbrown sugar1/4 cupsoy sauce
    • 1/4 cupsoy sauce
    • 1 teaspoongarlic powder1 teaspoononion powder1/2 teaspoonblack pepper1/2 teaspoonred pepper flakes (optional)
    • 1 teaspoononion powder1/2 teaspoonblack pepper1/2 teaspoonred pepper flakes (optional)
    • 1/2 teaspoonblack pepper1/2 teaspoonred pepper flakes (optional)
    • 1/2 teaspoonred pepper flakes (optional)
    • 1can (20 oz) pineapple chunks, drainedFresh parsley (optional, for garnish)
    • Fresh parsley (optional, for garnish)

    Instructions

    1. 1️⃣Prepare the Sauce:In a large mixing bowl, whisk together the barbecue sauce, pineapple juice, brown sugar, soy sauce, garlic powder, onion powder, black pepper, and red pepper flakes (if using).2️⃣Assemble the Slow Cooker:Place the frozen meatballs into the slow cooker.Pour the prepared sauce over the meatballs, ensuring they are well coated.Add the drained pineapple chunks on top and gently stir to combine.3️⃣Cook the Meatballs:Cover the slow cooker and set it tolowfor 4-5 hours orhighfor 2-3 hours.Stir occasionally to ensure the meatballs are evenly coated in the sauce.4️⃣Serve:Once the meatballs are heated through and the sauce has thickened, transfer them to a serving dish.Garnish with fresh parsley, if desired, and serve warm.
    2. In a large mixing bowl, whisk together the barbecue sauce, pineapple juice, brown sugar, soy sauce, garlic powder, onion powder, black pepper, and red pepper flakes (if using).2️⃣Assemble the Slow Cooker:Place the frozen meatballs into the slow cooker.Pour the prepared sauce over the meatballs, ensuring they are well coated.Add the drained pineapple chunks on top and gently stir to combine.3️⃣Cook the Meatballs:Cover the slow cooker and set it tolowfor 4-5 hours orhighfor 2-3 hours.Stir occasionally to ensure the meatballs are evenly coated in the sauce.4️⃣Serve:Once the meatballs are heated through and the sauce has thickened, transfer them to a serving dish.Garnish with fresh parsley, if desired, and serve warm.
    3. 2️⃣Assemble the Slow Cooker:
    4. Place the frozen meatballs into the slow cooker.Pour the prepared sauce over the meatballs, ensuring they are well coated.Add the drained pineapple chunks on top and gently stir to combine.3️⃣Cook the Meatballs:Cover the slow cooker and set it tolowfor 4-5 hours orhighfor 2-3 hours.Stir occasionally to ensure the meatballs are evenly coated in the sauce.4️⃣Serve:Once the meatballs are heated through and the sauce has thickened, transfer them to a serving dish.Garnish with fresh parsley, if desired, and serve warm.
    5. Pour the prepared sauce over the meatballs, ensuring they are well coated.Add the drained pineapple chunks on top and gently stir to combine.3️⃣Cook the Meatballs:Cover the slow cooker and set it tolowfor 4-5 hours orhighfor 2-3 hours.Stir occasionally to ensure the meatballs are evenly coated in the sauce.4️⃣Serve:Once the meatballs are heated through and the sauce has thickened, transfer them to a serving dish.Garnish with fresh parsley, if desired, and serve warm.
    6. Add the drained pineapple chunks on top and gently stir to combine.
    7. 3️⃣Cook the Meatballs:Cover the slow cooker and set it tolowfor 4-5 hours orhighfor 2-3 hours.Stir occasionally to ensure the meatballs are evenly coated in the sauce.4️⃣Serve:Once the meatballs are heated through and the sauce has thickened, transfer them to a serving dish.Garnish with fresh parsley, if desired, and serve warm.
    8. Cover the slow cooker and set it tolowfor 4-5 hours orhighfor 2-3 hours.Stir occasionally to ensure the meatballs are evenly coated in the sauce.4️⃣Serve:Once the meatballs are heated through and the sauce has thickened, transfer them to a serving dish.Garnish with fresh parsley, if desired, and serve warm.
    9. Stir occasionally to ensure the meatballs are evenly coated in the sauce.
    10. 4️⃣Serve:Once the meatballs are heated through and the sauce has thickened, transfer them to a serving dish.Garnish with fresh parsley, if desired, and serve warm.
    11. Once the meatballs are heated through and the sauce has thickened, transfer them to a serving dish.Garnish with fresh parsley, if desired, and serve warm.
    12. Garnish with fresh parsley, if desired, and serve warm.

    Notes

    To make this dish a complete meal, serve the meatballs over steamed rice or with roasted vegetables.For a spicier kick, add extra red pepper flakes or a splash of hot sauce to the sauce mixture.Store leftovers in an airtight container in the refrigerator for up to 3 days. Reheat in the microwave or on the stovetop.
    For a spicier kick, add extra red pepper flakes or a splash of hot sauce to the sauce mixture.Store leftovers in an airtight container in the refrigerator for up to 3 days. Reheat in the microwave or on the stovetop.
    Store leftovers in an airtight container in the refrigerator for up to 3 days. Reheat in the microwave or on the stovetop.

    “`

    Best Crème Brûlée French Toast Recipe You’ll Love

    “`html

    Best Crème Brûlée French Toast Recipe You’ll Love

    The Ultimate Crème Brûlée French Toast Experience

    Are you searching for a breakfast that transcends the ordinary, a dish that whispers promises of weekend luxury and pure indulgence? Look no further than the Crème Brûlée French Toast. This isn’t your average soggy slice of bread; it’s a transformation, a culinary alchemy that brings together the beloved crackle of caramelized sugar with the tender, custardy embrace of French toast. With an estimated 5.7 million searches for “French toast recipes” per month, it’s clear that this breakfast staple is a perennial favorite. Yet, by infusing it with the elegant sophistication of crème brûlée, we elevate it to an entirely new level of deliciousness. Imagine a golden-brown crust giving way to an unbelievably soft interior, all crowned with a shatteringly crisp sugar topping. It’s a symphony of textures and flavors that will make any morning feel like a special occasion. Let us guide you through the secrets of creating this exquisite dish that your taste buds will thank you for.

    Crème Brûlée French Toast on a plate

    Deconstruct the Decadence: Ingredients Explained

    The magic of Crème Brûlée French Toast lies in its key components, each playing a vital role in creating that iconic flavor and texture profile. We’ve broken them down for you, along with suggestions for substitutions to suit your pantry and preferences.

    The Foundation: Bread Choices

    The bread is the canvas for this masterpiece. You need something sturdy that can soak up the rich custard without falling apart, yet also be airy enough to become wonderfully fluffy.

    • Thick-cut Brioche or Challah (1-inch slices): These enriched breads are ideal. They are slightly sweet, incredibly tender, and have a beautiful eggy richness that pairs perfectly with the custard. Their open crumb structure allows for optimal soaking. For a slightly less sweet option, a good quality challah is excellent.
    • Sourdough (thick slices): If you prefer a tangier note, good quality sourdough can work beautifully. Its robust structure holds up well, and the slight acidity cuts through the richness of the custard. Ensure it’s a day or two old for better texture.
    • French Baguette (day-old, sliced thickly): A slightly drier baguette can also be a great choice, offering a chewier texture and a very satisfying bite. Slice it lengthwise or into thick rounds.

    The Heart: Custard Components

    This is where the “crème” in crème brûlée truly shines. A rich, creamy, and perfectly seasoned custard is essential.

    • Large Eggs (3): The binder and emulsifier of our custard. Use good quality, fresh eggs for the best flavor and color.
    • Heavy Cream (1.5 cups): Provides the luxurious, velvety texture. The higher fat content ensures a rich and creamy custard that coats the bread beautifully. Half-and-half can be used as a lighter alternative, though the texture will be less rich.
    • Milk (1/2 cup): Lightens the cream slightly, preventing the custard from being too dense. Whole milk is recommended for richness. 2% milk can be used if whole is unavailable; avoid skim.
    • Granulated Sugar (1/4 cup): Sweetens the custard, but not overly so, as the topping will provide the main sweetness.
    • Vanilla Extract (1.5 tsp): The quintessential flavor of crème brûlée. Use pure vanilla extract for the most authentic and aromatic result. Vanilla bean paste or the seeds from half a vanilla bean can be used for an even more intense vanilla flavor.
    • Pinch of Salt: Essential for balancing sweetness and enhancing all the other flavors.

    The Crown: Caramelizing Sugar

    This is what makes it “brûlée” – the burnt sugar topping!

    • Granulated Sugar (4-6 tbsp, or more as needed): This is what you’ll sprinkle on top to create that signature crackly layer. Fine granulated sugar is best for even melting and caramelization.

    Optional Embellishments

    Feel free to add a little extra flair:

    • Fresh Berries: Raspberries, blueberries, or strawberries add a burst of freshness and color.
    • Powdered Sugar: A light dusting can add a touch of elegance before serving.
    • Maple Syrup or Honey: For a little extra liquid sweetness.
    • Whipped Cream: For ultimate decadence.

    The Art of Timing: Prep, Cook, and Rest

    Prep time: 15 minutes
    Soaking time: 15-30 minutes
    Cook time: 5-7 minutes per batch
    Caramelizing time: 1-2 minutes
    Total time: Approximately 40-55 minutes (plus soaking)

    A typical French toast recipe might take around 20-30 minutes total. However, the soaking time for excellent Crème Brûlée French Toast is crucial to achieve that custardy interior. This added soaking time is well worth the wait for the superior texture and flavor.

    Crafting Your Crème Brûlée French Toast: Step-by-Step

    Step 1: Prepare the Bread

    If your bread isn’t already sliced, cut it into thick, 1-inch slices. If you are using a baguette, slice it lengthwise or into thick rounds. Stale or day-old bread is actually preferable as it will absorb the custard better without becoming mushy.

    Step 2: Whisk the Custard Base

    In a wide, shallow bowl or dish (large enough to fit your bread slices comfortably), whisk together the eggs, heavy cream, milk, granulated sugar, vanilla extract, and pinch of salt. Whisk until everything is thoroughly combined and the mixture is smooth and uniform in color. This liquid gold is the soul of your French toast.

    Step 3: Soak the Bread

    Gently place the bread slices into the custard mixture. Let each slice soak for about 15-30 seconds per side. The exact time will depend on the bread’s dryness and thickness. You want the bread to absorb a good amount of custard, becoming saturated but not completely sodden and falling apart. It should feel weighty.

    Step 4: Cook the French Toast

    Melt a tablespoon of butter (or a mix of butter and oil) in a large non-stick skillet or on a griddle over medium heat. Once the butter is shimmering, carefully lift a soaked bread slice from the custard, letting any excess drip off briefly. Place it in the hot skillet. Cook for about 3-5 minutes per side, until golden brown and cooked through. Cook in batches, adding more butter as needed, and avoid overcrowding the pan, which can steam the French toast instead of browning it.

    Step 5: Achieve the Caramelized Crust

    This is the pièce de résistance! Once your French toast slices are cooked and golden, arrange them on a baking sheet lined with parchment paper. Generously sprinkle the top of each slice with granulated sugar, creating an even layer. Using a kitchen torch, carefully move the flame back and forth over the sugar until it melts, bubbles, and caramelizes into a beautiful, amber-colored, crackly crust. If you don’t have a torch, you can very carefully use your oven’s broiler on high heat. Place the baking sheet under the broiler for 1-2 minutes, watching *very closely* as sugar can burn quickly. The goal is a melted, caramelized surface, not burnt bitterness.

    Nutritional Snapshot

    While this is a decadent treat, understanding its nutritional profile can be helpful. Actual values will vary based on specific ingredients and portion sizes. (Please note: This is an estimate and should not be considered medical advice.)

    • Calories: Approximately 450-600 per serving (1-2 slices, depending on size and toppings)
    • Protein: 10-15g
    • Fat: 25-40g (Saturated fat will be higher due to butter and cream)
    • Carbohydrates: 40-55g (Includes sugar from bread, custard, and topping)
    • Fiber: 1-3g

    A Lighter Indulgence: Healthier Swaps

    You can enjoy the essence of crème brûlée French toast with a few mindful adjustments:

    • Bread: Opt for whole-grain challah or a sturdy whole-wheat bread for added fiber.
    • Dairy: Use a mix of milk and half-and-half, or even unsweetened almond milk with a touch of heavy cream, to reduce fat content.
    • Sweetener: Reduce the sugar in the custard slightly, and use a sugar substitute if desired for the topping (though this may affect caramelization). Or, skip the sugar topping and opt for fruit.
    • Portion Control: Serve with plenty of fresh fruit to balance the richness.

    Elevate Your Brunch: Serving Ideas

    Presentation is key for this elegant dish!

    • Classic Combo: Serve with a side of fresh berries and a dollop of lightly sweetened whipped cream.
    • Fruity Fiesta: A medley of seasonal fruits like strawberries, blueberries, raspberries, and perhaps some sliced peaches or figs.
    • Savory Contrast: For those who love a sweet and savory balance, pair with crispy bacon or breakfast sausage.
    • Syrup Embrace: A light drizzle of good quality maple syrup or a swirl of honey can enhance the flavors.

    Avoiding Pitfalls: Common Mistakes to Sidestep

    Preventing common errors will ensure your Crème Brûlée French Toast is perfect every time:

    • Over-Soaking the Bread: Using bread that is too fresh or soaking for too long will result in a mushy, broken-down French toast.
    • Not Enough Fat in the Pan: Insufficient butter or oil will lead to sticking and uneven browning.
    • Crowding the Pan: Cooking too many slices at once lowers the pan temperature, leading to pale, steamed French toast instead of golden perfection.
    • Burning the Sugar: Sugar caramelizes very quickly. Watch it intensely when torching or broiling to avoid a bitter taste.
    • Using Low-Fat Dairy: While healthier alternatives exist, for the classic lusciousness, fat in cream and milk is essential for a rich custard.

    Savoring the Sweetness: Storing and Reheating

    While best enjoyed fresh, leftovers can be managed:

    • Storage: Allow cooked French toast (before caramelizing the sugar, if possible) to cool completely. Store in an airtight container in the refrigerator for up to 2 days. The caramelized topping may become soft upon refrigeration.
    • Reheating: For the best texture, gently reheat in a skillet over medium-low heat until warmed through. This can help re-crisp the bread slightly. You can also reheat in a toaster oven or a moderate oven (350°F/175°C) for a few minutes. For the topping, you may need to re-torch or broil briefly after reheating if you want that crackle back.

    Embrace the Exquisite

    The Best Crème Brûlée French Toast is more than just a recipe; it’s an experience. It’s an invitation to slow down, to savor a moment of pure, unadulterated deliciousness. From the comforting, custardy interior to the satisfying crackle of caramelized sugar, every bite is a testament to culinary elegance. Whether you’re impressing guests for a special brunch or simply treating yourself to a luxurious start to the day, this dish promises delight. Give it a try, and prepare to fall in love!

    Frequently Asked Questions

    ***What kind of bread is best for French toast?***

    Thick-cut, slightly stale bread like brioche, challah, or sourdough is ideal. It absorbs the custard well without becoming mushy.

    ***Can I make the custard ahead of time?***

    Yes, you can whisk the custard base up to 24 hours in advance and store it in the refrigerator. Whisk it again before using.

    ***How do I get the caramelized sugar topping without a torch?***

    You can use your oven’s broiler set to high. Place the sugared French toast on a baking sheet under the broiler for 1-2 minutes, watching *very carefully* to prevent burning.

    ***Is it necessary to use heavy cream?***

    Heavy cream contributes to the rich, luxurious texture characteristic of crème brûlée. While you can use half-and-half for a lighter version, the result will be less decadent.

    ***Can I bake this instead of pan-frying?***

    Yes, after soaking, you can arrange the bread on a baking sheet and bake at around 375°F (190°C) for about 15-20 minutes, flipping halfway, until golden brown. Then, proceed with caramelizing the sugar.

    Print

    clock clock iconcutlery cutlery iconflag flag iconfolder folder iconinstagram instagram iconpinterest pinterest iconfacebook facebook iconprint print iconsquares squares iconheart heart iconheart solid heart solid icon

    Overnight Crème Brûlée French Toast

    • Author: Chef Sara

    Description

    Indulge in this rich and custardy overnight French toast, finished with a caramelized sugar topping that gives it a crème brûlée flair. Perfect for a decadent breakfast or brunch!


    Ingredients

    Scale
    • 1loaf French bread, sliced 1-inch thick5large eggs1 cuphalf-and-half1 cupwhole milk1 teaspoonvanilla extract2/3 cupgranulated sugar (plus extra for topping)1/4 teaspoonground cinnamon1/4 teaspoonground nutmeg1/4 cupunsalted butter, cut into small piecesMaple syrup, for serving
    • 5large eggs1 cuphalf-and-half1 cupwhole milk1 teaspoonvanilla extract2/3 cupgranulated sugar (plus extra for topping)1/4 teaspoonground cinnamon1/4 teaspoonground nutmeg1/4 cupunsalted butter, cut into small piecesMaple syrup, for serving
    • 1 cuphalf-and-half1 cupwhole milk1 teaspoonvanilla extract2/3 cupgranulated sugar (plus extra for topping)1/4 teaspoonground cinnamon1/4 teaspoonground nutmeg1/4 cupunsalted butter, cut into small piecesMaple syrup, for serving
    • 1 cupwhole milk1 teaspoonvanilla extract2/3 cupgranulated sugar (plus extra for topping)1/4 teaspoonground cinnamon1/4 teaspoonground nutmeg1/4 cupunsalted butter, cut into small piecesMaple syrup, for serving
    • 1 teaspoonvanilla extract2/3 cupgranulated sugar (plus extra for topping)1/4 teaspoonground cinnamon1/4 teaspoonground nutmeg1/4 cupunsalted butter, cut into small piecesMaple syrup, for serving
    • 2/3 cupgranulated sugar (plus extra for topping)1/4 teaspoonground cinnamon1/4 teaspoonground nutmeg1/4 cupunsalted butter, cut into small piecesMaple syrup, for serving
    • 1/4 teaspoonground cinnamon1/4 teaspoonground nutmeg1/4 cupunsalted butter, cut into small piecesMaple syrup, for serving
    • 1/4 teaspoonground nutmeg1/4 cupunsalted butter, cut into small piecesMaple syrup, for serving
    • 1/4 cupunsalted butter, cut into small piecesMaple syrup, for serving
    • Maple syrup, for serving

    Instructions

    1. 1️⃣Prepare the baking dish:Generously butter a 9×13-inch baking dish. Arrange the French bread slices in a single layer, slightly overlapping if necessary.
    2. 2️⃣Make the custard:In a large mixing bowl, whisk together the eggs, half-and-half, milk, vanilla extract, sugar, cinnamon, and nutmeg until smooth and well-combined.3️⃣Soak the bread:Pour the custard mixture evenly over the bread slices, ensuring every slice is thoroughly coated. Use a spatula or your hands to gently press the bread into the custard.4️⃣Refrigerate overnight:Cover the dish tightly with plastic wrap and refrigerate overnight to allow the bread to absorb the custard.5️⃣Bake the French toast:Preheat your oven to 350°F (175°C). Remove the baking dish from the refrigerator and discard the plastic wrap. Dot the bread with small pieces of butter and sprinkle a light layer of sugar over the top. Bake for 35-40 minutes, or until the French toast is puffed and golden.6️⃣Caramelize the sugar topping:Remove the dish from the oven and let it cool slightly. Sprinkle an even layer of granulated sugar on top of the bread. Use a kitchen torch or the broiler setting on your oven to caramelize the sugar until it is golden and crisp.7️⃣Serve:Allow the French toast to cool for a few minutes before serving. Drizzle with maple syrup and enjoy!
    3. 3️⃣Soak the bread:Pour the custard mixture evenly over the bread slices, ensuring every slice is thoroughly coated. Use a spatula or your hands to gently press the bread into the custard.4️⃣Refrigerate overnight:Cover the dish tightly with plastic wrap and refrigerate overnight to allow the bread to absorb the custard.5️⃣Bake the French toast:Preheat your oven to 350°F (175°C). Remove the baking dish from the refrigerator and discard the plastic wrap. Dot the bread with small pieces of butter and sprinkle a light layer of sugar over the top. Bake for 35-40 minutes, or until the French toast is puffed and golden.6️⃣Caramelize the sugar topping:Remove the dish from the oven and let it cool slightly. Sprinkle an even layer of granulated sugar on top of the bread. Use a kitchen torch or the broiler setting on your oven to caramelize the sugar until it is golden and crisp.7️⃣Serve:Allow the French toast to cool for a few minutes before serving. Drizzle with maple syrup and enjoy!
    4. 4️⃣Refrigerate overnight:Cover the dish tightly with plastic wrap and refrigerate overnight to allow the bread to absorb the custard.
    5. 5️⃣Bake the French toast:Preheat your oven to 350°F (175°C). Remove the baking dish from the refrigerator and discard the plastic wrap. Dot the bread with small pieces of butter and sprinkle a light layer of sugar over the top. Bake for 35-40 minutes, or until the French toast is puffed and golden.6️⃣Caramelize the sugar topping:Remove the dish from the oven and let it cool slightly. Sprinkle an even layer of granulated sugar on top of the bread. Use a kitchen torch or the broiler setting on your oven to caramelize the sugar until it is golden and crisp.7️⃣Serve:Allow the French toast to cool for a few minutes before serving. Drizzle with maple syrup and enjoy!
    6. 6️⃣Caramelize the sugar topping:Remove the dish from the oven and let it cool slightly. Sprinkle an even layer of granulated sugar on top of the bread. Use a kitchen torch or the broiler setting on your oven to caramelize the sugar until it is golden and crisp.7️⃣Serve:Allow the French toast to cool for a few minutes before serving. Drizzle with maple syrup and enjoy!
    7. 7️⃣Serve:Allow the French toast to cool for a few minutes before serving. Drizzle with maple syrup and enjoy!

    Notes

    For a deeper flavor, substitute brown sugar for some or all of the granulated sugar in the custard.Leftovers can be stored in the refrigerator for up to 2 days and reheated in the oven.Customize the dish with fresh fruit or a dollop of whipped cream when serving.
    Leftovers can be stored in the refrigerator for up to 2 days and reheated in the oven.Customize the dish with fresh fruit or a dollop of whipped cream when serving.
    Customize the dish with fresh fruit or a dollop of whipped cream when serving.


    “`