“`html
Table of Contents
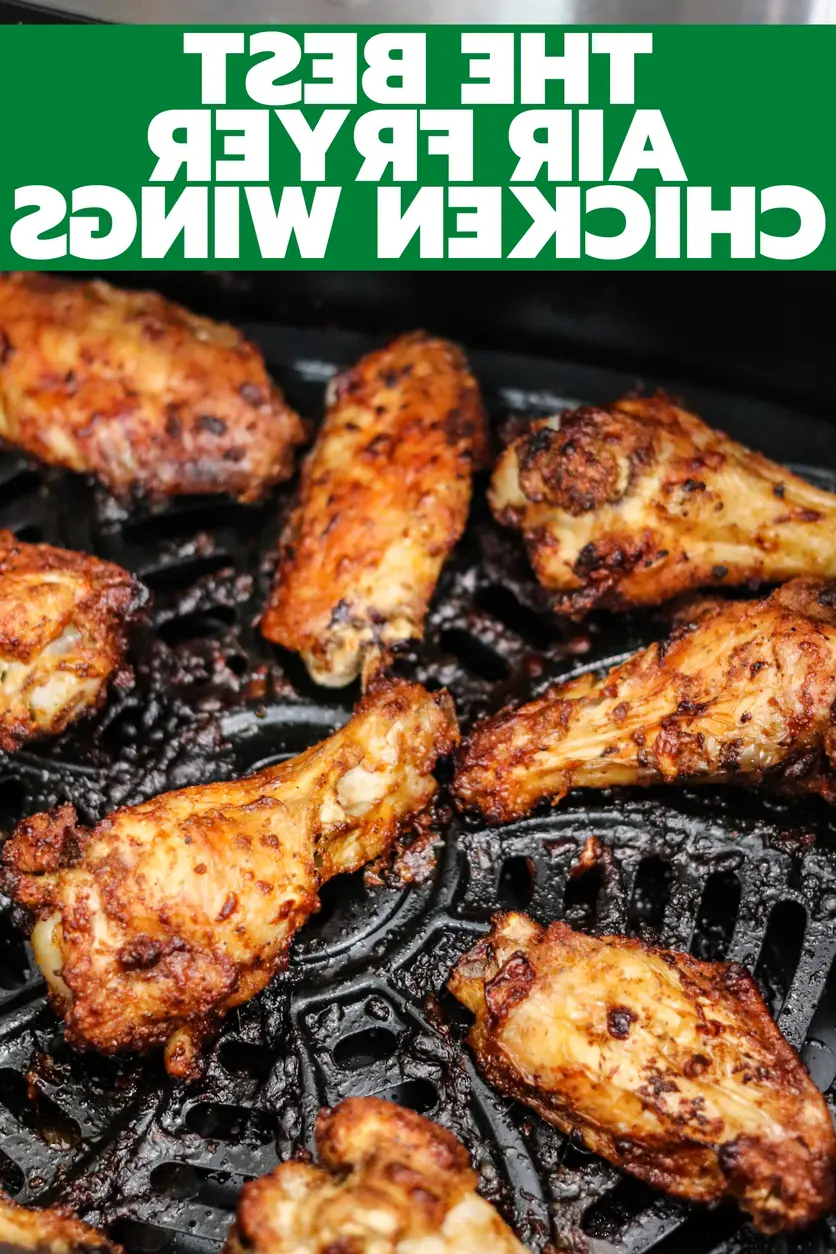
Crispy Air Fryer Chicken Wings (No Breading!) – Done in 20 Minutes
Let me tell you a little secret: the absolute best crispy air fryer wings don’t come from a complicated batter or a vat of oil. They come from a simple, vibrant dry rub and a technique I’ve perfected right here in my bustling NYC kitchen. These air fryer chicken wings are a revelation — crackling skin, juicy meat, and a deep, savory spice that takes me straight back to my mother’s tagine pot in Marrakech. Done in under 20 minutes of cook time, this easy chicken wing recipe is about to become your new weeknight hero.
Imagine this: the aromatic scent of garlic and smoked paprika wafting through your kitchen, mingling with the sound of the air fryer humming away. You pull out the basket to reveal perfectly golden wings, their skin blistered and shatteringly crisp. No greasy fingers, no messy cleanup. Just pure, unadulterated wing perfection. It’s the kind of meal that feels both like a nostalgic trip to a Parisian bistro snack and a quintessential New York game-day spread, all rolled into one beautiful, simple dish.
What makes my version truly stand out? It’s the marriage of French technique (meticulously patting the skin bone-dry for maximum crispiness) with the bold, earthy flavors of North Africa. We’re skipping the flour, the cornstarch, and all the fuss. This is an authentic, foolproof way to get the best air fryer wings every single time. I’ll walk you through each step, from choosing the perfect spice to the single most important trick for achieving that unbeatable crunch — no breading required!
Why This Recipe Is the Best
The Flavor Secret: While everyone else is drowning their wings in sticky sauce, we build flavor from the inside out. My carefully balanced blend of garlic powder, onion powder, and paprika (I use a mix of sweet and smoked) creates a savory crust that’s incredibly addictive. It’s a base that welcomes endless variations, but it’s absolutely perfect on its own.
Perfected Texture: The number one complaint I hear about air fried wings is that they aren’t crispy. The solution is simpler than you think: moisture is the enemy. In my Parisian culinary training, we learned that dry skin is the first step to perfectly rendered, crispy poultry. I’ll show you my exact technique for prepping the wings to ensure they come out shatteringly crisp every single time.
Foolproof & Fast: This is the perfect recipe for a busy weeknight or a last-minute gathering. With only 5 minutes of active prep and less than 20 minutes of cook time, you have a restaurant-quality appetizer or main course ready in a flash. It’s genuinely the easiest way to make wings, and I’ve never had a batch fail.
Crispy Air Fryer Wings Ingredients
One of the things I love most about this recipe is its beautiful simplicity. I picked up these ingredients from my favorite spice shop in Chelsea Market, but everything here is easily found at your local grocery store. This is proof that you don’t need exotic, hard-to-find items to create magic in your kitchen.
Ingredients List
- 2 lbs chicken wings (drums and flats), defrosted if frozen
- 1 TBS olive oil
- 1 tsp garlic powder
- 1 tsp onion powder
- 1 tsp paprika (sweet or smoked)
- 1 tsp salt
- 1/2 tsp black pepper
Ingredient Spotlight
Chicken Wings: I prefer buying a mix of drums and flats (the “party wing” cut). The key is to ensure they’re completely defrosted. Pat them dry with paper towels—this is the most important step and cannot be skipped!
Paprika: This is my secret weapon. Sweet paprika provides a beautiful color and mild sweetness, while smoked paprika adds a deep, campfire-like savoriness. I often use a 50/50 mix. At your US grocery store, look for “smoked paprika” in the spice aisle—it’s a game-changer for this easy chicken wing recipe.
Olive Oil: We use just a touch to help the spices adhere and to encourage browning. Don’t use extra-virgin olive oil here; a standard light olive oil or avocado oil has a higher smoke point, which is better for the high heat of the air fryer.
| Original Ingredient | Best Substitution | Flavor / Texture Impact |
|---|---|---|
| Olive Oil | Avocado Oil | Neutral flavor, equally high smoke point. No real change. |
| Paprika | 1/2 tsp Chipotle Powder + 1/2 tsp sweet paprika | Adds a smoky, spicy kick. Reduces the sweet red pepper flavor. |
| Garlic Powder | 1/2 tsp garlic, minced fresh | More pungent, can burn at high heat. Use powder for best results. |
| Chicken Wings | Chicken Drumsticks | Sturdier, more meat. Will need an extra 5-7 mins of cook time. |
How to Make Air Fryer Chicken Wings — Step-by-Step
Ready to make the best air fryer chicken wings of your life? Don’t let the simple steps fool you—each one is crucial for achieving that perfect, crackling crisp. Just follow along, and I promise you’ll be amazed.
Step 1: Prep the Wings
If you have full wings, separate them into drums and flats using a sharp knife—you should be able to feel the joint easily. Ensure the wings are completely defrosted if they were frozen. This is the most critical step: pat the wings absolutely bone-dry with several layers of paper towels. We want every bit of moisture gone.
💡 mia’s Pro Tip: Leave the wings uncovered on a paper-towel-lined baking sheet in the fridge for an hour before cooking. This dries out the skin even further, guaranteeing an incredibly crispy air fryer chicken wings texture!
Step 2: Season the Wings
Place the wings into a large bowl. Drizzle the olive oil over them and toss well to coat every nook and cranny. In a small dish, mix the garlic powder, onion powder, paprika, salt, and pepper. Sprinkle the spice blend over the oiled wings and toss until every wing is evenly coated. The oil helps the seasoning stick and promotes beautiful browning.
⚠️ Common Mistake to Avoid: Don’t use too much oil! You want just a light coating. Excess oil will steam the wings rather than crisp them up.
Step 3: First Air Fry (10 Minutes)
Preheat your air fryer to 400°F for 2 minutes. This step ensures the intense heat hits the skin immediately, kickstarting the rendering process. Place the wings in a single layer in the air fryer basket. They should not be touching or overlapping. Work in batches if necessary. Cook at 400°F for 10 minutes.
💡 mia’s Pro Tip: Crowding the basket is the #1 enemy of crispiness. The hot air needs to circulate around each wing to brown them evenly.
Step 4: Flip and Finish (8 Minutes)
After the timer goes off, carefully open the air fryer and, using tongs, flip each wing over. This ensures both sides get equal time against the hot basket floor. Cook for an additional 8 minutes at 400°F. The skin should be a deep golden brown and look blistered. Remove and serve immediately.
⚠️ Common Mistake to Avoid: Don’t skip the flip! While some air fryers claim to cook evenly, flipping guarantees that perfect, all-over crispiness on every single wing.
| Step | Action | Duration | Key Visual Cue |
|---|---|---|---|
| 1 | Pat Dry & Season | 5 mins | Wings look matte, no visible wet spots. |
| 2 | Cook (First Side) | 10 mins | Skin is sizzling and starting to turn golden. |
| 3 | Flip & Finish | 8 mins | Deep golden brown, blistered skin. |
Serving & Presentation
In my NYC apartment, these wings rarely make it to an actual plate. We gather around the kitchen island, picking them straight from a wooden board. I love to serve them with a pile of crisp celery and carrot sticks, and a generous bowl of homemade blue cheese dressing. The cool, tangy dip is the perfect counterpoint to the warm, smoky spice of the air fryer chicken wings.
For a nod to my Moroccan roots, I’ll sometimes whip up a quick chermoula yogurt sauce — just mix plain Greek yogurt with a bit of lemon juice, fresh cilantro, cumin, and a pinch of cayenne. It adds a bright, herby, North African flair that beautifully complements the smoky paprika in the rub. Serve them hot, immediately, and watch them disappear!
| Pairing Type | Suggestions | Why It Works |
|---|---|---|
| Side Dish | Celery & Carrot Sticks, Crispy Roasted Potatoes | Adds freshness and crunch to balance the rich, savory wings. |
| Sauce / Dip | Blue Cheese Dressing, Ranch, Chermoula Yogurt | Cool, creamy, and tangy dips cut through the spice and richness. |
| Beverage | Cold Lager, IPA, Mint Lemonade | Crisp, cold drinks refresh the palate and complement the savory notes. |
| Garnish | Fresh Cilantro, Toasted Sesame Seeds, Lime Wedges | Adds a pop of color and a burst of fresh flavor. |
Make-Ahead, Storage & Reheating
Honestly, these are best eaten straight from the air fryer, and we almost never have leftovers. But if you do, here’s how I handle them in my busy NYC life. I sometimes double the batch so I have cooked wings ready for a quick lunch or to toss into a salad during the week.
| Method | Container | Duration | Reheating Tip |
|---|---|---|---|
| Refrigerator | Airtight Container | 3-4 Days | Reheat in air fryer at 375°F for 3-4 minutes until hot and re-crisped. |
| Freezer | Freezer-Safe Bag (Remove air) | 2-3 Months | Reheat from frozen at 375°F for 6-8 minutes. Do not microwave. |
| Make-Ahead | Seasoned & Raw in Fridge | Up to 24 Hours | The salt in the rub will help dry the skin further. Perfect for prep! |
My strongest piece of advice is to never, ever reheat these in the microwave. It will steam the wings and you’ll lose all that beautiful crispiness. The air fryer is truly the only way to bring these back to life, restoring that just-cooked texture that makes this best air fryer wings recipe so special.
Variations & Easy Swaps
This easy chicken wing recipe is a perfect canvas for so many different flavors. Here are a few of my favorite ways to switch it up, depending on my mood or what I have in the pantry.
| Variation | Key Change | Best For | Difficulty Impact |
|---|---|---|---|
| Classic Buffalo | Toss in Franks RedHot + melted butter | Game Day & Parties | Easy |
| Garlic Parmesan | Toss in melted butter, garlic, and Parmesan | Weeknight Dinner | Easy |
| Moroccan Harissa | Toss in harissa paste + lemon juice + honey | A Flavorful Adventure | Easy |
Classic Buffalo Wings
This is the variation that took NYC by storm, and for good reason. While your cooked wings are resting, melt 1/4 cup (half a stick) of unsalted butter and whisk it together with 1/3 cup of Frank’s RedHot Original sauce. Toss the hot, crispy wings in this mixture until completely coated. The butter mellows the heat of the cayenne peppers beautifully, creating that classic, lacquered, tangy-hot finish that’s pure Buffalo, New York.
Garlic Parmesan Wings
For a rich, savory twist that feels a little more refined, try my Garlic Parmesan version. While the wings are cooking, melt 3 tablespoons of butter and stir in 2 cloves of finely minced fresh garlic and a tablespoon of fresh parsley. When the wings come out of the air fryer, toss them in the garlic butter and then immediately toss them with 1/2 cup of finely grated Parmesan cheese. The salty, nutty cheese clings to the buttery wings for an irresistible crust.
Moroccan Harissa Wings
This is my personal favorite and a loving nod to my heritage. After the wings are cooked and still piping hot, toss them with 2 tablespoons of good-quality harissa paste (I love the brand from New York Shuk in Chelsea Market), the juice of half a lemon, and a teaspoon of honey. The harissa provides a complex, smoky, earthy heat that is completely different from a standard cayenne-based hot sauce. It’s North African comfort food at its finest, and a fantastic twist on air fryer chicken wings.
How long do you cook chicken wings in an air fryer?
For perfectly cooked and crispy air fryer chicken wings, cook them at 400°F (200°C) for a total of 18-20 minutes. Start with 10 minutes on one side, then flip the wings carefully and cook for another 8-10 minutes. The exact time can vary slightly depending on the size of your wings and the model of your air fryer, so check for an internal temperature of 165°F and a golden, blistered skin.
Do you need to flip chicken wings in an air fryer?
Yes, absolutely! I highly recommend flipping your chicken wings halfway through the cooking process. Flipping ensures that both sides of the wing get equal exposure to the circulating hot air and direct contact with the hot basket, which promotes even browning and maximum crispiness. While some premium air fryers claim to cook evenly, this simple step is my foolproof way to guarantee perfect results every single time.
What is the best temperature for crispy air fryer chicken wings?
The best temperature for making crispy air fryer chicken wings is 400°F (200°C). This high temperature is hot enough to quickly render the fat under the skin and crisp it up to a perfect crackling finish, without drying out the meat. Lower temperatures might result in softer, leathery skin, while higher temperatures could risk burning the spices or drying out the wings before they are fully cooked.
Can you put frozen chicken wings directly in an air fryer?
Yes, you can definitely cook frozen chicken wings in an air fryer without defrosting them first! This is one of the great conveniences of using an air fryer. Simply add the frozen wings to the basket and cook at 400°F for about 25-28 minutes, or until the internal temperature reaches 165°F. Make sure to flip them halfway through and check that the skin is crispy and golden. You may need to drain excess liquid from the basket once or twice during cooking.
What is the best oil to use for air fryer wings?
For the best air fryer wings, I recommend using a neutral oil with a high smoke point, such as avocado oil, light olive oil, or grapeseed oil. These oils can handle the intense 400°F heat without breaking down or imparting a burnt flavor. Extra-virgin olive oil has a lower smoke point and can become bitter, so I suggest saving it for salads and dipping.
How do you make air fryer wings extra crispy?
The number one secret to extra crispy air fryer chicken wings is to pat them completely dry before seasoning. Use several layers of paper towels to remove all surface moisture. Additionally, do not overcrowd the air fryer basket—the wings need space for the hot air to circulate. For an even crispier result, you can let the seasoned wings rest uncovered in the refrigerator for an hour before cooking to further dry out the skin.
Can I use baking powder to make air fryer wings crispy?
Yes, a small amount of aluminum-free baking powder can help make your wings extra crispy by slightly raising the pH of the skin, which promotes browning and crispiness. If you choose to use it, add about 1 teaspoon of baking powder to your spice rub and make sure it is evenly distributed. Be very careful to use aluminum-free baking powder, as regular baking powder can leave a metallic aftertaste. However, I find that thoroughly drying the wings achieves an equally excellent result.
What dip goes best with air fryer chicken wings?
The classic pairing for crispy air fryer chicken wings is a creamy blue cheese dressing, which perfectly balances the savory, spicy flavors. Ranch dressing is another beloved US favorite. For a lighter, more unique option, I love serving these wings with a Moroccan-inspired chermoula yogurt sauce, which combines Greek yogurt with lemon, cilantro, and cumin for a bright, herby kick.
How do I reheat leftover air fryer wings without them getting soggy?
The best way to reheat leftover air fryer chicken wings is to use the air fryer itself! Preheat your air fryer to 375°F (190°C) and place the wings in a single layer in the basket. Heat for 3-4 minutes, or until they are warmed through and the skin has re-crisped. I strongly advise against using a microwave, as it will steam the wings and make the skin soft and rubbery.
Can I use this recipe for chicken thighs or drumsticks?
Absolutely! This spice rub and technique work beautifully for other cuts of chicken, like bone-in, skin-on thighs or drumsticks. Because these cuts are larger and thicker than wings, you will need to adjust the cooking time. For drumsticks, expect to cook them at 400°F for 20-25 minutes, flipping halfway. For bone-in thighs, cook for 18-22 minutes. Always ensure the internal temperature reaches 165°F at the thickest part.
Share Your Version!
I truly believe these are the best air fryer chicken wings you’ll ever make at home. They’re everything I love about cooking: simple ingredients, clever technique, and a result that feels far greater than the sum of its parts. Whether you toss them in a classic Buffalo sauce or keep them perfectly spiced, I’d love to see how they turn out in your kitchen.
If you try this recipe, please leave a star rating and comment down below—your feedback helps me, and it helps other home cooks find their new favorite meal! Tag me in your photos on Instagram or Pinterest @exorecipes. I can’t wait to see your crispy creations. Happy cooking!
From my NYC kitchen to yours — I hope this recipe brings as much warmth to your table as it does to mine. — mia 🧡
🌟 Loved This Post? Pin It & Share the Flavor!
Did these crispy air fryer wings hit the spot? 🍗
Drop a comment below and tell me your favorite dipping sauce—I’m always looking for new ideas!
Love This Recipe? Save It to Pinterest!
If you enjoyed this Air Fryer Chicken Wings recipe, don’t let it get lost in your browser tabs! 😄 Pin it now so you can find it again anytime — and explore hundreds more tried-and-tested recipes waiting for you on my Pinterest boards.
👉 Follow mia on Pinterest @exorecipe
📌 Pin this recipe · 🔁 Re-pin your favorites · 💬 Tag me when you make it — I love seeing your creations!
“`
Print
Air Fryer Chicken Wings
Description
Air Fryer Chicken Wings are the best and crispiest wings ever! Done in less than 20 minutes, you’ll never make wings another way again!
Ingredients
- 2 lbs chicken wings (drums and flats) ((defrosted if frozen))
- 1 TBS olive oil
- 1 tsp garlic powder
- 1 tsp onion powder
- 1 tsp paprika
- 1 tsp salt
- 1/2 tsp black pepper
Instructions
- Prep the chicken wings. If full wings, separate them into drums and flats. Make sure they are defrosted. Pat them dry completely dry (this will help them get crispy).
- Place the wings into a bowl and drizzle olive oil oven them. Toss to coat. Add garlic powder, onion powder, paprika, salt, and pepper. Toss to completely coat the wings.
- Preheat the Air Fryer at 400 F degrees for 2 minutes. Add wings in a single layer to the air fryer (they should NOT be touching), and cook for 10 minutes at 400 F degrees.
- After the timer goes off, open and carefully flip over the chicken wings. Cook for 8 more minutes. Remove the chicken wings and serve.
Nutrition
- Calories: 213 kcal
Tried This Recipe? Leave a Comment!
Did you make this recipe? I’d love to hear how it turned out! Please leave a comment and a rating below. Your feedback helps other home cooks and supports cheerychop.com!
For more delicious inspiration, follow me on Pinterest!