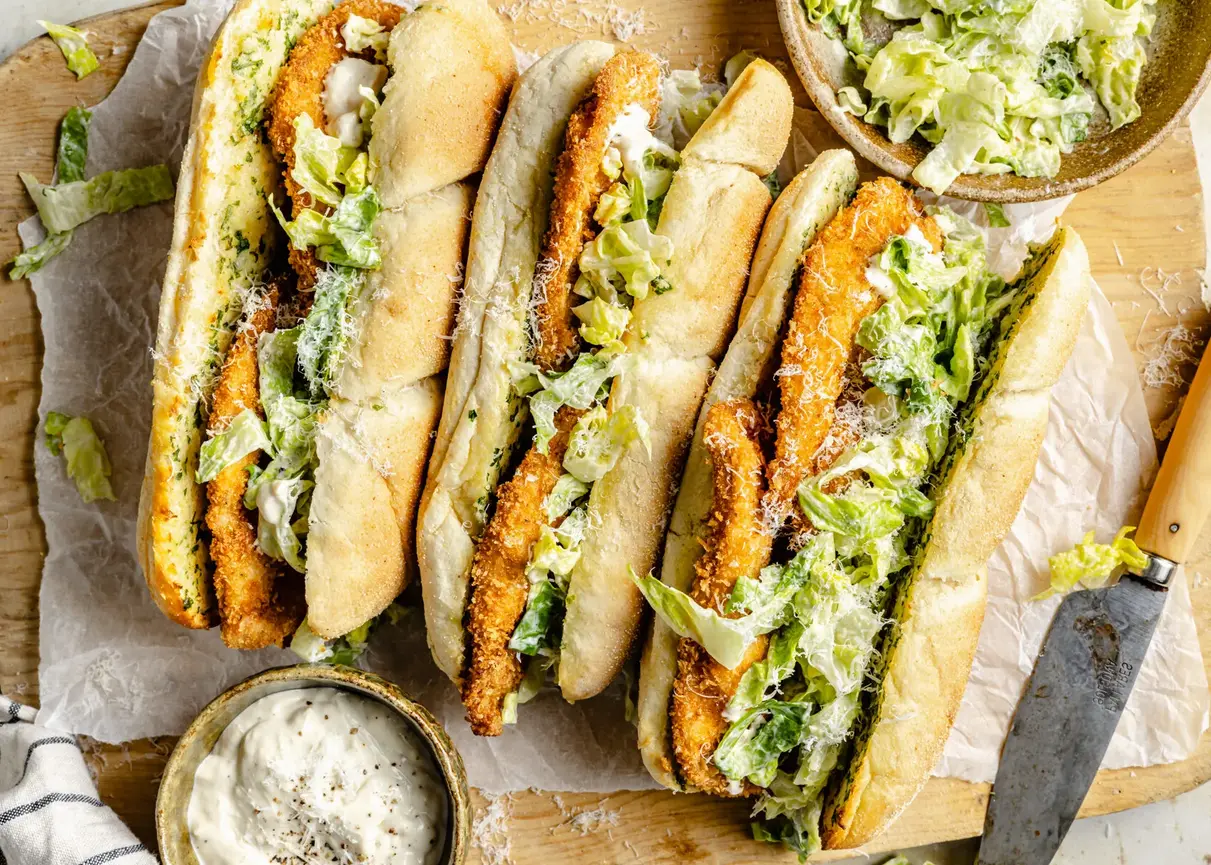
Chicken Caesar Sandwiches: Crispy Cutlets + Garlic Butter Toasted Hoagies – A Quick Lunch Idea Under 30 Minutes

⚖️
Difficulty
Easy
⏲️
Prep Time
15 mins
🕒
Cook Time
15 mins
⏱️
Total Time
30 mins
🍽️
Servings
4

I still remember the first time I made a Chicken Caesar Sandwich for my family in New York. It was a busy weeknight, and I needed something that felt special but came together fast. Growing up in Morocco, my mother would make djaj m’charmel – crispy pan-fried chicken – and I’d sneak bites straight from the pan. That golden crunch is the soul of this Chicken Caesar Sandwich recipe. Layered with my creamy homemade Caesar dressing and crunchy romaine, it’s everything you love about a Caesar salad salad sandwich, but tucked into garlic-butter-toasted bread. This easy Chicken Caesar wrap (or sandwich) has become a staple in my kitchen, and I’m thrilled to share it with you.

Close your eyes and imagine this: the first bite through a cloud of freshly toasted bread, followed by the satisfying crack of a perfectly crisp cutlet coated in seasoned panko. Then comes the cool, tangy Caesar dressing – made with real anchovy paste and Parmesan – and the fresh snap of romaine. A little extra Parmesan on top melts into the warmth of the chicken. It’s a sandwich that delivers layers of texture and flavor: crunchy, creamy, savory, and bright all at once. The garlic butter that soaks into the bread pairs beautifully with the classic Caesar flavors, tying the whole experience together.

After years training in Parisian kitchens and cooking all over NYC, I’ve learned that the best recipes are both ambitious and approachable. This grilled chicken sandwich (pan-fried, actually) is my version of a Caesar salad sandwich crossed with a classic Italian hoagie – and it’s foolproof. The key is using thin cutlets so they cook quickly and stay juicy, plus a double-coating of breadcrumbs and panko for that signature crunch. Oh, and my secret? I toast the hoagies under the broiler with a generous smear of garlic-Parmesan butter. It’s a little move that makes everything taste like it came from a real deli. 💡 mia’s Pro Tip: Don’t skip the anchovy paste in the dressing – it adds deep umami without being fishy. And one common mistake to avoid: overdressing the lettuce. You want just enough to coat, not drown, or your bread will get soggy.

Why This Chicken Caesar Sandwich Recipe Is the Best

The flavor secret lies in my Moroccan-French fusion approach. I use a garlic butter that’s half American-style salted butter, half mayonnaise – a trick from my Paris bistro days – spread generously on the bread before toasting. It gives the hoagies a golden, buttery crispness that stands up to the juicy cutlets and creamy dressing. The dressing itself is a classic Caesar, but I add a touch of Dijon and a whisper of Worcestershire for depth. It’s not just a salad on bread; it’s a harmonious sandwich where every component shines.

Texture is everything, and I’ve perfected it. Each chicken cutlet is pounded thin, then breaded in a mix of fine breadcrumbs and panko. The fine crumbs create a seal that locks in moisture, while the panko delivers that craggy, extra-crunchy exterior. I pan-fry in shallow vegetable oil until deeply golden – about 5 minutes total. The romaine is chopped and tossed in just enough dressing to coat, then piled high on the chicken. The contrast between hot, crunchy chicken and cool, crisp lettuce is pure magic.

This recipe is foolproof and fast – truly ready in 30 minutes. Whether you’re a seasoned cook or a beginner, the steps are straightforward. The ingredients are easy to find at any US grocery store. And it’s endlessly adaptable: you can swap the bread, use rotisserie chicken for a shortcut, or add extra veggies. I’ve made it for friends who claimed they didn’t like Caesar salad – they asked for seconds. This is the kind of sandwich that feels like a treat but comes together any night of the week.

Chicken Caesar Sandwich Ingredients

I buy my chicken from the butcher at the Union Square Greenmarket – nice plump breasts that I can slice into thin cutlets myself. The romaine comes from the same market, always crisp and green. For the Parmesan, I reach for a block of real Parmigiano-Reggiano and grate it fresh; it makes a world of difference in the dressing and the final garnish. And the hoagies? I love a good Italian-style roll from a local bakery, but any soft baguette will do. These ingredients are simple, but treated with respect, they become extraordinary.

Ingredients List

  • 2 boneless, skinless chicken breasts (about 1 lb total)
  • 1 egg, whisked with a splash of milk
  • ¼ teaspoon each garlic powder, salt, and pepper
  • ½ cup plain breadcrumbs
  • ½ cup panko breadcrumbs
  • Vegetable oil, for frying (about 1-inch depth in pan)
  • 4 tablespoons salted butter, slightly melted
  • 2 tablespoons mayonnaise
  • 2–3 cloves garlic, minced
  • 2–3 tablespoons chopped fresh parsley
  • ¼ cup finely grated Parmesan cheese
  • For the Caesar Dressing:
  • ½ cup mayonnaise
  • ¼ cup sour cream or Greek yogurt
  • ¼ cup finely grated Parmesan cheese
  • 1 tablespoon lemon juice
  • 1 teaspoon Dijon mustard
  • 1 teaspoon anchovy paste
  • 1 teaspoon Worcestershire sauce
  • 1 clove garlic, grated
  • Salt and freshly ground black pepper, to taste
  • 4 hoagie rolls or baguettes (about 6 inches each)
  • 3–4 cups romaine lettuce, chopped or shredded
  • Extra Parmesan cheese, for garnish

Ingredient Spotlight

Chicken Breasts: Look for uniformly thick breasts; you’ll slice them horizontally into cutlets. If you can’t find thin cutlets, place the breasts between plastic wrap and pound to ¼-inch thickness. Substitution: boneless thighs – stay juicier but take 1–2 minutes longer to cook. They’re equally delicious and a little more forgiving.

Panko + Breadcrumbs: The combination is non-negotiable for me. Plain breadcrumbs provide a fine, sturdy coating; panko adds the distinctive light crunch. Substitution: You can use all panko for extra texture, or all fine breadcrumbs for a more traditional fried chicken feel. If gluten-free, use gluten-free panko and breadcrumbs – same great results.

Anchovy Paste: This is the secret to a restaurant-quality Caesar dressing. It adds a savory depth that Worcestershire alone can’t match. Substitution: Mince 2 anchovy fillets from a tin. Or, if you absolutely must skip it, add an extra teaspoon of Worcestershire and a pinch of salt – but the flavor won’t be quite the same.

Original IngredientBest SubstitutionFlavor / Texture Impact
Chicken breast (cutlets)Boneless, skinless chicken thighsJuicier, slightly richer; needs a minute longer to cook
Panko + breadcrumbsAll panko or all fine breadcrumbsAll panko = crisper, all fine = less shatter
Anchovy paste2 anchovy fillets, or extra Worcestershire + saltLess umami depth; still good but not as complex
Salted butter + mayo for garlic spreadUse unsalted butter + ½ tsp salt, or all mayoAll mayo toasts just as golden but without buttery richness

How to Make Chicken Caesar Sandwiches — Step-by-Step

Follow these simple steps, and you’ll have restaurant-quality sandwiches at home. I’ve broken every part down with my chef’s tips to guarantee success.

Step 1: Prepare Chicken Cutlets

Place each chicken breast on a cutting board and slice horizontally through the middle, like you’re butterflying it, to create two thin cutlets. You should have 4 cutlets total. If any are thicker than ½ inch, gently pound them with a rolling pin between plastic wrap until even. In a shallow bowl, whisk the egg with milk, garlic powder, salt, and pepper. In a separate bowl, combine the breadcrumbs and panko.

⚠️ Common Mistake to Avoid: Cutting the cutlets unevenly. If one side is thicker, it will overcook by the time the thick part is done. Take your time to slice evenly, and pound if needed.

Step 2: Bread and Fry Chicken

Dip each cutlet into the egg wash, letting excess drip off, then press into the breadcrumb mixture, coating both sides. Set on a plate. Heat about 1 inch of vegetable oil in a large skillet over medium-high heat until shimmering (350°F if using a thermometer). Fry the cutlets in a single layer, 2 at a time, for 2–3 minutes per side, until deep golden brown and cooked through. Transfer to a paper towel-lined baking sheet. Season immediately with a pinch of salt.

💡 mia’s Pro Tip: Don’t crowd the pan. Overcrowding lowers the oil temperature and leads to greasy, soggy chicken. Fry in batches and let the oil come back to temperature between batches.

Step 3: Make Garlic Butter and Toast Bread

In a small bowl, mix the slightly melted butter, 2 tablespoons mayo, minced garlic, parsley, and ¼ cup grated Parmesan. Split each hoagie roll lengthwise without cutting all the way through, so it opens like a book. Spread the garlic butter mixture generously on the inside of each half. Place on a baking sheet and broil on high (or bake at 450°F) for 3–4 minutes, until golden and toasted. Keep warm.

⚠️ Common Mistake to Avoid: Over-broiling. The butter mixture can burn quickly. Watch closely after 2 minutes. You want toasted golden edges, not black spots.

Step 4: Make Caesar Dressing

While the bread toasts, whisk together all dressing ingredients in a small bowl or shake in a mason jar: ½ cup mayo, sour cream, ¼ cup Parmesan, lemon juice, Dijon, anchovy paste, Worcestershire, grated garlic, salt, and pepper. Taste and adjust – you might want more lemon or a pinch of salt. Set aside.

💡 mia’s Pro Tip: Make the dressing up to 3 days ahead. It gets even better as the flavors meld. Store in the fridge in a sealed jar.

Step 5: Toss Salad and Assemble

Place the chopped romaine in a large bowl. Drizzle with 3–4 tablespoons of dressing (or more if you like it saucy) and toss well to coat evenly. To assemble, place two chicken cutlets on the bottom half of each toasted roll. Pile the Caesar salad on top. Sprinkle with extra grated Parmesan. Close with the top half of the roll and press gently. Serve immediately!

⚠️ Common Mistake to Avoid: Adding too much dressing to the lettuce. The dressing should lightly coat each piece, not pool at the bottom. Too much liquid will make the bread soggy.

StepActionDurationKey Visual Cue
1Slice & bread chicken5 minsCutlets evenly thin, fully coated
2Pan-fry chicken~5 mins per batchDeep golden brown, internal temp 165°F
3Garlic butter & toast bread3–4 minsEdges golden, butter bubbling
4Make dressing5 minsSmooth, creamy, pale yellow
5Toss salad & assemble5 minsLettuce lightly coated, sandwich stacked high

Serving & Presentation

I love serving these sandwiches right after assembly, while the bread is still warm and the cutlets are crispy. Cut each hoagie in half on a slight diagonal – it looks beautiful and makes it easier to eat. The cross-section reveals the gorgeous layers: golden chicken, creamy white dressing against green romaine, and specks of parsley. For a true deli experience, wrap each half in parchment paper and tie with kitchen twine. It’s a trick I picked up from a sandwich shop in Brooklyn – it keeps everything neat and gives rustic flair.

Pair these sandwiches with a light side: a handful of kettle chips, a simple tomato-cucumber salad, or – my favorite – a bowl of French onion soup made ahead. For a nod to my Paris training, serve with a small ramekin of extra dressing on the side for dipping. Drinks? A crisp lemonade or an iced matcha latte complements the savory richness beautifully.

Pairing TypeSuggestionsWhy It Works
Side DishKettle chips, tomato-cucumber salad, or truffle friesAdds crunch and freshness; fries echo the sandwich’s indulgence
Sauce / DipExtra Caesar dressing, sriracha mayo, or lemon aioliProvides a tangy or spicy counterpoint
BeverageIced matcha latte, fresh lemonade, or a crisp lagerCuts through richness; matcha’s earthiness complements Parmesan
GarnishLemon wedges, extra parsley, or a few capersAdds freshness and visual pop; capers mimic briny anchovy note

Make-Ahead, Storage & Reheating

I often prep components in advance for busy weeks. The dressing can be made up to 3 days ahead. The breaded raw chicken cutlets can be breaded and refrigerated for a day; just fry them fresh when you’re ready. Assembled sandwiches are best eaten immediately, but with a few tricks you can enjoy them later without sogginess.

MethodContainerDurationReheating Tip
RefrigeratorAirtight container (store components separately)Up to 2 daysReheat chicken in a 350°F oven for 8 mins; toast bread fresh; toss salad fresh
FreezerFreezer-safe bag or container (chicken only, after breading and before frying)Up to 3 monthsThaw overnight in fridge, then fry as directed; do not freeze assembled sandwiches
Make-AheadDressing in jar, breaded chicken in fridgeDressing: 3 days; breaded chicken: 1 daySlather garlic butter on rolls and toast just before serving; fry chicken last minute

If you have leftovers, never refrigerate an assembled sandwich – the bread will turn soggy and the lettuce will wilt. Instead, separate the chicken and bread, then store them separately. Reheat the chicken in a toaster oven or skillet to revive its crunch. Toast a fresh hoagie if possible, and dress new lettuce. It takes just minutes more.

Variations & Easy Swaps

VariationKey ChangeBest ForDifficulty Impact
Grilled Chicken Caesar WrapUse grilled chicken strips instead of fried cutlets; swap hoagie for a large tortillaLighter meal, meal prep, portable lunchEasy (no breading/frying)
Gluten-Free Chicken Caesar SandwichUse gluten-free breadcrumbs + gluten-free hoagie or lettuce wrapsCeliac or gluten-sensitiveEasy (same process, different ingredients)
Buffalo Caesar SandwichToss fried chicken in buffalo sauce; add blue cheese crumblesSpice lovers, game dayEasy (extra step: toss in sauce)

Grilled Chicken Caesar Wrap

This is the variation I make when I want a quick lunch that feels fresh. Simply season chicken breasts with salt, pepper, and garlic powder, then grill on a hot pan or outdoor grill until cooked through. Slice into strips. Use a large flour tortilla (or gluten-free wrap). Spread a little Caesar dressing down the center, add the chicken strips and tossed romaine, and roll up tightly. No frying, no breading – just a light, satisfying wrap that takes 15 minutes.

Gluten-Free Chicken Caesar Sandwich

To make this recipe entirely gluten-free, swap the breadcrumbs and panko for gluten-free versions (I use Ian’s brand or homemade from GF bread). Use a gluten-free hoagie roll or sturdy lettuce wraps like romaine hearts for a low-carb option. The chicken will still be crispy, and the dressing is naturally gluten-free. Just double-check your Worcestershire sauce is GF (Lea & Perrins is).

Buffalo Caesar Sandwich

For a spicy twist, after frying the chicken cutlets, toss them in a bowl with 3 tablespoons of buffalo sauce (Frank’s is my go-to). Build the sandwich as directed, but add crumbled blue cheese along with the Parmesan. The cool, creamy dressing tames the heat beautifully. This version is a hit at parties – I serve sliders by cutting the hoagies into smaller pieces.

Share Your Version!

I’d love to see how these Chicken Caesar Sandwiches turn out in your kitchen! Leave a star rating and a comment below to tell me what you thought. Did you try the Buffalo twist? Or did you stick with the classic? Tag your photos on Instagram or Pinterest with @exorecipes – I personally look at every single one. And if you have a question about the technique or a substitution that’s not listed, ask away. I read every comment and I’m always here to help.

From my NYC kitchen to yours — I hope this recipe brings as much warmth to your table as it does to mine. — mia 🧡

📌

Love This Recipe? Save It to Pinterest!

If you enjoyed this Chicken Caesar Sandwiches recipe, don’t let it get lost in your browser tabs! 😄 Pin it now so you can find it again anytime — and explore hundreds more tried-and-tested recipes waiting for you on my Pinterest boards.

👉 Follow mia on Pinterest @exorecipe

📌 Pin this recipe · 🔁 Re-pin your favorites · 💬 Tag me when you make it — I love seeing your creations!

What is the best type of bread to use for Chicken Caesar Sandwiches?

Soft, sturdy rolls are key. I love a good Italian hoagie roll – it has a slightly crisp crust but a pillowy interior that soaks up the garlic butter without falling apart. French baguettes work too, but look for a pain de mie style or a soft sub roll. Avoid very crusty bread like sourdough boules; they can be hard to bite into and may break the delicate balance. For a lighter option, use large brioche buns – they add a touch of sweetness that contrasts beautifully with the tangy Caesar dressing.

Can I use rotisserie chicken for Chicken Caesar Sandwiches?

Absolutely, and it’s a fantastic shortcut! Simply shred or chop the cooked rotisserie chicken (skip the skin) and warm it briefly in a skillet with a little olive oil or butter. You won’t get the crispy coating, but the flavor will still be delicious. To add crunch, toast the bread extra well or toss a handful of croutons into the salad. This version turns the recipe into a true 15-minute meal – perfect for busy weeknights when you crave a Caesar salad sandwich without any fuss.

How do you keep Chicken Caesar Sandwiches from getting soggy?

The golden rule: don’t dress the lettuce until just before serving. Toss the romaine with only as much dressing as you’ll use immediately – about 3–4 tablespoons for 4 cups of lettuce. Also, toast the bread thoroughly so it develops a moisture-resistant barrier. If you’re making sandwiches ahead for later, pack the bread, chicken, and salad separately and assemble at the last minute. Another trick: spread a thin layer of softened butter on the bread before adding the garlic butter – it adds an extra seal against sogginess.

What’s a good cheese to add to Chicken Caesar Sandwiches besides Parmesan?

Parmesan is classic, but you can absolutely experiment. For a richer, creamier note, try shaved Pecorino Romano – it’s saltier and sharper. Gouda adds a smoky nuance if you’re doing a grilled chicken version. Fresh mozzarella slices add a milky, pull-apart texture that’s wonderful when melted. For a tangy kick, crumbled feta works beautifully with the Caesar dressing. I once made a version with aged Gruyère that was absolutely decadent – it melted into the chicken while still holding its shape. Just keep in mind that stronger cheeses may overpower the dressing, so use a light hand.

Can I make Chicken Caesar Sandwiches ahead of time for a party?

Yes, but you’ll want to serve them fresh. For a party, prep all components in advance: fry the chicken cutlets and keep them warm in a low oven (200°F) on a wire rack to stay crisp. Make the dressing and chop the lettuce up to a day ahead. Toast the bread just before guests arrive. Set up a sandwich bar where everyone can assemble their own – that way every sandwich is made to order and stays perfectly crunchy. If you need fully assembled sandwiches, build them no more than 20 minutes before serving and keep them uncovered at room temperature.

Print

clock clock iconcutlery cutlery iconflag flag iconfolder folder iconinstagram instagram iconpinterest pinterest iconfacebook facebook iconprint print iconsquares squares iconheart heart iconheart solid heart solid icon

Chicken Caesar Sandwiches

  • Author: Chef Mia

Description

Chicken Caesar Sandwiches feature well-seasoned, crispy chicken, Caesar salad and Parmesan cheese layered on soft bread toasted with garlic butter. Perfect for a hearty lunch or dinner that’s packed with incredible flavor in under 30 minutes!


Ingredients

Scale
  • 2 chicken breasts
  • 1 egg whisked with a splash of milk
  • ¼ teaspoon EACH garlic powder, salt, pepper
  • 1/2 cup breadcrumbs
  • 1/2 cup Panko
  • Vegetable oil for frying
  • 4 Tablespoons salted butter (slightly melted)
  • 2 Tablespoons mayo
  • 23 cloves garlic (minced)
  • 23 Tablespoons chopped fresh parsley
  • 1/4 cup finely grated Parmesan
  • 1/2 cup mayo
  • 1/4 cup sour cream or Greek yogurt
  • 1/4 cup finely grated parmesan cheese
  • 1 Tablespoon lemon juice
  • 1 teaspoon Dijon Mustard
  • 1 teaspoon anchovy paste
  • 1 teaspoon Worcestershire sauce
  • 1 clove garlic (grated)
  • Salt & pepper (to taste)
  • 4 hoagies or baguette
  • 34 cups romaine lettuce (chopped or shredded)

Instructions

  1. Make the chicken cutlets. On a cutting board or flat surface, slice the chicken cutlets in half or third horizontally to make 4-6 thin cutlets. In a small bowl whisk an egg with a splash of milk, garlic powder, salt, and pepper. In another bowl, combine the breadcrumbs. Bread your chicken by dipping it into the eggs then breadcrumbs, and fry in a shallow pan in 1-inch deep oil over medium-high heat until golden brown and crispy (about 5 minutes), set aside on a paper towel-lined pan.
  2. In a small bowl, combine all the ingredients for the garlic butter. Split your bread in half lengthwise, Spread the garlic butter on each half from inside. Place in a 450ºF oven or under a broiler to toast (about 3-4 minutes).
  3. Whisk all the ingredients for the dressing in a bowl or mason jar. In a large salad bowl, toss 3-4 tablespoons of the dressing with the chopped romaine.
  4. When ready to serve, build the sandwich by layering chicken cutlets, salad, and extra grating of parmesan cheese on the bread. Enjoy immediately!


Nutrition

  • Calories: 664 kcal
  • Sugar: 6 g
  • Fat: 38 g
  • Carbohydrates: 43 g
  • Protein: 37 g


Chicken Caesar Sandwiches

k">

Tried This Recipe? Leave a Comment!

Did you make this recipe? I’d love to hear how it turned out! Please leave a comment and a rating below. Your feedback helps other home cooks and supports cheerychop.com!

For more delicious inspiration, follow me on Pinterest!
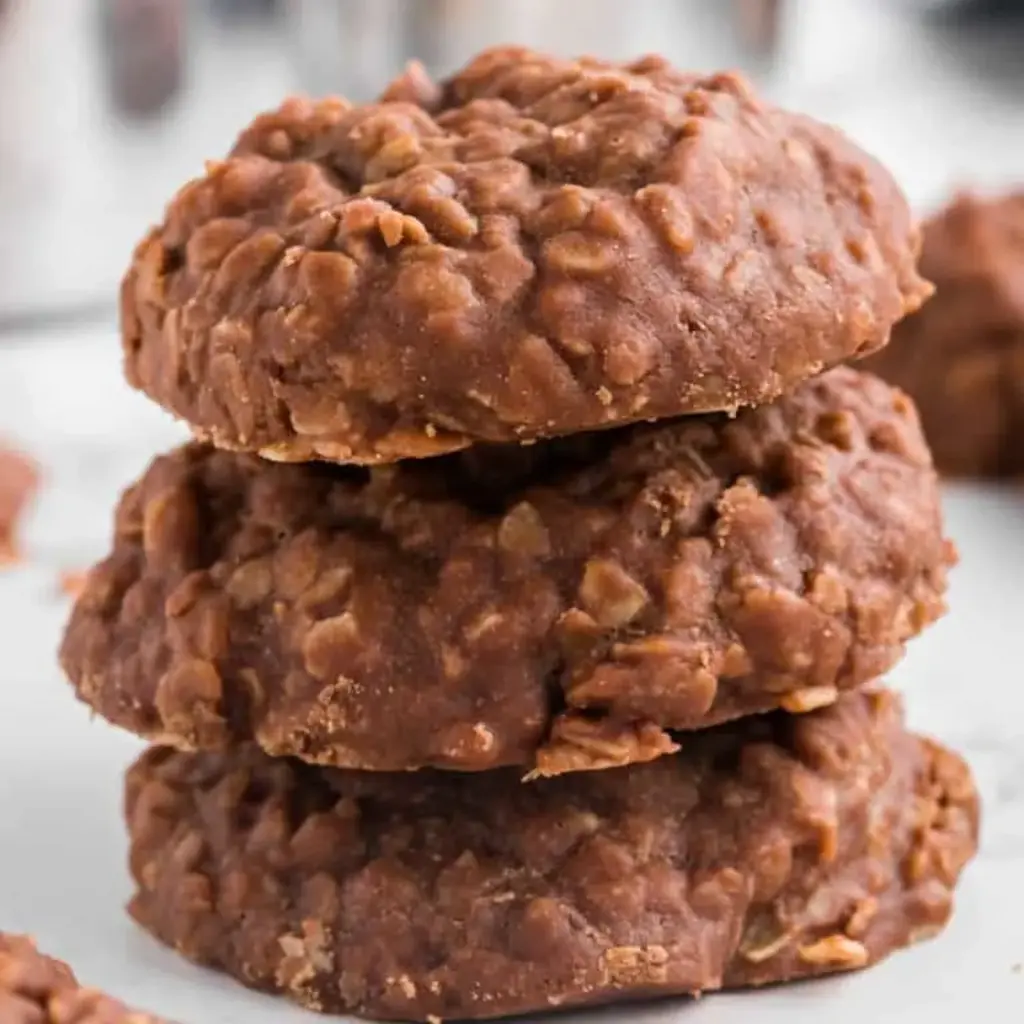
Easy No-Bake Cookies Ready in 15 Minutes

No-Bake Cookies: The Perfect One-Minute Boil Technique for Fudgy, Set-and-Forget Cookies

⚖️
Difficulty
Easy
⏲️
Prep Time
10 mins
🕒
Cook Time
8 mins
⏱️
Total Time
40 mins
🍽️
Servings
18 cookies

I’ve trained in Paris pastry kitchens, cooked across Morocco and NYC, and spent countless hours perfecting desserts — but my absolute favorite cookie is this no-bake cookies recipe. Yes, I bake bread and craft multi-layer tarts every week, but when I want something deeply satisfying without turning on the oven, these chocolate no-bake oatmeal cookies are what I make. The secret? A precise one-minute boil that transforms simple pantry staples into a fudgy, chewy, perfectly set cookie every single time.

The first bite takes me right back to my mother’s kitchen in Morocco — not because she made these exact cookies, but because that combination of rich cocoa, creamy peanut butter, and hearty oats feels like the kind of honest, soul-warming treat she would have whipped up after school. The texture is pure magic: firm enough to hold its shape, yet soft and almost fudge-like in the center. Each cookie has that classic craggy top, a slight sheen from the butter and cocoa, and a deep chocolate aroma that fills your whole kitchen.

What makes my version stand out is the technique I learned in culinary school: boiling the sugar, milk, butter, and cocoa for exactly one minute — no more, no less. That precise window activates the sugar properly and gives the cookies their signature set. I’ll share my pro tip for avoiding dryness (a common frustration with these) and the one mistake I see home cooks make that turns perfect no-bake cookies into crumbly disappointments. This easy no-bake cookie recipe is about to become your new go-to quick dessert.

Why This No-Bake Cookies Recipe Is the Best

The flavor secret is in the balance. I use creamy peanut butter for its silky richness and just enough cocoa to make it deeply chocolate without turning bitter. Growing up, my mother taught me that the best desserts let each ingredient sing — and here, the peanut butter, oat, and chocolate flavors are all perfectly audible. My French pastry training taught me how sugar syrups behave, and that one-minute boil is the foundation of this recipe’s success.

Texture is everything with no-bake cookies. Too dry and they crumble; too wet and they never set. My technique — stopping the whisk during the boil and trusting the timer — gives you cookies that are firm on the outside, tender in the center, and hold together beautifully. The quick oats absorb just the right amount of moisture, and the peanut butter acts as a natural binder. I’ve tested this dozens of times to get that ideal chew.

This recipe is foolproof and fast. From start to finish, you’re looking at about 40 minutes total, with only 8 minutes of active cooking. No oven, no mixer, no complicated steps. Whether you’re a beginner or a seasoned cook, these easy no-bake cookies deliver consistent results. I make them on busy NYC mornings, for last-minute guests, and whenever I need a chocolate fix without the fuss.

No-Bake Cookies Ingredients

I pick up most of these ingredients at my local NYC bodega or the Union Square farmers market. The quick oats and creamy peanut butter are staples I always have on hand — they remind me of the pantry my mother kept in Morocco, where simple ingredients became extraordinary treats. Here’s everything you need for these chocolate no-bake cookies.

Ingredients List

  • 2 cups sugar
  • 1/2 cup milk (whole or 2% works best)
  • 1/2 cup unsalted butter
  • 1/4 cup cocoa powder (natural unsweetened)
  • 3 cups quick oats (not old-fashioned — see FAQ below)
  • 1 cup creamy peanut butter
  • 1 tablespoon vanilla extract

Ingredient Spotlight

Sugar is the backbone here — it sweetens and, when boiled to the right stage, helps the cookies set. Use granulated white sugar for consistent results. Milk adds moisture and helps dissolve the sugar and cocoa; whole milk gives a richer texture, but 2% works fine too. Unsalted butter lets you control the salt level — if you only have salted, reduce any added salt and expect a slightly different flavor balance.

Cocoa powder delivers that deep chocolate flavor. Natural, unsweetened cocoa is what I use — Dutch-process will work but yields a milder, less acidic chocolate taste. Quick oats are crucial because they absorb moisture faster than old-fashioned oats, giving the cookies the right texture. Creamy peanut butter melts smoothly into the warm mixture and acts as both a flavor and structural binder. Vanilla extract brightens all the flavors — use pure vanilla if you can, but imitation works in a pinch.

Original IngredientBest SubstitutionFlavor / Texture Impact
SugarCoconut sugarLess sweet, slightly grainier, deeper caramel note
MilkUnsweetened almond milkSlightly thinner texture, less rich but still works
ButterVegan butter (like Miyoko’s)Nearly identical; use a high-fat block style
Peanut butterSunflower seed butter or almond butterNut-free option; slightly different flavor but same binder effect
Quick oatsOld-fashioned oats (pulsed briefly in a food processor)Chewier texture; needs longer set time to soften

How to Make No-Bake Cookies — Step-by-Step

These easy no-bake cookies come together in minutes. Follow these three simple steps, and you’ll have a batch of perfectly set, fudgy cookies in under an hour.

Step 1: Boil the Base

In a large pot, add 2 cups sugar, 1/2 cup milk, 1/2 cup unsalted butter, and 1/4 cup cocoa powder. Place the pot over medium heat and whisk everything together until the butter melts and the mixture is smooth. Slowly bring it to a full rolling boil — you’ll see bubbles across the entire surface. Once it reaches a vigorous boil, set a timer for exactly one minute and stop whisking. Let it boil undisturbed for that full minute.

💡 mia’s Pro Tip: Use a timer! That one-minute boil is non-negotiable. Less time and the cookies won’t set; more time and they become dry and crumbly. Trust the clock, not your eyes.

Step 2: Mix in the Goodness

Remove the pot from heat immediately after the minute is up. Add 3 cups quick oats and stir thoroughly until every oat is coated in chocolate goodness. Then add 1 cup creamy peanut butter and mix until it’s fully melted and incorporated — the mixture will look glossy and smell incredible. Finally, stir in 1 tablespoon vanilla extract. Mix until everything is evenly combined and no streaks remain.

⚠️ Common Mistake to Avoid: Adding the oats before removing the pot from heat. If you stir them in while still on the burner, the mixture can scorch and the oats will overcook, giving the cookies a gummy texture. Always take the pot off the heat first.

Step 3: Scoop and Set

Lay out a large sheet of parchment paper on your counter or a baking sheet. Working quickly while the mixture is still warm and pliable, use a cookie scoop or two spoons to drop rounded portions onto the parchment. Shape them into cookie discs — about 2 tablespoons each. Let the cookies set at room temperature for 15–30 minutes, or until they are firm to the touch. If your kitchen is warm, you can pop them in the refrigerator for 10 minutes to speed things up.

💡 mia’s Pro Tip: For evenly sized cookies that look bakery-perfect, use a #40 cookie scoop (about 1.5 tablespoons). This ensures uniform set times and consistent texture across the whole batch.

StepActionDurationKey Visual Cue
1Boil sugar, milk, butter, cocoa1 min at rolling boilFull surface bubbles, mixture darkens slightly
2Stir in oats, peanut butter, vanilla2–3 minutesGlossy, thick, no dry oats visible
3Scoop and let set15–30 minutesFirm to touch, holds shape when lifted

Serving & Presentation

I love serving these no-bake cookies just as they are — rustic, craggy, and full of character. Arrange them on a wooden board or a simple white platter so their chocolatey tops take center stage. A light dusting of flaky sea salt (like Maldon) right before serving elevates the flavor beautifully, bringing out the chocolate and balancing the sweetness. In my NYC kitchen, I often pair them with a tall glass of cold oat milk or a strong cup of black coffee.

For a more dressed-up presentation, drizzle a little melted peanut butter or dark chocolate over the tops and add a sprinkle of chopped roasted peanuts or toasted coconut flakes. This is how I serve them when friends come over for casual dinner parties — they disappear within minutes. In Morocco, we would have served something like this with hot mint tea, and the combination of sweet, chocolatey cookie and bright, herbaceous tea is still one of my favorites.

Pairing TypeSuggestionsWhy It Works
Side DishFresh berries, sliced bananaBright acidity cuts the richness
Sauce / DipMelted dark chocolate, peanut butter drizzleAdds indulgence and visual appeal
BeverageCold oat milk, black coffee, Moroccan mint teaCleanses palate and complements chocolate
GarnishFlaky sea salt, chopped peanuts, coconut flakesAdds crunch, salt contrast, and texture

Make-Ahead, Storage & Reheating

These no-bake cookies are perfect for meal prep — I make a double batch on Sunday and enjoy them all week long. In my busy NYC schedule, having a ready-to-grab treat means I never reach for store-bought snacks. The key is storing them properly to maintain that perfect fudgy texture.

MethodContainerDurationReheating Tip
RefrigeratorAirtight container with parchment between layersUp to 7 daysEnjoy cold or let sit at room temp 10 minutes
FreezerFreezer-safe bag or container, parchment between layersUp to 3 monthsThaw at room temp 15 minutes — do not microwave
Make-AheadShape dough and refrigerate before settingUp to 2 days in advanceLet set fully in fridge before serving

If your cookies have been in the fridge and you prefer a softer texture, let them sit at room temperature for about 10 minutes before eating. I do not recommend microwaving them — it can melt the peanut butter and make the oats gummy. For frozen cookies, transfer them to the fridge overnight or let them sit on the counter for 15 minutes. They’ll taste just as fresh as the day you made them.

Variations & Easy Swaps

VariationKey ChangeBest ForDifficulty Impact
Coconut ChocolateAdd 1/2 cup shredded coconut with oatsTexture lovers, tropical flavorEasy
Crunchy Peanut ButterUse crunchy instead of creamy peanut butterExtra crunch, peanut loversEasy
Vegan / Dairy-FreeUse almond milk and vegan butterDairy-free dietsEasy

Coconut Chocolate No-Bake Cookies

Fold in 1/2 cup unsweetened shredded coconut along with the oats. This adds a lovely chewy texture and a subtle tropical note that pairs beautifully with the chocolate and peanut butter. It’s a variation I picked up from a pastry chef friend in Paris who loved adding coconut to American-style cookies. The coconut doesn’t change the set time, so follow the same 15–30 minute rest.

Vegan / Dairy-Free No-Bake Cookies

Replace the milk with unsweetened almond or oat milk, and use a high-quality vegan butter like Miyoko’s or Earth Balance. The texture comes out slightly softer but still holds together beautifully. I’ve tested this version multiple times for my NYC friends with dairy sensitivities, and they swear it tastes identical to the original. Use the same one-minute boil and setting time.

Crunchy Peanut Butter Version

Swap creamy peanut butter for crunchy to add little pockets of peanut pieces throughout each cookie. This is my go-to when I’m craving extra texture. I buy my crunchy peanut butter from the Union Square farmers market — the small-batch kind with visible peanut pieces. The set time and proportions stay exactly the same; you just get more peanut in every bite.

How do you keep no-bake cookies from getting too dry or crumbly?

The number one cause of dry no-bake cookies is over-boiling the sugar mixture. That one-minute boil is critical — if you boil for longer, too much moisture evaporates and the cookies won’t hold together. Another common culprit is using old-fashioned oats instead of quick oats, since they absorb less moisture during the mixing stage. Finally, make sure you measure your peanut butter accurately. Too little peanut butter means less binder, and the cookies will be crumbly. Use a measuring cup and pack it firmly for consistent results.

Can you use quick oats instead of old-fashioned oats in no-bake cookies?

Yes, and I actually recommend quick oats for this recipe. Quick oats are rolled thinner and cut into smaller pieces, so they absorb the warm chocolate mixture more readily and give the cookies a softer, more cohesive texture. Old-fashioned oats are thicker and chewier — they can work if you pulse them briefly in a food processor to break them down, but the texture will be noticeably different and the cookies may take longer to set. For the best results with this easy no-bake cookie recipe, stick with quick oats.

How long do no-bake cookies need to set before they are firm enough to eat?

At room temperature, no-bake cookies typically need 15 to 30 minutes to set firm enough to eat. The exact time depends on the temperature and humidity of your kitchen. On a cool, dry day they may set in as little as 15 minutes; on a warm, humid day they could need closer to 30 minutes. You’ll know they’re ready when the cookies are firm to the touch and lift cleanly off the parchment without bending. If you’re in a hurry, pop them in the refrigerator for 10 minutes — just don’t leave them in too long or they can become overly hard.

What can I substitute for peanut butter in no-bake cookies?

You can substitute creamy peanut butter with sunflower seed butter, almond butter, or cashew butter in equal measure. Sunflower seed butter is the closest in texture and gives a neutral flavor that lets the chocolate shine, though it can turn slightly green when combined with cocoa (this is natural and safe). Almond butter works beautifully but adds a mild nutty flavor. For a nut-free version, sunflower seed butter is your best bet. Avoid using natural, runny peanut butters that have separated oil — they don’t bind as well and can make the cookies greasy.

Can I use crunchy peanut butter instead of creamy in no-bake cookies?

Absolutely! Crunchy peanut butter works perfectly in this recipe and adds lovely little peanut pieces throughout each cookie. Use the same amount — 1 cup — and follow the instructions exactly as written. The peanut pieces will soften slightly from the warm mixture but retain a pleasant crunch. This is one of my favorite variations, especially when I find a good artisanal crunchy peanut butter at the NYC farmers market. Just make sure your crunchy peanut butter is well-stirred if it has been sitting for a while, so the oil is evenly distributed.

Why did my no-bake cookies not set properly?

If your no-bake cookies didn’t set, the most likely reason is that the sugar mixture wasn’t boiled long enough. The one-minute rolling boil is essential for reaching the right temperature — around 234°F to 240°F — which allows the sugar to form a structure that holds the cookies together. Other possible causes include: using old-fashioned oats instead of quick oats (they don’t absorb enough moisture), adding too much milk, or not measuring the oats correctly. If your mixture looks runny after stirring in the oats, try letting it sit for 5 minutes before scooping to allow more absorption.

Can I make no-bake cookies without peanut butter?

Yes, you can make no-bake cookies without peanut butter by using a seed butter like sunflower seed butter or tahini (sesame paste). Sunflower seed butter is the closest substitute in terms of texture and binding ability. Tahini will give the cookies a more savory, earthy flavor that pairs surprisingly well with dark chocolate — this is a combination I love inspired by Middle Eastern flavors. You can also use cookie butter for a sweeter, spiced variation. Keep the amount at 1 cup and expect a slightly different flavor profile, but the texture will remain similar.

How do I store no-bake cookies so they stay fresh?

Store no-bake cookies in an airtight container at room temperature for up to 3 days, or in the refrigerator for up to 7 days. Layer them between sheets of parchment or wax paper to prevent sticking. If you live in a warm or humid climate (like NYC summers!), I recommend refrigerating them to prevent softening. For longer storage, freeze them in a freezer-safe bag or container with parchment between layers — they’ll keep for up to 3 months. Thaw frozen cookies at room temperature for about 15 minutes before eating. Avoid microwaving, as it can melt the peanut butter and make the oats gummy.

Share Your Version!

📌

Love This Recipe? Save It to Pinterest!

If you enjoyed this No-Bake Cookies recipe, don’t let it get lost in your browser tabs! 😄 Pin it now so you can find it again anytime — and explore hundreds more tried-and-tested recipes waiting for you on my Pinterest boards.

👉 Follow mia on Pinterest @exorecipe

📌 Pin this recipe · 🔁 Re-pin your favorites · 💬 Tag me when you make it — I love seeing your creations!

Print

clock clock iconcutlery cutlery iconflag flag iconfolder folder iconinstagram instagram iconpinterest pinterest iconfacebook facebook iconprint print iconsquares squares iconheart heart iconheart solid heart solid icon

No-Bake Cookies

  • Author: Chef Mia

Description

My all-time favorite cookie recipe! Just a few ingredients and no time in the oven for these delicious No-Bake Cookies. Yes, I cook and bake every day, but my favorite cookie is a No-Bake Cookie!


Ingredients

Scale
  • 2 cups sugar
  • 1/2 cup milk
  • 1/2 cup unsalted butter
  • 1/4 cup cocoa powder
  • 3 cups quick oats
  • 1 cup creamy peanut butter
  • 1 tablespoon vanilla extract

Instructions

  1. In a large pot add sugar, milk, butter, and cocoa powder. Slowly bring to a boil while whisking. Once at a boil allow to boil for one minute (I set a timer and stopped the whisking).
  2. Remove from heat and add in oats. Mix well. Add in peanut butter, mix well. Last add in vanilla extract and mix well.
  3. Lay out parchment paper on the counter and spoon out the dough into cookie shapes. Allow to set for 15-30 minutes.


Nutrition

  • Calories: 330 kcal
  • Sugar: 28 g
  • Fat: 16 g
  • Carbohydrates: 42 g
  • Protein: 7 g


No-Bake Cookies

ph">For more delicious inspiration, follow me on Pinterest!

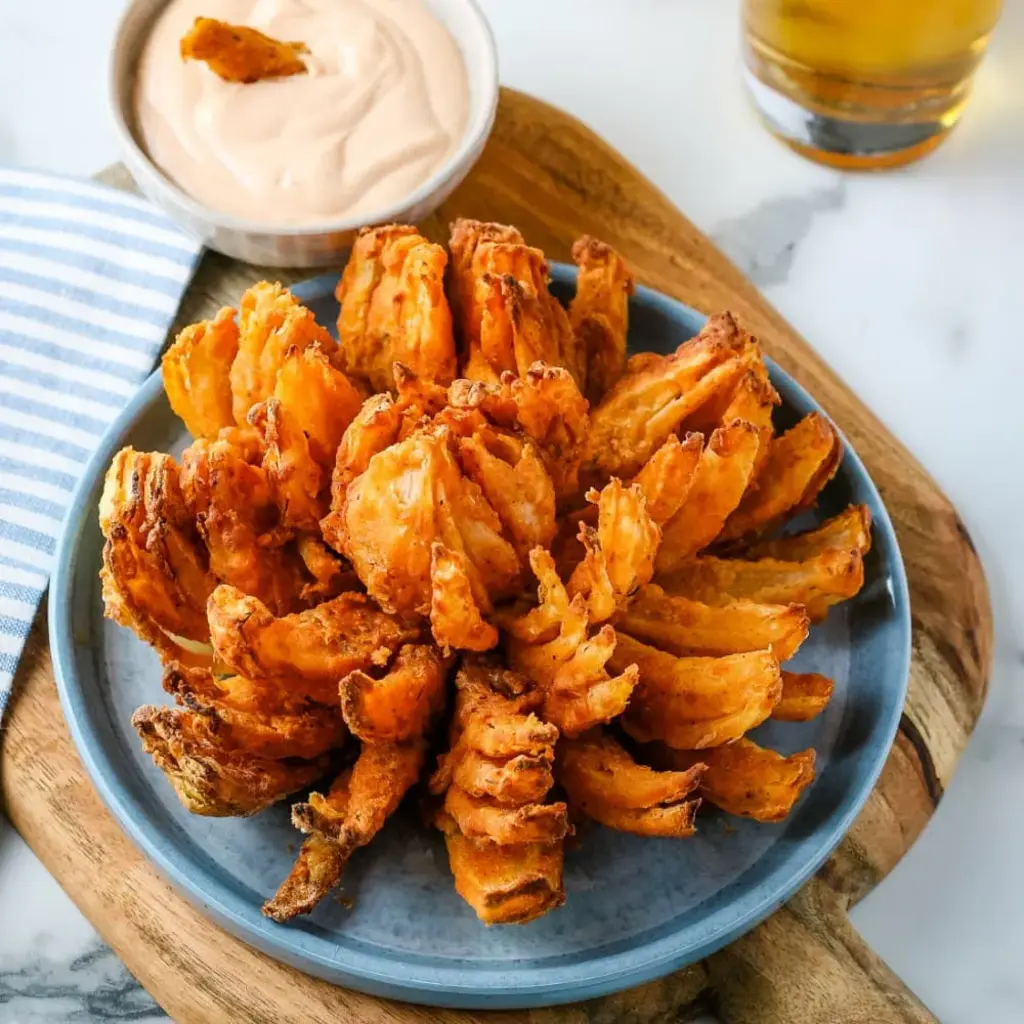
Perfectly Crispy Air Fryer Blooming Onion Recipe

Air Fryer Blooming Onion – Crispy, Golden & Better Than Outback!

⚖️
Difficulty
Medium
⏲️
Prep Time
20 mins
🕒
Cook Time
25 mins
⏱️
Total Time
45 mins
🍽️
Servings
4

Growing up in Morocco, my mother would fry onions until they were caramelized and sweet, then serve them with warm bread and olives. I never imagined I’d one day turn that humble onion into a show-stopping Air Fryer Blooming Onion — a dish that feels both nostalgic and completely new. After training in Paris and now cooking in my tiny New York City kitchen, I’ve learned that the best recipes honor tradition while embracing modern tools. This Air Fryer Blooming Onion does exactly that: it’s restaurant-quality, crispy on the outside, tender and sweet inside, and made with far less oil than the classic deep-fried version. The first time I made this for a game-day gathering, my friends couldn’t believe it came from an air fryer. That’s the moment I knew this recipe had to be shared.

Imagine pulling apart a perfectly golden petal — the crust shatters with the lightest pressure, giving way to a soft, sweet onion interior that practically melts on your tongue. The seasoning blend of paprika, cayenne, cumin, thyme, and oregano creates a warm, aromatic bite that lingers just long enough to make you reach for another piece. There’s a hint of heat, a whisper of earthiness, and a brightness that cuts through the richness. As the onion bakes in the circulating hot air, the kitchen fills with a savory, spiced fragrance that reminds me of the souks in Marrakech — layers of cumin and paprika mingling with the sweet steam of cooking onion. It’s the kind of aroma that draws people into the kitchen before you even call them to the table.

What sets my version apart is the double-breading technique I learned at Le Cordon Bleu in Paris — a light flour coating, a dip in egg wash, then a second dusting that creates an extra-craggly, crunchy crust without being heavy. That, combined with the controlled heat of the air fryer, gives you a blooming onion that’s golden, crisp, and never greasy. I’ve tested this recipe more times than I can count, adjusting the spice levels and timing to get it just right. 💡 mia’s Pro Tip: letting the cut onion rest for five minutes before breading allows the petals to open naturally, giving every nook and cranny room for that seasoned flour. And the one common mistake I see? Not spraying the onion with oil halfway through cooking — that extra spritz is what gives you that deep, even golden color. Trust me, this Air Fryer Blooming Onion will be the star of your next gathering.

Why This Air Fryer Blooming Onion Recipe Is the Best

The flavor secret lies in the spice blend — a nod to my North African roots. I combine paprika, cayenne, cumin, thyme, and oregano in a ratio that gives warmth without overwhelming the onion’s natural sweetness. The cumin adds an earthy depth that most blooming onion recipes miss, and a touch of cayenne provides just enough heat to keep you coming back. My French culinary training taught me the importance of balance: every spice has a role, and together they create a crust that’s savory, slightly smoky, and utterly addictive. This isn’t just a seasoned flour — it’s a homage to the spice markets of my childhood, reimagined for an American appetizer classic.

Perfect texture comes from the double-breading technique and the air fryer’s convection heat. The first flour layer adheres to the onion’s natural moisture, the egg wash creates a tacky surface, and the second flour coating forms those signature craggy petals that crisp up beautifully. The air fryer circulates hot air at 350°F, cooking the onion evenly while the exterior turns deep golden and shatter-crisp. Unlike deep-frying, there’s no greasy residue — just pure, crunchy satisfaction. I’ve tested every temperature from 325°F to 400°F, and 350°F for 25 minutes is the sweet spot: the onion becomes tender without turning mushy, and the crust stays crisp without burning.

This recipe is foolproof and fast, making it perfect for busy weeknights or last-minute entertaining. The hands-on prep takes about 20 minutes, and the air fryer does the rest. I’ve simplified the cutting technique so even a first-timer can achieve that iconic bloom. The key is making evenly spaced cuts about ½ inch from the root — that little stem holds everything together while the petals open like a flower. And because the air fryer uses a fraction of the oil, this is a healthier blooming onion that doesn’t sacrifice flavor or texture. Whether you’re hosting a Super Bowl party or just craving a fun snack, this recipe delivers every single time.

Air Fryer Blooming Onion Ingredients

I pick up my sweet onions at the Union Square Greenmarket in Manhattan — they’re always firm, heavy, and smell faintly of fresh earth. When I close my eyes, the scent takes me back to the spice souk in Marrakech, where onions were piled high alongside mounds of paprika and cumin. For this blooming onion recipe, every ingredient matters, from the flour to the cayenne. Here’s what you’ll need:

Ingredients List

  • 1 large sweet onion (such as Vidalia or Walla Walla)
  • 2 ½ cups all-purpose flour
  • 1 tablespoon paprika
  • 1 teaspoon cayenne pepper
  • ½ teaspoon ground cumin
  • ½ teaspoon dried thyme
  • ½ teaspoon dried oregano
  • 2 large eggs
  • 1 cup milk (whole or 2%)
  • 1 cup water
  • Salt and pepper to taste
  • Oil in a spray bottle (avocado or vegetable oil works best)

Ingredient Spotlight

Sweet Onion: The foundation of the dish. Sweet onions like Vidalia or Walla Walla have a higher sugar content and lower sulfur content, which means they caramelize beautifully and taste mild even when raw. Look for onions that are firm with tight, papery skin and no soft spots. If you can’t find sweet onions, a standard yellow onion works — just expect a slightly sharper flavor.

Paprika: This spice adds color and a subtle sweetness. I use Hungarian sweet paprika for its rich, deep red hue and gentle warmth. Avoid smoked paprika here — it can overpower the delicate onion flavor. If you only have smoked, use half the amount and balance with a pinch of sugar.

Cayenne Pepper: This is where the heat comes from. A full teaspoon gives a noticeable kick, but if you’re sensitive to spice, reduce it to ½ teaspoon. For a milder version, substitute with ancho chili powder for a smoky, fruity warmth without the burn.

Cumin: My Moroccan touch. Cumin adds an earthy, slightly nutty note that pairs beautifully with sweet onion. It’s a spice I use daily — in my mother’s tagines, in my French-inspired rubs, and now in this blooming onion. Make sure your cumin is fresh; stale cumin can taste flat and musty.

All-Purpose Flour: The base of the breading. All-purpose flour gives the right structure — not too dense, not too delicate. For a gluten-free version, use a 1:1 gluten-free baking flour blend. Do not use almond or coconut flour; they lack the starch needed for a crispy crust.

Original IngredientBest SubstitutionFlavor / Texture Impact
Sweet OnionYellow Onion + 1 tsp sugarSlightly sharper, sugar helps caramelization
All-Purpose Flour1:1 Gluten-Free Baking FlourSlightly less crispy, still very good
Cayenne PepperAncho Chili PowderMilder, smoky, fruity warmth
Milk (dairy)Unsweetened Almond MilkSlightly thinner batter, still works well

How to Make Air Fryer Blooming Onion — Step-by-Step

Making this blooming onion is easier than it looks. I’ll walk you through each step with the exact techniques I use in my own kitchen. Follow these instructions, and you’ll have a show-stopping appetizer that tastes like it came from a steakhouse.

Step 1: Cut the Onion to Bloom

Slice off about ½ inch from the top of the onion (the pointy end opposite the root). Peel away the outer papery skin completely, leaving the root end intact. Place the onion cut-side down on your cutting board. Starting about ½ inch from the root, make a downward cut all the way through to the board. Repeat to make four evenly spaced cuts around the onion. Then make three additional cuts between each section until you have 16 evenly spaced cuts. Turn the onion over and let it rest for 5 minutes — the petals will naturally begin to open.

💡 mia’s Pro Tip: Use a sharp chef’s knife and cut with confidence. If you hesitate, the cuts may be uneven. The root is your anchor — never cut through it, or the onion won’t hold its shape.

Step 2: Prepare the Breading Stations

In a large bowl, whisk together the flour, paprika, cayenne, cumin, thyme, oregano, 1 teaspoon salt, and ½ teaspoon black pepper. In a separate medium deep bowl, whisk the eggs, milk, and water until smooth. Set both bowls near your work area. Before breading, use your fingers to gently separate the outer petals of the onion — this helps the flour and egg reach every layer.

⚠️ Common Mistake to Avoid: Don’t skip separating the petals before breading. If you leave them stuck together, the flour and egg won’t penetrate, and you’ll end up with bare spots after cooking.

Step 3: First Flour Coating

Place the onion in a clean bowl, cut-side up. Pour the flour mixture on top, using a large spoon to coat the onion thoroughly. Work the flour between every petal — this is where the magic happens. Turn the onion over and pat off the excess flour. Reserve this bowl of flour for the second coating.

💡 mia’s Pro Tip: Use a spoon to gently lift each petal and sprinkle flour into the gaps. Think of it like seasoning a bird — you want every surface covered.

Step 4: Egg Wash and Second Flour

Submerge the floured onion in the egg mixture, turning to coat evenly. Let the excess drip off for a few seconds. Then return the onion to the reserved flour mixture and repeat the flouring process, making sure to coat every petal again. Gently tap off any excess flour — you want a thin, even layer, not a thick paste.

⚠️ Common Mistake to Avoid: Don’t press the flour into the onion. A gentle coating creates a lighter, crispier crust. Pressing the flour on will make it dense and doughy.

Step 5: Chill and Preheat

Place the breaded onion on a plate and refrigerate for at least 10 minutes while you preheat the air fryer to 350°F for 10 minutes. Chilling helps the breading adhere and prevents it from sliding off during cooking.

💡 mia’s Pro Tip: If you’re short on time, 10 minutes in the fridge is enough. But 20 minutes is even better — the coating sets firmly, and the onion stays extra crisp.

Step 6: Spray and Cook

Remove the onion from the refrigerator and spray generously with vegetable oil from a spray bottle — every visible surface should glisten. Make a sling from a sheet of aluminum foil (fold it into a long strip and shape it into a U-shape) to lower the onion into the air fryer basket cut-side up. Set the timer for 25 minutes at 350°F. Halfway through, carefully lift the basket and spray the onion again with oil, focusing on any spots that still look dry or floury. Repeat once more with 5 minutes left.

⚠️ Common Mistake to Avoid: Forgetting to spray the onion during cooking is the #1 reason for uneven browning. The oil spray is what gives you that deep golden color and crispy crust. Don’t skip it!

Step 7: Season and Serve

After 25 minutes, carefully remove the onion using the aluminum foil sling. Transfer to a serving plate and season immediately with a pinch of salt and pepper while it’s still hot. Serve with your favorite blooming onion dip — I’ll share my go-to options below.

💡 mia’s Pro Tip: The onion is done when the petals are deep golden brown and the center is tender when pierced with a knife. If you prefer extra-dark spots, add 2-3 more minutes — but watch closely so the spices don’t burn.

StepActionDurationKey Visual Cue
1Cut onion into 16 petals5 minPetals open like a flower after resting
2First flour coating3 minOnion fully dusted, no bare spots
3Egg wash + second flour3 minCraggly, textured coating
4Chill in refrigerator10–20 minCoating feels dry and set
5Air fry at 350°F25 minDeep golden brown, petals are crisp
6Season and serve1 minSalt and pepper on hot crust

Serving & Presentation

This Air Fryer Blooming Onion is a showstopper, and I love serving it the way we do in New York — as the centerpiece of a sharing platter. Place the onion on a large wooden board or a round white platter, with a small bowl of dipping sauce in the center where the onion’s petals naturally cradle it. I like to scatter a few fresh herbs like parsley or cilantro around the base for a pop of green, and a light dusting of extra paprika adds a beautiful red accent. The contrast of the golden petals against the dark sauce is pure visual drama.

For dipping, my top choice is a classic comeback sauce — mayonnaise, ketchup, horseradish, Worcestershire, and a squeeze of lemon. It’s tangy, creamy, and cuts through the richness of the fried coating. Sometimes I’ll also offer a harissa yogurt dip (a nod to my Moroccan roots) for those who want a spicy, tangy alternative. And for a truly NYC-inspired spread, serve it alongside a cold beer or a crisp white wine like Sauvignon Blanc — the acidity balances the savory notes perfectly.

This blooming onion is best enjoyed fresh out of the air fryer, while the petals are still warm and shatter-crisp. I always serve it as a starter before a main course like grilled steak or a hearty salad. It’s also the ultimate game-day snack — just set it on the coffee table and watch it disappear.

Pairing TypeSuggestionsWhy It Works
Side DishGrilled steak, roasted chicken, hearty saladThe crispiness contrasts with tender proteins
Sauce / DipComeback sauce, harissa yogurt, ranch, sriracha mayoTangy and creamy dips balance the savory crust
BeverageCold beer (IPA or lager), Sauvignon Blanc, sparkling water with limeAcidity and carbonation cut through the richness
GarnishFresh parsley, cilantro, extra paprika dusting, lemon wedgesFresh herbs add color and a bright note

Make-Ahead, Storage & Reheating

I know life in New York is busy — between work, errands, and social plans, sometimes you need to prep ahead. Here’s how I handle make-ahead and storage for this Air Fryer Blooming Onion. The good news is that with the right techniques, you can still enjoy that just-cooked crispiness even on a hectic weeknight.

MethodContainerDurationReheating Tip
RefrigeratorAirtight container lined with paper towelsUp to 2 daysAir fry at 350°F for 5–7 minutes until hot and crisp
FreezerFreezer-safe bag or container, parchment between layersUp to 2 monthsAir fry from frozen at 350°F for 10–12 minutes
Make-AheadBreaded and chilled on a baking sheetUp to 8 hours in advanceSpray with oil just before air frying; add 2–3 minutes to cook time

For the crispiest reheated results, always use the air fryer — never the microwave. The microwave will turn the crust soft and chewy. If you’re reheating from the refrigerator, a quick 5-7 minute blast at 350°F brings back that just-cooked crunch. From frozen, give it 10–12 minutes and spray with a little oil halfway through. I often make two blooming onions at once and freeze one for later — it’s a lifesaver when unexpected guests show up.

If you’re prepping the onion ahead but haven’t breaded it yet, you can cut the onion into petals and store it in a bowl of cold water in the refrigerator for up to 24 hours. Just pat it very dry before breading. This trick keeps the onion fresh and prevents it from oxidizing.

Variations & Easy Swaps

One of the things I love most about this recipe is how adaptable it is. Whether you’re catering to dietary needs or just want to switch up the flavors, these variations have all been tested and approved in my NYC kitchen.

VariationKey ChangeBest ForDifficulty Impact
Harissa-Spiced Blooming OnionAdd 2 tbsp harissa paste to egg washNorth African flavor loversEasy
Gluten-Free Blooming OnionUse 1:1 gluten-free flour blendGluten-sensitive guestsEasy
Everything Bagel Blooming OnionAdd 2 tbsp everything bagel seasoning to flourNYC bagel fansEasy

Harissa-Spiced Blooming Onion

This variation is a love letter to my Moroccan heritage. Stir 2 tablespoons of harissa paste into the egg wash before dipping the onion. The harissa adds a smoky, spicy complexity that deepens as it air-fries. Reduce the cayenne to ½ teaspoon to keep the heat balanced. Serve with a cool yogurt-mint dip to contrast the warmth. The aroma of harissa mingling with paprika takes me straight back to my mother’s kitchen in Marrakech — it’s pure comfort.

Gluten-Free Blooming Onion

For a gluten-free version, swap the all-purpose flour with a 1:1 gluten-free baking flour blend that contains xanthan gum. I’ve tested this with Bob’s Red Mill 1-to-1 and Cup4Cup, and both work beautifully. The texture is slightly less craggly but still wonderfully crisp. Make sure your paprika, cayenne, and other spices are certified gluten-free if needed. This version has been a hit at every party I’ve brought it to — no one can tell the difference.

Everything Bagel Blooming Onion

This is my NYC tribute. Add 2 tablespoons of everything bagel seasoning (poppy seeds, sesame seeds, garlic flakes, onion flakes, and salt) to the flour mixture. The seeds toast in the air fryer and create an incredible crunchy crust with that iconic bagel-shop flavor. I love serving this with a dill cream cheese dip — it’s like a bagel and cream cheese, reimagined as a crispy onion. It’s become my most requested variation for game days.

How do you cut an onion to make a blooming onion for an air fryer?

Start by slicing off about ½ inch from the top of the onion (the pointy end), leaving the root end intact. Peel the outer skin completely. Place the onion cut-side down on a cutting board. Make your first downward cut about ½ inch from the root, cutting all the way through to the board. Repeat to create four evenly spaced cuts around the onion. Then make three additional cuts between each section — you’ll have 16 evenly spaced cuts total. Turn the onion over and let it rest for 5 minutes; the petals will naturally begin to open. The key is never cutting through the root, which holds everything together like an anchor.

What is the best batter or breading for an air fryer blooming onion?

The best breading for an air fryer blooming onion is a seasoned flour coating with a double-breading technique. Start with all-purpose flour mixed with paprika, cayenne, cumin, thyme, oregano, salt, and pepper. First coat the onion in the seasoned flour, then dip it in an egg wash (eggs, milk, and water), then coat it again in the flour. This double layer creates a craggly, textured crust that crisps up beautifully in the air fryer. Unlike a wet batter, which can become soggy, this dry breading allows the hot air to circulate and create that signature crunchy exterior.

How long do you cook a blooming onion in an air fryer and at what temperature?

Cook a blooming onion in the air fryer at 350°F for 25 minutes. Preheat the air fryer for 10 minutes before adding the onion. Halfway through cooking, spray the onion with oil to ensure even browning and maximum crispiness. The onion is done when the petals are deep golden brown and the center is tender when pierced with a knife. Every air fryer is slightly different, so start checking at 22 minutes if your model runs hot. For extra-crispy results, add 2-3 more minutes, watching closely so the spices don’t burn.

What dipping sauce goes best with an air fryer blooming onion?

A comeback sauce is my top recommendation — it’s a Southern classic made with mayonnaise, ketchup, horseradish, Worcestershire sauce, and a squeeze of lemon. The tangy, creamy flavor perfectly complements the savory, spiced crust. For a Moroccan twist, try a harissa yogurt dip: mix plain Greek yogurt with harissa paste, lemon juice, and a pinch of salt. Other excellent options include ranch dressing, sriracha mayo, blue cheese dip, or a simple aioli with garlic and smoked paprika. I often serve two or three sauces so guests can mix and match.

Can I make an air fryer blooming onion without eggs?

Yes, you can make this blooming onion without eggs by using a buttermilk or flaxseed wash. For a buttermilk version, combine 1 cup buttermilk (or 1 cup milk mixed with 1 tablespoon lemon juice) with 2 tablespoons melted butter or oil — this creates a similar tacky surface for the flour to adhere to. For a vegan option, mix 2 tablespoons ground flaxseed with 6 tablespoons warm water and let it sit for 5 minutes until gel-like. Both alternatives work well, though the crust may be slightly less craggly. I’ve tested both and they’re delicious — just make sure to spray generously with oil during cooking.

Why is my air fryer blooming onion not crispy?

The most common reason for a soft blooming onion is insufficient oil spray. The air fryer needs a fine mist of oil to create that golden, crispy crust — don’t be shy with the spray bottle. Another culprit is overcrowding the basket; the onion needs room for hot air to circulate. If your air fryer is small, cook one onion at a time. Also, check that you preheated the air fryer for the full 10 minutes. Finally, make sure you let the breaded onion chill in the refrigerator for at least 10 minutes before cooking — this helps the coating set and prevents it from sliding off.

Can I use a different type of onion for blooming onion?

Sweet onions like Vidalia, Walla Walla, or Maui are the best choice for a blooming onion because of their high sugar content and mild flavor. They caramelize beautifully and taste sweet even when raw. If you can’t find sweet onions, a standard yellow onion will work — just expect a slightly sharper, more pungent flavor. Red onions can also be used, but they tend to be less sweet and may turn slightly purple during cooking. I don’t recommend white onions; they’re too sharp and lack the natural sweetness needed to balance the savory breading.

How do I reheat a leftover blooming onion in the air fryer?

To reheat a leftover blooming onion and bring back its crispy texture, preheat your air fryer to 350°F. Place the leftover onion in the basket and cook for 5-7 minutes, spraying lightly with oil halfway through. The key is to not overcrowd — if the onion is large, reheat in batches. The air fryer will restore the crunch far better than a microwave, which will make the coating soft and chewy. If the onion was frozen, reheat directly from frozen at 350°F for 10-12 minutes. I always make extra just so I have leftovers to reheat — they’re almost as good as fresh.

Can I make a blooming onion in a basket-style air fryer?

Yes, a basket-style air fryer works perfectly for a blooming onion, but you need to use an aluminum foil sling for easy removal. Fold a long sheet of foil into a 2-inch wide strip and shape it into a U-shape. Place the onion in the center of the sling, then lower it into the basket. The sling allows you to lift the onion out without breaking the petals. Make sure your basket is at least 5-6 inches wide to accommodate the onion. If your air fryer is smaller, use a smaller onion or cook in batches. I use a 6-quart basket model and it fits a large sweet onion perfectly.

What can I use instead of cayenne pepper in blooming onion seasoning?

If you want to reduce the heat or don’t have cayenne pepper, several substitutes work beautifully. Ancho chili powder is my favorite alternative — it adds a smoky, fruity warmth with very little heat. Smoked paprika is another excellent option, though it will change the flavor profile to something more barbecue-like. For a completely mild version, simply omit the cayenne and increase the paprika to 1½ tablespoons. If you still want a tiny kick, add a pinch of black pepper or a dash of hot sauce to the egg wash. I’ve made all these versions and each one has its own charm.

Share Your Version!

I absolutely love hearing how this Air Fryer Blooming Onion turns out in your kitchen! Did you try the harissa-spiced variation? Or maybe you invented a dipping sauce that’s even better than mine? Leave a star rating and a comment below — your feedback helps other readers know what to expect, and it genuinely makes my day to read about your cooking adventures. If you share a photo on Instagram or Pinterest, please tag @exorecipes so I can see your beautiful creation and feature it on my page.

One thing I’m especially curious about: did the double-breading technique give you that extra-craggly crust you were hoping for? Let me know in the comments — I read every single one and I’m always here to help troubleshoot if something didn’t go quite as planned. From my NYC kitchen to yours — I hope this recipe brings as much warmth to your table as it does to mine. — mia 🧡

📌

Love This Recipe? Save It to Pinterest!

If you enjoyed this Air Fryer Blooming Onion recipe, don’t let it get lost in your browser tabs! 😄 Pin it now so you can find it again anytime — and explore hundreds more tried-and-tested recipes waiting for you on my Pinterest boards.

👉 Follow mia on Pinterest @chefrecipes2

📌 Pin this recipe · 🔁 Re-pin your favorites · 💬 Tag me when you make it — I love seeing your creations!

Print

clock clock iconcutlery cutlery iconflag flag iconfolder folder iconinstagram instagram iconpinterest pinterest iconfacebook facebook iconprint print iconsquares squares iconheart heart iconheart solid heart solid icon

Air Fryer Blooming Onion

  • Author: Chef Mia

Description

Learn how to make this restaurant quality appetizer at home for a fun game day snack that your family and friends will love!


Ingredients

Scale
  • 1 large sweet onion
  • 2 ½ cups all-purpose flour
  • 1 tablespoon paprika
  • 1 teaspoon cayenne pepper
  • ½ teaspoon ground cumin
  • ½ teaspoon dried thyme
  • ½ teaspoon dried oregano
  • 2 large eggs
  • 1 cup milk
  • 1 cup water
  • Salt and pepper to taste
  • Oil in a spray bottle

Instructions

  1. Slice the onion to make it bloom. Start by cutting off 1/2 inch from the top of the onion, then peel the outer skin from the onion.
  2. Place the onion cut-side down. Starting about 1/2 inch from the root, make a downward cut all the way through to the cutting board.
  3. Repeat to make four evenly spaced cuts around the onion. Make 3 additional cuts between each section until you have 16 evenly spaced cuts.
  4. Turn the onion over and set aside for 5 minutes to allow the petals to relax.
  5. Prior to breading use your fingers to gently separate the outer pieces.
  6. Whisk the flour, paprika, cayenne, cumin, thyme, oregano, salt and pepper in a large bowl. In a medium deep bowl, whisk the eggs, milk, and water.
  7. Place the onion in a clean bowl, cut-side up, and pour the flour mixture on top. Using a large spoon to coat the onion with the flour mixture, especially between the onion petals. Turn the onion over and pat off the excess flour. Reserve the bowl of flour.
  8. Put the onion in the egg mixture and coat evenly. Remove and let the excess drip off.
  9. Then transfer the onion back into the reserved flour mixture and repeat the flouring process. Be sure you gently tap off extra flour. There will be leftover flour in the bowl when you are done.
  10. Place the onion in the refrigerator.
  11. Preheat the air fryer for 10 minutes to 350ºF.
  12. Remove the onion from the refrigerator and spray generously with vegetable oil from a spray bottle.
  13. After making a sling from a sheet of aluminum foil transfer the onion cut side up into the fryer basket.
  14. Set the timer for 25 minutes and cook. Spray the onion with the cooking oil 2-3 times as you cook it. If any spots still have visible flour spray them with the oil.
  15. After 25 minutes remove onion using the aluminum foil sling and season with salt and pepper.
  16. Serve with the blooming onion dip.


Nutrition

  • Calories: 278 kcal
  • Sugar: 3 g
  • Fat: 6 g
  • Carbohydrates: 47 g
  • Protein: 10 g


Air Fryer Blooming Onion

k">

Tried This Recipe? Leave a Comment!

Did you make this recipe? I’d love to hear how it turned out! Please leave a comment and a rating below. Your feedback helps other home cooks and supports cheerychop.com!

For more delicious inspiration, follow me on Pinterest!

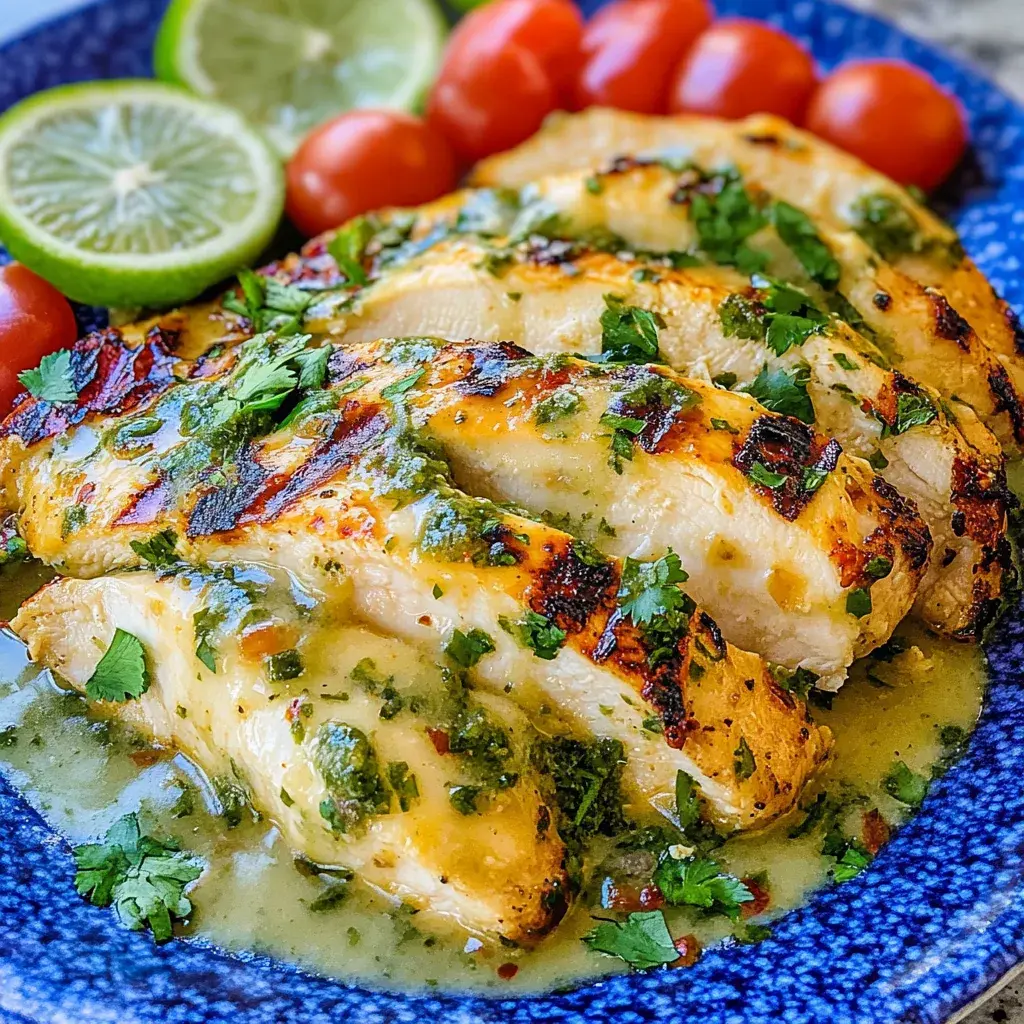
Grilled Salsa Verde Pepper Jack Chicken Recipe

Grilled Salsa Verde Pepper Jack Chicken – A Tangy, Cheesy Grilled Chicken Dinner That Comes Together in 45 Minutes

⚖️
Difficulty
Easy
⏲️
Prep Time
35 mins
🕒
Cook Time
10 mins
⏱️
Total Time
45 mins
🍽️
Servings
4

I still remember the first time I made this Grilled Salsa Verde Pepper Jack Chicken for a casual summer dinner on my tiny Brooklyn fire escape. The tangy salsa verde — bright with tomatillos and cilantro — hit the hot grill and sent up this incredible fragrant steam that had my neighbor poking her head out to ask what I was cooking. That’s the magic of this recipe. It’s a quick, easy chicken dinner that tastes like you spent hours fussing, but really, the salsa verde does all the heavy lifting. With a kick of cumin, a squeeze of lime, and that glorious melted pepper Jack cheese on top, this chicken with salsa verde is bold, vibrant, and downright addictive.

The first bite gives you that bright, tangy punch from the tomatillo-based salsa verde — slightly tart, mildly sweet, with just enough heat to wake up your palate. Then comes the creamy, molten pepper Jack cheese, spiced with jalapeño bits that linger on your tongue. The cumin in the marinade adds an earthy warmth that ties everything together, while the char from the grill gives the chicken a smoky edge. The texture is tender and juicy throughout, with lightly crisped edges from the grill marks. It’s the kind of meal that feels both fresh and deeply satisfying, perfect for a weeknight dinner or a laid-back gathering with friends.

I’ve tested this grilled chicken recipe every which way — adjusting the marinade ratios, trying different cheeses, and experimenting with grill temperatures — and this version is my absolute favorite. What sets it apart is the technique: using thin-sliced chicken breasts so the marinade penetrates quickly and the grilling time stays short, plus adding the cheese in the final minute with the lid closed so it melts evenly without sliding off. Coming from a background that blends my mother’s Moroccan tagine kitchen, classical French training in Paris, and the fast-paced energy of New York City, I love recipes that honor flavor without sacrificing convenience. This one delivers on all fronts. I’ll share my best pro tips and the most common mistakes to avoid so your pepper Jack chicken turns out perfect every time.

Why This Grilled Salsa Verde Pepper Jack Chicken Recipe Is the Best

The Flavor Secret: The secret to this dish is the double layer of tangy, spicy flavor. The salsa verde marinade — boosted with fresh lime juice and earthy cumin — tenderizes the chicken and infuses it with a bright, herbaceous kick. Then, just before serving, a slice of pepper Jack cheese melts over the top, adding a creamy, mildly spicy finish that complements the tangy salsa verde perfectly. This isn’t just chicken with salsa verde; it’s a carefully balanced combination where every element plays its part. My Paris training taught me the importance of building layers of flavor, and this recipe is a proud example of that philosophy in action.

Perfected Texture: Nothing ruins a grilled chicken dinner like dry, overcooked meat. I use thin-sliced boneless, skinless chicken breasts, which cook through in just 4–5 minutes per side — fast enough to stay juicy and tender. The key is to avoid flipping the chicken too early; letting it develop those deep grill marks before turning creates a flavorful crust while locking in moisture. I also insist on letting the chicken rest for a few minutes after grilling, which allows the juices to redistribute throughout the meat. This is a technique I honed during my years in French kitchens, and it makes all the difference in texture.

Foolproof & Fast: This easy chicken dinner is designed for busy cooks who still want extraordinary flavor. The marinade comes together in under five minutes with pantry staples, and the active cooking time is barely ten minutes on the grill. Even if you’re new to grilling, the step-by-step instructions and visual cues in this recipe will guide you to perfect results. I’ve made this recipe dozens of times — for weeknight meals, backyard barbecues, and even meal prep — and it never fails to impress. It’s proof that you don’t need complicated techniques or hard-to-find ingredients to create a restaurant-quality grilled chicken recipe at home.

Grilled Salsa Verde Pepper Jack Chicken Ingredients

I source my ingredients from the Union Square Greenmarket in Manhattan whenever I can — the tomatillos and cilantro there are incredibly fresh. For the salsa verde, I often grab a jar of Trader Joe’s version because it has the perfect balance of tang and heat, and it’s a reliable shortcut that doesn’t compromise flavor. This recipe is built on simple, accessible ingredients that you can find at any US grocery store, which is exactly how I like to cook for my readers.

Ingredients List

  • 1 ½ pounds thin-sliced boneless skinless chicken breasts (about 4 breasts)
  • 12 ounces salsa verde (Trader Joe’s recommended)
  • 3 tablespoons olive oil
  • 2 tablespoons lime juice
  • 1 teaspoon cumin
  • 1 teaspoon salt (or more, to taste)
  • 1 teaspoon freshly ground black pepper
  • 4 slices pepper Jack cheese (or as desired)
  • Fresh cilantro, finely minced (optional, for garnishing)
  • Lime wedges (optional, for serving)

Ingredient Spotlight

Chicken Breasts: Thin-sliced boneless, skinless chicken breasts are ideal for this grilled chicken recipe because they cook quickly and evenly, and the thinner profile allows the marinade to flavor the meat all the way through in just 30 minutes. Look for breasts that are uniform in thickness — about ½-inch thick — so they grill at the same rate. If your grocery store doesn’t carry them pre-sliced, you can easily butterfly thicker breasts yourself or pound them to an even thickness with a rolling pin.

Salsa Verde: This is the heart of the marinade and the primary flavor driver. Store-bought salsa verde is not only convenient but also consistent in flavor and acidity. I recommend Trader Joe’s brand for its bright tomatillo flavor and moderate heat, but any good-quality tomatillo-based salsa verde will work. If you prefer a milder flavor, look for one labeled “mild.” For a spicier kick, choose a salsa verde that includes serrano or habanero peppers.

Pepper Jack Cheese: This semi-soft cheese brings a creamy texture and a gentle spicy kick from the jalapeño pieces embedded in it. It melts beautifully under the grill lid, creating a golden, bubbly topping that clings to the chicken. For the best melting, use slices from a block of pepper Jack rather than pre-shredded cheese, which often contains anti-caking agents that prevent smooth melting. If you want less heat, Monterey Jack is a perfect substitute with a similar creamy melt but no spice.

Cumin: Cumin adds an earthy, slightly nutty warmth that deepens the overall flavor of the dish. It’s a spice I grew up with in my mother’s Moroccan kitchen, and it pairs beautifully with the bright, tangy notes of tomatillo and lime. Use ground cumin for even distribution in the marinade, and try to toast the seeds and grind them yourself for a more aromatic result — it’s a small step that makes a big difference.

Lime Juice: Fresh lime juice is non-negotiable here. Bottled lime juice lacks the bright, zesty acidity that fresh limes provide. The lime juice not only adds a burst of citrus flavor but also helps tenderize the chicken, making it extra juicy on the grill. Roll the limes on the counter before juicing to release more juice, and always zest first if you want to add extra lime flavor to your marinade.

Original IngredientBest SubstitutionFlavor / Texture Impact
Chicken Breasts (thin-sliced)Boneless Skinless Chicken ThighsThighs are juicier and more forgiving; grill 5–6 min per side
Salsa Verde (store-bought)Homemade Tomatillo SalsaBrighter, more customizable heat; requires extra prep time
Pepper Jack CheeseMonterey Jack or ProvoloneMilder flavor, still creamy melt; add red pepper flakes for heat
Cumin (ground)Smoked Paprika or Chili PowderSmokier, less earthy; 1:1 substitution works well
Lime Juice (fresh)Lemon Juice or White Wine VinegarSlightly less floral acidity; reduces marinade brightness

How to Make Grilled Salsa Verde Pepper Jack Chicken — Step-by-Step

This easy chicken dinner comes together quickly once the chicken has marinated. Follow these steps closely, and you’ll have perfectly grilled, cheesy chicken ready in no time.

Step 1: Prepare the Marinade

In a large bowl, combine 12 ounces of salsa verde, 3 tablespoons of olive oil, 2 tablespoons of fresh lime juice, 1 teaspoon of cumin, 1 teaspoon of salt, and 1 teaspoon of freshly ground black pepper. Whisk everything together until the cumin and salt are fully dissolved and the marinade looks smooth and cohesive. The olive oil helps carry the flavors into the chicken and also prevents sticking on the grill.

💡 mia’s Pro Tip: Taste your salsa verde before adding salt — some brands are saltier than others. If yours is already quite salty, start with ½ teaspoon of salt and adjust later.

Step 2: Marinate the Chicken

Add the thin-sliced chicken breasts to the bowl and toss until each piece is evenly coated in the marinade. Cover the bowl with plastic wrap or a lid and place it in the refrigerator. Let the chicken marinate for at least 30 minutes, or up to 2 hours. The acid in the salsa verde and lime juice gently tenderizes the chicken, so don’t go beyond 2 hours or the texture may become slightly mushy.

⚠️ Common Mistake to Avoid: Don’t skip the marinating time! Even 30 minutes makes a noticeable difference in flavor. If you’re short on time, pound the chicken to an even thickness first — it helps the marinade penetrate faster.

Step 3: Preheat the Grill

Preheat your grill to medium-high heat, about 375–400°F. If using a gas grill, close the lid and let it heat up for 10–15 minutes. For a charcoal grill, wait until the coals are glowing and covered in white ash. A properly preheated grill ensures those beautiful sear marks and prevents the chicken from sticking.

💡 mia’s Pro Tip: Clean your grill grates with a wire brush and then lightly oil them using a paper towel dipped in vegetable oil. This creates a non-stick surface and helps the chicken release easily after grilling.

Step 4: Grill the Chicken

Remove the chicken from the marinade and let any excess drip off. Discard the remaining marinade — it has raw chicken juices and should not be reused. Place the chicken on the hot grill and cook for 4–5 minutes per side. You’ll know it’s ready to flip when the edges look opaque and the chicken releases easily from the grates. The internal temperature should reach 165°F when fully cooked.

⚠️ Common Mistake to Avoid: Don’t press down on the chicken with a spatula while it’s grilling! That forces out the juices and dries out the meat. Let it cook undisturbed for the full time on each side.

Step 5: Add the Cheese

During the last minute of grilling, place a slice of pepper Jack cheese on each chicken breast. Close the grill lid and let the cheese melt for about 60 seconds. The steam from the closed lid helps the cheese melt evenly and form a lovely, bubbly crust over the chicken.

💡 mia’s Pro Tip: To keep the pepper Jack cheese from sliding off the chicken on the grill, pat the chicken slightly dry with a paper towel before adding the cheese. This helps the cheese stick better. Also, place the cheese in the center of each breast so it melts into the meat rather than dripping off the sides.

Step 6: Rest and Garnish

Remove the chicken from the grill and transfer it to a clean cutting board or platter. Let it rest for 3–5 minutes before serving. This rest period allows the juices to redistribute throughout the meat, ensuring every bite is tender and moist. Garnish with finely minced fresh cilantro and serve with lime wedges on the side for an extra squeeze of brightness.

⚠️ Common Mistake to Avoid: Skipping the rest time is a common error. If you cut into the chicken immediately, the juices will run out onto the board, leaving you with dry meat. Be patient — those 3 minutes make a huge difference in texture and flavor.

StepActionDurationKey Visual Cue
1Prepare Marinade5 minsMarinade is smooth, spices dissolved
2Marinate Chicken30 mins – 2 hrsChicken is fully coated, looks moist
3Preheat Grill10–15 minsGrill is hot, grates are clean and oiled
4Grill Chicken4–5 mins per sideGolden grill marks, internal temp 165°F
5Add Cheese & Melt1 min with lid closedCheese is bubbly, golden around edges
6Rest & Garnish3–5 mins restJuices settle, cheese is set

Serving & Presentation

I love serving this Grilled Salsa Verde Pepper Jack Chicken with a side of cilantro-lime rice or a simple green salad tossed with avocado and cherry tomatoes. The rice soaks up any extra juices from the chicken, while the salad adds a fresh, crunchy contrast. For a more hearty meal, try it with warm corn tortillas and a dollop of sour cream or crema — it’s like the best taco night without the fuss of assembling each one. When I have friends over in my NYC apartment, I arrange the chicken on a large platter, sprinkle fresh cilantro over the top, and place lime wedges around the edges for a bright, inviting presentation.

This grilled chicken recipe also works beautifully as a filling for tacos, burrito bowls, or even sliced on top of a crisp salad. The pepper Jack cheese melts into a creamy layer that clings to each slice, making it incredibly versatile. For a touch of Moroccan flair — a nod to my roots — I sometimes serve it with a side of harissa-spiced roasted vegetables. The smoky heat of the harissa echoes the grilled char of the chicken, and the sweetness of roasted bell peppers and zucchini balances the tangy salsa verde beautifully.

Pairing TypeSuggestionsWhy It Works
Side DishCilantro-lime rice, Mexican street corn, black bean saladBright, citrusy sides mirror the salsa verde’s acidity
Sauce / DipSour cream, crema, avocado crema, extra salsa verdeCreamy dips cool the spice and add richness
BeverageMargarita, cold Mexican beer, lime sparkling waterCitrusy, effervescent drinks cut through the cheese
GarnishFresh cilantro, lime wedges, pickled jalapeñosAdds brightness, color, and a pop of acidity

Make-Ahead, Storage & Reheating

As a busy New Yorker, I rely on make-ahead meals to keep my weeknights sane. This grilled chicken recipe is perfect for meal prep — the chicken can be marinated up to 2 hours in advance, and the cooked chicken stores beautifully for lunches and quick dinners throughout the week. I often double the recipe so I have leftovers to slice over salads, stuff into wraps, or reheat with a side of rice and beans. The key is to store the chicken properly to maintain its juiciness and that wonderful melted cheese topping.

MethodContainerDurationReheating Tip
RefrigeratorAirtight container, layered with parchmentUp to 4 daysReheat in a skillet over medium-low heat, covered, for 3–4 mins per side
FreezerFreezer-safe bag or container, remove as much air as possibleUp to 2 monthsThaw overnight in fridge; reheat in a 350°F oven for 10–12 mins
Make-AheadMarinate in a sealed bowl or bagUp to 2 hours before grillingTake chicken out of fridge 15 mins before grilling for more even cooking

For the best reheated texture, I avoid the microwave, which tends to make the chicken rubbery and can cause the cheese to seize. Instead, I place the chicken in a non-stick skillet over medium-low heat, add a tiny splash of water or chicken broth, and cover the pan with a lid. The steam gently reheats the chicken while keeping it moist, and the cheese re-melts into that lovely, creamy layer. This method takes only 3–4 minutes per side and delivers nearly fresh-off-the-grill results. If you’re reheating from frozen, thaw the chicken overnight in the refrigerator first, then use the same skillet method. I learned this trick during my years in Paris, where nothing goes to waste and every meal deserves to be enjoyed at its best.

Variations & Easy Swaps

One of the things I love most about this recipe is how adaptable it is. Whether you’re cooking for dietary restrictions or just want to switch up the flavors, these variations will keep your easy chicken dinner rotation exciting all year long.

VariationKey ChangeBest ForDifficulty Impact
Spicy Chipotle TwistAdd 1–2 tsp chipotle in adobo to the marinadeSmoky heat lovers, taco nightsNo change
Dairy-Free / VeganUse vegan pepper Jack or omit cheese, add avocadoDairy-free diets, vegan meal prepNo change
Herb & Citrus SummerAdd fresh oregano and orange zest to marinadeSummer grilling, lighter mealsNo change

Spicy Chipotle Twist

For those who love a smoky, fiery kick, add 1–2 teaspoons of finely chopped chipotle peppers in adobo sauce to the marinade. The chipotle’s smoky depth complements the tomatillo’s brightness beautifully, while the adobo sauce adds a touch of sweetness and heat. This variation is inspired by the bold, smoky flavors I’ve come to love in NYC’s Mexican food scene. Serve the chicken with creamy refried beans and a cool cucumber salad to balance the heat. Start with one chipotle pepper and taste the marinade — you can always add more if you want more fire.

Dairy-Free / Vegan Option

To make this recipe dairy-free, simply omit the pepper Jack cheese — the chicken is still incredibly flavorful thanks to the salsa verde marinade. For a vegan version, replace the chicken with thick slices of portobello mushrooms or extra-firm tofu (pressed and sliced ½-inch thick). Marinate and grill the same way, and top with a dairy-free pepper Jack alternative if you’d like. I’ve tested this with Violife’s vegan cheddar-style shreds, and they melt beautifully under the grill lid. The key is to brush the grill grates generously with oil to prevent sticking, since vegetable-based proteins are more delicate than chicken.

Herb & Citrus Summer Version

In the height of summer, when fresh herbs are overflowing at the Union Square Greenmarket, I love adding a handful of chopped fresh oregano and the zest of one orange to the marinade. The oregano adds a fragrant, slightly peppery note that pairs beautifully with the cilantro in the salsa verde, while the orange zest brightens the entire dish with its floral citrus oil. This version is especially wonderful served with a stone fruit salsa — diced peaches or nectarines mixed with red onion, jalapeño, and lime juice. It’s a fresh, sun-drenched take on this recipe that celebrates the best of summer produce.

Share Your Version!

What is the best way to prevent the pepper jack cheese from melting off the chicken on the grill?

The best way to keep pepper Jack cheese from sliding off the chicken is to pat the top of each breast dry with a paper towel just before adding the cheese. Moisture on the surface creates steam that can push the cheese off. Also, place the cheese slice in the center of the chicken breast rather than near the edges, and close the grill lid immediately so the cheese melts evenly from the ambient heat rather than dripping. Adding the cheese during the last minute of grilling — when the chicken is nearly done — gives it just enough time to melt without becoming runny. I also recommend using thin-sliced chicken breasts because they provide a flat, stable surface for the cheese to adhere to.

Can I use store-bought salsa verde for this grilled chicken recipe, or should I make it from scratch?

Absolutely, you can use store-bought salsa verde for this recipe — and honestly, I often do. Trader Joe’s salsa verde is my top recommendation because it has a bright, balanced flavor with just the right amount of heat and acidity. Making salsa verde from scratch is also a wonderful option if you have fresh tomatillos, cilantro, and jalapeños on hand, and it allows you to customize the heat and tanginess to your liking. However, for a quick weeknight meal, quality store-bought salsa verde saves time without sacrificing flavor. Just look for a brand that lists tomatillos as the first ingredient and has a vibrant green color — that’s a sign of freshness.

How long should I marinate the chicken in salsa verde before grilling for the best flavor?

For the best flavor, marinate the chicken for at least 30 minutes and no longer than 2 hours. The 30-minute minimum allows the salsa verde, lime juice, and cumin to penetrate the surface of the chicken and infuse it with bright, tangy flavor. Going beyond 2 hours can actually work against you — the acid in the salsa verde and lime juice will start to break down the protein fibers too much, resulting in a mushy texture rather than tender, juicy meat. If you’re short on time, even 15 minutes of marinating will add noticeable flavor, especially if you use thin-sliced chicken breasts. For the most convenient approach, marinate the chicken in the morning before work and grill it when you get home, staying within that 2-hour window.

What side dishes pair well with grilled salsa verde pepper jack chicken?

This grilled chicken recipe pairs beautifully with a wide range of side dishes. For a classic combination, serve it with cilantro-lime rice and a simple black bean salad — the rice soaks up the juices from the chicken, and the beans add protein and fiber. A crisp green salad with avocado, cherry tomatoes, and a lime vinaigrette complements the tangy salsa verde perfectly. If you’re in the mood for something heartier, try Mexican street corn (elote) or roasted sweet potatoes with chili and lime. For a low-carb option, a cauliflower rice medley with bell peppers and onions works wonderfully. The key is to choose sides that echo the bright, citrusy notes of the marinade while providing contrasting textures.

Can I use chicken thighs instead of chicken breasts for this recipe?

Yes, chicken thighs are an excellent substitute for chicken breasts in this recipe. Boneless, skinless chicken thighs are even more forgiving on the grill because they have a higher fat content, which keeps them juicy and tender even if you cook them a minute or two longer. Simply replace the thin-sliced chicken breasts with an equal weight of boneless, skinless thighs (about 1½ pounds) and increase the grilling time to 5–6 minutes per side. The internal temperature should still reach 165°F. Thighs also hold up well to the salsa verde marinade and develop a wonderfully rich flavor that complements the pepper Jack cheese beautifully. I often use thighs when I’m meal-prepping because they reheat especially well.

How do I know when the chicken is fully cooked on the grill?

The most reliable way to know your chicken is fully cooked is to use an instant-read thermometer inserted into the thickest part of the breast. The internal temperature should read 165°F. If you don’t have a thermometer, look for these visual cues: the juices should run clear when you cut into the thickest part, the chicken should feel firm to the touch but not hard, and there should be no pinkness in the center. For thin-sliced chicken breasts (about ½-inch thick), 4–5 minutes per side over medium-high heat is usually sufficient. Always let the chicken rest for 3–5 minutes after grilling — the temperature will continue to rise slightly during this time, and the juices will redistribute for the most tender result.

Can I cook this chicken indoors if I don’t have a grill?

Absolutely! You can cook this Grilled Salsa Verde Pepper Jack Chicken indoors using a cast-iron skillet or grill pan. Preheat the skillet over medium-high heat and add a small drizzle of oil. Cook the marinated chicken for 4–5 minutes per side, just as you would on an outdoor grill. A cast-iron skillet provides excellent heat retention and creates a beautiful sear on the chicken. During the last minute of cooking, place a slice of pepper Jack cheese on each breast, cover the skillet with a lid, and let the cheese melt. The result is nearly identical to grilled chicken, with a lovely golden crust and melted cheesy topping. I’ve used this method countless times during New York winters when firing up the grill isn’t practical.

What type of salsa verde works best for the marinade?

A tomatillo-based salsa verde works best for this recipe. Look for one that lists tomatillos as the first ingredient, followed by cilantro, onion, jalapeño or serrano peppers, and lime juice. The consistency should be somewhat thin and pourable — not as thick as a chunky pico de gallo. I recommend Trader Joe’s Salsa Verde for its consistent quality and balanced heat, but other good options include Herdez Salsa Verde or a fresh salsa verde from the refrigerated section of your grocery store. Avoid salsa verde that is overly creamy or contains mayonnaise, as those varieties won’t work well as a marinade. The acidity and herbal notes of a classic tomatillo salsa are what make this recipe so bright and flavorful.

Can I prepare the marinade ahead of time?

Yes, you can prepare the marinade up to 3 days in advance and store it in an airtight container in the refrigerator. In fact, making the marinade ahead of time allows the flavors of the salsa verde, lime juice, cumin, and olive oil to meld together, which can result in an even more flavorful dish. When you’re ready to cook, simply add the chicken to the prepared marinade and let it sit for at least 30 minutes. If the marinade has separated or thickened in the fridge, give it a quick whisk before adding the chicken. I often make a double batch of this marinade and keep it on hand for quick weeknight dinners — it also works beautifully as a sauce for grilled vegetables or shrimp.

How spicy is this grilled salsa verde pepper jack chicken?

This recipe is mildly to moderately spicy, depending on the brand of salsa verde and pepper Jack cheese you use. Most store-bought salsa verdes have a gentle heat level, with the spiciness coming from jalapeño peppers rather than hotter varieties. The pepper Jack cheese adds another layer of mild heat from the embedded jalapeño pieces, but it’s balanced by the creamy, milky nature of the cheese. Overall, the dish is flavorful and zesty without being overwhelming. If you’re sensitive to spice, use a mild salsa verde and replace the pepper Jack with plain Monterey Jack cheese. For extra heat, add a chopped chipotle pepper to the marinade or use a hot salsa verde. This recipe is designed to be flexible, so you can easily adjust the heat level to your preference.

📌

Love This Recipe? Save It to Pinterest!

If you enjoyed this Grilled Salsa Verde Pepper Jack Chicken recipe, don’t let it get lost in your browser tabs! 😄 Pin it now so you can find it again anytime — and explore hundreds more tried-and-tested recipes waiting for you on my Pinterest boards.

👉 Follow mia on Pinterest @exorecipe

📌 Pin this recipe · 🔁 Re-pin your favorites · 💬 Tag me when you make it — I love seeing your creations!

Print

clock clock iconcutlery cutlery iconflag flag iconfolder folder iconinstagram instagram iconpinterest pinterest iconfacebook facebook iconprint print iconsquares squares iconheart heart iconheart solid heart solid icon

Grilled Salsa Verde Pepper Jack Chicken

  • Author: Chef Mia

Description

This vibrant and flavorful grilled chicken is marinated in a tangy salsa verde with a kick of cumin and lime, then topped with melted pepper Jack cheese for a spicy, cheesy finish. Perfect for a quick and delicious meal!


Ingredients

Scale
  • 1 ½ pounds thin-sliced boneless skinless chicken breasts (about 4 breasts)
  • 12 ounces salsa verde (Trader Joes recommended)
  • 3 tablespoons olive oil
  • 2 tablespoons lime juice
  • 1 teaspoon cumin
  • 1 teaspoon salt (or more, to taste)
  • 1 teaspoon freshly ground black pepper
  • 4 slices pepper Jack cheese (or as desired)
  • Fresh cilantro, finely minced (optional, for garnishing)
  • Lime wedges (optional, for serving)

Instructions

  1. In a large bowl, combine salsa verde, olive oil, lime juice, cumin, salt, and black pepper.
  2. Add the chicken breasts to the bowl and toss to coat evenly with the marinade. Cover and refrigerate for at least 30 minutes, or up to 2 hours.
  3. Preheat the grill to medium-high heat.
  4. Remove the chicken from the marinade and discard any remaining marinade.
  5. Grill the chicken for 4-5 minutes per side, or until fully cooked through (internal temperature of 165°F).
  6. During the last minute of grilling, place a slice of pepper Jack cheese on each chicken breast and close the grill lid to melt the cheese.
  7. Remove the chicken from the grill and let rest for a few minutes.
  8. Garnish with fresh cilantro and serve with lime wedges, if desired.


Grilled Salsa Verde Pepper Jack Chicken

k">

Tried This Recipe? Leave a Comment!

Did you make this recipe? I’d love to hear how it turned out! Please leave a comment and a rating below. Your feedback helps other home cooks and supports cheerychop.com!

For more delicious inspiration, follow me on Pinterest!

Easy 5-Ingredient Chocolate Chip Cheesecake Bars

⚖️
Difficulty
Easy
⏲️
Prep Time
10 mins
🕒
Cook Time
35 mins
⏱️
Total Time
45 mins
🍽️
Servings
12 bars

Let me take you back to my mother’s kitchen in Morocco, where she’d layer sweet dough with a tangy cream filling for a hasty weekend treat. Years later, after training at Le Cordon Bleu in Paris and now cooking in my tiny NYC apartment, I’ve reimagined that concept into these chocolate chip cookie cheesecake bars. Made with just five ingredients, they’re the perfect cross between a classic chocolate chip cookie and a silky cheesecake — and they come together in under an hour.

Imagine a buttery, chewy cookie base topped with a luscious layer of vanilla cream cheese filling, all studded with melting chocolate chips. The first bite gives you that familiar crunch, followed by the cool, velvety richness of cheesecake. A sprinkle of coarse sea salt brings out the chocolate and cuts the sweetness — just like I learned from the pastry chefs at Le Cordon Bleu.

I’ve tested this recipe a dozen times to make sure it’s foolproof even for beginner bakers. The secret? Using refrigerated cookie dough as both crust and crumble topping saves time without sacrificing flavor. Plus, I’ll share my best tip for preventing cracks — and the one mistake most people make that leads to a soggy base. Trust me, once you make these easy cheesecake bars, you’ll never look at boxed mixes the same way again.

The Flavor Secret – The combination of a buttery chocolate chip cookie with a tangy cream cheese filling is pure magic. I add a touch of vanilla to the cheesecake layer — a technique I brought back from Paris — which rounds out the flavors and makes the chocolate chips pop. No fancy extracts needed, just good old vanilla.

Perfected Texture – The key is par-baking the cookie bottom so it stays firm and doesn’t turn soggy from the cheesecake. I also spread the cheesecake filling directly over the hot crust, which creates a gentle seal. The result is a crisp, golden base, a creamy center, and a crumbly topping that stays crunchy.

Foolproof & Fast – Only five ingredients, no stand mixer required for the cookie part, and everything comes together in one pan. The hardest part is waiting for them to cool before slicing! Whether you’re a seasoned baker or a complete beginner, these cookie cheesecake bars will come out perfect every time.

I grab my cream cheese from the farmers market in Union Square, and the cookie dough from the refrigerated aisle at my local bodega. It reminds me of the convenience my mother wished for — a few shortcuts that still taste homemade.

Ingredients List

  • 1 (18 oz) refrigerated chocolate chip cookie dough
  • 8 oz cream cheese, softened
  • 1/2 cup granulated sugar
  • 1 large egg, at room temperature
  • 1/2 tsp vanilla extract

Ingredient Spotlight

Cookie Dough – The base and topping in one! Use a reputable brand like Pillsbury or Trader Joe’s. For a homemade feel, you can replace with your favorite chocolate chip cookie dough recipe — just press two thirds for the base and crumble the rest.

Cream Cheese – Full-fat brick cream cheese gives the best creamy, firm texture. Avoid whipped or spreadable versions, as they contain too much air and water, which can cause the cheesecake to crack. Let it soften to room temperature for a smooth batter.

Sugar – Standard granulated sugar dissolves easily and keeps the filling sweet without being gritty. You can reduce to 1/3 cup if you prefer a less sweet cheesecake, but I wouldn’t go lower.

Egg – Room temperature egg ensures it emulsifies smoothly into the cream cheese. A cold egg will make the filling lumpy. If you’re in a hurry, place the egg in a bowl of warm water for 5 minutes.

Vanilla Extract – Pure vanilla extract adds a warm, floral note that elevates the entire bar. You can substitute with vanilla bean paste for speckled perfection, or even a pinch of almond extract for a subtle twist.

Original IngredientBest SubstitutionFlavor / Texture Impact
Refrigerated cookie doughHomemade chocolate chip cookie doughMore buttery, can control chocolate chips; slightly more effort
Cream cheeseNeufchâtel cheese (lower fat)Slightly less creamy, tangier; will set a bit softer
Granulated sugarCoconut sugarDeeper caramel notes, slightly grainier texture; may darken filling
EggFlax egg (1 Tbsp flax + 3 Tbsp water)Denser, less rise; not recommended for best texture
Vanilla extractVanilla bean paste or almond extractPaste adds specks; almond gives a nutty twist – use 1/4 tsp

Follow these simple steps and you’ll have a pan of glorious no-fuss cheesecake bars in just over half an hour. I’ll be right here with my best tips and tricks.

Step 1: Prepare the Pan

Preheat your oven to 350°F. Line a 9-inch square baking dish with parchment paper or non-stick foil, leaving a little overhang on two sides. This makes it easy to lift the bars out after baking.

💡 mia’s Pro Tip: Use foil with a slight non-stick coating, then lightly spray it with cooking spray. The cheesecake won’t stick, and cleanup is a breeze.

Spread a little more than half of the refrigerated cookie dough onto the bottom of the prepared pan. Press it down firmly into an even layer using your fingers or the back of a spatula. This will be the crust.

⚠️ Common Mistake to Avoid: Don’t press too hard or the crust will become thin and under-baked. Aim for about 1/4 inch thickness – thick enough to hold the filling.

Step 3: Make the Cheesecake Filling

In a large bowl using a hand or stand mixer, beat the softened cream cheese until light and fluffy, about 2 minutes. Add the sugar and beat until well combined, scraping down the sides. Beat in the room-temperature egg and vanilla extract until smooth and creamy.

💡 mia’s Pro Tip: Really let your cream cheese come to room temperature (about 30 minutes on the counter). Cold cream cheese creates lumps that won’t bake out – I learned that the hard way in pastry school!

Step 4: Assemble and Bake

Pour the cheesecake filling over the cookie dough base and spread it evenly. Crumble the remaining cookie dough over the top in small, irregular pieces – don’t press them down.

Bake for 30 to 35 minutes, until the edges are set and the top is lightly golden with a slight jiggle in the very center. A knife inserted near the center should come out clean.

⚠️ Common Mistake to Avoid: Overbaking is the number one cause of cracks! The filling will continue to set as it cools. If the center still wobbles like Jell-O after 30 minutes, give it an extra 2–3 minutes max.

Step 5: Cool and Slice

Let the bars cool completely in the pan on a wire rack. Then refrigerate for at least 2 hours (or overnight) before slicing. Use the parchment overhang to lift the entire block onto a cutting board, then slice into 12 bars.

💡 mia’s Pro Tip: For clean, sharp cuts, use a chef’s knife and wipe it clean between each slice. For extra fudge-like texture, chill for 4 hours.

StepActionDurationKey Visual Cue
1Preheat & line pan5 minsOven fully preheated
2Press cookie dough3 minsEven, 1/4 inch thick layer
3Make cream cheese filling3–5 minsSmooth, no lumps
4Assemble & bake30–35 minsEdges set, center slightly jiggly
5Cool & refrigerate2+ hrsFirm, no longer warm

Serving & Presentation

I love serving these bars straight from the fridge, cut into neat rectangles. The contrast between the cool, creamy filling and the crunchy cookie crumble is irresistible. For a Brooklyn-style dessert board, I sometimes dust them with a little powdered sugar and add fresh raspberries – the tartness cuts the richness.

In Paris, we’d serve these with a dollop of crème fraîche and a tiny scoop of vanilla bean ice cream. In my NYC apartment, I’ll plate them with a drizzle of warm chocolate sauce and a sprinkle of flaky sea salt – that hit of salt against the sweet chocolate brings it all together. They’re perfect for potlucks, bake sales, or just a quiet Friday night treat.

Pairing TypeSuggestionsWhy It Works
Side DishFresh berries, sliced strawberriesBitter fruit balances sweetness
Sauce / DipWarm caramel sauce, dark chocolate ganacheAdds indulgence and complements crust
BeverageCold milk, strong black coffee, stout beerCleanses the palate and cuts richness
GarnishFlaky sea salt, fresh mint, edible flowersAdds texture and visual appeal

Make-Ahead, Storage & Reheating

Being a busy NYC food blogger, I rely on make-ahead recipes. These bars actually get better after a day in the fridge – the flavors meld and the texture becomes supremely creamy. Here’s how I keep them fresh for my weekly meal prep.

MethodContainerDurationReheating Tip
RefrigeratorAirtight container, layers separated by wax paperUp to 5 daysEnjoy cold or at room temperature; do not reheat in microwave
FreezerWrap individually in plastic wrap, then foilUp to 3 monthsThaw in fridge overnight; reheat in a 300°F oven for 5 mins
Make-AheadAssemble in pan, cover tightly with foilUp to 24 hours before bakingAdd 5 minutes to bake time if starting from fridge

If you want a warm, crisp topping, pop a slice in a 300°F oven for about 5 minutes – the crust will crisp up beautifully while the center stays cool. Never microwave these bars unless you want a soggy mess (trust me, I learned that the hard way during a late-night craving).

Variations & Easy Swaps

One of the joys of this recipe is how easily you can adapt it. Whether you’re gluten-free, dairy-free, or just looking for a flavor twist, I’ve got you covered with these tested variations.

VariationKey ChangeBest ForDifficulty Impact
Peanut Butter LoversReplace 1/4 cup sugar with peanut butter in fillingNutty flavor profileNo added difficulty
Gluten-FreeUse gluten-free refrigerated cookie doughCeliac or gluten sensitivitySame process; check dough texture
VeganUse vegan cream cheese & egg replacerDairy-free/veganMedium – filling may be less firm

Peanut Butter Lovers

For a flavor reminiscent of my favorite Moroccan dessert – msemen with honey and peanut butter – add 3 tablespoons creamy peanut butter to the cream cheese mixture. Reduce the sugar by 2 tablespoons to keep the filling from becoming too sweet. The peanut butter adds a savory depth that pairs beautifully with the chocolate chips.

Gluten-Free Version

Most major brands now offer gluten-free chocolate chip cookie dough. The only catch is that gluten-free dough can be a bit more crumbly – press it firmly into the pan and let the dough rest at room temperature for 10 minutes beforehand. The cheesecake filling remains the same, so all you lose is gluten, not flavor.

Vegan Makeover

Replace the cream cheese with a high-quality vegan version (like Kite Hill or Miyoko’s). Use a flax egg (1 tablespoon ground flaxseed + 3 tablespoons water, set for 5 minutes). Note that vegan cream cheese often has more moisture, so the filling may be slightly softer – chill these bars for at least 4 hours before slicing.

How do you prevent chocolate chip cookie cheesecake bars from cracking on top?

To prevent cracks, follow these three key steps: 1) Make sure all dairy ingredients are at room temperature – cold cream cheese causes lumps that lead to cracks. 2) Don’t overmix the filling after adding the egg; just beat until combined, then stop. 3) Bake just until the edges are set and the center still jiggles slightly – the residual heat will finish cooking the center. Let the bars cool slowly in the pan with the oven door cracked open. Finally, chilling thoroughly before slicing helps the top set without cracking.

Can I use a boxed cookie mix for the crust in chocolate chip cookie cheesecake bars?

Absolutely! A boxed cookie mix works wonderfully as a substitute for refrigerated dough. Prepare the mix according to the package directions, but use only the amount needed – about 2/3 for the crust and 1/3 for the topping. You may need to add a tablespoon or two of melted butter if the mix feels too dry. Note that boxed mixes often have a higher sugar content, so your bars will be slightly sweeter. If you prefer a less sweet base, choose a mix labeled “less sugar” or “buttery sugar cookie” style.

How long should you chill chocolate chip cookie cheesecake bars before slicing?

You should chill the bars for at least 2 hours in the refrigerator, but for the cleanest slices and best texture, I recommend 4 hours or even overnight. Chilling allows the cream cheese filling to set completely, making it firm enough to cut without dragging or crumbling. If you try to slice them while still warm or even at room temperature, the cheesecake will be too soft and the cookie crust may break apart. For super-clean cuts, use a sharp chef’s knife and wipe it clean between each slice.

What’s the best way to store leftover chocolate chip cookie cheesecake bars?

Store leftover bars in an airtight container in the refrigerator, with layers separated by wax paper or parchment paper to prevent sticking. They will stay fresh for up to 5 days. You can also freeze them: wrap each bar individually in plastic wrap, then place them in a freezer-safe zip-top bag. Frozen bars last up to 3 months. To serve, thaw in the fridge overnight or enjoy them cold directly from the freezer for an ice-cream-like texture. Avoid reheating in the microwave as it will make the crust soggy.

Why is my cheesecake filling lumpy?

Lumpy cheesecake filling is almost always caused by cream cheese that is too cold. The fat in cold cream cheese does not incorporate smoothly with sugar and egg, leaving tiny unblended bits. To fix, always bring cream cheese to room temperature – about 30 minutes on the counter. If you’re short on time, cut it into small cubes and let them sit for 15 minutes. Another trick: microwave the cream cheese in 10-second bursts on low power, turning it over until very soft but not melted. If lumps still appear, beat the mixture a little longer (but don’t overbeat – that can cause cracking).

How do I know when the bars are done baking?

The bars are done when the edges are set and lightly golden, and the center still has a slight jiggle (like a firm Jell-O) when you gently shake the pan. A toothpick inserted near the center should come out clean or with just a few moist crumbs – not wet batter. The internal temperature should reach about 150°F to 155°F if you use an instant-read thermometer. Remember that the bars will continue to set as they cool, so it’s better to underbake slightly than to overbake. Overbaking causes the cheesecake to puff up and crack.

Can I use homemade cookie dough instead of refrigerated?

Yes, homemade cookie dough works perfectly! Use your favorite chocolate chip cookie recipe – about 1.5 times the standard batch for a 9×9 pan. The main difference: homemade dough often spreads more, so chill it for 30 minutes before pressing into the pan. You may also need to bake the bars 3–5 minutes longer since homemade dough has more moisture. If the crumble topping browns too quickly, tent the pan with foil after 20 minutes of baking. The flavor will be even more buttery and rich, making these bars taste like they came from a bakery.

What can I use instead of cream cheese for a dairy-free version?

For a dairy-free alternative, I’ve tested Kite Hill’s plain cream cheese style and Miyoko’s double cream classic. They both have a similar tang and creamy texture. You can also make your own by blending raw cashews (soaked overnight) with lemon juice, coconut cream, and a pinch of salt. The filling will be a little less firm, so be sure to chill the bars for a full 4 hours after baking. To boost the set, add 1 tablespoon of cornstarch or arrowroot powder to the filling mixture before baking.

Can I double this recipe for a 9×13 pan?

Absolutely! To double the recipe, use a 9×13-inch baking pan and line it with parchment. You’ll need two 18-oz rolls of cookie dough (or one 36-oz package), two 8-oz blocks of cream cheese, 1 cup sugar, 2 eggs, and 1 tsp vanilla. The bake time will increase to about 40–45 minutes because the pan is larger and the filling deeper. Check doneness with a toothpick in the center. You can also bake in two 9-inch square pans if you prefer – just reduce the time back to 30–35 minutes.

How do I get clean, professional-looking slices?

For picture-perfect slices, follow these steps: First, chill the bars for at least 4 hours (overnight is best). Then, use a long, sharp chef’s knife run under hot water and wiped dry before each cut. Cut straight down without sawing. For cold bars, you can even dip the knife in hot water between slices – this will melt through the cheesecake cleanly. Let the sliced bars come to room temperature for 10–15 minutes before serving for the best flavor and texture. If you want extra-clean edges, trim off the outer 1/4 inch of the pan before cutting into bars.

📌

Love This Recipe? Save It to Pinterest!

If you enjoyed these Chocolate Chip Cookie Cheesecake Bars, don’t let them get lost in your browser tabs! 😄 Pin it now so you can find them again anytime — and explore hundreds more tried-and-tested recipes waiting for you on my Pinterest boards.

👉 Follow mia on Pinterest @exorecipe

📌 Pin this recipe · 🔁 Re-pin your favorites · 💬 Tag me when you make it — I love seeing your creations!

Print

clock clock iconcutlery cutlery iconflag flag iconfolder folder iconinstagram instagram iconpinterest pinterest iconfacebook facebook iconprint print iconsquares squares iconheart heart iconheart solid heart solid icon

Chocolate Chip Cookie Cheesecake Bars

  • Author: Chef Mia

Description

These easy Chocolate Chip Cookie Cheesecake Bars are made with just five ingredients! This easy dessert recipe will satisfy all your cravings!


Ingredients

Scale
  • 1 18 oz roll refrigerated chocolate chip cookie dough
  • 8 oz cream cheese (softened)
  • 1/2 cup granulated sugar
  • 1 egg (room temperature)
  • 1/2 tsp vanilla extract

Instructions

  1. Preheat oven to 350 F.
  2. Line a 9-inch square baking dish with parchment paper or non-stick foil. Set aside.
  3. Spread a little more than half of the cookie dough onto the bottom of the baking dish and press down firmly creating an even layer.
  4. Using a stand mixer or hand held mixer, beat the cream cheese until light and fluffy.
  5. Add in the sugar and beat until combined.
  6. Beat in the egg and vanilla extract until smooth.
  7. Pour the cheesecake filling over the top of the cookie dough base.
  8. Crumble the remaining cookie dough over the top.
  9. Bake for 30 to 35 minutes.
  10. Let cool completely before cutting into bars.
  11. Store in an airtight container in the refrigerator.


Nutrition

  • Calories: 223 kcal
  • Sugar: 19 g
  • Fat: 11 g
  • Carbohydrates: 27 g
  • Protein: 2 g


Chocolate Chip Cookie Cheesecake Bars

ph">For more delicious inspiration, follow me on Pinterest!