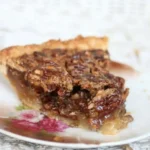
Best Blackberry Limeade – Refreshing Homemade Drink
Introduction
Nothing beats the refreshing zing of a homemade drink on a hot summer day, especially when it combines the bold sweetness of blackberries with the bright tang of lime. This Blackberry Limeade Recipe delivers exactly that—a vibrant, thirst-quenching sip that feels like sunshine in a glass. Whether you’re hosting a backyard barbecue or just craving a little pick-me-up, this drink promises to be your new go-to. Plus, it’s incredibly easy to make with just a handful of fresh ingredients. Trust me, one sip and you’ll wonder how you ever survived summer without it.
Blackberry Limeade Recipe is more than just a drink—it’s a celebration of seasonal flavors. The juicy blackberries bring a deep, fruity richness, while the lime adds a crisp acidity that balances every sip perfectly. Unlike store-bought alternatives, this homemade version lets you control the sweetness and intensity, ensuring a drink that suits your taste. For those who love experimenting, you can even swap ingredients or add a splash of sparkling water for extra fizz. If you enjoy fruity twists on classic drinks, you’ll adore our Watermelon Mojito Recipe, which offers a similarly refreshing vibe.
This recipe also fits perfectly with our blog’s mission: making gourmet flavors accessible to everyday cooks. You don’t need fancy equipment or hard-to-find ingredients—just fresh produce and a blender. And if you’re looking for more ways to use summer berries, check out our Mixed Berry Crumble for a delicious dessert pairing. Whether you’re a seasoned home bartender or a beginner, this Blackberry Limeade Recipe will impress with its simplicity and bold flavor.
Why I Love This Recipe
I’ll never forget the first time I made this Blackberry Limeade Recipe. It was during a family picnic, and I wanted something special to beat the heat. The moment everyone took their first sip, the compliments poured in—even my picky nephew asked for seconds. There’s something magical about how the flavors come together, creating a drink that’s both nostalgic and exciting. Now, it’s my signature summer staple, and I love how it brings people together. Every time I make it, I’m reminded that the best moments often start with a simple, delicious recipe.
Health and Nutrition
Why it’s good for your body
Blackberry Limeade Recipe packs a refreshing punch while delivering real health benefits. First, blackberries bring a powerhouse of antioxidants, which help fight inflammation and support overall wellness. Additionally, lime juice adds a hefty dose of vitamin C, boosting immunity and aiding digestion. Together, these ingredients make Blackberry Limeade Recipe a smarter alternative to sugary sodas or artificial drinks.
Moreover, this drink naturally hydrates your body without unnecessary additives. Since blackberries contain fiber, they promote gut health and steady energy levels. Meanwhile, the tartness of lime helps curb sugar cravings, making it easier to stick to balanced eating habits. Whether you sip it post-workout or as a midday pick-me-up, Blackberry Limeade Recipe keeps you refreshed and nourished.
Finally, the recipe’s simple ingredients mean you avoid processed sugars and preservatives. By using fresh fruit and natural sweeteners, you get a flavorful drink that aligns with clean eating. In short, Blackberry Limeade Recipe proves that tasty and healthy can go hand in hand.
How it fits in a healthy lifestyle
Blackberry Limeade Recipe fits seamlessly into a balanced diet, whether you’re focused on hydration, gluten-free living, or cutting back on refined sugars. Its natural sweetness satisfies cravings without the crash, making it a great swap for sugary beverages. If you’re exploring more gut-friendly options, pair it with a probiotic-rich snack for extra digestive support.
For those prioritizing heart health, the antioxidants in blackberries help reduce oxidative stress, while lime’s potassium supports healthy blood pressure. Plus, this drink is naturally vegan and free from common allergens, so it works for diverse dietary needs. If you’re meal prepping, try pairing it with quick, nutrient-packed lunches for a well-rounded day. With its versatility and wholesome ingredients, Blackberry Limeade Recipe makes healthy living feel effortless.
A refreshing and tangy blackberry limeade perfect for summer days.
Ingredients
Scale
For the Crust:
2 cups fresh blackberries
1 cup freshly squeezed lime juice
1/2 cup granulated sugar
4 cups cold water
Ice cubes for serving
Lime slices and fresh blackberries for garnish
Instructions
1. Prepare the Crust:
In a blender, puree the blackberries until smooth. Strain through a fine-mesh sieve to remove seeds.
In a pitcher, combine the blackberry puree, lime juice, and sugar. Stir until the sugar dissolves.
Add cold water and stir well to combine.
Chill in the refrigerator for at least 30 minutes before serving.
Serve over ice and garnish with lime slices and fresh blackberries.
Notes
You can customize the seasonings to taste.
s-dish">How to Prepare This Dish
Steps and time-saving tips
Start by rinsing fresh blackberries under cold water, then pat them dry with a paper towel. Toss the blackberries into a blender and pulse until smooth. Strain the puree through a fine-mesh sieve to remove seeds, pressing gently with a spoon. Meanwhile, squeeze fresh limes to get about a cup of juice—rolling them on the counter first makes this easier. In a large pitcher, combine the blackberry puree, lime juice, and cold water. Stir in sugar or honey to taste, dissolving it completely. For a quicker chill, add ice cubes directly to the pitcher or refrigerate for 30 minutes before serving. Garnish each glass with a lime wedge and a few whole blackberries for a vibrant touch. If you prefer a fizzy twist, top off with sparkling water just before drinking. To save time, prep the blackberry puree a day ahead and store it in the fridge. This Blackberry Limeade Recipe comes together in minutes but tastes like you spent hours perfecting it.
Mistakes I’ve made and learned from
I once over-sweetened my Blackberry Limeade Recipe, thinking extra sugar would balance the tartness. Instead, it drowned out the bright flavors. Now I add sweetener gradually, tasting as I go. Another time, I skipped straining the blackberry puree, and the gritty texture ruined the drink. A fine-mesh sieve is non-negotiable! If you’re new to working with fresh fruit, my guide to using fresh fruit has handy tips. Also, don’t substitute bottled lime juice—it lacks the zing of fresh-squeezed. For more refreshing ideas, check out my summer drink recipes, where I share lessons from all my kitchen experiments. Trust me, a little patience with this recipe pays off big in flavor.
n-and-variations">Cultural Connection and Variations
Where this recipe comes from
Blackberry Limeade Recipe traces its roots to the American South, where sweet-tart drinks have long been a staple for beating the summer heat. Farmers and home cooks would toss wild blackberries into simple limeade, creating a refreshing twist on classic lemonade. Over time, this vibrant drink became a symbol of backyard gatherings and porch-sipping afternoons. Today, you’ll find regional spins—like adding mint in the Carolinas or a splash of bourbon in Kentucky for a grown-up kick.
In Mexico, a similar drink called “limonada de zarzamora” swaps lime for lemon and often includes a pinch of chili salt for a spicy edge. Meanwhile, British versions might use elderflower cordial instead of lime, proving how adaptable Blackberry Limeade Recipe can be. My family’s version? We muddle the blackberries with basil for an herbal note, a trick my grandma picked up from her neighbor’s garden. Whether you stick to tradition or experiment, this drink always feels like a celebration of summer’s bounty.
How it fits in today’s cooking
Blackberry Limeade Recipe still shines in modern kitchens because it’s both nostalgic and versatile. Busy cooks love how it comes together in minutes, making it perfect for last-minute picnics or outdoor dining spreads. Health-conscious sippers appreciate its natural sweetness, often skipping refined sugar for honey or agave. Plus, it’s a hit at parties—just add sparkling water for a fizzy mocktail or mix with vodka for a crowd-pleasing cocktail.
Seasonal eating trends
have also given this drink a boost. When blackberries peak in late summer, food bloggers and home chefs alike spotlight Blackberry Limeade Recipe as a must-make. Some even freeze it into popsicles or use it as a base for summer desserts. Whether you’re serving it at a barbecue or sipping it solo on a hot day, this drink proves some classics only get better with time.
Taste and Texture
What makes it delicious
Blackberry Limeade Recipe bursts with vibrant, tangy sweetness that dances on your tongue. The juicy blackberries lend a rich, jammy depth, while the fresh lime juice adds a bright, zesty punch. Each sip feels refreshingly crisp, with a slight effervescence if you use sparkling water. The natural sweetness balances perfectly with the tartness, creating a harmonious flavor profile. Meanwhile, the crushed ice gives it a satisfyingly cool, smooth texture that melts effortlessly. Blackberry Limeade Recipe isn’t just a drink—it’s a sensory escape, fragrant with summer berries and citrus.
Boosting the flavor
For an extra flavor boost, muddle fresh mint leaves into your Blackberry Limeade Recipe to add a refreshing herbal note. Alternatively, swap regular sugar for honey or agave syrup to deepen the sweetness with a subtle floral twist. If you love a spicy kick, a pinch of chili powder or tajín on the rim elevates the tangy lime. Pair it with a berry chia pudding for a fruity breakfast combo, or serve alongside citrus grilled shrimp to highlight the lime’s zest. Small tweaks make this drink endlessly customizable!
Always use fresh blackberries for the Blackberry Limeade Recipe to ensure a vibrant, natural sweetness. Meanwhile, chill your glasses beforehand for an extra-refreshing sip. For the best balance, taste the limeade as you mix it and adjust the sugar or lime juice if needed. Additionally, strain the blackberry puree thoroughly to avoid seeds in your drink. Finally, serve the Blackberry Limeade Recipe immediately over ice to keep it crisp and flavorful.
Mistakes to avoid
Avoid over-blending the blackberries, as this can make the limeade bitter. Instead, pulse them gently to preserve their fresh taste. Another common mistake is skipping the simple syrup step, which can leave your Blackberry Limeade Recipe unevenly sweetened. For a smoother drink, check out our guide on how to make simple syrup. Also, don’t forget to use ripe limes—underripe ones lack the bright acidity this recipe needs. If you’re unsure about selecting fruit, our tips for choosing the best citrus will help.
g-suggestions">Serving and Pairing Suggestions
How to serve this dish
Serve your Blackberry Limeade Recipe in tall, frosty glasses for a refreshing summer treat. For extra flair, rim the glasses with sugar or crushed blackberries before pouring. Meanwhile, garnish each drink with a lime wheel and a few fresh blackberries on a skewer for a vibrant touch. This drink shines at outdoor gatherings, whether it’s a backyard barbecue or a poolside party. Alternatively, offer it as a signature drink at brunch alongside light bites for a cheerful twist.
What goes well with it
Pair your Blackberry Limeade Recipe with grilled shrimp skewers for a tangy contrast to the smoky flavors. The citrusy notes in the limeade also complement spicy dishes like our Mango Habanero Wings, balancing the heat perfectly. For a sweeter option, try it with a slice of our Lemon Blueberry Cake, as the berry flavors harmonize beautifully. Whether you choose savory or sweet, these pairings elevate every sip.
math-faq-block">
Can I use frozen blackberries for Blackberry Limeade Recipe?
Yes, frozen blackberries work perfectly for Blackberry Limeade Recipe. They’re often more affordable and available year-round. Just thaw and blend them as you would fresh berries for a refreshing drink.
How do I make Blackberry Limeade less tart?
To balance the tartness in Blackberry Limeade Recipe, add a bit more sweetener like honey or simple syrup. You can also dilute the lime juice slightly with extra water or use ripe blackberries for natural sweetness.
Can I turn Blackberry Limeade into a cocktail?
Absolutely! For a spiked version of Blackberry Limeade Recipe, add a shot of vodka, rum, or tequila to each glass. Garnish with fresh mint or lime slices for a festive touch.
ank-math-faq-item">
How long does homemade Blackberry Limeade last in the fridge?
Freshly made Blackberry Limeade Recipe stays fresh for up to 3 days when stored in a sealed pitcher. Stir well before serving as the ingredients may separate over time.
Best Easy Strawberry Lemonade Recipe – Refreshing & Homemade
Introduction
There’s something magical about sipping a chilled glass of strawberry lemonade on a warm summer day. Whether you’re hosting a backyard barbecue or simply craving a refreshing drink, this Easy Strawberry Lemonade Recipe delivers bright flavors with minimal effort. It’s the perfect balance of sweet and tangy, and best of all, you can whip it up in just minutes. Trust me, once you try this homemade version, you’ll never go back to store-bought mixes again.
This Easy Strawberry Lemonade Recipe combines fresh strawberries, zesty lemons, and a touch of sweetness for a drink that’s as vibrant as it is delicious. Unlike artificial alternatives, this recipe uses real fruit, giving it a naturally bold flavor and a gorgeous pink hue. Whether you’re serving it at a party or enjoying it solo, it’s a crowd-pleaser that fits any occasion. Plus, it’s incredibly versatile—you can adjust the sweetness or even add a splash of sparkling water for a fizzy twist. If you love fruity drinks, you’ll also enjoy our Homemade Mango Smoothie or our Watermelon Mint Cooler for more summer sips.
What makes this recipe stand out is its simplicity. You don’t need fancy equipment or hard-to-find ingredients—just fresh strawberries, lemons, sugar, and water. It’s a fantastic way to use up ripe strawberries, and the result is far superior to anything you’d buy pre-made. The blog’s tone leans toward approachable, family-friendly recipes, and this strawberry lemonade fits right in. It’s quick, customizable, and guaranteed to become a staple in your warm-weather rotation.
Why I Love This Recipe
This Easy Strawberry Lemonade Recipe holds a special place in my heart because it reminds me of summers at my grandma’s house. She always had a pitcher of homemade lemonade ready, and when she added strawberries, it felt like a celebration. Now, every time I make it, I’m transported back to those lazy afternoons on her porch. It’s more than just a drink—it’s a little taste of nostalgia, and I love sharing that joy with others.
Health and Nutrition
Why it’s good for your body
Easy Strawberry Lemonade Recipe packs a refreshing punch while delivering real health benefits. First, strawberries bring a hefty dose of vitamin C, which boosts immunity and keeps your skin glowing. Meanwhile, lemons add even more vitamin C along with antioxidants that fight inflammation. Together, they make this drink a powerhouse for your well-being.
Additionally, Easy Strawberry Lemonade Recipe uses natural sweetness from ripe strawberries, cutting down on processed sugars. Unlike store-bought lemonades, you control the ingredients, avoiding artificial additives. Plus, the hydration from this drink helps maintain energy levels and supports digestion, especially on hot days.
Finally, the blend of strawberries and lemons offers a gentle detox effect. Strawberries contain fiber, which aids digestion, while lemons stimulate liver function. Whether you sip it post-workout or as a midday pick-me-up, Easy Strawberry Lemonade Recipe keeps you refreshed and nourished without empty calories.
How it fits in a healthy lifestyle
Easy Strawberry Lemonade Recipe fits perfectly into a balanced diet. It’s naturally gluten-free and vegan-friendly, making it a great choice for diverse dietary needs. If you’re watching sugar intake, simply adjust the sweetness with honey or a sugar substitute.
For those focused on heart health, the antioxidants in strawberries and lemons support cardiovascular function. Pair it with a light meal like our avocado toast for a nutrient-packed combo. Or, enjoy it alongside our berry smoothie for a double dose of fruity goodness.
Easy Strawberry Lemonade Recipe also encourages mindful hydration. Swap sugary sodas for this homemade alternative to cut calories without sacrificing flavor. It’s a simple way to make healthy choices feel effortless and delicious.
A refreshing and fruity homemade lemonade with fresh strawberries.
Ingredients
Scale
For the Crust:
1 cup fresh strawberries, hulled and sliced
1 cup freshly squeezed lemon juice (about 4–6 lemons)
1/2 cup granulated sugar
4 cups cold water
Ice cubes for serving
Instructions
1. Prepare the Crust:
In a blender, puree the strawberries until smooth.
In a large pitcher, combine the strawberry puree, lemon juice, sugar, and water. Stir until the sugar dissolves.
Chill in the refrigerator for at least 30 minutes before serving.
Serve over ice with fresh strawberry slices or lemon wedges for garnish.
Notes
You can customize the seasonings to taste.
How to Prepare This Dish
Steps and time-saving tips
Start by washing and hulling fresh strawberries for your Easy Strawberry Lemonade Recipe. Slice them into quarters, then toss them into a blender with a splash of water. Blend until smooth, and if you prefer a seedless texture, strain the puree through a fine mesh sieve. Meanwhile, squeeze fresh lemons to get about one cup of juice—rolling them on the counter first makes juicing easier. In a large pitcher, combine the strawberry puree, lemon juice, and cold water. Stir in granulated sugar to taste, adjusting sweetness as needed. For a quicker dissolve, use simple syrup instead of granulated sugar. Add ice cubes to chill the lemonade instantly, or refrigerate it for 30 minutes before serving. Garnish with lemon slices and strawberry halves for a refreshing finish. To save time, prep the strawberry puree a day ahead and store it in the fridge. If you’re hosting, double the batch—this Easy Strawberry Lemonade Recipe disappears fast!
and-learned-from">Mistakes I’ve made and learned from
I once over-sweetened my Easy Strawberry Lemonade Recipe, thinking extra sugar would balance the tartness. Instead, it overwhelmed the fresh strawberry flavor. Now, I add sugar gradually and taste as I go, especially since strawberries vary in sweetness. Another mishap? Using bottled lemon juice—it lacked brightness compared to fresh lemons. Trust me, the extra effort pays off. For more tips on balancing flavors, check out my guide on perfecting sweet and sour balances. Also, don’t skip straining the strawberry puree if you dislike seeds. I learned this after serving a gritty batch to guests. For smoother purees, my blending vs. juicing breakdown has handy tricks. Small tweaks make all the difference!
Cultural Connection and Variations
Where this recipe comes from
Easy Strawberry Lemonade Recipe blends the bright flavors of summer with a timeless tradition. People have enjoyed lemonade for centuries, but adding strawberries gives it a sweet, modern twist. In the South, folks often mix fresh berries with lemonade for picnics and porch sipping. Meanwhile, in Mexico, they might spike it with chamoy or tajín for a spicy kick. Even in the Middle East, some versions include rose water or mint for an aromatic touch.
My family always made E
asy Strawberry Lemonade Recipe during backyard barbecues. We’d mash the strawberries by hand, leaving tiny chunks for texture. My aunt swore by a splash of sparkling water to make it fizzy. Across the globe, others might puree the fruit smooth or strain it for a clearer drink. No matter the method, this recipe brings people together—whether at a street fair in Spain or a Fourth of July cookout.
How it fits in today’s cooking
Easy Strawberry Lemonade Recipe still shines as a go-to refresher, especially when summer hits. Busy home cooks love it because it’s quick, customizable, and crowd-pleasing. Some blend it into smoothies or freeze it into popsicles, like the ones in our fruit popsicle guide. Others swap sugar for honey or agave to keep it light. It’s also a star at baby showers and brunches, often paired with treats from our brunch dessert roundup.
Thanks to social media, new twists pop up every season. Some add basil for an herbal note, while others layer it into cocktails. No matter how you tweak it, Easy Strawberry Lemonade Recipe stays a sunny staple. It’s proof that simple, fresh ingredients never go out of style.
>Taste and Texture
What makes it delicious
Easy Strawberry Lemonade Recipe bursts with bright, tangy sweetness that dances on your tongue. Fresh strawberries lend a juicy, fruity depth, while zesty lemon juice adds a refreshing punch. The drink feels silky-smooth yet lightly effervescent if you use sparkling water, making each sip irresistibly crisp. Meanwhile, a hint of honey or sugar rounds out the flavors, balancing the tartness with a subtle warmth. Whether served over ice or blended into a slushy treat, Easy Strawberry Lemonade Recipe delivers a vibrant, thirst-quenching experience that smells as heavenly as it tastes—like sun-ripened berries mingling with citrusy sunshine.
Boosting the flavor
For a bolder twist, muddle fresh mint leaves into your Easy Strawberry Lemonade Recipe to add an herbal freshness. Alternatively, swap honey for agave syrup to highlight the strawberries’ natural sweetness. If you love a spicy kick, a pinch of chili powder or a splash of ginger syrup elevates the drink with warming complexity. Pair it with a citrus salad for a refreshing side, or freeze leftover lemonade into popsicles for a fun, frosty upgrade. Small tweaks make this classic even more memorable.
Tips for Success
Best practices for results
Always use fresh strawberries for the best flavor in your Easy Strawberry Lemonade Recipe. Meanwhile, chill your lemonade before serving to enhance its refreshing taste. Additionally, muddle the strawberries gently to release their juices without crushing them completely. For a smoother texture, strain the mixture after blending. Finally, adjust the sweetness gradually by tasting as you go.
Mistakes to avoid
Avoid over-blending the strawberries, as this can make the lemonade too pulpy. Instead, pulse them briefly for a balanced texture. Furthermore, don’t skip the straining step if you prefer a silky finish. Many people also forget to taste-test before serving, so always check the sweetness and tartness levels. For more tips on perfecting fruit-based drinks, explore our guide on homemade iced tea. Also, ensure your lemons are ripe—underripe ones can make the lemonade bitter. Learn how to pick the best produce in our fresh fruit selection guide.
Serving and Pairing Suggestions
How to serve this dish
Make your Easy Strawberry Lemonade Recipe the star of any gathering by serving it in a large glass pitcher with fresh strawberry slices and lemon wedges floating on top. For a fun twist, rim the glasses with sugar or crushed freeze-dried strawberries. This drink shines at summer picnics, backyard barbecues, or even as a refreshing brunch companion. If you’re hosting a party, consider setting up a DIY garnish station with mint sprigs, extra berries, and colorful paper straws for guests to customize their drinks.
h-it">What goes well with it
Pair your Easy Strawberry Lemonade Recipe with light, fresh dishes to keep the flavors bright. For a perfect summer meal, try it alongside our Grilled Chicken Salad, where the tangy lemonade balances the smoky grilled flavors. Alternatively, serve it with our Berry Cheesecake Bars for a sweet-and-tart dessert combo that delights the palate. If you’re craving something savory, crispy fish tacos or a zesty quinoa salad also complement the drink’s vibrant notes.
How do you make strawberry lemonade from scratch?
To make an Easy Strawberry Lemonade Recipe from scratch, blend fresh strawberries with sugar, then mix with freshly squeezed lemon juice and cold water. Adjust sweetness to taste and serve over ice for a refreshing drink.
ank-math-faq-item">
Can I use frozen strawberries for strawberry lemonade?
Yes, frozen strawberries work perfectly in an Easy Strawberry Lemonade Recipe. Thaw them first or blend while still frozen for a slushier texture—just adjust sugar since frozen berries can be sweeter.
What’s the best sugar substitute for strawberry lemonade?
For a healthier Easy Strawberry Lemonade Recipe, try honey, agave, or stevia instead of sugar. These alternatives blend well with the strawberries and lemon while keeping the drink naturally sweet.
How long does homemade strawberry lemonade last in the fridge?
Your Easy Strawberry Lemonade Recipe will stay fresh for 2–3 days when stored in a sealed pitcher. Stir before serving as natural separation may occur.
div>
Best Chocolate Chip Muffins – Easy Homemade Recipe
Introduction
There’s something undeniably comforting about biting into a warm, freshly baked Chocolate Chip Muffin. Whether you’re starting your day with a sweet treat or need an afternoon pick-me-up, these muffins deliver that perfect balance of soft crumb and melty chocolate. Plus, they’re incredibly easy to make, even if you’re not a seasoned baker. If you’ve ever craved a bakery-style muffin without the hassle, this recipe will quickly become your go-to.
Chocolate Chip Muffins are a classic for a reason. They combine the simplicity of a basic muffin with the irresistible appeal of chocolate chips, creating a snack that appeals to kids and adults alike. Unlike overly complicated desserts, these muffins require minimal effort but deliver maximum flavor. They’re perfect for busy mornings, lunchboxes, or even as a quick dessert when you’re short on time. Moreover, they fit seamlessly into the cozy, approachable vibe of Exorecipes, where we celebrate fuss-free recipes that anyone can master. If you love easy baking projects, you’ll also enjoy our Classic Banana Bread or Blueberry Muffins, which share the same effortless charm.
Why I Love This Recipe
Chocolate Chip Muffins hold a special place in my heart because they remind me of lazy Sunday mornings with my family. My mom used to bake them as a surprise treat, and the smell of chocolate and vanilla wafting through the house instantly made the day feel brighter. Now, whenever I make them, I’m transported back to those simple, joyful moments. What I love most is how reliably they turn out—every batch is soft, fluffy, and packed with just the right amount of chocolate. It’s the kind of recipe that never fails to bring a smile.
Health and Nutrition
Why it’s good for your body
Chocolate chip muffins can offer surprising health benefits when made with wholesome ingredients. First, they provide quick energy thanks to their balanced mix of carbs, fats, and a touch of protein. Additionally, dark chocolate chips add antioxidants, which support heart health and reduce inflammation. Meanwhile, whole-grain flour or oats in the batter boost fiber, aiding digestion and keeping you full longer.
Moreover, Chocolate Chip Muffins deliver small doses of essential nutrients like iron and magnesium. For instance, cocoa powder contributes iron, while nuts or seeds sprinkled on top add healthy fats. Even better, you can easily tweak the recipe to cut sugar or use alternatives like honey for a natural sweetness. Ultimately, these muffins satisfy cravings without derailing your nutrition goals.
Finally, Chocolate Chip Muffins make a convenient snack for busy days. Pair them with Greek yogurt or fruit for extra protein and vitamins. Since they freeze well, you can also stash a batch for later. With mindful ingredients, they become a tasty way to fuel your body.
How it fits in a healthy lifestyle
Chocolate Chip Muffins fit perfectly into a balanced diet when enjoyed in moderation. For a protein boost, try adding almond flour or blending in cottage cheese, as shown in our high-protein baking guide. They also work well as a pre-workout snack or a midday pick-me-up with a handful of nuts.
If you follow dietary restrictions, simple swaps keep them gluten-free or dairy-free. Opt for oat flour or a gluten-free blend, and use plant-based milk. For heart-healthy versions, reduce butter and fold in mashed banana or applesauce. Craving more wholesome treats? Explore our healthy dessert ideas for inspiration. Whether you need a quick breakfast or a lunchbox treat, Chocolate Chip Muffins adapt to your lifestyle without sacrificing flavor.
Soft and fluffy muffins loaded with chocolate chips, perfect for breakfast or a snack.
Ingredients
Scale
For the Crust:
2 cups all-purpose flour
1/2 cup granulated sugar
1 tbsp baking powder
1/2 tsp salt
1 cup milk
1/3 cup vegetable oil
1 large egg
1 tsp vanilla extract
1 cup semi-sweet chocolate chips
Instructions
1. Prepare the Crust:
Preheat oven to 375°F (190°C) and line a muffin tin with paper liners.
In a large bowl, whisk together flour, sugar, baking powder, and salt.
In another bowl, mix milk, vegetable oil, egg, and vanilla extract.
Pour the wet ingredients into the dry ingredients and stir until just combined. Fold in chocolate chips.
Divide the batter evenly among the muffin cups, filling each about 2/3 full.
Bake for 18-20 minutes or until a toothpick inserted comes out clean. Let cool before serving.
Notes
You can customize the seasonings to taste.
s-dish">How to Prepare This Dish
Steps and time-saving tips
Start by preheating your oven to 375°F and lining a muffin tin with paper liners or greasing it lightly. In a large bowl, whisk together the flour, baking powder, and salt until well combined. Next, grab another bowl and beat the softened butter with sugar until it turns light and fluffy. Crack in the eggs one at a time, mixing well after each addition, then stir in the vanilla extract for that warm, comforting flavor. Slowly pour in the milk while mixing to create a smooth batter. Now, gently fold the dry ingredients into the wet mixture, being careful not to overmix—just stop when no flour streaks remain. Toss the chocolate chips with a sprinkle of flour to prevent sinking, then fold them into the batter. Spoon the mixture evenly into the muffin cups, filling each about two-thirds full. For an extra touch, sprinkle a few extra chocolate chips on top before baking. Slide the tray into the oven and bake for 18-20 minutes until the tops spring back when touched. Let the muffins cool for 5 minutes in the pan before transferring them to a wire rack. To save time, measure all your ingredients ahead and use a cookie scoop for evenly portioned batter.
Mistakes I’ve made and learned from
I once rushed the mixing process and ended up with dense Chocolate Chip Muffins instead of the light, fluffy texture I wanted. Now, I know to stop stirring as soon as the ingredients combine—overmixing activates the gluten, making them tough. Another blunder? Using cold butter straight from the fridge, which left uneven chunks in the batter. Softening it first ensures a smoother blend. If you’re new to baking, check out my guide on common baking mistakes to dodge similar pitfalls. Also, I learned the hard way that skipping the flour toss for chocolate chips leads to them all sinking to the bottom. For more pro tips on perfect muffins, peek at my muffin baking secrets. Trust me, these small tweaks make all the difference!
n-and-variations">Cultural Connection and Variations
Where this recipe comes from
Chocolate Chip Muffins feel like a warm hug in baked form, and their story stretches back to the early 20th century when chocolate chips first became a pantry staple. Originally inspired by classic American baking traditions, these muffins quickly became a beloved treat for breakfasts, snacks, and lunchboxes. However, different cultures put their own spin on them. In France, bakers might fold in dark chocolate chunks and a pinch of sea salt for a sophisticated twist. Meanwhile, in Australia, you’ll often find them loaded with extra chocolate chips or even a dollop of Nutella for indulgence.
In my family, Chocolate Chip Muffins were a weekend ritual. My grandma added a dash of cinnamon to the batter, claiming it “woke up the chocolate.” Some bakers swap in whole wheat flour or oats for a heartier texture, while others keep it classic with fluffy all-purpose flour. No matter the variation, the magic lies in that melty chocolate surprise in every bite. Whether you enjoy them fresh from the oven or days later (if they last that long!), these muffins carry a universal appeal.
How it fits in today’s cooking
Today, Chocolate Chip Muffins still hold their spot as a go-to comfort food. Busy parents love them for quick school mornings, and home bakers appreciate how easily they adapt to dietary needs—like using almond flour or dairy-free chocolate chips. They’ve also become a staple for cozy weekend brunches, especially when paired with a steaming cup of coffee. For more muffin inspiration, check out our guide to perfecting muffin texture or explore creative twists in our flavor combinations roundup.
Modern kitchens keep re
inventing this classic. Some bakers add espresso powder to deepen the chocolate flavor, while others mix in zucchini or bananas for a sneaky nutrient boost. Whether you stick to tradition or experiment, Chocolate Chip Muffins remain a timeless favorite. They bridge generations, proving that some treats never go out of style.
Taste and Texture
What makes it delicious
Chocolate Chip Muffins deliver a warm, buttery aroma that fills the kitchen as they bake. Each bite offers a tender, fluffy crumb that melts in your mouth, while the gooey chocolate chips add pockets of rich, velvety sweetness. The contrast between the soft muffin and the slightly crisp golden top creates a satisfying texture. Vanilla and brown sugar deepen the flavor, making these Chocolate Chip Muffins irresistibly comforting. Whether enjoyed fresh from the oven or at room temperature, they strike the perfect balance between decadent and wholesome.
Boosting the flavor
For an extra flavor boost, try folding in toasted walnuts or pecans for a crunchy contrast. A sprinkle of flaky sea salt on top before baking enhances the chocolate’s richness. Alternatively, swap half the chocolate chips for dark chocolate chunks or swirl in a spoonful of peanut butter sauce for a nutty twist. If you love warm spices, a dash of cinnamon or a drizzle of caramel glaze elevates these muffins to dessert-level indulgence. Experiment with these tweaks to make your Chocolate Chip Muffins even more memorable.
Always measure your flour correctly by spooning it into the cup and leveling it off—this prevents dense Chocolate Chip Muffins. For extra fluffy results, mix the batter just until combined, as overmixing leads to tough muffins. Additionally, use room-temperature eggs and dairy to help ingredients blend smoothly. Finally, sprinkle a few extra chocolate chips on top before baking for a bakery-worthy finish.
Mistakes to avoid
Avoid overfilling muffin cups, as this causes uneven baking and spills. Instead, fill each liner two-thirds full for perfectly domed Chocolate Chip Muffins. Also, resist opening the oven door too early, as sudden temperature drops can make muffins sink. For more troubleshooting tips, check out our guide on common baking mistakes. If your muffins turn out dry, try adjusting your bake time using our oven temperature guide for precise results.
g-suggestions">Serving and Pairing Suggestions
How to serve this dish
Serve Chocolate Chip Muffins warm for the best flavor and texture. If you want to impress guests, arrange them on a rustic wooden board or a tiered stand for a charming brunch display. For special occasions, dust them lightly with powdered sugar or drizzle melted chocolate on top. Meanwhile, fresh berries or a sprig of mint add a pop of color that makes them even more inviting. These muffins shine at holiday gatherings, weekend breakfasts, or as a sweet afternoon pick-me-up.
What goes well with it
Pair Chocolate Chip Muffins with a creamy latte or cold glass of milk for a classic combo. The rich coffee notes balance the sweetness, while milk enhances the comforting vibe. Alternatively, try them with a scoop of vanilla ice cream for an indulgent dessert twist. If you love baked treats, serve them alongside our fluffy banana bread for a delightful spread. For a fruity contrast, our berry smoothie adds a refreshing touch that cuts through the richness.
math-faq-block">
How do you keep chocolate chip muffins moist?
To keep chocolate chip muffins moist, avoid overmixing the batter and use ingredients like sour cream, yogurt, or buttermilk. Store them in an airtight container once cooled to lock in moisture. Properly baked chocolate chip muffins should stay fresh for 2-3 days.
Can you freeze chocolate chip muffins?
Yes, chocolate chip muffins freeze well for up to 3 months. Let them cool completely, then wrap individually in plastic wrap and place in a freezer bag. Thaw at room temperature or warm in the microwave for 15-20 seconds.
What’s the secret to fluffy chocolate chip muffins?
The key to fluffy chocolate chip muffins is using baking powder for lift and not overfilling the muffin cups. Gently fold in the chocolate chips at the end to maintain airiness. A 400°F oven creates the perfect dome on these muffins.
ank-math-faq-item">
Why do my chocolate chip muffins sink in the middle?
Chocolate chip muffins sink when the batter is too wet or the oven temperature is too low. Ensure your leavening agents are fresh and measure ingredients accurately. Opening the oven door too soon can also cause sinking in these delicate muffins.
Best Mixed Berry Muffins – Easy Homemade Recipe
Introduction
There’s something magical about biting into a warm, fluffy Mixed Berry Muffin—bursts of juicy berries, a tender crumb, and just the right touch of sweetness. Whether you’re savoring one with your morning coffee or packing them for a quick snack, these muffins bring comfort and joy to any moment. Plus, they’re incredibly easy to make, even if you’re not a baking pro. Let’s dive into why this recipe deserves a spot in your kitchen rotation.
Mixed Berry Muffins are a versatile treat that combines the vibrant flavors of blueberries, raspberries, and strawberries (or any berries you love) in a soft, moist muffin. They’re perfect for breakfast, brunch, or even dessert, and they’re a fantastic way to use up fresh or frozen berries. What makes them special is their balance of sweetness and tartness, along with their effortless adaptability—swap in your favorite berries or add a streusel topping for extra crunch. If you’re looking for more berry-inspired recipes, check out our Blueberry Pancakes or Strawberry Shortcake for more fruity delights.
This recipe fits perfectly with our blog’s mission to deliver approachable, crowd-pleasing dishes that anyone can master. Mixed Berry Muffins require simple ingredients, minimal prep time, and deliver maximum flavor. They’re also a great way to get kids involved in baking, making them a family-friendly favorite. Whether you’re baking for a weekend treat or meal-prepping for the week, these muffins never disappoint.
Why I Love This Recipe
Mixed Berry Muffins hold a special place in my heart because they remind me of lazy Sunday mornings with my grandma. She’d let me stir the batter and sneak a few extra berries into the mix, and the smell of them baking still takes me back to her cozy kitchen. Now, I love making them for my own family, watching their faces light up with that first bite. It’s a simple recipe, but the memories it creates are everything.
Health and Nutrition
Why it’s good for your body
Mixed Berry Muffins pack a nutritious punch while satisfying your sweet tooth. First, the berries deliver antioxidants like vitamin C and polyphenols, which help fight inflammation. Additionally, these muffins often include whole grains or oats, providing fiber to support digestion and keep you full longer. Because berries naturally sweeten the batter, you can often reduce added sugars without sacrificing flavor.
Moreover, Mixed Berry Muffins offer a balanced energy boost. The combination of complex carbs and healthy fats from ingredients like yogurt or nuts stabilizes blood sugar levels. Meanwhile, the protein in eggs or Greek yogurt aids muscle repair. Whether you enjoy them for breakfast or a snack, these muffins give you steady energy without the crash.
Finally, Mixed Berry Muffins adapt easily to dietary needs. You can swap in almond flour for gluten-free options or flax eggs for plant-based protein. With so many variations, you get a treat that’s as wholesome as it is delicious. Next time you bake a batch, know you’re fueling your body with nutrients it loves.
How it fits in a healthy lifestyle
Mixed Berry Muffins fit seamlessly into a balanced diet when enjoyed mindfully. Pair one with a protein-rich food like Greek yogurt or a handful of almonds for a satisfying breakfast. If you’re watching sugar intake, try our low-sugar baking tips to tweak the recipe without losing sweetness.
For those with dietary restrictions, these muffins shine. Use gluten-free flour blends or nut-based alternatives to keep them celiac-friendly. If heart health is a priority, incorporate oats and omega-3-rich walnuts. Explore our meal prep ideas to bake a batch ahead for quick, wholesome snacks all week. With simple swaps, Mixed Berry Muffins become a versatile part of your wellness routine.
Preheat oven to 375°F (190°C) and line a muffin tin with paper liners.
In a large bowl, whisk together flour, sugar, baking powder, and salt.
In another bowl, mix milk, melted butter, egg, and vanilla extract.
Pour the wet ingredients into the dry ingredients and stir until just combined.
Gently fold in the mixed berries.
Divide the batter evenly among the muffin cups, filling each about 2/3 full.
Bake for 20-25 minutes or until a toothpick inserted comes out clean.
Let cool in the pan for 5 minutes, then transfer to a wire rack.
Notes
You can customize the seasonings to taste.
s-dish">How to Prepare This Dish
Steps and time-saving tips
Start by preheating your oven to 375°F and lining a muffin tin with paper liners or greasing it lightly. In a large bowl, whisk together the flour, sugar, baking powder, and salt until well combined. In another bowl, mix the melted butter, milk, eggs, and vanilla extract until smooth. Pour the wet ingredients into the dry mixture and gently stir until just combined—overmixing will make your Mixed Berry Muffins dense. Next, fold in the fresh or frozen berries carefully to avoid crushing them. If you’re short on time, use frozen berries straight from the freezer; they’ll thaw while baking. Spoon the batter evenly into the muffin cups, filling each about two-thirds full. For an extra touch, sprinkle a little coarse sugar on top before baking. Pop the tray into the oven and bake for 20-25 minutes, or until a toothpick comes out clean. Let the muffins cool in the pan for 5 minutes, then transfer them to a wire rack. These Mixed Berry Muffins taste best warm, but they’ll stay fresh in an airtight container for up to 3 days.
Mistakes I’ve made and learned from
I’ve learned the hard way that overmixing the batter turns Mixed Berry Muffins into tough little bricks. Once, I got overzealous with my whisk and ended up with dense, chewy muffins instead of light, fluffy ones. Now, I stir just until the ingredients combine, even if the batter looks a little lumpy. Another mistake? Using soggy berries. If your berries are too juicy, they’ll bleed into the batter and make it soggy. Tossing them in a bit of flour first helps, as I discovered after a batch of purple-streaked muffins. For more baking tips, check out my guide on common baking mistakes. And if you’re new to working with berries, my berry baking tips will save you a lot of trial and error.
n-and-variations">Cultural Connection and Variations
Where this recipe comes from
Mixed Berry Muffins have a cozy, nostalgic charm that spans cultures and kitchens. Originally, bakers in Europe and North America whipped up simple berry muffins as a way to use fresh summer fruits. Over time, families added their own twists—like swapping local berries or folding in spices like cinnamon or cardamom. In Scandinavia, for example, bakers often use lingonberries or cloudberries, while Southern U.S. versions might feature blackberries or pecans for extra crunch.
My grandmother’s recipe for Mixed Berry Muffins always included a handful of wild blueberries and a dash of lemon zest. She’d bake them for Sunday breakfasts, filling the house with warmth. Meanwhile, in Australia, you might find these muffins with macadamia nuts or a dollop of passionfruit glaze. No matter the variation, the heart of the dish stays the same: a tender, fruity bite that feels like home.
How it fits in today’s cooking
Today, Mixed Berry Muffins bridge tradition and modern convenience. Busy bakers love them for meal prep, while food bloggers reinvent them with gluten-free flour or vegan substitutes. They’re a staple at brunch gatherings, especially when paired with a creamy lemon poppy seed loaf for contrast. Plus, frozen berries make this recipe year-round—perfect for snowy mornings or summer picnics alike.
Health-conscious cooks
also tweak the classic by reducing sugar or adding protein powder. Yet even with updates, the muffins keep their comforting appeal. For a fun twist, try serving them alongside a slice of classic banana bread at your next family breakfast. Whether you stick to tradition or experiment, Mixed Berry Muffins remain a timeless treat.
Taste and Texture
What makes it delicious
Mixed Berry Muffins burst with juicy sweetness in every bite, thanks to plump blueberries, tart raspberries, and tender blackberries folded into the batter. The crumb stays moist and buttery, while the golden-brown top offers a subtle crispness that contrasts perfectly with the soft interior. Warm vanilla and a hint of citrus zest brighten the aroma, making each muffin smell as irresistible as it tastes. Whether enjoyed fresh from the oven or at room temperature, Mixed Berry Muffins deliver a delightful balance of fruity tang and rich, bakery-style comfort.
Boosting the flavor
For an extra flavor boost, try tossing the berries in a light dusting of cinnamon or cardamom before mixing them into the batter. Alternatively, drizzle warm muffins with a simple vanilla glaze or sprinkle them with coarse sugar for a sparkling crunch. If you love citrusy notes, swap half the vanilla extract for orange blossom water or lemon juice—just like in these lemon-blueberry scones. A dollop of whipped cream or a side of berry compaste turns these muffins into a decadent treat without much effort.
For the best Mixed Berry Muffins, always use fresh or frozen berries without thawing them first to prevent excess moisture. Additionally, gently fold the berries into the batter at the very end to avoid crushing them and staining the dough. Meanwhile, preheat your oven fully and use an ice cream scoop for evenly sized muffins that bake uniformly. Finally, let the muffins cool in the pan for 5 minutes before transferring them to a wire rack to prevent sticking.
Mistakes to avoid
One common mistake is overmixing the batter, which can make Mixed Berry Muffins dense instead of light and fluffy. Instead, stir just until the ingredients combine, even if the batter looks slightly lumpy. Another error is skipping the muffin liner or greasing step, which can cause sticking. For foolproof removal, check out our guide on perfect muffin liners. Also, avoid overfilling the muffin cups, as this leads to uneven baking. For more on portioning, see our tips on baking time adjustments.
g-suggestions">Serving and Pairing Suggestions
How to serve this dish
Serve Mixed Berry Muffins warm for the best flavor and texture. For a beautiful presentation, arrange them on a rustic wooden board or a tiered cake stand. Meanwhile, dust them lightly with powdered sugar or drizzle with a simple glaze to make them extra inviting. These muffins shine at brunch gatherings, holiday breakfasts, or as a sweet afternoon treat with coffee. To elevate the experience, add fresh berries or mint leaves as a garnish for a pop of color.
What goes well with it
Pair Mixed Berry Muffins with a creamy latte or a refreshing iced tea for a balanced breakfast or snack. The rich coffee notes or citrusy tea flavors enhance the muffins’ fruity sweetness. Alternatively, try them with a scoop of vanilla ice cream or a dollop of homemade whipped cream for a decadent dessert. If you’re serving them as part of a larger spread, consider adding our Classic Quiche Lorraine for a savory contrast that rounds out the meal.
math-faq-block">
How do you keep mixed berry muffins from getting soggy?
To prevent soggy Mixed Berry Muffins, gently toss the berries in flour before folding them into the batter. This helps absorb excess moisture. Also, avoid overmixing the batter and bake until a toothpick comes out clean for perfectly textured muffins every time.
Can you use frozen berries for mixed berry muffins?
Yes, frozen berries work well in Mixed Berry Muffins—just don’t thaw them first to prevent color bleeding. Fold them directly into the batter while still frozen, and expect a slightly longer baking time. The result will be just as delicious as using fresh berries.
What’s the best flour for mixed berry muffins?
All-purpose flour is ideal for Mixed Berry Muffins because it provides the right structure without making them too dense. For a healthier twist, you can substitute up to half with whole wheat flour. The berries’ sweetness balances well with either option.
ank-math-faq-item">
How long do homemade mixed berry muffins stay fresh?
Freshly baked Mixed Berry Muffins stay moist for 2–3 days when stored in an airtight container at room temperature. For longer storage, freeze them for up to 3 months. Reheat briefly in the microwave or oven to revive that just-baked texture.
Best Carrot Banana Bread – Moist and Flavorful
Introduction
There’s something magical about the smell of warm spices and sweet bananas wafting through the kitchen, especially when they come together in a loaf of Carrot Banana Bread. Whether you’re looking for a cozy breakfast treat or a healthier way to satisfy your sweet tooth, this recipe delivers comfort and nourishment in every bite. Best of all, it’s a clever way to use up those overripe bananas and leftover carrots hiding in your fridge. Let’s turn them into something unforgettable.
Carrot Banana Bread is the perfect fusion of two classic favorites: moist banana bread and spiced carrot cake. Unlike traditional banana bread, this version packs extra nutrients and natural sweetness from shredded carrots, while keeping that irresistibly tender crumb. It’s a versatile recipe that works equally well as a morning snack, afternoon pick-me-up, or even a lightly sweetened dessert. Plus, it’s a fantastic way to sneak veggies into your family’s diet without a fuss. If you love our Healthy Banana Bread, you’ll adore this twist. The warm cinnamon and nutmeg elevate the flavors, making it a year-round staple. And because we prioritize simple, wholesome ingredients, this recipe aligns perfectly with our blog’s mission to make nutritious eating delicious and approachable. For more creative ways to use carrots, check out our Carrot Cake Muffins—they’re another reader favorite.
Why I Love This Recipe
Carrot Banana Bread holds a special place in my heart because it reminds me of weekend baking sessions with my grandma. She always found ways to make treats nourishing without sacrificing flavor, and this recipe captures that spirit. I love how the carrots add a subtle earthiness that balances the sweetness, and the aroma alone transports me back to her sunlit kitchen. It’s also a recipe my kids devour without realizing they’re eating veggies—a parenting win in my book. Every time I bake it, I’m reminded that the best food isn’t just tasty; it’s tied to memories and love.
Health and Nutrition
Why it’s good for your body
Carrot Banana Bread packs a nutritious punch while satisfying your sweet tooth. First, it combines fiber-rich carrots and potassium-loaded bananas, which support digestion and heart health. Additionally, the natural sweetness of ripe bananas means you can cut back on added sugars without sacrificing flavor. Moreover, carrots deliver a boost of beta-carotene, which your body converts into vitamin A for healthy vision and immunity.
Furthermore, Carrot Banana Bread often includes whole grains or nut flours, adding protein and healthy fats to keep you full longer. Unlike many store-bought treats, this homemade version avoids processed ingredients, so you know exactly what fuels your body. Finally, warming spices like cinnamon and nutmeg not only enhance taste but also offer anti-inflammatory benefits. Whether you enjoy it for breakfast or a snack, Carrot Banana Bread gives you energy and nutrients in every bite.
How it fits in a healthy lifestyle
Carrot Banana Bread fits seamlessly into a balanced diet. For gluten-free eaters, simply swap regular flour for almond or oat flour, making it a delicious alternative to traditional baked goods. If you prioritize heart health, the fiber from carrots and bananas helps manage cholesterol levels. Pair a slice with Greek yogurt or a handful of nuts for extra protein, turning it into a satisfying mini-meal.
Busy mornings become easier when you prep Carrot Banana Bread ahead of time. It stores well and pairs perfectly with your morning coffee or afternoon tea. For more wholesome baking ideas, explore our gluten-free baking guide or discover how to upgrade your snacks without guilt. Whether you follow a specific diet or just want smarter indulgences, this recipe keeps your goals on track.
A moist and flavorful bread combining the sweetness of bananas with the earthy taste of carrots.
Ingredients
Scale
For the Crust:
2 ripe bananas, mashed
1 cup grated carrots
1/2 cup brown sugar
1/4 cup vegetable oil
2 eggs
1 1/2 cups all-purpose flour
1 tsp baking soda
1/2 tsp cinnamon
1/4 tsp nutmeg
1/4 tsp salt
Instructions
1. Prepare the Crust:
Preheat oven to 350°F (175°C). Grease a loaf pan.
In a large bowl, mix mashed bananas, grated carrots, brown sugar, oil, and eggs.
In another bowl, whisk together flour, baking soda, cinnamon, nutmeg, and salt.
Gradually add dry ingredients to the wet mixture, stirring until just combined.
Pour batter into the prepared loaf pan and bake for 50-55 minutes, or until a toothpick comes out clean.
Let cool in the pan for 10 minutes before transferring to a wire rack.
Notes
You can customize the seasonings to taste.
s-dish">How to Prepare This Dish
Steps and time-saving tips
Start by preheating your oven to 350°F and greasing a loaf pan to save time later. Mash the ripe bananas in a large bowl until smooth, then whisk in the eggs, melted butter, and vanilla. Meanwhile, grate the carrots finely so they blend seamlessly into the batter. In a separate bowl, mix the flour, baking soda, cinnamon, and salt to ensure even distribution. Gradually fold the dry ingredients into the wet mixture, stirring just until combined—overmixing can make the Carrot Banana Bread dense. Gently fold in the grated carrots and any optional add-ins like nuts or raisins. Pour the batter into the prepared pan and smooth the top. Bake for 50-60 minutes, or until a toothpick comes out clean. Let it cool slightly before slicing to avoid crumbling. For a quicker version, use a food processor to grate the carrots and mash the bananas in seconds.
Mistakes I’ve made and learned from
One time, I rushed the prep and didn’t let the Carrot Banana Bread cool properly before slicing—it fell apart into a crumbly mess. Now, I always wait at least 15 minutes, and it holds together perfectly. Another mistake? Using underripe bananas. The bread lacked sweetness and moisture, so I stick to super-ripe ones now. If you’re short on time, try my quick banana bread hacks to speed things up without sacrificing flavor. Also, I once overbaked the loaf because I didn’t check it early enough. A simple trick from my perfect baking timings guide saved me: start testing 5 minutes before the recipe suggests. Small adjustments make all the difference!
n-and-variations">Cultural Connection and Variations
Where this recipe comes from
Carrot Banana Bread might sound like a modern twist, but its roots stretch back to resourceful home bakers who refused to let overripe bananas or extra garden veggies go to waste. Many cultures have their own versions of sweet, spiced quick breads, from British tea cakes to Caribbean banana breads studded with tropical flavors. In the U.S., Carrot Banana Bread became a pantry staple during the Great Depression, when families combined affordable ingredients to create something nourishing and comforting. Today, you’ll find it in cozy bakeries across the Midwest, often with a dash of cinnamon or nutmeg for warmth.
Globally, cooks put their own spin on this hybrid treat. In Jamaica, bakers might add rum-soaked raisins or a hint of allspice. Meanwhile, in Australia, shredded coconut or macadamia nuts often sneak into the batter. My grandma’s version, passed down through handwritten notes, always included a handful of walnuts for crunch. Whether you enjoy Carrot Banana Bread as a breakfast slice or an afternoon snack, its adaptability keeps it beloved across generations and borders.
How it fits in today’s cooking
Carrot Banana Bread still shines in modern kitchens because it’s both nostalgic and practical. Busy parents love it as a lunchbox filler, while meal preppers stash slices in the freezer for quick mornings. Health-conscious bakers tweak it, swapping in whole wheat flour or flaxseeds, proving this recipe evolves without losing its soul. During fall, it pairs perfectly with a cup of spiced chai, and come spring, it’s a bright alternative to heavier desserts.
Food bloggers and home
chefs also reinvent it—maybe as muffins or even French toast. For more inspiration, check out our guide to healthy baking swaps or explore seasonal ingredient spotlights to customize your loaf. Whether you stick to tradition or experiment, Carrot Banana Bread remains a timeless way to turn simple ingredients into something special.
Taste and Texture
What makes it delicious
Carrot Banana Bread wraps you in warmth the moment it leaves the oven, filling the kitchen with a sweet, spiced aroma. Each bite delivers a moist, tender crumb, thanks to the natural richness of ripe bananas and grated carrots. The carrots add subtle earthiness, while cinnamon and nutmeg weave in cozy, fragrant notes. Meanwhile, a hint of vanilla rounds out the flavors, making this Carrot Banana Bread irresistibly comforting. For extra delight, toasted walnuts or pecans introduce a satisfying crunch, contrasting the soft, velvety texture. Whether enjoyed warm or at room temperature, it’s a treat that feels like a hug in every slice.
Boosting the flavor
Elevate your Carrot Banana Bread with a few easy tweaks. First, swap white sugar for coconut sugar or maple syrup to deepen the caramel-like sweetness. A dollop of Greek yogurt in the batter adds tangy creaminess, while a handful of shredded coconut brings tropical flair. For a finishing touch, drizzle with a simple cream cheese glaze or sprinkle with cinnamon sugar before baking. If you love bold spices, try doubling the cinnamon or adding a pinch of cardamom. Pair a slice with a scoop of vanilla ice cream for an indulgent dessert. With these small upgrades, every bite becomes even more memorable.
For the best Carrot Banana Bread, always use ripe bananas since they add natural sweetness and moisture. Grate the carrots finely so they blend seamlessly into the batter. Additionally, measure your flour correctly by spooning it into the cup and leveling it off—this prevents a dense loaf. Finally, let the bread cool in the pan for 10 minutes before transferring it to a wire rack to avoid crumbling.
Mistakes to avoid
One common mistake is overmixing the batter, which makes Carrot Banana Bread tough. Instead, gently fold the ingredients until just combined. Another error is skipping the toothpick test—insert it into the center to ensure it comes out clean before removing the loaf from the oven. For more baking insights, check out our guides on perfect baking temperatures and moist bread secrets. These resources will help you avoid dry or underbaked results every time.
g-suggestions">Serving and Pairing Suggestions
How to serve this dish
Slice Carrot Banana Bread thickly for a hearty breakfast or keep it thin for elegant afternoon tea. For a festive touch, dust the top with powdered sugar or drizzle with a simple glaze. Meanwhile, warm slices slightly and serve with a pat of butter for a cozy brunch centerpiece. If you’re hosting a holiday gathering, arrange slices on a wooden board with fresh banana chips and carrot curls for a rustic yet vibrant display. Whether you enjoy it fresh from the oven or at room temperature, Carrot Banana Bread always feels like a treat.
What goes well with it
Pair Carrot Banana Bread with a creamy latte or spiced chai for a comforting morning combo. The warm spices in the bread harmonize perfectly with the aromatic notes of these drinks. For a refreshing contrast, try it alongside a scoop of vanilla bean ice cream or a dollop of tangy Greek yogurt. If you’re planning a full spread, serve it with our Classic Coffee Cake for a delightful duo of baked goods. Alternatively, balance the sweetness with a savory side like our Herbed Cheddar Scones, which add a satisfying contrast to every bite.
math-faq-block">
Can you substitute applesauce for oil in carrot banana bread?
Yes, you can replace oil with unsweetened applesauce in carrot banana bread for a healthier version. Use a 1:1 ratio, but expect a slightly denser texture. The natural sweetness of applesauce complements the flavors of carrot banana bread perfectly.
How do you keep carrot banana bread moist?
To keep carrot banana bread moist, avoid overbaking and store it in an airtight container once cooled. Adding ingredients like yogurt, crushed pineapple, or extra ripe bananas also helps retain moisture. The natural oils from carrots and bananas already make this bread tender.
Can you freeze carrot banana bread?
Absolutely! Carrot banana bread freezes well for up to 3 months. Slice it first, wrap tightly in plastic, then foil, or use freezer bags. Thaw slices at room temperature or lightly toast them for a fresh-baked taste.
ank-math-faq-item">
Why did my carrot banana bread sink in the middle?
Carrot banana bread may sink if underbaked, overmixed, or if the leavening agents are expired. Ensure your baking powder/soda is fresh and mix just until combined. The moisture from carrots and bananas requires proper baking time—test with a toothpick.