“`html
Table of Contents
- Introduction
- Irresistible Praline Crunch Ingredients
- Praline Crunch Timing: Perfectly Planned
- Crafting Your Praline Crunch: Step-by-Step
- Nutritional Snapshot
- Healthier Alternatives & Flavor Swaps
- Serving Suggestions
- Common Praline Crunch Mistakes to Avoid
- Storing Your Praline Crunch
- Conclusion
- Frequently Asked Questions
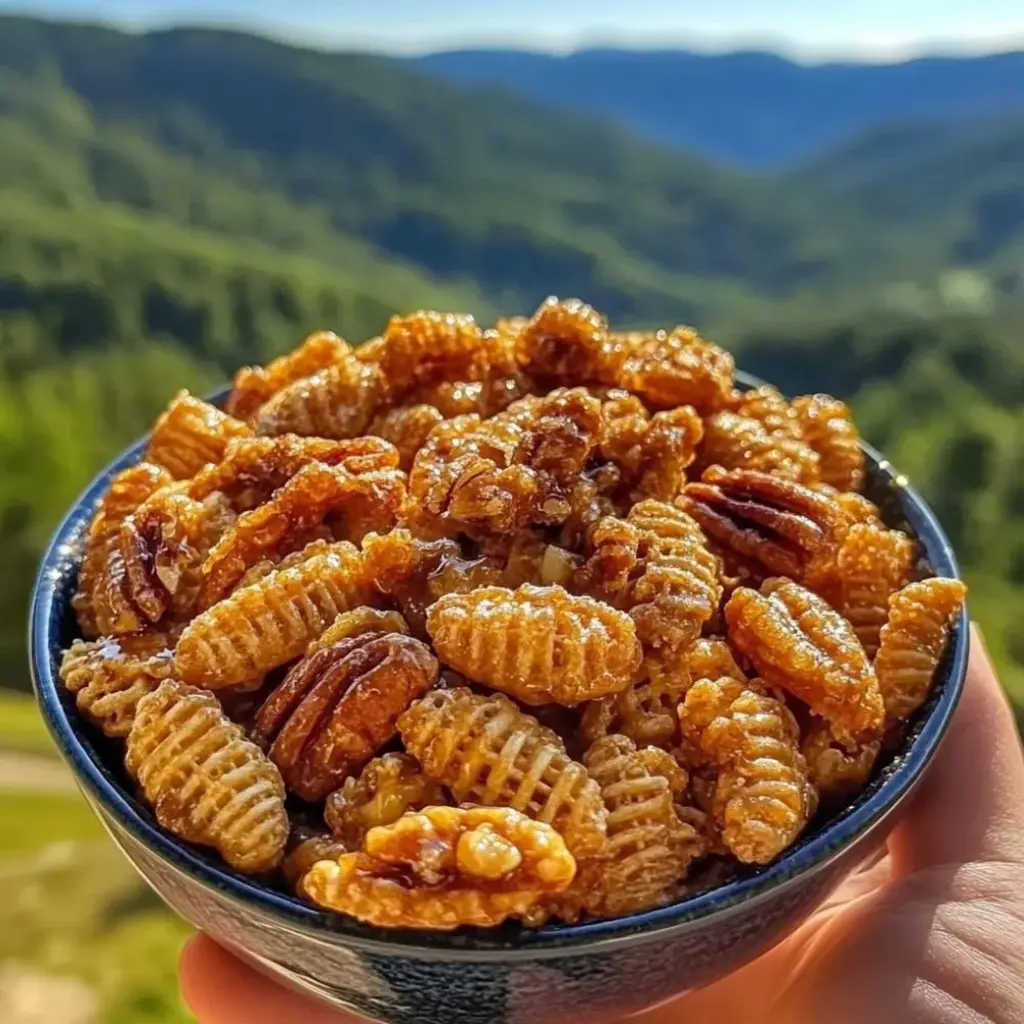
Praline Crunch
Praline Crunch is an irresistible combination of crispy cereal and buttery pecans coated in a caramel glaze. This sweet, crunchy treat is perfect for parties, gifting, or simply satisfying your cravings. With its rich praline flavor and addictive texture, it’s sure to be a crowd favorite!
Craving that Perfect Sweet & Salty Crunch? This Praline Crunch Recipe Has You Covered!
Are you constantly on the hunt for that ultimate crunchy, sweet, and slightly salty snack that disappears as soon as you put it out? We all know the feeling! A recent survey by The National Confectioners Association revealed that over 70% of Americans reach for a sweet treat to de-stress or celebrate. And when it comes to irresistible textures and flavors, praline-inspired snacks consistently rank high. If you’re looking for a homemade treat that delivers on intense caramel notes, a satisfying nutty crunch, and a whisper of buttery goodness, you’ve landed in the right place. Our Praline Crunch recipe offers exactly that – an easy-to-make, incredibly addictive snack that’s perfect for any occasion. Forget store-bought; this homemade version is packed with richer flavor and a guarantee of pure, crunchy joy.
Irresistible Praline Crunch Ingredients
The magic of Praline Crunch lies in its simple yet perfectly balanced ingredients. We’ve listed the stars of our show below, along with some notes and potential swaps to tailor it to your taste.
Cereal Base: The Crispy Foundation
- 6 cups Crispy Rice Cereal: The unsung hero, providing that iconic, airy crunch. Look for brands that hold their shape well. (Substitute: Corn Chex or other plain, crispy puffed cereals for a slightly different texture.)
- 1 cup Chopped Pecans: Buttery, slightly sweet, and oh-so-satisfyingly crunchy. We’ll toast them for extra depth. (Substitute: Walnuts or even almonds work, but pecans offer that classic praline flavor.)
Caramel Glory Glaze: The Sweet Unifier
- 1 cup (2 sticks) Unsalted Butter: The foundation for richness and a smooth, glossy glaze. Using unsalted allows you to control the saltiness.
- 2 cups Light Brown Sugar, packed: This is where the caramel flavor truly comes alive. Packed ensures you get the right amount of moisture and sweetness. (Substitute: A mix of brown sugar and granulated sugar for a slightly less intense caramel, or dark brown sugar for a deeper molasses note.)
- 1/2 cup Light Corn Syrup: Crucial for preventing crystallization and achieving that smooth, chewy-crisp texture. Don’t skip this! (Substitute: Use honey or maple syrup for a different flavor profile, but be aware of texture changes.)
- 1 teaspoon Vanilla Extract: Added at the end to preserve its delicate, aromatic flavor.
- 1/2 teaspoon Salt: Essential for balancing the sweetness and enhancing all the other flavors. Don’t be shy!
Optional Add-ins: Level Up Your Crunch!
- 1/2 cup Marshmallows: For a gooey, marshmallow-praline fusion. Add them in the last minute of cooking the glaze.
- 1/4 cup Mini Chocolate Chips: Stir into the cereal mix before it sets for delightful bursts of chocolate.
- A pinch of Cinnamon: For a warm, spiced praline twist.
Praline Crunch Timing: Perfectly Planned
This recipe is wonderfully efficient, proving that delicious treats don’t need hours in the kitchen!
Compared to average crunchy snack recipes that can take up to 3 hours from start to finish (including longer bake times for certain items), this Praline Crunch is a speedy delight!

Crafting Your Praline Crunch: Step-by-Step
Let’s get started on this incredibly easy, yet undeniably spectacular Praline Crunch. Follow these simple steps for maximum crunch and flavor!
Step 1: Preheat and Prep Your Station
First things first, let’s get everything ready. Preheat your oven to 350°F (175°C). This will be for toasting the pecans. Next, line a large baking sheet (about 13×18 inches) with parchment paper or a silicone baking mat. This is crucial for preventing any sticking and making cleanup a breeze. In a very large bowl – and I mean your biggest one – pour in the 6 cups of crispy rice cereal. Set this aside.
Step 2: Toast the Pecans to Golden Perfection
Spread your 1 cup of chopped pecans in a single layer on a separate small baking sheet or a small corner of your larger prepared baking sheet. Pop them into the preheated oven for about 5-7 minutes. You want them to be fragrant and lightly toasted, not burnt! Keep a close eye on them as they can go from perfect to pasty very quickly. Once toasted, remove them from the oven and let them cool slightly. Add these warm, toasty pecans to the bowl with your cereal.
Step 3: Melt and Mix the Caramel Base
Now for the gooey goodness! In a medium saucepan, combine the 1 cup of butter, 2 cups of packed light brown sugar, and 1/2 cup of light corn syrup. Place the saucepan over medium heat. Stir constantly with a whisk or wooden spoon until the butter is completely melted and the sugar has dissolved. Bring this mixture to a rolling boil, stirring continuously. Once it reaches a boil, let it boil for exactly 3 minutes. This is important for achieving the right consistency and caramelization. After 3 minutes, remove the saucepan from the heat.
Step 4: Combine and Coat the Crunch
This is the exciting part! Carefully pour the hot caramel mixture over the cereal and toasted pecans in your large bowl. Immediately add the 1/2 teaspoon of salt and 1 teaspoon of vanilla extract to the hot caramel. While the caramel is still piping hot (and with caution!), gently fold everything together using a large spatula. You want to ensure that every single piece of cereal and every pecan is thoroughly coated in that luscious, buttery caramel. Work quickly but carefully, as the caramel will start to cool and set.
Optional: If you’re adding marshmallows, now is the time to stir them in. The residual heat will partially melt them, creating wonderful gooey pockets. If adding cinnamon, stir it in with the salt and vanilla.
Step 5: Spread and Set to Crispy Bliss
Pour the coated cereal and pecan mixture onto your prepared baking sheet. Using your greased spatula or lightly oiled hands (this works wonders!), gently spread the mixture into an even layer. Try not to press too firmly, as you want to maintain that airy crunch. The goal is an even thickness so it sets uniformly. Let the Praline Crunch sit undisturbed at room temperature for at least 1 to 2 hours, or until completely firm and set. Avoid refrigerating it, as this can sometimes make it too hard or sticky.
Step 6: Break and Enjoy (or Store!)
Once your Praline Crunch is completely set and firm, gently break it apart into bite-sized pieces. This is the most satisfying part! You can use your hands or a knife. Your delicious Praline Crunch is now ready to be devoured. Admire your handiwork, take a deep breath of that sweet, nutty aroma, and prepare for an incredible taste experience!
Nutritional Snapshot
While this is a treat, understanding its nutritional profile can be helpful. Please note that these are approximate values and can vary based on specific ingredients used and portion size.
- Calories: ~200-250 per serving (serving size ~1/4 cup)
- Fat: ~10-15g (primarily from butter and pecans)
- Carbohydrates: ~30-40g (mostly from sugar and cereal)
- Sugar: ~20-30g
- Protein: ~2-3g (from pecans)
This treat is best enjoyed in moderation as part of a balanced diet.
Healthier Alternatives & Flavor Swaps
Looking to make this Praline Crunch a touch lighter without sacrificing all the flavor? Here are a few ideas:
- Use Whole Grain Cereal: Swap crispy rice for a whole-grain alternative like Chex or a whole-wheat puffed cereal for added fiber.
- Reduce Sugar and Butter: You can try slightly reducing the brown sugar and butter amounts, though this might affect the texture and proneness to crystallization. Use a sugar substitute in the glaze, but be mindful that many don’t caramelize the same way.
- Seed It Up: Replace some or all of the pecans with a mix of seeds like pumpkin seeds (pepitas) or sunflower seeds for healthy fats and protein.
- Popped Quinoa or Amaranth: For a lighter, protein-rich base, try using popped quinoa or amaranth instead of or in addition to rice cereal.
- Spice it Right: Instead of sugar, consider a sugar-free caramel syrup for the glaze, though the texture will be quite different. A pinch of cinnamon, nutmeg, or cardamom can add flavor without extra calories.
Serving Suggestions
This Praline Crunch is incredibly versatile:
- Party Perfect: Serve in bowls or arranged on a platter for guests to grab. It’s always a hit at gatherings!
- Gifting Galore: Package it in cute tins or cellophane bags tied with a ribbon for a homemade gift that’s thoughtful and delicious.
- Dessert Topping: Crush larger pieces and sprinkle over ice cream, yogurt, or even baked goods like brownies or cupcakes.
- Snack Attack: Keep a container handy for when those sweet cravings strike. It’s the perfect pick-me-up.
Common Praline Crunch Mistakes to Avoid
To ensure your Praline Crunch turns out perfectly every time, be aware of these common pitfalls:
- Undercooking the Caramel: Not boiling the caramel mixture for the full 3 minutes can result in a glaze that’s too soft, sticky, or doesn’t set properly.
- Burning the Pecans: Toasting pecans requires vigilance. Watch them closely to prevent them from burning, which will make your crunch bitter.
- Over-Mixing After Adding Cereal: Once the caramel is on the cereal, gentle folding is key. Over-mixing or stirring too vigorously can break down the cereal and make it mushy.
- Pressing Too Hard: Spreading the mixture too thinly or pressing down hard on the baking sheet can create a dense, hard crunch instead of an airy, crispy one.
- Trying to Speed Up Setting: Resist the urge to put the Praline Crunch in the refrigerator to speed up the setting process. This can lead to a sticky or overly hard texture.
Storing Your Praline Crunch
Proper storage is key to maintaining that delightful crunch:
- Airtight Container: Once completely cooled and set, store the Praline Crunch in an airtight container at room temperature.
- Avoid Moisture: Keep it away from humidity and moisture, as this is the enemy of crispiness.
- Shelf Life: Properly stored, Praline Crunch should stay fresh and crunchy for up to 2 weeks.
Indulge in Homemade Bliss!
There you have it – a straightforward path to creating a truly spectacular Praline Crunch that’s destined to become a favorite. The combination of textures and the rich, buttery caramel praline flavor is simply irresistible. Whether you’re looking for a quick sweet fix, a delightful homemade gift, or a show-stopping party snack, this recipe delivers. So gather your ingredients, get ready for that amazing aroma, and prepare to impress yourself and everyone lucky enough to try it. Happy crunching!
Frequently Asked Questions
***Do I really need corn syrup?***
Yes, light corn syrup is highly recommended. It prevents the sugar crystals from forming (crystallization), ensuring a smooth, glossy, and chewy-crisp texture rather than a grainy or hard one.
***Can I use different nuts?***
Absolutely! While pecans are traditional for praline, walnuts, almonds, or even a mix of nuts and seeds (like pepitas or sunflower seeds) will work wonderfully. Just ensure they are toasted for the best flavor.
***What if my caramel doesn’t thicken?***
Make sure you’re boiling the caramel mixture for the full 3 minutes without stirring too much once it starts boiling vigorously. If it’s still too thin after 3 minutes, you can let it boil for an additional minute or two, but be very careful not to burn it.
***Why is my Praline Crunch soft?***
This is usually due to not cooking the caramel to a high enough temperature or for long enough. It could also be that you didn’t stir in the salt and vanilla quickly enough after removing from heat, as these can sometimes affect crystallization and setting. Ensure your environment isn’t too humid when setting.
***Can I make this ahead of time?***
Yes! Praline Crunch stores very well in an airtight container at room temperature for up to two weeks, making it an excellent make-ahead treat for parties or gifts.

Praline Crunch
Description
Praline Crunch is an irresistible combination of crispy cereal and buttery pecans coated in a caramel glaze. This sweet, crunchy treat is perfect for parties, gifting, or simply satisfying your cravings. With its rich praline flavor and addictive texture, it’s sure to be a crowd favorite!
Ingredients
- 6 cupscrispy rice or corn cereal (such as Chex)
- 2 cupspecan halves
- 1/2 cupunsalted butter
- 1 cupbrown sugar (packed)
- 1/4 cuplight corn syrup
- 1 tspvanilla extract
- 1/2 tspbaking soda
Instructions
- Preheat the oven to 250°F (120°C) and line a large baking sheet with parchment paper or a silicone mat.
- In a large mixing bowl, combine the cereal and pecans.
- In a medium saucepan, melt the butter over medium heat. Stir in the brown sugar and corn syrup. Bring to a gentle boil and simmer for 3-4 minutes, stirring constantly.
- Remove from heat and stir in the vanilla extract and baking soda. The mixture will bubble up slightly.
- Pour the caramel glaze over the cereal and pecans. Gently stir to coat everything evenly.
- Spread the mixture onto the prepared baking sheet in an even layer.
- Bake for 1 hour, stirring every 15 minutes to ensure even crisping.
- Remove from the oven and let cool completely on the baking sheet. Break into pieces and store in an airtight container.
Notes
For extra variety, add shredded coconut, almonds, or pretzels to the mix before coating with caramel.
Praline Crunch can be stored at room temperature in an airtight container for up to 2 weeks or frozen for up to 3 months.
Stirring during baking is key to achieving an even, crispy texture.
“`