“`html
Table of Contents
10-Minute Miso Soup (Super Quick!) Easy Homemade Comfort – Fast Japanese Soup in Minutes
Growing up in Morocco, my mother taught me that the best soups don’t need hours on the stove — they need the right ingredients and a confident hand. This 10-minute miso soup is my quick weeknight homage to that philosophy. After training at Le Cordon Bleu in Paris and settling into my tiny NYC kitchen, I learned that a fast Japanese soup can still taste deeply layered and nourishing. This easy homemade miso soup comes together in the time it takes to toast a slice of sourdough, and it delivers the kind of comfort that makes you close your eyes on the first sip. The secret? Building the broth with instant dashi granules and treating the miso paste with the same care you’d give a delicate sauce — never boiling, always dissolving gently.
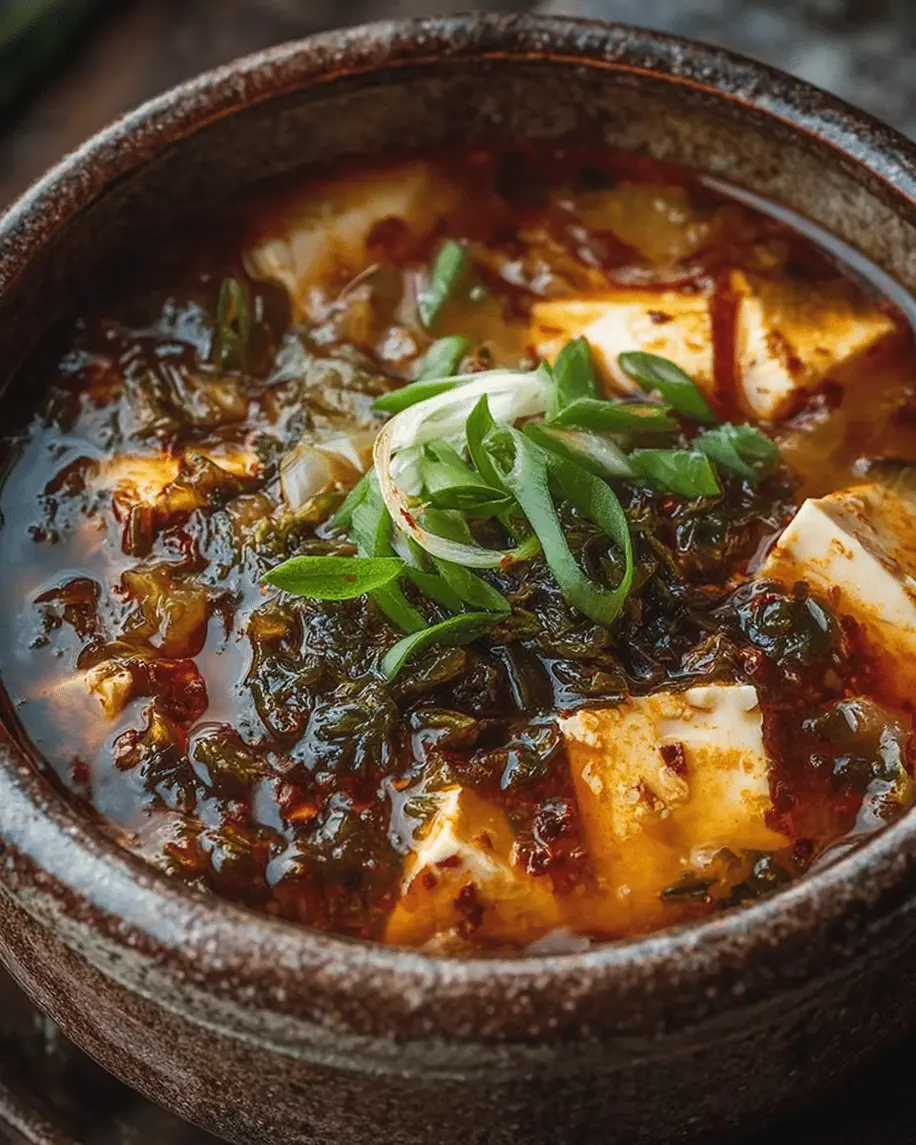
The aroma of this quick miso soup recipe is pure umami: warm, savory, and slightly briny from the dashi, with a soft, creamy undertone from the miso. Each spoonful carries tender cubes of silken tofu that barely hold their shape, sliced green onions adding a fresh, sharp bite, and optional nori strips that whisper of the sea. The broth is golden-tinged, clear yet full-bodied, and the contrast between the soft tofu and the crisp scallions makes every mouthful interesting. It’s the kind of bowl that warms you from the inside out — no heavy cream, no long simmer, just pure, honest flavor in under ten minutes.
What sets my version apart is the technique: I dissolve the miso in a small bowl of hot broth before stirring it back into the pot, which guarantees a silky, lump-free finish every time. It’s a trick I picked up in Paris while making emulsified sauces, and it works beautifully here. Most home cooks either boil the miso (which kills its flavor and beneficial probiotics) or dump it in and end up with clumps. I’ll show you exactly how to avoid both pitfalls. Whether you’re a busy parent, a student surviving on ramen, or someone who just wants a healthy, homemade bowl without the fuss, this easy miso soup is about to become your new go-to.
Why This 10-Minute Miso Soup Recipe Is the Best
The Flavor Secret: Most quick miso soup recipes rely solely on miso paste for flavor, but mine starts with dashi granules — instant Japanese stock made from bonito flakes and kombu seaweed. This gives the broth a smoky, oceanic depth that miso alone can’t achieve. It’s the same principle my mother used when she’d add a pinch of saffron to her harira: a small ingredient that transforms the whole dish. The dashi takes just seconds to dissolve, and it elevates this homemade miso soup from “fine” to “I need this every week.”
Perfected Texture: The tofu in this quick miso soup recipe is added while the broth is still hot but not boiling, then simmered gently for exactly two minutes. This keeps the cubes tender and intact — not mushy, not rubbery. In Paris, I learned that protein texture is everything; a miso soup with overcooked tofu feels sad and flat. By controlling the heat and time, you get soft, silky bites that practically melt on your tongue, exactly the way a proper 10-minute miso soup should feel.
Foolproof & Fast: This easy homemade miso soup requires zero special equipment, no knife skills beyond slicing a green onion, and absolutely no stress. The total active time is maybe four minutes — the rest is just waiting for water to boil and tofu to warm through. I’ve tested this 10-minute miso soup with absolute beginners in my NYC cooking classes, and every single person nailed it on the first try. If you can boil water and stir, you can make this fast Japanese soup tonight. 💡 mia’s Pro Tip: Keep a box of dashi granules and a tub of white miso in your pantry at all times — then a comforting bowl is always just ten minutes away.
10-Minute Miso Soup Ingredients
I buy my dashi granules from the Japanese market on St. Marks Place in NYC, but you can find them in most well-stocked grocery stores or online. The miso paste I prefer is white (shiro) miso for its milder, slightly sweet flavor — it’s what I keep in my fridge at all times. This quick miso soup recipe uses just six ingredients, and each one plays a specific role in building the perfect bowl.
Ingredients List
- 4 cups water
- 1 tablespoon dashi granules (or 1 package instant dashi)
- 1/2 cup cubed soft tofu (silken or medium-soft)
- 2 tablespoons miso paste (white or red — white is milder, red is stronger)
- 2 green onions, thinly sliced (white and green parts)
- 1 sheet nori, cut into thin strips (optional, but highly recommended)
Ingredient Spotlight
Dashi Granules: These are the backbone of your broth. I use hondashi-style granules made from bonito flakes and kombu. They dissolve instantly in hot water and provide the umami foundation. For a vegetarian version, substitute with kombu dashi powder or mushroom dashi — both are widely available at Whole Foods or online. The flavor will be slightly earthier but still delicious.
Miso Paste: White miso (shiro) is fermented with rice and barley, giving it a sweet, mild flavor that’s perfect for this quick recipe. Red miso (aka) is fermented longer and has a bolder, saltier punch — I use it when I want a heartier soup. Both work beautifully; just adjust the quantity to your taste. Store miso in the fridge, and never boil it after adding to the soup, as high heat destroys its beneficial probiotics and delicate flavor.
Soft Tofu: Look for silken or medium-soft tofu in the refrigerated section. It’s delicate and creamy, which is exactly what you want in a 10-minute miso soup. Extra-firm tofu will work in a pinch but won’t have the same silky mouthfeel. Drain the tofu gently and cut it into 1/2-inch cubes just before adding to the pot.
Nori: This optional topping adds a lovely briny crunch and a visual pop. I buy toasted nori sheets (the same ones used for sushi rolls) and cut them into thin strips with scissors. It’s a small touch that makes your easy homemade miso soup look restaurant-quality.
| Original Ingredient | Best Substitution | Flavor / Texture Impact |
|---|---|---|
| Dashi granules | Kombu dashi powder or mushroom dashi | Earthier, less smoky; still umami-rich |
| White miso paste | Red miso (aka) or yellow miso (shinshu) | Bolder, saltier flavor; reduce amount by 1 tsp |
| Soft tofu | Firm tofu (pressed), or diced cooked chicken | Chewier texture; less delicate but still satisfying |
| Nori strips | Chopped spinach or sliced shiitake mushrooms | Different texture; adds color and nutrients |
How to Make 10-Minute Miso Soup — Step-by-Step
Making this quick miso soup recipe is almost absurdly simple, but a few small techniques make all the difference. Follow these steps exactly, and you’ll have a bowl that tastes like it simmered for an hour.
Step 1: Boil the Dashi Broth
In a medium saucepan, combine 4 cups of water and 1 tablespoon of dashi granules. Bring to a boil over high heat. Stir once to ensure the granules dissolve completely — this takes only a few seconds. You’ll know it’s ready when the liquid turns a pale golden color and smells savory and slightly smoky.
💡 mia’s Pro Tip: Don’t skip the dashi! Using water alone will give you a flat-tasting soup. The dashi granules are the foundation of flavor in this homemade miso soup, and they dissolve instantly — no extra time needed.
Step 2: Simmer the Tofu
Reduce the heat to low so the broth is at a gentle simmer — small bubbles rising, not a rolling boil. Gently slide in the cubed soft tofu. Let it simmer for exactly 2 minutes. The tofu should be heated through but still tender and silky. If you boil it aggressively, the tofu will break apart and turn rubbery.
⚠️ Common Mistake to Avoid: Boiling the tofu on high heat. Tofu is delicate — treat it like a poached egg. Low heat keeps it soft and creamy. If you see the broth bubbling vigorously, turn the heat down.
Step 3: Dissolve and Add the Miso
While the tofu simmers, place 2 tablespoons of miso paste in a small bowl. Ladle about 1/4 cup of the hot broth (not boiling — just hot) into the bowl and whisk or stir with a spoon until the miso is completely dissolved and smooth. This creates a “miso slurry” that will blend seamlessly into the soup. Pour the slurry back into the pot and stir gently. Do NOT let the soup boil after adding the miso — this kills the flavor and the beneficial probiotics. Remove from heat immediately.
💡 mia’s Pro Tip: This dissolving technique is straight from my Paris sauce training — it’s the same method we used for emulsifying butter into a beurre blanc. By pre-dissolving the miso, you guarantee a silky, lump-free broth every single time. No blobs of miso floating in your soup!
Step 4: Serve with Toppings
Ladle the soup into four bowls immediately — miso soup is best served fresh and hot. Top each bowl with a generous sprinkle of sliced green onions and a pinch of nori strips, if using. The green onions add a fresh, sharp contrast to the rich broth, and the nori brings a delicate brininess. Serve right away.
⚠️ Common Mistake to Avoid: Letting the soup sit before serving. Miso soup loses its vibrant flavor as it cools, and the nori will turn soggy. Serve within 5 minutes of adding the miso for the best experience.
| Step | Action | Duration | Key Visual Cue |
|---|---|---|---|
| 1 | Boil water + dashi granules | ~3 min | Pale golden broth, savory aroma |
| 2 | Add tofu, simmer on low | 2 min | Tofu is warm, tender, not breaking apart |
| 3 | Dissolve miso in hot broth, stir back in | 1 min | Smooth, lump-free broth, creamy color |
| 4 | Ladle and top with scallions + nori | 1 min | Bright green garnish, optional dark nori strips |
Serving & Presentation
This quick miso soup recipe is incredibly versatile when it comes to serving. I love it as a starter before a Japanese-inspired meal — think grilled salmon, sushi rolls, or a simple rice bowl. But honestly, I often eat it as a light lunch with a side of steamed edamame or a small cucumber salad. In my NYC apartment, I’ll ladle it into deep ceramic bowls that I picked up at a flea market in Williamsburg, and the golden broth against the white bowl is just beautiful.
For garnishes, don’t stop at scallions and nori. A sprinkle of sesame seeds, a drizzle of toasted sesame oil, or a pinch of shichimi togarashi (Japanese seven-spice) adds another layer of flavor and visual appeal. I sometimes add a few slices of fresh shiitake mushrooms that I sauté quickly in a bit of soy sauce — it’s a trick I picked up from a ramen shop in the East Village.
In Morocco, we’d serve soup with fresh bread for dipping, and this homemade miso soup is no different. A piece of crusty sourdough or a few warm dinner rolls on the side is perfect for sopping up the last drops. For a heartier meal, serve it alongside a simple green salad with a ginger-soy dressing. The key is keeping the accompaniments light so the miso soup remains the star.
| Pairing Type | Suggestions | Why It Works |
|---|---|---|
| Side Dish | Steamed edamame, cucumber salad, seaweed salad | Light, fresh flavors that complement the umami broth |
| Main Course | Grilled salmon, teriyaki chicken, vegetable tempura | Balanced meal with protein + crunch |
| Beverage | Green tea, cold sake, cucumber-infused water | Clean, refreshing drinks that don’t overpower the soup |
| Garnish | Sesame seeds, shichimi togarashi, sesame oil drizzle | Adds texture, heat, and visual appeal |
Make-Ahead, Storage & Reheating
For my busiest NYC weeks, I prep the components of this easy miso soup separately and assemble right before serving. The broth (without miso) can be made ahead and kept in the fridge for up to 3 days. The miso paste should always be added fresh just before serving to preserve its flavor and probiotic benefits. Here’s my tested storage system so you can enjoy fast Japanese soup anytime.
| Method | Container | Duration | Reheating Tip |
|---|---|---|---|
| Refrigerator | Airtight jar or container (broth only, no miso) | Up to 3 days | Reheat broth to just below simmer, then dissolve fresh miso at the end |
| Freezer | Freezer-safe bag or container (broth only, no miso or tofu) | Up to 2 months | Thaw overnight in fridge, reheat gently, add tofu and miso fresh |
| Make-Ahead | Broth in fridge, miso in a small container, tofu in water | Up to 3 days in advance | Assemble in 3 minutes: reheat broth, add tofu, dissolve miso, serve |
When reheating, always warm the broth gently on the stove or in the microwave. If you’ve already added the miso, be very careful not to boil it — just heat until hot to the touch (about 140°F). I’ve found that the soup tastes best the day it’s made, but the make-ahead broth method is perfect for busy nights. And here’s a little trick from my Moroccan kitchen: if the broth tastes a bit flat after reheating, stir in a tiny splash of soy sauce or a pinch of salt to wake up the flavors. It works every time.
Variations & Easy Swaps
This 10-minute miso soup is endlessly adaptable. Over the years, I’ve developed these three favorite variations that keep the recipe feeling fresh and exciting. Each one takes the base recipe and gives it a new personality — perfect for when you want a change from the classic.
| Variation | Key Change | Best For | Difficulty Impact |
|---|---|---|---|
| Hearty Vegetable Miso Soup | Add diced carrots, bok choy, and shiitake mushrooms | A more filling meal with extra nutrients | Easy (adds 3 min prep) |
| Gluten-Free Miso Soup | Use tamari instead of dashi granules; add kombu | Celiac or gluten-sensitive individuals | Easy (same steps) |
| Spicy Miso Soup with a Kick | Add gochujang or chili oil + fresh ginger | Those who love heat and bold flavors | Easy (stir-in ingredients) |
Hearty Vegetable Miso Soup
This is my go-to when I want a more substantial bowl. After the dashi comes to a boil, add 1/4 cup finely diced carrots and 1/2 cup sliced shiitake mushrooms. Let them simmer for 3 minutes before adding the tofu. In the last minute, toss in a handful of baby bok choy or spinach. The vegetables soak up the umami broth beautifully, and the different textures make every spoonful exciting. It reminds me of the way my mother would add whatever vegetables were in the market to her soups — resourceful and delicious.
Gluten-Free Miso Soup (Already Gluten-Free!)
Great news — this quick miso soup recipe is naturally gluten-free as long as you choose the right ingredients. Standard dashi granules are made from fish and seaweed, which are gluten-free. However, some miso pastes contain barley, so look for “gluten-free miso” made from 100% soybeans or rice. I recommend the South River brand or any certified gluten-free white miso. Use tamari instead of soy sauce if you add any extra seasoning. This version tastes just as rich and comforting as the original — no one will know the difference.
Spicy Miso Soup with a Kick
When I’m craving heat, I stir in 1 teaspoon of gochujang (Korean chili paste) along with the miso, plus a 1/2-inch piece of fresh ginger grated into the broth. The gochujang adds a sweet-spicy depth that pairs amazingly with the miso. Top with a drizzle of chili oil and some sesame seeds for extra crunch. I discovered this combination at a Korean-Japanese fusion spot in K-Town in NYC, and it’s been a staple in my kitchen ever since. For a milder heat, just use less gochujang or skip the chili oil.
What kind of miso paste is best for a quick homemade miso soup?
For a quick and easy miso soup, I recommend white miso (shiro miso) as your first choice. It’s fermented for a shorter time — usually a few weeks to a few months — which gives it a mild, slightly sweet, and delicate flavor that blends beautifully into a 10-minute broth. White miso is also the most versatile for beginners because it’s less salty and less intense than red miso. That said, red miso (aka miso) works wonderfully if you prefer a bolder, more savory punch — just use about 1 tablespoon instead of 2, since it’s stronger. Yellow miso (shinshu) is a nice middle ground. The key is to always dissolve the miso in a small amount of hot broth before adding it to the pot, regardless of which color you choose. This prevents clumping and ensures an even, silky texture throughout your homemade miso soup.
Can I use water instead of dashi for 10-minute miso soup?
Technically yes, you can use plain water, but I don’t recommend it if you want a truly flavorful, authentic-tasting quick miso soup. Dashi provides the deep umami backbone that makes miso soup taste rich and satisfying — without it, the broth can taste flat, salty, and one-dimensional. Think of dashi the way you’d think of chicken stock in a Western soup: it’s the foundation. If you’re in a pinch and don’t have dashi granules, you can make a quick substitute by simmering a 2-inch piece of kombu seaweed in the water for 5 minutes (remove it before adding miso), or by stirring in 1/2 teaspoon of fish sauce or a splash of soy sauce for extra depth. For a vegetarian version, kombu dashi or mushroom dashi are excellent alternatives that still deliver that savory, umami quality without any fish products.
What vegetables or tofu can I add to miso soup for extra flavor?
This easy miso soup is incredibly flexible when it comes to add-ins. Soft or silken tofu is the classic choice because its delicate texture contrasts beautifully with the broth, but you can also use medium-firm tofu if you prefer a bit more chew. For vegetables, I love adding thinly sliced shiitake mushrooms (they soak up the umami like sponges), baby spinach or bok choy (adds color and nutrients in the last minute of cooking), and finely diced carrots or daikon radish (simmer them a few minutes longer so they soften). You can also toss in some wakame seaweed — just rehydrate it in water for a few minutes first, then add it at the end. If you want extra protein, diced cooked chicken, shrimp, or even a soft-boiled egg sliced in half are all wonderful additions. Just remember that the broth is delicate, so keep add-ins simple and let the miso shine.
How do I prevent the miso paste from clumping when mixing it in?
This is one of the most common questions I get, and the answer is simple: always pre-dissolve the miso paste in a small amount of hot broth before adding it to the pot. Here’s exactly how to do it: after the dashi broth is simmering, ladle about 1/4 cup of the hot (not boiling) broth into a small bowl. Add the miso paste and whisk gently with a fork or a small whisk until the miso is completely dissolved and the mixture is smooth with no lumps. Then pour this miso slurry back into the pot and stir gently to combine. This technique guarantees a silky, lump-free broth every single time. Never add miso directly to the boiling pot — it will form stubborn clumps that are difficult to break up, and boiling also destroys the beneficial probiotics and delicate flavor compounds in the miso.
Is miso soup healthy? What are the nutrition benefits?
Absolutely — miso soup is not only comforting but also packed with health benefits. Miso paste is made from fermented soybeans, which means it contains probiotics that support gut health and digestion. It’s also a good source of protein, providing about 6 grams per serving in this recipe, along with essential minerals like zinc, copper, and manganese. The tofu adds additional protein and calcium, while the dashi broth provides iodine from the seaweed. This 10-minute miso soup is naturally low in calories (just 84 calories per serving), low in fat, and contains no added sugars. The fermentation process also produces beneficial enzymes and antioxidants. That said, miso is high in sodium (about 600-800 mg per serving depending on the brand), so if you’re watching your salt intake, use a low-sodium miso paste or reduce the amount slightly and boost flavor with extra scallions and ginger.
Can I make miso soup in the microwave?
Yes, you can make a quick version of this easy miso soup in the microwave, though the stovetop method gives you more control over texture. To make microwave miso soup: combine 2 cups of water and 1/2 tablespoon dashi granules in a microwave-safe bowl. Microwave on high for 2-3 minutes until hot and steaming. Add 1/4 cup cubed soft tofu and microwave for another 30 seconds. In a small bowl, dissolve 1 tablespoon miso paste in a few tablespoons of the hot broth, then stir it back into the bowl. Top with sliced green onions and nori. The microwave method works in about 4 minutes total, but be careful not to overheat the miso — add it at the very end and don’t microwave after adding. The texture of the tofu won’t be quite as delicate as the stovetop method, but it’s a great option for dorm rooms or office kitchens.
Can I freeze miso soup?
You can freeze the dashi broth component of this quick miso soup, but I don’t recommend freezing the fully assembled soup with miso and tofu. Here’s why: miso’s delicate flavor and probiotic benefits degrade significantly when frozen and thawed, and tofu’s texture becomes spongy and unappealing after freezing. Instead, prepare the dashi broth (water + dashi granules) and let it cool completely. Pour it into a freezer-safe container or bag and freeze for up to 2 months. When you’re ready to enjoy the soup, thaw the broth overnight in the refrigerator, reheat it gently on the stove, add fresh tofu and any vegetables you like, and dissolve fresh miso paste at the very end. This way you get the convenience of freezer meal prep without sacrificing any of the flavor or texture that makes homemade miso soup so special.
What is the difference between white miso and red miso in soup?
White miso (shiro miso) and red miso (aka miso) are the two most common types used in Japanese cooking, and they each bring a distinct personality to your 10-minute miso soup. White miso is fermented for a shorter period — usually a few weeks to a few months — using rice and barley, which results in a pale, creamy color and a mild, slightly sweet, almost buttery flavor. It’s the best choice for a light, delicate soup that won’t overpower other ingredients. Red miso, on the other hand, is fermented for a year or longer, producing a deep reddish-brown color and a bold, salty, intensely savory flavor with notes of umami and a slight bitterness. Use red miso when you want a heartier, more robust soup, or when you’re adding strongly flavored ingredients like mushrooms or garlic. Many home cooks, including me, love blending a little of both — about 1 tablespoon white and 1 tablespoon red — for a balanced, complex broth that’s the best of both worlds.
How do I make miso soup less salty?
If you find your quick miso soup too salty, there are several easy fixes. First, reduce the amount of miso paste — start with 1 tablespoon instead of 2 and taste before adding more. Different brands of miso vary significantly in saltiness, so it’s always wise to start low and adjust. Second, choose a white miso over red miso, as white miso is generally milder and less salty. Third, dilute the soup with a bit more water or low-sodium vegetable broth after adding the miso — this reduces the overall sodium concentration without sacrificing too much flavor. Fourth, bulk up the soup with extra tofu, vegetables, or even a handful of cooked noodles to absorb and balance the saltiness. Finally, avoid adding any extra salty seasonings like soy sauce or fish sauce. A squeeze of fresh lemon juice or a splash of rice vinegar at the end can also help brighten the flavors and make the soup taste less salty.
Can I add noodles to 10-minute miso soup?
Absolutely — adding noodles to this easy miso soup is a fantastic way to make it a heartier, more filling meal. For the best results in a 10-minute timeframe, use quick-cooking noodles like soba (buckwheat) noodles, udon noodles (the thin variety cooks in about 3-4 minutes), or even instant ramen noodles (just skip the seasoning packet to avoid extra salt). Cook the noodles separately in boiling water according to package directions, then drain and add them to individual bowls before ladling the miso soup over the top. This keeps the noodles from absorbing too much broth and getting mushy. For a gluten-free option, use rice vermicelli or kelp noodles — both cook in just a few minutes. If you’re adding noodles, consider increasing the dashi and miso slightly so the broth flavor remains pronounced even with the extra bulk. Top with scallions, nori, and a soft-boiled egg for a complete meal that comes together in about 15 minutes.
Share Your Version!
I absolutely love hearing how this 10-minute miso soup turns out in your kitchen. Did you stick with the classic white miso, or did you experiment with red miso or even a blend? Did you load it up with vegetables, or keep it simple with just tofu and scallions? Maybe you tried the spicy gochujang version and fell in love — I want to hear all about it! Drop a star rating and a comment below to let me know how it went. Your feedback helps other home cooks feel confident trying this quick miso soup recipe for the first time.
And don’t forget to snap a photo of your beautiful bowl and share it on Instagram or Pinterest. Tag me at @exorecipes so I can see your creation — I personally look at every single tag and love featuring your photos in my stories. If you have a question about adapting this recipe for a specific diet or ingredient you have on hand, just ask in the comments. I’m here to help, and I reply to every single one. From my NYC kitchen to yours — I hope this recipe brings as much warmth to your table as it does to mine. — mia 🧡
Love This Recipe? Save It to Pinterest!
If you enjoyed this 10-Minute Miso Soup recipe, don’t let it get lost in your browser tabs! 😄 Pin it now so you can find it again anytime — and explore hundreds more tried-and-tested recipes waiting for you on my Pinterest boards.
👉 Follow mia on Pinterest @exorecipe
📌 Pin this recipe · 🔁 Re-pin your favorites · 💬 Tag me when you make it — I love seeing your creations!
“`
Print

10-Minute Miso Soup (Super Quick!) Easy Homemade Comfort
- Prep Time: 2 minutes
- Cook Time: 8 minutes
- Total Time: 10 minutes
- Yield: 4 1x
- Method: Soup
- Cuisine: Japanese
Description
A super quick and easy homemade miso soup that’s ready in just 10 minutes. Perfect for a comforting weeknight meal.
Ingredients
- 4 cups water
- 1 tablespoon dashi granules (or 1 package instant dashi)
- 1/2 cup cubed soft tofu
- 2 tablespoons miso paste (white or red)
- 2 green onions, thinly sliced
- 1 sheet nori, cut into thin strips (optional)
Instructions
- In a medium saucepan, bring water and dashi granules to a boil over high heat.
- Reduce heat to low and add tofu; simmer for 2 minutes.
- In a small bowl, dissolve miso paste in a few tablespoons of the hot broth, then stir the miso mixture back into the soup. Do not boil after adding miso.
- Ladle into bowls and top with green onions and nori strips, if using. Serve immediately.
Notes
For a vegetarian version, use kombu dashi or mushroom dashi. Adjust miso to taste; white miso is milder, red miso is stronger.
Nutrition
- Calories: 84
- Sugar: 1 g
- Fat: 3.5 g
- Carbohydrates: 5 g
- Protein: 6 g

k">
Tried This Recipe? Leave a Comment!
Did you make this recipe? I’d love to hear how it turned out! Please leave a comment and a rating below. Your feedback helps other home cooks and supports cheerychop.com!
For more delicious inspiration, follow me on Pinterest!