“`html
Table of Contents
- Lazy Chicken Parmesan Grilled Cheese – The Ultimate Comfort Food! 🧀
- Craving Comfort Food Without the Fuss?
- Ingredients: Time for a Flavor Fiesta!
- Timing is Everything
- Let the Magic Begin: Assembly Instructions
- Nutritional Highlights: Feel-Good Fuel
- Healthier Alternatives: Smart Swaps for Extra Goodness
- Serving Suggestions: Elevate Your Meal
- Common Mistakes to Avoid
- Storing Your Delicious Creation
- Conclusion: Your New Go-To Comfort Meal!
- Frequently Asked Questions About Lazy Chicken Parmesan Grilled Cheese
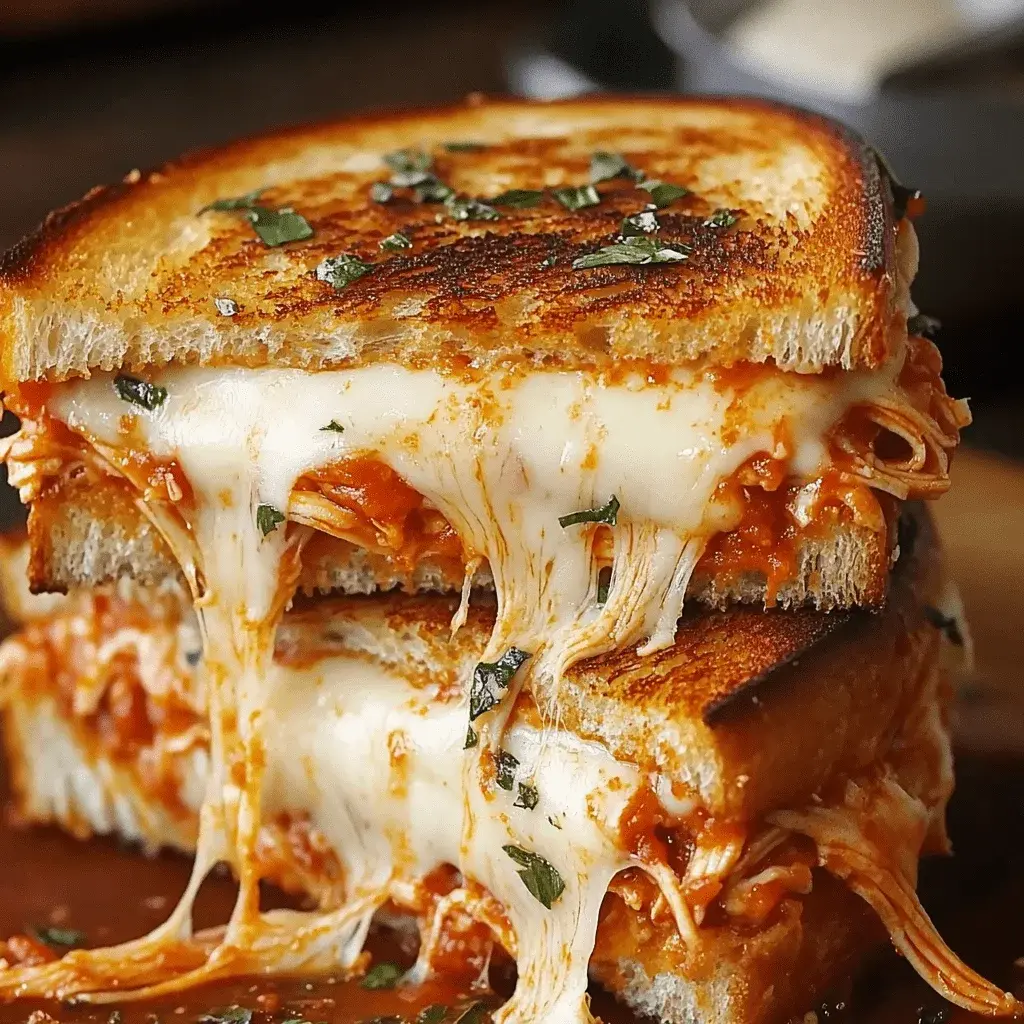
Lazy Chicken Parmesan Grilled Cheese – The Ultimate Comfort Food! 🧀
Craving Comfort Food Without the Fuss?
Hello, fellow food lovers! If you’ve been craving a delicious Chicken Parmesan sub but don’t have the time or energy for the full cooking process, you’re in for a treat. Today, I’m sharing an easy yet irresistibly tasty twist on a classic – the Lazy Chicken Parmesan Grilled Cheese. With this recipe, you’ll enjoy all the gooey cheese and crispy chicken goodness without the fuss of breading and frying. Let’s dive into this comfort food that’s perfect for busy weeknights or a quick, indulgent lunch! In a world where time is a precious commodity, who wouldn’t want a shortcut to a beloved classic? Studies show that quick and easy recipes are searched for more than ever, especially during busy periods. This lazy version of Chicken Parm checks all the boxes for speed, flavor, and pure, unadulterated comfort.
Ingredients: Time for a Flavor Fiesta!
The beauty of this recipe lies in its simplicity and the strategic use of pre-cooked ingredients to achieve maximum flavor with minimal effort. We’re talking about transforming humble pantry staples into a culinary hug.
- Bread: 4 slices of your favorite hearty bread (sourdough, Italian, or even thick-cut white). The crisp exterior is key!
- Pre-cooked Chicken: 1 cup shredded rotisserie chicken or pre-cooked grilled chicken strips. This is our secret weapon for speed and tenderness.
- Marinara Sauce: 1/2 cup of your favorite marinara or pasta sauce. A rich, flavorful sauce will make all the difference. A chunky or smooth variety works equally well.
- Mozzarella Cheese: 1 cup shredded mozzarella cheese, divided. The more, the merrier for that irresistible cheese pull!
- Parmesan Cheese: 1/4 cup grated Parmesan cheese, divided. Adds that salty, nutty depth unique to Chicken Parm.
- Butter or Olive Oil: 2 tablespoons butter, softened, or olive oil for grilling. For that perfect golden-brown crust.
- Optional additions: Pinch of red pepper flakes for a little heat, fresh basil leaves for a burst of freshness, or a thin slice of provolone cheese for extra creaminess.
Timing is Everything
This recipe is designed for speed without sacrificing flavor. Unlike traditional Chicken Parmesan which can take over an hour from start to finish, this grilled cheese version is remarkably quick.
On average, a classic Chicken Parmesan recipe can easily take 45-60 minutes, sometimes more. This lazy version slashes that time significantly, making it ideal for weeknights.

Let the Magic Begin: Assembly Instructions
Get ready to build your ultimate comfort food masterpiece. It’s more assembly than cooking, which is precisely why it’s so “lazy” and so wonderful!
Step 1: Prepare Your Chicken
In a medium bowl, combine the shredded rotisserie chicken (or pre-cooked chicken strips) with about half of the marinara sauce (1/4 cup). Stir well to ensure the chicken is evenly coated. If you like a bit of heat, now is the time to stir in a pinch of red pepper flakes.
Step 2: Assemble the Sandwiches
Lay out your four slices of bread. Spread the remaining marinara sauce thinly on one side of two of the bread slices. On the other two slices, evenly distribute the chicken mixture. Top the chicken with half of the shredded mozzarella cheese and half of the grated Parmesan cheese. Place the marinara-sauced slices on top, sauce-side down, to create two sandwiches.
Step 3: Butter and Grill
Generously butter the outside of each sandwich – both the top and bottom slices. Alternatively, you can lightly brush them with olive oil. Heat a non-stick skillet or griddle over medium heat. Place the sandwiches onto the hot skillet.
Step 4: Cook to Golden Perfection
Cook for about 4-6 minutes per side, or until the bread is a beautiful golden brown and toasted, and the cheese is gloriously melted and gooey. Press down gently with a spatula occasionally to ensure even cooking and melting. Keep an eye on the heat to prevent burning.
Step 5: Slice and Serve
Once perfectly grilled, carefully remove the sandwiches from the skillet. Let them rest for just a minute to allow the cheese to settle slightly, then slice them in half diagonally. Garnish with fresh basil if using. Serve immediately and prepare for pure comfort!
Nutritional Highlights: Feel-Good Fuel
While this is definitely a comfort food indulgence, it provides a good balance of protein and carbohydrates. Exact nutritional values will vary based on the bread and types of cheese and sauce used. Here’s an approximate breakdown per sandwich (assuming 2 sandwiches per recipe):
- Calories: ~450-600 kcal
- Protein: ~25-35g
- Carbohydrates: ~30-45g
- Fat: ~20-30g
Healthier Alternatives: Smart Swaps for Extra Goodness
Looking to make this even lighter without sacrificing flavor? Here are a few simple swaps:
- Bread: Opt for whole wheat bread or a lower-carb bread option.
- Cheese: Use part-skim mozzarella or a reduced-fat Italian blend.
- Sauce: Choose a marinara sauce with no added sugar or a vegetable-based sauce.
- Chicken: Use grilled chicken breast you’ve cooked yourself with minimal oil, or even lean turkey breast.
- Fat for Grilling: Use a light spray of cooking oil instead of butter.
Serving Suggestions: Elevate Your Meal
This Lazy Chicken Parmesan Grilled Cheese is a meal in itself, but here are a few ideas to make it even more special:
- Serve with a fresh, crisp green salad tossed with a light vinaigrette to balance the richness.
- A side of steamed or roasted broccoli or green beans makes for a complete, balanced meal.
- For an extra Italian flair, pair it with a small cup of minestrone soup.
Common Mistakes to Avoid
To ensure your Lazy Chicken Parmesan Grilled Cheese is a triumph every time:
- Low Heat: Don’t rush the grilling process by using heat that’s too high. You’ll burn the bread before the cheese melts. Medium heat is your friend.
- Over-Saucing: Too much marinara inside can make the bread soggy. Apply a thin, even layer.
- Skipping the Butter/Oil: The fat on the outside is crucial for achieving that perfect crispy, golden crust. Don’t be shy!
- Using Stale Bread: While not always a mistake, fresh, sturdy bread yields the best results.
Storing Your Delicious Creation
This grilled cheese is best enjoyed fresh off the grill. However, if you have leftovers:
Allow the grilled cheese to cool completely. Store in an airtight container in the refrigerator for up to 1-2 days. Reheat gently in a non-stick skillet over low heat, or in a toaster oven or air fryer, to restore crispness. Microwaving will likely result in a less desirable texture.
Ready to simplify your comfort food cravings?
This Lazy Chicken Parmesan Grilled Cheese recipe is your answer to deliciousness delivered fast. Bookmark it, share it, and get ready to enjoy all the flavors you love with none of the fuss!
Frequently Asked Questions About Lazy Chicken Parmesan Grilled Cheese
***What kind of bread is best?***
Hearty, sturdy breads work best as they hold up well to the fillings and grilling. Sourdough, Italian bread, or thick-cut country white are excellent choices. Avoid very soft or thin breads that can get soggy or burn too quickly.
***Can I make this entirely from scratch?***
Certainly! If you have pre-cooked chicken breasts, you can shred or dice them. For the sauce, you can use your favorite homemade marinara. However, the “lazy” aspect comes from using pre-cooked components for speed.
***How do I prevent the bread from getting soggy?***
The key is to use a moderate amount of marinara sauce, spreading it thinly on the bread. Also, ensure your pan is hot enough before adding the sandwich, and don’t overcrowd the pan, allowing for even heat distribution.
***Can I freeze this?***
It’s not recommended to freeze the assembled sandwich before cooking, as the bread texture will suffer. Leftovers can be stored in the fridge and reheated, but the crispness may not be fully retained.
***What if I don’t have rotisserie chicken?***
Any pre-cooked chicken will work! You can use leftover grilled chicken breast from a previous meal, or even chicken tenders that have been baked or fried according to package directions.
Lazy Chicken Parmesan Grilled Cheese – Easy Recipe Idea
Description
Hello, fellow food lovers! If you’ve been craving a delicious Chicken Parmesan sub but don’t have the time or energy for the full cooking process, you’re in for a treat. Today, I’m sharing an easy yet irresistibly tasty twist on a classic – theLazy Chicken Parmesan Grilled Cheese. With this recipe, you’ll enjoy all the gooey cheese and crispy chicken goodness without the fuss of breading and frying. Let’s dive into this comfort food that’s perfect for busy weeknights or a quick, indulgent lunch!
Ingredients
- 2frozen breaded chicken patties(such as Tyson®)
- 2 tablespoonsgarlic butter(or to taste)
- 4slices of Italian bread
- 1 cupmarinara sauce
- ½ teaspoondried basil(or to taste)
- 1pinch garlic salt(or to taste)
- 6thin slices provolone cheese
- 2 tablespoonsshredded Parmesan cheese
- Swapprovolone cheesewithmozzarellafor a stretchier texture.
- If you’re gluten intolerant, usegluten-free breadand chicken patties.
- For a lower-calorie option, replacegarlic butterwith a lightolive oil spread.
Instructions
- Start by preheating your oven to 400°F (200°C). Place the frozen chicken patties on a baking sheet and bake for about20 minutesuntil they are cooked through and crispy. Once done, cut each patty in half lengthwise.
- While the chicken is baking, spreadgarlic butteron one side of each slice of Italian bread. This will give your sandwich that perfect golden-brown crisp.
- In a microwave-safe bowl, combine themarinara sauce,basil, and a pinch ofgarlic salt. Heat the mixture in the microwave for 30 seconds to 1 minute, or until warm.
- Take one slice of bread and place it butter-side down in a heated skillet over medium heat. Layer it with2 slices of provolone cheese,1 tablespoon of marinara sauce, and2 chicken patty halves. Add2 more tablespoons of marinara sauce, anotherslice of provolone cheese, and top it off with another slice of bread, butter-side up.
- Cook the sandwich for2 to 3 minuteson each side, or until the bread is crispy and golden brown, and the cheese has melted into gooey goodness.
- Sprinkle the remainingshredded Parmesan cheeseover the leftover marinara sauce, and serve it on the side as a dipping sauce.
Notes
Tip 1: Use a panini press for extra crispy bread if you prefer a firmer texture.
Tip 2: Want more flavor? Add a dash of red pepper flakes to the marinara sauce for a bit of heat.
Tip 3: If you have fresh basil, use it as a garnish for a burst of freshness and color.
“`