Table of Contents
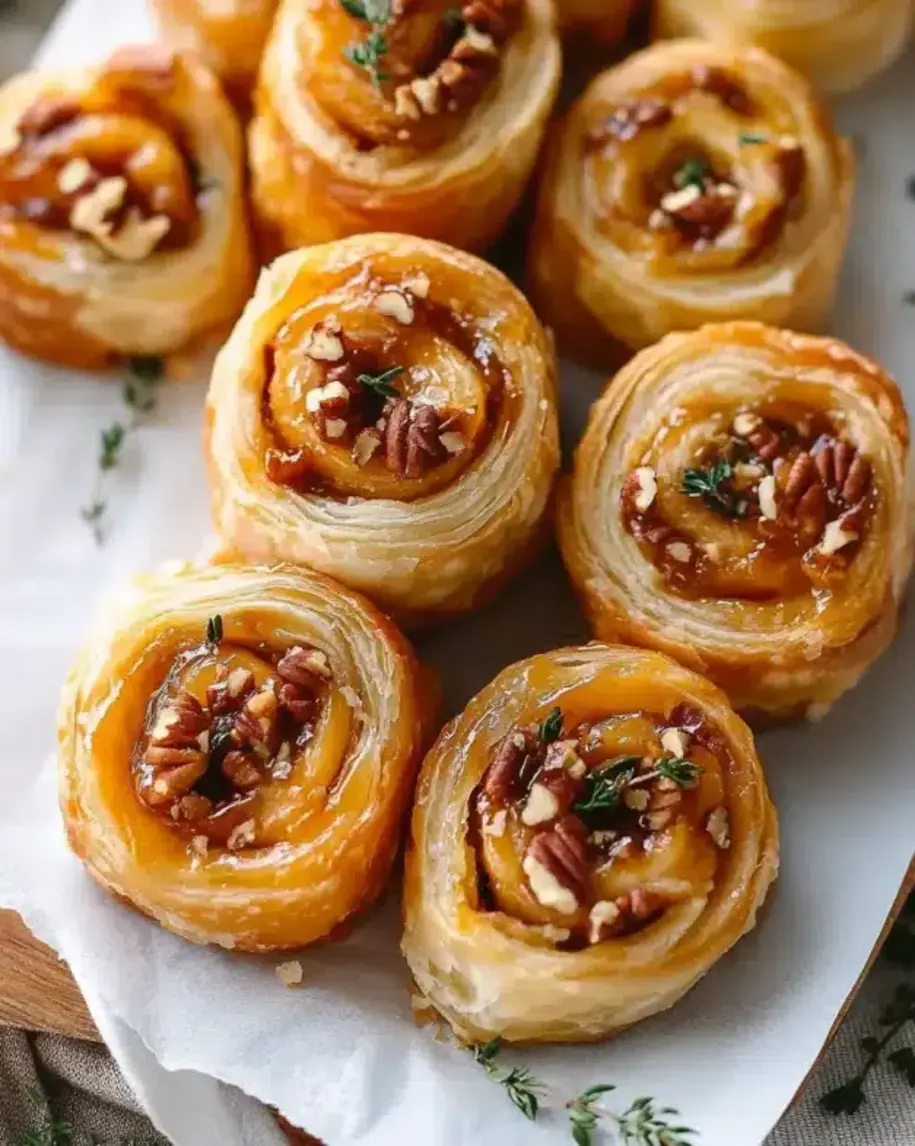
Apricot Goat Cheese Puff Pastry Pinwheels – A Sweet and Savory Appetizer You Can Make Today!
I still remember the first time I made these apricot goat cheese puff pastry pinwheels for a gathering in my tiny NYC apartment. The smell of buttery pastry melting in the oven, the tangy goat cheese mingling with sweet apricot preserves—it was like bringing a little bit of my Moroccan childhood and my Parisian pastry training together on one tray. This sweet and savory puff pastry recipe has become my go-to for every party, potluck, and holiday celebration. Today, I’m sharing my perfected version so you can make it too.
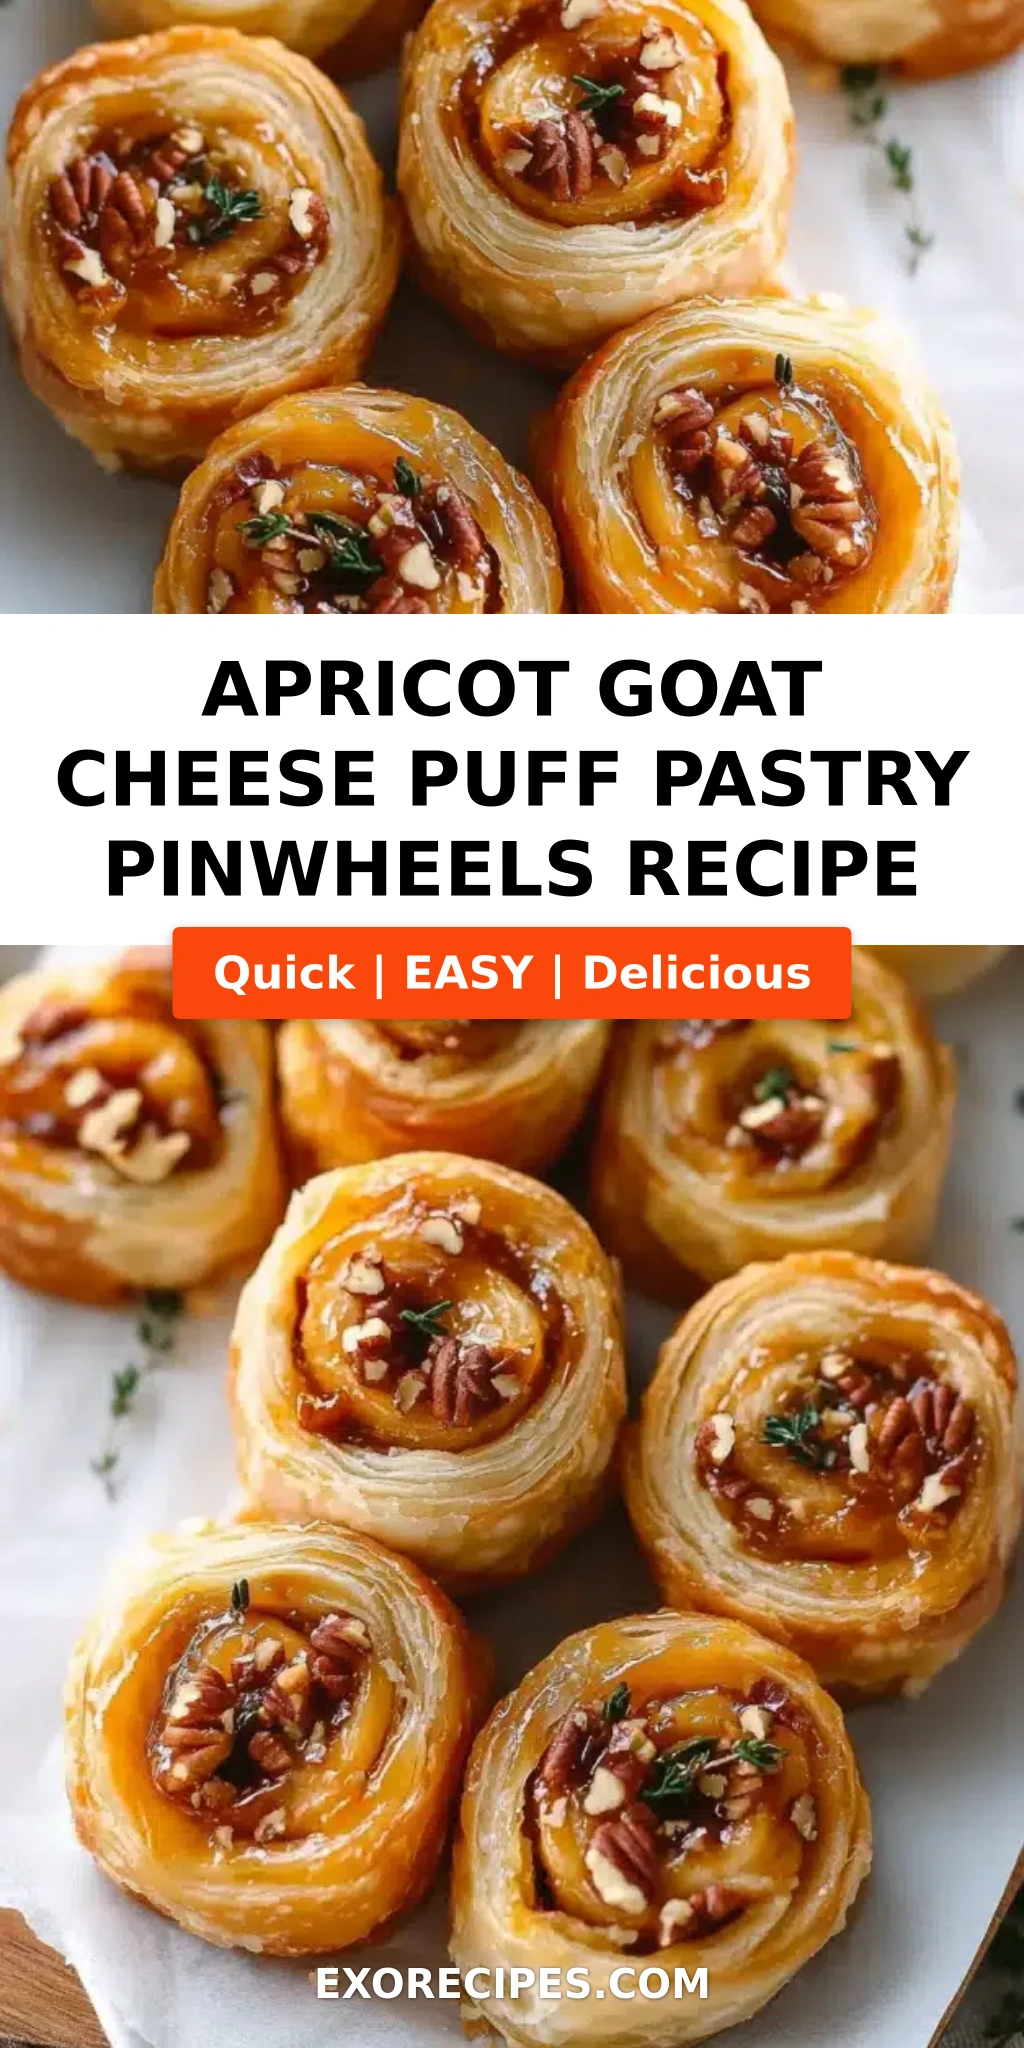
Imagine biting into a flaky, golden-brown pinwheel: the outer layers shatter, revealing a creamy, tangy center with pockets of sweet dried apricots and crunchy pistachios. The apricot preserves add just the right amount of sweetness to balance the goat cheese’s signature earthiness. A pinch of salt and pepper lifts every flavor, and that egg wash gives the puff pastry a gorgeous sheen. It’s the kind of appetizer that disappears in minutes, leaving everyone asking for the recipe.
I’ve tested this recipe more times than I can count, tweaking the ratio of cheese to preserves and the perfect rolling technique. My secret? Chilling the rolled log before slicing—a trick I picked up in a Paris patisserie—ensures clean, beautiful spirals every time. In the instructions below, I’ll walk you through each step, share mia’s Pro Tips, and point out the one mistake most home cooks make. By the end, you’ll have a foolproof goat cheese puff pastry appetizer that’s both impressive and incredibly easy.
Why This Apricot Goat Cheese Puff Pastry Pinwheels Recipe Is the Best
The Flavor Secret — Growing up in Morocco, my mother would make pastries filled with sweet and savory combinations like apricot and lamb or cheese and honey. That North African love for contrast is the soul of this recipe. The creamy goat cheese, sweet apricot preserves, tangy dried apricots, and nutty pistachios create a symphony of flavors that’s both familiar and surprising. I trained at Le Cordon Bleu in Paris, where I learned to respect each ingredient and let it shine—and that’s exactly what happens here.
Perfected Texture — The key to a great puff pastry pinwheel is texture. You want a crisp, flaky exterior with a soft, creamy interior. My technique of briefly chilling the assembled log before slicing—inspired by French bakers—prevents the pastry from tearing and keeps those layers distinct. The pistachios add a satisfying crunch, while the dried apricots offer chewy pops of sweetness. Every bite has something different.
Foolproof & Fast — I know that not everyone wants to spend hours in the kitchen. That’s why I designed this recipe to be both forgiving and quick. Frozen puff pastry does the heavy lifting, and the filling comes together in minutes. Even if you’ve never worked with puff pastry before, mia’s Pro Tips will guide you to perfect results on your first try. These easy puff pastry appetizers are proof that you can make something show-stopping without stress.
Apricot Goat Cheese Puff Pastry Pinwheels Ingredients
When I shop for ingredients, I head straight to my favorite farmers market in Union Square. The dried apricots and pistachios are always the best quality there, and I love supporting local vendors. But you can find everything you need at any well-stocked grocery store. Let’s talk about what you’ll need.
Ingredients List
- 1 sheet frozen puff pastry, thawed
- 4 ounces goat cheese, softened
- 2 tablespoons apricot preserves
- 1/4 cup chopped dried apricots
- 1/4 cup chopped pistachios
- 1 egg, beaten (for egg wash)
- Salt and pepper to taste
Ingredient Spotlight
Puff Pastry: The backbone of this recipe. I always use all-butter puff pastry (like Dufour or Pepperidge Farm) for the best flavor and flakiness. Thaw it in the refrigerator overnight, or set it on the counter for 30 minutes. Never microwave it—you’ll end up with a sticky, uneven dough. If you want a dairy-free option, there are excellent vegan puff pastry sheets available.
Goat Cheese: Soft, tangy, and creamy—it’s the star of this sweet and savory puff pastry recipe. Look for a log of fresh goat cheese (chèvre) that is soft enough to spread but not runny. If you’re dairy-intolerant, you can use a dairy-free cream cheese alternative, though the flavor will be milder. For a stronger tang, try a aged goat cheese, but you’ll need to crumble it finely.
Apricot Preserves: Choose a high-quality preserve with visible fruit pieces. Avoid jam with too much added sugar; you want the natural apricot sweetness to complement the goat cheese. If apricot isn’t available, fig preserves or honey make excellent substitutes (see the substitution table below). I often use a local New York brand called “Bonne Maman” for its bright, authentic flavor.
| Original Ingredient | Best Substitution | Flavor / Texture Impact |
|---|---|---|
| Goat cheese | Cream cheese (dairy or plant-based) | Milder, less tangy; creamier texture |
| Apricot preserves | Fig preserves or honey | Fig: deeper, slightly spicy sweetness; Honey: floral, thinner spread |
| Dried apricots | Dried figs or dates | Chewier, sweeter; dates are very sticky |
| Pistachios | Chopped almonds or walnuts | Less colorful; almonds add more crunch, walnuts a buttery flavor |
How to Make Apricot Goat Cheese Puff Pastry Pinwheels — Step-by-Step
Follow these detailed steps, and you’ll have a pan of beautiful, golden pinwheels in no time. I’ve included my personal pro tips and common mistakes to avoid—so you can skip the trial and error.
Step 1: Preheat and Prepare
Preheat your oven to 400°F (200°C). Line a large baking sheet with parchment paper. This simple step prevents sticking and ensures even browning. I always use a light-colored baking sheet to avoid over-darkening the pastry bottoms.
💡 mia’s Pro Tip: If your puff pastry is still slightly cold in the center, that’s fine. Work with it while it’s cool—it’s easier to roll and less likely to stick.
Step 2: Roll Out Puff Pastry
On a lightly floured surface, roll the thawed puff pastry sheet into a 10×12-inch rectangle. Use gentle, even pressure, and lift the pastry occasionally to make sure it isn’t sticking. Dust with flour as needed—but don’t overdo it, or the dough will become tough.
⚠️ Common Mistake to Avoid: Rolling the pastry too thin. If it’s thinner than 1/8 inch, the pinwheels won’t puff up properly. Aim for a consistent thickness.
Step 3: Mix the Filling
In a small bowl, combine 4 ounces of softened goat cheese and 2 tablespoons of apricot preserves. Stir until completely smooth and uniform. If your goat cheese is too cold, let it sit at room temperature for 15 minutes—it’ll blend much easier.
💡 mia’s Pro Tip: For an extra-smooth filling, use a hand mixer on low speed for about 30 seconds. Be careful not to overmix; you don’t want it to become runny.
Step 4: Apply Filling and Toppings
Using an offset spatula or the back of a spoon, spread the goat cheese mixture evenly over the entire puff pastry rectangle, leaving a 1/2-inch border around all edges. Sprinkle the chopped dried apricots and pistachios over the filling, then season with a pinch of salt and pepper. Don’t skip the salt—it balances the sweetness and brings out the goat cheese flavor.
⚠️ Common Mistake to Avoid: Overloading the filling. If you pile on too many apricots and nuts, the roll will be difficult to seal and may burst during baking.
Step 5: Roll and Chill
Starting from one long edge, tightly roll the puff pastry into a log, using your fingers to gently tuck the filling inside. Pinch the seam at the end to seal. Now, here’s the trick: wrap the log in plastic wrap and refrigerate it for 15–20 minutes. This firms up the butter and filling, making slicing much cleaner.
💡 mia’s Pro Tip: Don’t skip the chilling step! I learned this in a Paris patisserie: a chilled log gives you those perfect spiral cuts without squishing the layers.
Step 6: Slice and Arrange
Using a sharp serrated knife, slice the chilled log into 1/2-inch thick rounds. Place each pinwheel cut-side up on the prepared baking sheet, spacing them about 1 inch apart. If any slices are slightly misshapen, gently press them back into a round with your fingers.
⚠️ Common Mistake to Avoid: Using a dull knife. A serrated knife cuts cleanly through the pastry and filling without crushing the roll.
Step 7: Egg Wash and Bake
Beat one egg in a small bowl. Using a pastry brush, lightly coat the top of each pinwheel with the egg wash. This gives them a beautiful golden-brown sheen. Bake at 400°F for 15–18 minutes, or until the pastry is puffed and deeply golden. Rotate the pan halfway through for even baking.
💡 mia’s Pro Tip: For an extra-glossy finish, apply a second layer of egg wash halfway through baking. Just be quick so the oven doesn’t lose too much heat.
Step 8: Cool and Serve
Let the pinwheels cool on the baking sheet for 5 minutes—this allows the structure to set. Then transfer them to a wire rack to cool slightly. Serve warm or at room temperature. They’re best the day they’re made, but they’re still wonderful the next day (see storage section).
⚠️ Common Mistake to Avoid: Moving them too soon. If you try to transfer them while piping hot, they may fall apart. Give them that 5-minute rest.
| Step | Action | Duration | Key Visual Cue |
|---|---|---|---|
| 1 | Preheat oven, line sheet | 2 min | Oven at 400°F |
| 2 | Roll puff pastry | 5 min | 10×12-inch rectangle |
| 3 | Mix filling | 2 min | Smooth, creamy paste |
| 4 | Spread filling, add toppings | 3 min | Even layer, 1/2-inch border |
| 5 | Roll and chill log | 15–20 min chill | Firm, easy to handle |
| 6 | Slice and arrange | 5 min | Clean spirals, 1-inch apart |
| 7 | Egg wash and bake | 15–18 min | Golden brown, puffed |
| 8 | Cool and serve | 5 min rest | Firm to touch, warm |
Serving & Presentation
These apricot goat cheese snacks are incredibly versatile. I love serving them on a rustic wooden board with a few sprigs of fresh thyme or rosemary for color. They’re perfect for cocktail parties, brunch buffets, or even as a fancy snack with a cup of tea. In my Moroccan home, we’d serve something similar with mint tea—the sweetness of the apricot and the savory goat cheese are a perfect match for the herbal notes.
For a NYC-inspired presentation, arrange the pinwheels on a slate tile and drizzle a little honey over the top just before serving. Sprinkle a few extra crushed pistachios and a pinch of flaky sea salt. Trust me, the combination of warm pastry, cool goat cheese, and crunchy pistachios is irresistible.
| Pairing Type | Suggestions | Why It Works |
|---|---|---|
| Side Dish | Mixed greens with balsamic vinaigrette, roasted asparagus, or a simple arugula salad | The acidity cuts through the richness of the pastry and cheese |
| Sauce / Dip | Honey mustard, balsamic glaze, or a dollop of crème fraîche | Enhances sweetness and adds another layer of tang |
| Beverage | Prosecco, a crisp Sauvignon Blanc, or Moroccan mint tea | The bubbles or acidity balance the richness; mint tea echoes the apricot flavor |
| Garnish | Fresh thyme leaves, edible flowers, a drizzle of honey, or flaky sea salt | Adds visual appeal and a final pop of flavor |
Make-Ahead, Storage & Reheating
Living in NYC means I’m always looking for ways to save time. These pinwheels are perfect for meal prep. I often prepare the log the night before, chill it, and slice and bake the next day. They’re also great for freezing—both baked and unbaked. Here’s exactly how to handle leftovers and make-ahead.
| Method | Container | Duration | Reheating Tip |
|---|---|---|---|
| Refrigerator | Airtight container with paper towels | 3 days | Reheat in 350°F oven for 5–7 minutes to restore crispness |
| Freezer (baked) | Freezer bag or airtight container | 2 months | Reheat directly from frozen at 350°F for 10 minutes |
| Make-Ahead (unbaked log) | Wrap tightly in plastic wrap, then foil | Up to 24 hours in fridge | Slice and bake directly from fridge; add 1–2 minutes to bake time |
My favorite way to reheat leftovers is in a low oven (300°F) for about 8 minutes. It brings back the flakiness without drying them out. Avoid the microwave—it will make the pastry soggy and the goat cheese rubbery. If you’re serving them at a party, you can keep them warm in a 200°F oven for up to 30 minutes.
Variations & Easy Swaps
One of the things I love most about this recipe is how adaptable it is. Whether you’re catering to dietary needs or just want to experiment with flavors, there’s a variation here for you. I’ve tested all of these in my own kitchen, so you can trust the results.
| Variation | Key Change | Best For | Difficulty Impact |
|---|---|---|---|
| Savory Herb Version | Omit dried apricots, add fresh thyme and rosemary; reduce preserves to 1 tbsp | A more savory option for brunch or alongside a salad | Easy (same process) |
| Gluten-Free / Dairy-Free | Use gluten-free puff pastry and dairy-free cream cheese | Guests with dietary restrictions | Medium (different dough behavior) |
| Fig and Walnut Twist | Replace apricot preserves with fig preserves, dried apricots with chopped dried figs, and pistachios with walnuts | A deeper, more robust flavor perfect for fall | Easy |
Savory Herb Version
This version brings a touch of the Mediterranean to your table. Omit the dried apricots and reduce the apricot preserves to just 1 tablespoon. Add 1 tablespoon of chopped fresh thyme and 1 teaspoon of chopped fresh rosemary to the goat cheese mixture. The herbs complement the tangy cheese and buttery pastry beautifully. I love serving these with a glass of crisp white wine at a summer garden party.
Gluten-Free / Dairy-Free Version
Yes, you can make these pinwheels gluten-free and dairy-free! Look for a gluten-free puff pastry (like the one from Schär or GeeFree). For the filling, use a dairy-free cream cheese brand such as Kite Hill or Miyoko’s. The texture will be slightly less flaky but still delicious. I suggest adding an extra tablespoon of preserves to mimic the tanginess of goat cheese. The pinwheels may spread a bit more, so chill the log for a full 30 minutes before slicing.
Fig and Walnut Twist
This twist is inspired by my French training. Swap the apricot preserves for fig preserves, use chopped dried figs instead of dried apricots, and substitute walnuts for pistachios. The fig’s deep, almost caramel-like sweetness pairs wonderfully with the goat cheese. I often find beautiful dried figs at the Union Square Greenmarket in the fall. The walnuts add a buttery crunch that feels more rustic and hearty.
Can I make apricot goat cheese puff pastry pinwheels ahead of time and reheat them?
Absolutely! You have two great options. First, you can assemble the entire log (step 5) up to 24 hours in advance, wrap it tightly in plastic wrap, and refrigerate. When you’re ready to bake, simply slice and bake as directed, adding 1–2 minutes to the bake time. Second, you can bake the pinwheels completely, let them cool, and store them in an airtight container in the refrigerator for up to 3 days. To reheat, place them on a baking sheet in a 350°F oven for 5–7 minutes. This restores the flaky texture much better than a microwave.
What is a good substitute for goat cheese in these puff pastry pinwheels?
If goat cheese isn’t available or you’re looking for a milder option, cream cheese is your best bet. Use full-fat block cream cheese (or dairy-free alternative) and soften it to room temperature. The flavor will be less tangy and more creamy, but it still pairs beautifully with the apricot preserves. Another option is ricotta cheese, but it’s wetter, so you’ll need to drain it using cheesecloth for 30 minutes before mixing. For a dairy-free version, I recommend Miyoko’s cultured cream cheese, which has a pleasant tang.
How do I keep the puff pastry from getting soggy when using apricot jam or preserves?
The key is to use a thick apricot preserve rather than a runny jam. Look for preserves that have visible fruit pieces and a spoonable consistency, not a thin, syrupy jam. Also, make sure you’re not overloading the filling—2 tablespoons for the entire sheet is plenty. Spreading it evenly in a thin layer prevents pooling. Another trick I use is to lightly toast the pistachios and dried apricots before adding them; this draws out moisture and keeps them crisp. Finally, chilling the log before slicing ensures the pastry stays firm and doesn’t absorb moisture during baking.
Can I use dried apricots instead of apricot jam or preserves in this recipe?
Yes, you can use only dried apricots, but the texture and flavor will be different. Dried apricots are chewy and concentrated in sweetness, so they won’t provide the same spreadable moistness as preserves. If you omit the preserves, I recommend rehydrating the dried apricots by soaking them in hot water for 10 minutes, then draining and chopping them finely. Mix them directly into the softened goat cheese along with a teaspoon of honey for extra sweetness. The pinwheels will be less gooey and more chewy, but still delicious.
Can I freeze these pinwheels after baking?
Yes, baked pinwheels freeze beautifully. Let them cool completely, then arrange them in a single layer on a baking sheet and freeze for 1 hour. Transfer the frozen pinwheels to a freezer-safe bag or container, removing as much air as possible. They’ll keep for up to 2 months. To reheat, place them directly from the freezer onto a baking sheet and warm in a 350°F oven for 10 minutes. They’ll come out almost as crispy as freshly baked.
How do I prevent the pinwheels from unrolling during baking?
This is a common issue, but easily avoided. First, be sure to roll the puff pastry tightly after applying the filling. Use your fingers to keep tension as you roll. Second, when you slice the log, make sure the cut edge is facing up on the baking sheet—this seals the spiral. Third, and most importantly, chill the rolled log for at least 15 minutes before slicing. The cold butter firms up, and the filling becomes less loose, which keeps each pinwheel intact during baking.
What other nuts can I use besides pistachios?
Pistachios are my favorite for their vibrant color and mild, nutty flavor, but you can substitute many other nuts. Toasted walnuts add an earthy, buttery note—great with fig preserves (see variation above). Toasted almonds give a satisfying crunch and pair well with apricot. Pine nuts are another excellent option, especially if you want a more delicate texture. For a nut-free version, use pumpkin seeds (pepitas) or sunflower seeds. Whichever you choose, toast them lightly to enhance their flavor.
Can I add savory elements like prosciutto or herbs?
Absolutely! These pinwheels are a great base for experimentation. For a savory-sweet twist, lay a slice of prosciutto over the goat cheese mixture before adding the dried apricots and pistachios. The saltiness of the prosciutto contrasts perfectly with the sweet apricot. Fresh herbs like thyme, rosemary, or even chopped basil can be stirred into the goat cheese or sprinkled on top. I typically add a teaspoon of fresh thyme leaves when I want a more herbaceous flavor. Just be careful not to overstuff—stick to the same total volume of add-ins.
Share Your Version!
I love hearing how this recipe turns out in your kitchen! If you make these apricot goat cheese puff pastry pinwheels, please leave a star rating and a comment below—tell me which variation you tried, or how you customized the filling. Your feedback helps other readers and inspires me to create more recipes for you.
And don’t forget to snap a photo and share it on Instagram or Pinterest. Tag @exorecipes so I can see your beautiful creations. I love scrolling through the tag after a long day in my NYC kitchen—it reminds me why I do what I do. Whether you’re making these for a holiday party, a Sunday brunch, or just because, I’d love to know: What’s your favorite sweet and savory combination? Let me know in the comments!
From my NYC kitchen to yours — I hope this recipe brings as much warmth to your table as it does to mine. — mia 🧡
Love This Recipe? Save It to Pinterest!
If you enjoyed this Apricot Goat Cheese Puff Pastry Pinwheels recipe, don’t let it get lost in your browser tabs! 😄 Pin it now so you can find it again anytime — and explore hundreds more tried-and-tested recipes waiting for you on my Pinterest boards.
👉 Follow mia on Pinterest @exorecipes
📌 Pin this recipe · 🔁 Re-pin your favorites · 💬 Tag me when you make it — I love seeing your creations!
Did you make this recipe? Share your photo on Instagram with #exorecipes and tag @exorecipes for a chance to be featured! Don’t forget to rate it below ⭐