Olive Oil Dip with Warm Bread

“`html

Olive Oil Dip with Warm Bread

Introduction: Elevate Your Appetizer Game

This Olive Oil Dip with Warm Bread is more than just an appetizer; it’s an experience. It’s the kind of dish that whispers of Mediterranean coastlines, sun-drenched groves, and the joy of sharing simple, delicious food. In a world where appetizers can often be complex and time-consuming, this recipe stands out for its elegant simplicity and profound flavor. Imagine setting down a platter of perfectly warm, crusty bread alongside a shallow bowl of glistening, fragrant olive oil, infused with herbs and a hint of spice. It’s an invitation to slow down, to savor, and to connect. This dip is a testament to the fact that the finest flavors often come from the highest quality ingredients treated with respect. It’s perfect for impromptu gatherings, a cozy night in with a loved one, or as a sophisticated start to a more elaborate meal. With just a few high-quality components, you can bring a touch of restaurant-quality dining right into your own home, proving that exquisite taste doesn’t always require extensive effort.

Ingredients: The Heart of This Dip

The magic of this dip lies in the quality and synergy of its few, yet impactful, ingredients. Choose the best you can find – it truly makes a difference!

The Star: Olive Oil

Type: Extra Virgin Olive Oil (EVOO) is paramount. Look for a good quality, cold-pressed EVOO. Its robust, fruity, and sometimes peppery notes are what give this dip its soul.

Quantity: 1 cup (240ml)

Substitutions: While EVOO is ideal, a high-quality, mild olive oil can be used if EVOO is too intense for your palate. However, avoid refined olive oils as they lack the nuanced flavor.

Sensory Notes: A vibrant green hue, the aroma of freshly cut grass or ripe olives, and a smooth, sometimes slightly peppery finish. The better the oil, the more complex and delightful the dip will be.

Aromatics and Herbs

Garlic: 2-3 cloves, finely minced or grated. Fresh garlic provides a pungent kick that complements the olive oil beautifully.

Fresh Herbs: 2 tablespoons, finely chopped. A mix of rosemary, thyme, and oregano is divine. Parsley or basil can also be added for freshness.

Substitutions: For a milder garlic flavor, you can roast the garlic cloves until soft before mincing. Dried herbs can be used sparingly (about 1 teaspoon total) if fresh are unavailable, but fresh herbs offer a brighter, more aromatic profile.

Sensory Notes: The sharp, pungent aroma of fresh garlic and the fragrant, earthy, or floral notes of the herbs. Rosemary offers piney notes, thyme is earthy and minty, while oregano has a robust, slightly bitter flavor.

The Bread: Foundation

Type: Crusty bread is essential. A baguette, ciabatta, or a rustic country loaf works wonderfully. The key is a good, chewy interior and a satisfyingly crisp crust.

Quantity: 1 loaf, sliced into ½-inch thick rounds or torn into rustic pieces.

Substitutions: Any good quality crusty bread will do. Avoid soft sandwich bread as it won’t hold up to dipping.

Sensory Notes: The sound of a crisp crust breaking, the soft, airy crumb inside, and a slightly yeasty aroma.

Optional Enhancements

Red Pepper Flakes: ¼ teaspoon (or to taste) for a gentle warmth.

Balsamic Glaze: For drizzling. Adds a sweet and tangy counterpoint.

Sea Salt: A pinch of flaky sea salt to finish.

Lemon Zest: 1 teaspoon, for a bright, citrusy lift.

Substitutions: Fresh chili can be used instead of flakes, or omit entirely if you prefer no heat.

Timing: Simplicity in Every Minute

Prep time: 10 minutes
Cook time: 5-10 minutes (for the bread)
Total time: 15-20 minutes

This recipe is significantly faster than the average appetizer recipe, which often requires longer marinating or cooking times. Its beauty lies in its immediacy.

Olive oil dip with herbs and warm bread.

Step-by-Step Instructions: Crafting Your Dip

Let’s bring these delicious elements together. It’s so straightforward, you’ll wonder why you haven’t been making this for every gathering!

Step 1: Prepare the Bread

Slice your chosen crusty bread into ½-inch thick pieces. If using a rustic loaf, you can tear it into bite-sized rustic chunks. Arrange the bread slices or pieces on a baking sheet. For an extra touch, you can lightly brush each piece with a little olive oil, though this is entirely optional.

Step 2: Warm the Bread

Preheat your oven to 375°F (190°C). Place the baking sheet with the bread into the preheated oven. Toast for about 5-8 minutes, or until the bread is golden brown and wonderfully crisp on the outside, while remaining slightly soft on the inside. Keep a close eye on it to prevent burning. If you prefer a softer interior with a crisped edge, a quicker toast is ideal.

Step 3: Assemble the Dip

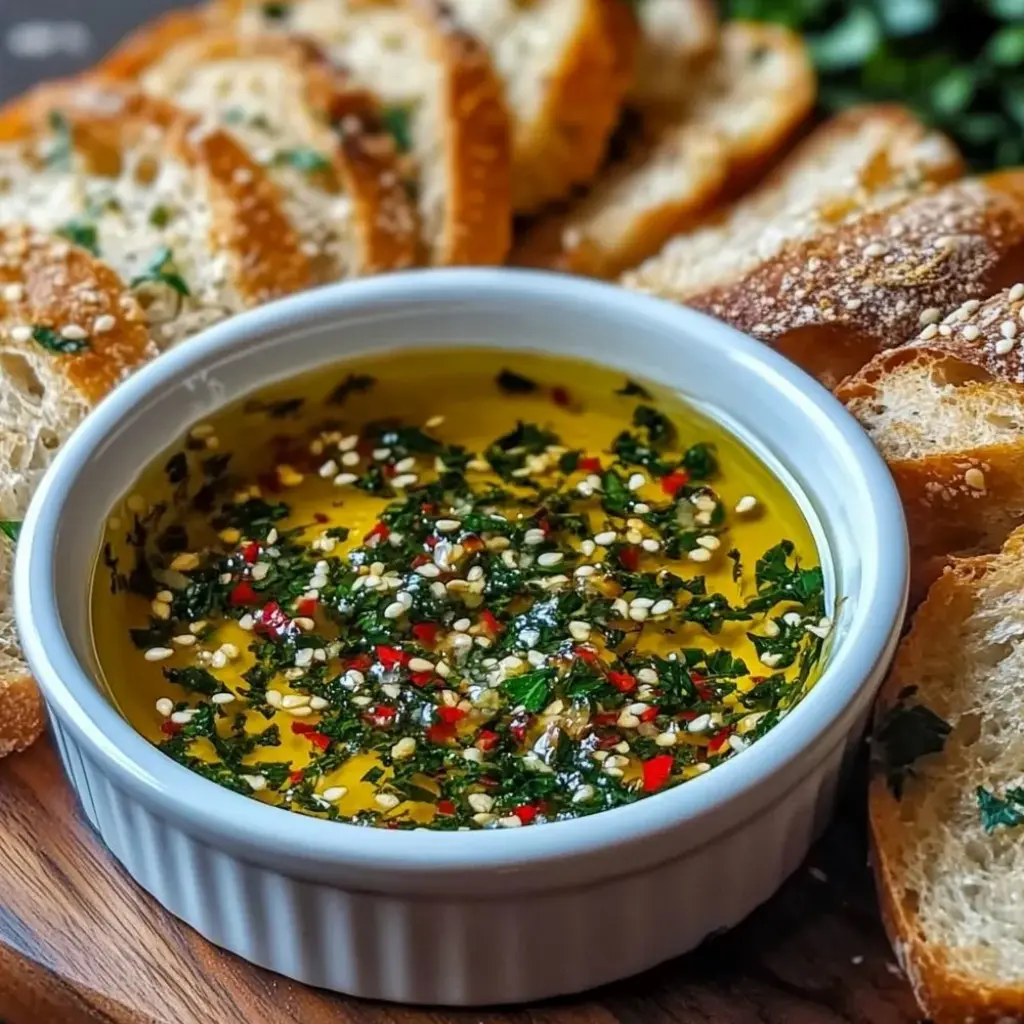
While the bread is toasting, grab a shallow serving bowl. Pour the 1 cup of high-quality extra virgin olive oil into the bowl. This is your flavor canvas!

Step 4: Infuse Flavors

Add the finely minced or grated garlic to the olive oil. Stir in your chopped fresh herbs (rosemary, thyme, oregano, etc.). If using, add the red pepper flakes and lemon zest now. Gently stir everything together. Let it sit for at least 5 minutes for the flavors to meld and for the garlic and herbs to infuse into the oil. The longer it sits, the more intense the flavors will become.

Step 5: Serve and Enjoy

Arrange the warm, toasted bread slices around the bowl of olive oil dip on a serving platter. Sprinkle a pinch of flaky sea salt over the oil, if desired. You can also add a drizzle of balsamic glaze at this stage for an extra layer of flavor and visual appeal. Serve immediately while the bread is still warm and the oil is fragrant. Encourage guests to dip generously!

Nutritional Information: A Taste of Goodness

(Note: Nutritional values are approximate and can vary based on specific ingredients used, especially the type and quantity of olive oil and bread.)

  • Calories: Approx. 150-200 per serving (includes dip and one slice of bread)
  • Fat: Approx. 15-20g (primarily healthy monounsaturated fats from olive oil)
  • Carbohydrates: Approx. 10-15g (from the bread)
  • Protein: Approx. 2-3g

The primary nutritional benefit comes from the high-quality extra virgin olive oil, which is rich in antioxidants and monounsaturated fats, known for their heart-healthy properties.

Healthier Alternatives: Indulge Wisely

While this recipe is inherently quite healthy due to the use of olive oil, you can make mindful choices to enhance its nutritional profile further:

  • Whole Grain Bread: Opt for a hearty whole-grain or sourdough bread for increased fiber content and a lower glycemic index.
  • More Vegetables: Add finely chopped sun-dried tomatoes (oil-packed, drained), Kalamata olives, or roasted bell peppers to the oil for added nutrients and flavor.
  • Reduced Bread Portion: Serve with a smaller amount of bread and offer vegetable sticks (carrots, cucumbers, bell peppers) for dipping as well.
  • Herb Power: Increase the quantity of fresh herbs – they are packed with vitamins and antioxidants!

Serving Suggestions: Beyond the Basic

This simple dip is incredibly versatile:

  • As an Appetizer: The classic. Perfect for parties, dinner parties, or just a snack.
  • As a Side: Serve alongside grilled meats, fish, or hearty salads.
  • Dipping Platter: Include it in a larger mezze platter with hummus, baba ghanoush, olives, and feta cheese.
  • Bruschetta Base: Toast bread slices, rub with a garlic clove, then top with the olive oil infusion.

Common Mistakes to Avoid

  • Using Low-Quality Olive Oil: This is the foundation of the dip. Compromising here significantly impacts the flavor.
  • Over-Toasting the Bread: Burnt or overly hard bread can be unpleasant. Aim for crisp but yielding.
  • Using Garlic Powder Instead of Fresh: Fresh garlic provides a much more vibrant and aromatic flavor.
  • Not Letting Flavors Meld: Give the herbs and garlic a few minutes to infuse into the oil.

Storing Tips: Keeping It Fresh

The infused olive oil can be stored in an airtight container in a cool, dark place for up to a week. The flavors will continue to develop over time. However, it’s best enjoyed within a few days for peak freshness. The bread is best served fresh, but any leftovers can be stored in a paper bag at room temperature for a day or two.

Conclusion: Your New Go-To Appetizer

This Olive Oil Dip with Warm Bread is the epitome of effortless elegance. It proves that with the right ingredients and minimal fuss, you can create a dish that is both incredibly satisfying and delightfully simple. It’s a recipe that encourages sharing, conversation, and the pure enjoyment of good food. Whether you’re a seasoned cook or just starting out, this dip is sure to become a staple in your entertaining repertoire. So, next time you need a quick yet impressive appetizer, reach for your best olive oil, a fresh baguette, and a handful of aromatic herbs. Your guests (and your taste buds) will thank you!

FAQs: Your Questions Answered

What is the best type of olive oil to use?

Extra Virgin Olive Oil (EVOO) is highly recommended for its superior flavor, aroma, and health benefits. A fruity, high-quality EVOO will make the biggest difference.

Can I make this dip ahead of time?

Yes! The infused olive oil can be made a day or two in advance and stored in an airtight container. For best results, add fresh herbs just before serving, or allow the oil to come to room temperature before serving if refrigerated.

What kind of bread is best for dipping?

Crusty breads like baguettes, ciabatta, or focaccia are ideal. Their sturdy crust and chewy interior hold up well to dipping and absorb the oil beautifully.

How do I store leftover infused oil?

Store any leftover infused olive oil in a clean, airtight glass bottle or jar in a cool, dark place (like a pantry) for up to a week. The refrigerator is an option, but the oil may solidify; allow it to return to room temperature before use.

Can I add other ingredients to the oil?

Absolutely! Feel free to experiment with other aromatics like lemon zest, finely chopped shallots, or a pinch of chili flakes for a bit of heat. Roasted garlic also adds a wonderful depth of flavor.

Print
clock clock iconcutlery cutlery iconflag flag iconfolder folder iconinstagram instagram iconpinterest pinterest iconfacebook facebook iconprint print iconsquares squares iconheart heart iconheart solid heart solid icon

Olive Oil Dip with Warm Bread

  • Author: Chef Mia

Description

This Olive Oil Dip with Warm Bread is a simple yet flavorful appetizer that brings restaurant-quality dining to your table. Made with high-quality olive oil, aromatic herbs, and warm, crusty bread, it’s perfect for entertaining or a cozy night in.


Ingredients

Scale
  • 1/3 cupextra virgin olive oil
  • 1clove garlic, minced
  • 1/2 tspdried oregano
  • 1/2 tspdried basil
  • 1/2 tspdried parsley
  • 1/4 tspcrushed red pepper flakes (or to taste)
  • 1 tbspfreshly chopped parsley (for garnish)
  • Salt and freshly cracked black pepper (to taste)
  • 2 tbspgrated parmesan cheese (optional)
  • 1baguette, ciabatta, or sourdough loaf, sliced

Instructions

  1. Preheat the oven to 350°F (175°C). Slice the bread into thin pieces and place on a baking sheet. Warm in the oven for about 5 minutes, or until slightly crispy on the edges.
  2. In a small serving dish, pour the olive oil as the base.
  3. Add the minced garlic, dried oregano, basil, and parsley to the oil, stirring gently to combine.
  4. Sprinkle in the crushed red pepper flakes and season with salt and freshly cracked black pepper to taste.
  5. Optionally, stir in grated parmesan cheese or use it as a garnish.
  6. Garnish the dip with freshly chopped parsley for a touch of color and brightness.
  7. Serve the olive oil dip alongside the warm bread slices and enjoy!

Notes

Use a high-quality, extra virgin olive oil for the best flavor.
Leftover dip can be stored in an airtight container in the refrigerator for up to 3 days. Bring to room temperature before serving.
For a tangy twist, drizzle some balsamic vinegar into the olive oil mixture.
Add crunch by including toasted nuts or seeds, like sesame or pine nuts.

“`

Irresistible Caramel Coffee Buttercream Cake – A Dreamy Treat!

“`html

Irresistible Caramel Coffee Buttercream Cake – A Dreamy Treat!

Welcome to Decadence!

Are you constantly on the hunt for that one dessert recipe that perfectly balances rich, comforting flavors with a touch of sophisticated indulgence? If the answer is a resounding YES, then you’ve landed in the perfect spot! Today, we’re diving headfirst into the creation of the Irresistible Caramel Coffee Buttercream Cake. Imagine the deep, alluring notes of freshly brewed coffee mingling with the sweet, buttery embrace of golden caramel, all swirled into a cloud-like buttercream frosting. This isn’t just a cake; it’s an experience, a meticulously crafted delight designed to tantalize your taste buds and elevate any occasion. Whether you’re celebrating a milestone, hosting a cozy gathering, or simply treating yourself because you deserve it (and you absolutely do!), this cake promises to be the star of the show. Get ready to impress your friends and family, or simply revel in your own culinary triumph. Let’s embark on this delicious adventure together!

Key Ingredients

To achieve the sublime flavors and textures of our Irresistible Caramel Coffee Buttercream Cake, precision and quality ingredients are key. Here’s what you’ll need for the cake layers and the star of the show – the caramel coffee buttercream:

  • For the Cake:
    • 2 ¾ cups all-purpose flour: The foundation of our tender cake crumb. Ensure it’s spooned and leveled for accuracy.
    • 1 ½ teaspoons baking powder: For that essential lift and airy texture.
    • ¾ teaspoon baking soda: Works with the acidic components to ensure a soft, moist crumb.
    • 1 teaspoon salt: Enhances all other flavors and balances sweetness.
    • 1 cup (2 sticks) unsalted butter, softened: The soul of richness and tenderness. Use good quality butter for the best flavor.
    • 2 cups granulated sugar: Sweetness and moisture.
    • 4 large eggs, room temperature: Bind ingredients and add structure and richness.
    • 1 teaspoon vanilla extract: A classic flavor enhancer.
    • 1 cup buttermilk, room temperature: Adds tenderness and a slight tang. If you don’t have buttermilk, mix 1 cup milk with 1 tablespoon lemon juice or white vinegar and let it sit for 5-10 minutes.
    • 1 cup strongly brewed coffee, cooled: The heart of our coffee flavor. Ensure it’s brewed strong and completely cooled to avoid cooking the eggs.
  • For the Caramel Coffee Buttercream:
    • 1 cup (2 sticks) unsalted butter, softened: The creamy base for our frosting.
    • 3 ½ cups powdered sugar, sifted: For sweetness and smooth texture. Sifting is crucial to avoid lumps.
    • ¼ cup strongly brewed coffee, cooled: Concentrated coffee flavor for the frosting.
    • 2 tablespoons caramel sauce (store-bought or homemade): The luscious caramel component.
    • 1 teaspoon vanilla extract: To round out the flavors.
    • Pinch of salt: Balances sweetness and enhances caramel notes.

Timing is Everything

Prep Time: 45 Minutes
Cook Time: 30-35 Minutes
Total Time: 1 Hour 20 Minutes (plus cooling)

Compared to average buttercream cake recipes that often clock in around 1.5 to 2 hours for prep and baking, our Irresistible Caramel Coffee Buttercream Cake is slightly more time-efficient, especially if you have your coffee brewed and cooled beforehand. The active prep time is focused, allowing for a relatively quick assembly, but remember to factor in ample cooling time for perfect frosting application!

Irresistible Caramel Coffee Buttercream Cake

Your Baking Journey Begins

Step 1: Preheat and Prep

Let’s get this party started! Preheat your oven to 350°F (175°C). Grease and flour two 9-inch round cake pans. For extra insurance against sticking, you can also line the bottoms with parchment paper. This seemingly small step is a game-changer for easy cake removal!

Step 2: Dry Ingredients Magic

In a medium bowl, whisk together the flour, baking powder, baking soda, and salt. This ensures that your leavening agents are evenly distributed, promising a consistent rise. Set this aside for now.

Step 3: Creaming Butter and Sugar

In a large bowl, using an electric mixer, beat the softened butter and granulated sugar on medium-high speed until light and fluffy, about 3-5 minutes. This step is crucial for creating a tender cake, as it incorporates air that helps the cake rise.

Step 4: Adding Eggs and Vanilla

Add the eggs one at a time, beating well after each addition. Then, mix in the vanilla extract. Don’t rush this; each egg needs to be fully incorporated before adding the next for a stable batter.

Step 5: Alternating Liquids and Dry

Now, we’ll alternate adding the dry ingredients and the wet ingredients to the butter mixture. Begin by adding about one-third of the flour mixture and mix on low speed until just combined. Then, add half of the buttermilk and the cooled coffee, mixing until just combined. Repeat with another third of the flour mixture, the remaining buttermilk and coffee, and finally, the last of the flour mixture. Mix until *just* combined after each addition. Be careful not to overmix, as this can develop the gluten too much, resulting in a tough cake.

Step 6: Baking to Perfection

Divide the batter evenly between the prepared cake pans. Bake for 30-35 minutes, or until a wooden skewer inserted into the center comes out clean. The aroma filling your kitchen will be heavenly!

Step 7: Cooling Down

Let the cakes cool in the pans for about 10-15 minutes before inverting them onto a wire rack to cool completely. Patience here is key; attempting to frost a warm cake is a recipe for a melted mess!

Step 8: Whipping Up the Buttercream

While the cakes cool, prepare your glorious caramel coffee buttercream. In a large bowl, beat the softened butter until creamy. Gradually add the sifted powdered sugar, alternating with the cooled coffee and caramel sauce, beating until smooth and fluffy. Mix in the vanilla extract and a pinch of salt. If it’s too thick, add a teaspoon of milk or coffee at a time. If it’s too thin, add a bit more powdered sugar.

Step 9: Assembling Your Masterpiece

Once the cakes are completely cool, place one layer on your serving plate. Generously spread a layer of the caramel coffee buttercream over the top. Carefully place the second cake layer on top. Frost the entire cake – top and sides – with the remaining buttercream. You can create swirls for a rustic look or smooth it for a more polished finish.

Nutritional Highlights

While we’re focusing on deliciousness, it’s good to have an idea of what you’re enjoying. Each serving (assuming 12 servings) of this rich cake is approximately:

  • Calories: ~450-550 kcal
  • Fat: ~25-35g
  • Carbohydrates: ~50-65g
  • Protein: ~5-7g

*Note: These are estimates and can vary based on specific ingredients and portion sizes.

Healthier Alternatives

Craving that caramel coffee goodness but looking for a lighter version? Here are some swaps:

  • For the Cake: Use whole wheat pastry flour or a blend of all-purpose and whole wheat flour. Reduce sugar slightly and add unsweetened applesauce or Greek yogurt for moisture. Opt for lower-fat milk if not using buttermilk.
  • For the Buttercream: Use a blend of butter and cream cheese for a tangier, lighter frosting. Replace some powdered sugar with a sugar substitute like erythritol or stevia (adjusting to taste). Use sugar-free caramel syrup and a very strong, unsweetened coffee concentrate. You can also try a lighter “stabilized whipped cream” frosting with coffee and caramel flavorings.

Serving Suggestions

This cake is a star on its own, but here are a few ways to make it even more special:

  • Drizzle with extra warm caramel sauce just before serving.
  • Garnish with chocolate shavings or a sprinkle of flaky sea salt for a sophisticated touch.
  • Serve with a dollop of freshly whipped cream or a scoop of vanilla bean ice cream for ultimate decadence.
  • Pair with a warm cup of coffee or a soothing tea.

Common Mistakes to Avoid

  • Overmixing the batter: This is the quickest way to a tough cake. Mix until just combined.
  • Frosting a warm cake: Melting is inevitable! Ensure cakes are completely cool.
  • Not using room temperature ingredients: Butter, eggs, and liquids at room temperature emulsify better, leading to a smoother batter and a more stable cake.
  • Using weak coffee: For that distinct coffee flavor, brew it strong!
  • Sifting powdered sugar: This is essential for smooth, lump-free buttercream.

Storing Your Masterpiece

Proper storage ensures your cake stays delicious. Store frosted cake in an airtight container at room temperature for up to 2 days, or in the refrigerator for up to 5 days. If refrigerating, allow it to come to room temperature for at least 30 minutes before serving for the best texture and flavor.

Savor the Moment!

And there you have it – the recipe for an truly Irresistible Caramel Coffee Buttercream Cake. This cake is more than just a dessert; it’s a testament to how simple, quality ingredients can come together to create something truly magical. The robust coffee notes embraced by sweet, sticky caramel, all enveloped in a cloud of creamy buttercream, is a flavor combination that’s hard to resist. We hope you loved baking and tasting this dreamy treat as much as we do. Give it a try and let us know how it turns out in the comments below! What occasions will you be celebrating with this masterpiece?

Frequently Asked Questions

***What kind of coffee should I use for this cake recipe?***

A medium to dark roast brewed strongly will give you the best depth of flavor. Espresso or instant espresso powder dissolved in hot water can also be used for an even more intense coffee kick.

***Can I make this cake ahead of time?***

Yes! The cake layers can be baked a day in advance, cooled completely, wrapped tightly in plastic wrap, and stored at room temperature. The buttercream can also be made a day ahead and stored in the refrigerator. Bring both to room temperature and assemble when ready.

***How do I make my buttercream smoother?***

Ensure your butter is truly softened but not melted. Sifting your powdered sugar is crucial. Also, don’t overmix when adding liquids; stop once it’s just combined.

***Can I use different size pans?***

If you use smaller pans (like 8-inch), the baking time might need to be slightly increased. For larger pans or cupcakes, you’ll need to adjust baking times accordingly and watch carefully.

***My caramel sauce is too runny. What should I do?***

You can gently simmer your caramel sauce for a few more minutes to thicken it, or add a touch more powdered sugar to the buttercream to compensate for the extra liquid.

Print
clock clock iconcutlery cutlery iconflag flag iconfolder folder iconinstagram instagram iconpinterest pinterest iconfacebook facebook iconprint print iconsquares squares iconheart heart iconheart solid heart solid icon

Irresistible Caramel Coffee Buttercream Cake Recipe

  • Author: Chef Mia

Description

Welcome, cake lovers! 🍰☕ If you’re searching for the perfect cake recipe that combines the rich flavors of caramel and coffee, look no further than thisIrresistible Caramel Coffee Buttercream Cake. Whether you’re a die-hard fan of coffee-infused desserts or just love a good, indulgent treat, this cake is for you. With a decadent caramel coffee buttercream frosting that’ll melt in your mouth, this cake will be your new favorite. Perfect for any occasion, this delightful cake combines the comfort of a classic dessert with a delicious twist. Ready to dive into this heavenly creation? Let’s get started!


Ingredients

  • For the Cake:
  • For the Caramel Coffee Buttercream:
  • For Garnish:
  • ThisCaramel Coffee Cakerecipe allows for some flexibility. You can substitute almond milk or oat milk in place of whole milk, and coconut cream can be used for a dairy-free alternative in the buttercream. You can also switch out the caramel sauce for a homemade vegan version if needed.

Instructions

  1. Preheat your oven to 350°F (175°C). Grease and flour three 8-inch round cake pans, ensuring they are ready to go once your batter is prepared.
  2. In a large bowl, cream together the butter, granulated sugar, and brown sugar until light and fluffy. This step is essential for giving your cake the perfect texture, so be sure to cream the mixture for at least 3-4 minutes.
  3. Add the eggs one at a time, beating well after each addition. Stir in the vanilla extract for that hint of extra flavor.
  4. In a separate bowl, sift together the flour, baking powder, baking soda, and salt. Gradually add the dry ingredients to the butter mixture, alternating with the brewed coffee and milk. Be sure to start and end with the dry ingredients for the smoothest consistency. Mix until just combined – be careful not to overmix!
  5. Divide the batter evenly among the three prepared cake pans and smooth the tops with a spatula. Bake for 25-30 minutes, or until a toothpick inserted into the center comes out clean. Allow the cakes to cool in the pans for about 10 minutes, then transfer them to wire racks to cool completely.
  6. While the cakes are cooling, you can prepare the buttercream. In a large bowl, beat the butter until creamy and smooth. Gradually add the powdered sugar, beating on low speed at first to avoid making a mess, then on medium-high speed for a fluffy texture.
  7. Add the caramel sauce, brewed coffee, heavy cream, and vanilla extract. Beat the mixture for a few minutes until it is light, fluffy, and well-combined.
  8. Once the cake layers are completely cool, it’s time to assemble. Place one cake layer on a serving plate and spread a thick layer of buttercream over the top. Repeat this with the remaining layers. Once the layers are stacked, frost the top and sides of the cake with the remaining buttercream.
  9. For the final touch, lightly dust the top of the cake with cocoa powder for an elegant finish.

Notes

Use room temperature ingredients: Ensure that your butter, eggs, and milk are at room temperature before you begin baking. This allows for smoother blending and a more even bake.
Homemade caramel sauce: If you have the time, making your own caramel sauce will add an extra homemade touch to your buttercream.
Chill your cake layers: Once baked, chilling the layers in the refrigerator for 15-20 minutes before frosting will help the buttercream adhere better and prevent any crumbs from mixing into your frosting.
Evenly spread the buttercream: When frosting, use an offset spatula to evenly spread the buttercream between the layers and on top. This will give your cake a professional finish.

“`

Strawberry Cheesecake Sweet Rolls

“`html

A Sweet Surprise: Strawberry Cheesecake Sweet Rolls

Are you searching for a dessert that’s both visually stunning and incredibly delicious? In a world of predictable pastries, have you ever craved something that marries the comfort of a classic cinnamon roll with the vibrant tang of fresh strawberries and the creamy indulgence of cheesecake? Look no further! These Strawberry Cheesecake Sweet Rolls are the answer to your dessert dreams, ingeniously blending the soft, fluffy texture of a strawberry-infused cake with a luscious, velvety cheesecake filling. Each roll is a masterpiece, carefully swirled and baked to golden perfection, then generously crowned with a decadent cream cheese frosting and a scattering of fresh, ruby-red strawberries. They are the ultimate treat that will elevate any brunch, make any celebration unforgettable, and bring a smile to everyone’s face. Get ready to experience a dessert that’s as delightful to make as it is to devour – a true game-changer for your baking repertoire.

Delectable Ingredients for Strawberry Cheesecake Sweet Rolls

The magic of these rolls lies in the quality and balance of their components. We’ve carefully selected ingredients for their ability to create a harmonious blend of sweet, tangy, and creamy. Here’s what you’ll need:

For the Dough

  • 1 cup warm milk (about 105-115°F / 40-46°C): This is the cozy start for our yeast, waking it up for a light and airy dough. Use whole milk for richness, or any milk you have on hand.
  • 2 ¼ teaspoons active dry yeast: The leavening powerhouse! Ensure it’s fresh for the best rise.
  • ¼ cup granulated sugar, plus a pinch: Feeds the yeast and adds a subtle sweetness to the dough.
  • 4 cups all-purpose flour, plus more for dusting: The foundation of our sweet rolls. All-purpose is perfect here, providing structure without being too heavy.
  • ½ teaspoon salt: Balances the sweetness and enhances flavor.
  • ¼ cup unsalted butter, softened: Crucial for a tender, rich dough.
  • 1 large egg, room temperature: Adds richness and structure.
  • 2 tablespoons freeze-dried strawberry powder (or finely ground freeze-dried strawberries): This is where our strawberry flavor begins, infusing the dough with a delicate pink hue and a burst of natural fruitiness.

For the Cheesecake Filling

  • 8 ounces cream cheese, softened: The heart of our cheesecake flavor! Full-fat cream cheese will yield the creamiest, most decadent filling.
  • ½ cup powdered sugar: For a smooth, sweet, and silky texture.
  • 1 teaspoon vanilla extract: Amplifies the cheesy goodness and adds aromatic depth.
  • 1 tablespoon lemon juice (optional): A touch of acidity to brighten the flavors and cut through the richness.

For the Strawberry Swirl

  • ½ cup strawberry jam or preserves: Choose a good quality jam with real fruit pieces for a delightful texture and vibrant flavor.
  • 2 tablespoons freeze-dried strawberry powder: To intensify the strawberry taste and color of the swirl.

For the Cream Cheese Frosting

  • 4 ounces cream cheese, softened: Provides that classic tangy cream cheese frosting flavor.
  • ½ cup unsalted butter, softened: Ensures a smooth, spreadable, and luxurious frosting.
  • 1 ½ cups powdered sugar: For sweetness and the perfect velvety consistency.
  • 1 teaspoon vanilla extract: A touch of warmth and sweetness.
  • 1-2 tablespoons milk or heavy cream: To achieve the desired drizzling consistency.
  • Fresh strawberries, sliced or whole, for garnish: The crowning glory!

Timing is Everything: Prep, Cook, and Total Time

These sweet rolls require a bit of patience, but the payoff is immense. Here’s a breakdown to help you plan:

Prep Time: 45 minutes
Rise Time: 2 hours
Cook Time: 25-30 minutes
Total Time: 3 hours 15 minutes

While the average sweet roll recipe might take around 2.5 to 3 hours in total, our Strawberry Cheesecake Sweet Rolls fit comfortably within that range, with a slightly longer rise time to ensure maximum fluffiness.

Beautifully baked Strawberry Cheesecake Sweet Rolls topped with cream cheese frosting and fresh strawberries

Crafting Your Strawberry Cheesecake Sweet Rolls: Step-by-Step

Let’s get baking! Follow these simple steps to create your masterpiece.

Step 1: Activate the Yeast

In a large bowl or the bowl of your stand mixer, combine the warm milk, a pinch of sugar, and the active dry yeast. Give it a gentle stir and let it sit for about 5-10 minutes, until it becomes foamy and bubbly. This tells us our yeast is alive and ready to work its magic!

Step 2: Prepare the Dough

To the activated yeast mixture, add the remaining ¼ cup granulated sugar, 2 cups of the flour, salt, softened butter, room temperature egg, and the freeze-dried strawberry powder. If using a stand mixer, attach the dough hook and mix on low speed until just combined. Gradually add the remaining 2 cups of flour, mixing until a shaggy dough forms. If mixing by hand, stir everything together with a wooden spoon until a shaggy dough forms.

Step 3: Let the Dough Rise

Turn the dough out onto a lightly floured surface and knead for 8-10 minutes (or let your stand mixer knead for 6-8 minutes) until the dough is smooth, elastic, and no longer sticky. Place the dough in a lightly greased bowl, cover with plastic wrap or a clean kitchen towel, and let it rise in a warm place for 1 to 1.5 hours, or until doubled in size.

Step 4: Make the Cheesecake Filling

While the dough is rising, prepare the cheesecake filling. In a medium bowl, beat the softened cream cheese until smooth. Gradually beat in the powdered sugar until well combined and creamy. Stir in the vanilla extract and lemon juice (if using). Set aside. For an even smoother filling, you can do this in a stand mixer with the paddle attachment.

Step 5: Prepare the Strawberry Swirl

In a small bowl, combine the strawberry jam or preserves with the freeze-dried strawberry powder. Stir until well combined. This will create a vibrant, intensely flavored strawberry layer within your rolls.

Step 6: Assemble the Rolls

Once the dough has doubled, punch it down gently. Turn it out onto a lightly floured surface and roll it into a large rectangle, about 12×18 inches and ¼ inch thick. Spread the cheesecake filling evenly over the dough, leaving about a ½-inch border on all sides. Then, spoon the strawberry swirl mixture over the cheesecake filling, spreading it as evenly as possible. Starting from one of the long sides, tightly roll up the dough. Pinch the seam to seal it.

Step 7: Second Rise

Cut the rolled dough into 12 equal slices using a sharp knife or dental floss. Place the slices cut-side up in a greased 9×13 inch baking dish. Cover loosely with plastic wrap and let them rise again in a warm place for another 30-45 minutes, or until puffy.

Step 8: Bake to Perfection

Preheat your oven to 375°F (190°C). Uncover the sweet rolls and bake for 25-30 minutes, or until they are golden brown and cooked through. The center should not be doughy.

Step 9: Make the Frosting

While the rolls are baking, prepare the cream cheese frosting. In a medium bowl, beat the softened cream cheese and softened butter until light and fluffy. Gradually add the powdered sugar and vanilla extract, beating until smooth. Add milk or cream, one tablespoon at a time, until the frosting reaches your desired drizzling consistency.

Step 10: Frost and Serve

Once the rolls are out of the oven and slightly cooled, generously drizzle the cream cheese frosting over them. Top with fresh sliced strawberries for a beautiful finish. Serve warm and enjoy the explosion of flavors!

Nutritional Snapshot

While every bite of these Strawberry Cheesecake Sweet Rolls is pure bliss, it’s good to have an idea of what you’re indulging in! Nutritional information can vary based on exact ingredients and portion sizes, but typically, one generous serving (about 1/12 of the recipe) contains:

  • Calories: Approximately 350-500 kcal
  • Protein: 6-9g
  • Fat: 18-30g (depending on full-fat dairy choices)
  • Carbohydrates: 40-60g
  • Sugar: 25-40g

(Note: These are estimates. Actual values may vary.)

Healthier Twists on Strawberry Cheesecake Sweet Rolls

Want to enjoy these delightful rolls with a slightly lighter touch? Here are some swaps that maintain flavor and texture:

  • Whole Wheat Flour: Substitute half of the all-purpose flour with whole wheat flour for added fiber.
  • Reduced Fat Cream Cheese: Use reduced-fat cream cheese for both the filling and frosting. The texture might be slightly less rich but still delicious.
  • Alternative Sweeteners: Consider using a natural sweetener like maple syrup or honey in moderation for the filling and frosting, though this may alter the flavor profile slightly.
  • Greek Yogurt: For the cream cheese filling, you can replace half the cream cheese with plain Greek yogurt (full-fat for best results) for a protein boost and lower fat content.
  • Less Sugar: Reduce the amount of powdered sugar in the filling and frosting by ¼ cup each. The natural sweetness of strawberries will help compensate.

Serving Suggestions

These rolls are spectacular on their own, but here are a few ideas to make them even more special:

  • For Brunch: Serve alongside fresh fruit salad, scrambled eggs, and crispy bacon for a complete and delightful brunch spread.
  • With Coffee or Tea: The perfect accompaniment to your morning coffee or afternoon tea.
  • As a Dessert: A scoop of vanilla bean ice cream alongside a warm roll would be pure heaven.
  • Kid-Friendly: They are a guaranteed hit with children!

Common Mistakes to Avoid

Even the most experienced bakers can encounter a few bumps. Here are some common pitfalls and how to sidestep them:

  • Water too Hot for Yeast: If your milk is too hot, it will kill the yeast, preventing your dough from rising. Always use warm, not hot, milk.
  • Under-kneading: Insufficient kneading results in a dense, tough dough. Knead until the dough is smooth, elastic, and passes the windowpane test.
  • Over-proofing: Letting the dough rise for too long can cause it to collapse when baking. Watch for it to double in size, then proceed with the next steps.
  • Uneven Filling Spread: Spreading the filling too thickly on one side can cause the roll to wrap unevenly or ooze out excessively during baking.
  • Cold Ingredients for Frosting: Ensure your cream cheese and butter are truly softened for a smooth, lump-free frosting.

Storing Your Sweet Rolls

For the best experience, these rolls are best enjoyed fresh. However, if you have leftovers:

  • Room Temperature: Store tightly covered at room temperature for up to 2 days.
  • Refrigeration: For longer storage (up to 4-5 days), keep them in an airtight container in the refrigerator. The frosting may firm up.
  • Reheating: To refresh them, gently warm individual rolls in the microwave for 10-15 seconds or in a low oven (around 300°F / 150°C) for a few minutes.
  • Freezing: Unfrosted rolls can be frozen. Wrap them tightly in plastic wrap and then in foil. Thaw at room temperature and frost before serving. You can also freeze baked and cooled rolls whole or sliced.

Conclusion

These Strawberry Cheesecake Sweet Rolls are more than just a dessert; they are an experience. The delightful fusion of fluffy strawberry cake, creamy cheesecake filling, and tangy cream cheese frosting creates a symphony of flavors and textures that will captivate your taste buds. Whether you’re planning a special brunch, looking for a show-stopping dessert, or simply craving a sweet treat that’s a step above the ordinary, these rolls are your answer. They are a testament to how classic flavors can be reimagined into something truly extraordinary.

Frequently Asked Questions

***Can I use fresh strawberries instead of freeze-dried ones?***

Yes, you can! For the dough and the swirl, you can puree fresh strawberries and cook them down to reduce their moisture content significantly. However, freeze-dried strawberries are preferred as they provide intense flavor and color without adding excess liquid, which can affect the dough’s consistency. If using fresh pureed strawberries, you may need to adjust the flour slightly.

***Why is my dough not rising?***

This is usually due to inactive yeast or an incorrect temperature of the liquid. Ensure your yeast is fresh and that the milk was warm (around 105-115°F / 40-46°C), not hot or cold. Also, make sure the rising environment is warm enough.

***Can I make these ahead of time?***

Yes, you can assemble the rolls the night before. After the second rise, cover them and refrigerate. In the morning, let them sit at room temperature for about 30 minutes to an hour before baking as usual. You can also make the cheesecake filling and frosting ahead of time and store them in the refrigerator.

***My strawberry swirl leaked out during baking. What went wrong?***

This can happen if the swirl mixture is too liquidy, or if the dough is rolled too thinly or not sealed well. Ensure your jam is thick, and consider not spreading the filling all the way to the very edges before rolling. Pinching the seam firmly also helps prevent leakage.

Print
clock clock iconcutlery cutlery iconflag flag iconfolder folder iconinstagram instagram iconpinterest pinterest iconfacebook facebook iconprint print iconsquares squares iconheart heart iconheart solid heart solid icon

Strawberry Cheesecake Sweet Rolls

  • Author: Chef Mia

Description

These Strawberry Cheesecake Sweet Rolls are a stunning dessert that combines fluffy strawberry cake with a creamy cheesecake filling. Rolled to perfection and topped with fresh strawberries, they’re perfect for brunch, celebrations, or as a delightful sweet treat for any occasion!


Ingredients

  • For the Cake Roll:
  • For the Cream Cheese Filling:
  • For Topping and Decoration:

Instructions

  1. Preheat the oven to 350°F (175°C). Line a 15×10-inch jelly roll pan with parchment paper and lightly grease it.
  2. In a medium bowl, whisk together the flour, baking powder, and salt. Set aside.
  3. In a separate bowl, beat the eggs and sugar on high speed until pale and fluffy (about 5 minutes). Add vanilla, milk, strawberry puree (if using), and food coloring. Mix until combined.
  4. Gradually fold the dry ingredients into the wet mixture, being careful not to overmix. Spread the batter evenly into the prepared pan.
  5. Bake for 10-12 minutes, or until the cake springs back when lightly touched.
  6. While still warm, carefully lift the cake out of the pan using the parchment paper. Place it on a flat surface and roll it into a log (with parchment). Let it cool completely.
  7. Prepare the filling by beating cream cheese, powdered sugar, and vanilla extract until smooth. Add heavy cream and mix until light and fluffy.
  8. Unroll the cooled cake and remove the parchment paper. Spread the cream cheese filling evenly across the surface, leaving a small border.
  9. Roll the cake back up (without the parchment), wrap it in plastic wrap, and refrigerate for at least 1 hour.
  10. Before serving, slice into rolls and top with crushed vanilla wafers, fresh strawberries, and powdered sugar. Serve chilled.

Notes

To enhance the strawberry flavor, add a splash of strawberry extract or jam to the filling.
Rolls can be stored in the refrigerator for up to 3 days or frozen for up to 1 month.
For a festive look, drizzle with melted white chocolate before serving.

“`

Raspberry Lemon Heaven Cupcakes

“`html

Raspberry Lemon Heaven Cupcakes

Why You’ll Love These Raspberry Lemon Heaven Cupcakes

If you’re searching for a dessert that sings with vibrant flavors and looks as stunning as it tastes, then look no further than these Raspberry Lemon Heaven Cupcakes. Imagine biting into a perfectly moist and tender lemon cupcake, the delicate citrus notes waking up your palate. Then, discover a hidden treasure: a luscious, fruity raspberry filling that offers a delightful tartness, perfectly complemented by a smooth, velvety lemon curd. To top it all off, a cloud-like, fluffy frosting envelops the cupcake, adorned with a few fresh raspberries for that final touch of elegance and flavor. These cupcakes aren’t just a sweet treat; they are an experience. They are ideal for any occasion, be it a festive birthday party, a sophisticated brunch, or simply an afternoon indulgence that elevates your day. The combination of tangy lemon and sweet raspberry is a classic for a reason, and in this cupcake form, it’s pure bliss. This recipe is meticulously crafted to ensure a delightful baking journey and an even more delightful tasting experience, promising to be a showstopper that leaves your guests in awe of your baking prowess.

Ingredients For Raspberry Lemon Heaven Cupcakes

For the Lemon Cupcakes

  • All-Purpose Flour: 2 ¼ cups (for a tender crumb)
  • Granulated Sugar: 1 ½ cups (for sweetness and moisture)
  • Baking Powder: 2 teaspoons (for lift and airy texture)
  • Baking Soda: ½ teaspoon (reacts with acidity for extra rise)
  • Salt: ½ teaspoon (enhances all flavors)
  • Unsalted Butter: ½ cup (1 stick), softened to room temperature for easy creaming
  • Eggs: 2 large, at room temperature for better emulsification
  • Lemon Zest: Zest of 2 large lemons (about 2 tablespoons), for intense citrus aroma and flavor
  • Lemon Juice: ¼ cup fresh lemon juice (from about 1-2 lemons), for tanginess
  • Buttermilk: 1 cup, at room temperature (adds moisture and tenderizes the crumb)
    • Substitution: For buttermilk, you can make your own by adding 1 tablespoon of white vinegar or lemon juice to 1 cup of milk and letting it sit for 5-10 minutes until slightly thickened.
  • Vanilla Extract: 1 teaspoon (a classic flavor enhancer)

For the Raspberry Filling

  • Fresh or Frozen Raspberries: 2 cups (for vibrant color and tartness)
  • Granulated Sugar: ½ cup (adjust to your sweetness preference)
  • Cornstarch: 2 tablespoons, mixed with 2 tablespoons of water (to thicken into a jam-like consistency)

For the Lemon Curd Filling

  • Large Eggs: 3 yolks + 1 whole egg (for richness and setting)
  • Granulated Sugar: ¾ cup (for sweetness to balance tartness)
  • Fresh Lemon Juice: ½ cup (from about 2-3 lemons), for that unmistakable lemon zing
  • Lemon Zest: Zest of 1 lemon (about 1 tablespoon), for an extra punch of lemon
  • Unsalted Butter: 6 tablespoons, cold, cut into cubes (for a luxurious, velvety texture)

For the Fluffy Frosting

  • Unsalted Butter: 1 cup (2 sticks), softened to room temperature
  • Powdered Sugar: 4 cups, sifted for a smooth consistency
  • Heavy Cream: ¼ cup (or milk), for desired frosting consistency
  • Lemon Zest: Zest of 1 lemon (about 1 teaspoon), for subtle lemon undertones
  • Vanilla Extract: 1 teaspoon
  • Salt: A pinch to balance sweetness

For Garnish

  • Fresh Raspberries: A handful for decoration
  • Optional: Lemon slices or mint sprigs

Timing Your Raspberry Lemon Masterpiece

Prep time:
45 minutes
Cook time:
25-30 minutes
Total time:
1 hour 15 minutes (plus chilling time for curd)

Compared to an average cupcake recipe that might take around 1 hour total, these Raspberry Lemon Heaven Cupcakes require a bit more attention due to the multiple components (cupcake batter, raspberry filling, lemon curd, and frosting). However, the extra effort is well worth it for the layered flavors and textures!

Beautifully decorated Raspberry Lemon Heaven Cupcakes

Step-by-Step Instructions For Raspberry Lemon Cupcakes

Preparing Your Lemon Cupcakes

  1. Preheat and Prep: Preheat your oven to 350°F (175°C). Line a 12-cup muffin tin with cupcake liners.
  2. Dry Ingredients: In a large bowl, whisk together the flour, sugar, baking powder, baking soda, and salt.
  3. Wet Ingredients: In a separate medium bowl, whisk together the softened butter until creamy. Beat in the eggs one at a time, then stir in the lemon zest, lemon juice, buttermilk, and vanilla extract until well combined.
  4. Combine: Gradually add the wet ingredients to the dry ingredients, mixing on low speed (or by hand) until just combined. Be careful not to overmix. The batter should be smooth and lump-free.
  5. Fill and Bake: Spoon the batter evenly into the prepared cupcake liners, filling each about two-thirds full. Bake for 20-25 minutes, or until a toothpick inserted into the center of a cupcake comes out clean.
  6. Cool: Let the cupcakes cool in the muffin tin for a few minutes before transferring them to a wire rack to cool completely. This is crucial before filling and frosting.

Making the Raspberry Filling

  1. Cook Raspberries: In a small saucepan, combine the raspberries and sugar. Cook over medium heat, stirring occasionally, until the raspberries break down and release their juices (about 5-7 minutes).
  2. Thicken: In a small bowl, whisk together the cornstarch and water to create a slurry. Pour this into the simmering raspberry mixture, stirring constantly. Continue to cook and stir until the filling thickens to a jam-like consistency.
  3. Cool: Remove from heat and let cool completely. You can speed this up by transferring it to a bowl and placing it in the refrigerator.

Creating the Lemon Curd

  1. Whisk: In a medium, heatproof bowl, whisk together the egg yolks, whole egg, sugar, lemon juice, and lemon zest until well combined and slightly pale.
  2. Cook: Set the bowl over a saucepan of simmering water (ensure the bottom of the bowl doesn’t touch the water). Cook, whisking constantly, until the mixture thickens enough to coat the back of a spoon (this can take about 8-10 minutes). Do not let it boil.
  3. Add Butter: Remove the bowl from the heat. Add the cold butter cubes, one at a time, whisking until each cube is fully incorporated and the curd is smooth and glossy.
  4. Strain and Chill: Strain the lemon curd through a fine-mesh sieve into a clean bowl to remove any bits of zest or cooked egg. Press plastic wrap directly onto the surface of the curd to prevent a skin from forming. Refrigerate until chilled and set (at least 2 hours, or preferably overnight).

Whipping Up the Fluffy Frosting

  1. Cream Butter: In a large bowl, beat the softened butter with an electric mixer until light and fluffy.
  2. Add Sugar: Gradually add the sifted powdered sugar, about a cup at a time, mixing on low speed until just incorporated. Scrape down the sides of the bowl as needed.
  3. Add Liquids and Flavor: Add the heavy cream (or milk), lemon zest, vanilla extract, and a pinch of salt. Beat on medium-high speed until the frosting is smooth, fluffy, and reaches your desired consistency. Add more cream or sugar if needed.

Assembling Your Heavenly Cupcakes

  1. Core the Cupcakes: Once the cupcakes are completely cool, use a small knife or an apple corer to remove a small cone from the center of each cupcake.
  2. Fill: Spoon a small amount of the cooled raspberry filling into the cavity, followed by a dollop of the chilled lemon curd. You can pipe or spoon it in to create layers.
  3. Frost: Frost the cupcakes generously using a piping bag with a decorative tip, or simply spread the frosting with an offset spatula.
  4. Garnish: Top each cupcake with a fresh raspberry and any other desired garnishes.

Nutritional Information For These Delights

Please note: Nutritional information is an estimate and can vary based on ingredient brands, substitutions, and portion sizes. This is calculated per cupcake assuming 12 servings.

  • Calories: Approximately 450-550 kcal
  • Protein: 4-6g
  • Fat: 25-35g (saturated and unsaturated)
  • Carbohydrates: 50-60g
  • Sugar: 35-45g

Healthier Alternatives For A Lighter Treat

While these cupcakes are a decadent treat, you can make them a bit lighter without sacrificing too much flavor:

  • Flour: Substitute half of the all-purpose flour with whole wheat pastry flour for added fiber.
  • Sugar: Reduce the amount of sugar in the cupcake batter and frosting by ¼ cup each. In the fillings, you can use a sugar substitute that bakes well, or slightly reduce the amount and rely more on the natural sweetness of the fruit.
  • Butter: In the frosting, you can try substituting half of the butter with cream cheese for a tangier, lighter texture. For the cupcake batter, a small portion of the butter can sometimes be replaced with unsweetened applesauce or Greek yogurt, though this may slightly alter the texture.
  • Frosting: Consider a lighter cream cheese frosting or a stabilized whipped cream frosting instead of a traditional buttercream.
  • Fillings: For a less sweet filling, you can reduce the sugar in the raspberry filling and make a less sweet lemon “topping” using Greek yogurt mixed with lemon juice and a touch of sweetener.

Serving Suggestions

These Raspberry Lemon Heaven Cupcakes are a star on their own! They’re perfect for:

  • Dessert platters: Arrange them alongside other treats for a delightful display.
  • Afternoon tea: Pair with a cup of herbal tea or coffee.
  • Special occasions: Birthdays, anniversaries, baby showers – they add a touch of elegance.
  • Picnics: They travel well in a sturdy container.

Their vibrant colors and appealing flavors make them a crowd-pleaser at any event. For an extra touch, consider serving them with a small glass of chilled champagne or prosecco.

Common Mistakes to Avoid

  • Overmixing the batter: This can lead to tough, dense cupcakes. Mix until just combined.
  • Not cooling the cupcakes completely: Filling and frosting warm cupcakes will result in melting and a messy presentation. Patience is key!
  • Overcooking the lemon curd: Directly cooking the curd over heat can scramble the eggs. Using a double boiler (bain-marie) and constant whisking is essential.
  • Using room temperature ingredients: For the best cupcake texture, ensure butter, eggs, and buttermilk are at room temperature. For the lemon curd, cold butter is used.
  • Not sifting powdered sugar: This can lead to a lumpy frosting. Sifting ensures a smooth, silky consistency.

Storing Your Raspberry Lemon Cupcakes

Store frosted cupcakes in an airtight container at room temperature for up to 2 days. If your kitchen is particularly warm, or if you used cream cheese in the frosting, it’s best to refrigerate them. For longer storage, you can refrigerate them for up to 4 days. Allow them to come to room temperature for about 30 minutes before serving for the best flavor and texture. The individual components (lemon curd, raspberry filling) can be stored separately in airtight containers in the refrigerator for up to a week.

Conclusion

These Raspberry Lemon Heaven Cupcakes are a testament to the magic that happens when tart, bright lemon meets sweet, vibrant raspberry. Each bite is an explosion of flavor and a symphony of textures – from the moist cake to the luscious fillings and the airy frosting. They are more than just a dessert; they are a celebration of flavor and a joyful baking project. So, gather your ingredients, embrace the process, and prepare to be delighted by these heavenly creations. Baking them is sure to bring joy, and sharing them will undoubtedly spread happiness. Get ready to impress yourself and everyone lucky enough to taste them!

Frequently Asked Questions

  • ) Can I make the components ahead of time?

    Absolutely! The lemon curd and raspberry filling can be made 2-3 days in advance and stored in the refrigerator. The cupcakes can be baked a day ahead and stored in an airtight container at room temperature. The frosting can also be made ahead and refrigerated, though you might need to re-whip it briefly to regain its fluffy texture.

  • ) Can I use store-bought lemon curd or raspberry jam?

    Yes, you can! Store-bought options can save you time. Look for high-quality lemon curd and raspberry jam for the best flavor. However, homemade fillings often have a brighter, more intense taste.

  • ) My frosting is too thin/thick. What can I do?

    If your frosting is too thin, gradually add more sifted powdered sugar, a tablespoon at a time, until it reaches the desired consistency. If it’s too thick, add more heavy cream or milk, a teaspoon at a time, until it’s smooth and spreadable.

  • ) Can I make these cupcakes gluten-free?

    Yes, you can! Use a good quality gluten-free all-purpose flour blend in place of the all-purpose flour. Ensure the blend contains xanthan gum for structure. You may need to adjust the liquid content slightly as gluten-free flours can absorb moisture differently.

Print
clock clock iconcutlery cutlery iconflag flag iconfolder folder iconinstagram instagram iconpinterest pinterest iconfacebook facebook iconprint print iconsquares squares iconheart heart iconheart solid heart solid icon

Raspberry Lemon Heaven Cupcakes

  • Author: Chef Mia

Description

These Raspberry Lemon Heaven Cupcakes are a delightful combination of tart lemon and sweet raspberry flavors. Moist lemon cupcakes are filled with a luscious raspberry jam and creamy lemon curd, then topped with fluffy frosting and fresh raspberries. Perfect for parties, brunches, or an indulgent treat, these cupcakes are sure to impress with their vibrant flavors and elegant appearance!


Ingredients

  • For the Cupcakes:
  • For the Filling:
  • For the Frosting:

Instructions

  1. Preheat the oven to 350°F (175°C) and line a 12-cup muffin tin with cupcake liners.
  2. In a medium bowl, whisk together flour, baking powder, baking soda, and salt. Set aside.
  3. In a large bowl, cream the softened butter and sugar until light and fluffy, about 2-3 minutes. Beat in eggs one at a time, then add vanilla extract and lemon zest.
  4. Alternate adding the dry ingredients and buttermilk to the butter mixture, beginning and ending with the dry ingredients. Mix until just combined.
  5. Spoon the batter evenly into the cupcake liners, filling each about two-thirds full. Bake for 18-20 minutes or until a toothpick inserted in the center comes out clean. Let the cupcakes cool completely on a wire rack.
  6. Once cooled, use a knife or cupcake corer to remove a small section from the center of each cupcake. Fill the cavity with half raspberry jam and half lemon curd. Replace the top piece to seal.
  7. For the frosting, beat the butter until smooth. Gradually add powdered sugar, then mix in vanilla and enough cream to achieve the desired consistency. Beat until fluffy.
  8. Pipe or spread frosting onto each cupcake and garnish with a fresh raspberry on top.

Notes

Storage: Store frosted cupcakes in an airtight container in the refrigerator for up to 4 days. Unfrosted cupcakes can be frozen for up to 2 months.
Variations: Substitute the lemon curd with lime curd or the raspberry jam with strawberry jam for a twist on flavors.
Decorating: Sprinkle powdered sugar or drizzle raspberry sauce over the frosting for extra flair.

“`

Strawberry Red Velvet Cheesecake

“`html

Strawberry Red Velvet Cheesecake

A Symphony of Flavors and Textures

Imagine a dessert that marries the deep, slightly cocoa-kissed notes of red velvet cake with the luxurious, smooth embrace of classic cheesecake. That’s exactly what this Strawberry Red Velvet Cheesecake delivers. It’s not just a dessert; it’s an experience. The vibrant ruby hue of the red velvet base, studded with a rich, creamy cheesecake layer, and adorned with glistening fresh strawberries and a ruby-red glaze, creates a showstopper for any occasion. This recipe is designed to guide you through creating a dessert that’s as beautiful as it is delicious, offering a delightful contrast of textures and a harmonious blend of sweet, tangy, and subtly chocolatey flavors.

The Art of Choosing Your Ingredients

The success of any great dessert lies in the quality and careful selection of its ingredients. For this Strawberry Red Velvet Cheesecake, we’ve broken down the components to ensure clarity and offer flexibility where possible.

For the Red Velvet Crust:

  • 2 cups (250g) Graham Cracker Crumbs: The sturdiest of crumbs, providing a classic base. (Alternative: Digestive biscuits or Oreos for a chocolate twist.)
  • 1/4 cup (50g) Granulated Sugar: Balances the richness and enhances crispness.
  • 6 tablespoons (85g) Unsalted Butter, melted: Binds everything together into a cohesive, slightly sweet foundation.
  • 1 tablespoon Unsweetened Cocoa Powder: For that signature subtle red velvet chocolate essence.
  • 1 teaspoon Red Food Coloring (gel or liquid): To achieve that iconic, vibrant red hue. Gel coloring provides a more intense color without thinning the mixture.
  • 1/2 teaspoon White Vinegar: Reacts with cocoa powder to enhance the red color.

For the Cheesecake Filling:

  • 3 (8-ounce) packages Cream Cheese, softened: The heart of the cheesecake, ensuring a velvety smooth texture. Ensure it’s at room temperature for seamless blending.
  • 1 1/4 cups (250g) Granulated Sugar: For sweetness and structure.
  • 3 large Eggs, room temperature: Act as binders, adding richness and stability.
  • 1 teaspoon Vanilla Extract: A timeless aromatic that complements both red velvet and cheesecake.
  • 1/2 cup (120ml) Sour Cream, room temperature: Adds moisture and a subtle tang, contributing to a lusciously creamy texture. (Alternative: Full-fat Greek yogurt.)
  • 1 teaspoon White Vinegar: Enhances the red velvet color.
  • 1 tablespoon Unsweetened Cocoa Powder: Reinforces the red velvet flavor profile.
  • 1 teaspoon Red Food Coloring (gel or liquid): For that signature vibrant red.

For the Strawberry Topping:

  • 2 cups Fresh Strawberries, hulled and sliced: The star of the topping, offering a burst of fresh, fruity sweetness and a beautiful visual appeal. (Frozen strawberries can be used but may result in a more watery texture.)
  • 1 tablespoon Granulated Sugar: To slightly sweeten and draw out the juices from the strawberries.
  • 1 teaspoon Lemon Juice: Adds a bright, zesty note that cuts through the sweetness.

For the Strawberry Glaze:

  • 1/2 cup Strawberry Jam or Preserves: The base for a glossy, intensely flavored glaze. (Choose a good quality jam for best results.)
  • 1 tablespoon Water: To thin the jam to a pourable consistency.
  • Optional: A few drops of red food coloring for an extra vibrant hue.
Prep time: 30 minutes
Cook time: 60-75 minutes
Chill time: 4 hours
Total time: 5 hours 35 minutes

Compared to a standard cheesecake which might take around 1.5 to 2 hours total, this Strawberry Red Velvet Cheesecake requires a bit more time due to the layering and glazing. However, the hands-on prep time remains manageable, and the extended chilling time is crucial for setting the perfect texture.

A slice of Strawberry Red Velvet Cheesecake showing its layers and strawberry topping

Crafting Your Masterpiece: Step-by-Step

Step 1: Prepare the Red Velvet Crust

In a medium bowl, combine the graham cracker crumbs, granulated sugar, and cocoa powder. Pour in the melted butter and stir until the crumbs are evenly moistened, resembling wet sand. In a small separate bowl, whisk together the red food coloring and white vinegar. Pour this mixture over the crumb mixture and toss until the crumbs are a uniform, vibrant red. Gently press this mixture into the bottom of a 9-inch springform pan, ensuring an even layer. You can use the bottom of a glass or measuring cup to pack it down firmly.

Step 2: Bake the Crust

Preheat your oven to 350°F (175°C). Bake the prepared crust for 8-10 minutes, until it’s firm and lightly fragrant. This step helps set the crust and prevent it from becoming soggy. Remove from the oven and let it cool completely on a wire rack while you prepare the filling.

Step 3: Make the Cheesecake Filling

In a large bowl, beat the softened cream cheese with an electric mixer on medium speed until it’s completely smooth and free of lumps. Gradually add the granulated sugar and continue beating until well combined and creamy. Beat in the eggs one at a time, mixing just until each is incorporated. Be careful not to overmix at this stage, as excessive air can cause cracks. Stir in the vanilla extract, sour cream, white vinegar, cocoa powder, and red food coloring until you achieve a smooth, uniform red batter. Again, avoid overmixing.

Step 4: Assemble and Bake

Pour the vibrant red cheesecake filling evenly over the cooled red velvet crust in the springform pan. Smooth the top with a spatula. For even baking and to prevent cracking, I highly recommend using a water bath. Wrap the bottom of the springform pan tightly with heavy-duty aluminum foil (multiple layers are best). Place the wrapped pan into a larger roasting pan. Carefully pour hot water into the roasting pan, about halfway up the sides of the springform pan. Bake in the preheated oven for 60-75 minutes, or until the edges are set but the center has a slight wobble. An instant-read thermometer inserted into the center should read 150°F (65°C).

Step 5: Chill the Cheesecake

Once baked, turn off the oven and let the cheesecake cool inside with the door slightly ajar for about an hour. This gradual cooling also helps prevent cracks. After the hour, remove the cheesecake from the water bath and let it cool completely on a wire rack. Once at room temperature, cover the pan tightly with plastic wrap and refrigerate for at least 4 hours, or preferably overnight, until completely firm and chilled.

Step 6: Prepare the Strawberry Topping

In a small bowl, gently toss the fresh sliced strawberries with the granulated sugar and lemon juice. Let them sit for about 15-20 minutes, allowing the sugar to draw out their juices, creating a lovely syrupy base. This step enhances the fresh strawberry flavor and creates a beautiful, slightly macerated topping.

Step 7: Prepare the Strawberry Glaze

In a small saucepan over low heat, gently warm the strawberry jam or preserves with the water. Stir constantly until the jam is smooth and pourable. If you desire a more intense red color, stir in a few drops of red food coloring. Strain the glaze through a fine-mesh sieve if you prefer a perfectly smooth finish, or leave it rustic with small fruit pieces. Let it cool slightly before using.

Step 8: Decorate and Serve

Once the cheesecake is thoroughly chilled, carefully run a knife around the edge of the springform pan and release the sides. Arrange the prepared fresh strawberries artistically over the top of the chilled cheesecake. Drizzle the slightly cooled strawberry glaze over the strawberries and the surface of the cheesecake. Allow the glaze to set for a few minutes before slicing and serving. For the cleanest slices, use a sharp knife dipped in hot water and wiped dry between each cut.

Nutritional Snapshot

While exact nutritional values can vary based on specific ingredients and portion sizes, a typical slice of Strawberry Red Velvet Cheesecake contains approximately:

  • Calories: 450-600 kcal
  • Fat: 30-40g (Saturated Fat: 18-25g)
  • Carbohydrates: 40-50g (Sugar: 30-40g)
  • Protein: 8-12g
  • Sodium: 200-300mg

This is a rich dessert, best enjoyed in moderation as part of a balanced diet.

Smarter Swaps for a Lighter Indulgence

Craving the flavor without all the richness? Consider these adjustments:

  • Crust: Use a single layer of crushed cookies or even a nut-based crust (like almond flour and a touch of butter) for a lower-carb option.
  • Cream Cheese: Substitute a portion of the full-fat cream cheese with Neufchâtel cheese or reduced-fat cream cheese. Be aware this might slightly alter the texture; room temperature is key.
  • Sugar: Reduce the sugar in the filling by a quarter cup, or experiment with a sugar substitute like erythritol or stevia, adjusting to taste.
  • Topping: Skip the glaze and opt for fresh fruit only. Or, use a sugar-free strawberry jam for the glaze.

Perfect Pairings and Presentation

This Strawberry Red Velvet Cheesecake is a star on its own, but can be wonderfully complemented. Serve a generous slice with a dollop of freshly whipped cream or a scoop of vanilla bean ice cream. A small sprig of fresh mint adds a final touch of elegance. For a truly decadent experience, consider serving alongside a glass of Moscato d’Asti or a sparkling rosé.

Common Mistakes to Avoid

  • Overmixing the Batter: This incorporates too much air, leading to cracks and a porous texture. Mix just until combined.
  • Ingredients Not at Room Temperature: Cold cream cheese and eggs won’t emulsify properly, resulting in a lumpy or curdled filling.
  • Sudden Temperature Changes: Rapid cooling (like immediately removing from oven and putting in fridge) can cause cracks. Gradual cooling is key.
  • Cutting the Cheesecake While Too Cold: Allow it to sit at room temperature for 15-20 minutes before slicing for cleaner cuts.

Keeping It Fresh

Store any leftover Strawberry Red Velvet Cheesecake tightly covered in the refrigerator. It will keep well for up to 3-4 days. Freezing is an option; however, the texture of the cheesecake may change slightly upon thawing, especially the creaminess. If freezing, wrap individual slices or the entire cheesecake tightly in plastic wrap and then in aluminum foil before placing in an airtight container for up to 1-2 months. Thaw overnight in the refrigerator before serving.

A Slice of Heaven Awaits!

This Strawberry Red Velvet Cheesecake is more than just a dessert; it’s a celebration of flavor, color, and texture. From its vibrant red velvet crust to its creamy, tangy cheesecake core and the delightful fresh strawberry topping, every bite is a journey. Whether you’re a seasoned baker or embarking on your cheesecake adventure, this recipe offers a rewarding outcome that is sure to impress. Don’t wait for a special occasion – create your own moment of joy with this magnificent creation. Give it a try and let the delightful flavors whisk you away!

Frequently Asked Questions

_What’s the best way to get a perfect red color for the red velvet part?_

Using a gel food coloring is highly recommended as it’s more concentrated than liquid coloring, allowing you to achieve a vibrant red without adding too much liquid, which could affect the batter consistency. Ensure you mix it thoroughly into the batter.

_Why is my cheesecake cracking?_

Cracking is often due to overmixing, overbaking, or rapid temperature changes. Using a water bath, gradual cooling in the oven, and ensuring ingredients are at room temperature can significantly minimize this.

_Can I make this cheesecake ahead of time?_

Yes, absolutely! In fact, it’s best made at least a day in advance. The chilling time allows the flavors to meld and the texture to set perfectly. You can add the topping and glaze just before serving.

_Can I use a different type of cookie for the crust?_

Certainly! Chocolate cookies like Oreos (filling removed or included, depending on preference) or vanilla wafers would also work beautifully for the crust, offering a slightly different flavor profile that pairs well with red velvet.

_How do I make sure the cheesecake doesn’t stick to the pan?_

Using a springform pan is essential. For extra security, you can lightly grease the sides of the pan before assembling the crust and filling, or line the sides with parchment paper. Always run a thin knife around the edge before releasing the springform clasp.

]

Print
clock clock iconcutlery cutlery iconflag flag iconfolder folder iconinstagram instagram iconpinterest pinterest iconfacebook facebook iconprint print iconsquares squares iconheart heart iconheart solid heart solid icon

Strawberry Red Velvet Cheesecake

  • Author: Chef Mia

Description

Strawberry Red Velvet Cheesecake is a stunning dessert that combines the rich, cocoa-infused flavor of red velvet cake with the creamy decadence of cheesecake. Topped with fresh strawberries and a glossy strawberry glaze, this elegant treat is perfect for birthdays, holidays, or any time you want to impress your guests.


Ingredients

  • For the Red Velvet Cake Base:
  • For the Cheesecake Layer:
  • For the Strawberry Topping:

Instructions

  1. Prepare the Red Velvet Cake Base:Preheat your oven to 350°F (175°C). Grease a 9-inch springform pan and line the bottom with parchment paper.In a medium bowl, sift together flour, baking soda, cocoa powder, and salt. Set aside.In a large bowl, cream the softened butter, oil, and sugar until light and fluffy. Beat in the egg and vanilla.Mix in buttermilk, red food coloring, and vinegar. Gradually add the dry ingredients, mixing until just combined.Pour the batter into the pan and bake for 15-20 minutes, or until a toothpick comes out clean. Let cool completely.
  2. Preheat your oven to 350°F (175°C). Grease a 9-inch springform pan and line the bottom with parchment paper.
  3. In a medium bowl, sift together flour, baking soda, cocoa powder, and salt. Set aside.
  4. In a large bowl, cream the softened butter, oil, and sugar until light and fluffy. Beat in the egg and vanilla.
  5. Mix in buttermilk, red food coloring, and vinegar. Gradually add the dry ingredients, mixing until just combined.
  6. Pour the batter into the pan and bake for 15-20 minutes, or until a toothpick comes out clean. Let cool completely.
  7. Prepare the Cheesecake Layer:Lower the oven temperature to 325°F (160°C).In a large bowl, beat cream cheese and sugar until smooth. Add eggs one at a time, beating well. Stir in vanilla extract.Pour the cheesecake batter over the cooled red velvet base and smooth the top.Bake for 40-45 minutes, or until the center is set but slightly jiggly. Cool at room temperature, then refrigerate for at least 4 hours or overnight.
  8. Lower the oven temperature to 325°F (160°C).
  9. In a large bowl, beat cream cheese and sugar until smooth. Add eggs one at a time, beating well. Stir in vanilla extract.
  10. Pour the cheesecake batter over the cooled red velvet base and smooth the top.
  11. Bake for 40-45 minutes, or until the center is set but slightly jiggly. Cool at room temperature, then refrigerate for at least 4 hours or overnight.
  12. Add the Strawberry Topping:Arrange halved strawberries on top of the chilled cheesecake.Warm the strawberry glaze and drizzle it over the strawberries for a shiny finish.Optionally, garnish with whipped cream before serving.
  13. Arrange halved strawberries on top of the chilled cheesecake.
  14. Warm the strawberry glaze and drizzle it over the strawberries for a shiny finish.
  15. Optionally, garnish with whipped cream before serving.

Notes

For a smoother cheesecake, make sure all ingredients are at room temperature before mixing.
To prevent cracks, bake the cheesecake in a water bath.
Store leftovers in the fridge for up to 4-5 days or freeze for up to 2 months.
Add extra flair with white chocolate shavings, melted chocolate drizzle, or powdered sugar.

“`